
DW-CD224PU - Lecteur de CD externe TEAC - Notice d'utilisation et mode d'emploi gratuit
Retrouvez gratuitement la notice de l'appareil DW-CD224PU TEAC au format PDF.


| Type de produit | Lecteur de CD/DVD externe USB |
| Modèle | TEAC DW-CD224PU |
| Interface | USB 2.0 (rétrocompatible USB 1.1) |
| Vitesse de lecture CD-ROM | Jusqu'à 24x (CAV) |
| Vitesse de lecture DVD-ROM | Jusqu'à 8x (CAV) |
| Vitesse d'écriture CD-R | Jusqu'à 24x (ZCLV) |
| Vitesse d'écriture CD-RW | Jusqu'à 10x (CLV) pour High Speed, 4x pour Multi Speed |
| Tampon de données | 2 Mo |
| Formats de lecture | CD-DA, CD-ROM, CD-R, CD-RW, DVD-ROM, DVD-R, DVD-RW, DVD-RAM (selon modèle) |
| Formats d'écriture | CD-DA, CD-ROM, CD-ROM XA, Photo CD multisession, Video CD, CD Extra |
| Sortie audio | Mini-jack stéréo 3,5 mm (0,75 Vrms pour CD, 0,8 Vrms pour DVD) |
| Alimentation | Adaptateur secteur fourni (AC 100V, 50/60 Hz, 10W max) |
| Dimensions (L x H x P) | 138 x 23 x 185 mm |
| Poids | Environ 420 g (sans câble) |
| Température de fonctionnement | 10°C à 40°C |
| Humidité relative de fonctionnement | 8% à 80% (sans condensation) |
| Conformité | USB 2.0 High Speed, branchement à chaud |
| Fonctions spéciales | Protection anti buffer under-run, lecture de DVD-Video (avec USB 2.0 recommandé) |
| Entretien | Essuyer avec un chiffon doux et sec. Ne pas utiliser de solvants. |
| Sécurité | Ne pas exposer à l'humidité, aux chocs ou aux températures extrêmes. Débrancher avant nettoyage. |
| Garantie | Voir document de garantie fourni |
FOIRE AUX QUESTIONS - DW-CD224PU TEAC
Questions des utilisateurs sur DW-CD224PU TEAC
0 question sur cet appareil. Repondez a celles que vous connaissez ou posez la votre.
Poser une nouvelle question sur cet appareil
Téléchargez la notice de votre Lecteur de CD externe au format PDF gratuitement ! Retrouvez votre notice DW-CD224PU - TEAC et reprennez votre appareil électronique en main. Sur cette page sont publiés tous les documents nécessaires à l'utilisation de votre appareil DW-CD224PU de la marque TEAC.
MODE D'EMPLOI DW-CD224PU TEAC
Portable USB CD-RW/DVD-ROM
Drive DW-224PUK
Portable USB CD-RW Drive
CD-W224PUK
User's manual
To ensure the smooth handling of your warranty please write the serial number of your drive into the box. In the case of warranty you are expected to send it together with a copy of your invoice to your nearest TEAC sales representative.
- Changes in specifications and features may be made without notice or obligation.
Copyright © 2003, TEAC Corporation Ltd. All rights reserved. First edition: January 2003 - Company and product names provided herein are trademarks of their respective companies.
- Windows 98 Second Edition, Windows Me, Windows 2000 and Windows XP are registered trademarks of Microsoft Corporation in the U.S.
CONTENTS
TO THE USER 75
PRECAUTIONS 75
LICENSE AGREEMENT/WARRANTY FOR PROVIDED DEVICE DRIVER SOFTWARE 76
- BEFORE USING 78
1.1 Computers to connect 78
1.2 Conforming Operating Systems 79
1.3 Checking the USB controller 80
2.PRODUCT OUTLINE 84
2.1 The Specification of TEAC CD-W224PUK 84
2.2 The Specification of TEAC DW-224PUK 85
2.3 Procedure Outline for Installation and Operation 85
- COMPONENTS 86
3.1 Precautions when unpacking the package 86
3.2 Package List 87
- PRECAUTIONS FOR SETTING AND HANDLING 88
Daily Maintenance 89
- NAMES AND FUNCTIONS 90
5.1 Front panel/top 90
5.2 Rear panel 92
5.3 AC Adapter 94
5.4 USB Cable 94
- SETTING UP THE DRIVE 95
6.1 Connecting the Cables 95
6.2 Disconnecting the Drive 99
6.3 Driver installation under Windows 98SE/Windows Me .... 102
6.4 "Manual" Driver Installation under Windows 98SE 110
6.5 "Manual" Driver Installation under Windows 98 Me (DW-224PUK only) 113
6.6 Uninstalling in Windows 98SE 116
6.7 CD-W224PUK Driver Installation under Windows 98SE ... 117
6.8 Driver installation under Windows 2000 118
6.9 Driver installation under Windows XP 119
- PRECAUTIONS IN HANDLING THE MEDIA 120
- SETTING AND REMOving THE MEDIA 122
8.1 Setting the Media 122
8.2 Removing the media 123
- OPERATION 124
9.1 Playing Music CDs 124
9.2 Before using the write function of Windows XP 129
9.3 Suspend/Resume 131
9.4 Using USB 2.0 131
9.5 RPC and Setting of region code (DW-224PUK only) 132
10.MEDIA 134
10.1 Readable media 134
10.2 CD-R/RW writing speed 135
10.3 Supported media 137
11.SUPPORT AND SERVICE 138
11.1 Warranty period 138
11.2 Requests for repair 138
11.3 Technical Service Depots (Europe) 139
- SPECIFICATION 140
12.1 General specification 140
12.2 Functional specification 141
TO THE USER
This equipment has been tested and found to comply with the limits for a Class B digital device, pursuant to VCCI Rules. Although this device is designed to be used in a home environment, it may cause interference if used near a radio or TV receiver. Be sure to handle the device properly in accordance with this instruction manual.
PRECAUTIONS
- While reasonable efforts have been made in the preparation of this product and this document to assure accuracy, contact TEAC if there is any doubt or error in this document. Note however that TEAC may not assume responsibility for the support or results of the above.
- TEAC assumes no responsibility for data loss caused by the operation that is not in accordance to this document, or data loss caused by natural disaster, fire, power outage, or spontaneous defect of this product.
- The product and the material in this document are subject to change toward improvement without notice.
- No part of this document may be reproduced without the prior written consent of TEAC.
- The contents in this document are written based on information as of December 2002.
LICENSE AGREEMENT/WARRANTY FOR PROVIDED DEVICE DRIVER SOFTWARE
IMPORTANT: PLEASE READ THIS AGREEMENT CAREFULLY.
This License Agreement is a legal agreement between you (either an individual or a single entity) and TEAC Deutschland GmbH (hereinafter called "TEAC") for the provided device driver software (which includes computer software and online and electronic documentations, and may include associated media and printed materials when supplied, collectively the "Software" hereinafter). By installing, copying, or otherwise using the Software, you agree to be bound by the terms of this License Agreement. If you do not agree to the terms of this License Agreement, you cannot use the Software.
The Software is protected by the copyright laws and international treaty provisions, and all other applicable laws and treaties concerning intellectual property rights.
1. Grant of License.
This Agreement permits you to have the following rights. Use and copy: TEAC approves you to use the Software for the drive unit purchased from TEAC and owned by you (hereinafter called "Your Drive Unit"). You may make a copy of the Software for use with all of Your Drive Units, or for backup purposes.
2. Restrictions.
All the copies of the Software must hold the copyright notification. You may not allow the Software to be sold to any third party. Except to the extent expressly permitted by the laws of the jurisdiction where you are located, you may not analyze, decompile, disassemble or otherwise reverse engineer the Software. You may not allow the Software to be transferred to any third party. Only when Your Drive Units permanently transferred to a third party, may you transfer all the rights under terms and conditions of this Agreement.
3. Termination.
Your rights under terms and conditions of this Agreement will be terminated at the same time as you dispose of Your Drive Unit. If you fail to comply with any term or condition of this Agreement, TEAC may termi
nate your license while withholding any other rights of claim for you. In this case, you must destroy all the copies of the Software.
4. Copyright.
All the rights concerning the Software and its copies are owned by TEAC or its suppliers. All the rights and copyrights concerning the contents of the Software when being accessed come under jurisdiction of each copyright owner, and are protected by the lays and international treaty provisions concerning the copyright and intellectual properties. This Agreement does not allow you to be approved in any term or condition of the contents of this Agreement.
5. Limited Warranty.
The Software is to be used at your own risk. The Software is supplied on the assumption that it will be used with Your Drive Unit. Except as required under the terms and conditions of the applicable laws, TEAC and its suppliers do not provide a warranty of any kind, either express or implied, including but not limited to, any implied warranties or conditions of merchantability, quality, fitness for a particular purpose and no-infringement.
6. No Liability for Consequential Damages.
In no event shall TEAC or its suppliers be liable for any other damages whatsoever (including, without limitation, damages for loss of business, business interruption, loss of business information, or other pecuniary loss) arising out of the use of or inability to use this Software, even if TEAC has been advised of the possibility of such damages. Unless the responsibility for the above consequential or accidental damage is excluded or allowed to be limited by the laws or judgment of the court, the above limitations are not applicable to you.
7. Upper Limit of Responsibility
TEAC's indemnities and compensation demanded of you for breaking terms and conditions of the Agreement will not exceed, in any case, the amount you paid for Your Drive Unit.
8. Other.
This Agreement is governed by the laws of Europe/Germany.
© 2003, TEAC Deutschland GmbH
1. BEFORE USING
Thank you for purchasing the TEAC USB Portable CD-R/RW unit CD-W224PU respectively the DVD-ROM/CD-R/RW unit DW-224PUK.
This manual shows how to install and to operate TEAC DW-224PUK (DVD-ROM/CD-RW/CD-R) and TEAC CD-W224PUK (CD-RW/CD-R). Descriptions which are common to both drives are given with the expressions "drive", "unit", or "device" while any behavior which is different between the drives is shown with the individual drive name. More informations can be found in the manuals of your computer and the respective software.
Please read this instruction manual carefully before use for proper handling and operations of the device.
This is a drive that is used by connecting it to the USB terminal of a personal computer. The drive functions as a device conforming to the USB1.1 when connected to the USB1.1 terminal and as a device conforming to the USB2.0 when connected to the USB2.0 terminal.
A floppy disk drive may be required for installing software when using this drive. You may download the needed driver routines from our web site.
1.1 Computers to connect
- A PC/AT compatible machine with a USB1.1 or USB2.0 interface
- CPU CD-W224PUK: Intel Pentium II 300MHz or more
- CPU DW-224PUK: Intel Pentium II 266MHz or more
- Main memory of 64MB or more
- Free hard drive space of approx. 800MB or more when writing to the CD-R or CD-RW disc.
-
Recommended to play the DVD-Video for DW-224PUK: The use of CPU of Pentium III 450MHz or more, a video card with a DVD play support function, a USB2.0 host card
-
The USB control conforms to one of the following: UHCI (Universal Host Controller Interface), OHCI (Open Host Controller Interface) or EHCI(Enhanced Host Controller Interface) of the USB 2.0. The drive may not operate with some USB interfaces that conform to the OHCI. Depending on the operating system the drive may not support all modes supported by the USB interface.
- for DW-224PUK only: Frame dropouts or sound dropouts may be caused while playing the DVD-Video depending on your environment or DVD titles.
- for DW-224PUK only: When the DVD-Video is played by connecting to the USB1.1 interface, picture and sound cannot be smoothly played due to its limited transfer rate.
1.2 Conforming Operating Systems
Any one of the following operating systems is required.
Microsoft® Windows 98 Second Edition
- Microsoft® Windows Me
Microsoft®Windows 2000 Professional
- Microsoft® Windows XP Home Edition/Professional
- The drive does not conform to Windows 95, Windows 98 and MS-DOS.
- Those operating systems updated from Windows 98, etc. are excluded.
- The re-setup of an operating system using a recovery disk, etc. is not supported with this drive.
1.3 Checking the USB controller
To use the DW-224PUK/CD-W224PUK in your computer, the USB controller incorporated in the computer must be operating normally. Execute the following steps to check the operation state of the USB controller.
In Windows 98SE or Windows Me
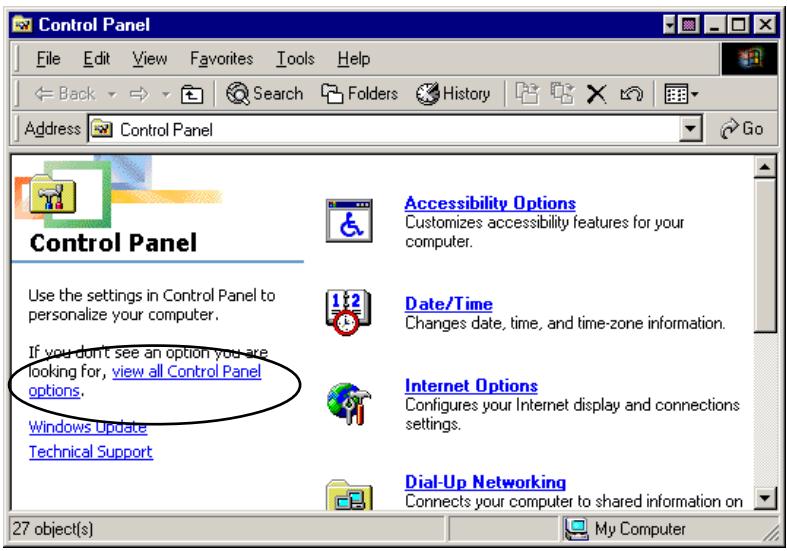
- Click Start, Settings, Control Panel.
- Double-click System. In Windows Me, System may not appear in the Control Panel. In that case, left-click view all Control Panel options to display it.
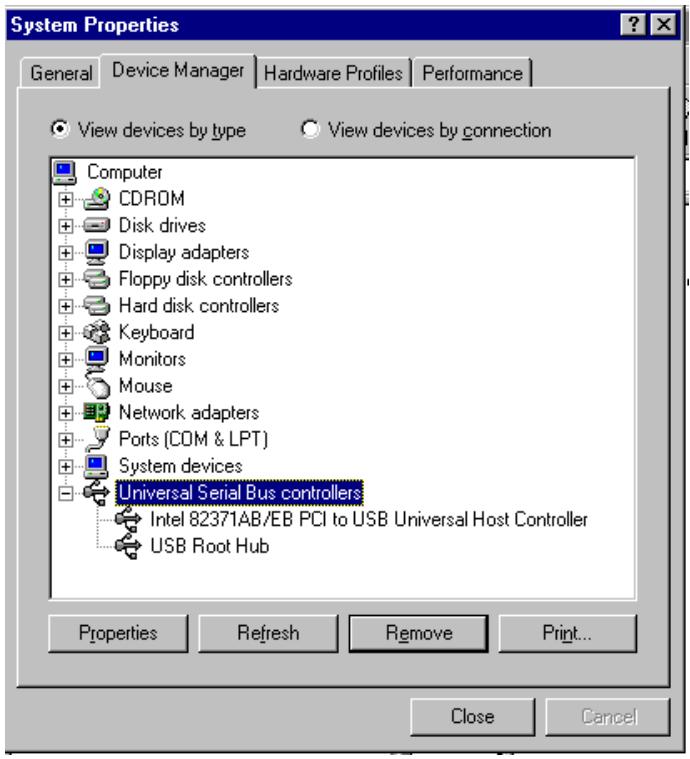
3. Click the Device Manager tab.
Confirm that USB (Universal Serial Bus) controller exists in the device list. The name of the USB controller depends on the PC used (the figure below represents a USB controller provided by Intel).
In Windows 2000
- Click Start, Settings, Control Panel.
- Double-click System.
- Click the Hardware tab.
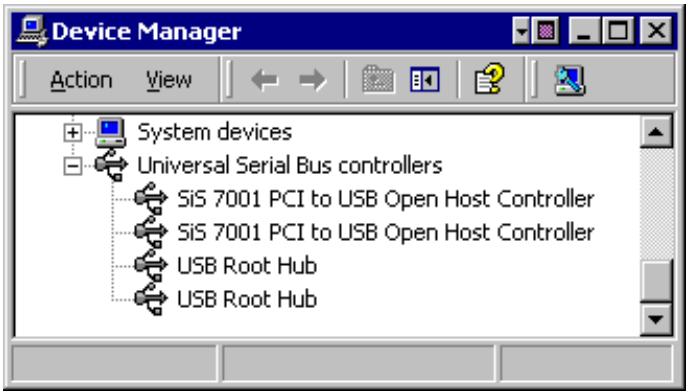
- Click the Device Manger button.
- Confirm that USB (Universal Serial Bus) controller exists in the device list.
In Windows XP
- Click Start, Control Panel.
- Click "Performance and Maintenance" and then System.
- Click the Hardware tab.
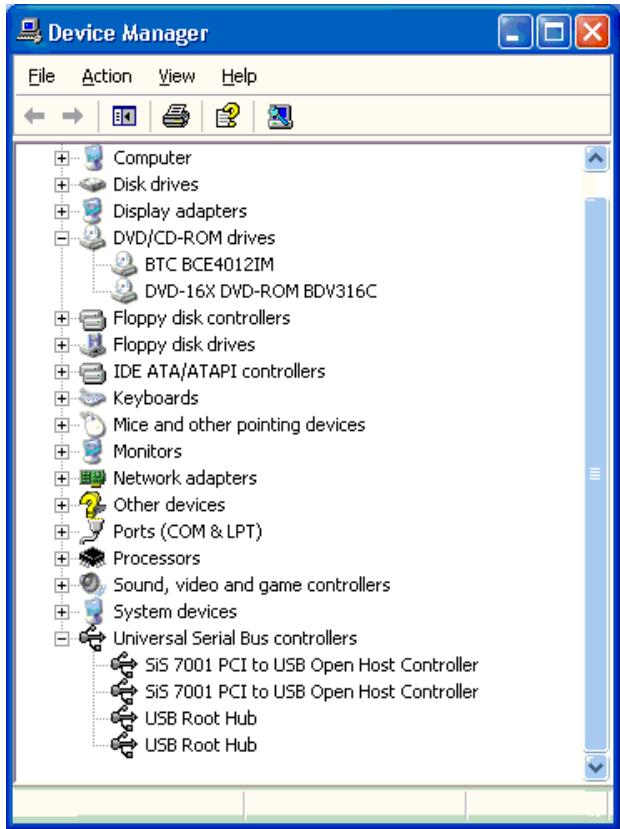
- Click the Device Manger button.
- Confirm that USB (Universal Serial Bus) controller exists in the device list.
2.PRODUCT OUTLINE
2.1 The Specification of TEAC CD-W224PUK
- Easy connection
This product incorporates the interface conforming to the USB2.0/ 1.1. Since this drive conforms to the USB1.1, it can be used with most computers that incorporate the standard USB interface. The drive can be easily connected with a cable using a commercially-available USB2.0 interface card.
-
When the drive is connected via a USB hub or multiple USB devices are connected to the computer, the drive may not operate properly. In that case, connect the drive directly to the USB terminal of the computer. It is recommended that only one USB device is connected to the computer.
-
Hot plugging conformance
Connecting or disconnecting the drive to or from the computer is allowed with the power of the computer on.
-
Perform proper disconnecting procedure using an unplug utility on your operating system when disconnecting the drive.
-
Latest high-speed interface
The drive conforms to the USB2.0 High Speed. A read speed of 24X at the maximum can be fully realized with the CD-ROM. Stable writing of 24X at the maximum for CD-R and 10X at the maximum for the CD-RW is realized.
-
When the drive is connected with the USB1.1, 4X to 6X speed is obtained.
-
Buffer under-run proof function incorporated
This drive incorporates the TEAC CD-W224E unit. The CD-W224E incorporates a technology to prevent buffer under-run errors that cause a write failure on the CD-R/RW media. With this function, the write to the CD-R/RW media is assured both with the USB1.1 and the USB2.0.
- Supporting the media manufactured by major media manufacturers
This product is best tuned to almost all the CD-R and CD-RW me
dia manufactured by major media manufacturers. Therefore, this drive can be used with little concern for compatibility issues.
- Ready-to-use software is provided.
2.2 The Specification of TEAC DW-224PUK
The DW-224PUK is a CD-RW/DVD drive used by connecting to the USB terminal of the computer. As this product uses the TEAC DW-224E as an internal drive unit, the operating system or application software may indicate the drive as "TEAC DW-224E" in some cases. The drive can perform the following.
- Reading the CD-ROM/ DVD-ROM media
The drive can read information written on a CD-ROM or DVD-ROM media.
- Playing a music CD, Video CD, and DVD-Video
The drive can play a music CD and Video CD/DVD-Video using your computer.
-
It is recommended to connect the drive to a USB 2.0 interface for playing a DVD-Video. When playing it by connecting to the USB 1.1 interface, frame dropouts or sound dropouts are caused due to limited data transfer rate.
-
Writing data on the CD-R/CD-RW media, creating a back-up copy of your CD
You can store your computer data on the rewritable CD-R or CD-RW media. You can create an original music CD and play it with other CD players by preparing a music file in advance. You can also create a back-up copy of your important CD.
- Some commercially-available CDs have a special structure. Note that a back-up copy of such CDs is impossible.
2.3 Procedure Outline for Installation and Operation
The procedure outline that must be followed before using the drive is described below. Refer to each section of this document for details of each procedure.
- Open the package and check the accessories.
- Check the names and functions of each section of the drive.
- Connect the drive and the provided AC adapter.
- Start your computer system and connect the USB terminal of the computer to the drive.
- Install the provided device driver and CD-R/CD-RW writing software as required.
- After checking that the components and the drive operate normally, fill in and send back the provided user registration card.

The copy or use of copyrighted materials such as music, images, computer programs, databases, etc. may be limited according to regulations such as copyright law, or the licensing agreement between users and owners. Please use this drive properly by checking the conditions of the copyrighted materials before creating a copy, and so on. TEAC will not hold any responsibility for such violation by users.
3. COMPONENTS
3.1 Precautions when unpacking the package
Open the product packing box and check to make sure that the following components are included. The drive is a precision device. Remove it from the box very carefully. Avoid jarring it.
- Check the appearance of the drive to see if there is any damage to the switches or connectors or any other defects.
- It is recommended that you keep the packing box and cushioning material in case of transporting the drive for repair, etc.
3.2 Package List
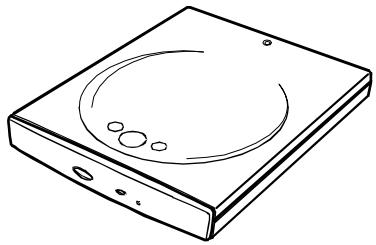
DW-224PUK drive
or
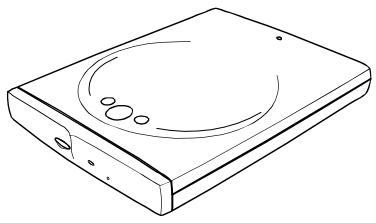
CD-W224PUK drive
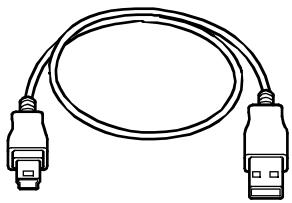
USB interface cable
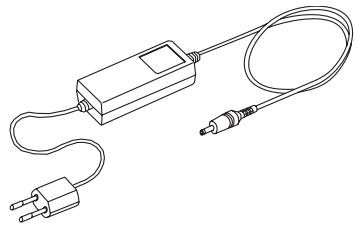
AC adapter
User's Manual (this document)
Warranty booklet/ User Registration card
Driver disk

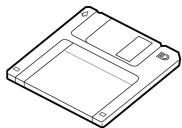
CD-R/RW writing software
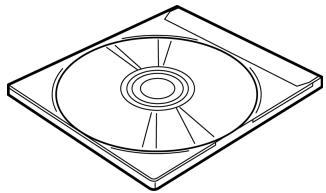
DVD-Playback software (DW-224PUK only)
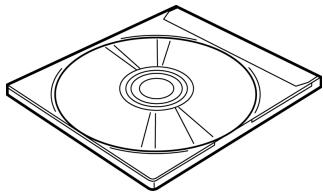
- Components
4. PRECAUTIONS FOR SETTING AND HANDLING
- Place the drive in a stable place without any vibrations or tilt.
- Avoid placing the drive in a place subject to considerable temperature change such as in direct sunlight or near a heater.
- Avoid placing the drive in a dusty or damp place
- Do not place the drive very close to an AV device or a display monitor.
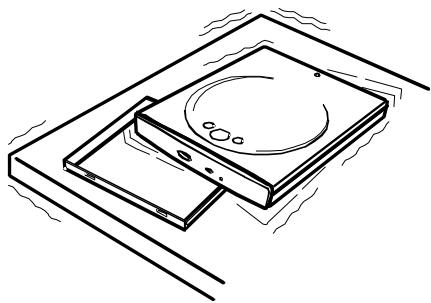
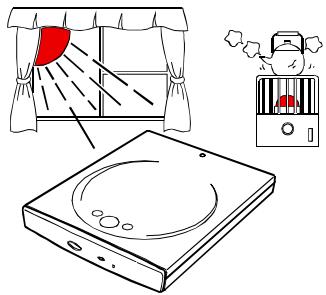
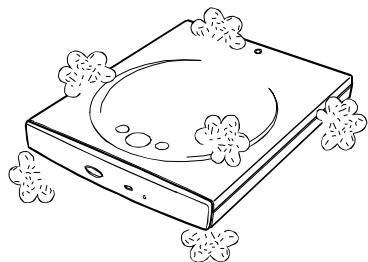
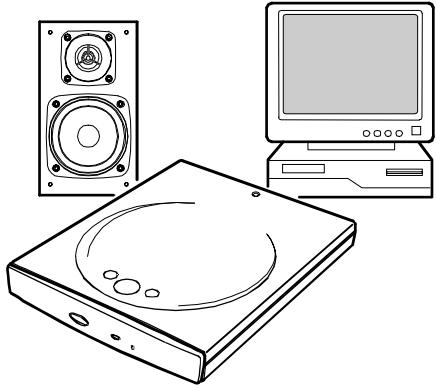
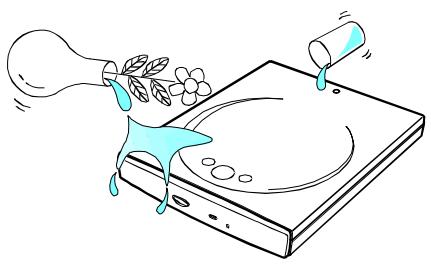
- Do not place a container with liquid such as a vase or cup on or near the drive. If liquid gets inside the drive, it may cause fire or electric shock.
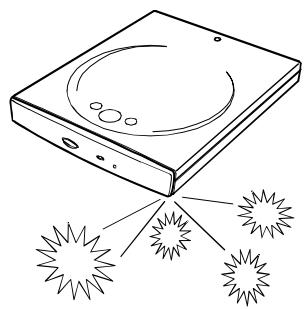
- Do not apply a strong shock to the drive during moving or transportation.
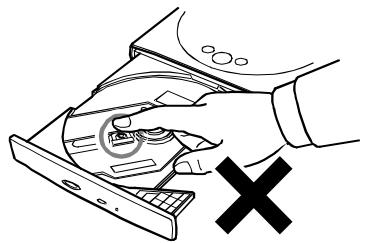
- Do not touch the pickup mechanism (internal lens). This will cause a malfunction.
Daily Maintenance
Wipe off soil on the drive using a soft cloth. If soil is persistent, use a cloth dampened with a diluted neutral detergent after squeezing all the water out.
If liquid is allowed into the drive, it may cause a serious malfunction, an electric shock or a fire. When cleaning with liquid, be sure to remove the provided AC adapter from the wall outlet after disconnecting the drive from your computer.
Do not apply solvents such as benzene or thinner. Chemical cleaners for home or industrial use may damage the coating of the drive.
5. NAMES AND FUNCTIONS
5.1 Front panel/top
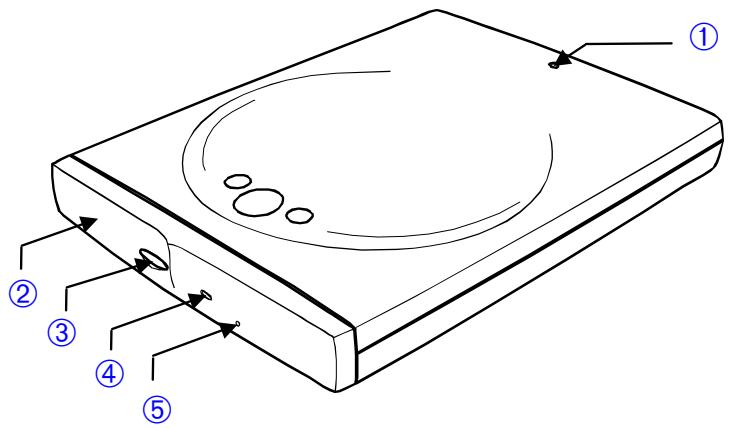
① Power indicator
(2) Tray
This indicator lights when the power is on.
Set the CD or DVD media on the tray for reading, writing and playing. Press the eject button to open it. Set the media with the label face (side on which the title and so on is printed) upward and press the tray front into the drive unit to close it.
③ Eject button
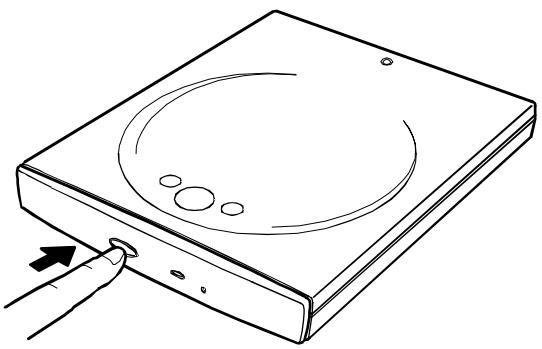
Press this button to open the tray in a few seconds. This button is valid only when the power is on.
④ Busy indicator
This indicator lights or blinks during play and read.
| Operation State | LED |
| During seek/ data transfer | The indicator lights |
| During start/ media set | The indicator blinks at an interval of about 0.5 second. |
| During write/ audio play | The indicator blinks at an interval of about 1.5 seconds. |
⑤ Emergency hole
This hole is used only when the media cannot be ejected or when ejecting the media with the power off. Ordinarily, this should not be used. With the power off, insert a thin metal rod with a diameter of 1.2mm or less into the emergency hole to release the lock and open the tray.

Perform this operation after disconnecting the drive from the computer and pulling off the plug of the AC adapter from the outlet.
5.2 Rear panel
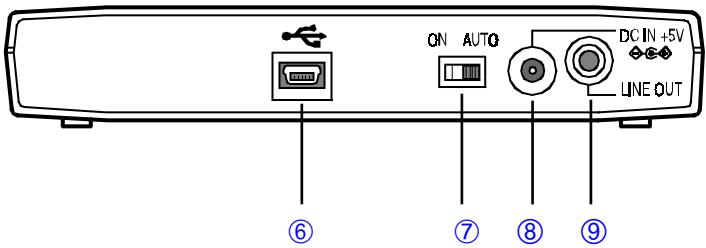
⑥ USB connector
⑦ Power switch

Insert the plug of the provided dedicated USB cable.
This switches the power on/off. Set this switch to AUTO in ordinary cases.
Do not operate the power switch during the operation of the drive. Operate the power switch when the USB cable connecting the drive and the computer is removed or when the power of the computer is off.
When the switch is set to AUTO, the drive power turns on only when the drive is connected to the computer with the USB connection cable and the power of the computer is on. The power of the drive will not be on when the power of the computer is off or the drive is not connected to the computer.
When the switch is set to ON, the drive power is always on when the AC adapter is connected.
⑧ DC input connector
Insert the plug of the provided AC adapter.

Warning
Be sure to connect the provided dedicated AC adapter to this connector. NEVER connect other AC adapters.

Caution
This drive cannot operate with only the bus power of the USB cable. Be sure to provide power by connecting the provided AC adapter to the drive.
⑨ Audio output jack
Insert the 3.5mm dia. stereo mini-plug of an audio cable to connect to speakers equipped with an amplifier, etc. for playing a music CD.
5.3 AC Adapter
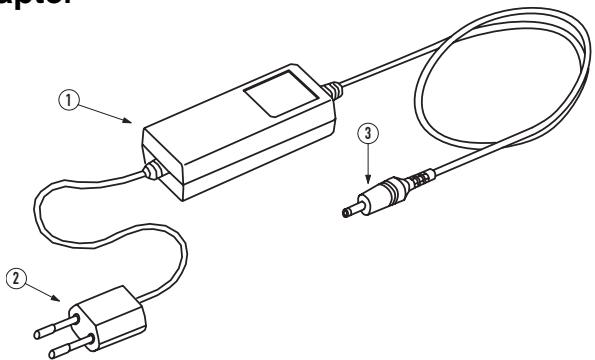
① AC adapter unit
This is a dedicated adapter for the drive. Do not use it for other purposes.
② AC input plug
Connect this plug to a 220V AC power source.
③ DC output plug
Connect this plug to the DC input connector at the back of the drive unit.
5.4 USB Cable
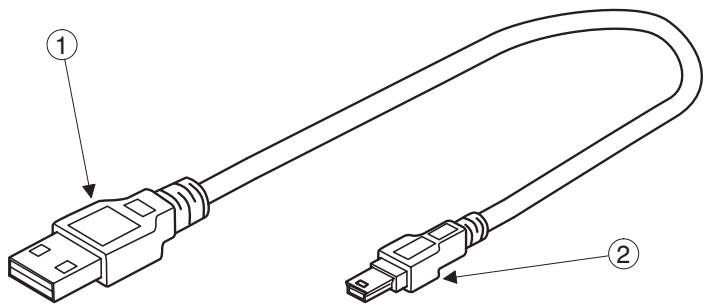
① A plug
Connect to the USB terminal of your computer or the USB hub.
② Mini B plug
Connect to the USB connector at the back of the drive unit.
6. SETTING UP THE DRIVE
6.1 Connecting the Cables
Windows 2000 and Windows XP operating systems provide the native drivers for USB controller and the drive. As far as the TEAC CD-W224PUK is concerned this is also true for Windows Me. Therefore, when this drive is connected, Windows will automatically install the appropriate driver and the drive will be ready to be used. You do not have to perform any special installation or deinstallation.
However, it is required that the device driver from the driver disk provided for the TEAC CD-W224PUK and the DW-224PUK has to be installed when using Windows 98 Second Edition (Windows 98SE). This is also necessary with Windows Me if running DW-224PUK. Insert the provided driver disk in the floppy drive of your computer.

Do not connect the drive when the computer is in the sleep or suspend mode. Connect the drive after restoring to the normal operating state by releasing the sleep or suspend mode.

When the drive is connected via a USB hub or multiple USB devices are connected to the computer, the drive may not operate properly. In that case, connect the drive directly to the USB terminal of the computer. It is recommended that only one USB device is connected to the computer at a time.
- Turn on the power of the computer and wait for the desktop screen to appear.
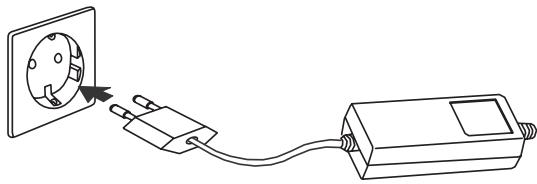
- Connect the DC output plug of the provided AC adapter to the DC input connector of the drive.
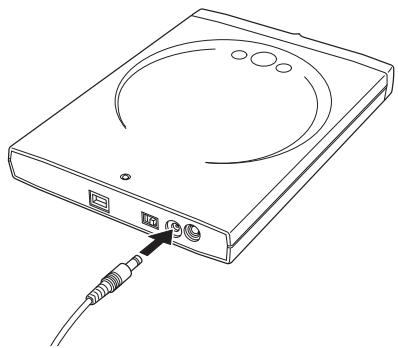
- Connect the other DC plug of the provided AC adapter to an outlet. Set the power switch of your USB drive to on.
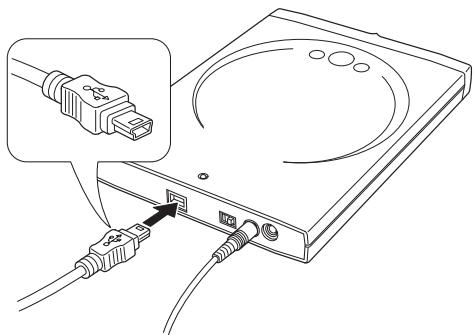
- Connect the drive and the computer using the provided USB cable. Insert the mini B plug of the provided USB connector to the USB connector at the back of the drive.
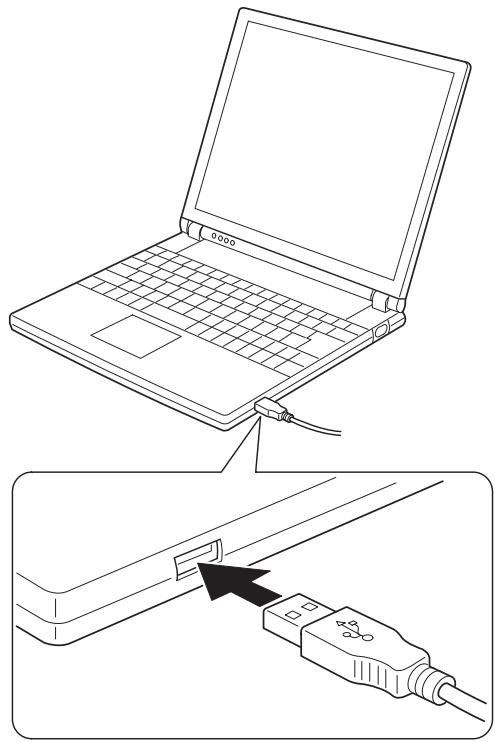
- Locate the USB terminal of your computer. Refer to the instruction manual of your computer for its location. The following logo is usually indicated near the USB terminal:

Insert the A plug of the USB connector to the USB terminal of the computer. When the power switch at the back of the drive is set to AUTO, the power indicator lights up.
- There appear some messages on the screen followed by the appearance of an CD-ROM icon in the window My Computer. Now the drive is ready to use.

Warning
When you are using Windows 98SE or with the DW224PUK drive Windows Me and the drive is connected for the first time, it is required to load and install the device driver file from the provided driver disk.

Caution
The drive is recognized by the Device manager either as TEAC CD-W224EA (CD-R/RW drive) or as DW-224E (DVD/CD-RW drive).
Connection of the line output
When listening to an audio CD by using the speakers of your computer, connect the line output jack of the drive and the line input jack of the computer using an audio cable.
Use a 03.5mm stereo mini plug audio cable (commercially available).
6.2 Disconnecting the Drive
When disconnecting the drive from the computer when the power of the computer is on, the disconnecting procedure is required to prevent corruption or loss of data files.

Warning
Do not pull out the USB cable or turn off the power of the drive without this disconnecting procedure. The disconnecting procedure is described below.
Note that the USB cable can be removed without this procedure if the power of the computer is off.
Do not disconnect the drive if the computer is in the sleep or suspend mode.
The screen displays as shown below are one example with Windows 98SE and the other one with Windows 2000. Part of the message may differ depending on the operating systems.
- Terminate any applications (CD-R/RW writing software, etc.) that are using the drive or a file on the media in the drive.
- Press the eject button at the front of the drive to take out the media. When the media is used with CD-R/RW packet writing software, etc., take out the media with the procedure using the software.
- Left-click on the Hardware disconnecting icon on the Taskbar at the lower right of the screen.
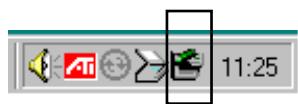
Windows 98SE

Windows 2000
A list of removable devices appears as a menu. Left-click on the applicable drive.

Windows 98SE with TEAC CD-W224PUK

Windows 98SE with TEAC DW-224PUK

Windows 2000
- The message that the USB storage device can be safely disconnected appears in a few seconds to allow you to remove the USB cable connecting the drive and the computer.
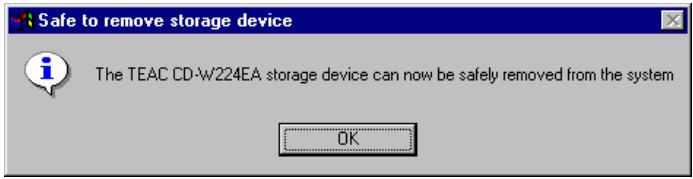
Windows 98SE with TEAC CD-W224PUK
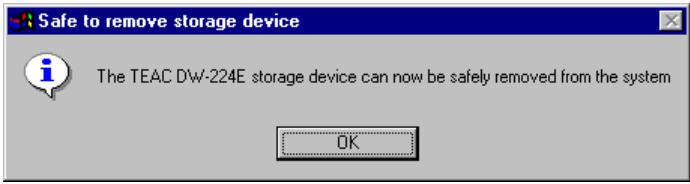
Windows 98SE with TEAC DW-224PUK
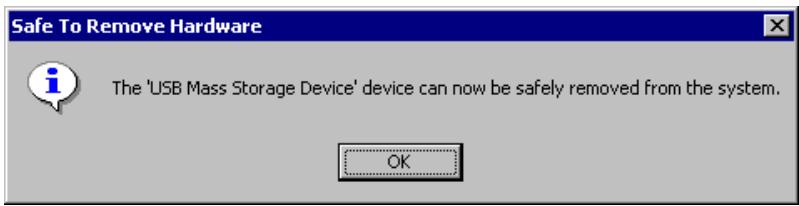
Windows 2000

When a message appears that the USB storage device cannot be disconnected, one or more applications are still using the drive. Perform the disconnecting procedure after terminating the applications.
- Click the OK button to pull out the USB cable.

Do not remove and reconnect the drive from or to the computer in rapid succession. The drive may not be recognized. Reconnect the drive approx. 20 seconds after removing.
6.3 Driver installation under Windows 98SE/Windows Me
When the drive is used for the computer in Windows 98 Second Edition or Windows Me (Windows Me for DW-224PUK only), it is required to install the device driver before connecting it to the computer for the first time.
The device driver is on the provided driver disk for Windows 98SE and Windows Me. When no floppy disk drive is installed in your computer, connect it in advance before connecting the drive to the computer for the first time. When your computer has only one USB terminal and the floppy disk drive is using that connector, create a new folder on your hard disk drive and save the contents of the driver disk for Windows 98SE or Windows Me before connecting this drive.
The equivalent of the contents of the driver disk for Windows 98SE and Windows Me can be downloaded from our web site. When you cannot use a floppy disk drive and you can connect to the Internet, download it to your hard disk drive before connecting the drive.

The device driver needs to be installed only when connecting the drive for the first time. The drive can be used just by connecting it to the USB terminal after the initial installation.
-
Terminate any active application. Connect as described before the dedicated AC adapter to the drive, then connect the USB interface cable between the drive and your computer.
-
When the computer detects that the drive is newly connected, the message "New hardware is detected. Searching necessary software" appears. After that, Add New Hardware Wizard is started and the USB CD-R/RW UNIT driver resp. USB CD-RW/DVD UNIT driver search window appears. Depending on the connected drive the shown messages are different (see the following pictures). Click the Next button.
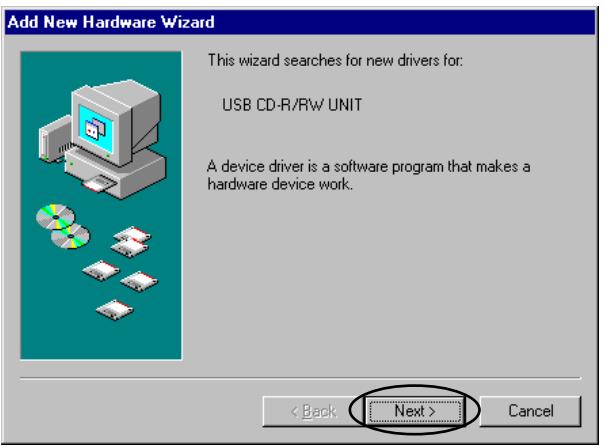
CD-W224PUK
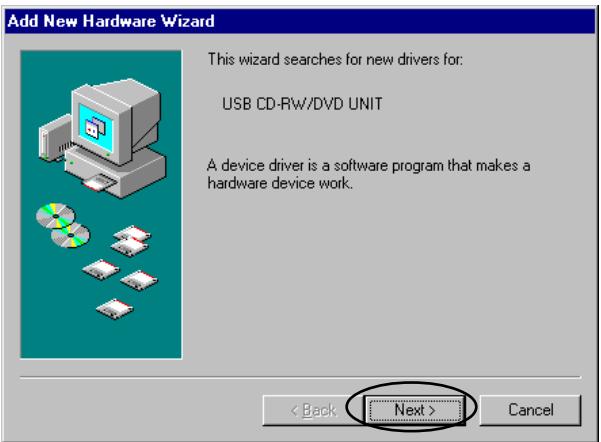
DW-224PUK
- Select "Search for the best driver for your device (Recommended)" and click Next.
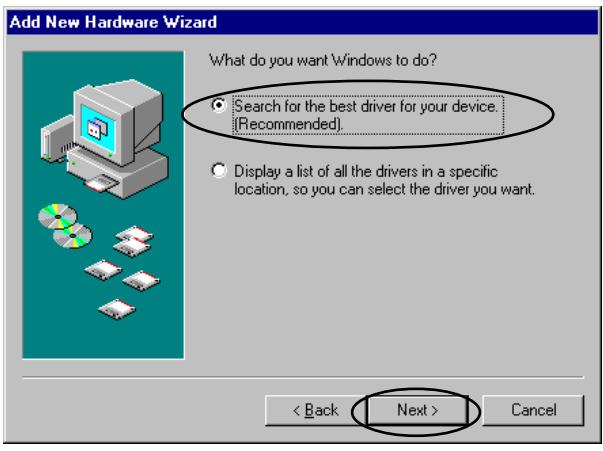
- Insert the dedicated driver disk (a floppy disk) to the FDD of your computer, select Floppy disk drives, then choose Next.

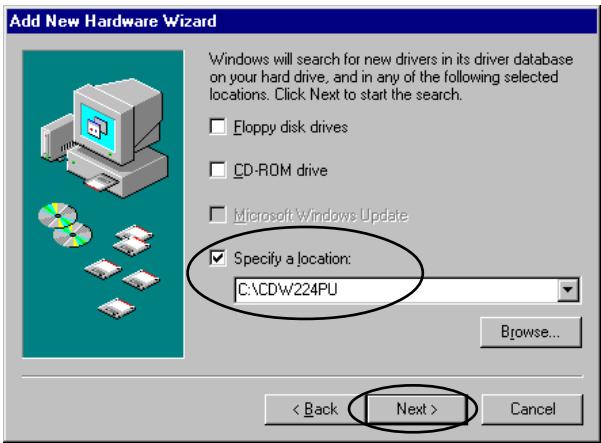
- When the content of the driver disk is stored in advance or it is downloaded from the Internet, select "Specify a location:" and input the location of the folder where the driver disk contents are stored. The window below is an example when a folder called CDW224PU is created and stored in the C drive. Click the Next button.
When the following window with "Windows driver file search for the device" - "TEAC USB CD-RW/ DVD Unit" respectively "TEAC USB CD-RW/DVD Unit" and Location of driver: "A:\TPP300.INF" appears, click Next. ("A:\" in the drive location "A:\TPP300.INF" may differ when the file is stored in the incorporated hard disk drive in advance).
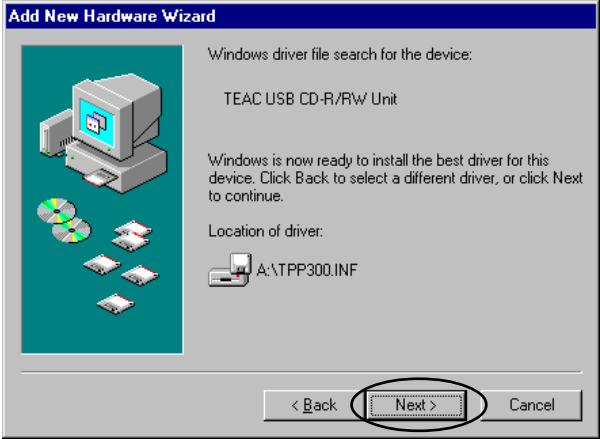
CD-W224PUK
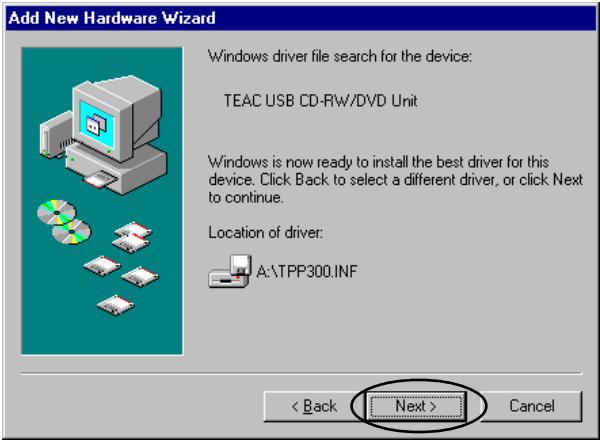
DW-224PUK
- When the following window appears after displaying several messages for reading the driver, click Finish to complete the installation.
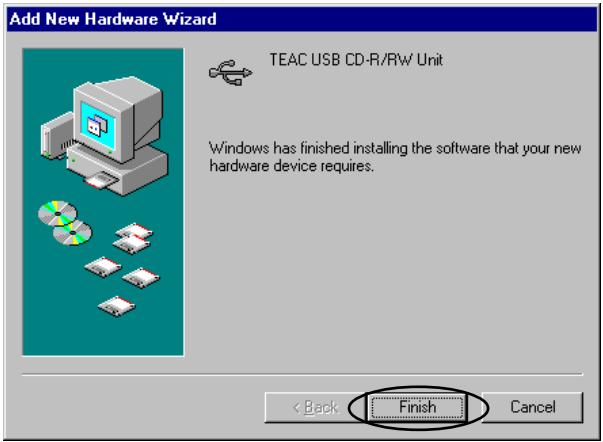
CD-W224PUK
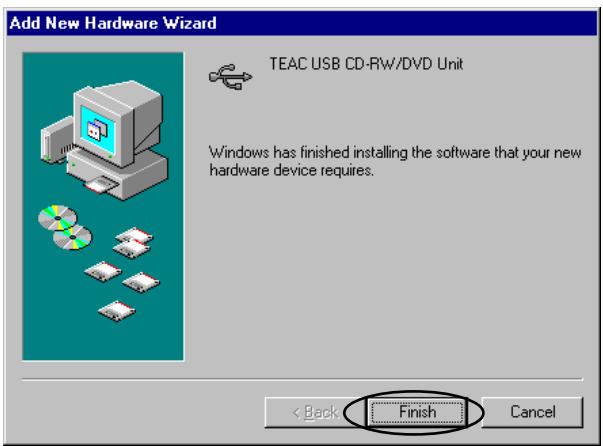
DW-224PUK
- You can make sure that the drive has been recognized after connection by using Device Manager (Control Panel, System).
"TEAC CD-W224EA" resp. "TEAC DW-224E" at "CDROM"
"TEAC USB 2.0 CD-R/RW Unit" resp.
"TEAC USB 2.0 CD-RW/DVD Unit" at "Universal Serial Bus controllers"
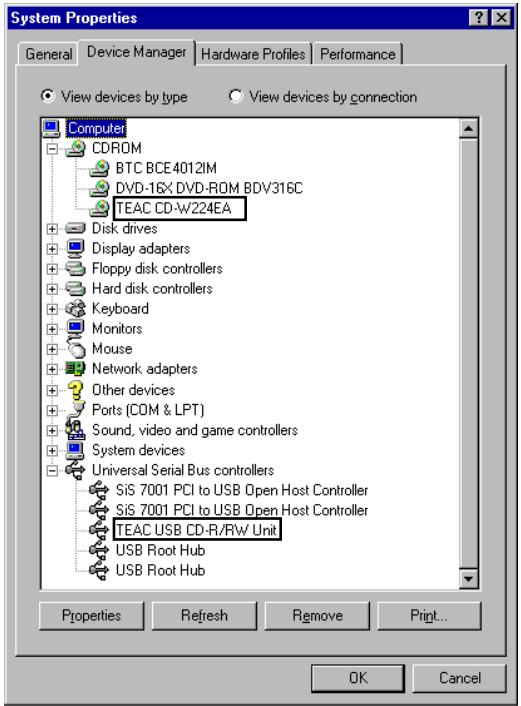
CD-W224PUK

If you cannot find the TEAC entry under "Universal Serial Bus controllers" and the entry "USB Mass Storage Device" can be found you have to carry out the steps described in section 6.5 to install the TEAC device driver.
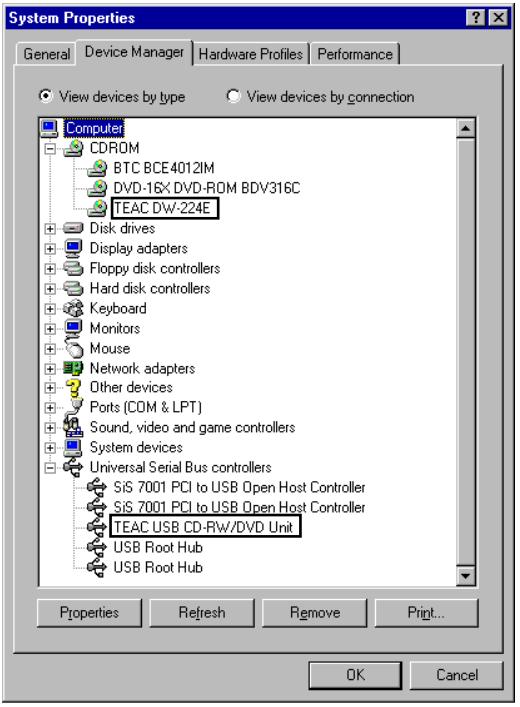
DW-224PUK
- Once the device driver is installed, you can use the drive just by connecting the drive to the USB terminal thereafter.

The provided driver and the driver available from the Internet are for Windows 98SE only. With the DW-224PUK the driver is also available for Windows Me. Do not set it up for other operating systems.

If an exclamation (!) mark is in the USB unit icon, it means that the driver has not been installed properly. Install the driver again referring to the following section 6.4.
6.4 "Manual" Driver Installation under Windows 98SE
- Connect the drive to the USB terminal of the computer again. See 6.1 Connection for the connecting procedure.
- Open Control Panel, System, Device Manager. Check the "Universal Serial Bus controllers" category.
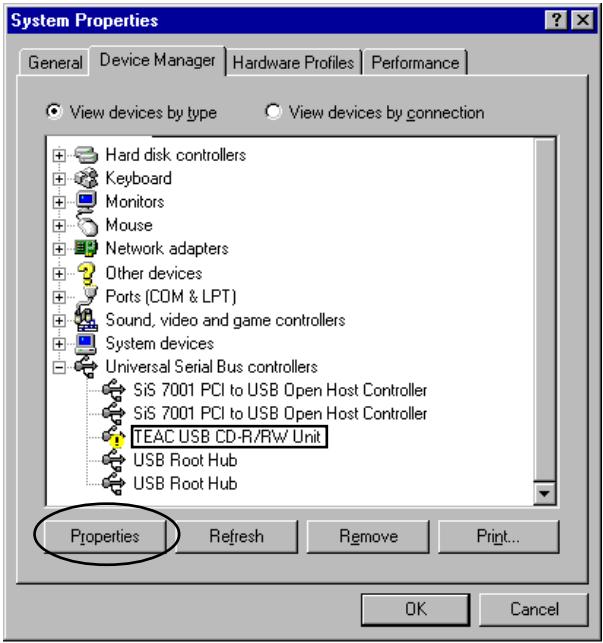
- Select "TEAC USB CD-R/RW Unit" resp. "TEAC USB CD-RW/DVD Unit" and click the Properties button.
When it is not found in the Universal Serial Bus controllers category, check Other Devices. Select Other devices - USB Device and click the Properties button.
- Select the Driver tab and click the Update Driver button.
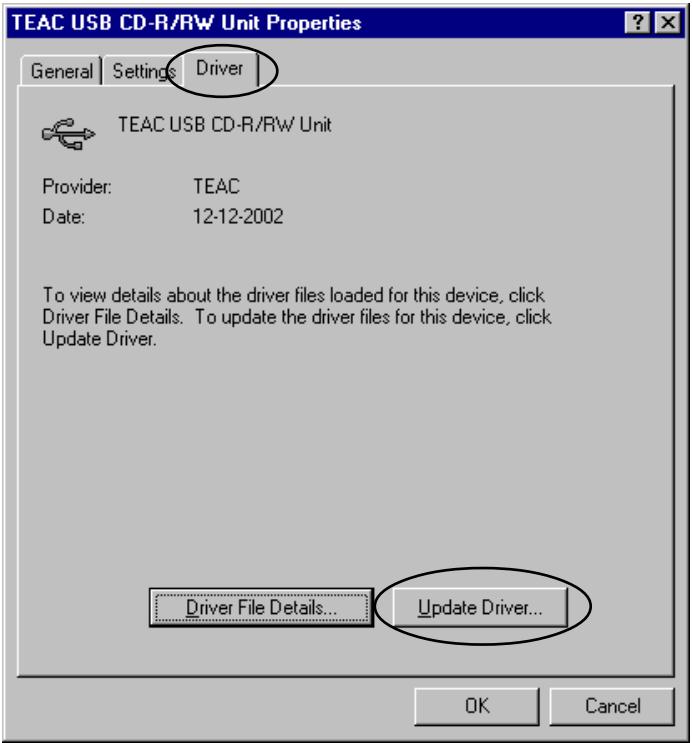
- The TEAC UNIT driver search window appears. Click Next.
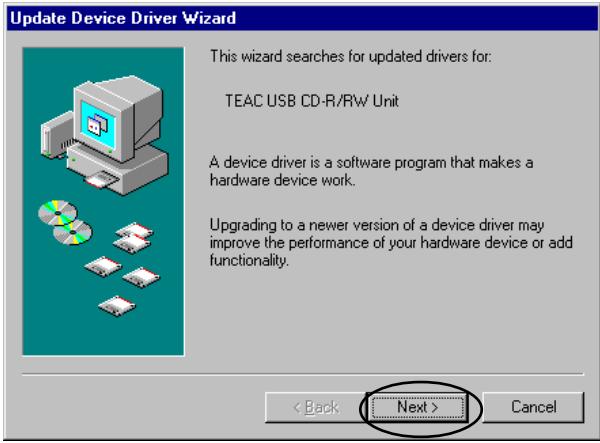
- The next steps for the installation procedure are similar to that in section 6.3 steps 3 to 8.
6.5 "Manual" Driver Installation under Windows 98 Me (DW-224PUK only)
- Connect the drive to the USB terminal of the computer again. See 6.1 Connection for the connecting procedure.
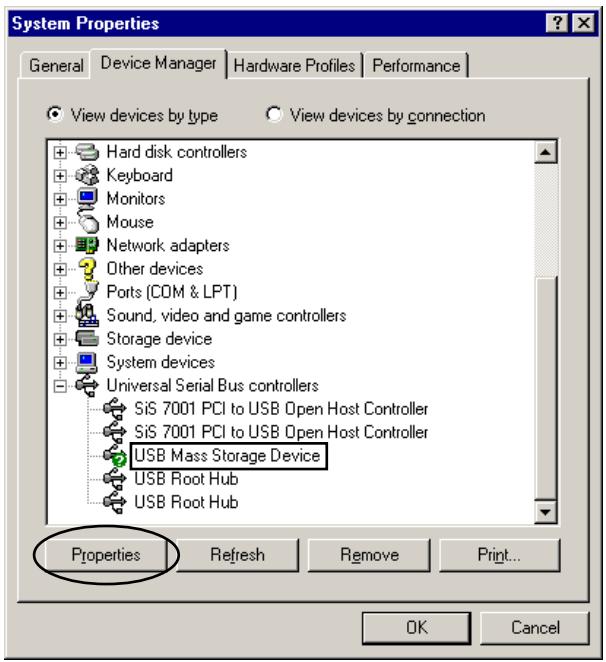
- Open Control Panel, System, Device Manager. Check the "Universal Serial Bus controllers" category.
-
Select "USB Mass Storage Device" and click the Properties button.
-
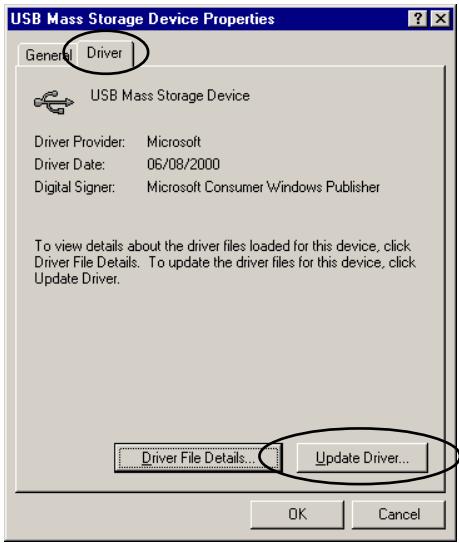
Select the Driver tab and click the Update Driver button.
- Insert the dedicated driver disk (a floppy disk) to the FDD of your computer, select "Automatic search for a better driver (Recommended)", then choose Next.
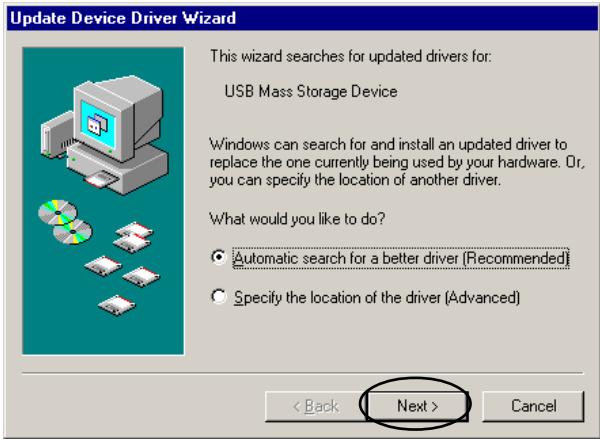
The TEAC device driver is now installed. Ensure that the drive was recognized correctly (see section 6.3, step 7).

Warning
It is of major importance to insert the provided driver disk into the floppy drive before Next will be clicked because otherwise the driver will not be installed.

Caution
If the device driver is loaded from a folder at your hard disk you have to carry out the steps 6 and 7 as shown below.
- When the content of the driver disk is stored in advance or it is downloaded from the Internet, select "Specify the location of the driver (Advanced)" and click the Next button.
- Select "Specify a location:" and input the location of the folder where the driver disk contents are stored. Click the Next button.
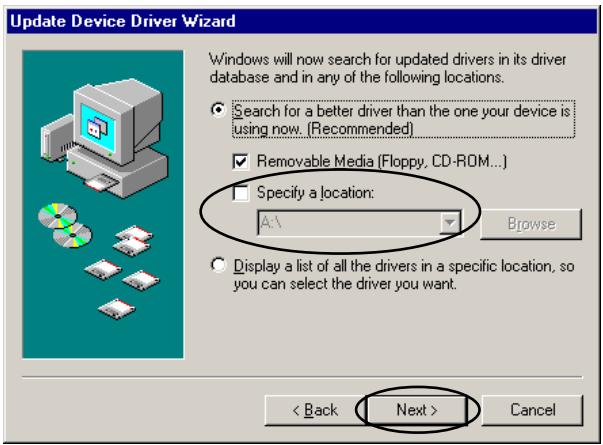
The TEAC device driver is now installed. Ensure that the drive was recognized correctly (see section 6.3, step 7).
6.6 Uninstalling in Windows 98SE
You do not have to uninstall (removing the device driver from your computer) the device driver in Windows 98SE under normal conditions. If you want to uninstall the device driver manually, perform the following steps:
1.Logout the drive at your PC and disconnect it.
2. Insert the provided floppy disk in the computer and open it using Explorer with the drive disconnected. When uninstalling from the downloaded file, open the corresponding folder in Explorer. Double-click tppun.exe.
3. When the following window appears click the Yes (Y) button.
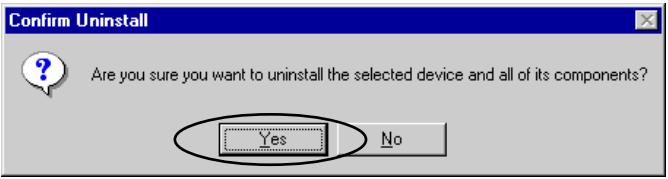
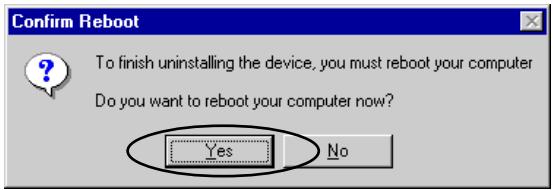
- When the following window prompting the restart appears, click Yes (Y) button to restart the computer.
- Un-installation of the device driver is now completed.
6.7 CD-W224PUK Driver Installation under Windows 98SE
An appropriate driver will be automatically set when the drive is initially connected in Windows Me. You can make sure that the drive has been recognized after connection by using Device Manager.

Caution
A green question mark (?) may appear in "USB Mass-Storage Device" on Device Manager. This indicates that the Windows device driver that conforms to the drive is being used, and this is normal.
You should see the following entries:
"TEAC CD-W224EA" at "CDROM"
USB Mass-Storage Device" at "Universal Serial Bus controllers"
"USB CD-ROM" at "Storage device"
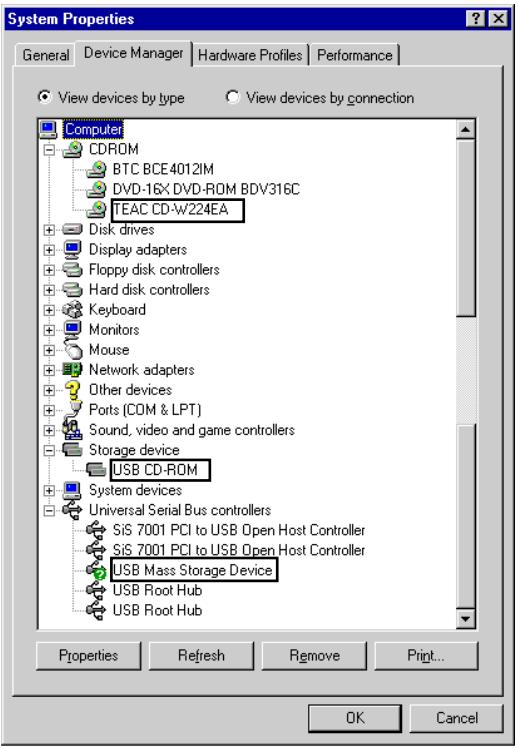
6.8 Driver installation under Windows 2000
The USB device drive is included in Windows 2000. When this drive is connected, Windows 2000 will automatically install the appropriate driver and the drive will be ready to be used. You do not have to perform any special installation or uninstallation. You can confirm that the drive has been recognized after connection by using Device Manager.
You should see the following entries:
"USB Mass-Storage Device" at "Universal Serial Bus controllers"
"TEAC CD-W224EA USB Device" at "DVD/CD-ROM drives" for the TEAC CD-W224PUK unit
resp.
"TEAC DW-224E USB Device" at "DVD/CD-ROM drives" for the TEAC DW-224PUK unit.
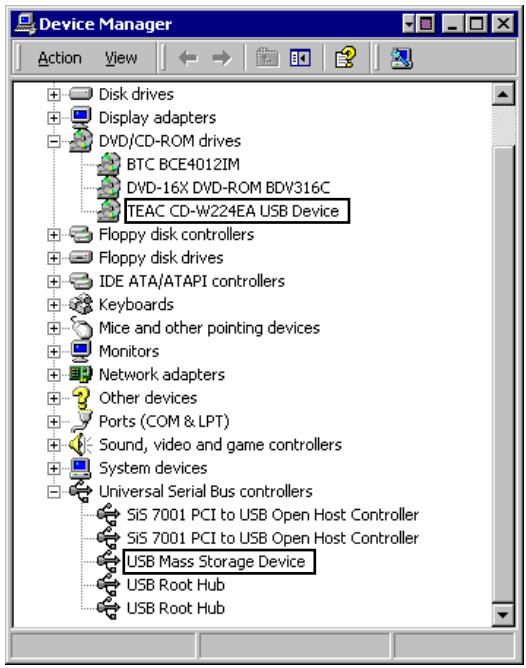
Example for the TEAC DW-224PUK drive
6.9 Driver installation under Windows XP
The USB device drive is included in Windows XP. When this drive is connected, Windows XP will automatically install the appropriate driver and the drive will be ready to be used. You do not have to perform any special installation or uninstallation. You can confirm that the drive has been recognized after connection by using Device Manager.
You should see the following entries:
"USB Mass-Storage Device" at "Universal Serial Bus controllers"
"TEAC CD-W224EA USB Device" at "DVD/CD-ROM drives" for the TEAC CD-W224PUK unit
resp.
"TEAC DW-224E USB Device" at "DVD/CD-ROM drives" for the TEAC DW-224PUK unit.
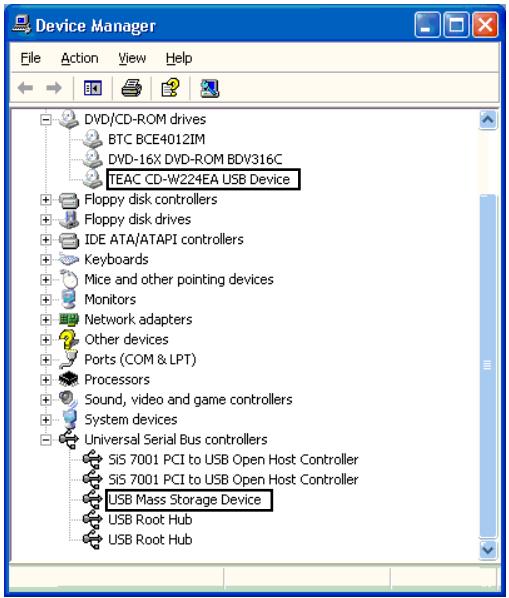
Example for the TEAC CD-W224PUK drive
7. PRECAUTIONS IN HANDLING THE MEDIA
Take the following precautions in order to maintain the reliability of data when handing the media.
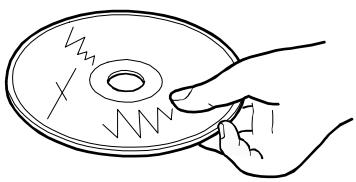
Hold the disc between the center hole and the outer edge of the disc. Do not touch the surface of the media.
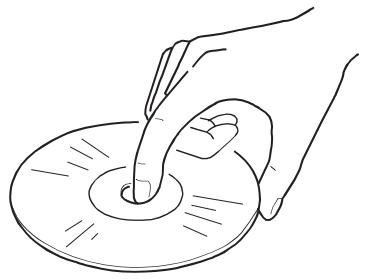
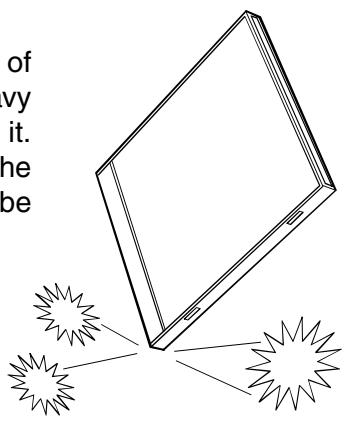
- Do not drop or stack the discs on top of each other. Do not place anything heavy on the disc or give a strong shock to it. When an excessive force is applied to the media, the reliability of data may not be maintained.
If the recording surface of the media is marred, data write may become impossible. Do not touch the recording surface of the media.
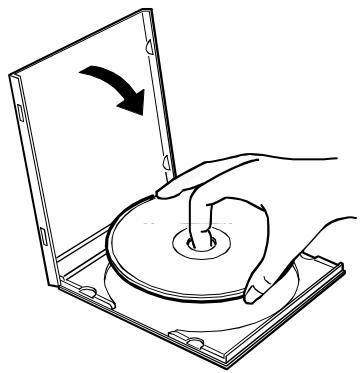
Store the disc in a protective case when not in use even for a short period of time in order to protect it from being scratched or damaged.
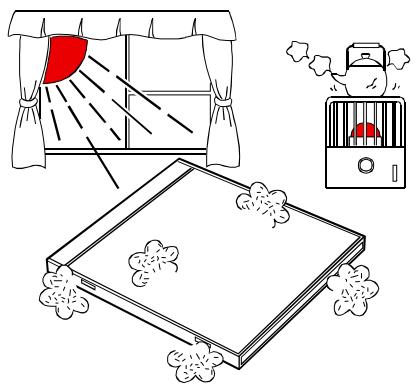
- Do not keep the media in places that contain dusts, humidity, high temperature, or are in direct sun light.

Wrong handling of the media may make data unreadable or prevent further writing.
8. SETTING AND REMOVING THE MEDIA
8.1 Setting the Media
- Press the eject button at the front of the drive to automatically open the tray.
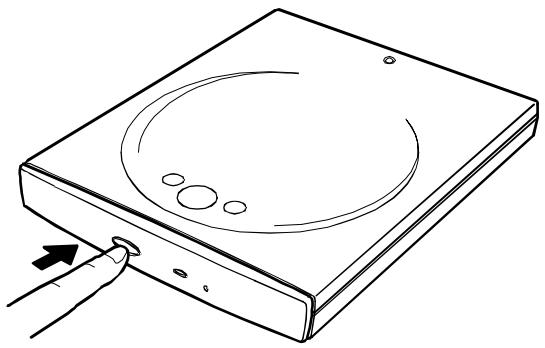
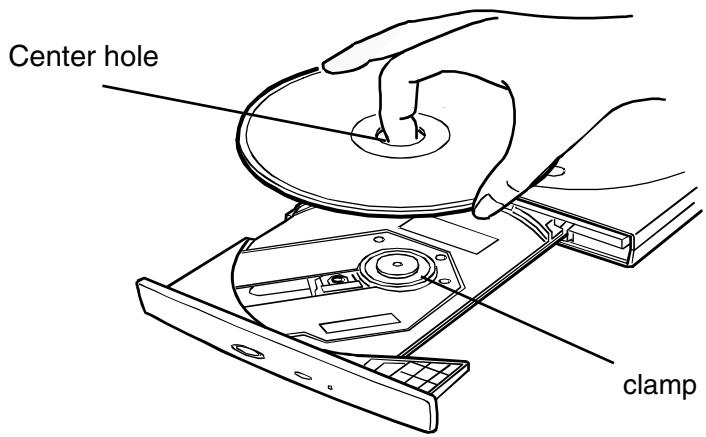
- Pull out the tray sufficiently and place the media on the tray with the label face upward. Align the center hole of the disc with the clamp at the center of the tray and fit the disc in securely by pressing the outer vicinity of the center hole.
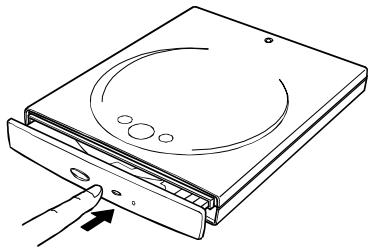
- Press the tray front gently until the tray is inserted in the drive unit completely.
- When the tray is closed normally, the busy indicator blinks for several seconds. After that the media is recognized to provide access to the media..
8.2 Removing the media
- Press the eject button at the front of the drive to eject the tray a little from the drive.
- Pull out the tray sufficiently and lift the disc by holding the disc edges carefully while pressing down the clamp.
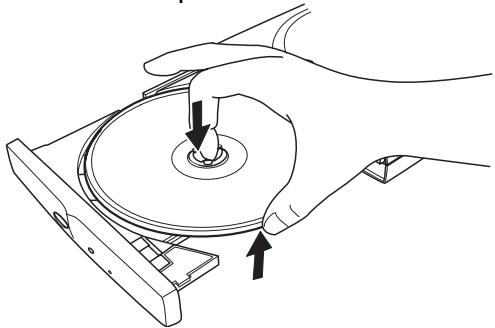
- Press the tray front gently until the tray is inserted in the drive unit completely. At this time, confirm if it is securely housed.

Be careful not to get your fingers caught when closing the top cover.
9. OPERATION
9.1 Playing Music CDs
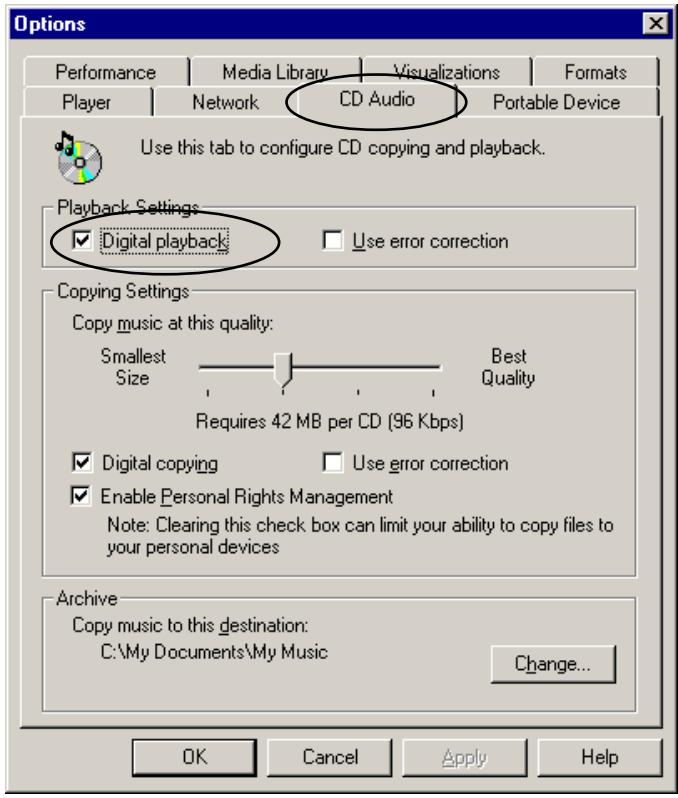
In some computers, "analog play" or "digital play" can be selected when playing a music CD using the provided application ("CD Player", "Media Player" and so on) in an operating system. (Digital play may not be selected in some computers).
In the case of analog play, sound of a music CD is output from the line output jack at the back of the drive unit. Connect the line output jack to the line input jack of your computer or speakers with a built-in amplifier using an audio cable as well as connecting the drive to the computer using the USB cable. In the case of digital play, sound is output from the speakers of the computer just by connecting the drive to the computer with the USB cable.
9.1.1 Using the CD Player (Windows 98 Second Edition)
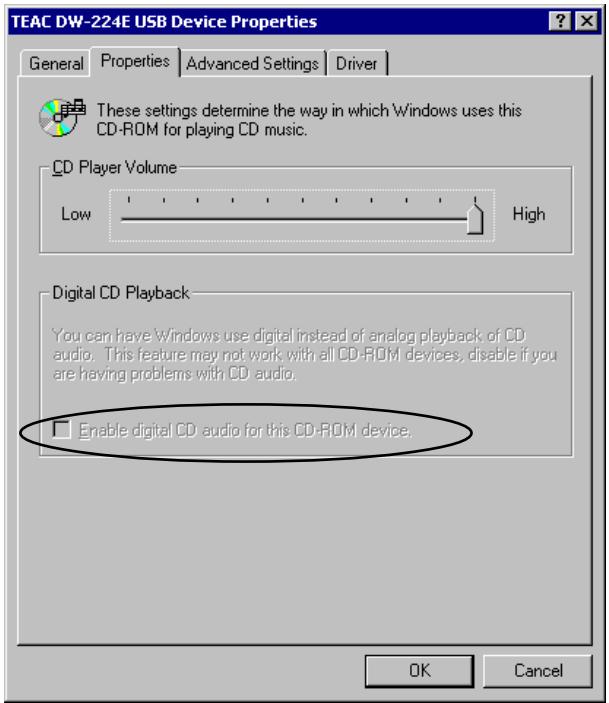
The method to play a music CD using the CD Player is described below. Double-click Multimedia in the Control Panel to open the Multimedia Property window. Select the CD Music tab to obtain the following window. Check (digital play) or uncheck (analog play) "Enable digital CD audio for this CD-ROM device", press the OK button and close the window.
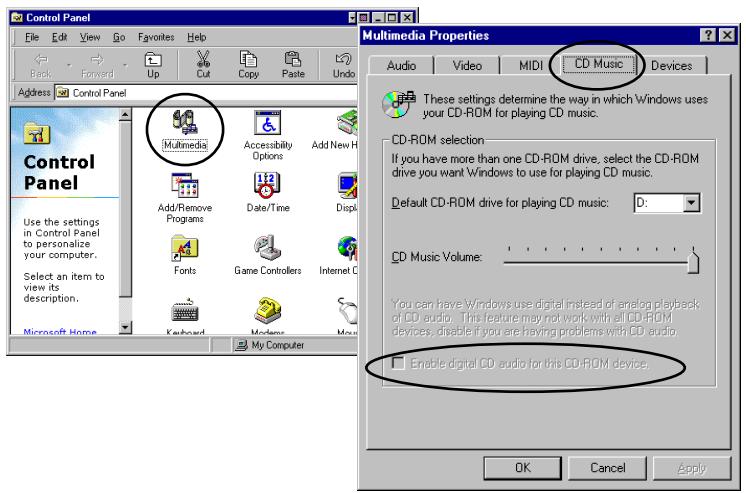

Caution
When this section is grayed out, digital play cannot be used.
9.1.2 Using the CD Player (Windows 2000)
In Windows 2000 you will find the same setting item with Device manager, DVD/CD-ROM drives, TEAC CD-W224EA resp. DW-224E USB device, Properties (the picture below is an example for the TEAC DW-224PUK).
9.1.3 Using the Windows Media Player 7
Select Option in the Tool menu of Windows Media Player 7 and the following window appears. Select CD Audio tab to perform the Digital playback settings.
9.1.4 Using the Windows Media Player 8
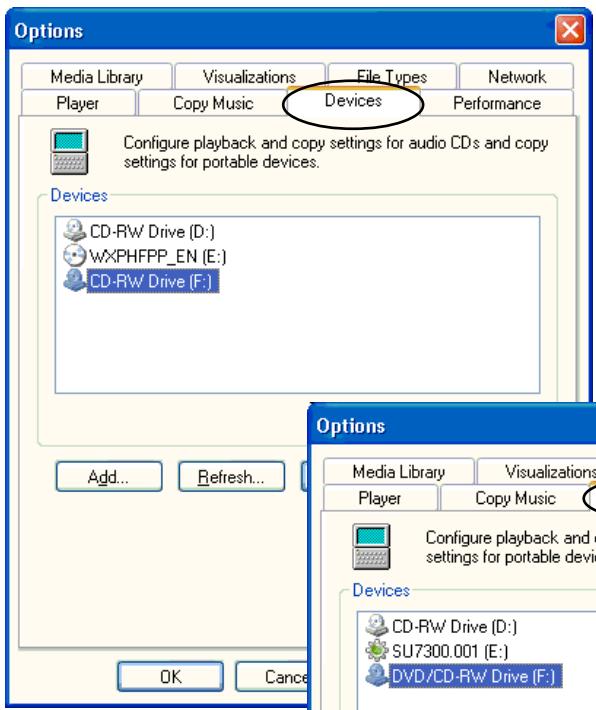
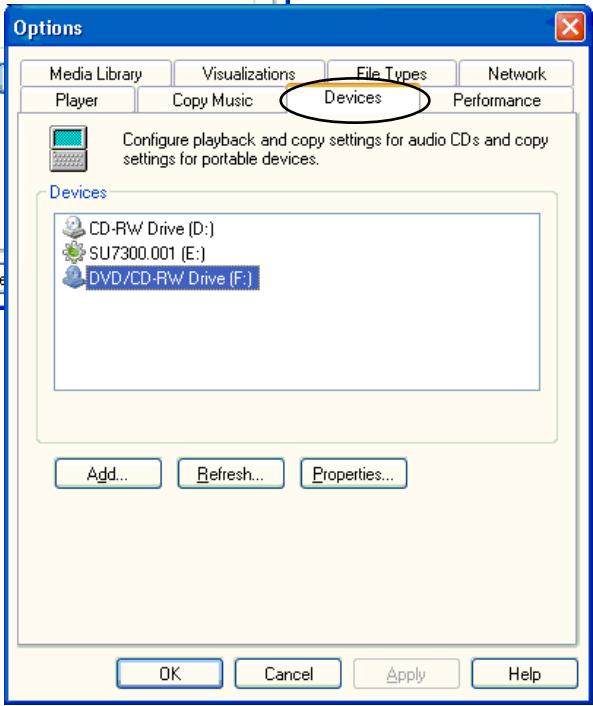
Select Option in the Tool menu of Windows Media Player 8 and the following window appears. Select the Devices tab and select CD-RW Drive (or DVD/CD-RW Drive whichever is indicated) in the drive list. If multiple CD drives are shown, select this drive using the drive letter.
CD-W224PUK
DW-224PUK
When the Properties button is pressed with the drive selected, you can switch between Digital and Analog as shown in the window below.
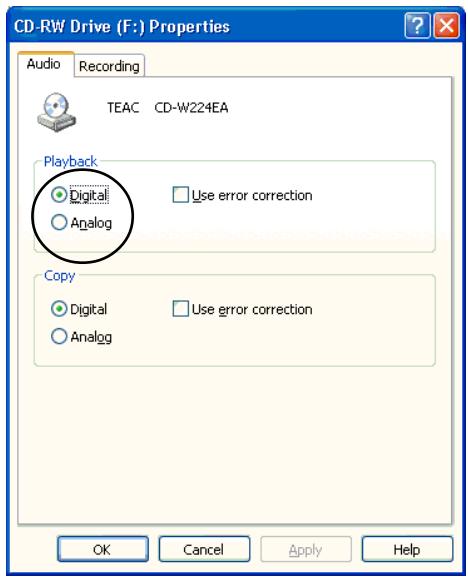
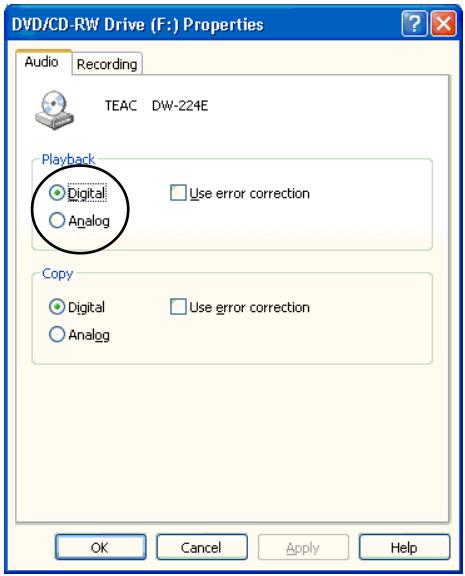
CD-W224PUK
DW-224PUK
9.2 Before using the write function of Windows XP
CD-R/RW write can be performed using Windows XP Explorer or Media Player. Refer to the online help or the instruction manual of Windows XP for detailed operation method. The settings required for using this function are described below:
- Open My Computer and right-click on the drive icon representing your drive. Select Property from the pop-up menu.
-
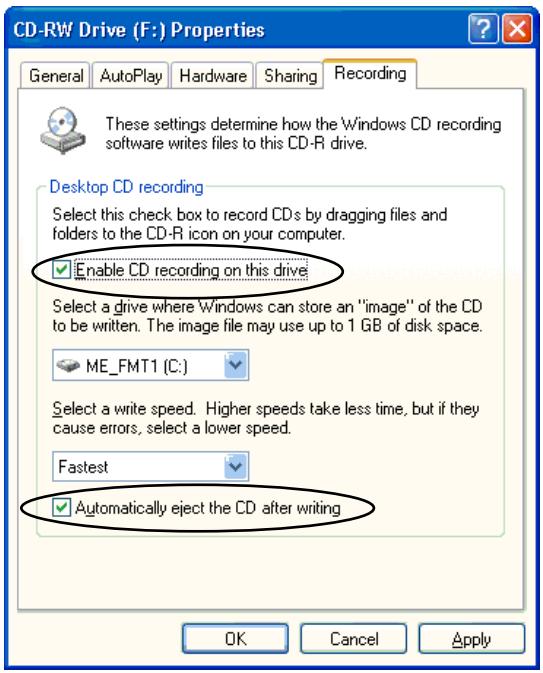
Open the Recording tab and make sure that the following setting items are checked. (the picture shows the window for the CD-W224PUK).
-
Enable CD recording on this drive
- Automatically eject the CD after writing

Do not enable the write function in Windows XP when using B's CLiP5.

Detailed settings cannot be set in the writing function in Windows XP.
It is recommended to use B's Recorder GOLD5 to make the most of the performance of the drive.
Installing the Writer Software
As a general precaution the installation of the hardware has to be carried out as described before. The software installation starts with activating the reading functionality of the drive as this is well known with any conventional CD-ROM drive.
If the reading functionality is available the next installation step is to achieve the writing functionality provided of the writer software. More details according the installation of your writer software you will find in its documentation [Help].
9.3 Suspend/Resume
This drive conforms to the OS-based suspend/resume, however, it may not operate properly depending on your PC environment. In such a case, do not use the suspend function with the drive connected to your computer.
Avoid using the suspend function while the drive is in operation.
- Do not connect or disconnect the drive while the computer is in the suspend mode.
Suspend: This may be called standby, sleep mode or hibernation depending on computers and operating systems.
9.4 Using USB 2.0
An operating system and a personal computer that conforms to the USB 2.0 or a USB 2.0 interface card and a driver are required for the operation using the USB 2.0.
- When using the USB 2.0, a problem in usage may be caused depending on the host card, driver, etc. being used. Use it within the limitation of a connected host card.
Use the appropriate USB 2.0 host card driver after obtaining information from the manufacturer/vendor.
9.5 RPC and Setting of region code (DW-224PUK only)
The RPC (Region Playback Control) specification is for restricting the DVD title play to specific area. In the RPC, areas to play the DVD title are divided into six areas using a number called a region code. This drive uses the RPC2 (Region Playback Control 2) specification. Such drive is called a phase 2 drive. To play DVD titles, it is required that the region code set in the drive is included or agrees with the code the DVD titles have.

Caution
The region code in this product is set to 2 (Europe).
The region code in some DVD titles is set to ALL. Such titles can be played regardless of the region code set in the DVD-ROM drive.
| Region code | Area |
| 1 | United States, Canada |
| 2 | Europe, Japan, Middle East, South Africa |
| 3 | Southeast Asia |
| 4 | Australia, South America |
| 5 | Africa, Russia, other Asian nations |
| 6 | People's Republic of China |
The DVD title package has one of the following logos that indicate an area where its play is allowed.

Can be played in the region code 2 area.

Can be played in areas (2, 3, 4, 5, 6) excluding region code 1.

Can be played in all the areas regardless of region codes.
The region code can be set up to five times. However, as the region code is set to 2 at shipping in this drive, only four settings remain to be selected. Note that when the allowable number of settings is exceeded, the drive region code is fixed to the last set region code.
When you attempt to play a DVD title with a region code different from the drive setting, the window for changing the region code setting appears. When you change the region code in accordance with DVD titles, follow the window instruction to change. The region code can be changed up to four times maximum.
When setting the DVD-Video title with a code different from the set region code, a window appears. Click OK to change the region code to play. When Cancel is clicked, the region code will not be changed and play is not allowed. Refer to the instruction manual of your playing software.
10. MEDIA
10.1 Readable media
The drive can read the following type of media.
CD/CD-ROM
Commercially-available music CD or CD with data for computer such as software installation CD-ROM. Use a music CD conforming to the JIS standard, with a CD log mark on the disc label face.
When using a nonconforming media, a defect may be caused such as a failure to play normally.
CD-R/RW
The drive can read a recorded CD-R or CD-RW media.
DVD-Video/DVD-ROM (DW-224PUK only)
Commercially-available DVD-Video with recorded image or sound, or DVD-ROM media with recorded data such as maps or dictionary.
DVD-R/DVD-RW (DW-224PUK only)
The drive can read recorded DVD-R or DVD-RW media.
The drive cannot write to the DVD-R or DVD-RW media. Note that the drive may not read media recorded with a special format in some cases.
DVD-RAM (DW-224PUK only)
The drive can read a recorded DVD-RAM media. Only reading of the DVD-RAM without a cartridge and one that can be removed from its cartridge (Type 2 and Type 4) is allowed. When reading the media in a cartridge, set the media after removing it from its cartridge. Reading of the DVD-RAM may not be allowed depending on the combination of writing format and the operating system of your computer.
| DVD-RAM Format Operating System | UDF 1.5 | UDF 2.0 | FAT32 |
| Windows 98 Second Edition | can | cannot | can |
| Windows Me | read | read | read |
| Windows 2000 Professional | can | cannot | cannot |
| read | read | read | |
| Windows XP Home Edition | can | can | can |
| Windows XP Professional | read | read | read |
To use the DVD-RAM media created in other formats, a device driver, reading software and so on are required. The usable formats may differ depending on the combination of Windows version used and software. Note that writing on the DVD-RAM media is not possible using this drive.
10.2 CD-R/RW writing speed
The drive can write to commercially-available CD-R or CD-RW media.
With the CD-R media, the content once written cannot be erased. (It can be erased in a pseudo manner, however, available write space will not increase.)
With the CD-RW media, available write space will increase by erasing the written contents, resetting the media back to the original unwritten state or erasing a file written using packet writing. (Erasure of about 1,000 times is possible.) There are two media standards (specifications) in the CD-RW media; the standard called Multi Speed that supports 1X to 4X write speed, and the other called High Speed that supports 4X to 10X write speed.
Supported write speed is generally indicated on the package and so on for the CD-R/RW media. Write within a scope of supported speed of the media used.
Writing speeds for the CD-R media
- 24X speed at the maximum (Zone CLV)
- 16X speed at the maximum (Zone CLV)
- 10X speed (CLV)
- 4X speed (CLV)
Writing speeds for the CD-RW media
Multi Speed (1 to 4X speed) media:
4X speed (CLV)
High Speed (4 to 10X speed) media:
4X speed (CLV)
10X speed (CLV)
■ Writing speed is fixed in the CLV format. In the Zone CLV format (ZCLV), the speed changes gradually from the lowest at the beginning to the maximum speed. The write speed in the Zone CLV format indicates the maximum speed.
The logo shown below is on the media or package of the High Speed CD-RW media (CD-RW media supporting 4X to 10X speed write).

Hiee

When using this drive with the USB1.1 interface, set the writing speed to 4X speed for writing because of its limited data transfer rate. When the drive is set to a speed faster than 4X, it may take more time because of write error prevention processing.
10.3 Supported media
An actual list of media recommended by TEAC can be found at TEACs web site under www.teac.de/support. Please select the menu "CD-Medias".
The drive does not support CD-R media for more than 80 minutes.
- When a Zone CLV write is performed, concentric patterns may appear on the recorded surface due to the change of writing speed depending on the media used.

Caution
Even when using media of which write operation has been confirmed, normal write operation may not be performed due to variations of the product lot etc., or a read using other CD-ROM drives or CD players cannot be performed due to the deterioration of the write quality of the CD-R/RW media. It is recommended that you check the contents of data after writing to a CD-R/RW media.
11. SUPPORT AND SERVICE
This product has been produced under strict quality control and you can use it worry-free under normal conditions.
If you need any repair, contact the representative from whom you purchased the drive or our technical service depots.
11.1 Warranty period
The free warranty period of this drive is described in the warranty document. Be sure to include the warranty with the drive when sending it for repair if within the warranty period. Refer to the warranty for details.
11.2 Requests for repair
If you think you need a repair, please let us know details about the defect after checking the corresponding operation in accordance with the instruction manual.
When you ship or bring the drive to our sales dealer or service depot, it is most safe to use the original packing box in which the drive was packed when you purchased it. However, damage incurred during transportation is not covered in the warranty.
If the packing box is not available, pack the drive using the following method.
1) Use a corrugated cardboard box, etc. with sufficient margins in width, depth, and height.
2) Insert cushioning material around the drive inside the box to prevent damage due to vibrations or shock during transportation.
3) Attach the warranty within the warranty period.
11.3 Technical Service Depots (Europe)
TEAC Deutschland GmbH, DSPD (Germany)
Technical Support Tel: 0180 5 999 588 (DM 0.24/min (Germany))
Mo-Fr
from
8:30 - 20:00 CET
Sa
from 10:00 - 16:00 CET
Technical Support Fax: +49 (0) 611 7158 666
Online RMA: http://www.teac.de/RMA
Internet: http://www.teac.de/support
TEAC UK LIMITED, DSPD (U.K.)
Technical Support Freecall: 0800 08 53 704 (U.K. only)
Mo-Fr
from
8:30 - 20:00 CET
Sa
from 10:00 - 16:00 CET
Technical Support Fax: +49 (0) 611 7158 666
Online RMA: http://www.teac.de/RMA
Internet: http://www.teac.de/support
TEAC FRANCE S.A. (France)
Technical Support Tel: +33 (0) 155590155
Mo-Fr
from 9:00 – 16:00 CET
Technical Support Fax: +33 (0) 1 55 59 01 56
Online RMA: http://www.teac.de/RMA
Internet: http://www.teac.de/support
Contact us by email: Support@teac.fr
All other countries please call:
+49 611 7158 600
12. SPECIFICATION
12.1 General specification
| Power supply | AC adapter | AC 100V±10% 50/60Hz |
| Input power | During read/write | 10W |
| Environmental condition | ||
| Ambient Temperature | Operating | 10°C to 40°C |
| Non-operating | -20°C to 60°C | |
| Temperature gradient | Operating | 11°C or less/hour (non-condensing) |
| Non-operating | 20°C or less/hour (non-condensing) | |
| Relative humidity | Operating | 8% to 80% (non-condensing) Maximum wet bulb temperature: 29°C or less |
| Non-operating | 5% to 95% (non-condensing) Maximum wet bulb temperature: 29°C or less | |
| Vibration | Operating | 1.96m/s² (0.2G) or less |
| Non-operating | 19.6m/s² (2G) or less | |
| Shock | Operating | CD-W224PUK: 68.0m/s² (7G) or less DW-224PUK: 49m/s² (5G) or less |
| During Audio playback | 19.6m/s² (2G) or less | |
| Non-operating | 588m/s² (60G) or less (half-sine wave 11ms or less in either case) | |
| Dimensions | CD-W224PUK | 138 (W) × 23 (H) × 180 (D) mm |
| DW-224PUK | 138 (W) × 23 (H) × 185 (D) mm | |
| Weight | app. 420 g (without an interface cable) | |
12.2 Functional specification
| Applicable disc format Read | CD-DA, CD-ROM Mode-1 CD-ROM XA Mode-2 (Form-1, Form-2) Mixed Mode CD, Photo CD multi-session, CD-TEXT, CD-I, Video CD, CD Extra (CD Plus) | |
| DW-224PUK only: | DVD-ROM, DVD-Video, DVD-R (General, Authoring), DVD-RW (ver. 1.1), DVD-RAM*1 | |
| Applicable disc format Write*2 | CD-DA, CD-ROM Mode-1 CD-ROM XA Mode-2 (Form-1, Form-2) Mixed Mode CD, Photo CD multi-session*3, CD-TEXT, CD-I, Video CD, CD Extra (CD Plus) | |
| Applicable disc type | Type | Pressed CD (CD-ROM, CD-DA) CD-R, CD-RW |
| DW-224PUK only: | DVD-ROM, DVD-R, DVD-RW, DVD-RAM | |
| Size | 12cm, 8cm | |
| Interface | USB1.1 / USB2.0 (High Speed) | |
| Data transfer speed | USB1.1: 1.5MB/s = 12Mbit/s USB2.0: 60MB/s = 480Mbit/s | |
1 DVD-RAM read may be limited in some cases depending on your environment including media format type, operating system used, etc.
2 Backup of some CDs is not allowed even if their format is supported.
*3 An original CD of the Photo CD format cannot be created.
| Read speed | |
| CD-ROM read*4 | 3,600KB/s (maximum at 24 x) |
| 24 x CAV | CD-ROM (Mode-1) |
| CD-ROM XA (Mode-2, Form-1) | |
| 8 x CLV | CD-ROM XA (Mode-2, Form-2) |
| CD-DA (Digital Audio Extraction) | |
| CD-RW | |
| DW-224PUK only: | |
| DVD-ROM read | 10,816KB/s (maximum at 8xCAV) |
| 8 x CAV | DVD-ROM, DVD-R, DVD-RW |
| 5 x CAV | DVD-RAM |
| 4 x CAV | DVD-Video |
| Write speed | |
| CD-R/RW write*4 | 3,600KB/s (maximum at 24xZCLV) |
| CD-R | 24xZCLV/16xZCLV/10xCLV/4xCLV |
| CD-RW | 10xCLV/4xCLV (High Speed) |
| 4xCLV (Multi Speed) | |
| Write mode | Disc-at-once, Session-at-once, |
| Track-at-once, Multi-session, | |
| Packet write | |
| Access time (average) | 90ms (during CD-ROM 24x read) |
| DW-224PUK only: | |
| 110 ms (during DVD-ROM 8x read) | |
| Data buffer | 2MB |
| (Memory capacity used for writing software becomes less than specified) | |
| Line output CD-W224PUK | 0.75Vrms±3dB (at a load of 10kOhm) |
| ø3.5mm stereo mini jack | |
| Line output DW-224PUK | 0.8Vrms±3dB (at a load of 47kOhm) |
| ø3.5mm stereo mini jack | |
| Others | Buffer under run proof function incorporated |
*4 Sufficient speed may not be obtained when reading or writing to the media recorded using packet writing.
When the drive is connected to the USB 1.1 interface, the speed will be limited by the USB 1.1 interface speed.
- Portable USB CD-RW/DVD-ROM
- Drive DW-224PUK
- Portable USB CD-RW Drive
- CD-W224PUK
- CONTENTS
- TO THE USER
- PRECAUTIONS
- LICENSE AGREEMENT/WARRANTY FOR PROVIDED DEVICE DRIVER SOFTWARE
- IMPORTANT: PLEASE READ THIS AGREEMENT CAREFULLY.
- Grant of License.
- Restrictions.
- Termination.
- Copyright.
- Limited Warranty.
- No Liability for Consequential Damages.
- Upper Limit of Responsibility
- Other.
- BEFORE USING
- Computers to connect
- Conforming Operating Systems
- Checking the USB controller
- In Windows 98SE or Windows Me
- Click the Device Manager tab.
- In Windows 2000
- In Windows XP
- 2.PRODUCT OUTLINE
- The Specification of TEAC CD-W224PUK
- - Easy connection
- The Specification of TEAC DW-224PUK
- Procedure Outline for Installation and Operation
- COMPONENTS
- Precautions when unpacking the package
- Package List
- PRECAUTIONS FOR SETTING AND HANDLING
- Daily Maintenance
- NAMES AND FUNCTIONS
- Front panel/top
- Rear panel
- AC Adapter
- USB Cable
- SETTING UP THE DRIVE
- Connecting the Cables
- Connection of the line output
- Disconnecting the Drive
- Driver installation under Windows 98SE/Windows Me
- "Manual" Driver Installation under Windows 98SE
- "Manual" Driver Installation under Windows 98 Me (DW-224PUK only)
- Uninstalling in Windows 98SE
- CD-W224PUK Driver Installation under Windows 98SE
- Driver installation under Windows 2000
- Driver installation under Windows XP
- PRECAUTIONS IN HANDLING THE MEDIA
- SETTING AND REMOVING THE MEDIA
- Setting the Media
- Removing the media
- OPERATION
- Playing Music CDs
- Using the CD Player (Windows 98 Second Edition)
- Using the CD Player (Windows 2000)
- Using the Windows Media Player 7
- Using the Windows Media Player 8
- Before using the write function of Windows XP
- Installing the Writer Software
- Suspend/Resume
- Using USB 2.0
- RPC and Setting of region code (DW-224PUK only)
- MEDIA
- Readable media
- CD-R/RW writing speed
- Supported media
- SUPPORT AND SERVICE
- Warranty period
- Requests for repair
- Technical Service Depots (Europe)
- SPECIFICATION
- General specification
- Functional specification
Marque : TEAC
Modèle : DW-CD224PU
Catégorie : Lecteur de CD externe