SP AF 200-500MM F 5-6.3 DI LD - Objectif photo TAMRON - Notice d'utilisation et mode d'emploi gratuit
Retrouvez gratuitement la notice de l'appareil SP AF 200-500MM F 5-6.3 DI LD TAMRON au format PDF.


| Type de produit | Objectif photo |
| Marque | Tamron |
| Modèle | SP AF 200-500 mm F/5-6.3 Di LD (Model A08) |
| Focale | 200-500 mm |
| Ouverture maximale | f/5-6.3 |
| Construction optique | 10 lentilles en 13 groupes |
| Angle de champ | 12°5' (à 500 mm) |
| Distance minimale de mise au point | 2,5 m (sur toute la plage focale) |
| Rapport de grossissement maximal | 1:5,0 (à 500 mm) |
| Diamètre de filtre | 86 mm |
| Diamètre max. | 93,5 mm |
| Longueur | 224,5 mm (sans adaptateur FEC) |
| Poids | 1226 g (sans adaptateur FEC) |
| Monture | Nikon, Canon, Minolta (selon modèle) |
| Adaptateur FEC | Inclus (Filter Effect Control) |
| Système de mise au point | Interne (IF) |
| Types de mise au point | Autofocus et manuel (commutateur AF/MF) |
| Verrouillage du zoom | Oui, position 200 mm |
| Pare-soleil | Amovible et réversible |
| Collier de pied | Rotatif avec fixation pour trépied |
| Entretien | Nettoyer avec un chiffon en silicone ou un soufflet ; éviter les solvants organiques |
| Précautions | Ne pas forcer la mise au point en mode AF ; ne pas transporter par le pare-soleil |
| Réparabilité | Consulter un atelier de réparation agréé Tamron |
FOIRE AUX QUESTIONS - SP AF 200-500MM F 5-6.3 DI LD TAMRON
Questions des utilisateurs sur SP AF 200-500MM F 5-6.3 DI LD TAMRON
0 question sur cet appareil. Repondez a celles que vous connaissez ou posez la votre.
Poser une nouvelle question sur cet appareil
Téléchargez la notice de votre Objectif photo au format PDF gratuitement ! Retrouvez votre notice SP AF 200-500MM F 5-6.3 DI LD - TAMRON et reprennez votre appareil électronique en main. Sur cette page sont publiés tous les documents nécessaires à l'utilisation de votre appareil SP AF 200-500MM F 5-6.3 DI LD de la marque TAMRON.
MODE D'EMPLOI SP AF 200-500MM F 5-6.3 DI LD TAMRON
1
2
3
4
5
6
7
8
9
10
11
C
The Cc Marking is a directive conformity mark of the European Community (EC).
Das Cz-Zeichen entspricht der EC Norm. :Le marquage (C) est un marquage de conf
La marca es marca de conformidad segun directiva de la Comunidad Europea(CE).
Il marchio C' attesta la conformita alla direcittiva della Comunita Europea(CEE).
CE标志表示符合欧州共同体(BC)指标

The EEC Conformity Report applies to the Council Directive 98/336/EEC, 92/31/EEC, 93/68/EEC and is used by Tamron Co., Ltd., manufacturer of this product.
SP AF200-500mm F/5-6.3 Di LD [IF] (Model A08)
| 5.0 | 5.6 | 8 | 11 | 16 | 22 | 32 | |||||||||
| 2.5m | 2.48 | 2.53 | 2.47 | 2.53 | 2.46 | 2.54 | 2.45 | 2.55 | 2.43 | 2.58 | 2.40 | 2.61 | 2.36 | 2.66 | |
| 200mm | 3m | 2.96 | 3.04 | 2.96 | 3.04 | 2.95 | 3.06 | 2.93 | 3.08 | 2.89 | 3.12 | 2.85 | 3.16 | 2.79 | 3.24 |
| 4m | 3.94 | 4.07 | 3.93 | 4.07 | 3.90 | 4.10 | 3.87 | 4.14 | 3.81 | 4.21 | 3.74 | 4.30 | 3.63 | 4.45 | |
| 5m | 4.90 | 5.11 | 4.89 | 5.11 | 4.85 | 5.17 | 4.79 | 5.23 | 4.70 | 5.34 | 4.60 | 5.48 | 4.43 | 5.73 | |
| 7m | 6.80 | 7.21 | 6.72 | 7.23 | 6.70 | 7.22 | 6.56 | 7.47 | 6.42 | 7.70 | 6.26 | 8.00 | 5.96 | 6.55 | |
| 10m | 9.60 | 10.4 | 9.56 | 10.5 | 9.39 | 10.7 | 9.18 | 11.0 | 8.85 | 11.5 | 8.48 | 12.2 | 7.93 | 13.5 | |
| 20m | 18.4 | 21.9 | 18.3 | 22.0 | 17.7 | 23.0 | 16.9 | 24.4 | 15.8 | 27.2 | 14.7 | 31.4 | 13.1 | 42.4 | |
| 159 | 150 | 116 | 89.8 | 65.4 | 49.4 | 35.0 | |||||||||
| 5.5 | 5.6 | 8 | 11 | 16 | 22 | 32 | |||||||||
| 2.5m | 2.48 | 2.52 | 2.48 | 2.52 | 2.48 | 2.53 | 2.47 | 2.54 | 2.45 | 2.55 | 2.43 | 2.57 | 2.40 | 2.61 | |
| 3m | 2.98 | 3.03 | 2.98 | 3.03 | 2.96 | 3.04 | 2.95 | 3.05 | 2.93 | 3.08 | 2.90 | 3.10 | 2.86 | 3.15 | |
| 4m | 3.96 | 4.05 | 3.95 | 4.05 | 3.94 | 4.07 | 3.91 | 4.09 | 3.87 | 4.14 | 3.83 | 4.19 | 3.75 | 4.28 | |
| 5m | 4.93 | 5.07 | 4.93 | 5.07 | 4.90 | 5.11 | 4.86 | 5.15 | 4.80 | 5.22 | 4.73 | 5.30 | 4.62 | 5.45 | |
| 7m | 6.86 | 7.14 | 6.86 | 7.15 | 6.82 | 7.21 | 6.79 | 7.29 | 6.61 | 7.44 | 6.46 | 7.61 | 6.23 | 7.93 | |
| 10m | 9.72 | 10.3 | 9.71 | 10.3 | 9.59 | 10.4 | 9.45 | 10.6 | 9.22 | 10.9 | 8.96 | 11.3 | 8.56 | 12.0 | |
| 20m | 18.9 | 21.2 | 18.9 | 21.3 | 18.4 | 21.9 | 17.9 | 22.6 | 17.1 | 24.1 | 16.2 | 26.1 | 14.9 | 30.3 | |
| 203 | 200 | 160 | 127 | 94.9 | 72.8 | 52.4 | |||||||||
| 5.7 | 5.8 | 8 | 11 | 16 | 22 | 32 | 45 | ||||||||
| 2.5m | 2.49 | 2.51 | 2.49 | 2.52 | 2.48 | 2.53 | 2.48 | 2.53 | 2.47 | 2.54 | 2.45 | 2.55 | 2.43 | 2.57 | |
| 3m | 2.98 | 3.02 | 2.98 | 3.03 | 2.97 | 3.03 | 2.97 | 3.05 | 2.93 | 3.07 | 2.90 | 3.11 | 2.86 | 3.15 | |
| 4m | 3.97 | 4.03 | 3.95 | 4.05 | 3.94 | 4.06 | 3.91 | 4.09 | 3.88 | 4.13 | 3.82 | 4.19 | 3.76 | 4.28 | |
| 5m | 4.95 | 4.05 | 4.05 | 4.07 | 4.00 | 4.07 | 4.00 | 4.06 | 4.06 | 4.15 | 4.01 | 4.23 | 3.92 | 4.42 | |
| 7m | 6.92 | 7.10 | 6.86 | 7.15 | 6.86 | 7.20 | 6.81 | 7.30 | 6.61 | 7.42 | 6.42 | 7.62 | 6.28 | 7.31 | |
| 10m | 9.80 | 10.2 | 9.72 | 10.3 | 9.61 | 10.4 | 9.45 | 10.6 | 9.26 | 10.9 | 8.95 | 11.3 | 8.59 | 12.0 | |
| 20m | 19.2 | 20.9 | 18.9 | 21.3 | 18.5 | 21.8 | 17.9 | 22.7 | 17.2 | 23.9 | 16.2 | 26.2 | 15.0 | 29.9 | |
| 243 | 202 | 165 | 127 | 98.8 | 72.4 | 53.7 | |||||||||
| 5.9 | 5.8 | 8 | 11 | 16 | 22 | 32 | 45 | ||||||||
| 2.5m | 2.49 | 2.51 | 2.49 | 2.51 | 2.48 | 2.52 | 2.48 | 2.53 | 2.47 | 2.54 | 2.45 | 2.56 | 2.43 | 2.58 | |
| 3m | 2.99 | 3.01 | 2.98 | 3.02 | 2.97 | 3.03 | 2.96 | 3.04 | 2.95 | 3.05 | 2.92 | 3.08 | 2.90 | 3.11 | |
| 4m | 3.98 | 4.03 | 3.97 | 4.04 | 3.95 | 4.05 | 3.93 | 4.07 | 3.91 | 4.10 | 3.87 | 4.14 | 3.82 | 4.20 | |
| 5m | 4.95 | 5.04 | 4.96 | 5.06 | 4.94 | 5.06 | 4.93 | 5.08 | 4.96 | 5.11 | 4.88 | 5.12 | 4.71 | 5.32 | |
| 7m | 6.92 | 7.08 | 6.90 | 7.11 | 6.86 | 7.15 | 6.86 | 7.15 | 6.79 | 7.22 | 6.72 | 7.30 | 6.60 | 7.45 | |
| 10m | 9.84 | 10.2 | 9.79 | 10.2 | 9.71 | 10.3 | 9.58 | 10.5 | 9.44 | 10.6 | 9.20 | 11.0 | 8.91 | 11.4 | |
| 20m | 19.4 | 20.7 | 19.2 | 20.9 | 18.9 | 21.3 | 18.4 | 21.9 | 17.9 | 22.7 | 17.0 | 24.2 | 16.1 | 26.5 | |
| 277 | 240 | 200 | 158 | 125 | 93.4 | 70.2 | |||||||||
| 6.1 | 6.1 | 8 | 11 | 16 | 22 | 32 | 45 | ||||||||
| 2.5m | 2.49 | 2.51 | 2.49 | 2.51 | 2.49 | 2.52 | 2.48 | 2.52 | 2.47 | 2.53 | 2.46 | 2.54 | 2.44 | 2.56 | |
| 3m | 2.99 | 3.01 | 2.99 | 3.02 | 2.98 | 3.02 | 2.97 | 3.03 | 2.96 | 3.04 | 2.94 | 3.06 | 2.92 | 3.09 | |
| 4m | 3.98 | 4.02 | 3.97 | 4.03 | 3.96 | 4.04 | 3.95 | 4.06 | 3.93 | 4.08 | 3.90 | 4.11 | 3.85 | 4.16 | |
| 5m | 4.95 | 5.04 | 4.96 | 5.04 | 4.94 | 5.06 | 4.93 | 5.09 | 4.96 | 5.12 | 4.87 | 5.17 | 4.77 | 5.25 | |
| 7m | 6.94 | 7.06 | 6.92 | 7.08 | 6.89 | 7.12 | 6.84 | 7.17 | 6.78 | 7.23 | 6.69 | 7.35 | 6.57 | 7.50 | |
| 10m | 9.87 | 10.1 | 9.84 | 10.2 | 9.77 | 10.2 | 9.68 | 10.4 | 9.56 | 10.5 | 9.37 | 10.7 | 9.14 | 11.0 | |
| 20m | 19.5 | 20.5 | 19.4 | 20.7 | 19.1 | 21.0 | 18.7 | 21.4 | 18.3 | 22.0 | 17.6 | 23.1 | 16.8 | 24.6 | |
| 306 | 273 | 233 | 187 | 152 | 115 | 87.7 | |||||||||
| 6.2 | 6.2 | 8 | 11 | 16 | 22 | 32 | 45 | ||||||||
| 2.5m | 2.49 | 2.51 | 2.49 | 2.51 | 2.49 | 2.51 | 2.48 | 2.52 | 2.48 | 2.52 | 2.47 | 2.54 | 2.45 | 2.55 | |
| 3m | 2.99 | 3.01 | 2.99 | 3.01 | 2.98 | 3.02 | 2.98 | 3.03 | 2.97 | 3.03 | 2.95 | 3.05 | 2.93 | 3.07 | |
| 4m | 3.98 | 4.02 | 3.98 | 3.02 | 3.97 | 3.03 | 3.96 | 3.04 | 3.94 | 3.06 | 3.92 | 3.09 | 3.08 | 3.13 | |
| 5m | 4.95 | 5.03 | 4.96 | 5.03 | 4.95 | 5.05 | 4.97 | 5.07 | 4.95 | 5.09 | 4.89 | 5.14 | 4.82 | 5.20 | |
| 7m | 6.95 | 7.05 | 6.94 | 7.07 | 6.91 | 7.09 | 6.87 | 7.13 | 6.82 | 7.19 | 6.75 | 7.27 | 6.65 | 7.39 | |
| 10m | 9.90 | 10.1 | 9.87 | 10.1 | 9.82 | 10.2 | 9.74 | 10.3 | 9.65 | 10.4 | 9.49 | 10.6 | 9.30 | 10.8 | |
| 20m | 19.6 | 20.4 | 19.5 | 20.5 | 19.3 | 20.8 | 19.0 | 21.1 | 18.6 | 21.6 | 18.1 | 22.4 | 17.4 | 23.5 | |
| 332 | 302 | 263 | 216 | 178 | 138 | 107 | |||||||||
| 6.3 | 6.3 | 8 | 11 | 16 | 22 | 32 | 45 | ||||||||
| 2.5m | 2.49 | 2.51 | 2.49 | 2.51 | 2.49 | 2.51 | 2.48 | 2.52 | 2.48 | 2.52 | 2.47 | 2.53 | 2.46 | 2.54 | |
| 3m | 2.99 | 3.01 | 2.99 | 3.01 | 2.99 | 3.02 | 2.98 | 3.02 | 2.97 | 3.03 | 2.96 | 3.04 | 2.94 | 3.06 | |
| 4m | 3.98 | 4.02 | 3.98 | 3.02 | 3.97 | 3.03 | 3.96 | 3.04 | 3.95 | 3.05 | 3.93 | 3.08 | 3.00 | 3.11 | |
| 5m | 4.98 | 5.02 | 4.97 | 5.03 | 4.96 | 5.04 | 4.94 | 5.06 | 4.92 | 5.08 | 4.89 | 5.12 | 4.84 | 5.17 | |
| 7m | 6.96 | 7.04 | 6.94 | 7.06 | 6.92 | 7.08 | 6.89 | 7.11 | 6.85 | 7.16 | 6.78 | 7.23 | 6.70 | 7.33 | |
| 10m | 9.91 | 10.1 | 9.89 | 10.1 | 9.85 | 10.2 | 9.78 | 10.2 | 9.70 | 10.3 | 9.57 | 10.5 | 9.40 | 10.7 | |
| 20m | 19.7 | 20.4 | 19.6 | 20.5 | 19.4 | 20.6 | 19.1 | 20.9 | 18.6 | 21.3 | 18.4 | 22.0 | 17.8 | 22.9 | |
| 349 | 322 | 284 | 237 | 198 | 155 | 121 | |||||||||
Thank you for purchasing the Tamron lens as the latest addition to your photographic equipment. Before using your new lens, please read the contents of this Owner's Manual. This manual will be highly useful in helping you choose the best lens for your specific needs. For more proper techniques for creating the best quality images possible, With proper handling and use of Tamron lens will give you many years of photographing beautiful and exciting pictures.
-
Explains precautions that help to prevent problems.
-
Explains things you should know in addition to basic operations.
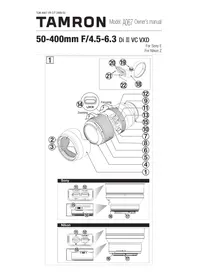
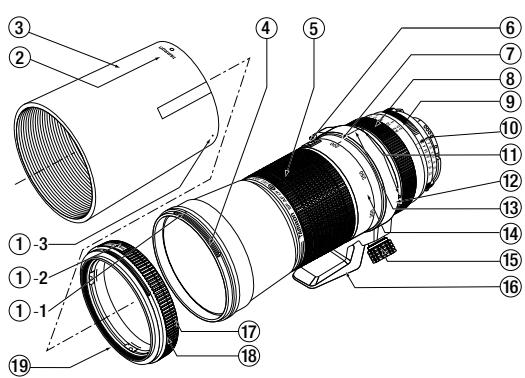
NOMENCLATURE (Refer to Fig. 1, if not specified)
1-1 Hood attaching alignment mark (on lens) 2-1 Hood attaching alignment mark (on FEC)
① 3 Hood attaching alignment ② Hood attachment mask
Lens hood
Hood filter ring
⑤Zoom ringing
Zoom lock switch
⑦Zoom ind
Focusing ring
Distance scale
Aperture index (Nikon) Tripod mount horizontal
Tripod mount ring
Tripod mount mark
Distance index
Tripod socket fixing screw
Tripod socket
FEC attaching ring
FEC ring
Filter Effect Control (FEC) adapter
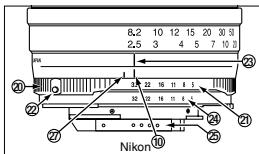
Aperture ring (Nikon)
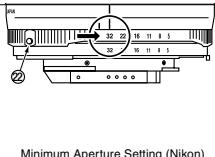
Aperture scale (Nikon) Aperture disk button (Nikon)
Distance index
Aperture scale for finder display (Nikon)
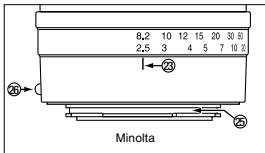
Lens mount / Lens mount contacts
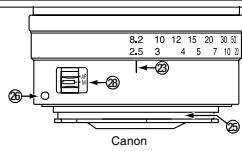
Lens attachment mark (Canon, Minolta)
密 Aperture mark for long focal lengths (Nikon)
AF-MF switch (Canon)
SPECIFICATIONS
| A08 | A08 | ||
| Focal Length | 200-500 mm | Filter Size | 86 mm |
| Maximum Aperture | 4/5-6.3 | Length | 224.5 mm (Except for the FEG adapter) |
| Angle of View | 12° 5' | Diameter | 93.5 mm |
| Lens Construction | 10/13 | Weight | 1226 g (Except for the FEG adapter) |
| Minimum Object Distance | 2.5 m (8.208) (Full zoom range) | ||
Maximum Magnification Ratio 1:5.0 (at 500 mm)
Lengths, diameters and weights listed in lens specifications are for lenses with Nikon mounts.
- Features and cosmetic designs of lenses listed in this owner's manual may be revised without notice.
ATTACHING AND REMOVING THE LENS
How to mount the lens
Remove the rear lens cap and align the lens attachment mark on the lens barrel with its counterpart on the camera mount and insert the lens. Rotate the lens clockwise until it click-locks. For Nikon model, align the lens attachment mark on the camera and the aperture index on the lens to attach the lens.
How to detach the lens
Pressing the lens release button on the camera down, turn the lens counter-clockwise (in case of Nikon lens, clockwise), and lift the lens off the camera's lens mount.
For further details, please read the instruction manual of your camera.
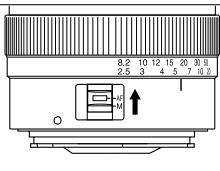
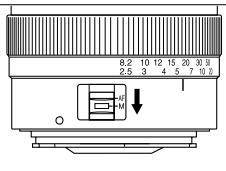
FOCUSING (Autofocus) (Ref. Fig. 2)
Switch the camera to the autofocus mode (AF). Press the shutter button lightly while viewing through the camera's viewfinder, the lens focuses automatically. An in-focus mark will light when lens focuses on the main subject sharply. Press the shutter button further to photograph.
- When set on AF mode, be very careful not to hinder the autofocusing movements of the lens. Such an interference may cause serious damage to the lens mechanism.
- Select between the autofocus and manual focus modes by using the AF/MF switch on the lens barrel. The lens barrel is a Minolta lens. The lens for Canon cameras has an AF-MF switch ⑦ on the lens barrel.
For further details, please read the Instruction manual of your camera.
FOCUSing (Manual Focus) (Ref. Fig. 3)
Switch the camera to manual focusing mode (MF) in case of a Nikon or Minolta. In case of Canon, switch to MF by using AF-MF switch on the lens barrel. Focus manually rotating the focusing ring while viewing through the camera's viewfinder. The main subject in the viewfinder will be sharp when the lens is focused correctly.
- Press the shutter button lightly while operating the lens for focusing. The focus aid mark in the viewfinder will light up when the subject is in a critical focus.
- At infinity, make sure the image in the viewfinder appears sharp. The infinity position on the lens is made with certain allowances to insure proper focus under a variety of conditions.
For further details, please read the instruction manual of your camera.
LENS APERTURE AND AE MODE (Ref. Fig. 4)
Setting lens f-numbers with Canon & Minolta cameras
Set the 1-number with the aperture setting device of the camera body in accordance with the selected photographing mode.
Setting lens f-numbers with Nikon
Depending on the photography mode, it is possible to set the aperture on either the lens aperture ring or on the camera body, or the both.
- Setting the aperture on the lens aperture ring
Move the lens aperture ring from the smallest aperture, and align it with the mark for the desired aperture.
- Setting the aperture on the camera
Move the lens aperture ring from the smallest aperture, and set the desired aperture on the camera.
For further details, please read the instruction manual of your camera.
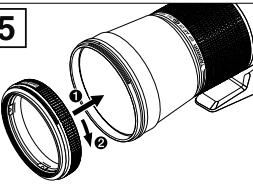
FILTER EFFECT CONTROL (FEC) ADAPTER (Ref. Fig. 5)
The FEC adapter has been made standard equipment for the A08 and allows a filter to be attached to the filter attached. By rotating the FEC ring, the filter attached such as PL filter can be adjusted.
-
The FEC adapter can be attached using the filter screw on the lens. Please note that for a particular application, tightening it too far may strip the threads making it impossible to remove the adapter.
-
Firmly tighten the FEC adapter when attaching it. If it is not firmly tightened, then it may come off when attaching or removing the hood.
-
You can use filters other than the PL filter (such as the cross filter) in the same manner.
■ Attaching and Removing the FEC Adapter
Attaching
1) Screw the FEC adapter to the hood filter ring in the same way as the filter.
2) Rotate the FEC adapter ⑨ clockwise.
3) The FEC adapter ⑨ attaches to the lens.
Removing
1) Turn the FEC attaching ring ⑦ counterclockwise.
2) The FEC adapter comes away from the lens.
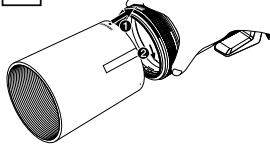
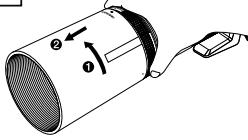
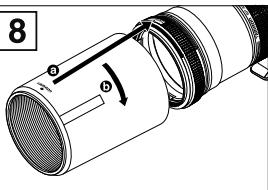
LENS HOOD (Ref. Figs. 6, 7, 8 & 9)
■ Attaching the lens hood when the FEC adapter is not attached
1) Align the attaching mark ① - 3 () on the hood and the hood attaching alignment mark ① -1 () on the lens, then mount the hood evenly.
2) Turn the hood (approx. 90^ ) until the hood attachment mark "TAMRON." and turn the hood (approx. 10^ ) until the hood attachment mark 1 ( ) on the lens lines up and you hear a click when the hood is fixed.
■ Removing when the FEC adapter is not attached
1) Firmsly turn the hood in a counterclockwise direction until you hear a click to release it.
2) Then turn the hood attaching alignment (approx. 90^ ) to remove it.
■ Attaching the lens hood when the FEC adapter is attached
1) Hold the FEC ring ③ firmly with one hand so that it does not turn.
2) Line up the hood attaching alignment mark 1· 3· (+) on the hood and the hood attaching alignment mark 0· 2 "TAMRON" ^+ on the FEC, then mount the hood
3) Turn the hood (approx. 90^ ) until the hood attachment mark © TAMRON . and the hood attaching alignment mark © 2 - TAMRON * on the FEC lines up and you can see the details in Figure 1.
■ Removing the lens hood when the FEC adapter is attached
1) Hold the FEC ring firmly with one hand so that it does not turn.
2) Firmly turn the hood in a counterclockwise direction until you hear a click to release it.
3) Then turn the hood (approx. 90^ ) to remove it.
Stowing the lens hood
You can reverse and attach the lens hood when it is stowed.
1) Reverse the hood and align the hood attachment mark "TAMRON with the hood attaching alignment mark (O - 1)^ on the lens and mount it. "The mark on the FEC ring is -2 "TAMRON when the FEC adapter is attached.
2) Rotate the hood clockwise (approximately 90^ ), the hood is difficult to pull off completely because of the construction the hood will not be fixed when attached backwards.
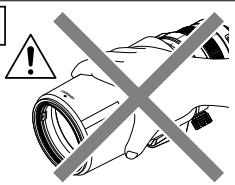
- The hood for the A08 does not lock when it is reversed due to the structural configuration. When carrying the lens, be sure to hold the lens firmly. If you carry it by the hood portion only, the hood may come off the lens causing it to fall. Do not do this as it may cause bodily harm or substantial damage to the lens.
ZOOMING
Rotate the zoom ring ⑤ of the lens while viewing through the camera's viewfinder and compose your image at the chosen focal length.
ZOOM LOCK SWITCH (A08) (Ref. Figs. 1 - a & b)
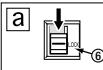
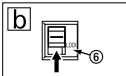
Model A08 is equipped with a zoom lock mechanism that prevents the lens barrel from moving in the direction of the camera. The zoom lock mechanism is used to prevent the lens barrel from moving too far from the 200mm position to prevent the lens from extending while hanging around the neck.
1) Locking: Set the zoom ring on the lens to the 200 - mm position. Move the zoom lock lever to the left and the zoom lever to the right. The barrel is locked in position when the portion beneath 'Lock' is shown in red. (Fig. ③)
2) Releasing: Push the zoom lock switch ⑥ up. The red indicator is hidden, the zoom lock switch ⑨ lock is released and the zoom ring ① can be rotated.(Fig.1b)
- The zoom lock switch can not be activated unless the lens is set to the 200mm position. Do not force the lock switch or try to rotate the lens barrel while locked. Doing so may cause damage to the lens.
-
The zoom lock mechanism is made to prevent the lens barrel from extending while contacting the neck. When not locking in the 200mm position, the lens may change its focal length during a long time exposure when angled in the low or high position.
-
The lens can be used in the 200-mm setting for picture taking even while in the zoom lock position.
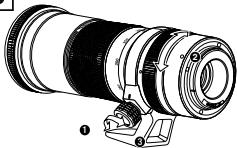
TRIPOD SOCKET(Ref.Figs.10,11)
The A08 comes equipped with a socket for using a tripod. Firmly fix the lens tripod mount to the tripod attaching screw when using a tripod.
Changing the vertical and horizontal position of the camera
1) Turn the tripod socket fixing screw in a counterclockwise direction to loosen it. (Fig. 2 - ①)
2) Rotate the camera using the lens as the axis and line up the indicator on the tripod mount mark ⑤ using the vertical or horizontal indicators ① (Fig. ② - ③).
3) Tighten the tripod socket fixing screw in a clockwise direction and lock the camera into place. (Fig. ①-③)
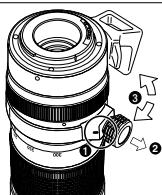
■Removing the tripod socket
1) Turn the tripod socket fixing screw ⑤ in a counterclockwise direction and line up the white mark on the top of the knob with the tripod mount mark () (Fig. 11-10).
2) Pull the tripod socket fixing screw ⑥ outward to open the tripod mount ring ⑦ and then remove the tripod socket. (Fig. 11-2, 3)
■Attaching the tripod socket
1) Open the tripod mount ring and set it to the lens.
2) Make sure that the white mark on the top of the tripod socket fixing screw ⑤ and the tripod mount ⑤ are aligned, and then pull the knob outward.
3) Close the tripod mount ring ⑤ , and tighten the tripod socket fixing screw ⑤ in a clockwise direction.
- Hold the camera firmly when removing the tripod socket so that you do not drop the camera or the lens.
- Make sure that the white mark on the top of the knob and the indicator on the tripod socket are aligned before you pull on the tripod socket fixing screw ⑤ .
DEPTH OF FIELD
With a camera equipped with a depth-of-field-preview button or a aperture-stop-down button, the user can easily access the camera from a variety of angles. For example, the view of your camera. For the operational details, read the instruction manual of your camera.
- You can also download a depth-of-field table of your interest from our web site. Tamron URL: http://www.tamron.com
The optical design for this lens takes into consideration the various features of digital single reflex cameras. However, due to the configuration of the digital single reflex cameras, even when the autofocus accuracy is within specifications, the focal point is not always fixed and the focus is behind the optimum point when shooting with auto focus under some conditions.
PRECAUTIONS IN SHOOTING
- The Tamron lens, SP AF200-500 mm (Model A08) employs an internal focusing (IF) system to achieve a remarkable minimum object distance of 2.5 meters (8.20 feet). Because of the characteristics of this optical design, the angles of view at distances of less than 1mm in infinity are wider than that of the lenses applying an ordinary focusing system.
- When the built-in flash on the camera is used, adverse photographic phenomena such as corner illumination fall-off or vignetting at the bottom part of the image may be observed. This can be due to the inaccuracy of the lens and the image quality. In addition, the built-in flash, flash,and/or the relative position of the flash to the edge of the lens barrel which causes shadows on the image. It is strongly recommended to use a suitable separate flash unit provided by the camera manufacturer for all flash photography. The details, please read the "built-in flash" article on the instruction manual of your camera.
- To attach a lens where the maximum aperture is F3.5 or slower, (ex., high power zoom lenses) is not recommended.
- When a tele-converter is attached, the focal length of the lens becomes longer but the depth of field becomes shallower and it may be difficult to focus in AF mode. Therefore, focusing in MF (Manual Focusing) mode is recommended when a tele-converter is used.
- Tele-conversers are efficient tools to add focal length to the photographer's telephoto camera. They can be used to reduce the amount of time spent with wide-angle lenses or zoom lenses that cover wide-angle range focal lengths.
- When using the lens in the telephoto focal range, it may be necessary to use a tripod camera with a high speed. This is possible when the camera is powered with a fast shuttered speed is also helpful to reduce the influence of camera shake.
- Do not forcibly turn the focusing ring when camera and/or lens is/are set in the AF mode. Doing so could damage the lens and/or camera.
- Certain camera models may indicate the maximum and minimum aperture values of the lens inapproximate numbers. This is inherent to the design of the camera and not to the lens.
Please be aware that there is no infrared index line on any models listed in this owner's manual. Therefore practically no black-and-white infrared film can be used in the system.
TO ENSURE LONG-TERM SATISFACTION
- Avoid touching the glass element surface. Use a photographic lens cloth or blower to protect the element surface. When not using the lens, always place the lens cap on it for protection.
- Use a lens cleaning tissue or tint cloth with a drop of cleaning solution to remove the excess liquid from the skin.
- Use a silicone brush to clean your skin surface by rotary motion from the center to the edge. Use a silicon cloth to clean your lens barrel only.
- Clean the lens barrel with a silicon cloth. Do not use benzene or paint thinner or other organic cleansers.
- Mildew is an enemy of your lens. Clean the lens after shooting near water or in any humid place. Store your lens in a clean, cool and dry place. When storing the lens in an lens case, store it with commercially available drying agent such as silicagel, and use a mildew test to confirm that the moldew in your lens, consult an authorized repair shop or nearby photographic store.
- Do not touch the lens-camera mount contacts since dust, dirt and/or stains may cause a contact failure between the lens and camera.
- When using your equipment [camera(s) and lens(es)] in an environment where the temperature changes from one extreme to the other, make sure to put your equipment temporarily in a case or a plastic bag for a length of time in order for the equipment to go through a gradual temperature shift. This will reduce potential equipment trouble.