LC206 - Adaptateur électrique SWEEX - Notice d'utilisation et mode d'emploi gratuit
Retrouvez gratuitement la notice de l'appareil LC206 SWEEX au format PDF.


| Type de produit | Adaptateur USB vers Ethernet |
|---|---|
| Caractéristiques techniques principales | Compatible avec USB 2.0 et 3.0, prise en charge des vitesses jusqu'à 100 Mbps |
| Alimentation électrique | Alimentation par le port USB, pas besoin d'alimentation externe |
| Dimensions approximatives | 10 x 3 x 2 cm |
| Poids | 50 g |
| Compatibilités | Compatible avec Windows, macOS et Linux |
| Type de batterie | Non applicable |
| Tension | Non applicable |
| Puissance | Non applicable |
| Fonctions principales | Connexion réseau via USB, prise en charge de la technologie Plug and Play |
| Entretien et nettoyage | Essuyer avec un chiffon doux, éviter l'exposition à l'humidité |
| Pièces détachées et réparabilité | Pas de pièces détachées disponibles, produit non réparable |
FOIRE AUX QUESTIONS - LC206 SWEEX
Questions des utilisateurs sur LC206 SWEEX
0 question sur cet appareil. Repondez a celles que vous connaissez ou posez la votre.
Poser une nouvelle question sur cet appareil
Téléchargez la notice de votre Adaptateur électrique au format PDF gratuitement ! Retrouvez votre notice LC206 - SWEEX et reprennez votre appareil électronique en main. Sur cette page sont publiés tous les documents nécessaires à l'utilisation de votre appareil LC206 de la marque SWEEX.
MODE D'EMPLOI LC206 SWEEX
Powerline Adapter
Important!
- Do not expose the Powerline Adapter to extreme temperatures. Do not place the device in direct sunlight or in the direct vicinity of heating elements.
- Do not use the Powerline Adapter in extremely moist or dusty surroundings.
- Protect the device against powerful shocks and falls - they may damage the internal electronics.
- Never attempt to open the device yourself, there are no serviceable parts inside. Opening the device will cause the warranty to lapse.
Package contents
In this package you will find:
Powerline Adapter
Network cable
CD with software and manual
Note: For Powerline kits, one network cable should be included for each adapter, in the same colour as the adapter.
If you find that any of the package contents are missing, please return the package to the sales point where it was bought.
Terminology list
This manual will contain a number of technical terms. It is important to know what they mean before you begin installing and configuring the router.
- Router A router is a network device required for sharing an Internet connection between multiple devices, such as computers but also other devices such as a network printer, internet-enabled Blu-Ray player or network storage device / NAS. If you wish to use powerline adapters to connect more than one device to the Internet, a router is also required.
- Network cable A network cable is used for connecting network devices such as computers, modems and routers to the powerline adapter or to eachother.
- Powerline adapter This is the product you have just bought.
- Powerline security By default, your powerline network is not secured. This means that it is possible that others in the same building or buildings nearby can use a powerline adapter to gain access to your network. Powerline security protects your network so that only authorized adapters can gain access. Sweex recommends all users to secure their powerline network after installation. For more information please see the "Securing your powerline network" section of this manual.
Product description
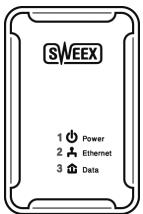
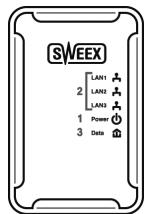
Front
- Power LED This light indicates that the adapter receives power.
A constantly burning power LED indicates normal operation of the adapter. - LAN LED(s) This light indicates an active connection on the corresponding network port. A flickering light indicates network activity.
- Data LED This light indicates an active connection to other powerline adapters.
For more information, see the "LED Indications" section of this manual.
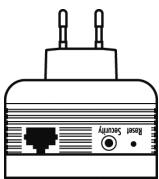
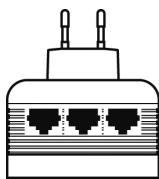
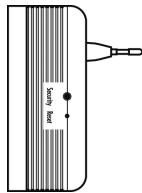
Bottom / side
- LAN port(s)
You can connect a network cable coming from a computer to this port. When the computer is turned on the corresponding light at the front of adapter will light up.
- Security button
This button activates powerline security.
For more information please see the "Securing your powerline network" section of this manual.
- Reset button
This button is used to reset the adapter to factory default settings.
For more information on the reset procedure please refer to the "Troubleshooting" section of this manual.
LEDs
| ON | OFF | BLINKING | |
| Power LED | The adapter receives power | Off / no power | Creating a secure connection |
| Lan LED(s) | Active network connection | No network connection | Network activity |
| Data LED | Active powerline connection | No Powerline network | Powerline activity detected |
Installing the adapter(s)
To build a powerline network, you need a minimum of two adapters. One adapter to create a powerline signal on your power lines, and one or more other adapters to pick up the signal and pass it to your computer or other network device. A single pair of powerline adapters is best viewed as a cable replacement, the adapters can be placed between for example, a router and a computer, and it will be as if the two devices are connected directly to eachother by a cable. In the case of the 3 port LC206 adapter, up to three devices can be connected to a single adapter at the same time.
Installation
Powerline as well as Ethernet network technology is in most cases plug & play and self-configuring. You do not need to turn off your router, modem or computer to install the adapters.
Step 1:

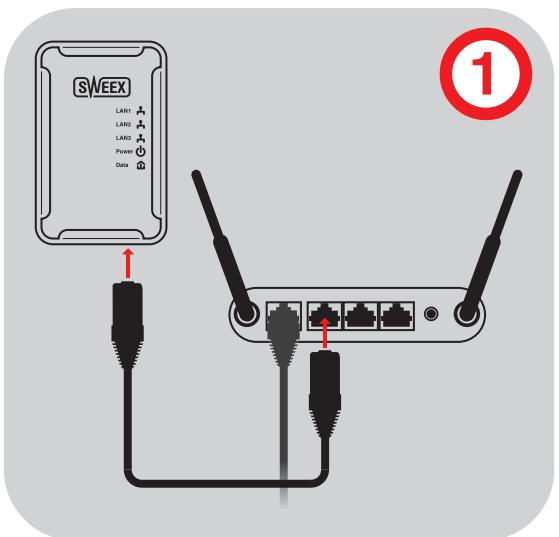
Use the bundled network cable to connect the first adapter to your router or modem, and put the adapter in a power socket. Check that the "LAN" led is burning.
Step 2:
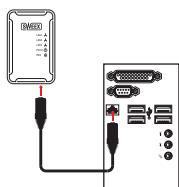
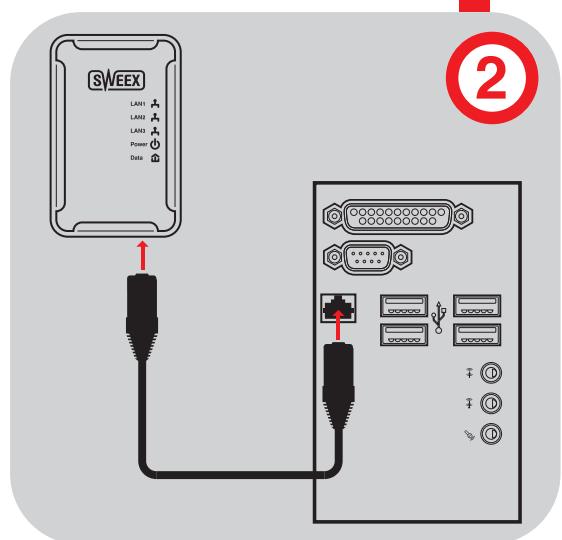
Use the bundled network cable to connect the second adapter to your computer and put the adapter in a power socket. Check that the "LAN" led is burning.
Note: It is recommended that you avoid plugging the adapter in a power strip or extension cord, UPS or a socket with surge protection and/or line filter. For best performance, plug the adapter directly in a wall socket.
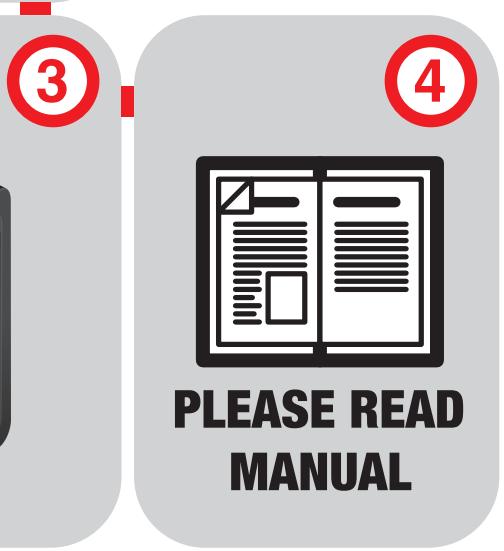
After a few seconds, the "Data" LEDs on both adapters should be burning, your powerline network is now operational and your computer will have Internet access. If you do not have internet access, please consult the "Troubleshooting" section of this manual.
After your network is operational, it is recommended that you secure it using powerline security. For more information please see the "Securing your powerline network" section of this manual.
Extending your powerline network
Extending your powerline network is as simple as connecting the cable and plugging in another adapter. Please be reminded that if your network is secured, you will need to follow the procedure for adding an adapter to your secured network described in the "Securing your powerline network" section of this manual.
Warning: Never connect more than one powerline adapter to your router.
Note: A modem can only provide an Internet signal to a single network device, and hence can only be used with a maximum of two powerline adapters. If you have multiple network devices a router is required. In most cases, a router can be recognized by having multiple Ethernet network ports, usually four, labeled "LAN". Whereas a modem only has a single Ethernet network port. When in doubt, contact your Internet Service Provider (ISP) for more information.
Advanced: Technically, the adapters function like a virtual Ethernet switch. If you would have a power strip with 5 powerline adapters in it, this would be functionally identical to a 5 port Ethernet switch. Similarly, the powerline adapter's port(s) can be extended further with an Ethernet switch.
Securing your powerline network
Securing your powerline network is easy with the security button found on the bottom or side of the adapter. It is done as follows:
Initial security with two adapters A and B
- Press and hold the security button on adapter A until the lights go out
- Press and hold the security button on adapter B until the lights go out
- Wait 30 seconds until on both adapters only the power LED is lit
- Press and hold the security button on adapter A for 1 second
- Press and hold the security button on adapter B for 1 second
- On both adapters the lights will go out and turn back on. After a maximum of 1 minute the connection is established and secured.
Adding another adapter X to the secured network
- Press and hold the security button on adapter X until the lights go out
- Wait 30 seconds until on only the power LED is lit on adapter X
- Press and hold the security button on adapter A or B for 1 second
- Press and hold the security button on adapter X for 1 second
- On adapter X all lights will go out and turn back on. After a maximum of 1 minute the connection is established and secured.
Bundled software
The bundled software offers additional management and security features such as viewing the adapters on your network and their speed and signal strength, and configuring security manuall. These features are beyond the scope of this manual and normally only needed for problem diagnosis and tech support.
Troubleshooting
This chapter of the manual will explain a number of common issues that you may run into and possible solutions.
- The powerline LED is lit on all adapters, but I cannot access the internet from one or more computers
-
This issue can have two common causes:
-
Check that you have a router or that your modem has an integrated router. If you are in doubt, contact your internet service provider (ISP) for more information.
- Incorrect IP settings on your computer. You can check and adjust your settings as follows:
Windows XP
- Click the start button at the bottom right of your screen and click "Control Panel"
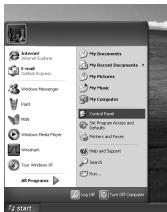
- In the control panel, click "Network and Internet Connections and open the "Network Connections" icon. If your control panel is in Classic View, you may open the "Network Connections" icon straightaway.
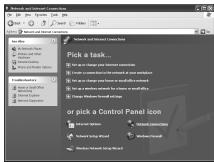
- Right click the first connected LAN or High-Speed Internet Connection, in this example the "Local Area Connection", and click "Properties" from the context menu. If you have multiple connected connections, repeat steps 3 to 6 for each connection.
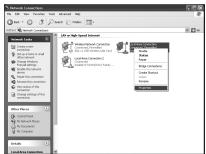
- The connection's property window appears. In this windows, select the "Internet Protocol" from the list of items and click the "Properties" Button:
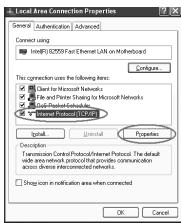
- The Internet Protocol's property window appears. In this window, ensure that both settings are set to "Obtain automatically":
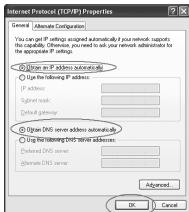
- Confirm the settings by clicking "OK". The network settings for XP are now properly configured for your router.
Windows Vista
- Click the start button at the bottom right of your screen and click "Control Panel"
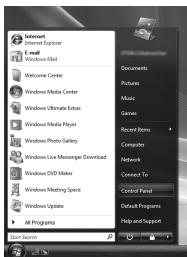
- In the Control Panel, click "View network status and tasks". If your Control Panel is in classic view, open the "Network and Sharing Center" icon:
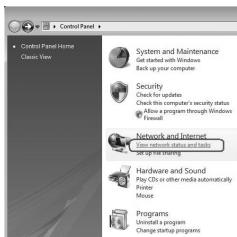
- The Network and Sharing Center window should now open.
In the Network and Sharing Center, click "Manage network connections" in the bar on the left side:
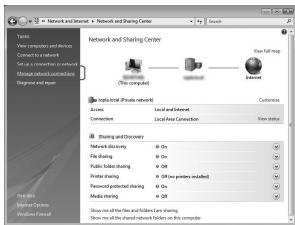
- Right click the first connected LAN or High-Speed Internet Connection, in this example the "Local Area Connection", and click "Properties" from the context menu. If you have multiple connected connections, repeat steps 4 to 7 for each connection:
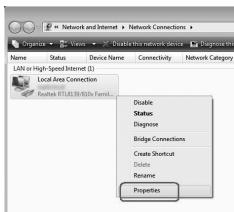
- The connection's property window appears. In this windows, select the "Internet Protocol Version 4" from the list of items and click the "Properties" Button:
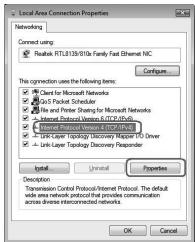
- The Internet Protocol Version 4's property window appears. In this window, ensure that both settings are set to "Obtain automatically":
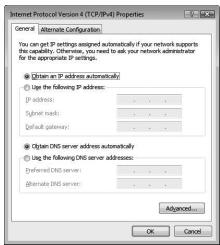
- Confirm the settings by clicking "OK". The network settings for Vista are now properly configured for your router.
Windows 7
- Click the start button at the bottom right of your screen and click "Control Panel"
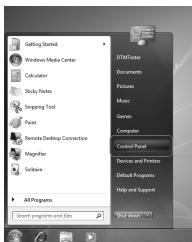
- In the Control Panel, click "View network status and tasks". If your Control Panel is in icon view, open the "Network and Sharing Center" icon:
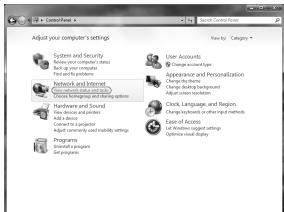
- The Network and Sharing Center window should now open.
In the Network and Sharing Center, click "Change adapter settings" in the bar on the left side:
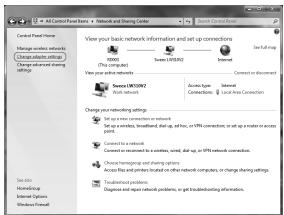
- Right click the first connected connection, in this example the "Local Area Connection", and click "Properties" from the context menu. If you have multiple connected connections, repeat steps 4 to 7 for each connection:
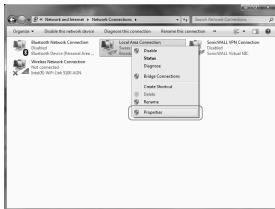
- The connection's property window appears. In this windows, select the "Internet Protocol Version 4" from the list of items and click the "Properties" Button:
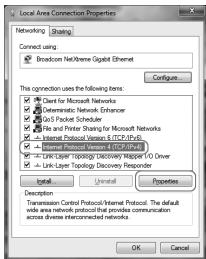
- The Internet Protocol Version 4's property window appears. In this window, ensure that both settings are set to "Obtain automatically":
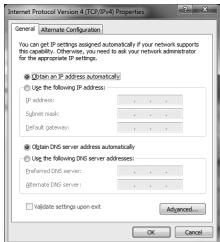
-
Confirm the settings by clicking "OK". The network settings for Windows 7 are now properly configured for your router.
-
I appear to be connected but Internet Explorer still displays an error message "Internet Explorer cannot display the webpage" or similar.
-
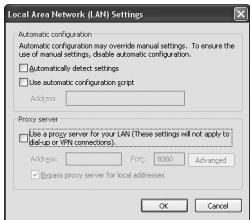
This problem may be due to incorrect proxy server settings. You can adjust these settings as follows:
-
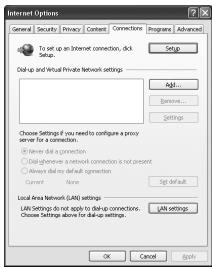
In Internet Explorer, click the "Tools" menu or icon and chose "Internet Options".
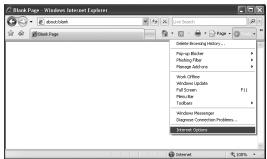
- The "Internet Options" window will now open.
- In this window, click the "Connections" tab and in this tab, the "LAN Settings" button.
- The "LAN Settings" window will now open. Ensure that all checkboxes are unchecked and confirm the settings by clicking "OK".
- My computer indicates that it is not connected to a network.
- This problem is usually resolved by carefully checking all connections and indicator lights. For a wired computer, follow the network cable to the adapter and check the connection and the corresponding LAN light on the adapter. It must be lit.
- Something has gone wrong and the adapter needs to be reset
- To reset the adapter, use an unfolded paperclip to press and hold the reset button for 2 seconds. The lights of the adapter will go off and the adapter will restart with the factory default settings and no security.
Warranty
Thank you for purchasing this Sweeex product. Sweeex devotes ample attention and care to the quality, reliability, functionality, durability and user friendliness of all its products. In this way Sweeex distinguishes itself in the market and can we convince you as a buyer to continue purchasing products of the Sweeex brand. We wish you a lot of pleasure with your purchase.
An important extra advantage for you is the possibility of product registration.
After the registration of your product Sweex offers you a number of important yet equally useful advantages.
The biggest advantage is that by means of the online registration on www.sweex.com/12yearswarranty the warranty on the product is extended by a 10-year manufacturer's warranty (see the applicable conditions on this website). This in addition to the statutory 2-year warranty which is already available for the product. In total the warranty period will therefore amount to 12 years.
There are also other advantages:
For example, if you wish so, you are regularly informed by us of the latest developments in our assortment by means of a digital newsletter.
Where applicable, you also automatically receive the latest drivers and/or firmware from us for the product you purchased to preserve or improve the compatibility and the performance.
Moreover, our support desk can assist you faster in case of possible support questions about the product if you registered the product.
Sweex warranty conditions.
2-year standard warranty within the EU
- In a standard manner a warranty period of 2 years as from the purchase date is available for this Sweex product within the EU.
- Should you wish to invoke this warranty within the first 2 years after the purchase then you can directly apply to the point of sale where you purchased the product for the conditions and procedures.
10-year manufacturer's warranty
- However, in addition to the statutory 2-year standard warranty Sweex offers you an extended quality warranty of no less than 10 years, if you purchased your product within the EU.
- For more information, conditions and the registration form go to www.sweex.com/12yearswarranty and register within 30 days after the purchase of your product for the extended warranty period of in total 12 years.
Matters that are excluded from the warranty
- The warranty of Sweex only covers manufacturing defects. Excluded from the warranty are accessories like batteries, rechargeable batteries and also supplied software, where applicable.
- The liability of Sweex is limited to the costs of repair and/or replacement of the product covered by the warranty.
- Both warranty types (the 2-year standard warranty and the 10-year extended manufacturer's warranty) are null and void if the product has been opened, changes have been made, physical damage was caused to the product and if the product is used for another purpose than for which it is originally meant.
All brand names and associated rights mentioned in this manual are and remain the sole property of the rightful claimant.