
VMP75 - Affichage interactif VIEWSONIC - Notice d'utilisation et mode d'emploi gratuit
Retrouvez gratuitement la notice de l'appareil VMP75 VIEWSONIC au format PDF.

| Type de produit | Lecteur multimédia réseau |
| Marque | VIEWSONIC |
| Modèle | VMP75 |
| Dimensions (L x l x H) | 130 mm x 100 mm x 25 mm |
| Poids | 0,75 kg |
| Alimentation | Adaptateur secteur (12V) fourni |
| Consommation électrique | Non spécifiée |
| Fonctions principales | Lecture de fichiers vidéo, audio et photos ; streaming Internet (Netflix, YouTube, Live365) ; navigation web ; UPnP ; Samba client/serveur |
| Connectivité | HDMI, S/PDIF optique, A/V composite, Ethernet, USB 2.0, eSATA/USB combo |
| Résolution vidéo maximale | 1080p (HDMI) |
| Formats audio supportés | MP3, WMA, AAC, AC3, DTS (pass-through) |
| Formats vidéo supportés | MPEG2, MPEG4, H.264, AVI, MKV (consulter le manuel complet) |
| Stockage local | Disque dur SATA interne (non inclus) ; USB flash ou disque dur externe |
| Réseau sans fil | Via dongle USB Wi-Fi optionnel (autorisé ViewSonic) |
| Télécommande | Infrarouge avec piles AAA (fournies) |
| Entretien et nettoyage | Nettoyer avec un chiffon sec ; ne pas utiliser de liquides |
| Sécurité | Ne pas exposer à l'eau ou à la chaleur ; utiliser uniquement en intérieur ; température de fonctionnement 5°C à 35°C |
| Pièces détachées et réparabilité | Télécommande, adaptateur secteur, câbles disponibles ; réparation par centre agréé ViewSonic |
| Garantie | 1 an pièces et main-d'œuvre |
| Informations générales | Conforme aux normes CE, RoHS ; classe laser 1 |
FOIRE AUX QUESTIONS - VMP75 VIEWSONIC
Questions des utilisateurs sur VMP75 VIEWSONIC
0 question sur cet appareil. Repondez a celles que vous connaissez ou posez la votre.
Poser une nouvelle question sur cet appareil
Téléchargez la notice de votre Affichage interactif au format PDF gratuitement ! Retrouvez votre notice VMP75 - VIEWSONIC et reprennez votre appareil électronique en main. Sur cette page sont publiés tous les documents nécessaires à l'utilisation de votre appareil VMP75 de la marque VIEWSONIC.
MODE D'EMPLOI VMP75 VIEWSONIC
ViewSonic™
VMP75
Network media player
-User Guide
- Guide de l'utilisateur
- Guía del usuario
- Bedienungsanleitung
-Guida dell'utente
- Podręcznik uzytkownika
-PykoBoDCTBO NOIb3OBaTeJIa
- Användarhandbok
- 使用手册(繁體中文)
- 使用手册(简体中文)
Compliance Information
CE Conformity for European Countries
The device complies with the EMC Directive 2004/108/EC and Low Voltage Directive 2006/95/EC.
Following information is only for EU-member states:
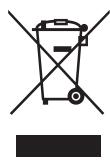
The mark is in compliance with the Waste Electrical and Electronic Equipment Directive 2002/96/EC (WEEE).
The mark indicates the requirement NOT to dispose the equipment including any spent or discarded batteries or accumulators as unsorted municipal waste, but use the return and collection systems available.
If the batteries, accumulators and button cells included with this equipment, display the chemical symbol Hg, Cd, or Pb, then it means that the battery has a heavy metal content of more than 0.0005% Mercury or more than, 0.002% Cadmium, or more than 0.004% Lead.
Declaration of RoHS Compliance
This product has been designed and manufactured in compliance with Directive 2002/95/ EC of the European Parliament and the Council on restriction of the use of certain hazardous substances in electrical and electronic equipment (RoHS Directive) and is deemed to comply with the maximum concentration values issued by the European Technical Adaptation Committee (TAC) as shown below:
| Substance | Proposed Maximum Concentration | Actual Concentration |
| Lead (Pb) | 0.1% | < 0.1% |
| Mercury (Hg) | 0.1% | < 0.1% |
| Cadmium (Cd) | 0.01% | < 0.01% |
| Hexavalent Chromium (Cr6+) | 0.1% | < 0.1% |
| Polybrominated biphenyls (PBB) | 0.1% | < 0.1% |
| Polybrominated diphenyl ethers (PBDE) | 0.1% | < 0.1% |
Certain components of products as stated above are exempted under the Annex of the RoHS Directives as noted below:
Examples of exempted components are:
- Mercury in compact fluorescent lamps not exceeding 5mg per lamp and in other lamps not specifically mentioned in the Annex of RoHS Directive.
- Lead in glass of cathode ray tubes, electronic components, fluorescent tubes, and electronic ceramic parts (e.g. piezoelectronic devices).
- Lead in high temperature type solders (i.e. lead-based alloys containing 85% by weight or more lead).
- Lead as an allotting element in steel containing up to 0.35% lead by weight, aluminium containing up to 0.4% lead by weight and as a cooper alloy containing up to 4% lead by weight.
Copyright Information
Copyright © ViewSonic Corporation, 2010. All rights reserved.
ViewSonic, the three birds logo, OnView, ViewMatch, and ViewMeter are registered trademarks of ViewSonic Corporation.
Disclaimer: ViewSonic Corporation shall not be liable for technical or editorial errors or omissions contained herein; nor for incidental or consequential damages resulting from furnishing this material, or the performance or use of this product.
In the interest of continuing product improvement, ViewSonic Corporation reserves the right to change product specifications without notice. Information in this document may change without notice.
No part of this document may be copied, reproduced, or transmitted by any means, for any purpose without prior written permission from ViewSonic Corporation.
For Your Records
Product Name: VMP75
ViewSonic Network Media Player
Model Number: VS13416
Document Number: VMP75_UG_ENG Rev. 1B 06-11-10
Serial Number:
Purchase Date:
Product disposal at end of product life
ViewSonic is concerned about the preservation of our environment. Please dispose of this product properly at the end of its useful life. Your local waste disposal company may provide information about proper disposal.
This product is manufactured under license from Dolby Laboratories. "Dolby" and the double-D symbol are trademarks of Dolby Laboratories.


2.0 Channel
This product is manufactured under license under U.S. Patent #’s: 5,451,942; 5,956,674; 5,974,380; 5,978,762; 6,487,535 & other U.S. and worldwide patents issued & pending. DTS and the Symbol are registered trademarks, & DTS 2.0+ Digital Out and the DTS logos are trademarks of DTS, Inc.
ViewSonic Network Media Player
ViewSonic Network Media Player are warranted for 1 year for labor from the date of the first customer purchase.
Safety Information

WARNING: Failure to follow these safety instructions could result in fire, electric shock, injury or damage.
- Read these instructions; Keep these instructions; Heed allWarnings; Follow all instructions
- Do not use this apparatus near water.
- Clean only with dry cloth
- Do not install near any heat sources such as radiators, stoves, or other apparatus (including amplifiers) that produce heat.
- Unplug this apparatus during lightning storms or when unused for long periods of time.

WARNING: To reduce the risk of electronic shock, do not remove the cover.

WARNING: The device can display static images, which can cause "burn in" of certain
displays. Avoid leaving static images (such as photos or paused videos) onscreen for long periods of time.

WARNING: This device should be used only indoors in well-ventilated areas. Do not
operate this device outside the temperature range of 5^ 35^ . To reduce the risk of fire, electric shock, or interference, do not expose this appliance to rain, liquid, moisture, excessive hear, or naked flame. For technical support, please go to http://www.viewsonic.com/

CAUTION: About Laser and LED
Use of controls or adjustments, or performance of procedures other than those specified herein my result in hazardous radiation exposure. This device complies with International Standard IEC 60825-1:2001-08 for a Class 1 and Class 2 laser product. This device also complies with 21CFR 1040.10 and 1040.11 except for deviations pursuant to Laser Notice No. 50, dated July 26, 2001.
Class 1 Laser Devices
Beam description: Collimated (parallel) beam of infrared light (invisible to user)
Laser power output: < 716 microwatts (at 832 nanometers) to 834 microwatts (at 865 nanometers)
Emitted laser wavelength: nominal: 850 nanometers, range: (832 - 865 nanometers)
A Class 1 laser product is safe under reasonable foreseeable conditions of operation as described by IEC 60825-1 and 21 CFR 1040.10. However, it is recommended that you not direct the laser beam (which is emitted from the bottom of the device) at anyone's eyes.
About This Guide
This Guide gives you the fastest way for hand-on procedure to enjoy multimedia with Media Player. There will be user manual which describes usage information in detail. Please go to
http://www.viewsonic.com/ to download it. For a quick help, press “? ” on the remote control unit.
Package Contents
The product package should contain the following items:
- Media Player unit (Weight: 0.75Kg; Dimension: 130mm x 100mm x 25mm)
- Remote control unit
- 2 AAA batteries for remote control unit (1.65 ~ 1.725 Volt). The batteries are NOT rechargeable.

CAUTION: There's danger of explosion if battery is incorrectly replaced. Replace only with
the same or equivalent type.
Power adapter

WARNING: Be sure to use the power adapter shipped with Media Player unit. Other
power adapters such as the one with 12V output generally for laptop PC will damage or even burn the unit.
- HDMI cable
- Quick Start Guide
- Phone Jack to Composite (CVBS) A/V cable
Hardware Overview
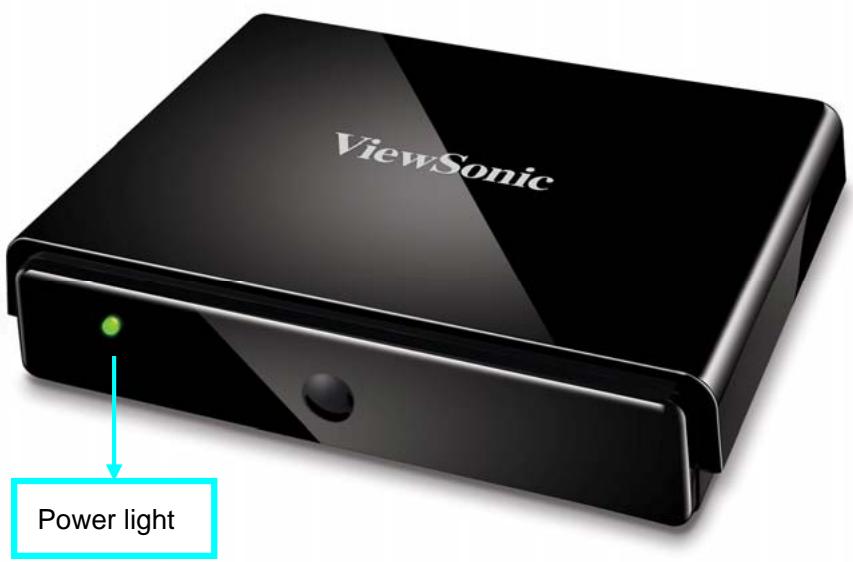

FRONT VIEW
REAR VIEW
Power Off: Press the Power On/Off button on the back of the set for more than 5 seconds in operation status will force the system to power off.
Front Panel LED indicator:
Red- Power Off Green- Operating
Peripheral Connections
Video & Audio
HDMI is for high-definition video and audio quality.
Optical S/PDIF is for high-quality audio connected to an external decoder or amplifier.
Please press hotkey on the remote control unit and go to 'System Setup' 'Audio Setup' to select for Analog or Digital Audio Output.

A/V is for general RCA connector; please see the adapter cable below which is included in the product package.

Storage Device
The USB host is for external HDD enclosure or flash drive and other USB devices (keyboard, mouse etc.). The eSATA/USB combo port can be employed for by either a SATA or USB device.

Please take special attention to insert a USB cable or device into the eSATA/USB combo port and not to damage the connector when you plug or unplug it.
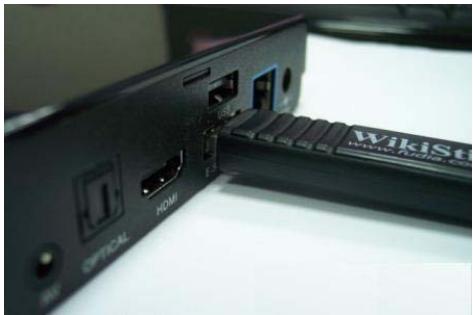
Network Connection
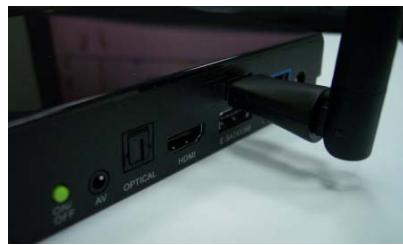
The ETHERNET port is to connect to your home router for local area network or Internet connection. You can also connect your Media Player to the network wirelessly by ViewSonic authorized wireless USB dangle.

Using Remote Control
Use the remote control to navigate menus, and to select and watch videos, listen to music, or view photos on your television.

The table below describes the function of the remote control unit.
REMOTE CONTROL KEY FUNCTION TABLE
| No. | KEYPAD | FUNCTION DESCRIPTION |
| 1 | POWER | Turn On/Off "Media Player". |
| 2 | HOME | Return to Main Menu. |
| 3 | OUTPUT | Switch the video output among HDMI 1080p (AUTO), HDMI 480p and CVBS. |
| 4 | HELP | Hot key on-screen instruction |
| 5 | SETUP | Enter Setup main page. |
| 6 | SORT/EPG | Sort and re-arrange the order of all the files in one folder. |
| 7 | FUNC | (Reserved) |
| 8 | BGM | Add/Remove a music file or iMedia station as background music. |
| 9 | RECORD | (Reserved) |
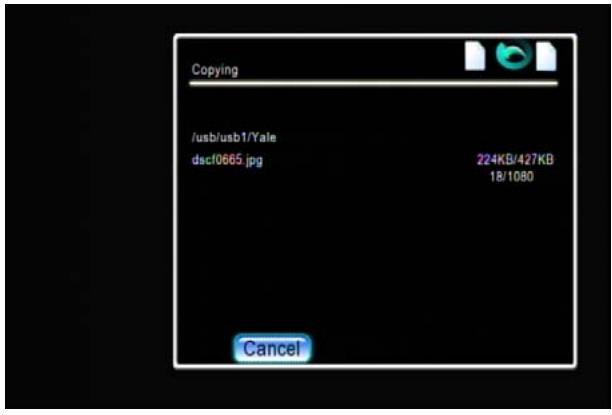
| 10 | COPY | Copy or delete files/folders between USB storage and SATA HDD. |
| 11 | MUTE | Mute audio output. |
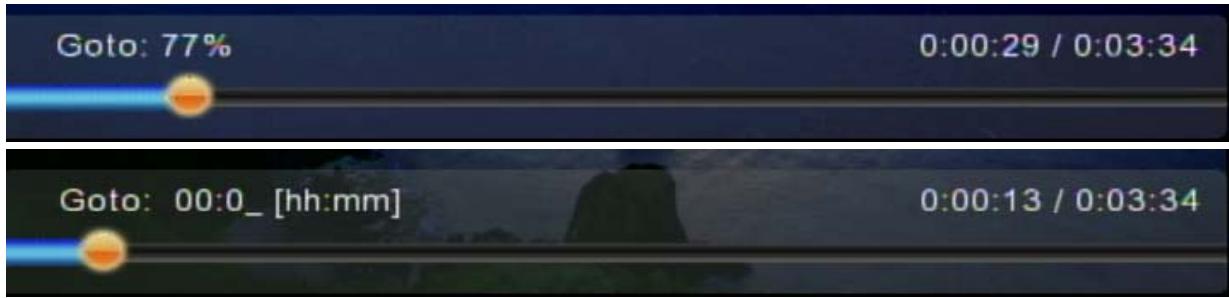
| 12 | NUMBERS | 1. Input numbers or alphabet when required. 2. Go to 00%-99% progress of current video or music file. |
| 13 | PREV | 1. Skip to the previous page when browsing media files. 2. Skip to the previous file when playing media files. |
| 14 | NEXT | 1. Skip to the next page when browsing media files. 2. Skip to the next file when playing media files. |
| 15 | BACK | 1. Return to previous page. Save/cancel setting in setup pages. 2. Escape from Web Browser. |
| 16 | INFO | Display media info. Pressing twice will show more information about video. |
| 17 | VOLUME — | Decrease the volume. |
| 18 | VOLUME + | Increase the volume. |
| 19, 20 22, 23 | DIRECTIONS | To move cursor for item selection. |
| 21 | Play/ Pause OK | 1. Play or pause media files 2. Enter the highlighted item. |
| 24 | VIDEO | Jump to VIDEO mode |
| 25 | MUSIC | Jump to MUSIC mode |
| 26 | PICTURES | Jump to PHOTO mode |
| 27 | iMEDIA | Jump to Internet Media mode |
| 28 | SUBTITLE | Select different subtitles |
| 29 | STOP | Stop the media play. |
| 30 | REPEAT | 1. Video & Music: Repeat current file or Repeat all files in this folder or cancel repeat function. 2. Photo: Repeat Background music. |
| 31 | AUDIO | Select different languages/audio tracks |
| 32 | ZOOM | Zoom video or photo. |
| 33 | ROTATE | Rotate the picture being viewed. |
| 34 | MENU | 1. Go to the Menu of DVD films. 2. Choose directory levels when navigating. |
| 35 | A-B | Set/Cancel A-B repeat mode. |
| 36 | SLOW/SLIDE | Slow forward / backward the media with speed 1/2x, 1/4x, 1/8x... |
| 37 | GOTO | Go to the specified time of current file. |
Networking Diagram
A connection example with network and peripheral devices is shown below.
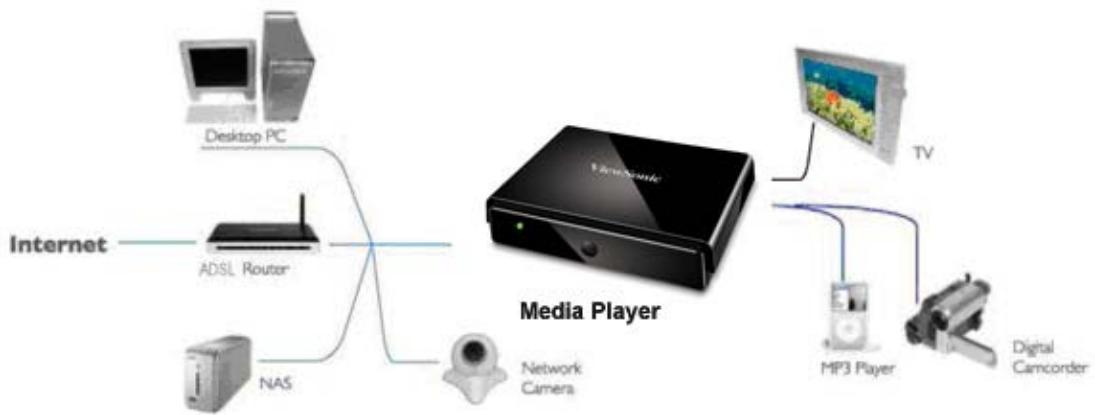
NETWORK DIAGRAM
Setup for TV Mode
Please set the video sources selector of your TV to match the connection from your Media Player. For example, if you use HDMI, set the TV to use the corresponding HDMI input port.
- Turn on the Media Player. The LED on the front panel of the Media Player will turn orange during system loading and then green when it's finished.
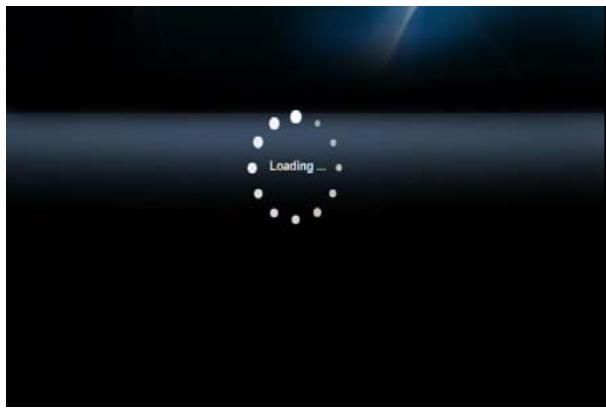
START-UP PAGE
- Check the TV display by going to 'Setup' 'System Setup' 'TV Mode Setup' 'Video Output'. The default display of Media Player is HDMI. If you use CVBS, use the remote control and
press "Output" Key. You can cycle through the TV modes to get the correct display mode.
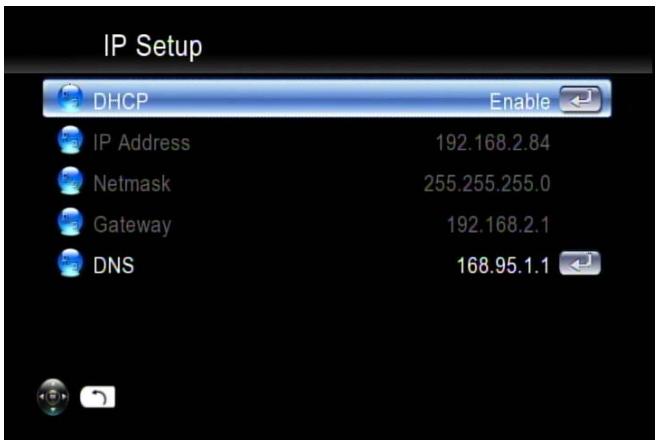
Wired Network Setup
1) Press “Setup” hotkey on the remote control or select “SETUP” mode from the Main Menu.
2) Select "Network Setup" "IP Setup", and Enable DHCP or set your static IP address according to your local configuration.
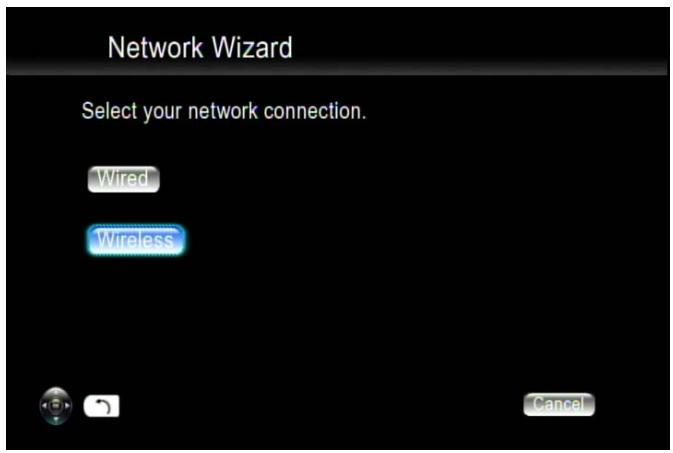
Wireless Network Setup
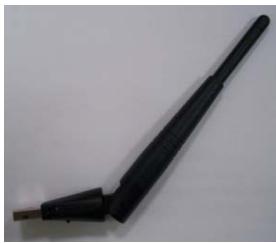
Media Player supports wireless Ethernet with an USB Wi-Fi dongle (option) authorized by ViewSonic. To enable wireless function, please make sure you plug the Wi-Fi dongle into the USB port before Powering on Media Player.
For high-definition video with high big-rates, streaming with a wired connection between Media Player and home router is recommended. It is ok for playing music and photo with wireless connection.
1) Press "SETUP" key on the remote control or select "SETUP" from the OSD Main Menu.
2) Select "Network Wizard" from setup main menu to start setup wizard and choose "Wireless"
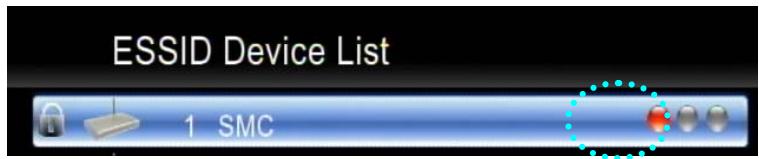
3) Media Player scans

and displays all available networks, choose yours from
the list.
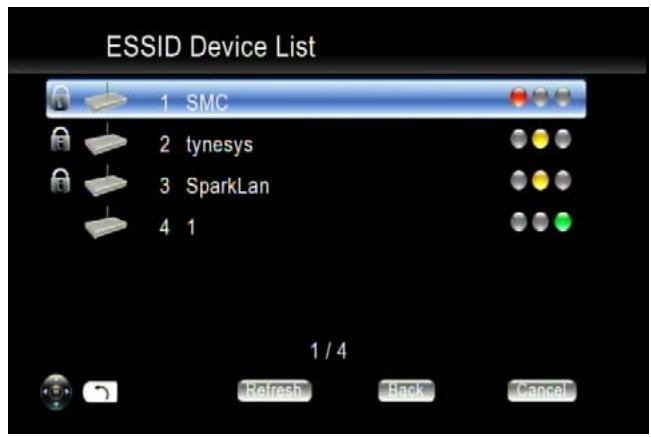
4) If the network you choose is locked by password, a “Lock” icon will be shown. And the signal strength is indicated by the red (poor quality), yellow (fair quality) or green (good quality) symbol.
5) Select "Key Value", and have your password ready to enter.
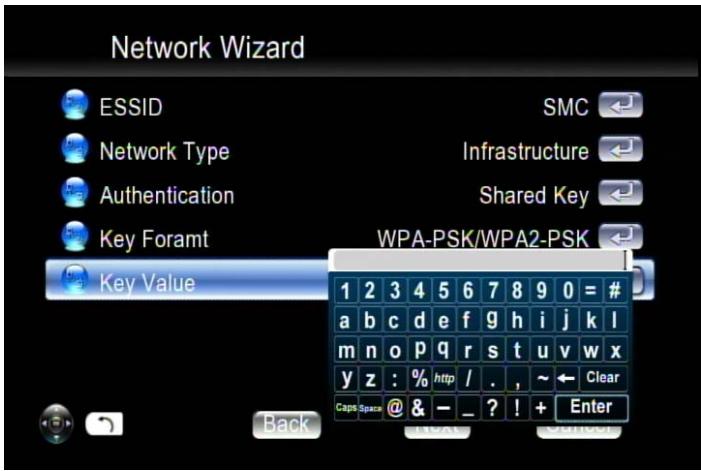
The key length of each Key Format is described in the table below. For WPA and WPA2 format, Media Player will detect and switch automatically.
| Key Format | Key Length |
| WEP64(ASCII) | 5 digits |
| WEP64(HEX) | 10 digits |
| WEP128(ASCII) | 13 digits |
| WEP128(HEX) | 26 digits |
| WPA-PSK/WPA2-PSK | 8 digits or more |
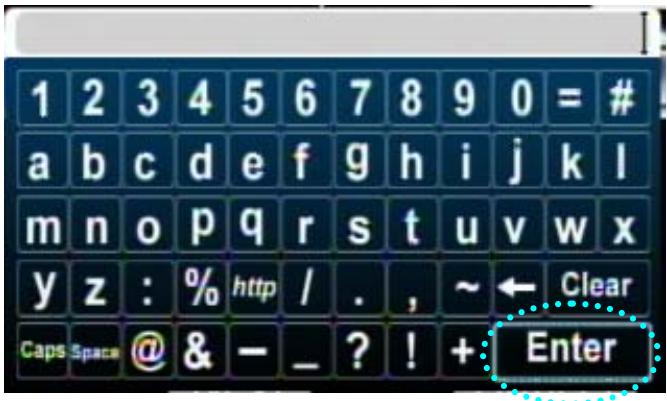
6) Input password and choose "Enter" to save.
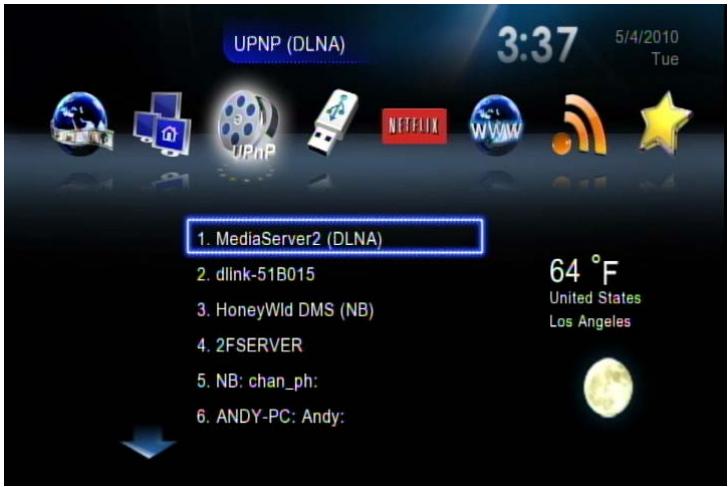
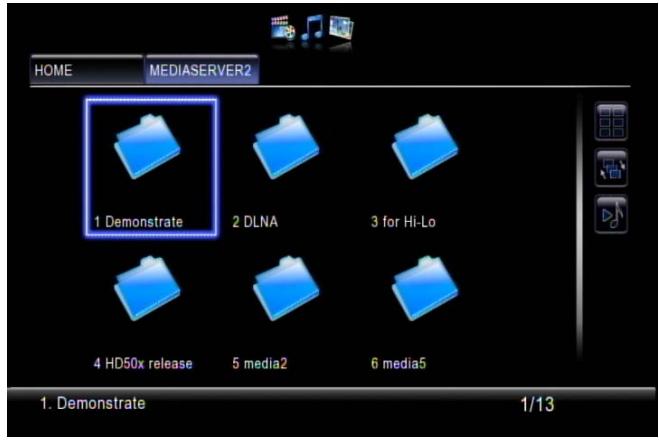
UPnP
The Media Player will automatically detect all available UPnP AV compliant content severs on boot-up and list them on UPnP column of the main menu. No additional setup is needed for Media Player itself.
Network Neighborhood (Samba Client)
As long as the network is linked and no firewall is blocking the shares from remote sites, there is no additional set-up needed to enable this feature.
Following steps show how to access media through the Samba Client Protocol.
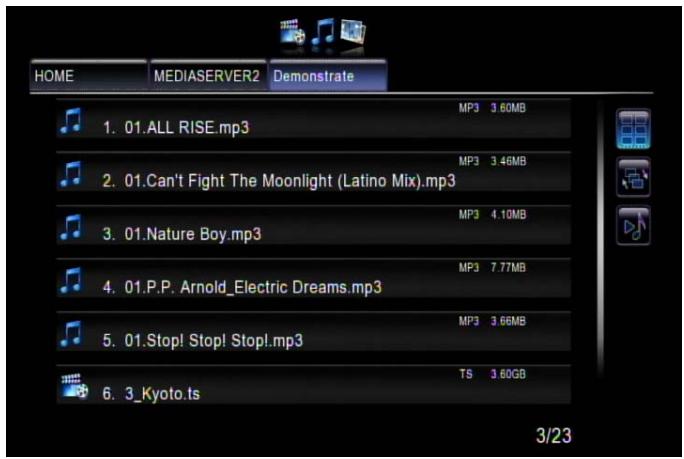
- Select "Network Shared Folders" in the main menu and all available sources will be detected and shown automatically.
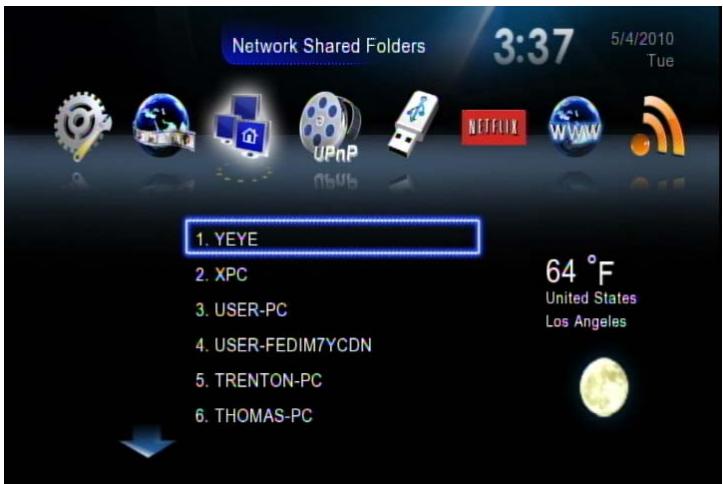
- Press "down" button to choose the one target machine and navigate to the destination files you require to play.
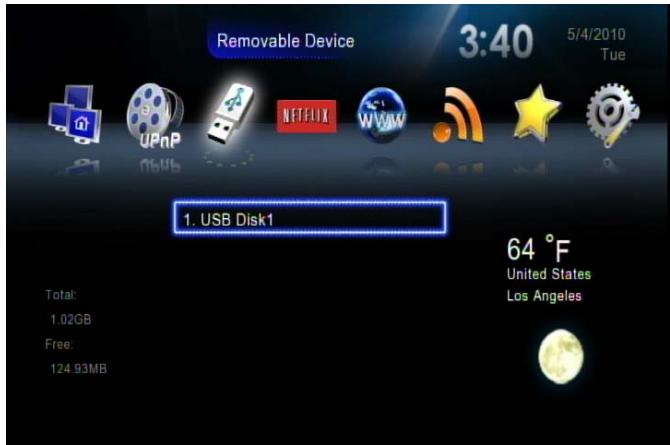
Local Storage Device
The Media Player supports USB flash disk, USB Hard Disk Drive and SATA HDD. In the main menu, just choose "Removable Device" and navigate to play the files you require.
The number of USB ports can be extended using a USB hub, please use a powered hub for higher power consumption devices. Media Player itself supplies limited power for the USB port.
File Management by Remote Control Unit
- Go to "Removable Device" at the Main Page.
- Select the name of your storage device from the list and press "COPY".
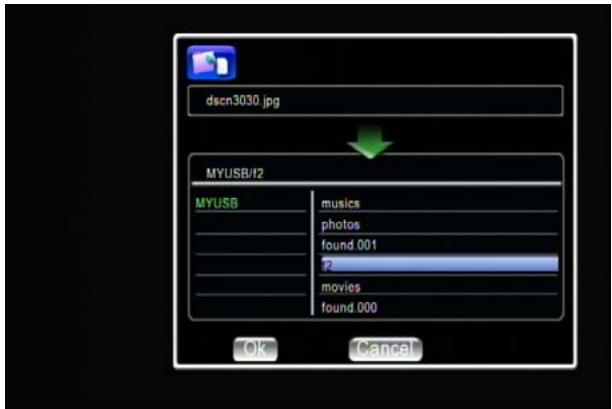
- Select the origin and destination. Press "OK" if you wish to proceed or "Cancel" to go back.
Copy/Delete local files from PC
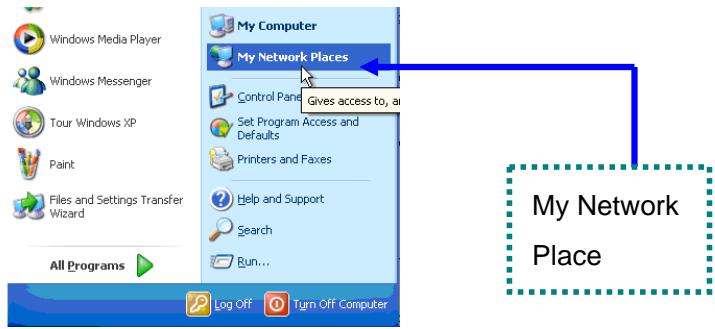
Media Player supports the Samba server function which shares your local storage space with client PC over the network. For PC with Windows OS, it's generally known as My Network Places. At first, check the IP address number of your Media Player in the "Network Setup" item under "Setup" menu. Then key in this IP address (for example, \192.168.1.5) on the address bar of client PC's My Network Places. After successful connection, type "admin" for both default user name and password to log in. Or see the following example as an alternative method based on Microsoft Windows XP platform. Please note that when both eSATA HDD and USB disk exist, the eSATA one will be the sole storage device for this function
- Click "My Network Place" icon on your PC.
- Click "Entire Network" → "Workgroup"
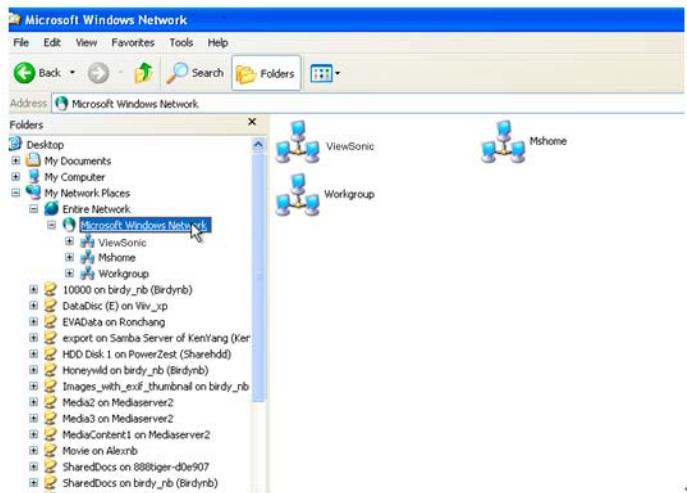
- The default Media Player Local HDD location is "Workgroup", double click it and you will see the Media Player (ShareHDD) icon.
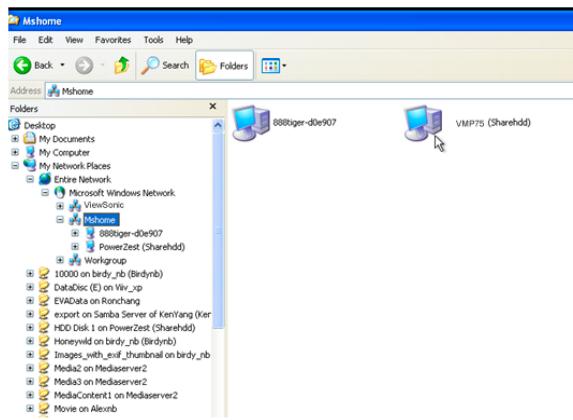
- Double click the Media Player (Sharehdd) icon, a login menu pops up. Input the default user name and password "admin".
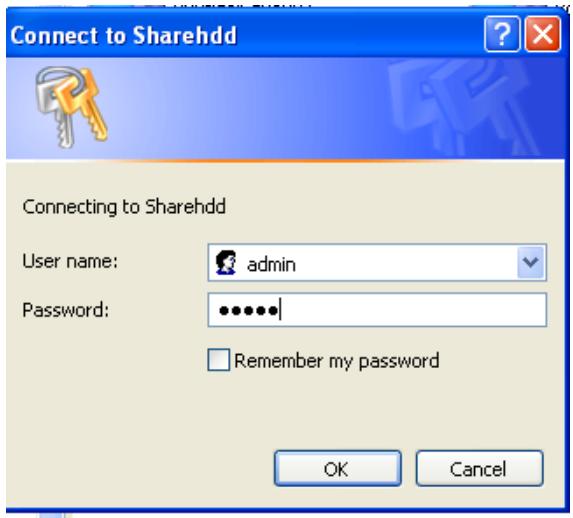
- Manage your media files between your PC to Media Player local HDD by using PC mouse.
Netflix
REMOTE CONTROL KEY FUNCTION TABLE FOR NETFLIX
| No. | IR Key | Netflix key |
| 1 | Home | Exit Netflix, return to main menu |
| 2 | Back | Netflix main menu |
| 3 | Prev | Rewind |
| 4 | Next | Fast Forward |
| 5 | 0 | Play/Pause |
| 6 | Stop | Stop |
| 7 | Up | Up |
| 8 | Down | Down |
| 9 | Left | Left |
| 10 | Right | Right |
| 11 | OK | Enter |
Here is the process of watching content on Netflix:
Step 1: Create an Account
When first started, an un-activated Netflix Ready Devices (NRDs) will display a screen asking if the viewer is already a Netflix member. If yes, the NRD proceeds to activation. If no, the viewer is instructed to go to the Netflix web site and create a regular (or free trial) account, and return to proceed to the activation screen.

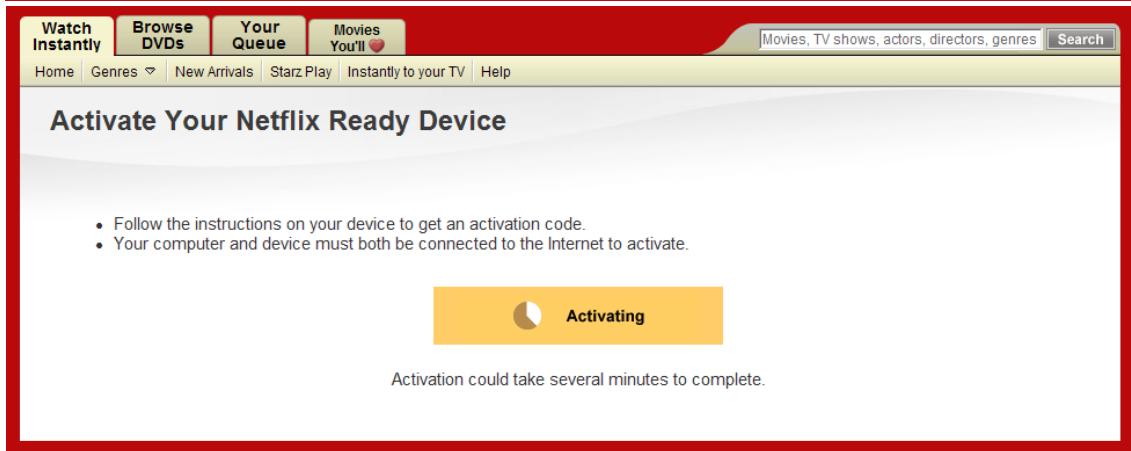
Step 2: Activation
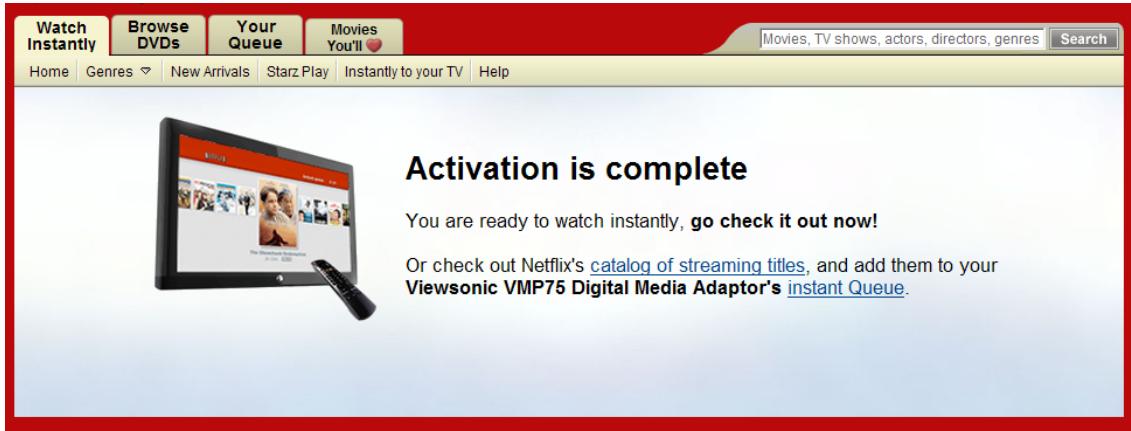
NRDs are associated with a Netflix member account using a simple one-time process called activation. When a member chooses to activate an NRD, the NRD displays a short activation code on the TV screen and an instruction on the TV screen and in instruction to open a PC web browser and go to netfliX.com/Activate where they enter the activation code. After entering this code in the browser, the Netflix servers complete the activation process automatically with the N3etfliX over the network. After successful activation, the Netflix displays the member's instant queue.
- When a member chooses to activate an NRD, the NRD displays a short activation code on the TV screen and an instruction on the TV screen.
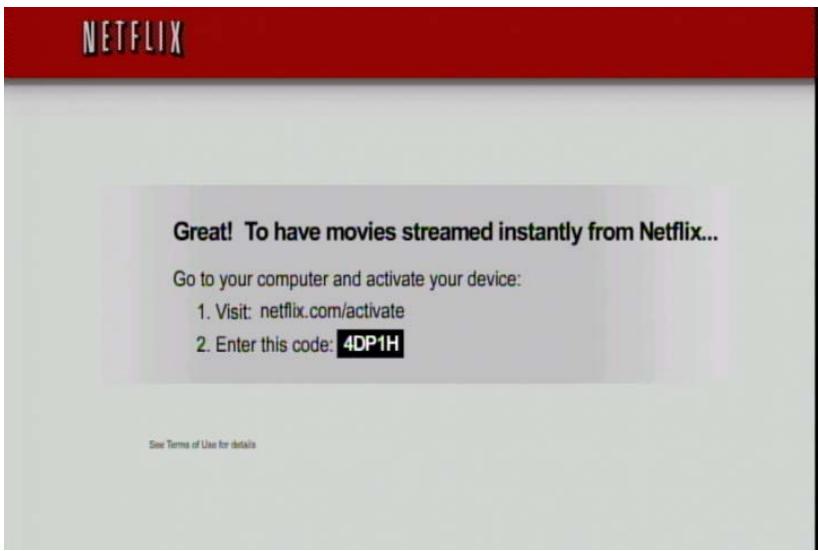
- Please visit netflix.com/activate website and enter the code. Then, complete the activation.


Step 3: Add Movies & TV Episodes to the Instant Queue Using the Netflix Web Site
When browse the movies, TV episodes on Netflix web site, member could add it/them to the queue. It/them will be shown on NRDs at the same time.
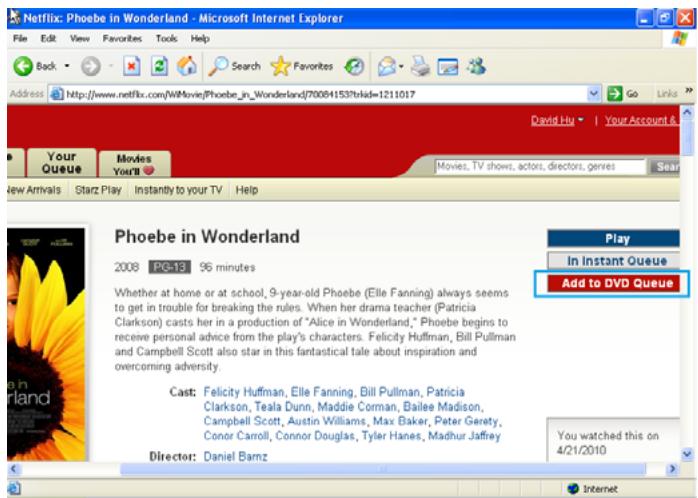
Step 4: Browse the Instant Queue on the Netflix/TV
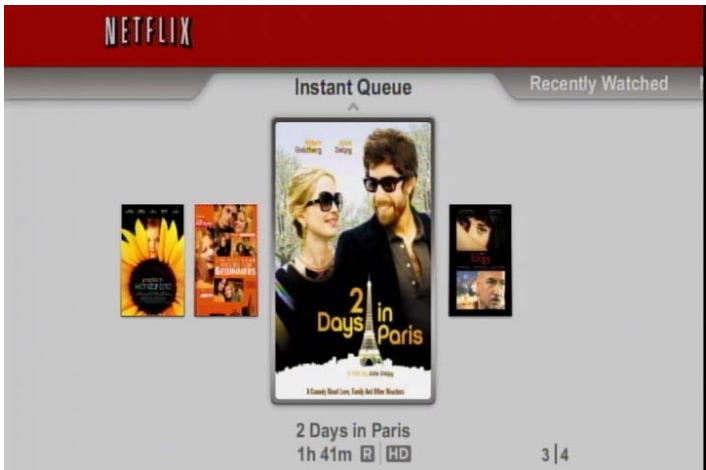
After maintained "Your Queue" on Netflix web site and enter NRDs, Instant Queue will show all of the videos in the list.
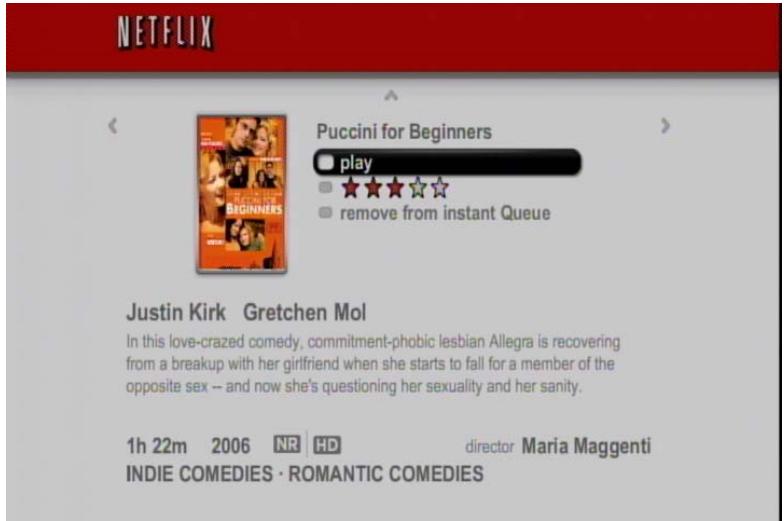
Selecting a title in the queue browser displays the poster screen for that title. From the poster screen, members can rate, play, view content metadata, or remove the tile from their queue.
Step 5: Browsing Lists of Recommendations
At the top of the queue browse screen, a row of lists of movie and TV recommendations is displayed.
These are dynamic lists of recommendations by category, similar to what the member would see when viewing the various recommendation pages on the Netflix web site such as Movies. In these documents, this feature is called LOLOMO (for lists of lists of movies) and is part of the Netflix Web API. LOLOMO provides Netflix members a way to add recommended titles to their instant queue without visiting the Netflix web site.
Step 6: Palyback and Trickplay
When a member chooses to playback a movie or TV Show, the NRD buffers, then begins playback.
Playing Music, Photo and Video files
For the supported file format and container in detail, please refer to the relevant section in the user manual. Some frequent usage of functions is highlighted as follows:
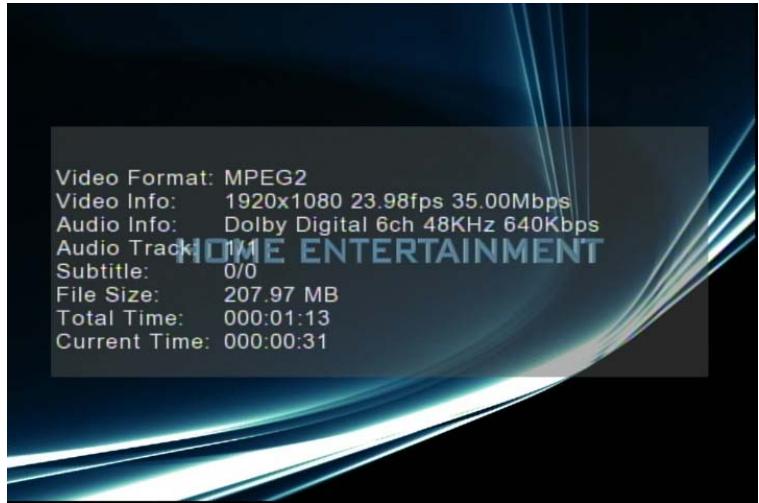
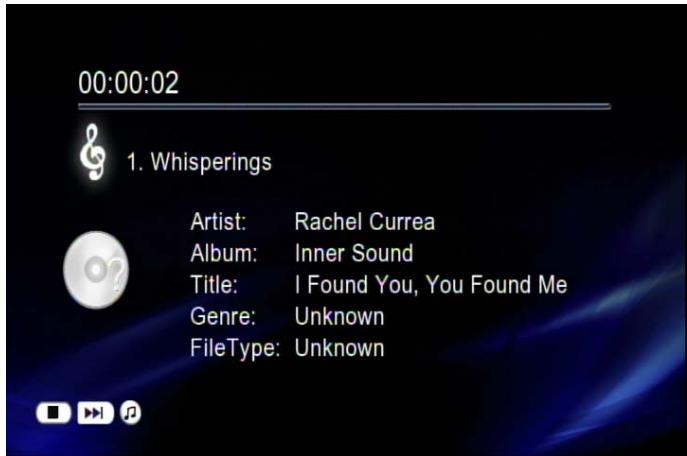
- Viewing Video Information: Press "Info" button to get video information; press again to see more info.
- Searching elapsed time and percentage of a music or video playing: Press "0(GOTO)" button on the remote control unit to enter time seek mode, and press the numeric buttons directly for a certain percentage of the file being played.
-
Photo Slide Show: Press 'OK' for the selected photo in thumbnail for full-screen display and press again to start the slide show.
-
Location Directory Navigation: Press "MENU" button to go to the 'directory' bar on the top of the screen. By pressing the numerical buttons on the remote control unit during navigation will sort
the file names by the first letter of the key pressed. This will help you find the targeted file among many.
- If you would like to use some functions (like iMEDIA or audio settings etc) while you're navigating directories and files, always press hot keys such as 'HOME', 'SETUP'...on the remote control unit instead of just pressing 'BACK' button numerous time. Then it will be easy to go back to where you were in a long directory path by pressing 'VIDEO', 'MUSIC' or 'PICTURE' hot keys.
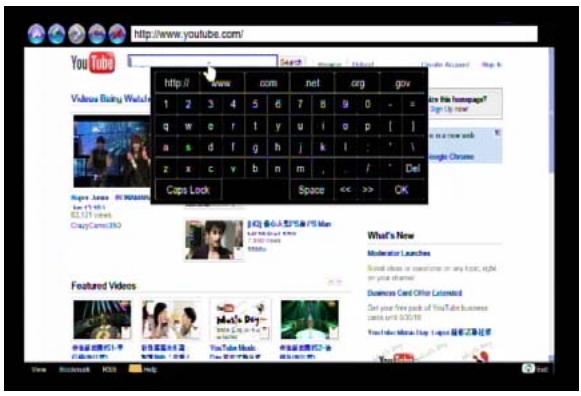
Web Browser & RSS
Wherever you are in the user interface, press 'Home' button on the remote control to return to the main menu as shown below. Select the icon which shows 'Web Browser' and press 'ok'.
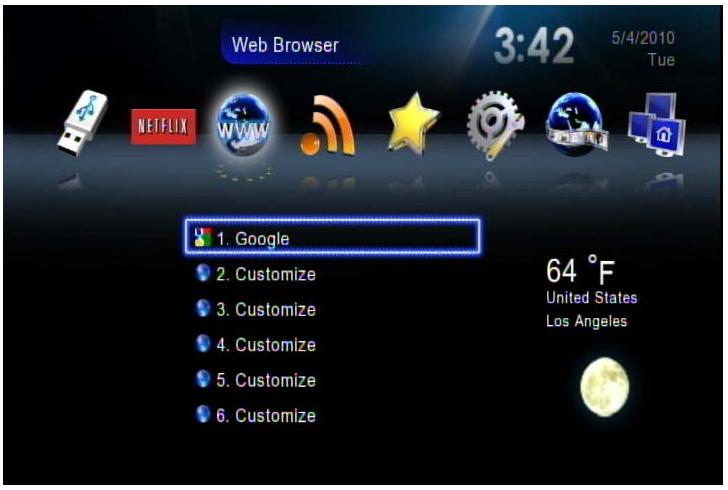
The homepage of the web browser will be displayed, then you can surf the web using the remote control or keyboard and mouse. An USB keyboard and mouse can be plugged to facilitate the web surfing. Make sure you plug it before you enter the Web Browser.
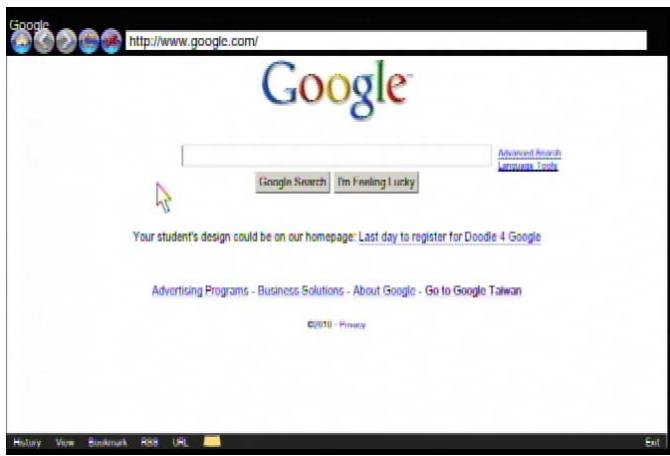

A virtual keyboard is also available there by pressing to facilitate input. Press the yellow button for help; you'll get instructions of all function hot keys as below.

When there's an RSS(Really Simple Syndication) icon like on a webpage, that means the page can be viewed with RSS format used to publish frequently updated works—such as blog entries, news headlines, audio, and video. An RSS document (which is called a "feed", "web feed" or "channel") includes full or summarized text, plus metadata such as publishing dates and authorship. Web feeds benefit publishers by letting them syndicate content automatically.
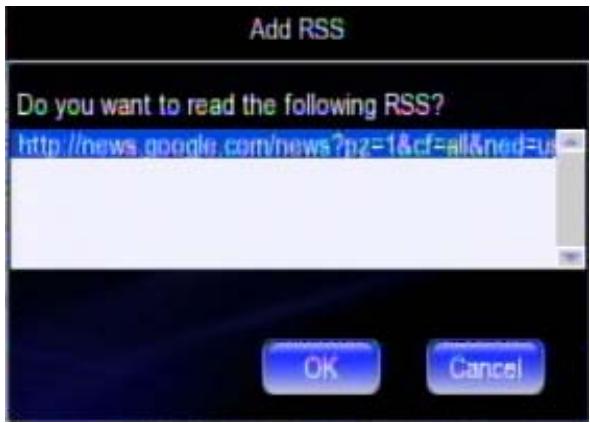
To add the feed into the RSS list of Media Player, please click on the icon on the page.
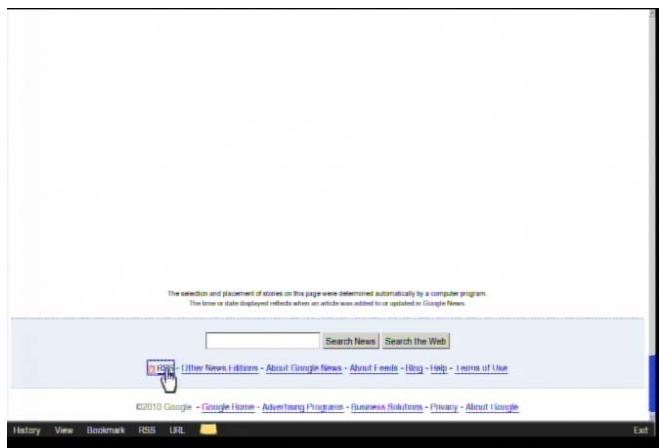
Press "ok" to confirm or "Cancel" to skip.
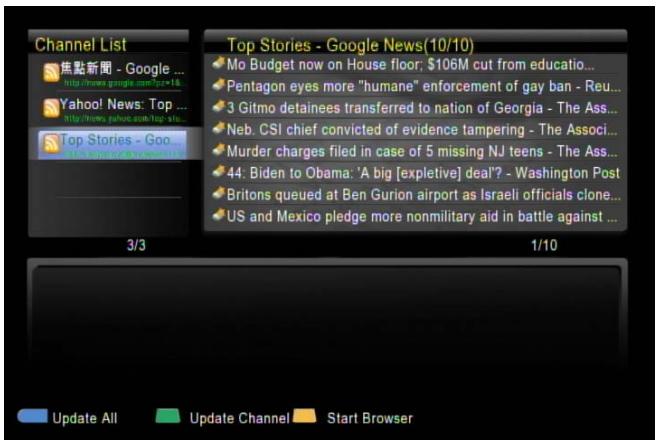
Go into the RSS page from the main page, and select the one you wish to view. There're already some built-in feeds.
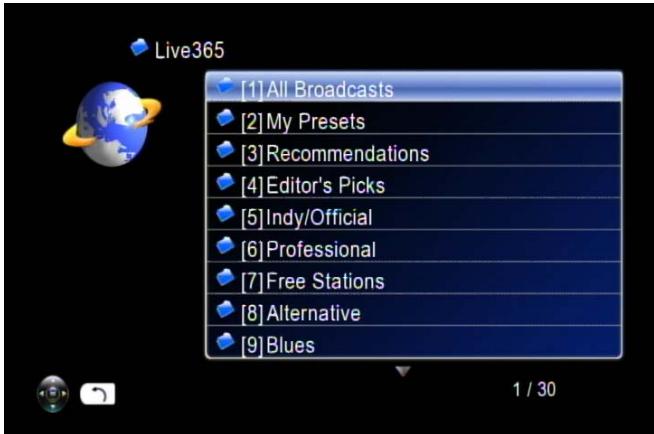
Play Internet Radio- Live 365^TM
Live365™ is an Internet radio service that provides virtually unlimited on-demand access to thousands of radio stations. The audio is streamed directly over the Internet. Follow below steps to access the radio stations:
- Make sure your network setting is correct and be able to access the internet.
- Select "iMedia" from main menu or press "iMedia" button on the remote control.
- Select "Live 365" and press "OK" button on remote control.
- Select a catalog you prefer from the list, or select "All Broadcasts" to browse all radio stations.
- Select a radio station from list, and press "OK", "Play", or "Left" button to play it.

indicates stands for a radio station.
Note: Press "BGM" hotkey on the remote control to add the station into background music list.
Viewing Youtube Content
You can use the Media Player to view Youtube content without the need for a PC.
To view YouTube content, follow these steps:
- Select "iMedia" from main menu or choose "YouTube".
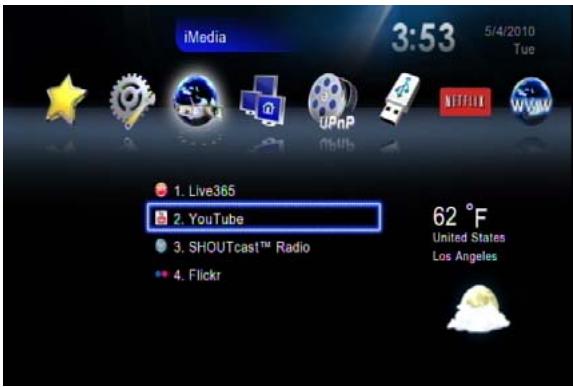
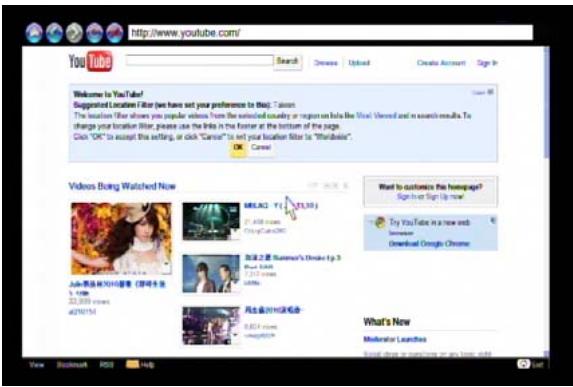
- Navigate to choose one to play.

Because the content is directly streaming from the Internet, please be patient while the content is loading. The waiting time depends on your local network bandwidth, the wide area network situation and the situation of correspondent YouTube server.
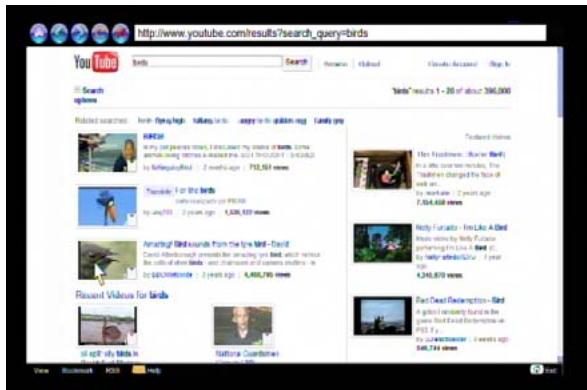
- Video Search
Please select the search icon on the right side, a virtual keyboard will be there for a keyword is
available to key-in search criteria.
ShoutCast
You can use the Media Player to listen to ShoutCast station without the need for a PC. Follow these steps:
- Select "iMedia" from main menu or choose "ShoutCast".
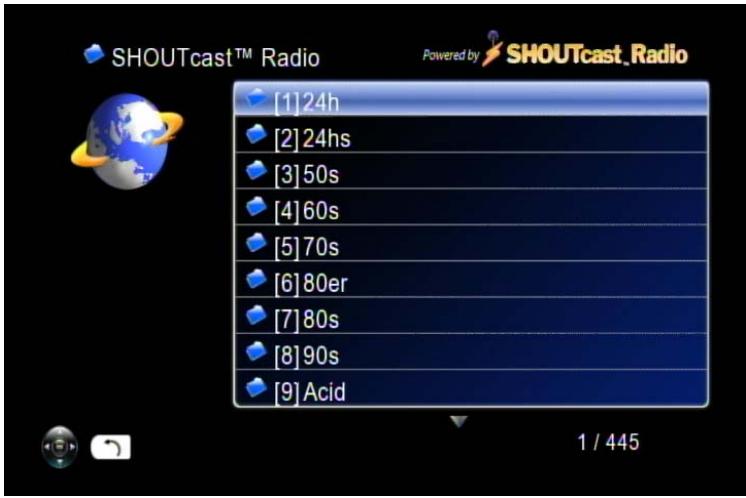
- Navigate to choose one to play.
Because the content is directly streaming from the Internet, please be patient while the content is being loaded.
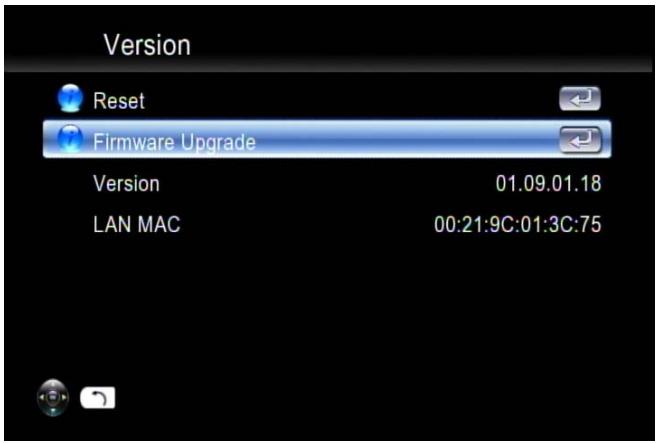
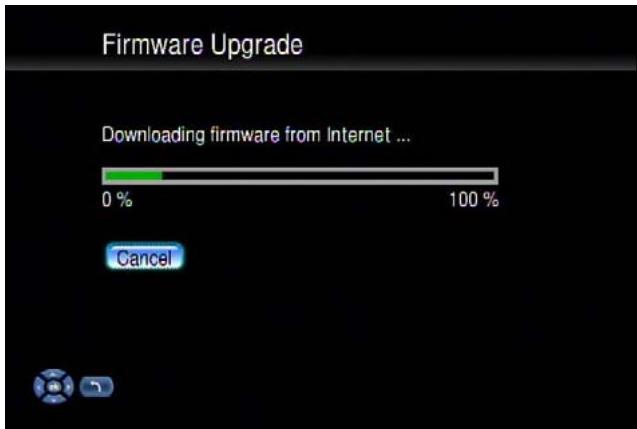
Firmware Upgrade
There're two ways to upgrade the firmware. Go to 'Setup' in the main menu and select 'Version'. The first way to upgrade the firmware is by 'Internet Upgrade', which can be more convenient without the necessity of a PC. Make sure Media Player is connected to the Internet beforehand. Follow the steps below:
- Go to "Setup Main Menu", Select "Version", and choose 'Firmware upgrade'.
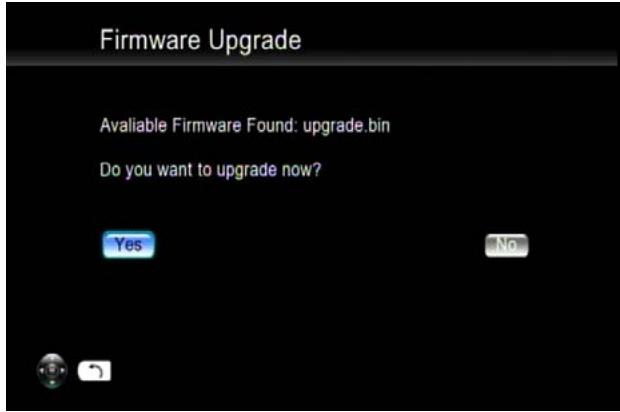
- Choose "Internet Upgrade", the system will automatically search available firmware code from the Internet.
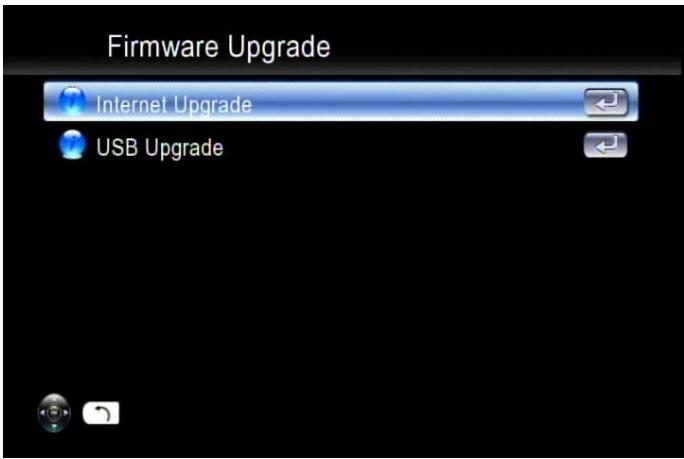
- Select 'Yes' if you wish to proceed. Please note that the power must not be turned off or interrupted during the process, otherwise the firmware can be corrupted and Media Player will not able to boot again.
- When the process is successfully finished, Media Player will reboot automatically.
- An alternative way is to choose "USB Upgrade". The latest firmware binary file is compressed and located on http://www.ViewSonic.com, ensure that the correct file/model is located before downloading.
- Download the firmware file, store it in your USB flash disk and uncompress it. The "upgrade.bin"
file must be stored in the root directory for Media Player to detect it.
- Insert the USB disk/stick to the USB port of Media Player. Go to "Setup" → "Version" → "Firmware upgrade" → "USB Upgrade".
- Select "Yes" to proceed or "No" to cancel. Please note that the power must not be turned off or interrupted during the process, otherwise the firmware can be corrupted and Media Player will not able to boot again.
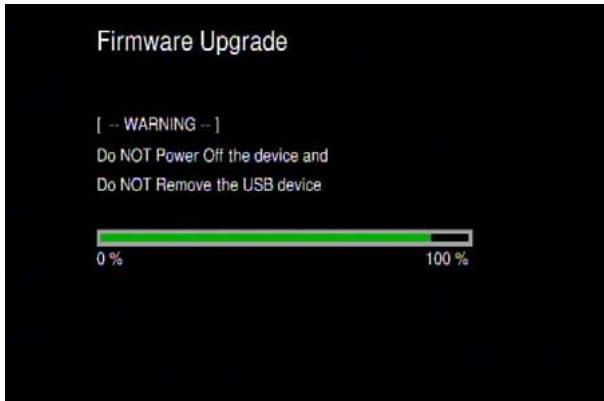
- When the process is successfully finished, Media Player will reboot automatically.
Miscellaneous Settings
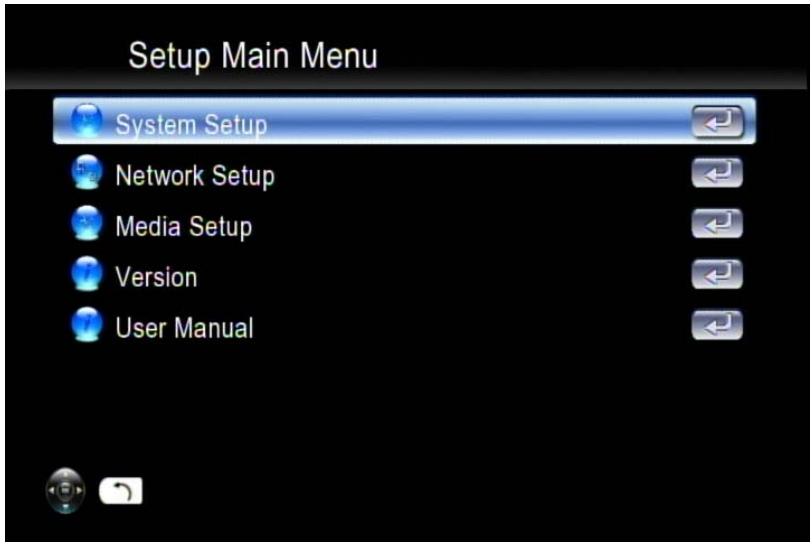
System Language and other settings apply on system are configured in the "System Setup" of the Setup Main Menu". Please select the item that you want to configure and press "OK" button or "Right" button on remote control to enter sub menu. After configuration, please press "Back" button or "Left" button to leave the setup menu and save the configurations that you've changed.

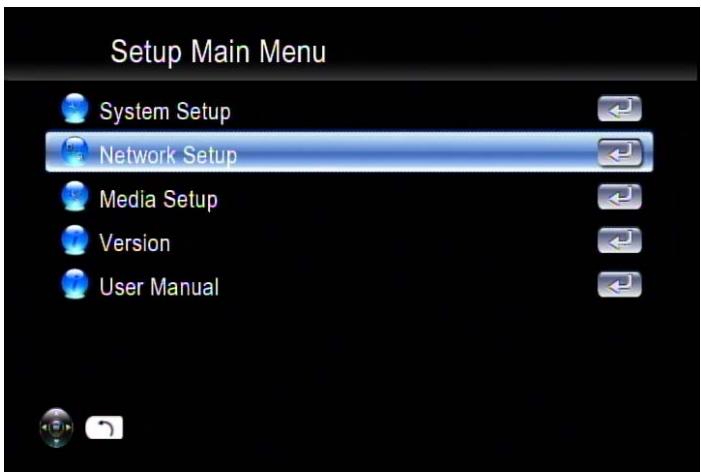
System Setup
If you want to change the configuration of your setup, you can select the "Setup" from Main Page, and select "System Setup" from Setup Main Menu. You can select, configure or adjust Language, TV mode, Audio, Video, HDD sharing and other settings here.
System Setup main page
Below table is a brief description for the System Setup selection.
SYSTEM SETUP TABLE
| Item Name | Value | Use |
| Language | Language | Selectcct |
| TV Mode Setup | TV System/ Video Output/Video Scale | Configure |
| Audio Setup | Digital Audio Output/AnalogAudio Output | Configure |
| Video Setup | Brightness/ Contrast/HUE/Saturation | Adjust |
| Other Setting | Music, Photo & Video DisplayOption /Advance Setting | Configure |
| HardDisk Share Set Up | User Name / Password | Configure |
Language
Language Table
| Item Name | Value | Use |
| Language | Chinese Simp./ Chinese Tradi. /Czech /English / French/ German/ Greek/ Hebrew/ Italian /Japan /Netherlandish/ Polish/ Portugese /Russia /Serbian/ Spanish/ Swedish / Turkish | Select |
TV Mode Setup
You can go to the "System Setup" menu to change the TV mode setting, including the Video output, TV system and aspect ratio.
TV Mode Setup Table
| Item Name | Value | Use |
| Video Output | P-SCAN Composite/ HDMI | Select |
| TV System | NTSC/480p/720p60/1080i60/1080p24/1080p60 | Select |
| Aspect Ratio | 4:3 PS/ 16:9/ 4:3 LB | Select |
| HDMI EDID | Enable/Disable | Switch |
Audio Setup
For DTS (Digital Theater System) audio tracks, the device passes it through digital audio output port (Optical or Coaxial cable) to an external decoder. Please make sure the Digital Audio Output mode (SPDIF-PCM / SPDIF-RAW) is turned on, if you are connecting the Optical/Coaxial cable.
Audio Setup Table
| Item Name | Value | Use |
| Digital Audio Output | On/Off | Switch |
| Analog Audio Output | MONO R/ MONO L/ MIX MONO/ STEREO | Select |
| DTS | SPDIF/RAW PCM | Select |
| AAC | SPDIF/RAW PCM | Select |
| AC3 | SPDIF/RAW PCM | Select |
| WMA PRO | SPDIF/RAW PCM | Select |
Video Setup
Video Setup Table
| Item Name | Value | Use |
| Brightness | 0 ~ 32 | Adjust |
| Contrast | 0 ~ 32 | Adjust |
| HUE | 0 ~ 32 | Adjust |
| Saturation | 0 ~ 32 | Adjust |
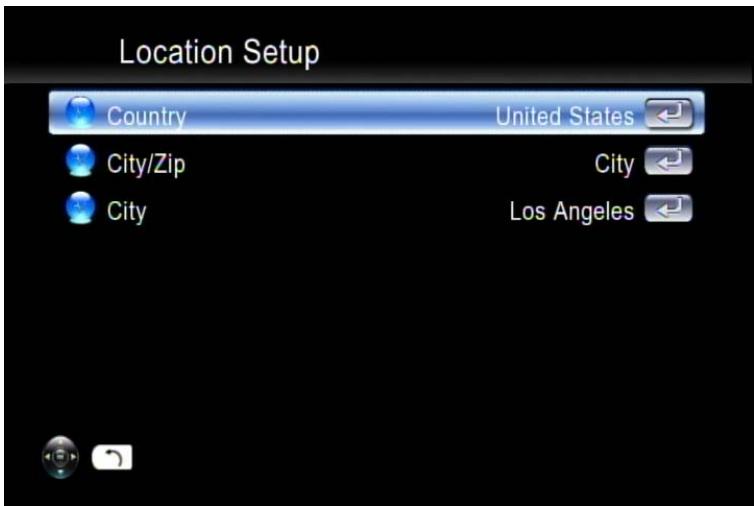
Location Setup
You can setup whatever location/weather your favoured country, city shown on the main page.
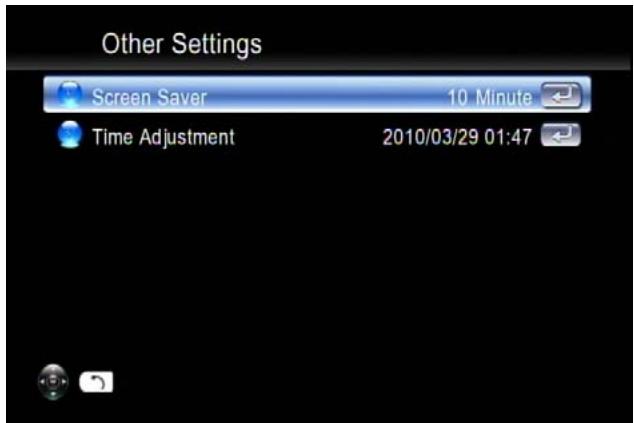
Other Settings
You can set the screen saver time as well as time shown on the main page.
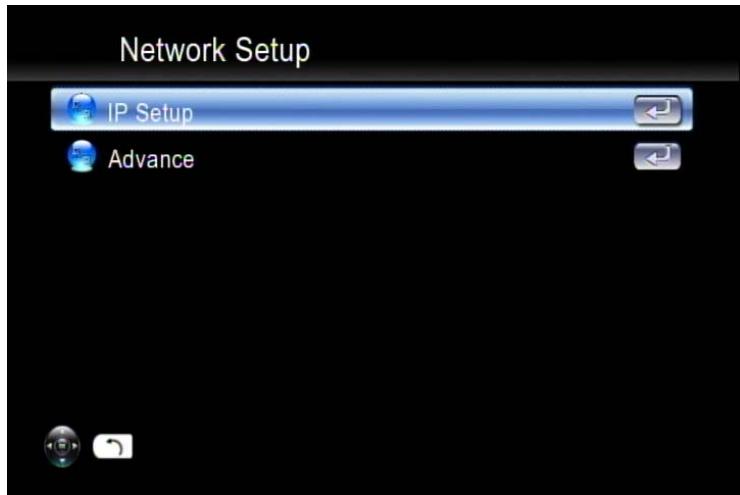
Network Setup
This section contains the following items:
Media Setup
This section contains the following items, description in detail is below the table.
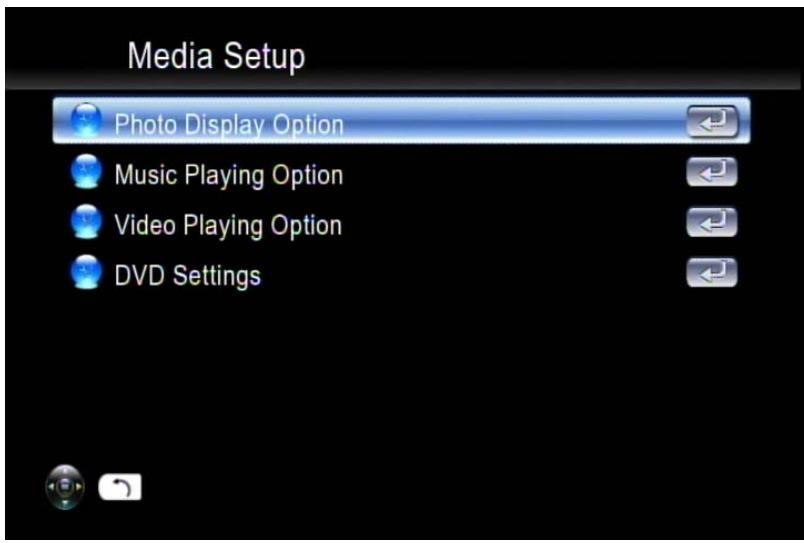
LABEL OF MEDIA SETTINGS
| Category | Item Name | Value | Use |
| Photo Display Option | Slide Show Time | 1 sec ~ 3 min | Select |
| Orientation Correction | Enable/Disable | Switch | |
| Transition Effect | Enable/Disable | Switch | |
| Music Playing Option | Music Auto Play | Off/ Repeat One/ Repeat All/ Random | Switch |
| Video Playing Option | Video Playing Videos | Ask/On/Off | Switch |
| Play Next Video | Enable/Disable | Switch | |
| Video Subtitle | Enable/Disable | Switch | |
| Auto Sync | Enable/Disable | Switch | |
| DVD Settings | Preferred Subtitle | English/ German/ French/ Italian/ Spanish/ Portugal/ Turkish/ Dutch/ Russian | Select |
| Preferred Audio | English/ German/ French/ Italian/ Spanish/ Portugal/ Turkish/ Dutch/ Russian | Select |
Auto Sync
For some video film with 24 frames per second, you may see poor quality on the display due to frame rate conversion. Please turn on Auto Sync, then the TV output will be adjusted automatically to the correct mode. Make sure the HDMI EDID is turned on at the same time.
Hard Disk Share Setup
If you have installed a Hard Disk Drive into your media player, you can see the "Hard Disk Share Setup" here to configure your HDD Settings.
Hard Disk Share Setup

Share Name
sharehdd


Group Name
workgroup


UserID
admin


Password
admin


You can rename the default Share Name, Group Name, User Name and Password by onscreen keyboard.
Trouble Shooting
No Television display or Poor quality image.
- Make sure your TV is turned on and switched to the correct input.
- Make sure Media Player is turned on and switched to the correct TV mode.
If the TV Mode that you are using is not correct one for your television, you may not be able to see any image displayed. To fix this problem, push "Output" key on the remote control. You can cycle through each of the possible TV modes to find and select the correct one.
- Make sure you are using the correct video cables and that they are connected firmly to Media Player and to your TV.
- The Power cords for Media Player and your TV are securely connected to a working power source.
Unstable Display with 1080p24 films
For some video film which is with 24 frames per second, you may see poor quality on the display. Please select 1080p24 as the TV output mode, or turn on "Auto Sync" function.

No Audio Output with with DTS encoded films
Media Player does not decode audio with DTS format, but pass through to S/PDIF for external AV amplifier. For the films with DTS sound tracks, pls enable 'Digital Audio Output' and use an external decoder.
Media Player does not find my network.
If you use wireless networks, make sure that the Wireless Network Name (SSID) and the security settings of Media Player and media server match exactly. If you use wired network, make sure the cable is connected correctly.
Digital Media Server can only be seen for a short time
Some firewall or antivirus software may cause failures of the UPnP communications between
Media Player and Digital Media Server. Please configure your firewall setting to allow the access of "UPnP" and Digital Media Server. Or you may disable the firewall or antivirus applications while using Digital Media Server!
Media Player does not receive a valid IP Address
- Verify that a working DHCP server is on your network. PCs on the network should get IP addresses in the correct range.
- You can use a Static IP Address of there is a problem connecting to the server.
- If you are using a wireless network, verify that Media Player is associated with the correct SSID, and that the WEP settings on Media Player match the setting on your access point.
No Subtitle when playing "mpeg2" files
Please make sure to enable the "subtitle" function by pressing "subtitle button" every time when you are watching mpg2 video files; also please enable this function with each mpg2 video file that has subtitle file included.
Please note if you have enabled the "Transcoding" function, the subtitle function might not work for some video files.
No Subtitle when playing "mpeg2" files after pressing "subtitle" button
Please make sure the conversation of thempeg2 video file has begun before pressing "subtitle" button.
Fast forward or slow forward is not working
Please note if you have enabled the "Transcoding" function, the "fast forward", "fast backward", "slow forward", and "slow backward" functions will not work due to limitation.
Can not add music files to BGM list?
Please make sure you did not add more than 500 music files to BGM list since the capacity of BGM list is 500 files.
Can not find Firmware Upgrade file in the USB device
Please check if you put the latest firmware file under root directory of USB device, or Media Player system can not find it.
Display of metadata (Artist, Album, Title etc.) of audio files is not correct
Please set the Language (in Settings) as the same as the language coding of metadata of the audio files to avoid scrambled characters.
FAQ
Q: Why I can not see anything on TV screen?
Answer: Please select the correct signal input on your TV set. If you connect the player to TV via HDMI, please select the right HDMI port no. on your TV set; If you connect the player to TV via A/V port, please select the right A/V port no. on your TV set.
Q: Why I can not connect the player to my home network?
Answer: If you use wireless connection, please make sure the right encryption protocol is selected and right password is entered. Choose the 'iMedia' icon on the main menu and press enter, you'll see if an IP address is assigned.
Q: USB HDD External Enclosure is not supported?
Answer: Please use external power supply for USB HDD External Enclosure, although many drives can be driven directly through USB power, some may exceed the ports power capability.
Customer Support
For technical support or product service, see the table below or contact your reseller.
Note : You will need the product serial number.
| Country/Region | Web Site | T=TelephoneF=Fax | |
| Australia/New Zealand | www.viewsonic.com.au | AUS=1800 880 818NZ=0800 008 822 | service@au.viewsonic.com |
| Canada | www.viewsonic.com | T (Toll-Free)= 1-866-463-4775T (Toll)= 1-424-233-2533F= 1-909-468-3757 | service.ca@viewsonic.com |
| Europe | www.viewsoniceurope.com | www.viewsoniceurope.com/uk/Support/Calldesk.htm | |
| Hong Kong | www.hk.viewsonic.com | T= 852 3102 2900 | service@hk.viewsonic.com |
| India | www.in.viewsonic.com | T= 1800 11 9999 | service@in.viewsonic.com |
| Ireland (Eire) | www.viewsoniceurope.com/uk/ | www.viewsoniceurope.com/uk/support/call-desk/ | service_ie@viewsoniceurope.com |
| Korea | www.kr.viewsonic.com | T= 080 333 2131 | service@kr.viewsonic.com |
| Latin America(Argentina) | www.viewsonic.com/la/ | T= 0800-4441185 | soporte@viewsonic.com |
| Latin America(Chile) | www.viewsonic.com/la/ | T=1230-020-7975 | soporte@viewsonic.com |
| Latin America(Columbia) | www.viewsonic.com/la/ | T= 01800-9-157235 | soporte@viewsonic.com |
| Latin America(Mexico) | www.viewsonic.com/la/ | T= 001-8882328722 | soporte@viewsonic.com |
| Renta y DATOS, 29 SUR 721, COL. LA PAZ, 72160 PUEBLA, PUE. Tel: 01.222.891.55.77 CON 10 LINEASElectroser, Av Reforma No. 403Gx39 y 41, 97000 Merida, Yucatan. Tel: 01.999.925.19.16Other places please refer to http://www.viewsonic.com/la/soporte/index.htm#Mexico | |||
| Latin America(Pu) | www.viewsonic.com/la/ | T= 0800-54565 | soporte@viewsonic.com |
| Macau | www.hk.viewsonic.com | T= 853 2870 0303 | service@hk.viewsonic.com |
| Middle East | ap.viewsonic.com/me/ | Contact your reseller | service@ap.viewsonic.com |
| Puerto Rico &Virgin Islands | www.viewsonic.com | T= 1-800-688-6688 (English)T= 1-866-379-1304 (Spanish)F= 1-909-468-3757 | service.us@viewsonic.comsoporte@viewsonic.com |
| Singapore/Malaysia/Thailand | www.viewsonic.com.sg | T= 65 6461 6044 | service@sg.viewsonic.com |
| South Africa | ap.viewsonic.com/za/ | Contact your reseller | service@ap.viewsonic.com |
| United Kingdom | www.viewsoniceurope.com/uk/ | www.viewsoniceurope.com/uk/support/call-desk/ | service_gb@viewsoniceu-rope.com |
| United States | www.viewsonic.com | T (Toll-Free)= 1-800-688-6688T (Toll)= 1-424-233-2530F= 1-909-468-3757 | service.us@viewsonic.com |
Limited Warranty
ViewSonic Network Media Player
What the warranty covers:
ViewSonic warrants its products to be free from defects in material and workmanship, under normal use, during the warranty period. If a product proves to be defective in material or workmanship during the warranty period, ViewSonic will, at its sole option, repair or replace the product with a like product. Replacement product or parts may include remanufactured or refurbished parts or components.
How long the warranty is effective:
ViewSonic Network Media Player are warranted for 1 year for labor from the date of the first customer purchase.
Who the warranty protects:
This warranty is valid only for the first consumer purchaser.
What the warranty does not cover:
- Any product on which the serial number has been defaced, modified or removed.
- Damage, deterioration or malfunction resulting from:
a. Accident, misuse, neglect, fire, water, lightning, or other acts of nature, unauthorized product modification, or failure to follow instructions supplied with the product.
b. Repair or attempted repair by anyone not authorized by ViewSonic.
c. Causes external to the product, such as electric power fluctuations or failure.
d. Use of supplies or parts not meeting ViewSonic's specifications.
e. Normal wear and tear.
f. Any other cause which does not relate to a product defect.
- Any product exhibiting a condition commonly known as "image burn-in" which results when a static image is displayed on the product for an extended period of time.
How to get service:
- For information about receiving service under warranty, contact ViewSonic Customer Support (please refer to Customer Support page). You will need to provide your product's serial number.
- To obtain warranted service, you will be required to provide (a) the original dated sales slip, (b) your name, (c) your address, (d) a description of the problem, and (e) the serial number of the product.
- Take or ship the product freight prepaid in the original container to an authorized ViewSonic service center or ViewSonic.
- For additional information or the name of the nearest ViewSonic service center, contact ViewSonic.
Limitation of implied warranties:
There are no warranties, express or implied, which extend beyond the description contained herein including the implied warranty of merchantability and fitness for a particular purpose.
Exclusion of damages:
ViewSonic's liability is limited to the cost of repair or replacement of the product. ViewSonic shall not be liable for:
- Damage to other property caused by any defects in the product, damages based upon inconvenience, loss of use of the product, loss of time, loss of profits, loss of business opportunity, loss of goodwill, interference with business relationships, or other commercial loss, even if advised of the possibility of such damages.
- Any other damages, whether incidental, consequential or otherwise.
- Any claim against the customer by any other party.
4.3: ViewSonic DMP Warranty
- ViewSonic™
- VMP75
- Network media player
- Compliance Information
- CE Conformity for European Countries
- Following information is only for EU-member states:
- Declaration of RoHS Compliance
- Copyright Information
- For Your Records
- Product disposal at end of product life
- Safety Information
- Class 1 Laser Devices
- About This Guide
- Package Contents
- Hardware Overview
- REAR VIEW
- Peripheral Connections
- Video & Audio
- Storage Device
- Network Connection
- Using Remote Control
- Networking Diagram
- Setup for TV Mode
- Wired Network Setup
- Wireless Network Setup
- UPnP
- Network Neighborhood (Samba Client)
- Local Storage Device
- File Management by Remote Control Unit
- Copy/Delete local files from PC
- Netflix
- Step 1: Create an Account
- Step 2: Activation
- Playing Music, Photo and Video files
- Web Browser & RSS
- Play Internet Radio- Live 365TM
- Viewing Youtube Content
- ShoutCast
- Firmware Upgrade
- Miscellaneous Settings
- System Setup
- Language
- TV Mode Setup
- Audio Setup
- Video Setup
- Location Setup
- Other Settings
- Network Setup
- Media Setup
- Auto Sync
- Hard Disk Share Setup
- Trouble Shooting
- FAQ
- Customer Support
- Limited Warranty
- ViewSonic Network Media Player
- What the warranty covers:
- How long the warranty is effective:
- Who the warranty protects:
- What the warranty does not cover:
- How to get service:
- Limitation of implied warranties:
- Exclusion of damages:
Marque : VIEWSONIC
Modèle : VMP75
Catégorie : Affichage interactif