
AM-F80 - Radio portable AIWA - Notice d'utilisation et mode d'emploi gratuit
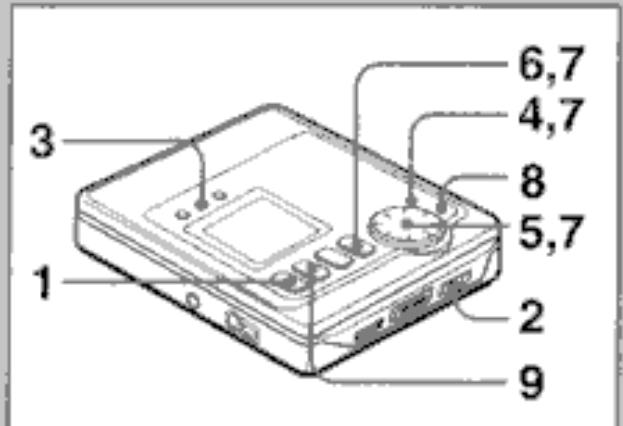
Retrouvez gratuitement la notice de l'appareil AM-F80 AIWA au format PDF.

| Type de produit | Mini-lecteur/enregistreur MD portable |
| Marque | AIWA |
| Modèle | AM-F80 |
| Dimensions | 78,8 x 18,8 x 86,8 mm (L x H x P) |
| Poids | Environ 163 g (avec batterie rechargeable) |
| Alimentation | DC 3,6 V via batterie lithium-ion rechargeable LIB-902 ; DC 1,5 V via une pile LR6 (AA) ; secteur via adaptateur AC-D401 |
| Autonomie (lecture) | Environ 11,5 h (batterie seule) ; environ 20 h (batterie + pile alcaline) |
| Autonomie (enregistrement) | Environ 5 h (batterie seule) ; environ 7,5 h (batterie + pile alcaline) |
| Type de disque | MiniDisc (60, 74 ou 80 minutes) |
| Méthode d'enregistrement | Magnéto-optique |
| Réponse en fréquence | 20 à 20 000 Hz ±1 dB |
| Taux d'échantillonnage | 44,1 kHz avec convertisseur de fréquence intégré |
| Entrées | MIC (mini-jack stéréo) ; LINE (mini-jack stéréo) ; OPTIQUE numérique (mini-jack optique) |
| Sortie | Casque (mini-jack stéréo) – 10 mW + 10 mW sur 16 ohms |
| Fonctions d'enregistrement | Enregistrement stéréo/mono, synchronisation analogique/numérique, marqueur automatique/manuel/temporel |
| Fonctions de lecture | Lecture normale, répétition, aléatoire, programmée, accélérée (×2) |
| Édition | Nommer disque/piste, combiner/diviser pistes, réordonner, effacer |
| Accessoires fournis | Télécommande LCD, casque stéréo, adaptateur secteur, batterie rechargeable, boîtier à pile, câble optique numérique, étui de transport |
| Entretien et nettoyage | Nettoyer le boîtier avec un chiffon doux légèrement humidifié avec une solution détergente. Ne pas utiliser de solvants forts. |
| Sécurité | Ne pas démonter l'appareil (rayon laser). Éviter l'exposition au faisceau laser lors de l'ouverture. Utiliser à un volume modéré pour éviter les dommages auditifs. Ne pas utiliser en conduisant. |
| Pièces détachées et réparabilité | Pour le remplacement de la batterie de sauvegarde interne, contacter le service après-vente Aiwa. Piles et batterie rechargeable remplaçables par l'utilisateur. |
FOIRE AUX QUESTIONS - AM-F80 AIWA
Questions des utilisateurs sur AM-F80 AIWA
0 question sur cet appareil. Repondez a celles que vous connaissez ou posez la votre.
Poser une nouvelle question sur cet appareil
Téléchargez la notice de votre Radio portable au format PDF gratuitement ! Retrouvez votre notice AM-F80 - AIWA et reprennez votre appareil électronique en main. Sur cette page sont publiés tous les documents nécessaires à l'utilisation de votre appareil AM-F80 de la marque AIWA.
MODE D'EMPLOI AM-F80 AIWA
MINIDISCRECORDER
AM-F80
OPERATING INSTRUCTIONS
BEDIENUNGSANLEITUNG
MODE D'EMPLOI

CAUTION
Use of controls or adjustments or performance of procedures other than those specified herein may result in hazardous radiation exposure.
CLASS 1 LASER PRODUCT
KLASSE 1 LASER PRODUKT
LUOKAN 1 LASER LAITE
CLASS 1 LASER APPARAT
This minidisc recorder is classified as a CLASS 1 LASER product.
The CLASS 1 LASER PRODUCT label is located on the exterior.
CAUTION

Invisible laser radiation when open and interlocks are defeated. Avoid exposure to beam.
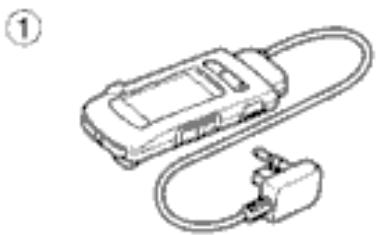
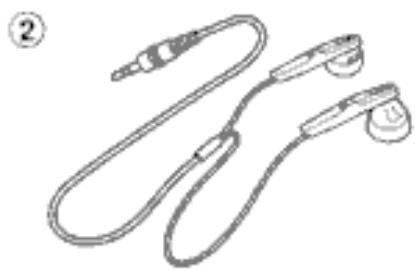
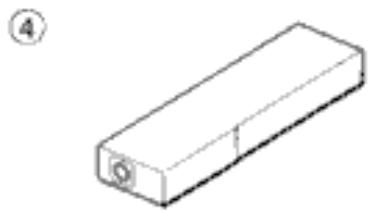
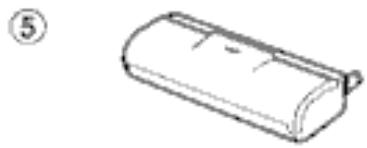
Accessories
Following accessories are supplied with this unit. Check them before use.
① LCD remote control
② Stereo headphones
③ AC adaptor
④ Rechargeable battery
⑤ Battery case
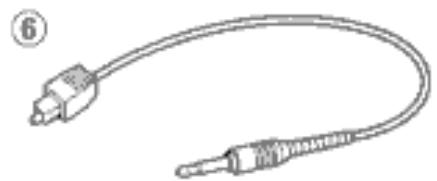
Optical digital cable
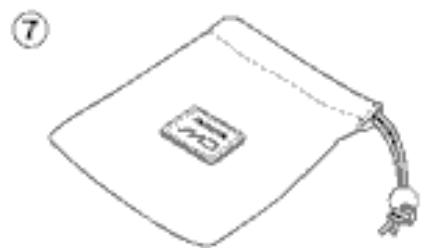
⑦ Carrying case
COPYRIGHT
Please check the laws on copyright relating to recordings from discs, radio or external tape for the country in which the machine is being used.
PRECAUTIONS 6
USING ON THE RECHARGEABLE BATTERY 10
USING ON AC HOUSE CURRENT .... 12
USING ON DRY CELL BATTERY 14
PREPARATIONS 16
RECORDING
Recording methods and connections ... 20
Basic operation 26
Adjusting the recording level 30
USABLE FUNCTIONS FOR RECORDING
Registering the index mark 32
Selecting a marker function 34
Extended recording (Monaural recording) 36
Synchronized analog recording 38
Synchronized digital recording 38
PLAYBACK
Basic operation 40
To change the display 44
Title search function 46
Other playback modes 48
Programmed play 50
EDITING
Registering the disc name and track title 52
Combining two tracks 56
Dividing a track 58
Changing the order of the tracks 60
Erasing tracks 62
OTHER SETTINGS
To cancel the beep sound (Signal sound function) 64
To limit the maximum volume level (Ear guard function) 64
To cancel the back light of the display and buttons 66
To set the alarm 68
MDGUIDEMESSAGES 72
TROUBLESHOOTING GUIDE 75
WHAT IS A MINIDISC? 78
SPECIFICATIONS 84
To maintain good performance
- Do not use the unit in places which are extremely hot, cold, dusty or humid. In particular, do not use or keep the unit in the following places.
in a highly humid area such as a bathroom
near a heater
- in an area exposed to direct sunlight (Example: inside a parked car, where it can become extremely hot)
where it is very dusty or sandy
- near sources of strong magnetism, such as televisions, speakers, or magnets
- where there is a lot of movement or vibration, such as on a card dashboard or unstable shelf
For safety
- Do not attempt to disassemble the unit. Laser rays from the optical pickup are dangerous to the eyes.
- Make sure that pins or other foreign objects do not get inside the unit.
Take care not to drop the unit or subject it to strong shocks. - To keep dust from the pickup lens, keep the disc holder closed after use. Never touch the lens.
- If you hear no sound when playing a disc, DO NOT turn the volume up too high since the music could suddenly start. Turn the volume to the lowest level before starting playback and slowly turn it up to the desired level.
Note on listening with the headphones
- Listen at a moderate volume to avoid hearing damage.
- Do not wear the headphones while driving or cycling. It may create a traffic hazard.
- You should use extreme caution or temporarily discontinue use in potentially hazardous situations, such as walking, jogging, etc.
- Wear them properly; L is left, R is right.
The in-ear type headphones should be worn with the longer cord behind your neck.

A

B
CAUTION
Listening to headphone stereo at full power for extended periods of time can result in hearing damage.
Note on condensation
If the unit is suddenly moved from a cold place to a warm one, it may result in condensation on the pickup lens causing malfunction or playback difficulties.
Should this occur, leave the unit for a few hours, then try playback again.
Note on handling MD→A
Since MDs come in a cartridge which protects the discs inside from fingerprints and dust, you do not have to be overly careful when handling them.
However, soiled or damaged cartridges can lead to malfunctions in the unit.
Observe the following tips when handling MDs.
- Keep a cartridge in the attached case.
- Do not open the shutter of the cartridge to touch the disc directly. If the disc inside becomes soiled, it is very difficult to clean. The cartridge can also be damaged.
- Close the shutter if it opens while handling or ejecting a disc. Otherwise dust may enter or a disc may become scratched.
If erroneous display occurs 8
Reset the unit pressing the RESET button on the bottom of the unit with a thin rod.
To clean the cabinet
Use a soft cloth lightly moistened with a detergent solution.
Do not use strong solvents such as alcohol, benzine or thinner.

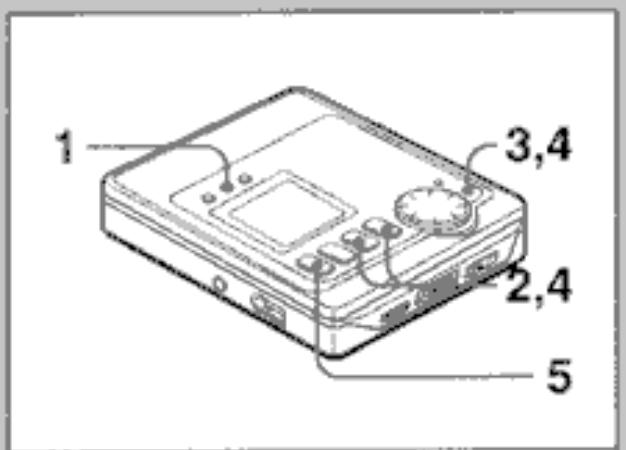
1

2

3
USING ON THE
English
RECHARGEABLE BATTERY
When using on the rechargeable battery for the first time, charge it for more than 1 hour.
1 Open the battery compartment.
2 Insert the rechargeable battery with the step marks ⑧ correctly aligned.
After inserting the battery, close the battery compartment and the dis holder.
3 Connect the AC adaptor.
① to the DC 4.5 V jack
② to a wall outlet
in the display blinks.
Recharging a fully used battery takes about 2 hours. goes out when the rechargeable battery is fully charged.
After recharging, disconnect the AC adaptor.
Time to recharge the battery
The battery indicator changes from to to based on the remaining power in the battery. Recharge the battery when the lights.
If the unit remains in use after lights, "LOW BATT" appears and the operation will stop.
If "TMP OVER" appears
Check that the ambient temperature is between 0^ and 40^ .
You cannot recharge the battery where the temperature is under 0^ or over 40^
Note on the rechargeable battery
- Use only the supplied AC adaptor to recharge the battery.
- Do not carry the battery in a pocket or handbag together with metal objects such as pendants or key holders.
- Do not short-circuit the terminals.
- Do not disassemble the battery, heat it or put it in water.
- Toprolong the performance of the battery, recharge it in an ambient temperature of 10^ to 30^ and keep it in a cool location when not using.
To maintain the performance of the battery, recharge it at least once a year even when it is not used for a long period of time.
The supplied rechargeable battery can be recharged approximately 300 times.
USING ON AC HOUSE CURRENT
Connect the supplied AC adaptor in the same way as when recharging the battery.

USING ON DRY CELL BATTERY
- Insert rechargeable battery when using on dry cell battery.
1 Insert a LR6 (size AA) alkaline battery with the and marks correctly aligned.
2 Attach the battery case.
Battery replacement
The battery indicator changes from to to to based on the remaining power of the battery. Replace the battery when the lights. After that, it may take few seconds for the display to change to the correct one. If the unit remains in use after lights, "LOW BATT" appears and the operation will stop.
For prolonged operation
Insert the fully charged rechargeable battery in the unit and attach the battery case with a new LR6 (size AA) alkaline battery inside. Playback of approx. 20 hours is possible.
Note on dry cell batteries
Make sure that and marks correctly aligned.
- To prevent the risk of electrolyte leakage or explosions, never recharge the battery, apply heat to it, or take it apart.
- When not using the battery, remove it to prevent needless battery wear.
If liquid leaks from the battery, wipe thoroughly to remove.
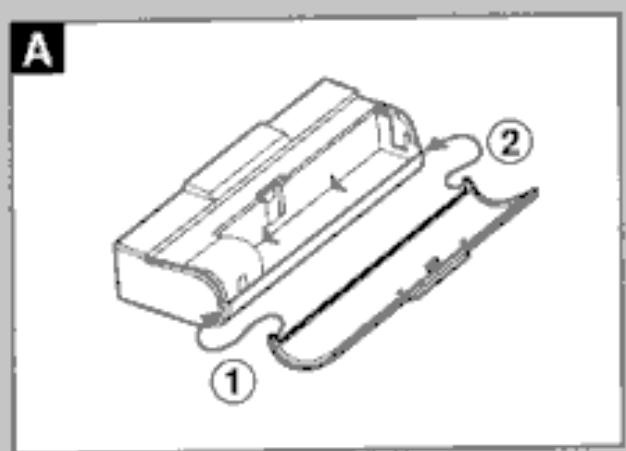
If the cover of the battery case comes off
Reattach it as illustrated. A
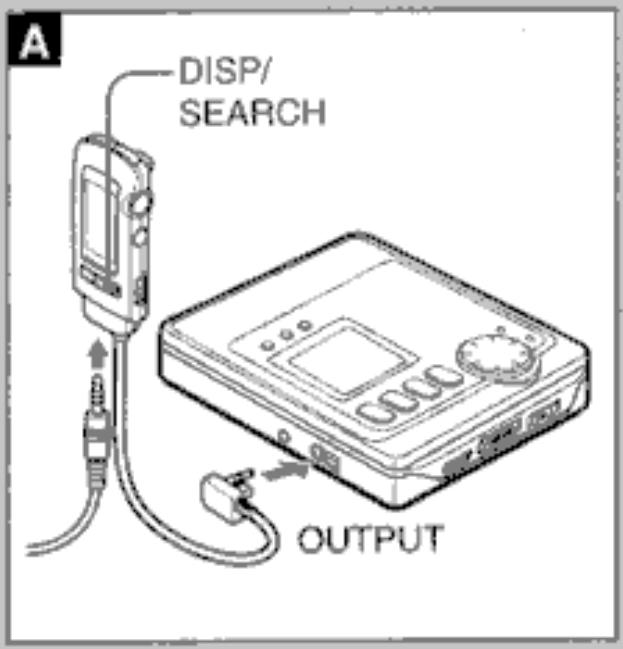

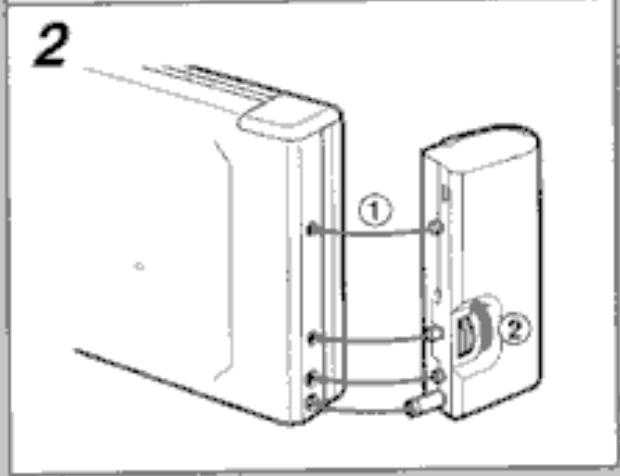
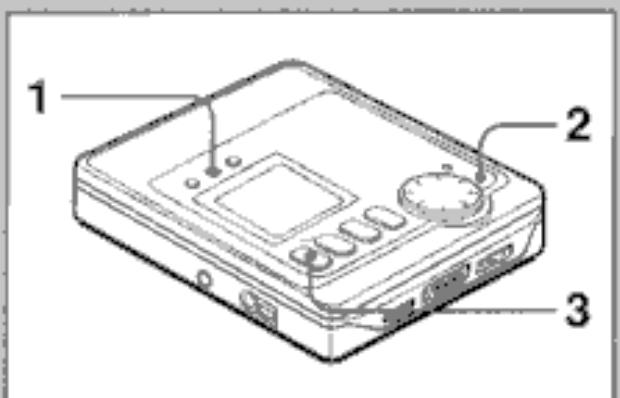
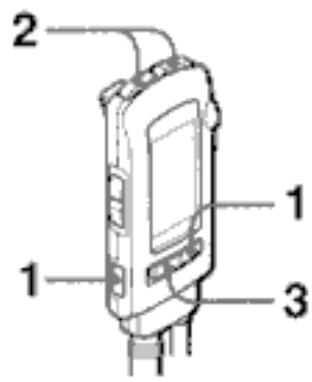
Connecting the headphones A
Connect the supplied headphones to the remote control and connect the remote control to the OUTPUT jack of the main unit.
To turn on the backlight of the display on the remote control, press DISP/SEARCH.
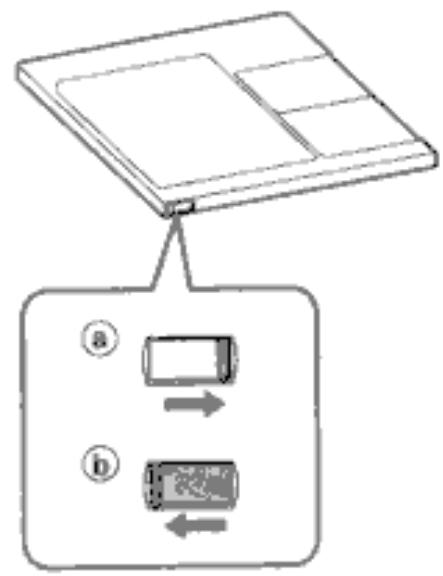
HOLD switches B
When operating with the main unit, release HOLD on the main unit. (a)
When operating with the remote control, release HOLD on the remote control. ⑥ When not using the unit, set both to the HOLD position. ⑧
Accidentally pressed buttons will not function.
If buttons on the main unit are pressed when the HOLD switch is set to the HOLD position, "HOLD" appears.
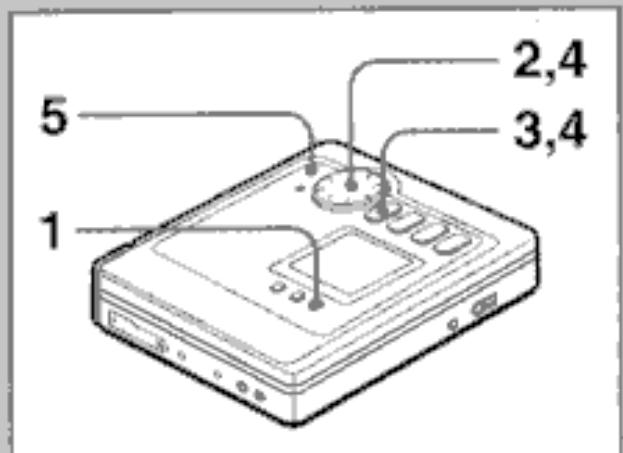


Setting the clock
- If you set the clock before use, the date will be recorded automatically every time a recording is done.
- Before setting the clock, make sure that enough battery power remains.
Operate when the power is off.
1 Keep DISP pressed for about 3 seconds.
"CLOCKSET" is displayed.
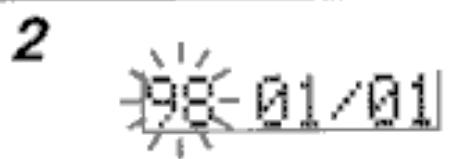
2 Turn MULTI JOG to set the year.
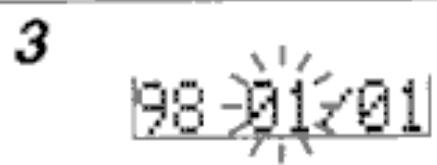
3 Press▶.
The month starts flashing.
4 Repeat the steps 2 and 3 to set the month, day, hour and minute.
5 Press ENTER.
The clock starts from the 00 seconds.
To correct a setting mistake
Press repeatedly until the digits to be corrected are flashing, then turn MULTI JOG to reset them.
To see the time
Press DISP while in the stop mode. Press again to see the date.
Note
The clock does not work properly in the following cases:
- when the unit is not used for a long period of time
- when the batteries are removed for a long period of time
In these cases, you cannot see the time even if you press DISP.
Set the clock again.
About the built-in back-up battery
The built-in back-up battery retains the time and date when the batteries are removed. When the back-up time becomes extremely short, consult your nearest Aiwa service personnel to change the back-up battery.
A
Recording methods and connections
The INPUT jack of this unit can accept digital signals, analog signals (line output), and sound signal from the microphone.
According to the source signal and output jack of the connected unit, make connections properly as follows.
- Connect the plugs completely.
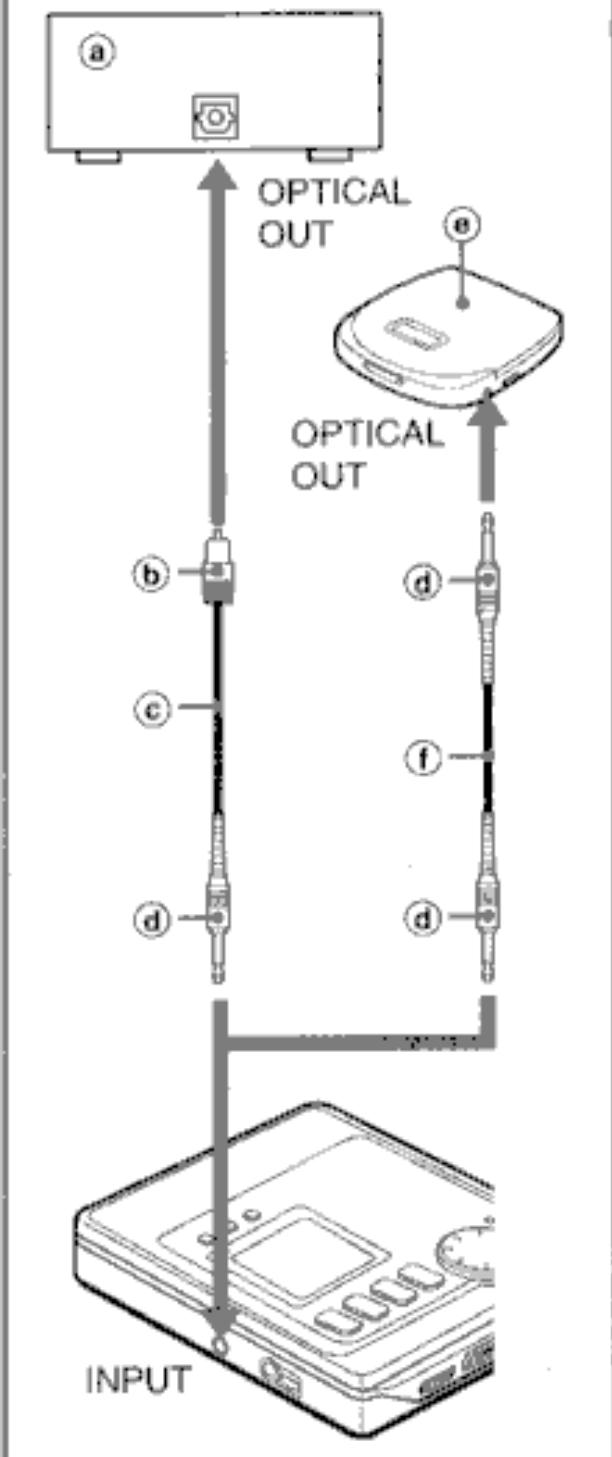
Digital recording (connecting with the optical digital output) A
High quality recording is possible since the digital source signals from a CD, etc. are not converted into analog signals.
The playing time and index mark data of the TOC (Table of contents) are recorded automatically at the same time. This is particularly useful when recording a whole CD.
This unit can record digital signals from DAT and BS/CS tuners as this unit has a built-in sampling frequency rate converter.
Equipment with optical square shaped jack
Optical square shaped plug
Optical digital cable (supplied)
Optical mini-plug
Equipment with optical mini-jack
Optical digital cable (commercially available)
This unit can be connected to only optical output jacks for digital recording.
B
1 ①
2

C
About the Serial Copy Management System (SCMS) ③
To protect the copyrights of the recorded material, digital dubbing cannot be done because of the built-in record restriction function complying with the SCMS standard.
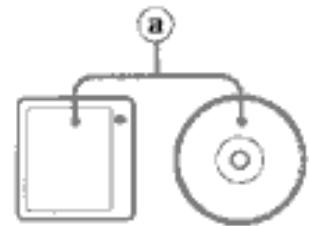
Source material (CD, MD, BS/CS tuners)
① Digital recording
b 1st generation
② Digital recording cannot be done
2nd generation (by only analog recording)
- When the source material is BS or CS signal, digital recording can be done for 2nd generation (except recording from some types of tuners).
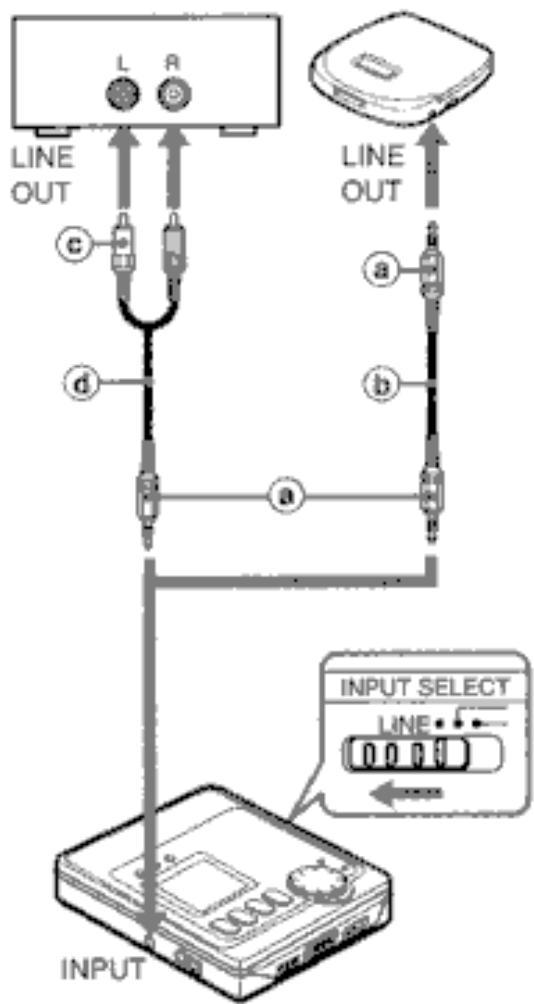
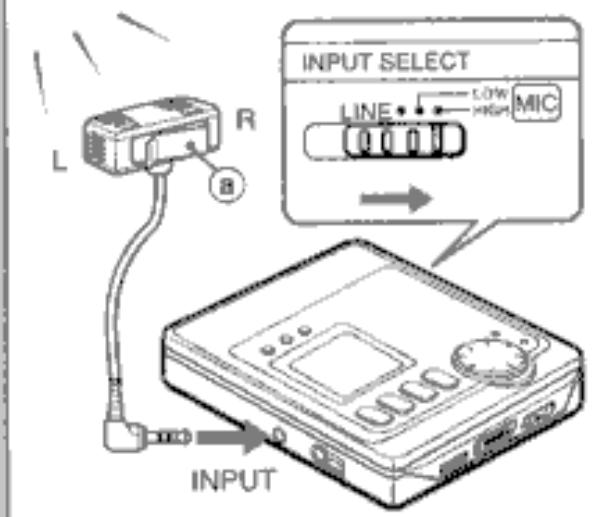
Analog recording (connecting with the analog line output)
Set INPUT SELECT at the side of the unit to LINE.
Stereo mini-plug
Analog connection cord (Optional Aiwa SSW-8, etc.)
Stereo pin plug
Analog connection cord (Commercially available)
D
Microphone recording D
Set INPUT SELECT at the side of the unit to MIC HIGH or MIC LOW.
To increase the microphone sensitivity, set to HIGH.
To decrease the microphone sensitivity, set to LOW.
Connect an optional microphone and orient to the sound source with correct direction.
Optional microphone AIwa CM-TS22 etc.

RECORDING
English
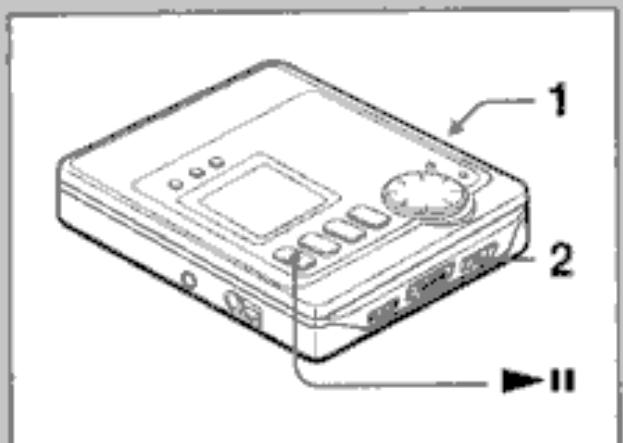
Basic operation
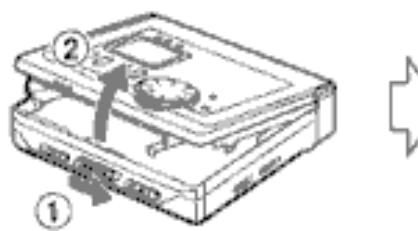
1 Release HOLD.
2 Insert a recordable disc with the label side 已 up and in the direction of the arrow b.
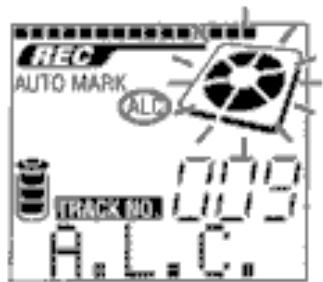
3 Slide REC/EDIT while pressing the red button.
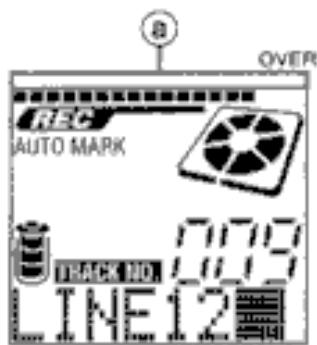
The REC indicator lights and recording starts.
Recording sound level
Current track number
Remaining time of the disc
Holding REC/EDIT for 2 seconds after sliding activates the recording pause mode.
Press to start recording.
When operating with the remote control, press while pressing MODE.
Press again to start recording.
4 Start playback of the connected unit.
5 Press to stop recording.
The data concerning the contents of the recording are registered. ⑤
After the TOC (Table Of Contents) data is registered, the display changes and power is automatically turned off. 6
① Remaining time of the disc
Total recording time
To pause recording
Press during recording. To resume, press it again.
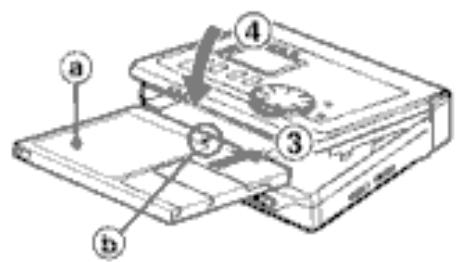
To remove the disc
Make sure that the power is turned off after registering the TOC data in step 5, then open the disc holder.
You cannot open the disc holder during recording or registering the TOC data.
A
Note
- You cannot record on the disc for playback only.
- Do not remove the batteries or disconnect the AC adaptor while the unit is registering the TOC data. The data will not be registered correctly and the disc cannot be played back.
About the recording level
The recording level is adjusted automatically.
You can adjust the recording level during analog recording and microphone recording.
To record the sound source better, adjust the recording level referring to page 30.
To monitor the sound source in recording
Connect the supplied headphones.
Adjusting the volume does not affect the recorded sound.
To record on a previously recorded disc
If there is an unrecorded section left on the disc, the new recording automatically starts from where the previous recording finished. If there is not enough unrecorded section left, or you want to record after erasing previous recordings, erase the recording referring to page 62.
To prevent the accidental erasure of recorded material A
Slide the record-protect tab as illustrated. Slide the tab so that it is completely locked. To protect the recorded contents a To record b
If recording or editing is attempted when the tab is set to the protect position, "PROTECT" appears and the operations are deactivated.
1

2
4
Adjusting the recording level
- Start playback of the connected unit or connect the microphone.
Operate in the recording pause mode.
1 Press MODE repeatedly until "A.L.C." is displayed.
A.L.C.:Automatic Level control
2 Press ENTER.
"MANUAL" is displayed.
3 Press MODE three times.
4 Press + or - referring to the level meter in the display to adjust the recording level.
Set the recording level ⑧ as high as possible but not reaching the OVER indication.
5 Press II to start recording.
To adjust the recording level during recording
Press + or - during recording in the same way as step 4.
To resume automatic level control
Press MODE while in recording pause mode to display "MANUAL", then press ENTER to display "A.L.C."
A

B
USABLE FUNCTIONS FOR RECORDING
English
Registering the index mark
To search for a desired passage quickly, you can register up to 254 index marks.
This unit has three functions for registering the index marks.
Auto marker function
"AUTO MARK" appears in the display and index mark information is registered automatically as follows.
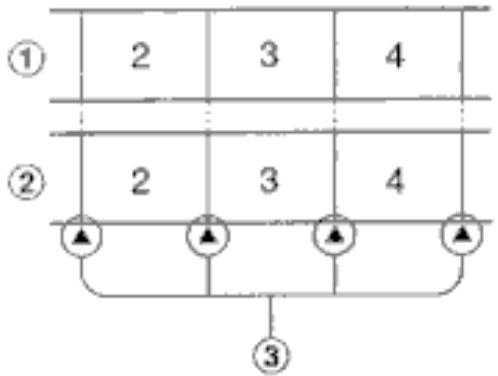
During digital recording from a CD or MD→A
The index mark information recorded on the CD or MD is copied as it is.
①CD or MD
② Recording (MD)
③ Index marks
During analog recording or microphone recording
If there is an unrecorded section lasting longer than 3 seconds, an index mark will be registered automatically when a signal is input next time.
① Input sound
② Recording (MD)
③ While there is no sound
4 Index marks
Time marker function
"TIME MARK" appears in the display and index mark information is registered every 5 minutes.
USABLE FUNCTIONS FOR RECORDING
Manual marker function
You can register an index mark by pressing during recording even if the Marker function is set to OFF.
This function is activated when the Auto marker or Time marker function is set.
Note
The index mark may not be registered correctly even if the Auto marker function is set.
- You cannot register index marks without registering the track number.
- You cannot register any index mark on a disc with 254 tracks already recorded.
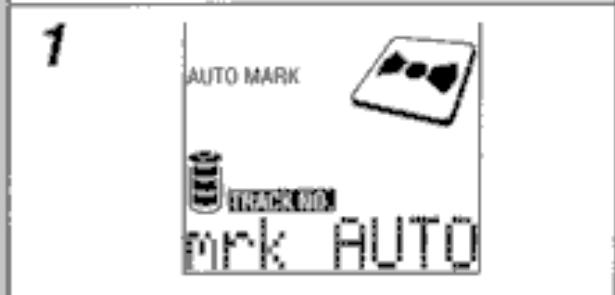
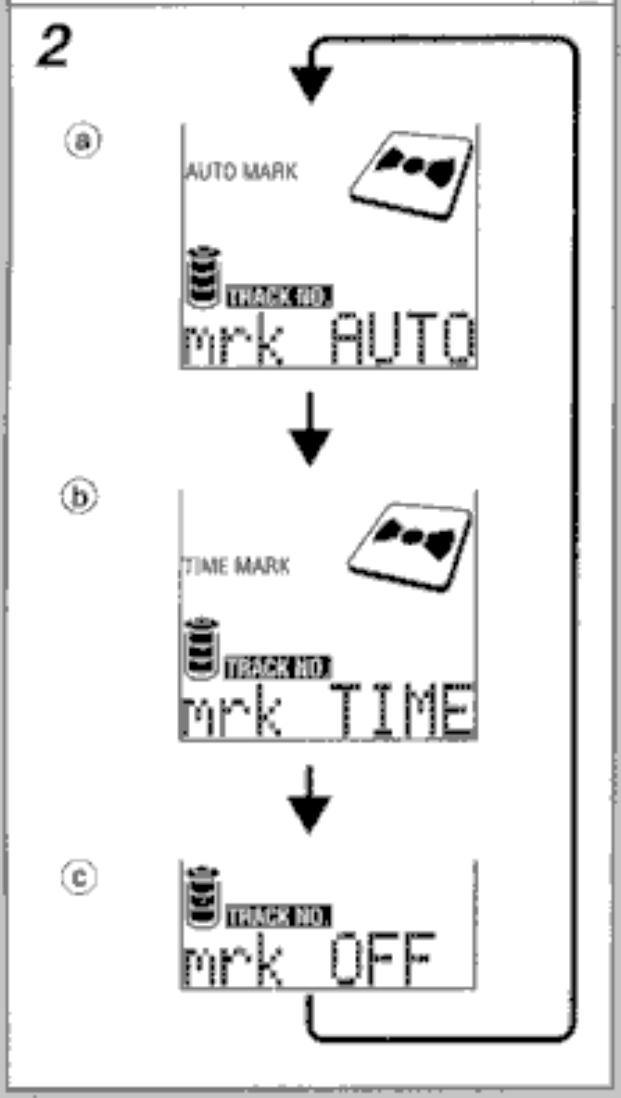
Selecting a marker function
Operate while in recording pause mode.
1 Press MODE repeatedly until "mrk AUTO" is displayed.
2 Press ENTER repeatedly to select a marker function.
Auto marker function
Time marker function
Marker function off
3 Press to start recording.
Note
- Selected marker function is retained after the power is turned off.
- Auto marker function is selected when purchasing the unit.
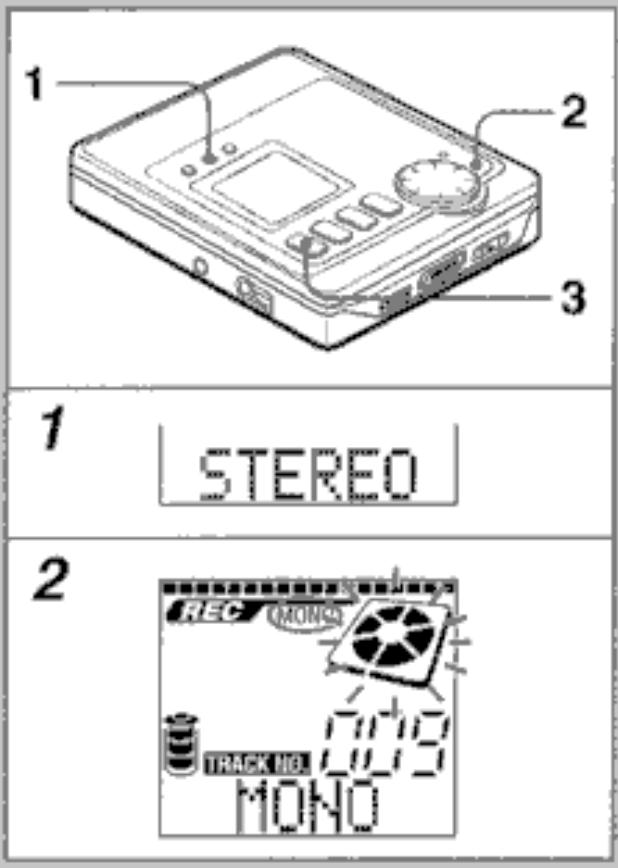
Extended recording (Monaural recording)
The available time printed on the disc can be doubled when the sound is recorded in monaural.
Operate while in recording pause mode.
1 Press MODE repeatedly until "STEREO" is displayed.
2 Press ENTER. "MONO" is displayed.
3 Press to start recording.
To resume stereo recording
Display "MONO" in step 1 and display "STEREO" in step 2.
Note
Every time you change the recording mode, the track number advances by one.
- Selected recording mode is retained after the power is turned off.
While recording a stereo sound source in monaural, the sound from the headphones will be heard in stereo.
- A disc recorded in monaural cannot be played back on another MD player which cannot play back a monaural recorded disc.

1
2

Synchronized analog recording
Recording pauses when there is no sound, and resumes automatically when the sound begins again.
When recording a meeting, it will only record when someone is speaking and saves the disc space.
1 Set SYNCHRO to ON.
2 Start recording.
The recording pauses when the sound source is below a certain level for 4 seconds and resumes when the sound begins. You can restart recording by pressing while in recording pause mode.
After recording, press
Synchronized digital recording
During digital recording from an Aiwa mini component, the recording is always synchronized with the operation of the connected unit.
- Connect the unit to an Aiwaminicomponent with the supplied optical digital cable.
1 Start recording on this unit.
"NoSignal" is displayed and REC indicator blinks in the display.
2 Start playback of the connected mini component.
Recording starts automatically when the connected unit starts playback. Recording pauses when the connected unit pauses or stops, and resumes when the connected unit restarts playback.
After recording, press
Note
- Synchronized digital recording can be done from a unit with a DIGITAL OPTICAL OUTPUT jack.
- Synchronized digital recording may not be done from some type of Aiwa mini component.

2

3

4
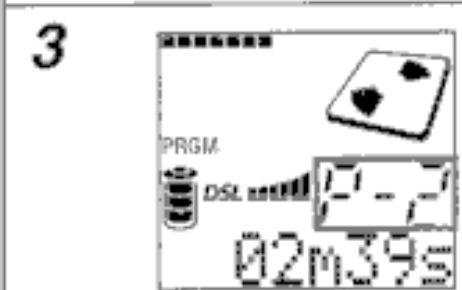
PLAYBACK
English
Basic operation
1 Release HOLD.
2 Insert a disc with the label side up ⑧ and in the direction of the arrow ⑥
3 Press II.
Current track number
d Elapsed time of the current track
4 Adjust the VOLUME with MULTI JOG.
When operating with the remote control, press VOL + / -
To stop playback, press . When playing the disc the next time, playback will start from that point.
The power is automatically turned off after about 5 seconds.
| Basic operation | Button to press | Signal sound |
| To pause | ▶II during playback | bip, bip, bip, bip *** |
| To resume | ▶II while in pause mode | bip |
| To go back to the beginning of a previous track | ▶briefly | bipbipbip |
| To go to the beginning of a succeeding track | ▶briefly | bipbip |
| To search for a desired point | Keep▶or pressed |
To adjust the sound
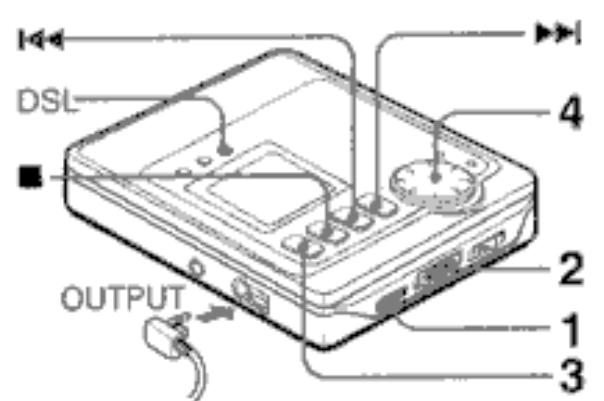
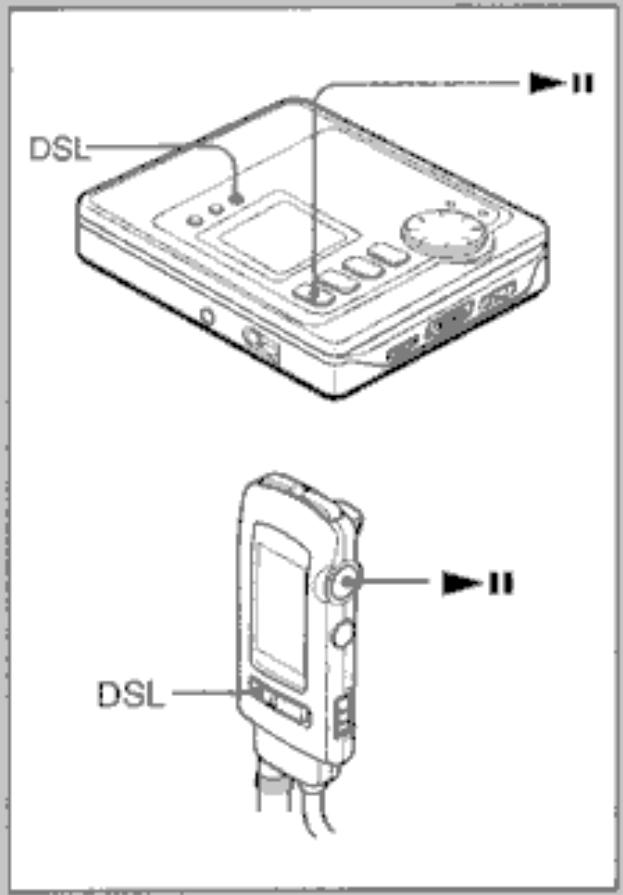
Press DSL repeatedly.
DSL 1: Low frequency is emphasized.
DSL2: Low and high frequencies are more emphasized than in DSL 1.
DSL3: Low and high frequencies are more emphasized than in DSL 2.
DSL OFF: Normal sound
To play a disc at double speed (Rapid-playback)
Keep I1 pressed for 2 seconds during playback.
"×2 PLAY" is displayed.
To resume normal playback, press again.
- When the or is pressed during rapid-playback, the rapid playback is canceled.

PLAYBACK
English
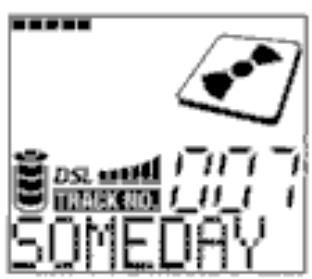
To change the display
Press DISP repeatedly during playback. Each time the button is pressed, the display changes in the following order.
Current track number
b Elapsed time of the current track
Title of current track
Remaining time of current track
Disc name
Total number of tracks on the disc
Recording date of the current track (22nd October, 1998 in this case)
Alarm remaining time (only when alarm is set)
Note
The display changes to 1 when playback is stopped.
- "No Title" or "No Name" appears when playing a disc in which no data is registered.
- Recording date of the current track is not displayed when playing a prerecorded disc or a disc in which no data is registered.


1

2
Title search function
- You can search for a desired track confirming the title during playback.
Operate during playback.
1 Press SEARCH.
The track number in the display flashes for about 4 seconds. When operating with the remote control, keep DISP/SEARCH pressed for 3 seconds.
2 While the track number flashes, press or repeatedly until the desired track title is displayed. You can use the MULTI JOG.
3 Press II or ENTER to start playback.
- You can start this operation in playback pause mode. In this case, press again after step 3 to resume playback.
Note
- Title search function is not activated during random play and program play.
If the flashing stops during operation, repeat the procedure from the beginning.

8

b

C

d
Other playback modes
This unit has 4 play modes other than normal play.
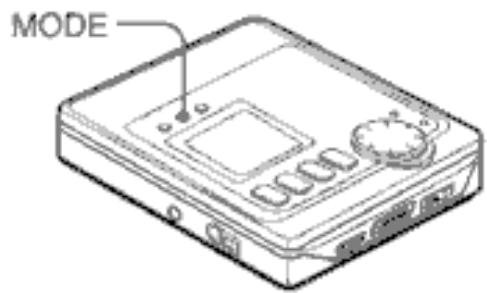
Press MODE repeatedly during playback to select the desired play mode.
Each time the button is pressed, the play mode changes in the following order.
All-repeat play
All tracks are played repeatedly.

bOne-track repeat play
Current track is played repeatedly.

Random play
All tracks are played in random order.

④ Programmed play
The programmed tracks are played in programmed order.
To program, please refer to page 50.

Normal play
Note
The play mode changes to normal play after:
opening the disc holder
recording or editing the disc
disconnecting the AC adaptor
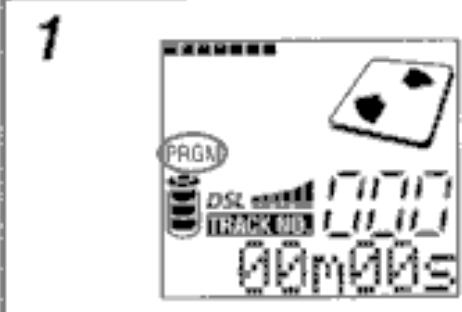
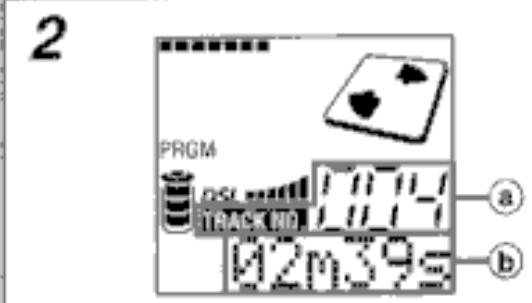
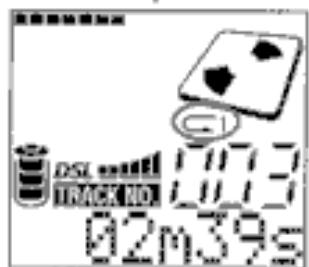
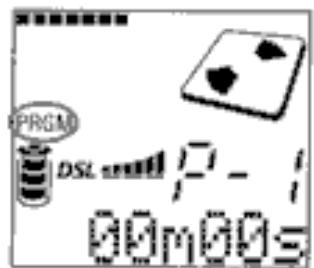
Programmed play
- You can memorize up to 25 tracks in a desired order.
Operate during playback or in playback pause mode.
1 Press MODE repeatedly until "PRGM" is displayed.
2 Press or to select a track.
a Selected track number
b Playing time of the selected track
3 Press ENTER to program the track.
4 Repeat steps 2 and 3 to program other tracks.
5 Press to start programmed play.
To cancel the program
Press MODE repeatedly until "PRGM" disappears.
You can cancel the program by opening the disc holder or removing the batteries.
If "PRG FULL" appears
25 tracks are already programmed.
You cannot add any track to the program.
Note
You cannot go back to a previous track by keeping pressed during programmed play.

3
②


4

5
6


7
8
Registering the disc name and track title
A total of 1700 characters can be registered in one disc.
Operate during playback or in playback pause mode.
1 Play a track to be assigned a title. The name of the disc can be registered while any track is in play.
2 Slide REC/EDIT while pressing the red button.
3 To register a title of a track, press MODE repeatedly until "TRCKNAME" is displayed. ① To register the name of the disc, press MODE to display "DISCNAME". ②
4 Press SHIFT repeatedly to select the kind of character.
A: Capital letters
a: Small letters
Numbers/Symbols
5 Turn MULTI JOG to select a desired character.
6 Press▶.
The selected character stops flashing, and the flashing moves to the right.
7 Repeat steps 4 to 6 to enter all the characters (up to 100 characters).
8 Press ENTER.
9 Press ■.
The data concerning the contents of the editing process are registered and the display disappears.
Editing during recording
During recording or recording pause mode, slide REC/EDIT while pressing the red button. Then follow step 3 to 8 above.
Press to stop recording.
While editing during analog recording, cannot be used to skip track numbers.
Note
When recording is stopped or playback moves on to the next track while editing, the characters already entered are memorized automatically.
To cancel entering
Press 11.
To change a character
Press or repeatedly until the character to be changed flashes. Then enter the desired character again.
To delete the character
Press or repeatedly until the character to be deleted flashes. When the character is flashing, press DISP/INS, then press
To insert a space between the characters
Press or repeatedly until the character to the right of where the space is to be added flashes. Press DISP/INS, then press
Note
- When you operate during random, repeat or programmed play, the play mode changes to normal play.
Note on editing
Be sure to press after operation to turn off the display.
If the AC adaptor is disconnected or the batteries are removed before the display goes out, the data is not registered correctly.
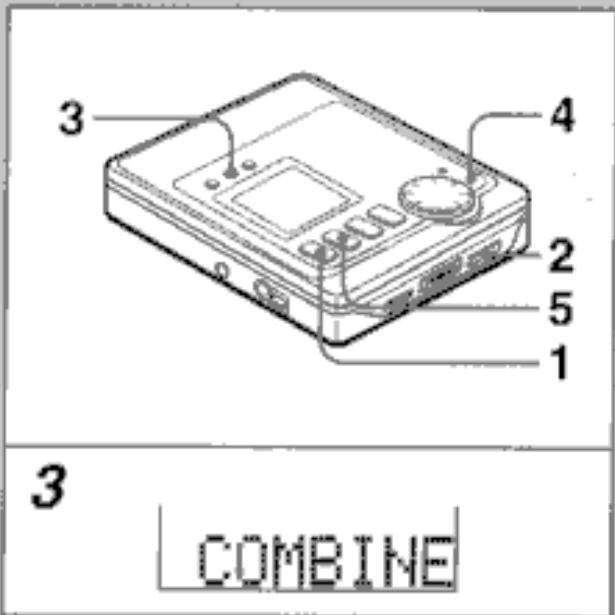
Combining two tracks
- You can combine two tracks by erasing the index mark in between.
- Example: The 2nd track and the 3rd track can be combined by erasing the index mark at the beginning of the 3rd track.
Operate during playback or in playback pause mode.
1 Play the latter track of the two tracks that you want to combine. Example: To combine the 2nd track and 3rd track, play the 3rd track.
2 Slide REC/EDIT while pressing the red button.
3 Press MODE repeatedly until "COMBINE" is displayed.
4 Press ENTER. The index mark of the selected track is erased. At the same time, all the succeeding track numbers move down by one.
5 Press. The data concerning the contents of the editing process are registered and the display disappears.
To cancel entering
Press or
If the tracks are titled
- When both tracks are titled, the title of the lower numbered track remains.
- When only one track is titled on the tracks to be combined, this title remains.
Note
You cannot combine a track recorded in monaural and a track recorded in stereo.


Dividing a track
You can divide a track into 2 parts by registering an index mark.
1 Press during playback at the point to be divided. Playback is paused.
2 Slide REC/EDIT while pressing the red button.
3 Press MODE repeatedly until "DIVIDE" is displayed.
4 Press ENTER. A 3-second segment is played repeatedly to confirm the point to be divided.
5 Adjust this point with 14 / 10 or MULTI JOG referring to the playing sound.
6 Press ENTER. The index mark is registered and the track number advances by one.
7 Press. The data concerning the contents of the editing process are registered and the display disappears.
To cancel entering
Pressor
Note
A track cannot be divided in the following cases:
- when the disc already contains 254 tracks
- when elapsed time is displayed as 00m00s
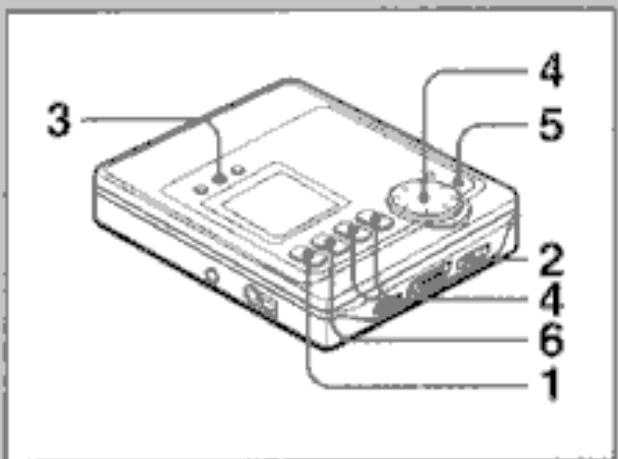

Changing the order of the tracks
You can change the order of tracks after completing a recording.
Operate during playback or in playback pause mode.
1 Play the track that you want to move. Example: To move the 3rd track, play the 3rd track.
2 Slide REC/EDIT while pressing the red button.
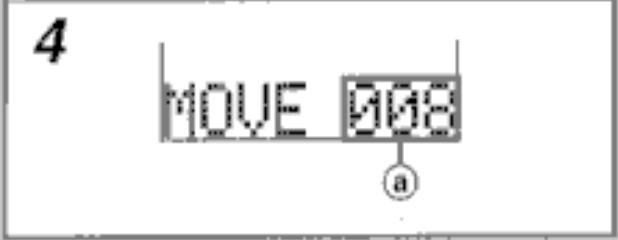
3 Press MODE repeatedly until "RENUMBER" is displayed. The display changes to "MOVE".
4 Turn MULTI JOG to select the desired track number ⑧ to move the track to. You can operate with and
5 Press ENTER. The order of the track is changed.
6 Press ■.
The data concerning the contents of the editing process are registered and the display disappears.
To cancel editing
Pressor
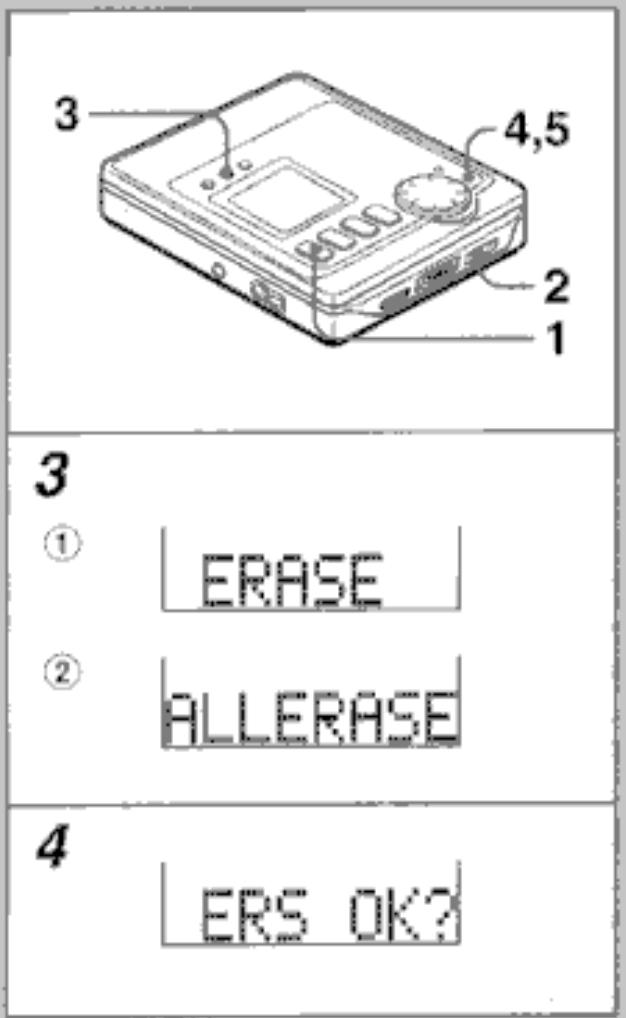
Erasing tracks
You can erase one track or all tracks on a disc.
1 Play a track to be erased.
When erasing all tracks, you can play any track.
2 Slide REC/EDIT while pressing the red button.
3 To erase only one track, press MODE repeatedly until "ERASE" is displayed. 1
To erase all the tracks on the disc, press MODE repeatedly until "ALLERASE" is displayed. ②
4 Press ENTER.
"ERS OK?" is displayed.
Make sure to check that it is all right to erase.
To cancel, press or
5 Press ENTER again.
When you selected "ERASE", the selected track is erased and all the succeeding track numbers move down by one.
When you selected "ALLERASE", all tracks on the disc are erased.
A
1
CLOCKSET
2
BEEP ON
3
BEEP OFF
8

7
CLOCKSET
2
EARG OFF
3
EARG ON
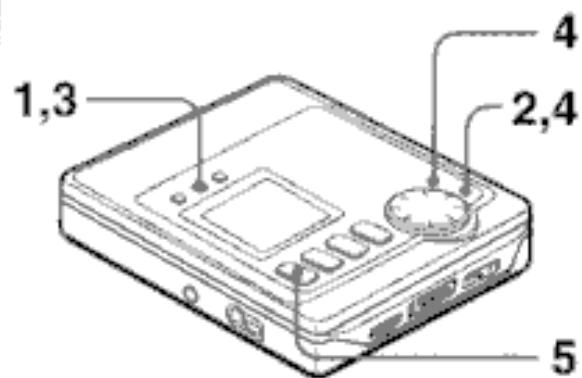
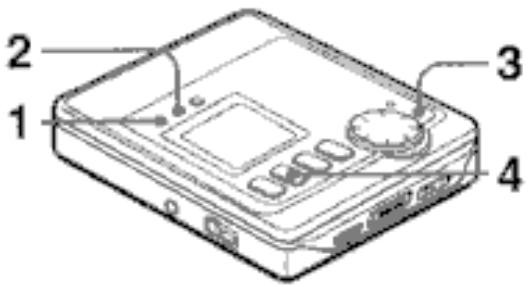
To cancel the beep sound (Signal sound function) A
Beep sounds are heard when you press an operation button. You can cancel this beep sound.
Operate in stop mode.
1 Keep DISP pressed for about 3 seconds. "CLOCKSET" is displayed.
2 Press MODE.
"BEEP ON" is displayed.
3 Press ENTER.
"BEEP OFF" is displayed and beep sounds are canceled.
4 Press ■
To resume the beep sound
Display "BEEP ON" in step 3.
To limit the maximum volume level (Ear guard function) 8
You can set the volume level from 0 to 20. When you set the Ear guard function, the maximum volume will be limited at 12.
Operate in stop mode.
1 Keep DISP pressed for about 3 seconds.
"CLOCKSET" is displayed.
2 Press MODE twice.
"EARG OFF" is displayed.
3 Press ENTER.
"EARG ON" is displayed and the Ear guard function is set.
"Ear GRD!" is displayed when setting the volume over the level of 12.
4 Press ■.
To cancel the Ear guard function
Display "EARG OFF" in step 3.
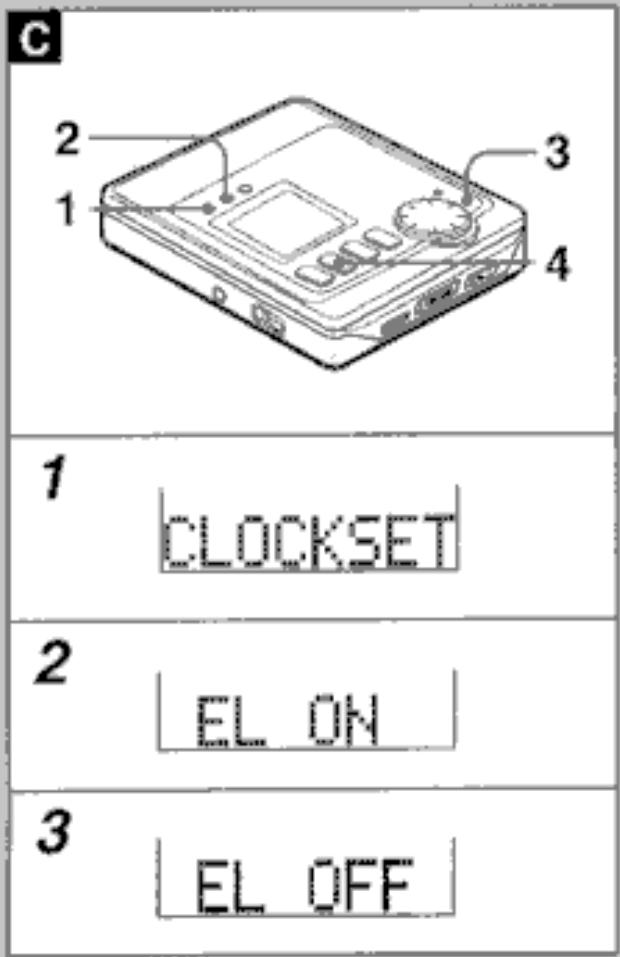
To cancel the back light of the display and buttons
When a button is pressed, the backlight of the display lights up.
When using on batteries, you can cancel this backlight.
Operate in stop mode.
1 Keep DISP pressed for about 3 seconds.
"CLOCKSET" is displayed.
2 Press MODE three times.
"EL ON" is displayed.
3 Press ENTER.
"EL OFF" is displayed.
4 Press
To resume the backlight
Display "EL ON" in step 3.
Note
The backlight always lights when using on
AC house current.
D
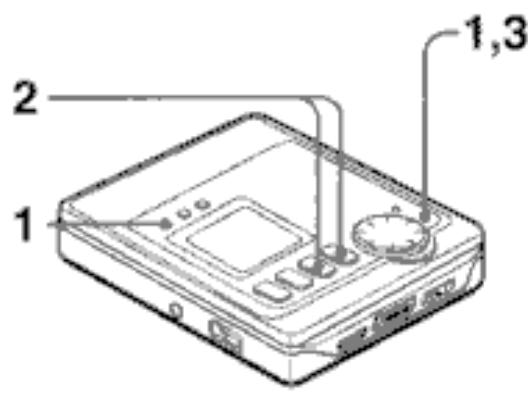
To set the alarm
You can set the unit to alert you after a specified time.
Operate during playback or in playback pause mode.
1 Press DISP while pressing ENTER. "ALRM SET" is displayed and followed by "ALM 0:10". When operating with the remote control, press DISP/SEARCH and MODE.
2 Press or to specify the duration until the unit alerts you. The time changes between 10 minutes and 3 hours in 10-minute steps. If or is kept pressed, the time will change in 1-minute steps.
3 Press ENTER to confirm. The unit starts to count down.
When the specified time has reached, the unit enters playback pause mode. "It's TIME" is displayed with beep sound for 30 seconds. Then the playback resumes.
To display the remaining time from the alarm set
Press DISP repeatedly until "ALM" is displayed.
To cancel the alarm function
Press twice. "ALRM OFF" is displayed and the alarm function is canceled. It is also canceled by opening the disc holder.
Note
- When the time is reached, beep sounds can be stopped by pressing any buttons.
- If you press during playback, playback stops and the unit continues count down. At this time, you can do recording. When the specified time has reached, the beep sound is heard for 30 seconds, but it does not affect the recorded sound.
BLANK
Nothing is recorded on the disc.
Prohibit
- Digital recording is prohibited by the SCMS standard.
→ See "About the Serial Copy Management System (SCMS)" on page 22.
Can't ED
Tracks are too short to be combined. See "The limitations of MD" on page 80.
The combine function was used while playing the first track.
The divide function was used at the beginning of a track.
The combine function was used to combine a track recorded in monaural with a track recorded in stereo.
Caution!
- Recording cannot be continued by damage of the disc.
The unit operates abnormally. Reset the unit pressing the RESET button on the bottom of the unit.
DISC ERR
The disc is damaged by scratches.
The TOC data is not registered correctly.
DISCFULL
There is not enough time remaining on the disc to record.
There are too many tracks to be recorded.
Ear GRD!
- You cannot increase the volume anymore by the EAR GUARD function.
HOLD
The HOLD switch is set to HOLD position.
NO DISC
No disc is inside the unit.
NoSignal
- Playback of the connected unit has not started yet.
- Optical digital cable is not connected completely.
LOW BATT
The batteries wear out.
OPEN
The disc holder is not closed.
PB DISC
- Recording is attempted on the disc for playback only.
PRG FULL
- 25 tracks are already programmed and no track can be added.
PROTECT
The disc is record-protected.
TMP OVER
The ambient temperature is too high or too low.
TOC FULL
- There are too many tracks or emphasis data to be recorded or edited.
If the unit fails to perform as described in these Operating Instructions, check the following guide.
Wrong or no display appears on the remote control.
- Connect the remote control firmly.
Power does not turn on.
Connect the AC adaptor firmly.
- Insert the batteries correctly.
- Recharge the rechargeable battery or replace the dry cell batteries.
Operation does not start.
- Close the disc holder completely.
- Insert a disc.
- Release the HOLD switch.
- Connect the remote control completely.
Erroneous display/operation occur.
- Reset the unit by pressing the RESET button on the bottom of the unit.
The sound is noisy.
If the unit is close to a magnetic object, keep the unit further away from it.
Sound mutes.
- Place the unit on a stable surface with no vibration.
Cannot record or edit.
- Release the HOLD switch.
- Connect the unit firmly.
Use a recordable disc. - Slide the protect-tab on the disc.
Sound cannot be heard from the headphones.
- Connect the headphones firmly.
Recording date is not registered directly.
Set the clock again.
- Recharge the rechargeable battery or replace the dry cell batteries.
A
B

A Mini Disc is only 64mm (25 / 8 inches) in diameter, about half the size of a conventional CD. But Mini Discs can be used to store and play back a full 80 minutes of information. Unlike a CD, a Mini Disc comes in a plastic cartridge, so that it can be handled with ease. The cartridge also protects the disc inside from shocks, dust and scratches. Unlike cassette tapes, which can become stretched or tangled, a MiniDisc is an excellent durable media.
Two types of discs
There are two types of MiniDiscs: "Optical discs" and "Magneto-optical discs". Both types use laser beams and optical pick-up technology to read recorded information during playback.
Optical discs A
These are playback only discs. Like CDs, they are used as prerecorded music discs. You cannot record or edit them. The shutter covers the opening only on the non-labeled side of the MD.
Recordable MO\* discs 8
These are recordable discs which can be recorded on again and again, like cassette tapes. The recording method called magneto-optical technology employs a laser and magnetism to record signals. Therefore, the quality of recorded sound does not deteriorate even after many playbacks and recordings. The shutter covers the opening on the both sides of the MD.
- Magneto-optical
Ultra compact size made possible by ATRAC* technology
A newly developed digital audio compression technology called the ATRAC system automatically extracts only the frequencies that are actually audible to the human ear and cuts the frequencies which are inaudible. This compresses the amount of information to be recorded to 1/5 of the normal amount. The ATRAC system is based upon studies carried out in the field of auditory psychology and does not impair the quality of the audible sound.
- Adaptive Transform Acoustic Coding
Quick random access
One of the great features of the MiniDisc is that you can search for desired tracks quickly. There are also quick and easy functions for random playback, in which the order of the tracks can be rearranged randomly, and for renumbering tracks to play them in any order.
The limitations of MD
Recording on the MD is performed differently from that of a cassette tape or a DAT. Therefore, the MD system is subject to the following restrictions.
"DISCFULL" is displayed even if the recording time does not reach the maximum recordable time of the disc (60-minute, 74-minute or 80-minute).
"DISCFULL" is displayed when 254 tracks are already recorded on a disc, without regard to the recording time.
"DISCFULL" is displayed even if a disc is not fully recorded on.
If there are lots of emphasis data in a particular track, the unit handles the data as index codes, and tracks are counted, in addition, without regard to the time and number of tracks.
The remaining time on a disc is not increased even after some short tracks have been erased.
When the remaining time on a disc is displayed, it may not be increased even after erasing short tracks because the sections less than 12 seconds are not counted.
Tracks cannot be joined (the COMBINE function does not function). Tracks created by editing may not be joined.
The total of the recorded time and the remaining time on a disc does not match with the maximum recordable time of the disc (60-minute, 74-minute or 80-minute).
Recording is performed by the minimum unit of one cluster (two seconds). Even if the recorded section is shorter than two seconds, a two-second space is needed in recording. Therefore, the available time becomes shorter. If there are scratches on a disc, the available time becomes shorter as well, because the sections which are scratched are automatically erased.
Track numbers may not be registered properly.
When recording from a CD through digital inputs, small tracks may be created depending on the contents of a CD.
When using the auto marker function, track numbers may not be registered properly depending on the contents of the CD.
Main unit
Playback system MiniDisc digital audio system
Laser pickup
Semiconductor laser
Recording system
Magnetic polarity modulation. overwrite system
Revolutions
Approx. 400 to 900 rpm (CLV)
Sampling Frequency
44.1 kHz, with built-in sampling
frequency rate converter
Number of channels
Stereo: 2 channels
Monaural: 1 channel
Modulation system
Eight to Fourteen Modulation (EFM)
A/D, D/A converter
1-bit
Frequency response
20 to 20,000 Hz ±1dB
Wow and Flutter
Below measurable limit
(±0.001% W.PEAK)
Input
Output
| MIC | LINE | OPT (digital) | |
| Jack type | Stereo mini-jack | Stereo mini-jack | OPTICAL mini-jack |
| Rated input level | 1.1 mV | 280 mV | - |
| Minimum input level | 0.4 mV | 100 mV | - |
OUTPUT/PHONES
| Jack type |
| Maximum output level |
| Load impedance |
Stereo mini-jack
10mW+10mW
16 ohms
Power requirements
DC 3.6 V using the supplied lithium-ion rechargeable battery LIB-902
DC 1.5 V using one LR6 (size AA) dry cell batteries (used together with rechargeable battery)
AC house current using the supplied AC adaptor AC-D401
Battery life
Using the supplied rechargeable battery
Approx. 11.5 hours for playback
Approx. 5 hours for recording
Using the supplied rechargeable battery and one LR6 (size AA) dry cell batteries
Approx. 20 hours for playback
Approx. 7.5 hours for recording
Dimensions
Approx. 78.8 (W) × 18.8 (H) × 86.8 (D) mm (3 1/8 × 3/4 × 3 1/2 in.)
Weight
Approx. 163 g, 6 oz including the rechargeable battery
AC adaptor (AC-D401)
Output DC 4.5 V
Rated voltage
AC 230V,50Hz
Supplied headphones HP-M031 H
Type: In-ear type
Impedance: 16 ohms
Sensitivity: 94 dB/mW
Recommended commercially available headphones
Type: In-ear type/Vertical type
Headband type
Impedance: 16 ohms
Sensitivity: 91 - 99 dB/mW
The specifications and external appearance of this unit are subject to change without notice.
US and foreign patents licensed from Dolby Laboratories Licensing Corporation.