
MP-GT1 - Lecteur audio portable TASCAM - Notice d'utilisation et mode d'emploi gratuit
Retrouvez gratuitement la notice de l'appareil MP-GT1 TASCAM au format PDF.

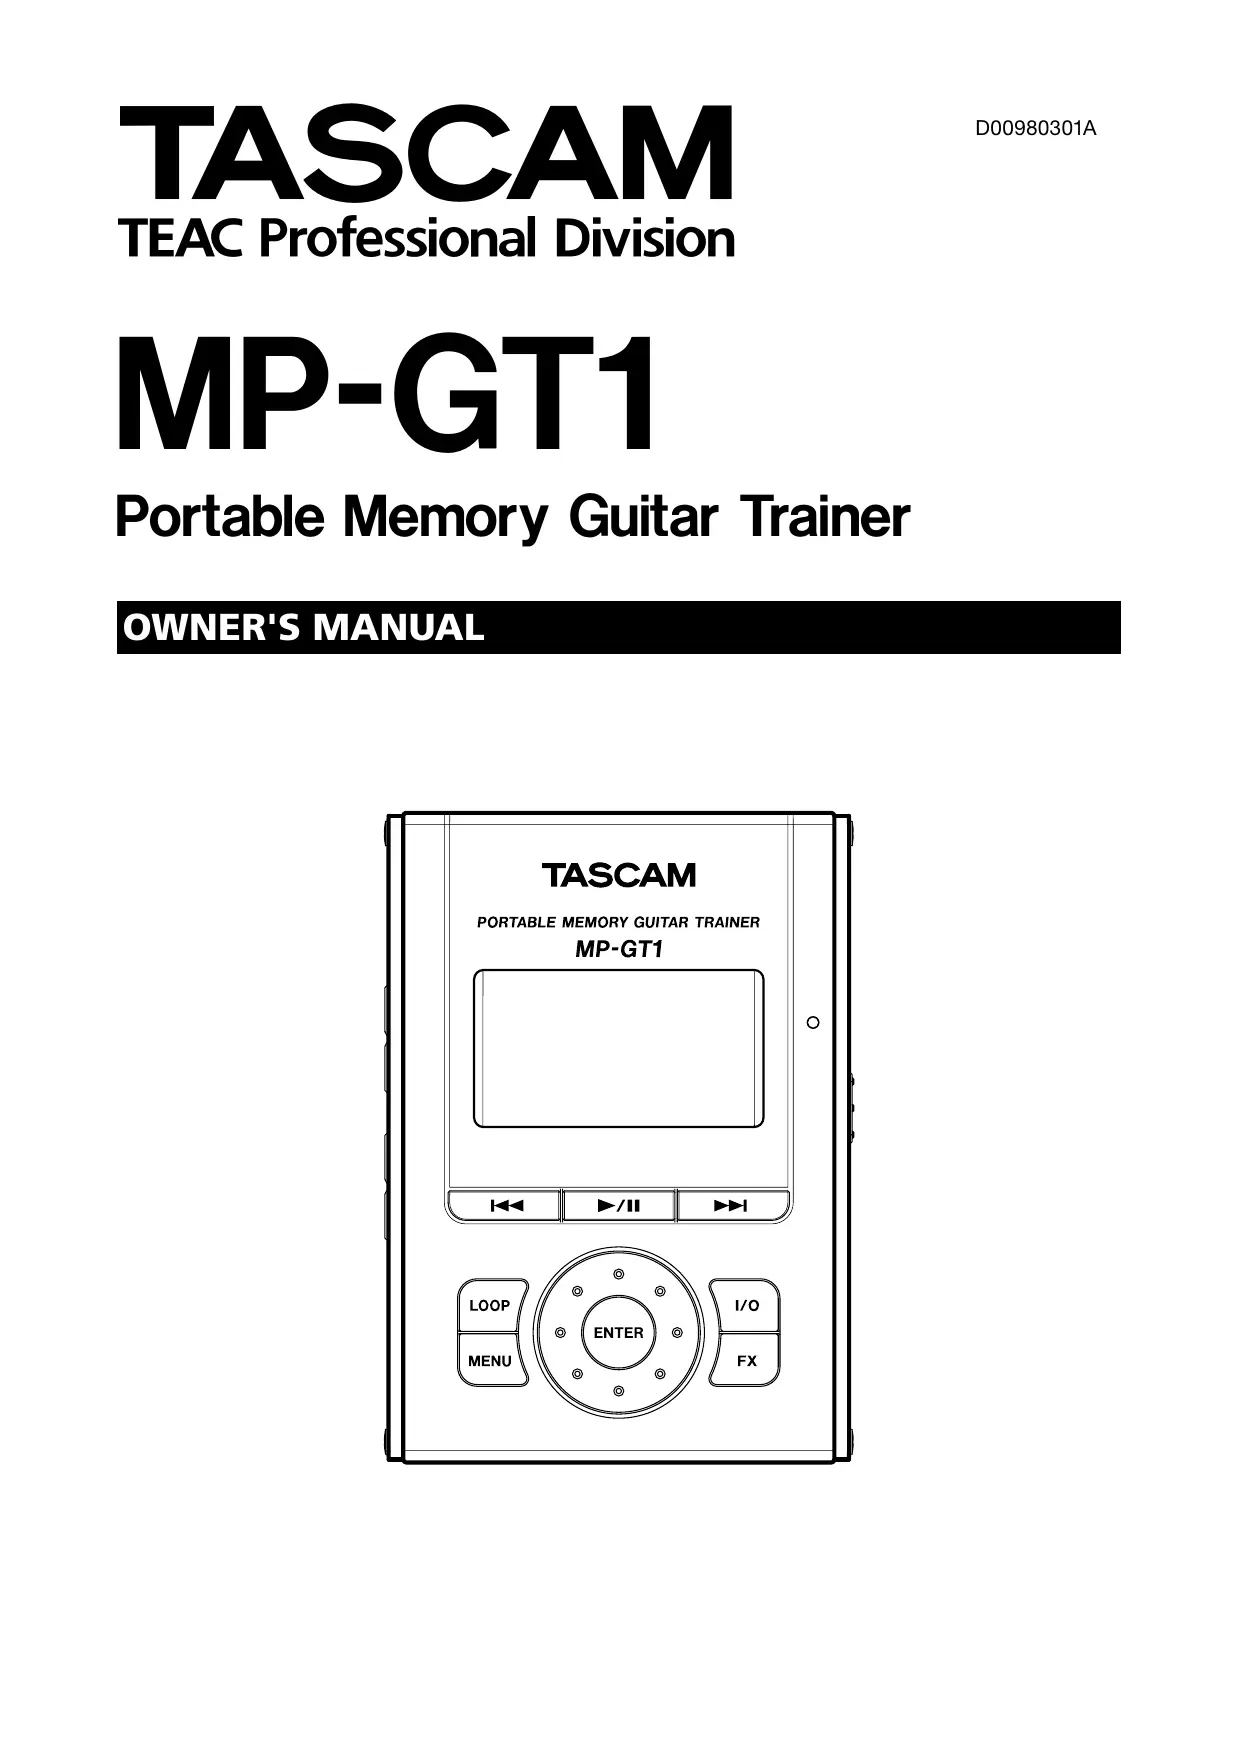

| Type de produit | Lecteur audio portable avec fonctions d'entraînement pour guitare |
| Marque | TASCAM |
| Modèle | MP-GT1 |
| Dimensions (L x H x P) | 78 x 110 x 25,5 mm (3,1 x 4,3 x 1 pouce) |
| Poids | 220 g (7,8 oz) incluant la batterie |
| Alimentation | Batterie lithium-ion rechargeable intégrée 3,7 V CC ; charge via USB ou adaptateur secteur PS-P520 (vendu séparément) |
| Autonomie de la batterie | Environ 8 heures (neuve) |
| Temps de charge | ~6 h via USB (appareil éteint) ; ~3 h via adaptateur secteur |
| Mémoire interne | 1 Go de mémoire flash (FAT16, max. 550 fichiers/dossiers) |
| Formats audio supportés | MP3 (MPEG1 Audio Layer III), 32–320 kbps, 44,1 kHz, VBR supporté |
| Entrée guitare | Jack standard (mono, non symétrique) ; impédance 1 MΩ ; niveau max +10 dBV |
| Sortie casque / ligne | Jack stéréo 3,5 mm ; puissance max 20 mW + 20 mW (sous 32 Ω) |
| Réponse en fréquence | 20 – 20 000 Hz ±1/-3 dB (entrée guitare → sortie) |
| Distorsion harmonique totale | < 0,05 % (entrée guitare → sortie) |
| Rapport signal/bruit | > 90 dB (sortie ligne, 0 dBV) |
| Effets intégrés | 73 presets combinant distorsion, overdrive, compresseur, flanger, phaser, exciter, chorus, trémolo, vibrato, autowah, pitch shifter, réverbe, delay |
| Fonctions d'entraînement | Contrôle de tempo et tonalité (VSA), annulation de guitare, boucle de répétition, métronome, accordeur chromatique/guitare/oscillateur |
| Connectivité | USB 2.0 (mini-B) pour transfert de fichiers et charge |
| Accessoires inclus | Câble USB mini-B, guide de démarrage rapide, notice (PDF stockée dans la mémoire) |
| Température de fonctionnement | 0 °C à 40 °C |
| Humidité relative | 30 % à 80 % (sans condensation) |
| Réparabilité | Batterie remplaçable (retrait possible) ; contacter un centre TEAC pour toute autre réparation |
FOIRE AUX QUESTIONS - MP-GT1 TASCAM
Questions des utilisateurs sur MP-GT1 TASCAM
0 question sur cet appareil. Repondez a celles que vous connaissez ou posez la votre.
Poser une nouvelle question sur cet appareil
Téléchargez la notice de votre Lecteur audio portable au format PDF gratuitement ! Retrouvez votre notice MP-GT1 - TASCAM et reprennez votre appareil électronique en main. Sur cette page sont publiés tous les documents nécessaires à l'utilisation de votre appareil MP-GT1 de la marque TASCAM.
MODE D'EMPLOI MP-GT1 TASCAM
TASCAM
TEAC Professional Division
MP-GT1
Portable Memory Guitar Trainer
OWNER'S MANUAL
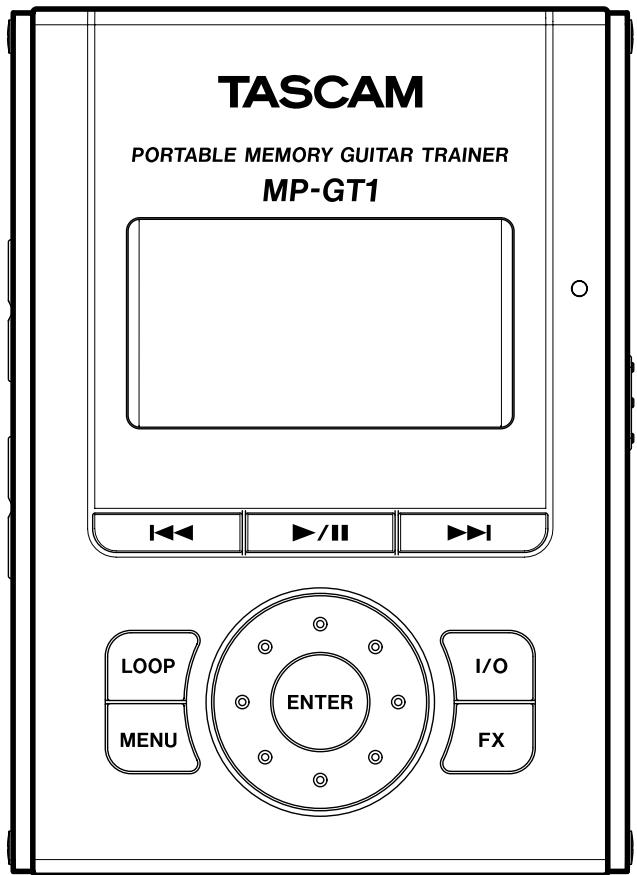
1 – Introduction......3
Supplied accessories....3
Manual conventions 3
Precautions for placement and use.... 3
Beware of condensation....3
About the power supply 4
Recharging the battery 4
Recharging with a computer 4
Recharging with a PS-P520 AC adapter 4
Turning the power on and off....4
To turn the MP-GT1 power on.... 4
To turn the MP-GT1 power off 4
2 – Part names and functions .... 5
Top Panel....5
Front Panel 6
Right Side Panel 6
Left Side Panel....7
Back Panel....7
Home screen....8
3 – Connections & MP3 Transfer.... 10
Making connections 10
Connecting headphones or speakers 10
Connecting a guitar.... 10
Connecting to a computer ....11
Disconnecting from a computer 11
Moving MP3 files to the the MP-GT1 .....11
Copying tracks from a computer....11
Preparing MP3 files on a computer ....11
4 – Menus & Settings.... 12
Menu items 12
Menu overview 12
Using the Menus 12
5 – Playing and Selecting Tracks.... 14
Basic track playback functions.... 14
Playing a track.... 14
Pausing a track.... 14
Selecting a track 14
Searching a track 14
Adjusting the volume 14
Selecting a track to play 14
Using the Browse screen to select tracks.... 14
Setting the play area 15
Using the playlist 16
Adding tracks to the playlist.... 16
Editing the playlist.... 16
ALL CLR: Remove all tracks from the playlist 16
DELETE: Remove one track from the playlist 16
MOVE: Change the order of tracks 17
Repeat and single-track playback (PLAY MODE) .....17
6 – Practice Functions.... 18
Changing playback pitch and tempo 18
Changing the tempo (TEMPO).... 18
Change tempo without changing pitch (VSA).... 18
Change key without changing tempo (KEY) 18
Canceling guitar sounds (GUITAR CANCEL) 18
Repeat playback of a selected loop 19
Connecting a guitar to practice 19
Practicing with tracks as they play 19
Using the metronome (METRONOME) 19
Turning the metronome ON and OFF 19
7 – Using Effects...... 20
8 – Using the Tuner 21
Chromatic tuner mode (AUTO) 21
Guitar tuner mode (GUITAR) 21
Oscillator mode (OSC.) 21
9 – Setup Menu Options...... 22
Cue and review speed 22
Automatic power off....22
Automatically turning off the backlight 22
Display contrast 22
Backlight brightness 22
Initializing the unit....22
Formatting the unit quickly 23
Formatting the unit completely....23
10 - Using the Information Pages...... 24
File information page (FILE)....24
Memory information page (MEMORY)....24
System information page (SYSTEM) 24
11 – Effect Lists 25
Effect preset list 25
Effect module parameters 26
12 – Messages ...... 27
13 – Recycling the Battery 28
How to remove the rechargeable battery.... 28
14 – Specifications 29
Rated audio input and output 29
Audio performance 29
Other specifications 29
Minimum computer requirements 29
Stored settings 30
Dimensions....30
Thank you very much for purchasing the TASCAM MP-GT1 Portable Memory Guitar Trainer. Please read this Owner's Manual carefully before using the unit in order to maximize your use of all its features. We hope that you will enjoy using this trainer for many years to come.
The MP-GT1 is a flash memory (1 GB) music player that has been optimized for practicing guitar. If you run into a phrase on a recording that is too difficult for you to learn by ear at ordinary speed, you can play
and loop the music at a slower speed to study the part. Furthermore, the dedicated guitar input allows you to use the unit's built-in effects as you play along with the music. Using a computer, you can also transfer music as MP3s easily from audio CDs and other sources to the MP-GT1.
Supplied accessories
In addition to this manual, the following accessories are supplied.
- Quick Start Guide....1
- Mini-B USB cable ....1
- An insertion sheet....1
- Warranty card....1
Please contact the store where you purchased this unit if any of these accessories are missing or have been damaged during transportation.
NOTE
We recommend that you keep the original box and packing materials for transportation of this unit.
Manual conventions
In this manual, we use the following conventions:
- Controls and keys on the MP-GT1 are written like this: MENU.
-
Messages shown on the display are written like this: Are you sure? .
-
If a fixed onscreen indicator (i.e. one which cannot change) is shown, it is written like this: VSA.
- We use the term “key” to describe the push-button controls on the MP-GT1.
Precautions for placement and use
The MP-GT1 may be used in most areas, but to maintain top performance, and prolong operating life, observe the following notes, precautions and environmental conditions:
- Avoid exposing it to extremes of temperature and humidity and avoid mechanical shocks and vibration.
- Keep the unit away from strong magnetic fields (TV sets, computer monitors, large electric motors, etc.).
- The nominal temperature should be between 0^ and 40^ (32°F and 104°F).
-
Relative humidity should be 30 to 80 percent.
-
As the unit may become hot during operation, always leave sufficient space above the unit for ventilation. Do not install this unit in a confined space such as a bookcase, and do not put anything on top of the unit.
- Avoid installing this unit on top of any heat-generating electrical device such as a power amplifier.
- Make sure that the unit is mounted in a level position for correct operation.
- The voltage supplied to the unit should match the voltage as printed on the rear panel. If you are in any doubt regarding this matter, consult an electrician.
Beware of condensation
If the unit is moved from a cold to a warm place, or used after a sudden temperature change, there is a danger of condensation; vapor in the air could condense on the internal mechanism, making correct operation impossible. To prevent this, or if this occurs, let the player sit for one or two hours at the new room temperature before using.
About the power supply
The MP-GT1 uses a built-in lithium ion battery that can be recharged by connecting the unit to a computer with the included USB cable. You can also use an AC adapter (sold separately) to power the unit and recharge the battery.
When new, the battery charge lasts about 8 hours.
NOTE
When you purchase the MP-GT1, the battery is not fully charged. Please charge it before use or use it with an AC adapter (sold separately).
Recharging the battery
Recharging with a computer
To charge the battery using a computer, connect the unit to the computer using the included USB cable and turn the computer on if it is off and not transmitting power to the unit.
Connect the MP-GT1 directly to the computer.
Recharging cannot be guaranteed if a USB hub is used between the computer and the MP-GT1.
Recharging takes about 6 hours (when the MP-GT1 power is OFF).
If the MP-GT1's power is turned ON when it is being recharged from a computer, it is automatically treated by the computer as a connected USB drive. (See “Connecting to a computer” on page 11.)
Recharging with a PS-P520 AC adapter (sold separately)
Connect the AC adapter to the MP-GT1's DC IN 5V jack and plug the adapter into a working power outlet.
Recharging takes about 3 hours.
You can use the MP-GT1 when it is connected to an AC adapter and recharging.
Furthermore, the recharging time is the same whether the MP-GT1 power is ON or OFF.
NOTE
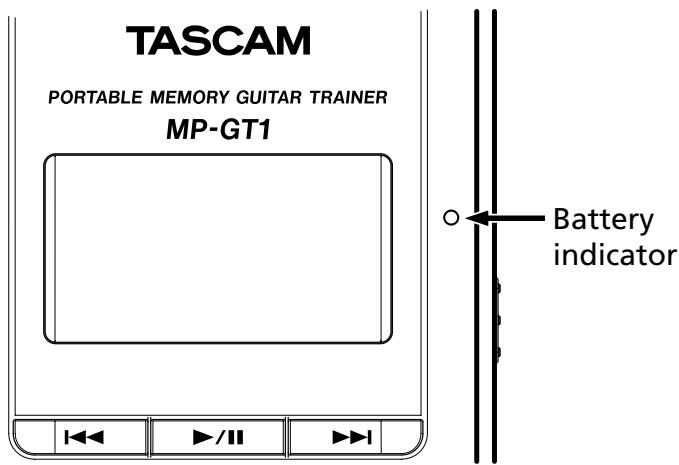
The indicator at the right side of the display shows the battery's charging status. It lights orange while charging and goes out when charging is complete.
Turning the power on and off
To turn the MP-GT1 power on
Slide the POWER switch in the direction of the arrow and hold it until “TASCAM” appears on the screen.
Release the switch.
The MP-GT1 starts and the home screen appears.
To turn the MP-GT1 power off
Slide the POWER switch in the direction of the arrow and hold it until “Trainer series” appears on the screen.
Release the switch. The MP-GT1 then shuts down.
Top Panel
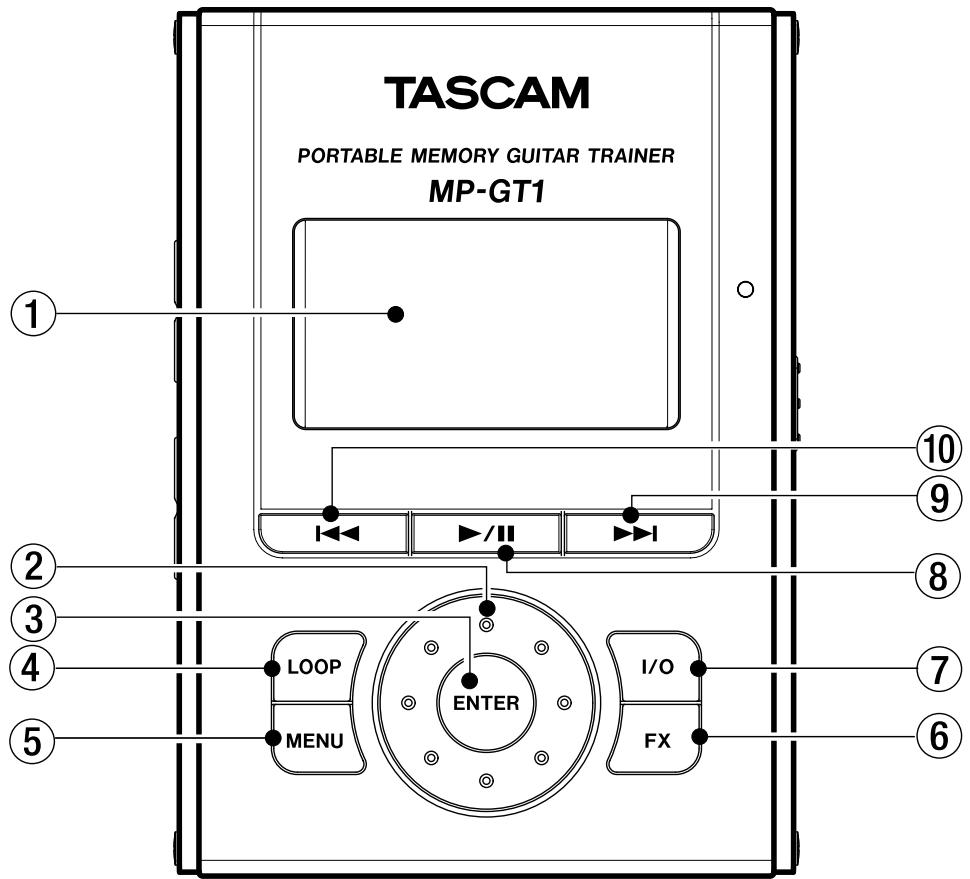
① Display (LCD)
The display shows the Home screen and the menus related to using the metronome and making operation and effect settings. (See “Home screen” on page 8.)
② Wheel
Use to select items and change values when using menus and the effect section.
③ ENTER key
Press this key to confirm a selection when using menus and the effect section and to advance to the next screen.
④ LOOP key
Press this key to start loop playback mode and automatically repeat playback of a section of a song that you select. The I O indicator appears on the display. (See “Repeat playback of a selected loop” on page 19.)
Press this key again to exit loop playback mode.
⑤ MENU key
When the home screen is open, press this key to open the MENU screen.
During use of menus or the effect settings screen, press this key to return to the previous screen.
Repeated presses eventually returns to the home screen.
⑥ FX key
Press this key to open the EFFECT screen. When the EFFECT screen is open, press this key to return to the home screen.
⑦ I/O key
Use this key to set the IN and OUT points to set a section for loop playback.
When both IN and OUT points are set, pressing this key again will clear these points. (See “Repeat playback of a selected loop” on page 19.)
⑧ ▶/II key
Press this key to start playback or to pause playback at the current position.
When the METRONOME screen is open, press this to start and stop the metronome.
⑨ ▶▶▶ I key
Press this key to skip to the next track.
Press and hold to search forward.
⑩ ◀◀ key
Press this key to return to the beginning of a track that is playing or paused.
When at the beginning of a track, press to skip to the previous track.
Press and hold to search backward.
Front Panel
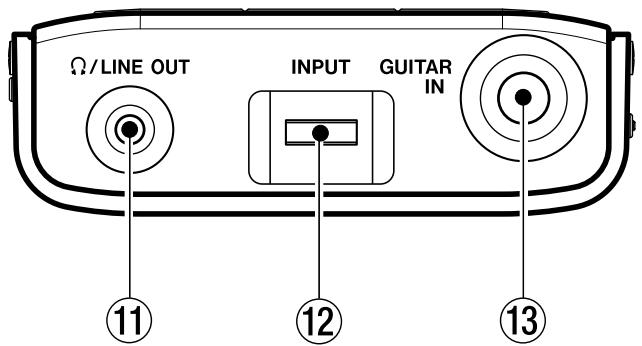
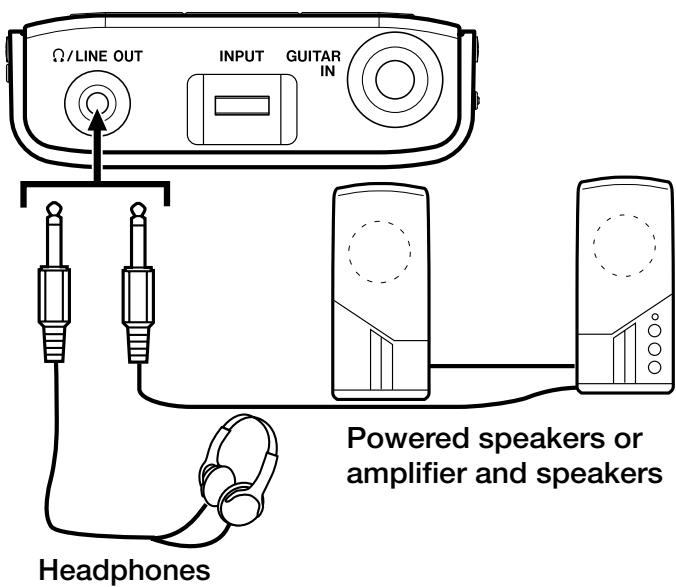
⑪ Ω/LINE OUT jack
Connect headphones to this jack to hear the playing tracks and the sound of a connected guitar.
This jack can also be used as a line output jack.
⑫ INPUT volume
Use to adjust the input level of the GUITAR IN jack.
⑬ GUITAR IN jack
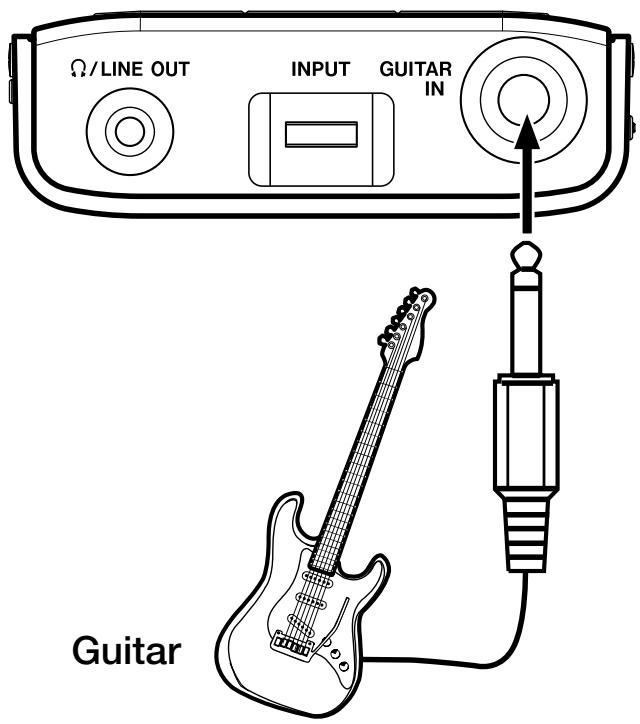
Connect a guitar with a standard guitar cable here.
Right Side Panel
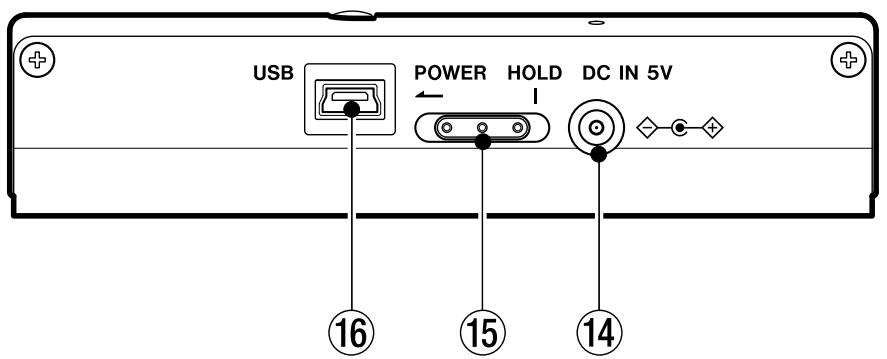
⑭ DC IN 5V jack
Connect an AC adapter (TASCAM PS-P520, sold separately).
⑮ POWER switch
Slide and hold this switch in the direction of the arrow (to the left) to turn the power ON and OFF.
Slide it to the right to engage the HOLD function.
When set to HOLD, all keys are disabled.
⑯ USB port
Connect the included USB cable to this port and your computer.
NOTE
Trouble-free use of a USB hub cannot be guaranteed. If you experience trouble using a USB hub, connect the unit directly with the computer.
Left Side Panel
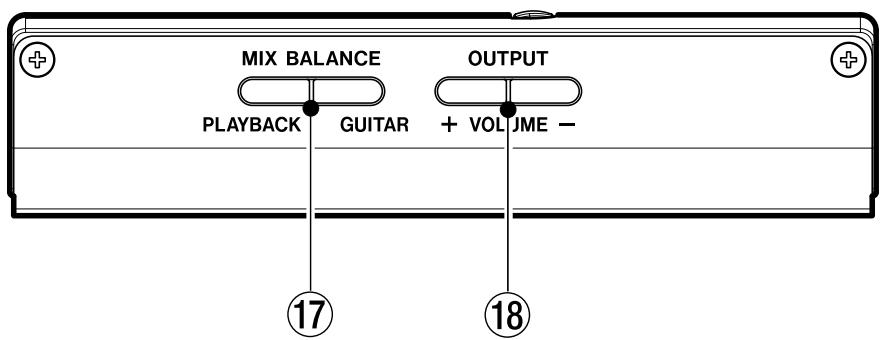
⑰ MIX BALANCE (GUITAR, PLAYBACK) keys
Use these keys to adjust the balance between the volume of the guitar connected to the GUITAR IN jack and the playing track. During adjustment, the balance status is shown at the bottom of the display.
Press the GUITAR key to increase the relative level of the guitar, and the PLAYBACK key to increase the relative level of the playing track.
During metronome playback, these keys adjust the guitar and metronome balance with the PLAYBACK key increasing the metronome volume relatively.
⑱ OUTPUT VOLUME (+, -) keys
Use to adjust the overall signal level sent from the / LINE OUT jack.
During adjustment, the output volume is shown at the bottom of the display.
Back Panel

Reset hole
If the MP-GT1 starts to operate incorrectly, insert the end of a paper clip or similar object into this hole to press the System Reset Button inside. Pressing this button turns the power OFF.
CAUTION
Do not press the System Reset Button if the unit is operating normally.
Home screen
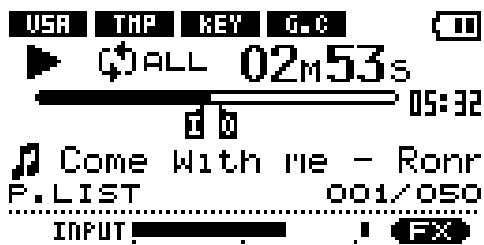
During normal operation the Home screen appears on the display. The following explanation is for the Home screen.
NOTE
When using menus or the built-in effects dedicated screens are opened. See other sections for explanation of menu and effect screens.

① Power
The battery indicator appears when the built-in lithium ion battery is used. Three bars show a full battery. This indicator blinks when the battery needs to be recharged.
② Player operation indicators
These indicators show what the player is doing.
▶ Track is playing
Track is paused
■ Track stopped at beginning
▶▶ Fast forwarding
◀ Fast rewinding
▶▶I Skipping to next track
Skipping to previous track
③ Elapsed time (00m00s)
The elapsed time (minutes: seconds) appears during track playback.
④ Playback position bar
This bar shows the current playback position. The dark bar extends from the left as playback proceeds.
⑤ Remaining time
The remaining time (minutes: seconds) appears during track playback.
⑥ Loop IN point and OUT point markers
Shows the loop playback IN and OUT points.
When the IN point is set, “I” appears below the playback position bar at the position relative to the time of the IN point.
When the OUT point is set, “0” appears below the playback position bar at the position relative to the time of the OUT point.
⑦ Loop/repeat setting status indicators
The following indicators appear according to the playback settings.
SINGLE Current track plays and then playback stops
^1 Current track plays repeatedly
ALL All tracks in the play area play repeatedly
I O Playback loops between IN and OUT points
⑧ Track information
Tag information or file name appears during playback.
If there is ID3 tag information, the Title information will be shown, but if not, the file name will be shown.
2 - Part names and functions
⑨ Play area
The currently selected play area appears.
ALL All files in the MUSIC folder
FOLDER Files in a subfolder of the MUSIC folder
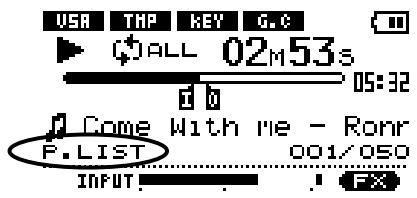
P.LIST Files added to the playlist
Playback track number/total number of tracks
The current track number and the total number of tracks in the selected play area appears.
⑩ Track number
Shows the current track number/number of tracks in the selected play area.
⑪ INPUT level meter
Level of the guitar signal entering the GUITAR IN jack appears.
⑫ Status of playback control functions
The status of each playback control function (VSA, tempo, key, guitar cancel) is shown.
When a function is ON, its indicator appears with light colored letters on a dark background.
⑬ Effect setting status
Shows whether the effects are ON or OFF. When the effect function is ON, its indicator appears with light colored letters on a dark background.
Making connections
Connecting headphones or speakers
You can connect headphones or a monitoring system (powered speakers, amplifier/speaker system, etc.) to the MP-GT1 Ω/LINE OUT jack.
Connecting a guitar
Using the MP-GT1's guitar input jack and built-in guitar effects, you can create a variety of electric guitar tones with just the MP-GT1. You can also play guitar along with an MP3 track on the unit. (See the “Practice Functions” chapter on page 18 and the “Using Effects” chapter on page 20.)
The INPUT level meter appears at the bottom of the home screen. Use this to confirm input and adjust the level of the guitar signal. If the input level is too high, the dot at the far right end of the bar will stay lit briefly. If the input level is low, then the meter bar will extend only a short distance from the left when you play the guitar.
Watch this meter as you adjust the INPUT volume input level to set the input level so that it is neither too high or too low.
The guitar sound is output through the /LINE OUT jack.
Connecting to a computer
By connecting the MP-GT1 to a computer, you can copy music files (in MP3 format) from the computer to the MP-GT1, erase files on the MP-GT1 and edit folders.
To transfer music files stored on a computer to the MP-GT1, use the included USB cable to connect the USB port on the unit to a computer USB port.
“connected... USB” appears on the MP-GT1 screen. On the computer, you should find the unit shown as an external drive named “MP-GT1.”

NOTE
When shipped from the factory, a copy of this Owner's Manual is stored in the MP-GT1 drive in PDF format in the MANUAL folder. If you erase it, please make a backup copy for future reference.
Disconnecting from a computer
When disconnecting the MP-GT1 from a computer, follow the procedures for your computer operating system to dismount an external drive, and then disconnect the USB cable.
The MP-GT1 automatically restarts.

Moving MP3 files to the the MP-GT1
Copying tracks from a computer
The MP-GT1 can play back MP3 (MPEG1 Audio Layer III) format files. (See “File information page” on page 24.)
MP3 files are transferred from a computer by the USB cable.
NOTE
RIFF format MP3 files with .wav extensions are not supported. 44.1 kHz is the only supported sampling frequency. MP3 files with other frequencies, including 48 kHz and 32 kHz, are not supported.
Preparing MP3 files on a computer
Use a software application to convert tracks from a CD or other source into MP3 files on the computer.
NOTE
Most music importing software (e.g. iTunes) can convert tracks from other formats to MP3s. However, this software can probably also convert and import into other formats. Please confirm that your software is set to import tracks in MP3 format.
Procedures to copy tracks from a computer
1 Connect the MP-GT1 and the computer. (See "Connecting to a computer" above.)
2 Click on the “MP-GT1” drive icon on the computer to open it. There are two folders inside: UTILITY and MUSIC.
3 Drag and drop MP3 files from the computer into the MUSIC folder. The MP3 files appear in the MUSIC folder when copying to the MP-GT1's memory is complete.
4 When finished copying files, from the computer, follow the procedures for your computer operating system to disconnect the MP-GT1, and then disconnect the USB cable. The MP-GT1 automatically restarts.
TIP
- You can create subfolders inside the MUSIC folder. Two levels of subfolders can be used. By setting the unit to play tracks only in a selected folder, you can categorize tracks or create folders for different users, for example. (See "Setting the play area" on page 15.)
- Give names to the sub folders and tracks as you wish them to appear on the MP-GT1 screen. (MP3s with ID3 tags will have Title information shown instead of file names.)
- Subfolders and tracks 3 or more levels below will not appear on the MP-GT1 and cannot be used with the unit.
Menu items
Press the MENU key to open the menu and access most of the MP-GT1 functions and settings.
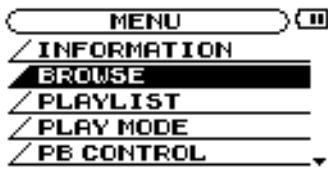
NOTE
The effect settings screen is accessed by using the FX key rather than the MENU key.
Menu overview
The MP-GT1 Menu has the following items.
| Menu item | Function |
| INFORMATION | Show summaries of current file information, memory usage and system settings |
| BROWSE | Show music files/folders inside the MUSIC folder and allows tracks to be selected for direct playback and adding to the playlist |
| PLAYLIST | Show and edit the playlist (move and erase playlist tracks) |
| PLAY MODE | Set the playback area and repeat mode |
| PB CONTROL | Set tempo, key, and guitar cancel settings |
| METRONOME | Set and use the metronome |
| TUNER | Set and use the guitar tuner and the oscillator |
| SETUP | Make various global settings and initialize and format the unit |
Using the Menus
Use the MENU and ENTER keys and the wheel for most menu operations. (See “Top Panel” on page 5.)
The currently selected item appears as light letters on a dark background.
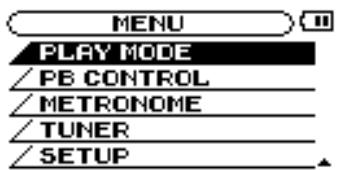
NOTE
You can use the menus and effects while a track is playing.
Operation example
In this example, we change the fast forward and reverse speed by using the SETUP menu CUE/REV SPEED item.
1 With the Home screen open, press the MENU key. The MENU screen with the list of menus appears.
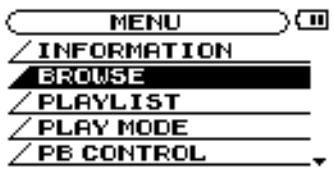
NOTE
As shown above, the ▼ at the bottom right of the screen indicates that there are items not shown that can be accessed by scrolling down. If the ▲ appears in the same area, there are items not shown that can be accessed by scrolling up.
2 Turn the wheel to select the SETUP screen and press the ENTER key to open the SETUP screen.

3 Turn the wheel to select CUE/REV SPEED and press the ENTER key. The current setting is highlighted.
4 Turn the wheel to choose the desired value.
NOTE
▲ and ▼ appear to the right of the setting value and indicate whether the value can be raised or lowered.
For example, in the case of CUE/REV, there are five possible settings: X2, X4, X6, X8 and X10.
If the lowest value (in this example, X2) is set, then the ▲ appears, showing that the value can be raised.
If the highest value (in this example, X10) is set, then the ▼ appears, showing that the value can be lowered.
If set at any other value, both ▲ and ▼ appear showing that the value can be raised or lowered.
- Press the MENU key repeatedly to return to the Home screen. Each time you press this key, you will return to the previous level of operation.
NOTE
Using the EFFECT screen works in the same way as the other Menus. (See the "Using Effects" chapter on page 20.)
5 – Playing and Selecting Tracks
Basic track playback functions
Use the ▶/Ⅱ, ◀◀ and ▶▶ keys to operate the MP-GT1 in the same way that you would use an ordinary CD player or other music device.
Playing a track
Press the ▶/■ key to start playback of a track that is stopped.
Pausing a track
Press the ▶/■ key to pause a track that is playing at the position where you press the key.
Selecting a track
Press the skip (◀◀ and ▶▶) keys to select a track. This is possible during playback or when paused.
Pressing the ◀◀◀ key during playback or when a track is paused returns the playback position to the beginning of that track.
Pressing the ◀◀ key when stopped at the beginning of a track skips to the beginning of the previous track.
Pressing the ▶▶▶ key always skips to the beginning of the next track.
NOTE
The ■ indicator appears on the display when playback is stopped at the beginning of a track. The ■ indicator appears when playback is paused at any other point in a track.
Searching a track
Press and hold the ◀◀ and ▶▶I keys to search backward and forward through a track (rewind and fast forward).
Adjusting the volume
Use the OUTPUT VOLUME keys (+, -) to adjust the playback volume. During adjustment, the current volume level appears at the bottom of the display. Since the OUTPUT VOLUME keys adjust the volume level of all MP-GT1 sound output, they also affect the volume level of a connected guitar.

Selecting a track to play
There are two ways to choose the track that you want to play. You can use the ◀◀◀ and ▶▶◀ keys when the Home screen is open or you can use the BROWSE screen (see below).
Using the Browse screen to select tracks
On the BROWSE screen, you can see the contents of the MUSIC folder. You can immediately start playback of a track by selecting a music file on this screen and pressing the ▶/■ key.
NOTE
You can also add tracks to the playlist on the BROWSE screen. Use a computer to erase or move files and folders in the MUSIC folder. You cannot do this using the BROWSE screen.
To open the BROWSE screen, press the MENU key to open the MENU screen, then select the BROWSE item and press the ENTER key.
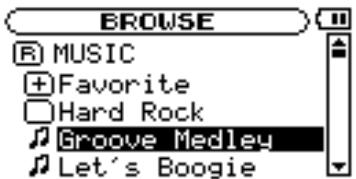
The BROWSE screen shows the folders and music files by their levels. Open a folder to see the music files in it. To open a folder, select it and press the ENTER key.
R MUSIC
The MUSIC folder is the top level folder shown in the BROWSE screen.
#
This indicator appears next to the names of music files.
Select a music file and press the ▶/■ key to start playing that track and return to the Home screen immediately.
Select a music file and press the ENTER key to open a popup window that allows you to add that track to the playlist. (See “Using the playlist” on page 16.)
NOTE
Files with extensions other than MP3 do not appear.
(Continues on next page.)
5 – Playing and Selecting Tracks

This indicator appears next to folders that contain subfolders.

This indicator appears next to folders that do not contain subfolders.
The following BROWSE screen shows what happens after the folder named “Favorite” has been opened.
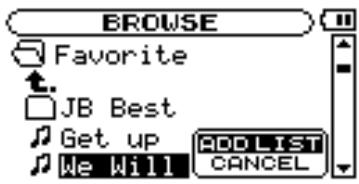

The contents of this folder (in this example, Favorite) are shown on the screen.

Select this indicator and press the ENTER key to close the open folder and return to the screen showing the contents of the folder that holds it.
Setting the play area
You can set the MP-GT1 to play only a specific group of tracks from the Home screen by setting the play area. This makes track selection easier when you have numerous tracks on the unit.
Use the PLAY MODE menu to set the play area.
1 Press the MENU key to open the MENU screen, and select and open the PLAY MODE screen.
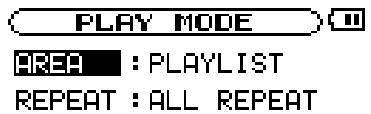
2 Select the AREA item and press the ENTER key.
3 Choose one of the following play area options.
ALL
Allows Home screen playback of all accessible files that have been transferred to the MP-GT1's MUSIC folder from a computer.
FOLDER
Allows Home screen playback of all accessible files in the same folder as the currently selected track.
To change the current folder, go to the BROWSE screen and select any track inside the desired folder. (See “Using the Browse screen to select tracks” on page 14.)
NOTE
Only files in the currently selected folder are available for Home screen playback. Files inside subfolders within the selected folder are not available.
PLAYLIST
Allows Home screen playback of all files added to the playlist. (See “Using the playlist” on page 16.)
If no files have been added to the playlist, then “No PLAYLIST” appears. Add files to the playlist or make a different selection.
NOTE
The current play area setting appears at the bottom left of the Home screen.
5 – Playing and Selecting Tracks
Using the playlist
You can create a list of tracks (playlist) for playback. Select “PLAYLIST” for the AREA item on the PLAY MODE screen. Tracks that can be selected and played from the Home screen are then limited to those added to the playlist.
Adding tracks to the playlist
1 Press the MENU key to open the MENU screen. Then, select and open the BROWSE screen.
2 Select a track (music file) that you want to add to the playlist and press the ENTER key.
A popup window for adding tracks to the playlist appears.
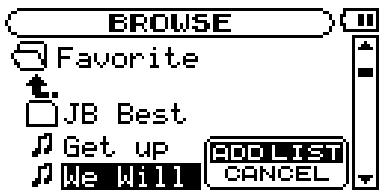
3 Select ADD LIST and press the ENTER key.
The track is added to the playlist and the popup window closes.
NOTE
If you select CANCEL and press the ENTER key, the track is not added and the popup window closes.
4 Repeat steps 2 and 3 as necessary to add more tracks to the playlist. The tracks are numbered in the order that they are added.
Editing the playlist
You can view and edit the playlist on the PLAYLIST screen.
1 Press the MENU key to open the MENU screen. Select PLAYLIST and press ENTER to open the PLAYLIST screen.
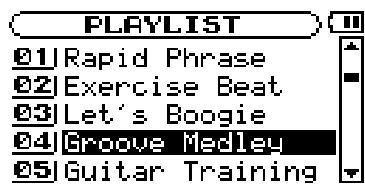
2 Select the track that you want to edit and press the ENTER key to open a popup window.
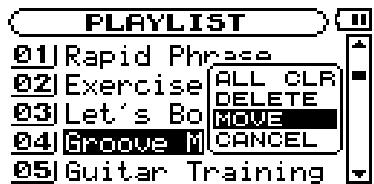
The remaining procedures differ according to which of the three items that you choose to edit.
NOTE
Select CANCEL in the popup window and press the ENTER key to quit the procedure without making any change.
ALL CLR: Remove all tracks from the playlist
Select this to remove all tracks from the playlist. (In this case, it does not matter which track you select in step 2.) This removes tracks from the playlist, but it does not erase them from the MP-GT1.
3 Select ALL CLR from the popup window and press the ENTER key.
A confirmation message appears.
4 Press the ENTER key to remove all the tracks from the playlist.
Press the MENU key to cancel this action.
DELETE: Remove one track from the playlist
Select this to remove a track from the playlist. This removes the track from the playlist, but it does not erase it from the MP-GT1.
3 Select DELETE from the popup window and press the ENTER key.
The track is removed from the playlist.
(Continues on next page.)
5 – Playing and Selecting Tracks
MOVE: Change the order of tracks
Select this to change the order of tracks in the playlist.
3 Select MOVE from the popup window and press the ENTER key.
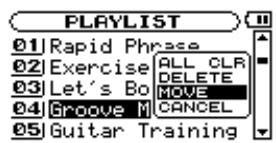

The track's number is highlighted.
4 Use the wheel to move the track to a different position in the playlist.

In the example shown above, the 4th track in the list is being moved to the 3rd track position.
5 Press the ENTER key to complete track reordering and return to the ordinary PLAYLIST screen.
Repeat and single-track playback (PLAY MODE)
Repeat playback of the current track or all tracks in the selected play area is possible. Playing a single track just once is also possible.
1 Press the MENU key to open the MENU, and select and open the PLAY MODE screen.
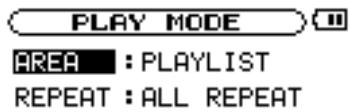
2 Select the REPEAT item to set one of the following modes.
OFF
All tracks in the current play area play once in order.
SINGLE
The current track plays once without repeating and the (Single indicator) appears on the Home screen.
1 REPEAT
The current track plays repeatedly and the (1track repeat indicator) appears on the Home screen.
ALL REPEAT
All tracks in the current play area play repeatedly and the (all track repeat indicator) appears on the Home screen.
NOTE
Loop playback automatically turns OFF any active PLAY MODE repeat mode.
Changing playback pitch and tempo
Not only can you use the MP-GT1 to change the tempo of track playback, you can do this without changing the pitch. You can also change the playback pitch of a track without changing the tempo.
These changes can be made on the PB CONTROL screen.
When the Home screen is open, press the ENTER key to open the PB CONTROL screen.

NOTE
You can also access this menu from the MENU screen by selecting and opening PB CONTROL.
Changing the tempo (TEMPO)
Use the TEMPO item to change the track tempo, including reducing it up to 50%.
Playback speed is altered according to the tempo value setting. The number shown is a percentage change.
On the Home screen the TMP indicator appears as light letters on a dark background.
The available tempo change values depend on whether the VSA function is ON or OFF.
VSA: ON Choose one of the following values (%): -50, -32, -16, -12, -8, -4, 0, +4, +8, +12, +16
VSA: OFF Choose any value between -50 and +16 (%)
NOTE
If you set the tempo adjustment value when VSA is OFF and then turn VSA ON, the nearest tempo value is selected automatically
Change tempo without changing pitch (VSA)
Turn the Variable Speed Audition (VSA) function ON to keep the pitch the same when changing the tempo. Use the VSA item to turn the VSA function ON and OFF.
When ON, the VSA indicator appears on the Home screen as light letters on a dark background.
NOTE
During use of pitch control functions, playback may sometimes sound uneven. This is the result of special processing and is not a malfunction.
Change key without changing tempo (KEY)
Use the KEY item to change the pitch in semitones without changing the tempo.
Use the KEY item to adjust the pitch up or down by 1–6 semitones ( ^# 6– ^b 6).
When KEY is ON (changed from 0), the KEY indicator appears as light letters on a dark background on the Home screen.
Use the FINE item to adjust the pitch in cents (100 cents = 1 semitone).
Canceling guitar sounds (GUITAR CANCEL)
Use the guitar cancel function to cancel the sounds of guitars in playing tracks. Use the three GUITAR CANCEL items to set the guitar cancel function.
CANCEL
Set the CANCEL item to ON to turn the guitar cancel function ON. On the Home screen, the G.C indicator appears as light letters on a dark background.
NOTE
The effectiveness of this function varies between tracks and it cannot completely eliminate all guitar sounds. If turning this function ON does not reduce guitar sounds as you want, or it cancels different instrument parts, try adjusting the following parameters for better results.
By adjusting the RANGE and PART items, you may be achieve even more thorough guitar cancellation. Please listen as you adjust these settings to find the best setting.
RANGE
Use the RANGE item to set the frequency range in the stereo position set with the PART item to be cancelled to either mid-range frequencies (MID), which covers most guitar sounds, or the full range of frequencies (ALL).
PART
Use the PART item to determine the position in the stereo spectrum (L10—R10) for cancellation.
For example, if the part you want to cancel is panned to the left, try setting PART to L10 and adjust it toward the center (L9, L8, etc.) until you achieve best cancellation.
Repeat playback of a selected loop
Follow these procedures to repeat playback of a selected part of a track (loop playback).
1 Press the I/O key when a track is playing or paused at the point where you want to set the IN point (loop starting point).
2 Press the I/O key again at the point when you want to set the OUT point and start loop playback between the IN and OUT points.
NOTE
Loop playback automatically turns OFF any active PLAY MODE repeat mode.
Below the playback position bar on the Home screen, the “1” indicator appears at the IN point, and the “0” indicator appears at the OUT point. During loop playback, 1++0 appears on the LCD.
- To stop loop playback press either the LOOP key or the I/O key.
- If you press the LOOP key, the loop IN and OUT points are kept, so you can play the same loop if you press the LOOP key again.
- If you press the I/O key, the loop IN and OUT points are cleared.
Connecting a guitar to practice
You can connect a guitar and mix your guitar playing with the track you are playing back.
You can also use the built-in guitar effects to craft your guitar tone for even more effective practice and performance.
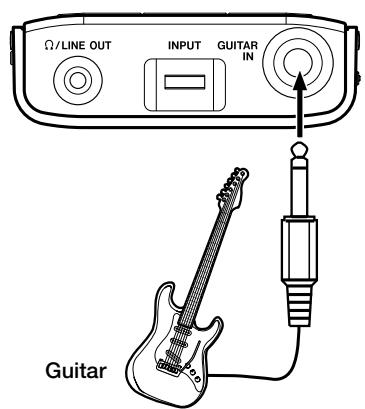
1 Connect a guitar to the GUITAR IN jack.
2 Adjust the guitar volume with the INPUT dial.
The guitar sound is output through the / LINE OUT jack. (See "Connecting a Guitar" on page 10 for more information.)
Practicing with tracks as they play
If you play guitar while a track is playing back, you can hear the combined signals of the guitar and the track output through the /LINE OUT jack.
Use the MIX BALANCE keys to adjust the volume level balance between the track being played back (PLAYBACK) and the guitar (GUITAR) signals.
As you adjust the balance, a status bar appears at the bottom of the display.

Using the metronome (METRONOME)
Use the MP-GT1's built-in metronome during practice to improve your timing.
To use the metronome, press the MENU key to open the MENU screen and select and open the METRONOME item.
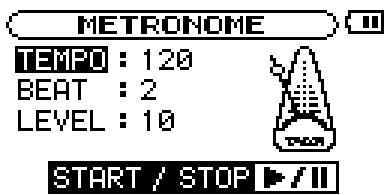
TEMPO
Use to set the tempo between 20 and 250.
BEAT
Set the accent between 0 and 9. There is no accent when set to 0.
LEVEL
Use to set the metronome volume.
Turning the metronome ON and OFF
Press the ▶/■ key to start and stop the metronome.
NOTE
When the metronome is ON, you can use other settings, but instead of returning to the usual Home screen, you return to the METRONOME screen. Stop the metronome if you want to return to the Home screen.
The MP-GT1 has built-in guitar effects.
Press the FX key to open the EFFECT screen.
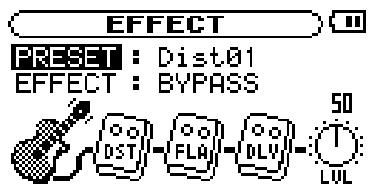
As with other screens, use the wheel to select items and adjust setting values and press the ENTER key to confirm selections. Use the MENU key to return to previous items or screens.
As the figure above shows, on the EFFECT screen, in addition to PRESET and EFFECT items, there is a guitar, up to 3 effect modules, and a knob labeled LVL. The guitar is there just to show you where the signal starts, but you can adjust all the other items. Turn the wheel when the EFFECT screen is open to select the effect modules and the LVL knob. These items appear darker when selected just like menu items.
NOTE
Each preset has a different set of effect modules. See the Effect presets list on page 25 for which modules are included with each preset.
PRESET
Choose from 73 presets, including 18 distortion, 18 overdrive, 18 compressor presets and 18 other effects. (See the “Effect presets list” on page 25 for details.)
EFFECT
Turn the effect ON or set it to BYPASS. When ON, the FX indicator appears as light letters on a dark background at the bottom right of the Home screen.
Effect modules
Select a module and press the ENTER key to open its settings window. Each module has two parameters that vary according to the effect type. See the “Effect module parameters list” on page 26 for details.
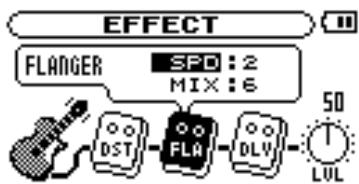
LVL knob
Use this to adjust the effect output level. Select it and press the ENTER key. When the number above the knob appears light on a dark background, you can adjust it using the wheel to a value between 0 (no sound from the effect) and 100.
Press the FX key again to close the EFFECT screen and return to the Home screen.
NOTE
You can also return to the Home screen by pressing the MENU key.
The MP-GT1 has a built-in guitar tuner and an oscillator that can output any pitch between C4 and B6 To use the tuner functions, press the MENU key to open the MENU screen, and select and open the TUNER item.

MODE
Select from the following tuner modes.
GUITAR Guitar tuning mode
AUTO Chromatic tuning mode
OSC. Oscillator mode
CALIB
You can adjust the frequency of A between 435 and 445 Hz. The value of this setting also appears at the bottom right of the screen. This setting affects all tuner modes.
The following sections explain how to use each of the three tuner modes.
Chromatic tuner mode (AUTO)
This is the default mode. In this mode, there is no need to change settings as you tune each string.
1 With the guitar connected to the GUITAR IN jack, play the string that you want to tune. The note name closest to the current string pitch appears.
2 Tune the string approximately until the note that you want to tune to appears on the screen.
3 When the center of the meter lights, the string is in tune.
A bar appears on the left side of the meter if the pitch is too low, and on the right side if the pitch is too high. The longer the bar is, the more out of tune the string is.

Guitar tuner mode (GUITAR)
In this mode, you must manually set the note for each string to be tuned.
1 Use the NOTE item to select the string that you want to tune (1E, 2B, 3G, 4D, 5A or 6E).
2 When the center of the meter lights, the string is in tune.
A bar appears on the left side of the meter if the pitch is too low, and on the right side if the pitch is too high. The longer the bar is, the more out of tune the string is.
Oscillator mode (OSC.)
Use the built-in oscillator to output a sine wave through the /LINE OUT jack. You can set this wave to any note in a 3-octave range between C4 and B6.
NOTE
Use this to set the pitch of the note to be output between C4 and B6.
OUT
Use this to turn the oscillator output ON and OFF. When ON, the onscreen tuning fork provides visual feedback.

LEVEL
Use this to set the output level (0–100) of the oscillator.
9 – Setup Menu Options
On the SETUP screen, you can make various MP-GT1 settings, as well as initialize or format the unit. Press the MENU key to open the MENU screen, and then select and open the SETUP item.
The following settings related to how the MP-GT1 operates and its display behaves can be made on the SETUP screen.
| SETUP | |
| CUE/REV SPEED | : x8 |
| AUTO OFF | : 30sec |
| BACKLIGHT | : 15sec |
| CONTRAST | : 5 |
| DIMMER | : High |
Cue and review speed
Use CUE/REV SPEED to determine how fast search occurs when the ▶▶1 and ◀◀ keys are pushed and held.
Setting choices: x2, x4, x8 (factory setting), x10
Automatic power off
Use AUTO OFF to set how long until the unit automatically turns OFF when powered by the internal battery. This setting is the amount of time from when track playback has stopped and the unit has last been used.
Setting choices: OFF (factory setting, the power must be turned off manually), 3 min, 5 min, 10 min, 30 min
Automatically turning off the backlight
Use BACKLIGHT to set the time since the last operation until the backlight automatically turns OFF when powered by the internal battery.
Setting choices: OFF (backlight always on), 5 sec (factory setting), 10 sec, 15 sec, 30 sec
Display contrast
Use CONTRAST to adjust the display contrast.
Setting choices: 1–20 (factory setting: 12)
Backlight brightness
Use DIMMER to adjust the backlight brightness.
Setting choices: HIGH (factory setting), LOW, OFF (no backlight)
Initializing the unit
Use INITIALIZE to restore the MP-GT1 to its factory settings.
1 Select INITIALIZE and press the ENTER key to highlight Exec.
2 Press the ENTER key again to open a confirmation popup window.
3 Press the ENTER key again to initialize the unit. Press the MENU key to cancel initialization.
Formatting the unit quickly
Use QUICK FORMAT to format the MP-GT1's flash memory quickly. Formatting the unit erases all files on the unit, but the MUSIC and UTILITY folders and the mp-gt1.sys files are automatically regenerated.
1 Select QUICK FORMAT and press the ENTER key to highlight Exec.
2 Press the ENTER key again to open a confirmation popup window.
3 Press the ENTER key again to format the unit quickly.
Press the MENU key to cancel formatting.
Formatting the unit completely
Use FULL FORMAT to format the MP-GT1's flash memory completely. Unlike QUICK FORMAT, FULL FORMAT also checks the memory for errors. For this reason, it takes much more time. Formatting the unit erases all files on the unit, but the MUSIC and UTILITY folders and the mp-gt1.sys files are automatically regenerated.
1 Select FULL FORMAT and press the ENTER key to highlight Exec.
2 Press the ENTER key again to open a confirmation popup window.
3 Press the ENTER key again to format the unit fully.
Press the MENU key to cancel formatting.
CAUTION
When using QUICK FORMAT or FULL FORMAT, use the AC adapter (sold separately) or confirm that the battery is sufficiently charged. If the power fails during formatting, the formatting may not occur correctly.
WARNING
Using QUICK FORMAT or FULL FORMAT erases the MANUAL folder and the pdf Owner's Manual in it. Please make a copy of this file before formatting the unit.
10 - Using the Information Pages
Use the INFORMATION screen to view various information about files, memory usage and MP-GT1 system settings.
Press the MENU key to open the MENU screen and select and open INFORMATION.
Use the wheel to switch between the three INFORMATION pages.
FILE Currently active MP3 file data
MEMORY Built-in flash memory use
SYSTEM MP-GT1 system settings and firmware version
File information page (FILE)
Shows information about the currently selected file.
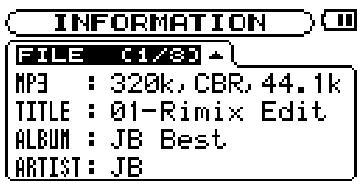
MP3 File bit rate (kbps), CBR or VBR (constant bit rate, variable bit rate), and sampling frequency (kHz)
TITLE ID3 tag title information when available; otherwise shows file name
ALBUM Shows ID3 tag album information when available; otherwise blank
ARTIST Shows ID3 tag artist information when available; otherwise blank
Memory information page (MEMORY)
Shows status of built-in flash memory usage.
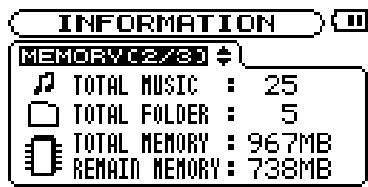
TOTAL MUSIC Total number of playable files in the MUSIC folder
TOTAL FOLDER Total number of subfolders in the MUSIC folder
TOTAL MEMORY Total capacity of the built-in flash memory
REMAIN MEMORY Total amount of unused built-in flash memory
NOTE
The MP-GT1 can recognize a maximum combined total of 550 files and folders. If there are more than 550, files and folders in excess of this number will not appear on the unit.
System information page (SYSTEM)
Shows MP-GT1 system settings information and firmware version.
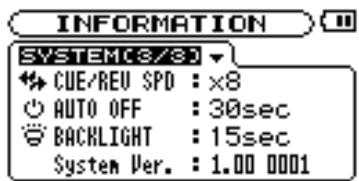
CUE/REV SPD Cue and review speed
AUTO OFF Auto power OFF
BACKLIGHT Backlight auto OFF
System Ver. System firmware version
Effect preset list
| Name | Module 1 | Module 2 | Module 3 | Name | Module 1 | Module 2 | Module 3 | |||
| 1 | Dist01 | Distortion | Flanger | Reverb | 37 | Comp01 | Compressor | Flanger | Reverb | |
| 2 | Dist02 | Distortion | Flanger | Delay | 38 | Comp02 | Compressor | Flanger | Delay | |
| 3 | Dist03 | Distortion | Phaser | Reverb | 39 | Comp03 | Compressor | Phaser | Reverb | |
| 4 | Dist04 | Distortion | Phaser | Delay | 40 | Comp04 | Compressor | Phaser | Delay | |
| 5 | Dist05 | Distortion | Exciter | Reverb | 41 | Comp05 | Compressor | Exciter | Reverb | |
| 6 | Dist06 | Distortion | Exciter | Delay | 42 | Comp06 | Compressor | Exciter | Delay | |
| 7 | Dist07 | Distortion | Chorus | Reverb | 43 | Comp07 | Compressor | Chorus | Reverb | |
| 8 | Dist08 | Distortion | Chorus | Delay | 44 | Comp08 | Compressor | Chorus | Delay | |
| 9 | Dist09 | Distortion | Tremolo | Reverb | 45 | Comp09 | Compressor | Tremolo | Reverb | |
| 10 | Dist10 | Distortion | Tremolo | Delay | 46 | Comp10 | Compressor | Tremolo | Delay | |
| 11 | Dist11 | Distortion | Vibrato | Reverb | 47 | Comp11 | Compressor | Vibrato | Reverb | |
| 12 | Dist12 | Distortion | Vibrato | Delay | 48 | Comp12 | Compressor | Vibrato | Delay | |
| 13 | Dist13 | Distortion | AutoWah | Reverb | 49 | Comp13 | Compressor | AutoWah | Reverb | |
| 14 | Dist14 | Distortion | AutoWah | Delay | 50 | Comp14 | Compressor | AutoWah | Delay | |
| 15 | Dist15 | Distortion | Pitchshifter | Reverb | 51 | Comp15 | Compressor | Pitchshifter | Reverb | |
| 16 | Dist16 | Distortion | Pitchshifter | Delay | 52 | Comp16 | Compressor | Pitchshifter | Delay | |
| 17 | Dist17 | Distortion | Through | Reverb | 53 | Comp17 | Compressor | Through | Reverb | |
| 18 | Dist18 | Distortion | Through | Delay | 54 | Comp18 | Compressor | Through | Delay | |
| 19 | OD01 | Overdrive | Flanger | Reverb | 55 | Flanger01 | Through | Flanger | Reverb | |
| 20 | OD02 | Overdrive | Flanger | Delay | 56 | Flanger02 | Through | Flanger | Delay | |
| 21 | OD03 | Overdrive | Phaser | Reverb | 57 | Phaser01 | Through | Phaser | Reverb | |
| 22 | OD04 | Overdrive | Phaser | Delay | 58 | Phaser02 | Through | Phaser | Delay | |
| 23 | OD05 | Overdrive | Exciter | Reverb | 59 | Exciter01 | Through | Exciter | Reverb | |
| 24 | OD06 | Overdrive | Exciter | Delay | 60 | Exciter02 | Through | Exciter | Delay | |
| 25 | OD07 | Overdrive | Chorus | Reverb | 61 | Chorus01 | Through | Chorus | Reverb | |
| 26 | OD08 | Overdrive | Chorus | Delay | 62 | Chorus02 | Through | Chorus | Delay | |
| 27 | OD09 | Overdrive | Tremolo | Reverb | 63 | Tremolo01 | Through | Tremolo | Reverb | |
| 28 | OD10 | Overdrive | Tremolo | Delay | 64 | Tremolo02 | Through | Tremolo | Delay | |
| 29 | OD11 | Overdrive | Vibrato | Reverb | 65 | Vibrato01 | Through | Vibrato | Reverb | |
| 30 | OD12 | Overdrive | Vibrato | Delay | 66 | Vibrato02 | Through | Vibrato | Delay | |
| 31 | OD13 | Overdrive | AutoWah | Reverb | 67 | AutoWah01 | Through | AutoWah | Reverb | |
| 32 | OD14 | Overdrive | AutoWah | Delay | 68 | AutoWah02 | Through | AutoWah | Delay | |
| 33 | OD15 | Overdrive | Pitchshifter | Reverb | 69 | PitShift01 | Through | Pitchshifter | Reverb | |
| 34 | OD16 | Overdrive | Pitchshifter | Delay | 70 | PitShift02 | Through | Pitchshifter | Delay | |
| 35 | OD17 | Overdrive | Through | Reverb | 71 | Reverb | Through | Through | Reverb | |
| 36 | OD18 | Overdrive | Through | Delay | 72 | Delay | Through | Through | Delay | |
| 73 | Through | Through | Through | Through |
Effect module parameters
The chart below explains the features of the effect modules that make up the MP-GT1 effect presets. Most of the effect presets use two or three modules in combination to achieve sounds that are even more interesting. If you have a specific sound in mind, try different presets and adjust the module parameters to find effect settings that meet your needs.
| Module | Effect | Parameter | Details | Value range |
| Distortion (DST) | Heavily distorts the guitar sound, making it stand out with thickness and sustain for a nice lead sound. | DIST | Adjusts the amount of distortion | 0–30 |
| TONE | Adjusts the tone | 0–12 | ||
| Overdrive (OD) | Lightly distorts the guitar sound giving it the sound of an overdriven amplifier—great for creating a warm classic rock sound. | DRIV | Adjusts the amount of overdrive | 0–30 |
| TONE | Adjusts the tone | 0–12 | ||
| Compressor (CMP) | Compresses the guitar sound, giving it clarity and sustain—good for creating appealing, clean sounds. | COMP | Adjusts the amount of compression | 0–30 |
| TONE | Adjusts the tone | 0–12 | ||
| Flanger (FLA) | Gives the sound a moving modulation that can be compared to the sound of a jet engine. | SPD | Adjusts the speed of modulation | 0–30 |
| MIX | Adjusts the amount of the effect | 0–20 | ||
| Phaser (PHA) | Gives the sound a rough modulation useful for creating 70s funk style sounds. | SPD | Adjusts the speed of modulation | 0–30 |
| MIX | Adjusts the amount of the effect | 0–20 | ||
| Exciter (EXC) | Adds high frequencies to the original sound to make rich, shimmering tones that stand out. | FREQ | Adjusts the high frequencies added to the sound | 0–30 |
| MIX | Adjusts the amount of the effect | 0–20 | ||
| Chorus (CHO) | Adds a slightly detuned sound to create a wide, ensemble-like tone. This effect was popular in 70s hard rock and fusion. | DPTH | Adjusts the modulation depth | 0–30 |
| MIX | Adjusts the amount of the effect | 0–20 | ||
| Tremolo (TRM) | Creates a cyclical variation in the volume. A sound like a rotary speaker can be achieved by combining it with delay. | SPD | Adjusts the speed of the effect. | 0–30 |
| MIX | Adjusts the amount of the effect | 0–20 | ||
| Vibrato (VIB) | Creates a cyclical variation in the frequency for a regular pitch variation. | SPD | Adjusts the speed of the effect. | 0–30 |
| MIX | Adjusts the amount of the effect | 0–20 | ||
| Autowah (WAH) | Creates a sound like a wah pedal that is great for funky sounds. Vary your picking force when using this effect. | SENS | Adjusts the sensitivity of the effect to picking force | 0–30 |
| MIX | Adjusts the amount of the effect | 0–20 | ||
| Pitch Shifter (PIT) | Changes the pitch of the input signal and can be used to create a doubled lead sound, for example. Set the PIT values between 6 and 17, or -6 and -17, for semitone changes. | PIT | Adjusts pitch in semitones (±6–17) or in smaller intervals at values between -5 to +5. | -17–+17 |
| MIX | Adjusts the amount of the effect | 0–20 | ||
| Reverb (REV) | Creates reflections, like the echoes in a stone church, to give the sound greater width. Surf rock uses this effect extensively. | TIME | Adjusts the reverberation time | 0–25 |
| MIX | Adjusts the amount of the effect | 0–20 | ||
| Delay (DLY) | Adds echoes to the sound. Adjust the TIME and turn the MIX level up for a rockabilly sound. | TIME | Adjusts the delay time | 0–99 |
| MIX | Adjusts the amount of the effect | 0–20 |
The following is a list of the popup messages that may appear on the MP-GT1. Use this list if one of these popup messages appears and you want to check the meaning or confirm a proper response.
| Message | Meaning and response |
| File not found | Appears when the audio file cannot be found or the file is corrupted. Use a computer to check and reload the audio file. |
| Non-Supported | This appears when the audio file is not a supported encoding format. Use a computer to check the file format and reencode it and reload it if necessary. |
| Battery Empty | This warning appears when the battery is almost out of power. Use a USB connection or an AC adapter (sold separately) to recharge it. |
| I/O Too Short | This appears when using the I/O key to start loop playback if the IN and OUT points are too close together. Reset the IN and OUT points a little further apart and try again. |
| File Not Found PLAYLIST | The file in the PLAYLIST cannot be found. Please confirm that the file is still in the MUSIC folder. |
| No PLAYLIST | No files are in the PLAYLIST. This popup appears when the PLAY MODE is set to PLAYLIST, but no files have been added to the PLAYLIST. Add a file to the PLAYLIST. See “Adding tracks to the playlist” on page 16. |
| PLAYLIST FULL | This message appears if you try to add another track to the PLAYLIST when it already has 99 tracks. Erase an unneeded file from the PLAYLIST and then add a new file. See “Editing the playlist” on page 16. |
| Not Continued | If any of these errors occurs, turn the MP-GT1 power OFF and restart the unit. If the error message continues to appear, contact a TEAC Repair Center. |
| File Error | |
| FX Rx Failed | |
| FX Busy | |
| Can’t Save Data | |
| Memory Error | |
| Player Error | |
| System Err 50 | |
| System Error 1 | |
| System Error 2 | |
| System Error 3 | |
| System Error 4 | |
| System Error 5 | |
| System Error 6 | |
| System Error 7 | |
| System Error 8 | |
| System Error 9 |
13 – Recycling the Battery
This unit uses a lithium ion battery. Lithium ion batteries are a valuable, recyclable resource. Before disposing of this unit, please remove and recycle its battery.

WARNING
NEVER TAKE THE UNIT APART FOR ANY PURPOSE OTHER THAN TO REMOVE THE BATTERY BEFORE DISPOSAL!

How to remove the rechargeable battery
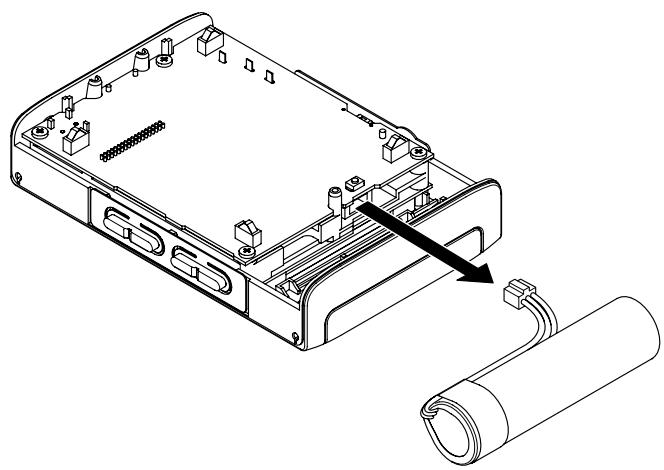
Before removing the battery, turn the unit power switch ON and drain the battery until it ceases to function. (Set the AUTO OFF function to OFF. See “Automatic power off” on page 22.)
1 Remove the four side screws and remove the upper case.

natural_image
Technical line drawing of an electronic device casing with internal components and mounting hardware (no text or symbols)2 Remove the battery from the unit and detach the connector.
natural_image
Technical line drawing of an electronic device showing a rear panel with connectors and a cable wrapped around it (no text or symbols present)Rated audio input and output
| Guitar Input | Standard phone jack (mono, unbalanced) |
| Input impedance | 1 MΩ |
| Maximum input level | +10 dBV |
| Headroom | 10 dB |
| Phones/Line Out | 1/8” (3.5 mm) stereo jack |
| Maximum output | 20 mW + 20 mW (with 32 Ω headphones connected) |
Audio performance
| Frequency characteristics | 20 – 20,000 Hz +1/-3 dB (Guitar Input > Phones/Line Out) |
| Total Harmonic Distortion | <0.05% (Guitar Input > Phones/Line Out) |
| S/N ratio (Line Out) | >90 dB (0 dBV) |
Other specifications
| MP3 file support | Bit rate | 32–320 kbps |
| Sampling frequency | 44.1 kHz | |
| VBR files | Supported | |
| ID3 tag display | Up to Ver 2.4 | |
| Note that loop playback IN and OUT points may not always set correctly for VBR MP3 files. | ||
| Memory medium | Built-in flash memory (1 GB) | |
| File system | FAT16 (recognizes a maximum combined total of 550 files and folders) | |
| Built-in lithium ion battery | 3.7V DC | |
| Power consumption | About 1.5 W (during MP3 playback) | |
| Dimensions (W x H x D) | 78 x 110 x 25.5 mm (3.1 x 4.3 x 1 inches) excluding protrusions | |
| Weight (including lithium ion battery) | 220 g (7.8 ounces) | |
| Accessory (sold separately) | AC adapter (PS-P520) | |
Minimum computer requirements
| Windows PC | Windows 2000, XP300 MHz Pentium128 MB memoryUSB port with 500 mA bus power (USB 2.0 recommended) |
| Macintosh | Mac OS 10.2 or later266 MHz Power PC (including iMacs, G3 and G4 processors)64 MB memoryUSB port with 500 mA bus power (USB 2.0 recommended) |
| Recommended | USB host controller, Intel chipset |
Stored settings
The following settings are saved when the MP-GT1 power is turned OFF. They are the same when the power is turned ON again.
- EFFECT settings
- TUNER settings
• METRONOME settings - PB CONTROL settings
- Loop playback ON/OFF status
-
Loop IN and OUT point settings
-
Playback mode
- Mix balance
- Auto power OFF setting
- Currently active track
- Output volume settings
- Backlight OFF Setting
Dimensions

TASCAM
TEAC Professional Division
MP-GT1
TEAC CORPORATION
Phone: +81-422-52-5082
3-7-3, Nakacho, Musashino-shi, Tokyo 180-8550, Japan
www.tascam.com
TEAC AMERICA, INC.
Phone: +1-323-726-0303
7733 Telegraph Road, Montebello, California 90640
www.tascam.com
TEAC CANADA LTD.
Phone: +1905-890-8008 Facsimile: +1905-890-9888
5939 Wallace Street, Mississauga, Ontario L4Z 1Z8, Canada
www.tascam.com
TEAC MEXICO, S.A. De C.V
Phone: +52-555-581-5500
Campesinos No. 184, Colonia Granjes Esmeralda, Delegacion Iztapalapa CP 09810, Mexico DF
www.tascam.com
TEAC UK LIMITED
Phone: +44-8451-302511
Unit 19 & 20, The Courtyards Hatters Lane, Watford, Hertfordshire. WD18 8TE, U.K.
www.tascam.co.uk
TEAC EUROPE GmbH
Phone: +49-611-71580
Bahnstrasse 12, 65205 Wiesbaden-Erbenheim, Germany
- TASCAM
- TEAC Professional Division
- MP-GT1
- Portable Memory Guitar Trainer
- – Introduction......3
- – Part names and functions .... 5
- – Connections & MP3 Transfer.... 10
- – Menus & Settings.... 12
- – Playing and Selecting Tracks.... 14
- – Practice Functions.... 18
- – Using Effects...... 20
- – Using the Tuner 21
- – Setup Menu Options...... 22
- - Using the Information Pages...... 24
- – Effect Lists 25
- – Messages ...... 27
- – Recycling the Battery 28
- – Specifications 29
- Supplied accessories
- NOTE
- Manual conventions
- Precautions for placement and use
- Beware of condensation
- About the power supply
- Recharging the battery
- Recharging with a computer
- Recharging with a PS-P520 AC adapter (sold separately)
- Turning the power on and off
- To turn the MP-GT1 power on
- To turn the MP-GT1 power off
- Top Panel
- Front Panel
- Right Side Panel
- Left Side Panel
- ⑰ MIX BALANCE (GUITAR, PLAYBACK) keys
- ⑱ OUTPUT VOLUME (+, -) keys
- Back Panel
- Reset hole
- CAUTION
- Home screen
- - Part names and functions
- ⑨ Play area
- ⑩ Track number
- ⑪ INPUT level meter
- ⑫ Status of playback control functions
- ⑬ Effect setting status
- Making connections
- Connecting headphones or speakers
- Connecting a guitar
- Connecting to a computer
- Disconnecting from a computer
- Moving MP3 files to the the MP-GT1
- Copying tracks from a computer
- Preparing MP3 files on a computer
- Procedures to copy tracks from a computer
- TIP
- Menu items
- Menu overview
- Using the Menus
- Operation example
- – Playing and Selecting Tracks
- Basic track playback functions
- Playing a track
- Pausing a track
- Selecting a track
- Searching a track
- Adjusting the volume
- Selecting a track to play
- Using the Browse screen to select tracks
- R MUSIC
- #
- Setting the play area
- ALL
- FOLDER
- PLAYLIST
- Using the playlist
- Adding tracks to the playlist
- Editing the playlist
- MOVE: Change the order of tracks
- Repeat and single-track playback (PLAY MODE)
- OFF
- SINGLE
- REPEAT
- ALL REPEAT
- Changing playback pitch and tempo
- Changing the tempo (TEMPO)
- Change tempo without changing pitch (VSA)
- Change key without changing tempo (KEY)
- Canceling guitar sounds (GUITAR CANCEL)
- CANCEL
- RANGE
- PART
- Repeat playback of a selected loop
- Connecting a guitar to practice
- Practicing with tracks as they play
- Using the metronome (METRONOME)
- TEMPO
- BEAT
- LEVEL
- Turning the metronome ON and OFF
- PRESET
- EFFECT
- Effect modules
- LVL knob
- MODE
- CALIB
- Chromatic tuner mode (AUTO)
- Guitar tuner mode (GUITAR)
- Oscillator mode (OSC.)
- OUT
- – Setup Menu Options
- Cue and review speed
- Automatic power off
- Automatically turning off the backlight
- Display contrast
- Backlight brightness
- Initializing the unit
- Formatting the unit quickly
- Formatting the unit completely
- WARNING
- - Using the Information Pages
- FILE Currently active MP3 file data
- File information page (FILE)
- Memory information page (MEMORY)
- System information page (SYSTEM)
- Effect module parameters
- – Recycling the Battery
- How to remove the rechargeable battery
- Stored settings
- Dimensions
- TEAC CORPORATION
Marque : TASCAM
Modèle : MP-GT1
Catégorie : Lecteur audio portable