
CD-RW402 - Enregistreur CD TASCAM - Notice d'utilisation et mode d'emploi gratuit
Retrouvez gratuitement la notice de l'appareil CD-RW402 TASCAM au format PDF.

| Type de produit | Enregistreur CD double platine CD-R/RW |
| Marque | TASCAM |
| Modèle | CD-RW402 |
| Formats supportés | CD-Audio, CD-R, CD-RW |
| Lecteurs | 2 platines (drive 1 et drive 2) |
| Fonctions principales | Enregistrement, lecture, copie de disques (DAO), édition TOC, programmation, SYNC REC, faders automatiques |
| Entrées audio | Analogique (RCA), numérique coaxiale, numérique optique |
| Sorties audio | Analogique (RCA), numérique (coaxiale et optique) |
| Contrôle du volume d'entrée | Potentiomètres INPUT et BALANCE pour analogique, menu DIG VOLUME pour numérique (-60 à +18 dB) |
| Vitesses de copie | 1x, 2x, 4x |
| Fonctions d'édition TOC | Division, fusion, effacement de pistes, décalage des points de début/fin |
| Fonctions de recherche | Call, Jog, Auto Cue, Auto Ready |
| Dimensions (format rack) | 19 pouces, hauteur 2U (environ 8,9 cm) |
| Poids | Environ 5 kg |
| Alimentation | Secteur (230 V, 50 Hz) |
| Consommation | Environ 20 W |
| Température de fonctionnement | 5°C à 35°C |
| Accessoires fournis | Câble d'alimentation, télécommande (estimation) |
| Entretien | Éviter poussière et fumée, utiliser des câbles de qualité |
| Sécurité | Ne pas ouvrir l'appareil, confier les réparations au personnel agréé |
| Fabricant | TEAC Corporation, Japon |
FOIRE AUX QUESTIONS - CD-RW402 TASCAM
Questions des utilisateurs sur CD-RW402 TASCAM
0 question sur cet appareil. Repondez a celles que vous connaissez ou posez la votre.
Poser une nouvelle question sur cet appareil
Téléchargez la notice de votre Enregistreur CD au format PDF gratuitement ! Retrouvez votre notice CD-RW402 - TASCAM et reprennez votre appareil électronique en main. Sur cette page sont publiés tous les documents nécessaires à l'utilisation de votre appareil CD-RW402 de la marque TASCAM.
MODE D'EMPLOI CD-RW402 TASCAM
This quick start guide is designed to help you with some of the special operations that demonstrate the unique features of the CD-RW402.
Naturally, it cannot pretend to be a comprehensive guide to all the facilities provided on this equipment, but we hope that it will serve its purpose in getting you started with the CD-RW402 and giving you some ideas of the capabilities of the unit.
Before you get going
There are some commonsense precautions which you should note before starting to work with the CD-RW402.
- Do not install this equipment in a confined space such as a bookcase or similar unit, and make sure there is enough space at the rear for cable connections, and for ventilation. Allow 1U of rack space above the unit for ventilation.
- Avoid very hot, very cold or very humid locations for the CD-RW402.
- If possible, make the area where you work with the CD-RW402 into a smoke-free zone. Smoke and dust are enemies of precision electronic devices.
- Always use high-quality cables and connectors with the CD-RW402, especially when making digital audio connections.
- Always make connections to and from the CD-RW402 with the power turned off to all units. This avoids possible damage to components, as well as avoiding "thumps", etc. through the monitoring system.
-
If anything appears to be wrong with the CD-RW402:
-
If an error message appears, make a note of it, as well as what you were doing immediately prior to the problem occurring.
- Read the manual. It may well contain something which is relevant to the problem you have encountered.
- If you have Internet access, visit your local TASCAM Web site for the latest product news, etc.
- Do not attempt to repair the CD-RW402 yourself. Arrange for it to be examined and repaired by TASCAM-authorized service personnel.
A note on recording
The CD-RW402 is designed to help you record and reproduce sound works to which you own the copyright, or where you have obtained permission from the copyright holder or the rightful licensor. Unless you own the copyright, or have obtained the appropriate permission from the copyright holder or the rightful licensor, your unauthorized recording, reproduction or distribution thereof may result in severe criminal penalties under copyright laws and international copyright treaties. If you are uncertain about your rights, contact your legal advisor. Under no circumstances will TEAC Corporation be responsible for the consequences of any illegal copying performed using the CD-RW402.
Copying discs (disc at once)


DISC COPY DISC AT ONCE COPY> DAO
CopySpeed>×4
COMPARE > NO
COPY START ?
Lead In 1:12
101 1:56
LeadOut 0:23
COMPARE21:45
① Insert the source disc into drive 1 and a blank recordable disc. into drive 2 Close both drive trays.
② Press the DISC COPY key.
The display shows DISC AT ONCE/ COPY> DAO if a data disc is being copied.
NOTE that the procedure for audio discs is slightly different—see the manual for details.
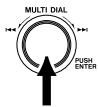
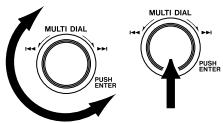
③ Press the MULTI DIAL (2).
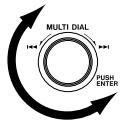
Turn the MULTI DIAL (2) to select the copy speed (1x, 2x or 4x).
Push the MULTI DIAL to confirm the setting.
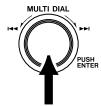
④ Turn the MULTI DIAL to select whether to compare the two discs after the contents of the source disc have been copied to it.
Press the MULTI DIAL to confirm the setting.
Press the MULTI DIAL to start the copy process.
6 After a brief standby period, the lead-in is written, the copy process continues, and the time so far (at normal speed) is shown.
The disc will be finalized (Lead Out) after the data has been copied.
If you have selected the compare option, the discs will be compared following the finalization.
TOC EDIT

① When an audio disc is in drive 1, it is possible to edit the TOC so that tracks are joined, split or removed, and the start and end times of tracks can be shifted.
This applies only to the TOC, not the material actually recorded on the disc.
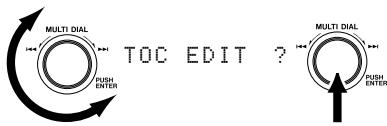
With the drive in play or ready mode, press MENU (1), turn the MULTI DIAL to display TOC EDIT ?, and press the MULTI DIAL.

ALL CANCEL?
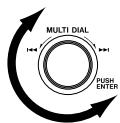
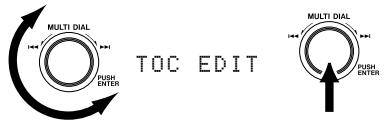
② Turn the MULTI DIAL to select the TOC editing options, and push it to carry out the operation.
Sometimes you may need to confirm the operation by pressing the MULTI DIAL again.
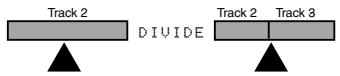
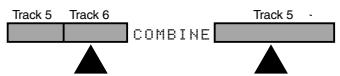
③ Divide a track into two at the current position.
4 Combine two tracks.
⑤ Erase a track from the TOC
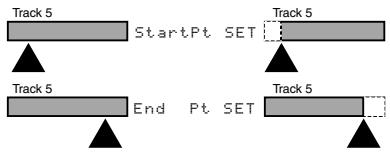
(6) Move the start of the track or the end of the track to the current playback position.
⑦ Return the disc to "normal" by ejecting it, or the ALL CANCEL menu option (when the drive is stopped.
Analog and digital source volume

INPUT


REC MENU 1

DIG VOLUME
① When recording from an outside source on drive 2, use the INPUT SELECTOR to choose between the digital COAXIAL or OPTICAL connectors, the ANALOG connectors, or INTERNAL (drive 1).
② Adjust the level of analog signals (and their balance) using the INPUT and BALANCE controls.
③ Use the REC MENU 1 menu to select the digital volume to set the level of all signals (analog post-step 2, and digital).
Adjust the level between -60 and +18 dB (there is also an "off" setting, shown by ---).
How do I...?
restart playback from the point where I last started? On drive 1 and drive 2, you press the CALL key. This will locate the playback position from which playback last started, and enter ready mode.
set a playback position precisely? On either drive, with the drive in play or play ready mode, press the appropriate JOG key. While monitoring, use the MULTI DIAL to jog a loop backwards and forwards to frame accuracy. The end of the loop marks the point which will be set. Press READY to locate playback at the end of the loop. The length of the loop is set using the menu system.
cue up the playback position to the first sound in a track? You can set the playback position to the first sound in a track (as opposed to the track division) using the Auto Cue and Auto Ready functions (menu items). The playback position can then automatically be cued up to the point at which the sound level crosses the set threshold level when a track is selected for playback.
play back a whole disc with only part of a certain track? TOC editing allows you to redefine the disc in drive 1. You can "erase" tracks, "merge" tracks, "split" tracks and set different start and end points for tracks. Of course, you are not actually altering what's on the disc—just the way that the CD-RW402 reads the disc.
automatically start recording when the source starts to play back? You can do this using the SYNC REC key. When drive 2 is in record ready mode, press the SYNC REC key. Recording then starts after the source starts to play back, and finishes a little after the source stops.
make neat fades in and out when recording? With drive 2 in record ready mode, press the FADER key. Recording starts, and the recording volume moves from full cut to the preset level. While recording, press the FADER key again to fade out. The fade in and fade out times can be independently set in the menu system.
copy some tracks from one disc and some from another to make a
compilation disc? This involves the use of programmed playback. Set up a program for the tracks from the first disc, and use the program copy function to copy these tracks. Then change source discs, set up a program on the second disc, and use program copy to copy these tracks, and finalize the disc.
reuse a disc which I finalized by accident? It may happen that you have recorded a disc, finalized it, and now want to add another track or two. With the CD-RW402 this is not a problem. On a finalized disc, you have the option of "unfinalizing" it. Simply put the finalized disc into drive 2, press the ERASE key, turn the MULTI DIAL until the display shows UNFINALIZE? and press the MULTI DIAL. Note that this only works with CD-RW discs. If you have finalized a CD-R disc, that's it, and you can't do anything about it. Sorry.
TEAC CORPORATION
Phone: (0422) 52-5082
3-7-3, Nakacho, Musashino-shi, Tokyo 180-8550, Japan
Marque : TASCAM
Modèle : CD-RW402
Catégorie : Enregistreur CD