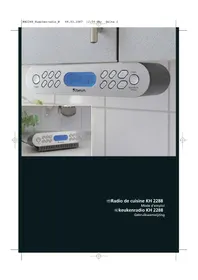
KH 2214 PROJECTION CLOCK WITH RADIO - Horloge projection EBENCH - Notice d'utilisation et mode d'emploi gratuit
Retrouvez gratuitement la notice de l'appareil KH 2214 PROJECTION CLOCK WITH RADIO EBENCH au format PDF.

| Type de produit | Horloge projection avec radio AM/FM et réveil |
| Marque | EBENCH |
| Modèle | KH 2214 (également compatibles KH 2215, KH 2216) |
| Alimentation principale | 230 V ~ 50 Hz |
| Alimentation de secours | Pile 9 V type 6LR61 (non incluse) |
| Consommation électrique | 6 W |
| Fréquences radio AM | 530 – 1600 KHz |
| Fréquences radio FM | 87,5 – 108 MHz |
| Fonctions principales | Affichage LED, projection de l'heure, radio, réveil (radio ou sonnerie), mise en veille, snooze |
| Affichage | LED et projection réglables indépendamment |
| Réglage projection | Molette FOCUS pour mise au point |
| Boutons de commande | TUNING, FM/AM, VOLUME, SLEEP, ALARM, SNOOZE, TIME, HOUR, MIN, projection on/off |
| Température de fonctionnement | +5°C à +40°C |
| Sécurité | Utilisation en intérieur sec ; ne pas ouvrir le boîtier ; éviter l'humidité |
| Entretien | Nettoyer avec un chiffon doux et sec ; pas de solvants ni produits chimiques |
| Garantie | Voir certificat de garantie fourni |
FOIRE AUX QUESTIONS - KH 2214 PROJECTION CLOCK WITH RADIO EBENCH
Questions des utilisateurs sur KH 2214 PROJECTION CLOCK WITH RADIO EBENCH
0 question sur cet appareil. Repondez a celles que vous connaissez ou posez la votre.
Poser une nouvelle question sur cet appareil
Téléchargez la notice de votre Horloge projection au format PDF gratuitement ! Retrouvez votre notice KH 2214 PROJECTION CLOCK WITH RADIO - EBENCH et reprennez votre appareil électronique en main. Sur cette page sont publiés tous les documents nécessaires à l'utilisation de votre appareil KH 2214 PROJECTION CLOCK WITH RADIO de la marque EBENCH.
MODE D'EMPLOI KH 2214 PROJECTION CLOCK WITH RADIO EBENCH
KH2214 2215 2216 IB UK 12.07.2006 16:21 Uhr Seite 1
UK
Kompernaß GmbH · Burgstrasse 21 · D-44867 Bochum www.kompernass.com
ID-Nr.: KH2214.15.16-07/06-V1
KH2214 2215 2216 IB UK 12.07 2006 16:21 Uhr Seite 2

text_image
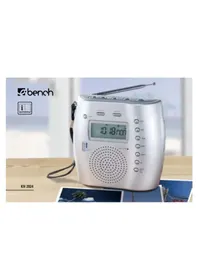
8:00 bench DIGITAL ALARM CLOCK RADIO KH 2215 KH 2214 KH 2216 KH 2215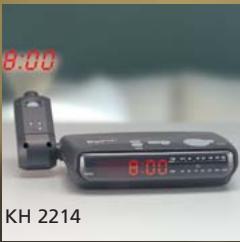
text_image
8:00 KH 2214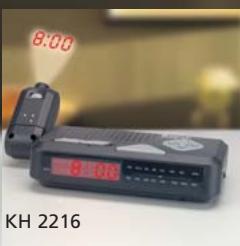
text_image
8:00 8:00 KH 2216Projection Clock with Radio
Operator's manual
KH2214_2215_2216_IB_UK 12.07.2006 16:21 Uhr Seite 3

natural_image
Pure black rectangle with white crosshair markers at corners (no text or symbols)KH2214_2215_2216_IB_UK 12.07.2006 16:21 Uhr Seite 4
KH2214

text_image
① ② ③ TUNING FM AM +VOLUME ⑳

text_image
15 13 14 12 19 8:00 5 6 SPEED SLEEP ALABM HOUR SPICE TLE PUM RHO ONION ONION ONION ONION ONION ONION ONION ONION ONION ONION ONION ONION ONION ONION ONION ONION ONION ONION ONION ONION ONION ONION ONION ONION ONION ONION ONION ONION ONION ONION ONION ONION ONION ONION
text_image
10 11 AUTO USB I/O PRODUCTION USB 16 17
KH2214 2215 2216 IB UK 12.07.2006 16:21 Uhr Seite 5
KH2215

text_image
Labeled diagram of an iron iron with numbered parts and measurement scales
text_image
Labeled diagram of a handheld device with numbered parts for identification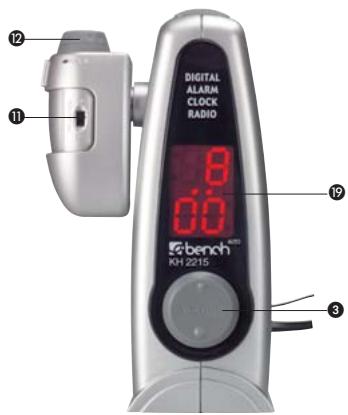
text_image
DIGITAL ALARM CLOCK RADIO 8 00 19 ebench KH 2215 3KH2214_2215_2216_IB_UK 12.07.2006 16:21 Uhr Seite 6
KH2216
text_image
Diagram of a device with numbered labels pointing to ports and cables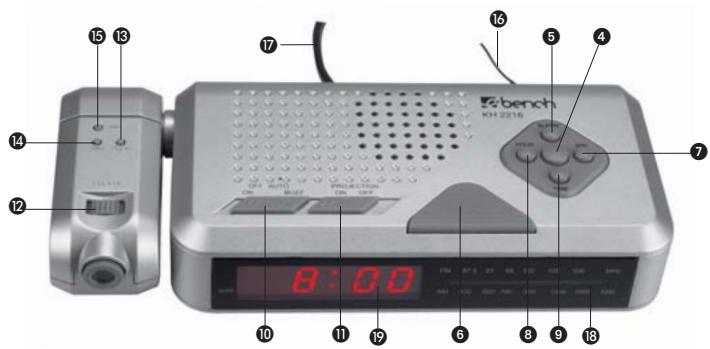
text_image
KBench KBH 2216 8:00 10 11 19 6 8 9 18KH2214_2215_2216_IB_UK 12.07.2006 16:21 Uhr Seite 7


natural_image
Pure geometric lines forming a cross and vertical line with a circle at the top (no text or symbols)


[Non-Text]
[Non-Text]
[Non-Text]
[Non-Text]
[Non-Text]
KH 2214 / 2215 / 2216
Projection clock with Radio
- Intended Use 4
- Technical Data 4
- Safety Instructions 4
- Connection 6
- Controls 6
- Setting the clock 7
LED display 7
Projection display 7 - Setting the wake-up time 8
- Radio reception 8
- Setting the alarm 8
Set the radio alarm 8
Set the alarm tone 9 - Switching off the alarm 9
- Sleep timer 9
- Cleaning and Care 10
- Disposal 10
- Warranty & Service 11
Read the operating instructions carefully before using the appliance for the first time and preserve this booklet for later reference. Hand over the manual to anyone, whom you pass on the appliance to.
KH 2214 / 2215 / 2216
Projection clock with Radio
1. Intended Use
This appliance is designed for the reception of AM / FM radio stations. It is intended for domestic use. It is not intended for commercial use.
2. Technical Data
Mains voltage: 230 V / \~50 Hz Back-up power: 9 V Battery block (type 6LR61) (Not included in the scope of delivery) Power consumption: 6 W Frequency ranges: AM (MW): 530 – 1600 KHz FM (UKW): 87.5 - 108 MHZ Alarm functions: Radio, Alarm sound Operating temperature range: +5°... +40°C
3. Safety Instructions
Keep this manual for future reference and pass it on with the equipment to any future users.
a) To avoid risks of electrical shock:
- Make sure that the power cord never becomes wet or damp during operation. Lay the cord such that it does not get clamped or otherwise damaged. If the mains cable is damaged, get it replaced by the customer service, before using the instrument again.
- Do not place candles or other open fire sources on the appliance.
- Use the clock in dry environments only.
- Make sure that fluids or any other objects do not get inside the device.
- Position the appliance near the wallsocket. Make sure that the wall socket is easily accessible
KH 2214 / 2215 / 2216
- Do not open or repair the appliance casing yourself. In this case, the device is not safe and the warranty is voided. Repairs are to be carried out exclusively by a specialist firm or the service centre.
b) To avoid risks of fire and injuries:
- Set up the appliance in an open and well-ventilated area, so that there are no heat pockets.
Never cover the ventilation holes. - Avoid any additional heat build up, e.g. direct sunlight, heaters, other devices, etc.
- Do not allow children or elderly persons to play with the appliance unsupervised, as they are not always able to assess the possible dangers correctly.
c) Electromagnetic fields
This device does not cross the permissible limits of electro smog within the casing. However, if you still have doubts about installing it in the bedroom:
- You will be quite safe if you place the appliance about half a meter from the bed.
At this distance, there will be no effect even on persons sensitive to electromagnetic fields.
Note: This appliance is equipped with non-slip rubber feet. As floor surfaces can consist of different materials, which are treated with the most various cleaning agents, it cannot be absolutely guaranteed that these agents do not contain substances that affect and soften the rubber feet. If necessary, place the appliance on a non-slip base.
KH 2214 / 2215 / 2216
4. Connection
Before operating the device, make sure that it is in perfect condition. Do not use it otherwise.
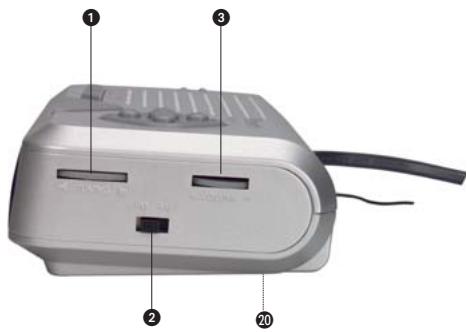
20 Open the battery compartment at the back or underneath, and insert a 9V battery pack. (Type 6LR61)
⑰ Insert the power plug into the power socket.
Select a socket which is accessible at any time, so that the plug can be quickly pulled out in case of any problem.
Note: Rechargeable batteries cannot be charged via the battery connection. In case of a long power supply failure (several hours), you must check and adjust the time and alarm time if necessary
5. Controls
1 TUNING
② FM/AM (Band selector)
③ VOLUME (volume control)
4 SLEEP (Sleep timer)
⑤ ALARM Set / Off
6 SNOOZE
7 MIN (LED display)
8 HOUR (LED display)
9 TIME (time setting LED display)
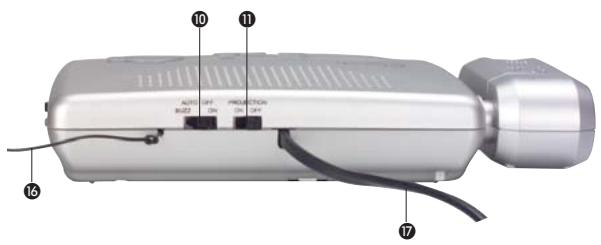
10 Function switch ON OFF AUTO BUZZ
11 Projection On/Off
12 FOCUS (for projection)
13 HOUR (Projection display)
14 MIN (Projection display)
15 TIME (time setting Projection display)
16 UKW / FM antenna
17 Power cord
18 Frequency scale
19 Display
20 Battery compartment
KH 2214 / 2215 / 2216
6. Setting the clock
Separate settings must be made in the clock for the LED and projection displays.
a) LED display
⑨ While you keep the TIME key pressed:
⑧ Press the HOUR key to set the hours.
⑦ Press the MIN key to set the minutes.
b) Projection display
11 Place the PROJECTION switch in the ON position to switch on the projection display.
In case of poor lighting, direct the projection beam against a wall or a similar surface.
12 Adjust the sharpness of the projection display by rotating the small FOCUS wheel.
Note: the display is visible only in darkness at a distance of more than approx. 0.5 m (e.g. on the ceiling).
If you can see the time display on the projected area clearly...
15 while you keep the TIME key pressed:
13 Press the HOUR key to set the hours.
14 Press the MIN key to set the minutes.
The set time is automatically accepted as soon as the TIME button 0 is released.
KH 2214 / 2215 / 2216
7. Setting the wake-up time
If the time for the LED display is set as explained above:
⑤ while you keep the ALARM Set / Off key pressed:
⑧ Press the HOUR key to set the hours.
⑦ Press the MIN key to set the minutes.
8. Radio reception
10 Place the function switch in the ON position.
③ Turn the volume control button VOLUME to a medium position.
② Select the radio band on the band selector AM/FM.
① Search the desired transmitter with the help of TUNING control.
Note: To improve the reception of radio stations in the UKW/FM frequency range, point the end of the antenna ^16 slowly in various directions. When you have found a suitable position for the reception of the set radio station, secure the antenna
16 in this position, e.g. with a strip of adhesive tape. To receive MW/AM radio stations, a fixed receiver antenna is installed in the appliance. For improved reception, alter the position of the appliance in radio mode.
9. Setting the alarm
You can wake up to the radio or set an alarm sound.
Once the time for LED display and the wake-up time have been set as explained above:
a) Set the radio alarm
③ Place the volume control button VOLUME at the volume appropriate to wake you up.
KH 2214 / 2215 / 2216
10 Place the function switch in the AUTO position. The alarm is now switched on. The LED display shows a point to the bottom left (bottom right for KH2215), as an indicator.
b) Set the alarm tone
10 Place the function switch in the BUZZ position. The alarm is now switched on. The LED display shows a point to the bottom left (bottom right for KH2215), as an indicator.
10. Switching off the alarm
6 Press the SNOOZE key, and the alarm repeats after 9 minutes.
5 Press the ALARM Set / Off key to put the alarm off until the next day.
10 Place the function switch in the OFF position to switch off the alarm function completely.
11. Sleep timer
If you would like to listen to the radio for a while before going to sleep and would like the radio to switch off by itself:
④ press the SLEEP key. The radio will remain on for 59 min.
You can shorten the time remaining till switch-off time by ...
④ keep the SLEEP key pressed
⑦ and simultaneously adjust the remaining time with the Min key.
You can extend the time up to switching off by...
④ keeping the SLEEP button pressed
⑧ and at the same time adjusting the remaining time via the HOUR button.
The sleep timer can be set to a maximum time of 1:59 h.
To stop the SLEEP function and switch the radio off...
6 Press the SNOOZE key.
KH 2214 / 2215 / 2216
12. Cleaning and Care
Warning: Danger of electrical shocks.
- Pull the plug out of the socket before cleaning.
- Never open the casing of the device. There are no operating controls inside.
→ Clean the instrument only with a soft, dry piece of cloth.
Do not use any cleansing agents or solvents. They can damage the plastic surfaces.
13. Disposal

Do not dispose of the device in normal domestic waste.
Dispose of the device over a registered waste disposal firm or through your communal waste disposal facility.
Observe the currently valid regulations. In case of doubt, consult your waste disposal facility.
Battery disposal!
Batteries may not be disposed of with normal domestic waste. All consumers are statutorily obliged to dispose of batteries at the collection point in their community/district or with the original supplier.
The purpose of this obligation is to ensure that batteries can be disposed of in an environmentally-friendly manner.
Only dispose of batteries when they are fully discharged.
KH2214 2215 2216 IB UK 12.07.2006 16:21 Uhr Seite 11
KH 2214 / 2215 / 2216
14. Warranty & Service
The warranty conditions and the service center address can be found on the warranty slip.
Kompernaß GmbH
Burgstrasse 21
44867 Bochum
www.kompernass.com
-11-
GB