
MAXXUM FLASH 4000AF - Flash pour appareil photo MINOLTA - Notice d'utilisation et mode d'emploi gratuit
Retrouvez gratuitement la notice de l'appareil MAXXUM FLASH 4000AF MINOLTA au format PDF.


| Type de produit | Flash pour appareil photo reflex autofocus |
| Marque et modèle | MINOLTA MAXXUM FLASH 4000AF |
| Dimensions | 82 × 144,5 × 102,5 mm |
| Poids | 495 g (sans piles) |
| Alimentation | 4 piles AA (1,5 V alcalines ou 1,2 V Ni-Cd) ou adaptateur secteur AC-1000 ou grip CG-1000 |
| Types de piles compatibles | Alcalines-manganèse ou nickel-cadmium rechargeables |
| Nombre de flashes par jeu de piles | De 90 à 1600 selon le niveau de puissance et le type de piles |
| Temps de recyclage | 0,3 à 10 s selon le niveau de puissance et le type de piles |
| Modes de flash | Automatique TTL et manuel (M) |
| Niveaux de puissance | 6 (FULL, 1/2, 1/4, 1/8, 1/16, MD pour rafale) |
| Compatibilité appareils | Minolta AF SLR (MAXXUM 5000/7000/9000) |
| Vitesse de synchronisation X | 1/100 s (MAXXUM 5000/7000) ou 1/250 s (MAXXUM 9000) |
| Couverture du zoom | De 28 mm à 70 mm (adaptateur grand-angle 24 mm inclus) |
| Modes de zoom | Automatique et manuel (positions 28, 35, 50, 70 mm) |
| Illuminateur AF | Portée de 1 m à 7 m environ, activé automatiquement en basse lumière |
| Indications | Signal de charge (LED rouge), signal d'exposition correcte (OK vert) |
| Rétroéclairage écran LCD | Par bouton LIGHT, durée 8 s |
| Fonction spéciale | Flash en rafale (MD) jusqu'à 2 images/s |
| Accessoires optionnels | Bounce Reflector II, Color Panel Set, câbles, grip, etc. |
| Entretien | Nettoyer avec un chiffon sec, éviter alcool et solvants, retirer les piles si inutilisé plus de 2 semaines |
| Sécurité | Ne pas démonter, éviter l'eau, ne pas viser les yeux, tenir hors de portée des enfants |
| Stockage | Endroit frais et sec, à l'abri de la poussière et des produits chimiques |
| Réparabilité | Contacter un centre agréé Minolta pour toute réparation |
FOIRE AUX QUESTIONS - MAXXUM FLASH 4000AF MINOLTA
Questions des utilisateurs sur MAXXUM FLASH 4000AF MINOLTA
0 question sur cet appareil. Repondez a celles que vous connaissez ou posez la votre.
Poser une nouvelle question sur cet appareil
Téléchargez la notice de votre Flash pour appareil photo au format PDF gratuitement ! Retrouvez votre notice MAXXUM FLASH 4000AF - MINOLTA et reprennez votre appareil électronique en main. Sur cette page sont publiés tous les documents nécessaires à l'utilisation de votre appareil MAXXUM FLASH 4000AF de la marque MINOLTA.
MODE D'EMPLOI MAXXUM FLASH 4000AF MINOLTA
MAXXUM
FLASH 4000AF
The MAXXUM Flash 4000AF is designed for totally automatic flash photography with your Minolta AF SLR. Its power zoom head automatically adjusts flash coverage for lens focal lengths from 28mm through 70mm , even while zooming. The LCD flash data panel shows complete flash information, including power level, flash-coverage setting, and minimum and maximum flash ranges. For simplified operation, the 4000AF is automatically set for full power, TTL metering, and auto zooming when you switch on the unit. The built-in AF Illuminator is activated automatically for autofocusing in low light or total darkness.
Minolta Direct Autoflash Metering (TTL off-the-film) assures accurate exposures in all modes. The 4000AF uses Minolta's new flash program for professional results: In P mode, fill flash is completely automatic with no calculations or manual settings needed. Any aperture can be used in A mode, while slow-shutter sync and fill flash are also possible. In M mode, aperture and shutter speed can be set for creative control with either TTL flash metering or full manual control of exposure.
Carefully read this manual to learn about your 4000AF's parts and features, and keep it handy for future reference.
IMPORTANT SAFEGUARDS
WHEN USING THIS FLASH AND/OR ITS ACCESSORIES, BASIC SAFETY PRECAUTIONS SHOULD ALWAYS BE FOLLOWED, INCLUDING:
- READ AND UNDERSTAND ALL INSTRUCTIONS.
- SUPERVISE CLOSELY WHEN ANY FLASH OR ACCESSORY IS USED BY OR NEAR CHILDREN. DO NOT LEAVE UNATTENDED WHILE IN USE OR WITHIN REACH OF CHILDREN.
DO NOT CONNECT EXTERNAL POWER SOURCES OTHER THAN AC ADAPTER AC-1000. - DO NOT OPERATE FLASH AND/OR ACCESSORIES IF DROPPED OR DAMAGED OR WITH DAMAGED CORD UNTIL EXAMINED BY AN AUTHORIZED MINOLTA SERVICE FACILITY.
-
WHEN USING AC ADAPTER AC-1000, BE SURE TO READ AND FOLLOW IMPORTANT SAFEGUARDS AND OTHER CAUTIONS ON ITS INSTRUCTION SHEET.
-
TO AVOID ELECTRIC SHOCK, DO NOT IMMERSE FLASH AND/OR ACCESSORIES IN WATER OR OTHER LIQUIDES.
- TO REDUCE RISK OF ELECTRIC SHOCK, DO NOT DISASSEMBLE FLASH AND/OR ACCESSORIES. TAKE THEM TO AN AUTHORIZED MINOLTA SERVICE FACILITY WHENEVER SERVICE OR REPAIR IS REQUIRED. INCORRECT REASSEMBLY CAN CAUSE ELECTRIC SHOCK WHEN UNIT IS USED SUBSEQUENTLY.
SAVE THESE INSTRUCTIONS
TABLE OF CONTENTS
Names of parts 2
Batteries and power 4
Checking batteries. 5
Test button 5
Cold-weather operation 6
Automatic charge control. 6
Attaching and removing flash. 7
Basic information 8
Flash data panel. 80
Power-level selection. 9
Power zoom head 10
Wideangle adapter. 11
Exposure adjustment. 12
AF illuminator. 12
X-sync speeds. 14
Camera settings 15
Flash settings. 15
P-mode autoflash operation. 16
Programmed fill flash. 17
A-mode autoflash operation 18
Slow-shutter sync. 19
A-mode fill flash. 20
S-mode autoflash operation. 21
S-mode fill flash 22
M-mode operation. 23
TTL flash exposure. 23
Manual flash exposure 24
Bounce-flash photography. 25
Accessories. 27
Technical details 30
Care and storage 34
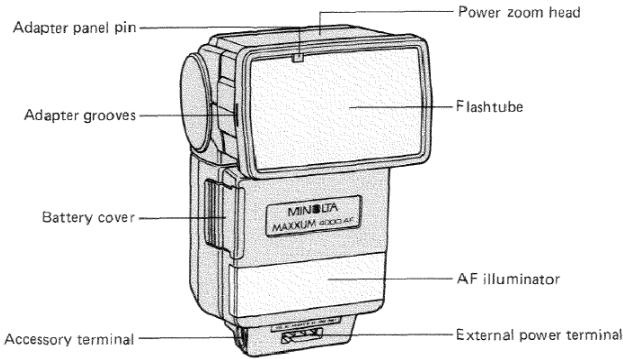
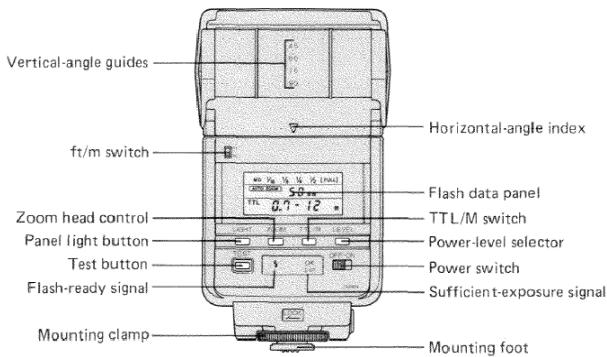
NAMES OF PARTS
BATTERIES AND POWER
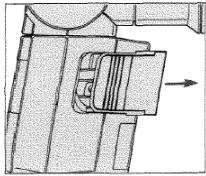
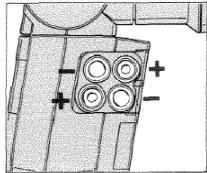
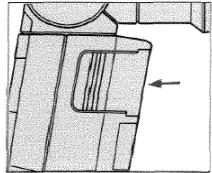
The MAXXUM Flash is powered by four AA-size batteries. Either alkaline-manganese or rechargeable nickel-cadmium batteries can be used.
To install batteries:
- With power off, slide battery cover out. Wipe terminals with a clean dry cloth.
- Insert batteries with ends as indicated.
- Reinsert cover in grooves, and slide it fully in.
NOTES
To prevent battery leakage or bursting, never mix batteries of different types, brands, or ages.
- If flash will not be used for more than two weeks, batteries should be removed.
Used batteries should not be discarded in fire.
- Keep batteries away from young children.
- If batteries are not inserted correctly, flash will not charge and leakage or bursting of batteries may result.
Checking batteries
To check battery capacity: Turn on power and wait until the flash-ready signal glows, indicating flash is fully charged. If charging time is longer than listed below, batteries should be changed or recharged.
Alkaline-manganese 30 sec.-change
Nickel-cadmium 15 sec. - recharge
Test button
Test firing is possible by pressing TEST button after flash is charged.
Cold-weather operation
In cold weather, always use fresh batteries and carry a spare set in a warm pocket. For prolonged cold-weather use at approx. 0^ (32^) or lower, use of nickel-cadmium batteries is recommended. Battery capacity will be restored as their temperature rises.
Automatic charge control
To conserve battery power, the 4000AF automatically turns itself off if camera's operating button is not touched within 15 minutes after full charge is reached. If this happens, flash can be readied for firing by touching operating button.
ATTACHING AND REMOVING FLASH
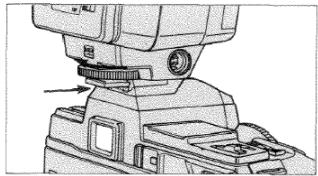
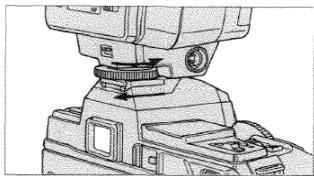
To attach: With power off, turn mounting clamp fully to the right. Then slide flash's mounting foot fully into camera's accessory shoe and turn clamp to the left to secure unit.
To remove: Switch power off, then completely loosen mounting clamp. Grasp base of flash, and slide flash straight out of accessory shoe.
BASIC INFORMATION
Flash data panel
The LCD panel on the 4000AF shows the following kinds of data: power level, flash coverage with either manual or automatic zooming, and flash range with TTL metering or manual (M) flash exposures. With camera's meter on and flash fully charged, flash range is displayed in flash data panel. Range can be displayed in feet or meters by setting ft/m switch accordingly.
Whenever an adapter panel (wideangle adapter, color panel, bounce reflector) is attached to zoom head, "PANEL" is displayed in data panel.
In low light, flash data panel can be illuminated by pressing the panel light button (marked LIGHT). Light remains on for 8 sec, after pressing button.
A.
B.
C.
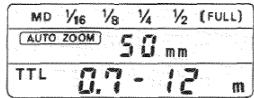
A. Power level
B. Flash coverage
C. Flash range
Power-level selection
The MAXXUM Flash 4000AF has six power levels: FULL, 1/2, 1/4, 1/8, 1/16, and MD. For maximum flash range, FULL power should be selected. Other settings can be selected to reduce recycling time, control flash range, etc. At "MD" (motor drive) setting, unit recycles at up to two frames per sec. for shooting flash sequences.
Power level is set by pressing power-level selector (marked LEVEL). Each time button is pressed, power level changes in the following order: FULL, 1/2, 1/4, 1/8, 1/16, MD, FULL, and so on. In flash data panel, brackets appear around power level selected. Guide numbers at each power level for ISO 100 film are listed on page 32.
CAUTION
When using the Control Grip CG-1000 and full power, do not shoot flash sequences of more than twenty frames, as this may damage the flash unit's internal circuitry.
Power zoom head
As soon as the 4000AF is switched on, it is set for automatic power zooming. When camera's meter is on, the 4000AF's power zoom head is adjusted automatically for correct flash coverage from 28mm through 70mm focal lengths. With zoom lenses, head adjusts automatically as lens is zoomed.
Zoom head can also be adjusted by pressing zoom head control to extend flash range with short-focal-length lenses or when taking bounce-flash photos. Each time zoom head control (marked ZOOM) is
pressed, setting changes in the following order: auto zoom, manual zoom 28mm, manual zoom 35mm, manual zoom 50mm, manual zoom 70mm, auto zoom, etc. Always use ZOOM button to adjust flash coverage; do not push or pull zoom head manually.
Store flash unit with zoom head adjusted to its shortest position. To do this quickly, simply switch power on, wait a moment for head to adjust to 28mm position, then switch power off.
Wideangle adapter
When lenses having focal lengths of less than 28mm are mounted on camera, flashcoverage setting in flash data panel shows
The wideangle adapter snaps onto the zoom head and increases flash coverage to that required for 24mm lenses. Whenever adapter is attached; "PANEL" is displayed in flash data panel. Also, with zoom head at its shortest position, flash range for 24mm lenses is displayed.
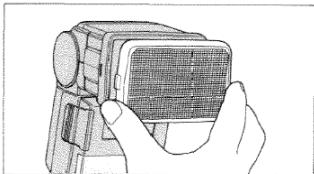
To attach: While holding adapter by its sides and with its open edge pointing downward, gently snap it onto front of zoom head.
To remove: Hold tabs on either side of panel and detach one side at a time.
Exposure adjustment
The camera's exposure-adjustment control can be used to vary normal TTL flash exposure. Refer to the explanation in the camera owner's manual for detailed information on how and when to use exposure adjustment.
AF illuminator
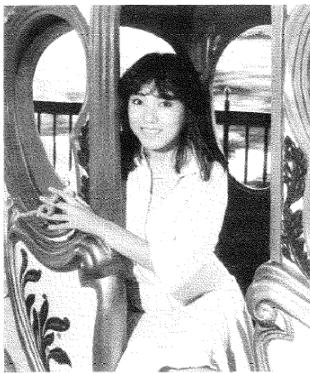
When required for low-contrast subjects in low light, the AF illuminator is activated by pressing operating button halfway. This focus-assist illumination is projected on the subject, thus enabling the camera's autofocus system to determine focus status and adjust the lens. AF illuminator is activated only when flash is fully charged.
The working range for the AF illuminator is 1m (3.3 ft.) to approx. 7m (23 ft.). These distances are for autofocusing in total darkness and are not related to the flash unit's maximum flash range indicated on the flash data panel.
The AF illuminator's range is based on Minolta's standard test method with a 50mm lens. With longer focal lengths, camera may not focus lens accurately. In this case, or whenever focus signals blink, set focus mode switch to M and focus lens manually.
X-sync speeds
When the MAXXUM 4000AF reaches full charge, the shutter speed is automatically set to the X-sync speed required for taking flash exposures. If you take a picture before the flash is charged, the flash will not fire and exposure is set for ambient light. The table shows the X-sync speeds for the various camera models and exposure modes available:
| MAXXUM 5000 | MAXXUM 7000 | MAXXUM 9000 | |
| P mode | 1/100 above EV 12 | 1/100 above EV 12 | 1/250 above EV 13 |
| 1/60 below EV 12 | 1/60 below EV 12 | 1/125 at EV 12-13 | |
| 1/60 below EV 12 | |||
| A mode | Not available | 1/100 | 1/250 |
| S mode | Not available | Same as program mode | 1/250 or slower usable /5,6 set automatically |
| M mode | 1/100 or slower can be set manually | 1/100 or slower can be set manually | 1/250 or slower can be set manually |
MAXXUM 5000 and 7000: Speed reset to 1/100 sec. for faster manually set speeds in M mode. MAXXUM 9000: Speed reset to 1/250 sec. for faster manually set speeds in M and S mode.
Camera settings
After attaching the flash unit, check the following camera settings:
- Film-speed setting for TTL Direct Autoflash Metering:
MAXXUM 5000/7000 - ISO 25 to ISO 1000
MAXXUM 9000 - ISO 12 to ISO 1000
- Focus mode switch: AF position for autofocusing, M for manual focusing.
- MAXXUM 5000: No other settings are required.
MAXXUM 7000: For single-frame advance, set drive mode to "S". For continuous film advance, set drive mode to "C".
MAXXUM 9000: When advancing the film manually, no other settings are required. When using the optional Motor Drive MD-90, refer to its owner's manual for information about flash operation.
Flash settings
- For maximum flash range, set 4000AF to "FULL" power. Lower power settings can be used for faster recycling, controlling flash range, etc. For shooting sequences, set power level to "MD," which provides recycling at up to two frames per sec.
- For simplest operation, auto zoom setting should be used. Power zoom head then adjusts automatically for uniform flash coverage at the focal length in use. When desired for creative control or bounce-flash photos, manual zoom settings can be used.
PROGRAMMED AUTOFLASH OPERATION (P MODE)
P-made flash is ideal for point-and-shoot flash photography, since the camera sets both shutter speed and aperture according to its flash program. In bright sunlight, exposure for fill flash is automatically set for optimum results. To use:
- Set camera to P mode.
-
Switch flash unit on to start charging. When charged, flash-ready signal glows on back of flash unit and the flash signal blinks in viewfinder. Also, camera-selected X-sync speed and aperture are displayed in camera's viewfinder and data display panel.
-
After focusing, check whether main subject is within flash range displayed on flash data panel. If "▶" appears beside minimum distance, use a higher power level. If "▶" appears beside maximum distance, refer to page 33 to determine actual maximum flash distance.
- Press operating button all the way down to release shutter. If exposure was sufficient, flash signal in viewfiner blinks rapidly and "OK" signal on flash unit glows.
NOTE
Program shift is not possible when using flash.
Programmed fill flash
In P mode, fill-flash exposure is calculated automatically. In bright sunlight, flash duration is reduced to fill shadows without overexposing the main subject. X-sync speed is automatically set according to the ambient light level, thus giving more natural rendition of the background.
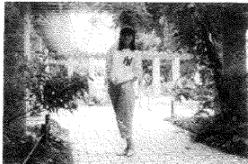
Without flash
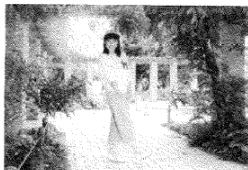
With programmed fill flash
A-MODE AUTOFLASH OPERATION
In A mode, any available aperture can be used. Set smaller apertures for more depth of field, or larger apertures to obtain maximum flash range for distant subjects. Also, flash recycling time is reduced when larger apertures are set for close subjects. To use:
- With camera in A mode, set desired aperture.
-
Switch flash on to start charging. When charged, flash-ready signal glows on back of flash unit and flash signal in viewfinder blinks. Also, X-sync speed and selected aperture are displayed in camera's viewfinder and data display panel.
-
After focusing, check whether main subject is within flash range for aperture selected. If not, move closer or use a larger aperture. If "▲" appears beside minimum distance, use higher power level or set a larger aperture. If "▶" appears beside maximum distance, refer to page 33 to determine actual maximum flash distance.
- Press operating button all the way down to release shutter. If exposure was sufficient, flash signal in viewfinder blinks rapidly and "OK" signal on flash unit glows.
A-mode slow-shutter sync
In low light, such as at dusk or dawn, slower X-sync speeds can be set to increase background exposure while maintaining normal exposure of the main subject.
- With flash unit turned off, select an aperture so that the metered speed is 1/60 sec. or slower with MAXXUM 7000, 1/125 sec. or slower with MAXXUM 9000.
- Turn on the flash unit. When unit is charged, shutter speed will be set to camera's maximum X-sync speed.
-
Press and hold camera's AE lock (AEL button). Shutter speed is now set one stop faster than metered speed to prevent overexposure of main subject. For example, if metered speed was 1/30 sec., speed is set to 1/60 sec.
-
While still pressing AE lock, focus on main subject and check whether it is within flash range for aperture selected, then release shutter. If exposure was sufficient, flash signal in viewfinder blinks rapidly and "OK" signal on flash unit glows.
NOTES
- Metered speed should be at least one stop slower than the camera's maximum X-sync speed. If not, subject may be overexposed since required shutter speed cannot be obtained.
- When shutter speed is too slow for handheld pictures, mount camera on a tripod.
Fill flash in A-mode
In most situations, Program mode can be used for automatic fill flash without special settings or calculations. A-mode fill flash should be used for greater control of background exposure or when you want to set smaller apertures for increased depth of field.
The procedure for fill flash in A mode is the same as for slow-shutter sync operation; however, since subject brightness may be higher, you may need to use a neutral-density filter on the lens to set shutter speed below camera's maximum X-sync speed.
S-MODE AUTOFLASH OPERATION (MAXXUM 9000 ONLY)
S-mode autoflash can only be used with the MAXXUM 9000. If the MAXXUM 7000 is set to S mode, operation is the same as in P mode.
With the MAXXUM 9000 in S mode, any shutter speed from 1/250 to 30 sec. can be set, and aperture is set automatically to f/5.6. TTL flash metering automatically controls exposure for this aperture setting. For S-mode autoflash operation:
-
With MAXXUM 9000 in S mode, set desired shutter speed. For hand-held shots, shutter speeds from 1/60 to 1/250 sec. are recommended.
-
Switch flash unit on. When flash reaches full charge, aperture is set automatically to f/5.6, flash signal in viewfinder blinks, and flash-ready signal on flash unit glows.
- After focusing, check whether main subject is within flash range displayed on flash data panel. If not, change distance to subject or adjust power level.
- Press operating button all the way down to release the shutter. If exposure was sufficient, flash signal in viewfinder blinks rapidly and "OK" signal on flash unit glows.
Fill flash and slow-shutter sync in S mode
S mode is particularly useful for mixing flash illumination with ambient light. Shutter speed can be adjusted to control background exposure, and by pressing camera's AE lock, aperture is set automatically to that required for normal background exposure. When shutter is released while pressing AE lock, TTL flash metering reduces flash duration to prevent overexposure of main subject. To use:
-
With MAXXUM 9000 in S mode, set desired shutter speed. Any speed from 1/250 sec. to 30 sec. can be set. Set faster speeds for less background exposure, slower speeds for more background exposure.
-
Switch flash unit on. When flash reaches full charge, aperture is automatically set to f/5.6, flash signal in viewfinder blinks, and flash-ready signal on flash unit glows.
- After focusing on main subject, press and hold camera's AE lock (AEL button). Aperture will now be set one stop smaller for normal exposure of the background.
- While pressing AE lock, check whether subject is within flash range. If not, change distance to subject or adjust power level.
- While still pressing AE lock, press operating button all the way down to release the shutter. If exposure was sufficient, flash signal in viewfinder blinks rapidly and "OK" signal on flash unit glows.
M-MODE FLASH OPERATION
When the camera is set to M mode, pressing the 4000AF's TTL/M switch changes the unit from Direct Autoflash Metering (TTL setting) to manual flash exposure (M setting). Note: The TTL/M switch operates only when camera is in M mode. For TTL-metered flash exposures:
- Set camera to M mode.
-
Switch flash unit on to start charging. The 4000AF is set automatically for TTL metering when unit is switched on. When unit is charged, flash-ready signal glows on back of the flash unit, and flash signal in viewfinder blinks.
-
For normal background exposure, set aperture and shutter speed according to metering indicators in the viewfinder. Any available aperture and any shutter speed from camera's maximum X-sync speed to 30 sec. or "bulb" setting can be used.
- Focus on main subject and check whether subject is within flash range displayed on flash data panel. If not, adjust aperture, power level, or camera-to-subject distance.
- Press operating button all the way down to release shutter. If exposure was sufficient, flash signal in viewfinder blinks rapidly and "OK" signal on flash unit glows.
Manual flash exposure
With 4000AF at "M" setting, flash fires at power level shown on flash data panel. The camera's TTL flash metering does not control flash exposure; aperture and/or power level must be set manually to obtain correct flash exposures.
For manual flash exposures:
- With camera in M mode, set desired shutter speed, then switch on flash unit.
-
Press TTL/M switch to set 4000AF for manual flash operation; "M" is displayed on flash data panel when camera's meter is on.
-
After focusing on main subject, adjust aperture and/or power level until distance shown on flash data panel equals camera-to-subject distance indicated on lens' distance scale.
- Press operating button all the way down to release shutter.
BOUNCE FLASH
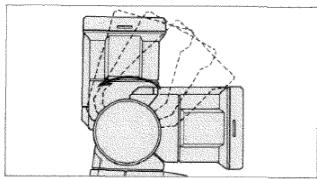
Reflecting the flash's light off a nearby surface provides softer lighting than direct flash. The 4000AF's zoom head can be tilted up 90^ from horizontal and rotated 90^ to left or right for bounce flash. When zoom head is rotated or tilted from its normal position, flash-range display on flash data panel shows ·s·s·s·s·s·s·s
Bounce surface
For maximum lighting softness, bounce surface should disperse light broadly; a shiny surface is not desirable. Surface should be as near white as possible. For color bounce-flash photos, surface should be as neutral in color as possible, as colored surfaces will affect color rendition in the photo. Dark tones reflect less light and may thus result in insufficient exposure.
Bounce angle
The head should be aimed so light strikes the ceiling or wall roughly halfway between flash and subject. To avoid uneven illumination, position head so that no part of subject receives direct lighting from flash head.
When using focal lengths below 50mm zoom head should be adjusted manually to 50mm setting. For longer focal lengths, set zoom head manually to 70mm setting. Anytime distance to bounce surface is greater than 3m (10 ft.), zoom head should be set to 70mm position. Do not use wide-angle adapter when taking bounce-flash photographs.
CAUTION
For bounce-flash with automatic power zooming, the angle of the zoom head must not exceed 45^ when zoom head is at 70mm position, 60^ at 50mm or 35mm positions, and 75^ at 28mm position. Otherwise, subject may receive direct flash illumination which would result in uneven exposure or possibly sharp shadows.
ACCESSIONS
Bounce-flash exposure
Exposure for bounce-flash photos varies according to total distance from flash to bounce surface to subject. Determining camera settings is thus difficult without using a flash meter, and the aperture range in P mode may not be sufficient. Setting the 4000AF to full power with TTL metering is recommended to obtain accurate exposures. With camera in A or M mode, set aperture at least two or three stops larger (e.g., f/2.8 instead of f/5.6) than required for directflash photos from the same distance.
After exposure, flash signal in viewfinder will blink rapidly and "OK" signal on flash will glow if exposure was sufficient. If it does not glow, move closer or use a larger aperture.
Bounce Reflector II Set
This compact accessory attaches to the 4000AF zoom head and enables you to use bounce flash for softer, more natural lighting, even outdoors. Minolta Direct Autoflash Metering controls flash duration for proper exposure. Included are additional adapters for mounting the Bounce Reflector on Minolta 360PX and 132PX flash units.
TECHNICAL DETAILS
Type: Fully dedicated autofocus with TTL metering and a built-in AF illuminator for autofocus
Exposure control: Minolta Direct Autoflash Metering (TTL off-the-film) in all flash exposure modes based on camera's film-speed setting; with camera in M mode, manual flash exposure at power level selected
Film-speed range for TTL metering: ISO 25 to 1000 with MAXXUM 5000/7000, ISO 12 to 1000 with MAXXUM 9000
AF illuminator: Focus-assist LEDs automatically activated when required for autofocusing of low-contrast subjects in low light, approx. range 1m-(3.3 ft.) to 7m (23 ft.) based on Minolta's standard test method with 50mm lens at EV 1 and ISO 100 film
Flash data panel: LCD panel shows power level selected, automatic or manual adjustment of power zoom head, flash coverage/zoom head position, TTL or manual flash operation, and flash range for power level, zoom head setting, and aperture in use.
Controls: Zoom head control, panel light button, power-level selector, TTL/M switch, test button, ft/m switch, power switch
Indications: Flash-ready signal (red LED) glows when unit is charged; sufficient-exposure signal (green "OK" LED) glows after exposure if flash exposure was sufficient.
Power sources: Uses four AA-size batteries, either 1.5v alkaline-manganese or 1.2v rechargeable nickel-cadmium; optional Control Grip CG-1000 or AC Adapter AC-1000
Battery performance:
| Power level | Flashes per set | |||||
| FULL | 1/2 | 1/4 | 1/8 | 1/16 | MD | |
| Alkaline-manganese | 90 ~ 1600 | 200 ~ 1600 | 450 ~ 1600 | 700 ~ 1600 | 1000 ~ 1600 | 1100 ~ 1600 |
| Nickel-cadmium | 40 ~ 500 | 70 ~ 500 | 140 ~ 500 | 220 ~ 500 | 300 ~ 500 | 350 ~ 500 |
Flash recycling:
| Power level | Recycling time (sec.) | |||||
| FULL | 1/2 | 1/4 | 1/8 | 1/16 | MD | |
| Alkaline-manganese | 0.3 ~ 10 | 0.3 ~ 5.0 | 0.3 ~ 3.0 | 0.3 ~ 1.5 | 0.3 ~ 1.0 | 0.3 ~ 0.7 |
| Nickel-cadmium | 0.2 ~ 6.0 | 0.2 ~ 3.0 | 0.2 ~ 2.0 | 0.2 ~ 1.0 | 0.2 ~ 0.6 | 0.2 ~ 0.4 |
Flash duration (sec.):
| Power level | FULL | 1/2 | 1/4 | 1/8 | 1/16 | MD |
| TTL setting | 1/25000 ~ 1/800 | 1/25000 ~ 1/1200 | 1/25000 ~ 1/2500 | 1/25000 ~ 1/5000 | 1/25000 ~ 1/10000 | 1/25000 ~ 1/14000 |
| M setting | 1/800 | 1/1200 | 1/2500 | 1/5000 | 1/10000 | 1/14000 |
Flash coverage: Power zoom head automatically adjusts flash coverage from 28mm to 70mm , manual adjustment also possible; coverage for lenses down to 24mm using wideangle adapter supplied
Angle of flash output:
| Flash coverage | [°] | [°] |
| 70mm | 26° | 36° |
| 50mm | 34° | 46° |
| 35mm | 45° | 60° |
| 28mm | 53° | 70° |
| 24mm (Wideangle adapter) | 60° | 78° |
Guide number at ISO 100:
| Power levelFlash coverage | FULL | 1/2 | 1/4 | 1/8 | 1/16 | MD | |
| 70mm | In meters | 45 | 32 | 23 | 16 | 11 | 9.5 |
| In feet | 148 | 105 | 75 | 52 | 36 | 31 | |
| 50mm | In meters | 40 | 28 | 20 | 14 | 10 | 8.4 |
| In feet | 131 | 92 | 66 | 46 | 33 | 28 | |
| 35mm | In meters | 34 | 24 | 17 | 12 | 8.5 | 7.1 |
| In feet | 112 | 79 | 56 | 39 | 28 | 23 | |
| 28mm | In meters | 28 | 20 | 14 | 10 | 7.1 | 5.9 |
| In feet | 92 | 66 | 46 | 33 | 23 | 19 | |
| 24mm (Wide-angle adapter) | In meters | 20 | 14 | 10 | 7 | 5.0 | 4.2 |
| In feet | 66 | 46 | 33 | 23 | 16 | 14 | |
Maximum flash range at ISO 100:
P mode: 0.7 to 14m (2.3 to 46 ft.)
A/M mode: 0.7 to 28m (2.3 to 92 ft.)
S mode: 0.7 to 7m (2.3 to 23 ft.)
Flash-camera contacts: Spring-loaded contacts on attaching foot dedicate flash to camera body for: triggering flash unit, automatic X-sync speed setting, signaling flash-ready indication in viewfinder, Direct Autoflash Metering, and activating AF illuminator for autofocus.
Exposure confirmation: After exposure, "OK" signal on back panel glows and flash signal in viewfinder blinks rapidly if exposure was sufficient.
Other: Auto charge control turns unit off automatically if operating button is not touched within 15 minutes after full charge
is reached, charging restarted by touching operating button; panel light button illuminates LCD panel for 8 sec. after button is pressed.
Optional accessories: Control Grip CG-1000 Set, Cable EX, Cable CD, Cable OC, Off-Camera Shoe, Triple Connector TC-1000, Color Panel Set PS-1000, AC Adapter AC-1000, Ni-Cd Charger NC-2 with Ni-Cd cells included
Dimensions: 82 × 144.5 × 102.5mm (3-1/4 × 5-11/16 × 4-1/16 in.)
Weight: 495g (17-7/16 oz.) without batteries
Specifications subject to change without notice
CARE AND STORAGE
- When storing flash unit for more than two weeks, remove batteries and keep it in a cool, dry place away from dust or chemicals.
- Never attempt to disassemble the unit. Any repairs should be made by an authorized Minolta service facility.
- Keep flash unit away from water and other liquids. Never handle unit with wet hands.
- Flash unit may not operate satisfactorily at temperatures above 50^ (120^) or below -10^ (15^) .
-
Never fire flash at close range into eyes of people or animals.
-
When dirty, flash unit may be wiped with a clean, dry cloth. Do not allow alcohol or other chemicals to touch surfaces.
- Never subject flash unit to shock, high heat, or high humidity. Be particularly careful not to leave it in the glove compartment or other places in motor vehicles where it may be subjected to high temperatures.
Before shipping your flash unit for repairs, contact your nearest authorized Minolta service facility.
- MAXXUM
- IMPORTANT SAFEGUARDS
- SAVE THESE INSTRUCTIONS
- TABLE OF CONTENTS
- BATTERIES AND POWER
- To install batteries:
- NOTES
- Checking batteries
- Test button
- Cold-weather operation
- Automatic charge control
- ATTACHING AND REMOVING FLASH
- BASIC INFORMATION
- Flash data panel
- Power-level selection
- CAUTION
- Power zoom head
- Wideangle adapter
- Exposure adjustment
- AF illuminator
- X-sync speeds
- Camera settings
- Flash settings
- PROGRAMMED AUTOFLASH OPERATION (P MODE)
- NOTE
- Programmed fill flash
- A-MODE AUTOFLASH OPERATION
- A-mode slow-shutter sync
- Fill flash in A-mode
- S-MODE AUTOFLASH OPERATION (MAXXUM 9000 ONLY)
- Fill flash and slow-shutter sync in S mode
- M-MODE FLASH OPERATION
- Manual flash exposure
- For manual flash exposures:
- BOUNCE FLASH
- Bounce surface
- Bounce angle
- ACCESSIONS
- Bounce-flash exposure
- Bounce Reflector II Set
- TECHNICAL DETAILS
- Maximum flash range at ISO 100:
- CARE AND STORAGE
Marque : MINOLTA
Modèle : MAXXUM FLASH 4000AF
Catégorie : Flash pour appareil photo