
ES-2008 - Switch réseau ZYXEL - Notice d'utilisation et mode d'emploi gratuit
Retrouvez gratuitement la notice de l'appareil ES-2008 ZYXEL au format PDF.

| Type de produit | Switch réseau Ethernet 10/100 |
| Marque | ZYXEL |
| Modèle | ES-2008 |
| Dimensions (L x P x H) | 250 x 132 x 37 mm |
| Poids | 1,08 kg |
| Alimentation | 100-240 VAC, 50/60 Hz, interne universelle |
| Consommation électrique | 17 W max |
| Nombre de ports | 8 ports RJ-45 10/100Base-TX avec auto-négociation et auto MDI/MDIX |
| Port console | 1 port DB-9 RS-232C pour gestion locale |
| Méthode de commutation | Store-and-forward |
| Table d'adresses MAC | 8000 entrées |
| Mémoire tampon | 256 Ko |
| Débit de la matrice de commutation | 3,8 Gbps non-bloquant |
| Gestion | Web (Internet Explorer 5.0+), Telnet, console, SNMP |
| VLAN | Port-based et tag-based (IEEE 802.1Q), jusqu'à 4095 VLAN, GVRP |
| Protocoles supportés | IEEE 802.3, 802.3u, 802.3x, 802.1D (STP), 802.1p (QoS), 802.1ad (Trunking LACP), IGMP snooping |
| Fonctions avancées | Port trunking, port mirroring, filtrage MAC, sécurité de port, contrôle de tempête broadcast, priorisation des files d'attente |
| LEDs | PWR, 100M, LK/ACT, FD/COL par port |
| Température de fonctionnement | 0 °C à 45 °C |
| Humidité de fonctionnement | 10% à 90% (sans condensation) |
| Normes | FCC Classe A, CE, UL, cUL |
| Entretien | Nettoyer avec un chiffon sec et doux. Ne pas utiliser de liquides ni d'aérosols. |
| Pièces détachées / Réparabilité | Contactez le support ZyXEL. Aucune pièce réparable par l'utilisateur. |
| Contenu de l'emballage | Switch, cordon d'alimentation, guide de démarrage rapide, pieds en caoutchouc |
FOIRE AUX QUESTIONS - ES-2008 ZYXEL
Questions des utilisateurs sur ES-2008 ZYXEL
0 question sur cet appareil. Repondez a celles que vous connaissez ou posez la votre.
Poser une nouvelle question sur cet appareil
Téléchargez la notice de votre Switch réseau au format PDF gratuitement ! Retrouvez votre notice ES-2008 - ZYXEL et reprennez votre appareil électronique en main. Sur cette page sont publiés tous les documents nécessaires à l'utilisation de votre appareil ES-2008 de la marque ZYXEL.
MODE D'EMPLOI ES-2008 ZYXEL
Dimension ES-2008
Ethernet Switch
User's Guide
Version 1.02
March 2003
ZyXEL Unleash Network
Unleash Networking Power
Copyright
Copyright ©2003 by ZyXEL Communications Corporation
The contents of this publication may not be reproduced in any part or as a whole, transcribed, stored in a retrieval system, translated into any language, or transmitted in any form or by any means, electronic, mechanical, magnetic, optical, chemical, photocopying, manual, or otherwise, without the prior written permission of ZyXEL Communications Corporation.
Published by ZyXEL Communications Corporation. All rights reserved.
Disclaimer
ZyXEL does not assume any liability arising out of the application or use of any products, or software described herein. Neither does it convey any license under its patent rights nor the patents' rights of others. ZyXEL further reserves the right to make changes in any products described herein without notice. This publication is subject to change without notice.
Trademarks
Trademarks mentioned in this publication are used for identification purposes only and may be properties of their respective owners.
ZyXEL Limited Warranty
ZyXEL warrants to the original end user (purchaser) that this product is free from any defects in materials or workmanship for a period of up to two (2) years from the date of purchase. During the warranty period and upon proof of purchase, should the product have indications of failure due to faulty workmanship and/or materials, ZyXEL will, at its discretion, repair or replace the defective products or components without charge for either parts or labor and to whatever extent it shall deem necessary to restore the product or components to proper operating condition. Any replacement will consist of a new or remanufactured functionally equivalent product of equal value, and will be solely at the discretion of ZyXEL. This warranty shall not apply if the product is modified, misused, tampered with, damaged by an act of God, or subjected to abnormal working conditions.
NOTE
Repair or replacement, as provided under this warranty, is the exclusive remedy of the purchaser. This warranty is in lieu of all other warranties, express or implied, including any implied warranty of merchantability or fitness for a particular use or purpose. ZyXEL shall in no event be held liable for indirect or consequential damages of any kind of character to the purchaser.
To obtain the services of this warranty, contact ZyXEL's Service Center for your Return Material Authorization (RMA) number. Products must be returned Postage Prepaid. It is recommended that the unit be insured when shipped. Any returned products without proof of purchase or those with an out-dated warranty will be repaired or replaced (at the discretion of ZyXEL) and the customer will be billed for parts and labor. All repaired or replaced products will be shipped by ZyXEL to the corresponding return address, Postage Paid. This warranty gives you specific legal rights, and you may also have other rights that vary from country to country.
Online Registration
Register online at www.zyxel.com for free future product updates and information.
Information for Canadian Users
The Industry Canada label identifies certified equipment. This certification means that the equipment meets certain telecommunications network protective operation and safety requirements. The Industry Canada does not guarantee that the equipment will operate to a user's satisfaction.
Before installing this equipment, users should ensure that it is permissible to be connected to the facilities of the local telecommunications company. The equipment must also be installed using an acceptable method of connection. In some cases, the company's inside wiring associated with a single line individual service may be extended by means of a certified connector assembly. The customer should be aware that compliance with the above conditions may not prevent degradation of service in some situations.
Repairs to certified equipment should be made by an authorized Canadian maintenance facility designated by the supplier. Any repairs or alterations made by the user to this equipment, or equipment malfunctions, may give the telecommunications company cause to request the user to disconnect the equipment.
For their own protection, users should ensure that the electrical ground connections of the power utility, telephone lines, and internal metallic water pipe system, if present, are connected together. This precaution may be particularly important in rural areas.
Caution
Users should not attempt to make such connections themselves, but should contact the appropriate electrical inspection authority, or electrician, as appropriate.
Note
This digital apparatus does not exceed the Class A limits for radio noise emissions from digital apparatus set out in the radio interference regulations of Industry.
Interference Statements andWarnings
FCC Interference Statement
This device complies with Part 15 of the FCC rules. Operation is subject to the following two conditions:
(1) This device may not cause harmful interference.
(2) This device must accept any interference received, including interference that may cause undesired operations.
FCC Warning
This equipment has been tested and found to comply with the limits for a Class A digital device, pursuant to Part 15 of the FCC Rules. These limits are designed to provide reasonable protection against harmful interference in a commercial environment. This equipment generates, uses, and can radiate radio frequency energy and, if not installed and used in accordance with the instruction manual, may cause harmful interference to radio communications. Operation of this equipment in a residential area is likely to cause harmful interference in which case the user will be required to correct the interference at his own expense.
CE Mark Warning:
This is a class A product. In a domestic environment this product may cause radio interference in which case the user may be required to take adequate measures.
Taiwanese BCIQ A Warning:
警告使用者
這是甲類的資訊產品,在居住的環境使用時,
可能會造成射頻干擾,在這種情況下,
使用者會被要求採取某些適當的對策
Certifications
Refer to the product page at www.zyxel.com.
Customer Support
When contacting your Customer Support Representative, please have the following information ready:
Product model and serial number.
Firmware version information.
Warranty Information.
Date you received your product.
Brief description of the problem and the steps you took to solve it.
| METHOD LOCATION | E-MAIL SUPPORT/SALES | TELEPHONE/FAX | WEB SITE/ FTP SITE | REGULAR MAIL |
| WORLDWIDE | support@zyxel.com.tw | +886-3-578-3942 | www.zyxel.com | ZyXEL Communications Corp., 6 Innovation Road II, Science- Based Industrial Park, Hsinchu 300, Taiwan |
| sales@zyxel.com.tw | +886-3-578-2439 | www.europe.zyxel.com | ||
| NORTH AMERICA | support@zyxel.com | +1-714-632-0882 | www.zyxel.com | ZyXEL Communications Inc., 1650 Miraloma Avenue, Placentia, CA 92870, U.S.A. |
| sales@zyxel.com | 800-255-4101 | ftp.zyxel.com | ||
| SCANDINAVIA | support@zyxel.dk | +45-3955-0700 | www.zyxel.dk | ZyXEL Communications A/S, Columbusvej 5, 2860 Soeborg, Denmark |
| sales@zyxel.dk | +45-3955-0707 | ftp.zyxel.dk | ||
| GERMANY | support@zyxel.de | +49-2405-6909-0 | www.zyxel.de | ZyXEL Deutschland GmbH, Adenauerstr. 20/A2 D-52146 Wuerselen, Germany |
| sales@zyxel.de | +49-2405-6909-99 |
Table of Contents
Copyright..
ZyXEL Limited Warranty.. 3
Information for Canadian Users. iv
Interference Statements andWarnings
Customer Support vi
List of Figures xi
List of Tables. xiv
Preface . xvi
Chapter 1 Getting to Know Your ES-2008. 1-1
1.1 Features 1-1
1.2 Management Features 1-1
1.3 Management Methods 1-2
1.4 Applications 1-2
Chapter 2 Hardware Description and Installation 2-1
2.1 Hardware Installation 2-1
2.2 Hardware Connections 2-1
2.3 Front Panel LEDs 2-3
2.4 Rear Panel 2-5
2.5 Turning On the Switch 2-6
Chapter 3 Introducing the Web Configurator 3-1
3.1 Accessing the Web Configurator 3-1
3.2 Commonly Used Buttons 3-3
3.3 General Switch Information 3-4
3.4 Switch Console Port Settings 3-4
Chapter 4 Basic Switch Configuration 4-1
4.1 Setting the IP Address of the Switch 4-1
4.2 Changing SystemUsername and Password 4-1
4.3 Resetting the Switch 4-2
4.4 Rebooting the Switch 4-3
Chapter 5 Advanced Switch Configuration 5-1
5.1 Switch Configuration 5-1
Chapter 6 Port Control. 6-1
6.1 Configuring the Ethernet Ports 6-1
6.2 View Port Status 6-2
6.3 Port Statistics 6-2
Chapter 7 Port Trunking 7-1
7.1 Introduction 7-1
7.2 Configuring Port Trunking 7-2
7.3 Viewing Static Trunk Group Information 7-3
7.4 State Activity 7-4
Chapter 8 Filter and Security Setup 8-5
8.1 IGMP 8-5
8.2 Static MAC Address 8-10
8.3 Port Security 8-11
8.4 MAC Address Filtering 8-12
Chapter 9 VLAN. 9-1
9.1 Introduction 9-1
9.2 VLAN Types 9-1
9.3 Selecting VLANSupport 9-2
9.4 Port-Based VLAN Configuration 9-3
9.5 Tag-Based VLAN Configuration 9-4
Chapter 10 Spanning Tree Protocol. 10-1
10.1 Introduction 10-1
10.2 Activating Spanning Tree Protocol 10-2
10.3 Configuring Spanning Tree Parameters 10-2
10.4 Viewing Root Bridge Information 10-3
10.5 Configuring Spanning Tree Port Parameters 10-4
10.6 Viewing STP Port Status 10-5
Chapter 11 Port Mirroring 11-1
11.1 Introduction 11-1
11.2 Configuring Port Mirroring 11-1
Chapter 12 SNMP 12-1
12.1 About SNMP 12-1
12.2 Configuring SNMP 12-2
Chapter 13 Introducing the SMT 13-1
13.1 Introduction 13-1
13.2 Accessing the SMT Using Telnet 13-1
13.3 Accessing the SMT Using the Console Port 13-1
13.4 Initial SMT Screen 13-2
13.5 The SMT Overview 13-3
13.6 Navigating the SMT Interface 13-3
13.7 SMT Main Menu.. 13-5
Chapter 14 Basic System Setup 14-1
14.1 Introduction 14-1
14.2 Administration Configuration 14-2
Chapter 15 Switch Configuration. 15-1
15.1 Port and Trunk Group Settings 15-1
15.2 Port Mirroring 15-2
15.3 VLAN 15-4
15.4 Priority Configuration 15-8
15.5 MAC Address Configuration 15-9
15.6 Miscellaneous Configuration 15-13
Chapter 16 Protocol Related Configuration 16-1
16.1 Introduction 16-1
16.2 STP Configuration 16-1
16.3 SNMP Configuration 16-4
16.4 GVRP Configuration 16-6
16.5 LACP Configuration 16-7
Chapter 17 Status and Counters 17-1
17.1 Status and Counters 17-1
Chapter 18 Firmware and Configuration File Maintenance. 18-1
18.1 Filename Convention 18-1
18.2 Firmware Upgrade 18-1
18.3 Configuration File Maintenance 18-4
Chapter 19 Troubleshooting. 19-1
19.1 Using LEDs to Diagnose Problems 19-1
19.2 Console Port 19-2
19.3 Telnet 19-3
19.4 Web Configurator 19-3
19.5 LoginUsername and Password 19-4
19.6 Improper Network Cabling and Topology 19-4
Appendix A Setting up Your Computer's IP Address .A
Appendix B. L
IP Subnetting .L
Appendix C Product Specifications.
Index W
List of Figures
Figure 1-1 Standalone Workgroup Example 1-3
Figure 1-2 Bridging Application Example 1-4
Figure 1-3 VLAN Application Example 1-5
Figure 2-1 ES-2008 2-1
Figure 2-2 ES-2008 with Fiber Port. 2-2
Figure 2-3 ES-2008 with Gigabit Port 2-2
Figure 2-4 Ethernet Port LEDs 2-4
Figure 2-5 Rear Panel 2-5
Figure 3-1 Login Window 3-1
Figure 3-2 Welcome Screen 3-2
Figure 3-3 Menu 3-2
Figure 3-4 Expanded Menu 3-2
Figure 3-5 Web Configurator Front Panel Display 3-3
Figure 3-6 Port Status 3-3
Figure 3-7 Web Configurator: View Switch Information 3-4
Figure 3-8 Web Configurator: Serial Port Information 3-4
Figure 4-1 Network Configuration 4-1
Figure 4-2 User Authentication. 4-2
Figure 4-3 Factory Default. 4-2
Figure 4-4 System Reboot 4-3
Figure 5-1 Switching Configuration: Advanced 5-1
Figure 6-1 Port Configuration. 6-1
Figure 6-2 Port Statistics 6-3
Figure 7-1 Trunking: Aggregator Setting 7-2
Figure 7-2 Trunking: Aggregator Information. 7-3
Figure 7-3 Trunk State Activity 7-4
Figure 8-1 Configuring IGMP 8-6
Figure 8-2 IGMP Example 1 8-7
Figure 8-3 IGMP Example 2 8-8
Figure 8-4 IGMP Example 2 8-9
Figure 8-5 IGMP Snooping 8-9
Figure 8-6 Static MAC Address. 8-11
Figure 8-7 Port Security 8-12
Figure 8-8 MAC Address Filtering 8-13
Figure 9-1 Switch Configuration: Enable Protocols 9-2
Figure 9-2 VLAN Setup: Port-based VLAN Information. 9-3
Figure 9-3 VLAN Setup: Port-based Configuration 9-3
Figure 9-4 VLAN Setup - 802.1Q with/without GVRP VLAN Information 9-4
Figure 9-5 Tag-Based VLAN: 802.1 Q VLAN Basic Setup 9-5
Figure 9-6 VLAN Setup: 802.1Q VLAN Port Tagging 9-5
Figure 9-7 Tag-Based VLAN: Port VLAN ID. 9-6
Figure 10-1 Activating STP 10-2
Figure 10-2 Configure Spanning Tree Parameters. 10-2
Figure 10-3 View STP Root Bridge Information. 10-3
Figure 10-4 Configuring STP Port Parameters 10-4
Figure 10-5 STP Port Status 10-5
Figure 11-1 Port Mirroring 11-1
Figure 12-1 SNMP Management Model. 12-1
Figure 12-2 SNMP Management 12-3
Figure 13-1 Starting a Telnet Session 13-1
Figure 13-2 HyperTerminal Communication Parameter Settings Example. 13-2
Figure 13-3 SMT: Login Screen 13-2
Figure 13-4 SMT Overview. 13-3
Figure 13-5 SMT: Menu Breakdown. 13-4
Figure 13-6 SMT: Main Menu. 13-5
Figure 14-1 SMT: Switch Configuration 14-1
Figure 14-2 SMT: Device Configuration. 14-2
Figure 14-3 SMT: Device Information 14-3
Figure 14-4 SMT: IP Configuration. 14-4
Figure 14-5 SMT:Username Configuration. 14-5
Figure 14-6 SMT: Password Configuration. 14-5
Figure 15-1 SMT: Port/Trunk Configuration. 15-1
Figure 15-2 SMT: Port Monitoring Configuration 15-3
Figure 15-3 SMT: VLAN Configuration 15-4
Figure 15-4 SMT: VLAN Support Configuration: Setting VLAN Mode. 15-5
Figure 15-5 SMT: VLAN Support Configuration: 802.1Q 15-5
Figure 15-6 SMT: Add a VLAN Group. 15-6
Figure 15-7 SMT: Edit/Delete a VLAN Group 15-8
Figure 15-8 SMT: Priority Configuration 15-9
Figure 15-9 SMT: MAC Address Configuration 15-10
Figure 15-10 SMT: Static MAC Address. 15-10
Figure 15-11 SMT: Add Static MAC Address 15-11
Figure 15-12 SMT: MAC Address Filtering. 15-12
Figure 15-13 SMT: Edit MAC Address Filtering 15-12
Figure 15-14 SMT: Misc Configuration 15-13
Figure 15-15 SMT: Port Security 15-14
Figure 15-16 SMT: Aging Time Setting 15-15
Figure 15-17 SMT: Broadcast Storm Filter Mode. 15-15
Figure 15-18 SMT: Max Bridge Transmit Delay Bound. 15-16
Figure 16-1 SMT: Protocol Related Configuration 16-1
Figure 16-2 SMT: STP Configuration 16-2
Figure 16-3 SMT: Enable STP 16-2
Figure 16-4 SMT: STP Parameters Setup. 16-3
Figure 16-5 SMT: STP Per Port Setting. 16-3
Figure 16-6 SMT: SNMP Configuration. 16-4
Figure 16-7 SMT: SNMP System Options. 16-5
Figure 16-8SMT: SNMP Community Strings. 16-5
Figure 16-9 SMT: SNMP Trap Manager. 16-6
Figure 16-10 SMT: Add SNMP Trap Manager 16-6
Figure 16-11 SMT: GVRP Configuration 16-7
Figure 16-12 SMT: LACP Configuration 16-7
Figure 16-13 SMT: LACP Group Setting 16-8
Figure 16-14 SMT: LACP State Activity 16-9
Figure 16-15 SMT: LACP Group Status. 16-10
Figure 17-1 SMT: Status and Counters 17-1
Figure 17-2 SMT: Port Status 17-2
Figure 17-3 SMT: Port Counters 17-2
Figure 17-4 SMT: Switch Information. 17-3
Figure 18-1 SMT: Startup Message 18-2
Figure 18-2 1K Xmodem Firmware Upload Example 18-2
Figure 18-3 SMT: Firmware Upload Process 18-3
Figure 18-4 Web Configurator: Firmware Upgrade 18-3
Figure 18-5 Web Configurator: Successful Firmware Retrieval 18-4
Figure 18-6 Backup Configuration 18-4
Figure 18-7 Web Configurator: Backup Configuration File Successful 18-5
Figure 18-8 Web Configurator:Restore Configuration. 18-5
Figure 18-9 Web Configurator: Successful Configuration File Retrieval 18-6
List of Tables
Table 2-1 Network Cable Types 2-3
Table 2-2 The Switch Power LED Description 2-3
Table 2-3 Ethernet Port LED Descriptions 2-4
Table 2-4 100FX Module LED Descriptions. 2-4
Table 2-5 Gigabit Module LED Descriptions 2-5
Table 3-1 Commonly Used Button 3-3
Table 3-2 View Switch Information. 3-4
Table 4-1 Network Configuration. 4-1
Table 4-2 User Authentication 4-2
Table 5-1 Switching Configuration: Advanced. 5-2
Table 6-1 Port Configuration. 6-1
Table 6-2 Port Statistics. 6-3
Table 7-1 Trunking: Aggregator Setting 7-2
Table 7-2 Aggregator Information 7-3
Table 7-3 Trunk State Activity. 7-4
Table 8-1 IGMP Message Descriptions 8-5
Table 8-2 IGMP Query Mode. 8-6
Table 8-3 IGMP Snooping. 8-10
Table 9-1 VLAN Operation Mode. 9-2
Table 9-2 VLAN Setup: Port-based Configuration. 9-4
Table 9-3 VLAN Setup: 802.1Q VLAN Port Tagging.. 9-6
Table 9-4 Tag-Based VLAN: Port VLAN ID 9-6
Table 10-1 Recommended Path Cost. 10-1
Table 10-2 Configure STP Parameter 10-2
Table 10-3 View STP Root Bridge Information. 10-3
Table 10-4 STP Port Status 10-5
Table 11-1 Port Mirroring. 11-2
Table 12-1 SNMP Management. 12-3
Table 13-1 Control Key Descriptions 13-4
Table 13-2 SMT Menu Summary 13-5
Table 14-1 Switch Configuration Menu Choice 14-1
Table 14-2 SMT: Device Information. 14-3
Table 14-3 SMT: IP Configuration 14-4
Table 15-1 SMT: Port/Trunk Configuration 15-1
Table 15-2 SMT: Port Monitoring Configuration. 15-3
Table 15-3 SMT: VLAN Support Configuration: 802.1Q 15-5
Table 15-4 SMT: Add a VLAN Group 15-7
Table 15-5 SMT: Priority Configuration. 15-9
Table 15-6 Edit MAC Address Filtering SMT Field Descriptions. 15-12
Table 15-7 SMT: Port Security 15-14
Table 15-8 SMT: Max Bridge Transmit Delay Bound 15-16
Table 16-1 SMT: STP Per Port Setting 16-4
Table 16-2 SMT: LACP Group Setting. 16-8
Table 16-3 SMT: LACP State Activity. 16-9
Table 16-4 SMT: LACP Group Status 16-10
Table 19-1 Troubleshooting Power LED 19-1
Table 19-2 Troubleshooting LK/ACT LED 19-1
Table 19-3 Troubleshooting 100 LED. 19-2
Table 19-4 Troubleshooting FD/COL LED. 19-2
Table 19-5 Troubleshooting Console Port 19-2
Table 19-6 Troubleshooting Telnet 19-3
Table 19-7 Troubleshooting Web Configurator. 19-3
Table 19-8 Troubleshooting Internet Browser Display 19-4
Table 19-9 Troubleshooting LoginUsername and Password. 19-4
Table 19-10 Troubleshooting Improper Network Cabling and Topology 19-5
Preface
Congratulations on your purchase of the ES-2008 Ethernet Switch.
About The ES-2008 Series Switches
The ES-2008 switch allows you to easily configure and manage your network via a web browser. Just click your mouse instead of typing cryptic command strings. Moreover, the ES-2008 can also be managed via SNMP.
There are four ES-2008 Ethernet switch models.
| MODEL | DESCRIPTION |
| ES-2008 | Eight port 10/100M Ethernet switch. |
| ES-2008-SC | Eight port 10/100M Ethernet switch with multi-mode fiber port. |
| ES-2008-SC30 | Eight port 10/100M Ethernet switch with single-mode fiber port. |
| ES-2008-GTP | Eight port 10/100M Ethernet switch with one gigabit port. |
About this User's Guide
This manual is designed to guide you through the configuration of your ES switch for its various applications. All ES models are discussed together in this guide.
Unless specified, images of the ES-2008-SC are used throughout this document. Images that directly relate to the other two models are used when referring to the key differences between the models.
General Syntax Conventions
"Enter" means for you to type one or more characters and press the carriage return. "Select" or "Choose" means for you to use one from the predefined choices.
The SMT menu titles and labels are in Bold Times New Roman font. Predefined field choices are in Bold Arial font. Command and arrow keys are enclosed in square brackets. [ENTER] means the Enter, or carriage return key; [ESC] means the Escape key and [SPACE BAR] means the Space Bar.
For brevity's sake, we will use "e.g." as shorthand for "for instance", and "i.e." as shorthand for "that is" or "in other words" throughout this manual.
The Dimension ES-2008 Ethernet Switch models will be referred to as the ES-2008 or simply as "the switch" in this manual.
Glossary
www.zyxel.com contains an online glossary of networking terms.
Part I:
Getting Started
Part I covers Getting to Know Your Switch, Hardware Installation, and Introducing the Web Configurator.
Chapter 1
Getting to Know Your ES-2008
The ES-2008 is a multi-port switch that can be used to build high-performance switched workgroup networks. This switch uses a store-and-forward switching scheme, in which incoming data frames are first stored in buffer memory and checked for errors before being forwarded; thus offering minimum delay for high-speed networking. It is the ideal switch for small-to-medium sized enterprise workgroups, departments or backbone computing environments.
The embedded web configurator makes managing and configuring the ES-2008 easy, enabling system management as well as individual port control and monitoring. In addition, the ES-2008 can be managed via Telnet, the console port, or SNMP.
1.1 Features
Conforms to IEEE 802.3, 802.3u, and 802.3x Ethernet Standards
IEEE802.3ab Gigabit copper for ES models with a gigabit port.
8 auto-negotiating (100M Full/half-duplex, or 10M Full/half-duplex mode) Ethernet RJ-45 ports
Auto MDI/MDIX (auto-sensing) Ethernet ports
One fixed 100Mbps Fiber (SC/SC single-mode) or gigabit port (not available on all switch models)
One console port for local configuration
Full duplex and half duplex mode flow control
Store-and-Forward switching scheme
2 megabits memory buffer
Automatic MAC address learning; MAC address table can contain up to 8,000 entries
Performs non-blocking full wire speed (switch fabric bandwidth 3.8 Gbps) switching
PWR, 100M, LK/ACT and FD/COL LEDs
Ten-inch desktop size design
1.2 Management Features
Web-based management
SNMP network management
Supports port-based and tagged VLAN Groups
Port Trunking and IEEE 802.3ad LACP
MIB II (RFC1213) supported
IP multicast
IGMP snooping
Quality of Service (QoS)
Supports port mirror, broadcast filter, static MAC address, port security and GVRP
Configure/Manage individual ports
Enable/Disable individual ports
1.3 Management Methods
The switch supports the following management methods:
- Local console management
- Telnet management
Web configurator
SNMP network management
1.3.1 Console and Telnet Management
Managing the switch through the console port requires a direct connection between the computer and the switch using an RS-232 console cable. You can also telnet into the switch from any computer on your network (provided you know the IP address of the switch).
1.3.2 Web Configurator
The switch comes with an embedded HTML web configurator. It offers advanced management features and allows you to manage the switch from anywhere on the network through Microsoft Internet Explorer (version 5.0 or later).
1.4 Applications
The switch is ideally suited as a workgroup switch or a bridge for large network segmentation.
For ES-2008 models that come with a fiber port, you can also use the fiber port to connect to other network switches. The distance between two switches via fiber cable can be up to 2Km (multi-mode) or 30Km (single-mode).
1.4.1 Standalone Workgroup
The switch can be used as a standalone switch to which computers, servers and printer servers are directly connected to form a small workgroup.
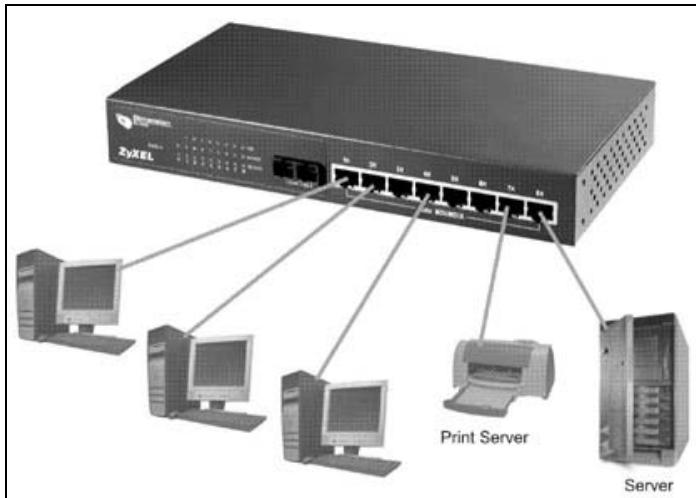
Figure 1-1 Standalone Workgroup Example
1.4.2 Bridging Application
For enterprise networks where large data broadcasts are constantly processed, this switch is an ideal solution for department users to connect to the corporate backbone.
In the next illustration, two Ethernet switches with attached computers, print server and local server, are all connected to the switch. All devices in this network can communicate with each other through the switch and also access the server.
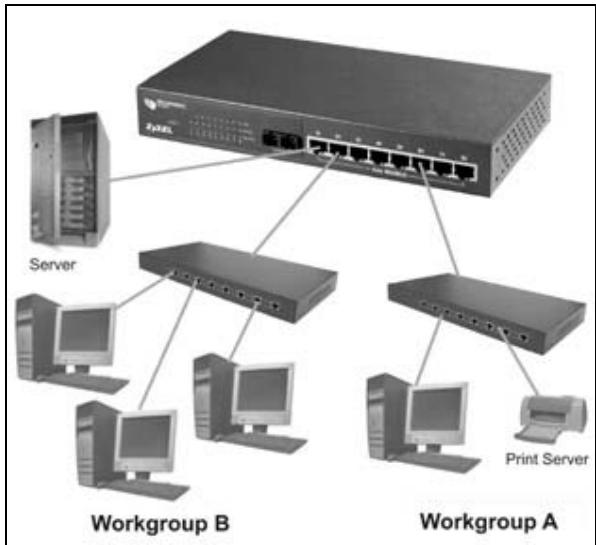
Figure 1-2 Bridging Application Example
1.4.3 VLAN Application
VLAN (Virtual Local Area Network) allows a physical network to be partitioned into multiple logical networks. Stations on a logical network belong to one group. A station can belong to more than one group. With VLAN, a station cannot directly talk to or hear from stations that are not in the same group(s); the traffic must first go through a router.
As well as security, VLANs also increase network performance by limiting broadcasts to a smaller and more manageable logical broadcast domain. In traditional switched environments, all broadcast packets go to each and every individual port. With VLAN, broadcasts are confined to the members of the VLAN. Note that VLANs are unidirectional - they only govern outgoing traffic.
Port-based VLANs are VLANs where the packet forwarding decision is based on the destination MAC address and its associated port.
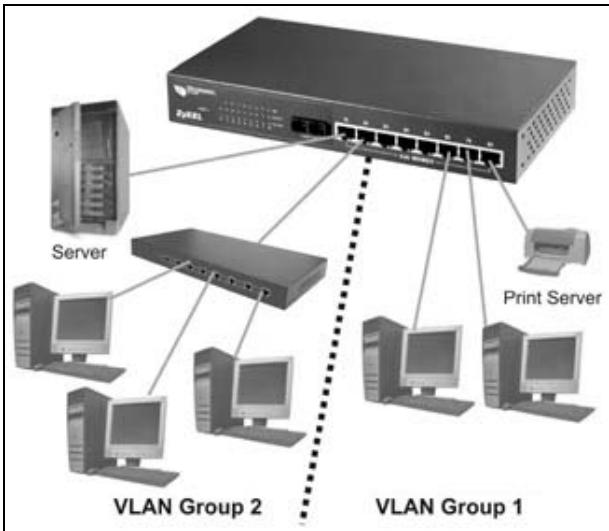
Figure 1-3 VLAN Application Example
Chapter 2 Hardware Description and Installation
This chapter describes the switch hardware and installation
2.1 Hardware Installation
The switch is suitable for an office environment where it can be placed on a desktop.
Step 1. Make sure the switch is clean and dry.
Step 2. Attach the supply rubber feet to the bottom of the switch.
Step 3. Set the switch on a smooth and sturdy flat space strong enough to support the weight of the switch and the connected cables. Make sure there is a power outlet nearby.
Step 4. Make sure there is enough clearance around the switch to allow air circulation and the attachment of cables and the power cord.
Do not block the ventilation holes. Leave space between switches when stacking.
2.2 Hardware Connections
2.2.1 Front Panel
The front panel of the switch consists of eight auto-sensing, auto-negotiating 10/100Base-TX Ethernet RJ-45 ports and/or one 100Base-FX fiber or gigabit port.
The LEDs are also located on the front panel of the switch.
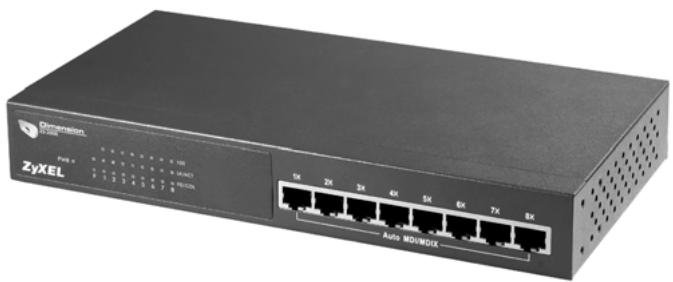
Figure 2-1 ES-2008
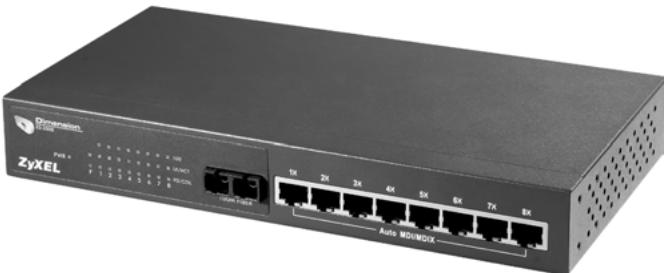
Figure 2-2 ES-2008 with Fiber Port
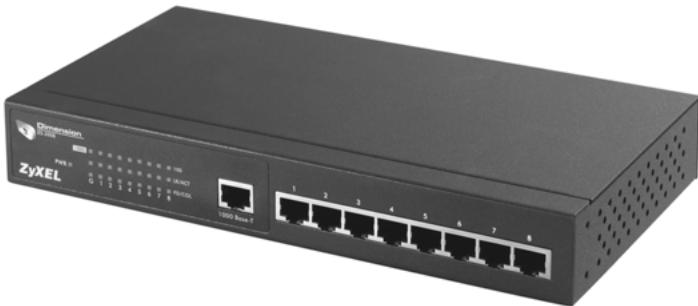
Figure 2-3 ES-2008 with Gigabit Port
2.2.2 The Ethernet Connections
Auto-Sensing 10/100Base-TX RJ-45 Ports (Auto MDI/MDIX)
The ES-2008 has eight auto-negotiating, auto-sensing 10/100Base-TX Ethernet RJ-45 ports. All these ports support auto-sensing, a built-in function that automatically recognizes the type (straight/crossover) of the attached cable. This feature effectively removes all wiring troubles caused by a cable type mismatch. Although a crossover cable is usually required to cascade a switch to another switch, auto MDI/MDI-X lets you use a normal straight cable to do the task.
Auto-Negotiating 10/100Base-TX RJ-45 Ports
The auto-negotiation feature allows the switch to detect the speed of incoming transmission and adjust appropriately without manual intervention. It allows data transfers of either 10 Mbps or 100 Mbps in either half-duplex or full-duplex mode depending on your Ethernet network.
2.2.3 Network Cable Types
The following table describes the types of network cable used for the different connection speeds. The fiber and gigabit ports are not available on all ES models.
Make sure the 10/100 Base-TX and/or 1000Base-T cable length between connections does not exceed 100 meters (328 feet).
Table 2-1 Network Cable Types
| SPEED | NETWORK CABLE TYPE |
| 10 Base-TX | 100Ω 2-pair UTP/STP Category 3, 4 or 5 |
| 100 Base-TX | 100Ω 2-pair UTP/STP Category 5 |
| 1000BASE-T | 100Ω 4-pair UTP/STP Category 5 |
| 100BASE-FX (multi-mode) | 50~62.5/125 micron multi-mode fiber-optics |
| 100BASE-FX (single-mode) | 8~10/125 micron single-mode fiber-optics |
2.3 Front Panel LEDs
All the LEDs are found on the front panel of the switch to indicate real-time status of the ports and the switch.
2.3.1 The PWR LED
The PWR LED on the front panel indicates whether the switch is receiving power.
Table 2-2 The Switch Power LED Description
| LED | COLOR | STATUS | DESCRIPTION |
| Power | Green | On | The switch is receiving power. |
| Off | The switch is not receiving power. |
2.3.2 10/100M Ethernet Port LEDs
The LEDs for the 10/100M Ethernet ports give real-time system information and status.
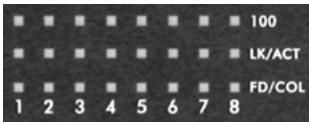
Figure 2-4 Ethernet Port LEDs
The following table describes the LEDs for the Ethernet ports on the front panel.
Table 2-3 Ethernet Port LED Descriptions
| LED | COLOR | STATUS | DESCRIPTION |
| 100 | Green | On | The port is operating at 100Mbps. |
| Off | No device is attached or the port is operating at 10Mbps. | ||
| LK/ACT | Green | On | The port is connecting with a device. |
| Blinking | The port is receiving or transmitting data. | ||
| Off | No device is attached. | ||
| FD/COL | Orange | On | The port is operating in full-duplex mode. |
| Blinking | Packet collisions are occurring | ||
| Off | No device is attached or the device is in half-duplex mode. |
2.3.3 The Fiber Port
The 100FX fiber module is designed to extend the distance between the switch and other Ethernet devices by up to 2km using multi-mode fiber or 30km using single-mode fibers. The fiber port is not available on all switch models.
The LEDs provide real-time system status information of the fiber port. The following table is a summary of LED status and meaning.
Table 2-4 100FX Module LED Descriptions
| LED | COLOR | STATUS | DESCRIPTION |
| LK/ACT | Orange | On | The fiber port is connected to an Ethernet device. |
| Blinking | This fiber port is transmitting data. | ||
| Off | No data is being transmitted. | ||
| FD/COL | Orange | On | The port is operating in full-duplex mode. |
| Blinking | Packet collision is occurring on this port. |
Table 2-4 100FX Module LED Descriptions
| LED | COLOR | STATUS | DESCRIPTION |
| Off | No device is attached or the port is operating in half-duplex mode |
2.3.4 The Gigabit Port
The gigabit port module is capable of transferring data at a speed up to 1000 mbps. The gigabit port is not available on all switch models.
The following table describes the gigabit port LEDs.
Table 2-5 Gigabit Module LED Descriptions
| LED | COLOR | STATUS | DESCRIPTION |
| 1000 | Green | On | The port is connected at 1000 Mbps. |
| Off | The port is not connected at 1000 Mbps. | ||
| LK/ACT | Orange | On | The fiber port is connected to an Ethernet device. |
| Blinking | This fiber port is transmitting data. | ||
| Off | No data is being transmitted. | ||
| FD/COL | Orange | On | The port is operating in full-duplex mode. |
| Blinking | Packet collision is occurring on this port. | ||
| Off | No device is attached or the port is operating in half-duplex mode |
2.4 Rear Panel
The console port and the power socket are located on the rear panel as shown in the next figure.

Figure 2-5 Rear Panel
2.4.1 Console Port
Local switch management is done through the console port. It requires a direct connection between the switch and a computer via an RS-232 console cable. Refer to chapters on SMT configurations.
2.5 Turning On the Switch
Connect one end of the power cord to the power receptacle on the rear panel of the switch and the other end to the power outlet. Refer to the product specifications for the right power source.
The PWR LED on the front panel turns on.
Chapter 3
Introducing the Web Configurator
This chapter describes how to access the embedded web configurator and view general switch information.
3.1 Accessing the Web Configurator
Follow the steps below to access the web configurator.
Step 1. Make sure your switch is properly connected (refer to instructions in Chapter 2).
Step 2. Prepare your computer to connect to the switch. Set your computer to use a static IP address in the same subnet as the IP address of the switch (refer to the Setting Your Computer's IP Address appendix).
Step 3. Launch your Internet Explorer.
You must use Internet Explorer 5.0 or later versions.
Step 4. Type "192.168.1.1"as the URL.
Step 5. Type "admin" (default) as the user name and "1234" (default) as the password and click OK.
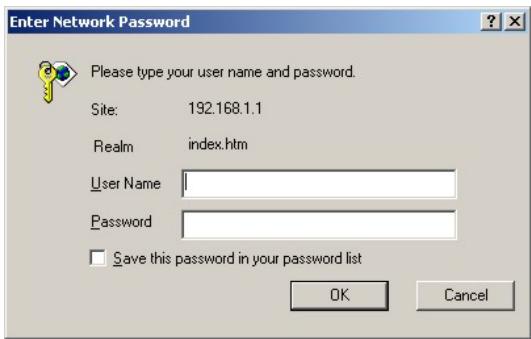
Figure 3-1 Login Window
Step 5. You should now see the welcome screen as shown next.
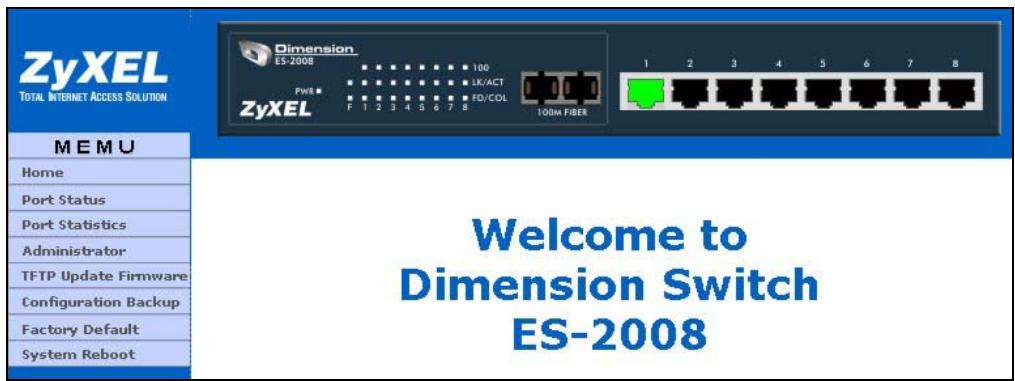
Figure 3-2 Welcome Screen
3.1.1 The Navigation Panel
The navigation panel on the left of all web pages provides a consistent way to access all program functions. Click Administrator to expanded the menu and configure the switch.
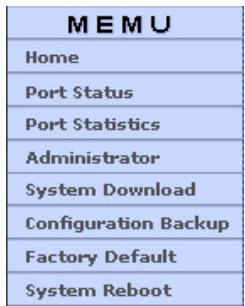
Figure 3-3 Menu
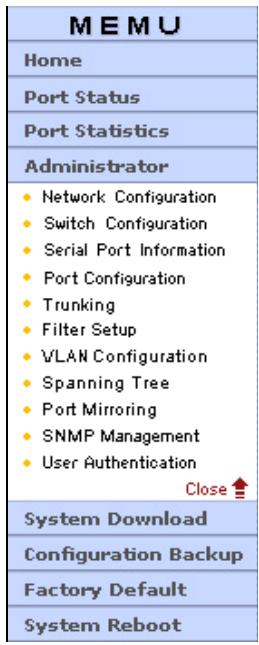
Figure 3-4 Expanded Menu
3.1.2 The Web Configurator Front Panel Display
The front panel graphic is displayed on all web screens to indicate the real-time port status of the switch.

Figure 3-5 Web Configurator Front Panel Display
A port in green means a device is connected to the port. To view port information, click on the ports to open a read-only status window as shown next.

Figure 3-6 Port Status
Refer to the Port Statistics section for field descriptions.
3.2 Commonly Used Buttons
The following table describes the buttons found in most screens.
Table 3-1 Commonly Used Button
| BUTTON | DESCRIPTION |
| Apply | Click Apply to save the changes. |
| Default | Click Default to set the screen settings back to factory defaults. |
| Delete | Click Delete to remove a selected item. |
| Help | Click Help to open a web-based HTML help window. The Help button is not available in all web configurator screens. |
3.3 General Switch Information
To view general information such as firmware version and MAC address click Administrator, Switch Configuration and click on the Basic tab. The following screen displays as shown.
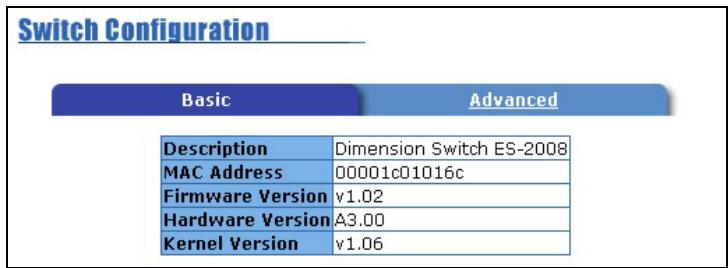
Figure 3-7 Web Configurator: View Switch Information
The table below describes the read-only fields in this screen.
Table 3-2 View Switch Information
| FIELD | DESCRIPTION |
| Description | This field displays a short description of the switch. |
| MAC Address | This field displays the MAC address of the switch without the “.” separator. |
| Firmware Version | This field displays the version of the firmware the switch is using. |
| Hardware Version | This field displays the hardware version of the switch. |
| Kernel Version | This field displays the version of the kernel on which the firmware is based. |
3.4 Switch Console Port Settings
To view the console port settings of the switch click Administrator and Serial Port Information.
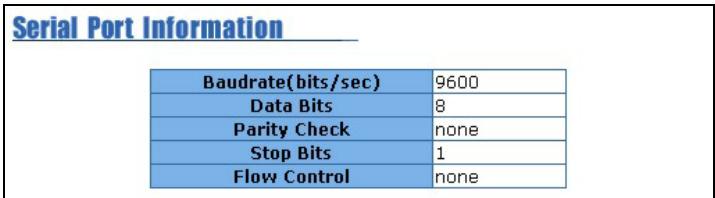
Figure 3-8 Web Configurator: Serial Port Information
Use the information in this screen to set the communication parameters of a terminal emulation program to access the switch via the console port.
Chapter 4
Basic Switch Configuration
This chapter describes how to set the IP address of the switch, reset and reboot
the switch.
4.1 Setting the IP Address of the Switch
To configure the Ethernet TCP/IP settings of the switch click Administrator and then Network Configuration to display the screen shown next.
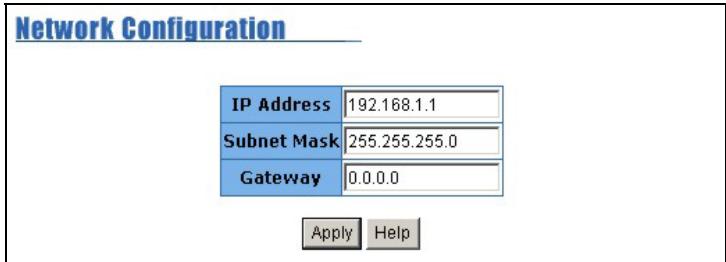
Figure 4-1 Network Configuration
Follow the instructions in the table below to set the fields in this screen.
Table 4-1 Network Configuration
| FIELD | DESCRIPTION | EXAMPLE |
| IP Address | Enter a LAN IP address for the switch in dotted decimal notation. | 192.168.1.1 |
| Subnet Mask | Enter a subnet mask in dotted decimal notation. Refer to the Subnetting appendix to calculate a subnet mask if you are implementing subnetting. | 255.255.255.0 |
| Gateway | Enter the LAN IP address of the gateway device. |
You must reboot the switch if you change the IP address to make the changes take effect.
4.2 Changing SystemUsername and Password
Use the User Authentication screen to change the switch system username and password.
Click Administrator and then User Authentication to display the screen shown next.
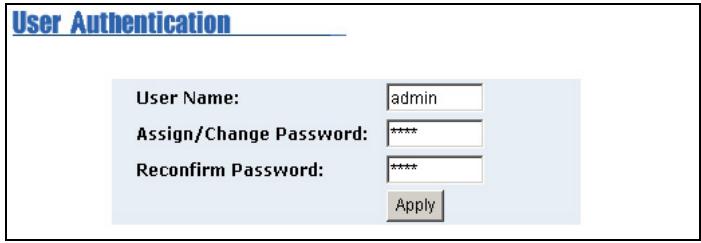
Figure 4-3 Factory Default
Figure 4-2 User Authentication
Follow the instructions in the next table to set the fields in this screen.
Table 4-2 User Authentication
| FIELD | DESCRIPTION |
| User name | Type in your new switch system user name. |
| Assign/Change Password | Type in your new switch system password. |
| Reconfirm password | Re-type your new switch system password for confirmation. |
4.3 Resetting the Switch
Restoring to factory defaults resets the switch's parameters. The user name will be reset to "admin", the password to "1234" and the LAN IP address to 192.168.1.1.
This function erases the current configuration before restoring a previous back up configuration; please do not attempt to restore unless you have a backup configuration file stored on disk.
Follow the steps to restore your switch back to factory defaults.
Step 1. Click Factory Default to display the screen shown next.
Factory Default
Click the Default button to reset the switch back to factory default configuration. All your custom configuration will be erased.
Default
Step 2. Click the Factory Default button and wait until the switch finishes rebooting before accessing the switch again.
4.4 Rebooting the Switch
You must reboot the switch after you make changes to the switch's IP address and uploads a firmware or configuration file.
Step 1. Click System Reboot to display the screen as shown next.

Figure 4-4 System Reboot
Step 2. Click Reboot and wait until the switch finishes rebooting before accessing the switch again.
Part II:
Advanced Settings
Part II covers advanced port settings such as trunking, port security and filtering.
Chapter 5
Advanced Switch Configuration
This chapter shows you how to configure the Advanced Switch Settings screen.
5.1 Switch Configuration
Use the Switch Configuration screen to configure advanced features of the switch.
From the main menu, click Administrator, Switch Configuration and then click on the Advanced tab to display the screen as shown next.
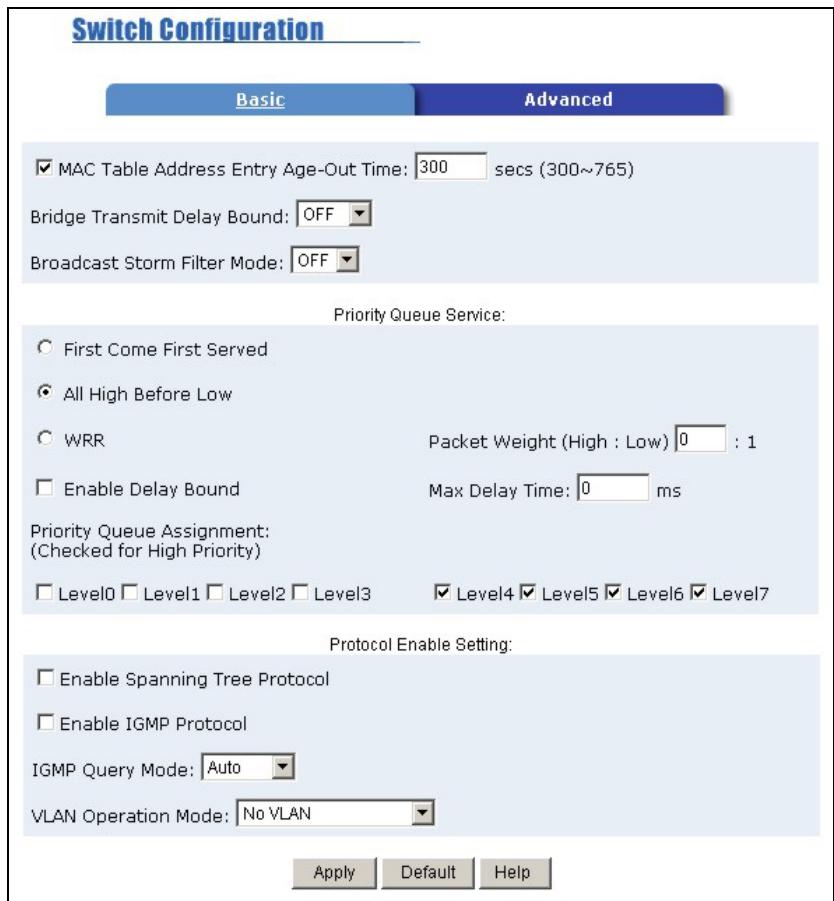
Figure 5-1 Switching Configuration: Advanced
Follow the instructions in the table below to configure this screen.
Table 5-1 Switching Configuration: Advanced
| FIELD | DESCRIPTION |
| MAC Table Address Entry Age-out time | Select this check box to remove a MAC address from the MAC address table after a duration specified in the field provided. Enter the duration in seconds between 300 and 765 that an inactive MAC address remains in the switch's MAC address table. The default is 300 seconds. |
| Bridge Transmit Delay Bound | Select 1 sec, 2 sec or 4 sec from the pull down list box to limit the packet queuing time in the switch. If enabled, the packets queued beyond the time period specified here will be dropped. Select OFF to disable this feature. This is the default setting. |
| Broadcast Storm Filter Mode | Threshold is the percentage of the port's total bandwidth used by broadcast traffic. When broadcast traffic for a port increases above the threshold, broadcast storm control becomes active. Select a percentage number from the drop-down list box to set the threshold of the ports. Select OFF to disable this feature. This is the default setting. |
| Priority Queue ServiceSelect a priority queuing type. | |
| First Come First Served | Select this option to send packets in the order of arrival. |
| All High Before Low | Select this option to send all high priority packets before sending packet with low priority. |
| WRR | Select the Weighted Round Robin (WRR) option to send packets depending on the weight (or priority) in the Packet Weight field. For example, if Packet Weight is 2, then the switch sends out two packets with higher priority for every one low priority packet sent. |
| Packet Weight (High: Low) | This is the high weight and low weight ratio. Specify the number of high priority packets to send. The number must be bigger than 1. Note: The default value for the low weight value is 1. You cannot change this number. |
| Enable Delay Bound | Select this option and specify a time in the Max Delay Time field (in milliseconds) to specify a time period a low priority packet is allowed to queue in the switch. |
Table 5-1 Switching Configuration: Advanced
| FIELD | DESCRIPTION |
| Max Delay Time | Specify a time period a low priority packet is allowed to queue in the switch before the packet is dropped. |
| Priority Queue Assignment (Checked for High Priority) | With QoS (Quality of Service) organizations can differentiate traffic by setting the precedence values in the IP header at the periphery of the network to enable the backbone to prioritize traffic. |
| Level1 ... Level7 | Select the check box(es) to add the packets with the level bits to the high priority queue. |
| Protocol Enable Settings | |
| Enable Spanning Tree Protocol | Select this option to activate Spanning Tree Protocol (STP). Refer to the STP chapter for more information. |
| Enable IGMP Protocol | Select this option to activate Internet Group Multicast Protocol (IGMP). Refer to Section 8.1 for more information. |
| IGMP Query Mode | Select Auto to allow the network to automatically find the IGMP server. The multicast device with the lowest numerical IP address to be the IGMP server. This is the default setting. Select Enable to force this switch to be the IGMP server even when there is already an IGMP server on the network. Selecting this option may affect network performance. Select Disable to forcibly disallow this switch from being an IGMP server. |
| VLAN Operation Mode | Select No VLAN, 802.1Q with GVRP, 802.1Q without GVRP or Port-Based from the drop-down list box. Select No VLAN to disable VLANs. Select 802.1Q with GVRP to set up tag-based VLAN groups that extend beyond the local switch. Select 802.1Q without GVRP to set up tag-based VLAN groups on the switch only. Select Port-Based to set up port-based VLANs. Refer to the chapter on VLANs. |
Chapter 6
Port Control
This chapter shows you how to configure the Ethernet ports and view port status.
6.1 Configuring the Ethernet Ports
The Port Configuration screen allows you to configure settings for individual Ethernet ports on the switch and view the status of all the ports.
Click Administrator and then Port Configuration to display the screen as shown next.
Port Configuration
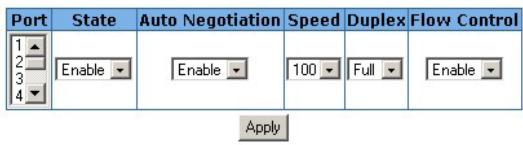
Figure 6-1 Port Configuration
Port Status
The following information provides a view of the current status of the unit.
| Port | State | Link Status | Auto Negotiation | Speed Status | Duplex Status | Flow Control | |||||
| Config | Actual | Config | Actual | Config | Actual | Config | Actual | Config | Actual | ||
| 1 | On | On | Up | Auto | Auto | 100 | 100 | Full | Half | On | On |
| 2 | On | Off | Down | Auto | N/A | 100 | N/A | Full | N/A | On | N/A |
| 3 | On | Off | Down | Auto | N/A | 100 | N/A | Full | N/A | On | N/A |
| 4 | On | Off | Down | Auto | N/A | 100 | N/A | Full | N/A | On | N/A |
| 5 | On | Off | Down | Auto | N/A | 100 | N/A | Full | N/A | On | N/A |
| 6 | On | Off | Down | Auto | N/A | 100 | N/A | Full | N/A | On | N/A |
| 7 | On | Off | Down | Auto | N/A | 100 | N/A | Full | N/A | On | N/A |
| 8 | On | Off | Down | Auto | N/A | 100 | N/A | Full | N/A | On | N/A |
| 9 | On | Off | Down | N/A | --- | 100 | N/A | Full | N/A | On | N/A |
Follow the instructions in the next table to configure the Ethernet ports.
Table 6-1 Port Configuration
| FIELD | DESCRIPTION |
| Port Configuration | |
| Port | Select a port to configure from the selection list. |
| State | Select Enable from the drop-down list box to activate the port. |
Table 6-1 Port Configuration
| FIELD | DESCRIPTION |
| Auto Negotiation | Select Enable from the drop-down list box to have the port detect the speed of incoming transmission and adjust appropriately without manual intervention. |
| Speed | Select from the drop-down list box to set the transmission speed of the port. Choices are 10 Mbps and 100 Mbps. All ports are set to 100 Mbps by default. |
| Duplex | Select either Full or Half from the drop-down list box to set the duplex mode of the port. All ports are set to Full duplex mode by default. |
| Flow Control | Select Enable from the drop-down list box to activate flow control on this port. |
6.2 View Port Status
The bottom half of the Port Configuration screen displays status of all ports on the switch.
You may also view the port status information in the Port Status screen
Refer to Table 6-1 for field descriptions. The Config fields display the configured port settings while the Actual fields displays the real-time status of the port.
6.3 Port Statistics
Click Port Statistics in the menu to display the screen as shown next.
Port Statistics
The following information provides a view of the current status of the unit.
| Port | State | Link | TxGoodPkt | TxBadPkt | RxGoodPkt | RxBadPkt | TxAbort | Collision |
| 1 | Off | Down | 0 | 0 | 0 | 0 | 0 | 0 |
| 2 | On | Up | 23005 | 0 | 363855 | 6192 | 0 | 49 |
| 3 | Off | Down | 0 | 0 | 0 | 0 | 0 | 0 |
| 4 | Off | Down | 0 | 0 | 0 | 0 | 0 | 0 |
| 5 | Off | Down | 0 | 0 | 0 | 0 | 0 | 0 |
| 6 | Off | Down | 0 | 0 | 0 | 0 | 0 | 0 |
| 7 | Off | Down | 0 | 0 | 0 | 0 | 0 | 0 |
| 8 | Off | Down | 0 | 0 | 0 | 0 | 0 | 0 |
Clear
Figure 6-2 Port Statistics
The following table describes the fields in this screen.
Table 6-2 Port Statistics
| FIELD | DESCRIPTION |
| Port | This field displays the port number of each entry. |
| State | This field indicates whether the port is connected (On) to an Ethernet device or not connected (Off). |
| Link | This field indicates whether the port has a successful connection (Up) or no connection (Down). |
| TxGoodPKT | This field displays the number of packets transmitted successfully. |
| TxBadPKT | This field displays the number of packet transmission failures. |
| RxGoodPKT | This field displays the number of packets received successfully. |
| RxBadPKT | This field displays the number of bad packets received. |
| TxAbort | This field displays the number of aborted data transmissions. |
| Collision | This field displays the number of collisions that occurred on the port. |
Click Clear to reset the counters
Chapter 7
Port Trunking
This chapter describes how to configure trunk groups and IEEE 802.3ad link
aggregation.
7.1 Introduction
Port Trunking (or link aggregation) lets you group physical ports into one logical high-capacity link. It may be more cost-effective to group multiple lower-speed ports than to under-utilize a higher-speed, but more costly, port.
However, the more ports you aggregate, the higher bandwidth capacity you obtain, but the fewer available ports you have.
7.1.1 Trunk Groups
Trunk groups are manually configured aggregate links containing multiple ports.
7.1.2 Dynamic Port Trunking
The switch supports IEEE 802.3ad standard for port trunking. This standard describes the Link Aggregate Control Protocol (LACP), which is a protocol that allows a switch to dynamically create and manage trunk groups.
When you enable LACP trunking on a port, the port can automatically negotiate with the ports at the remote end of a link to establish trunk groups.
Besides dynamic trunking, LACP provides port redundancy. When an operational port fails, one of the "standby" ports becomes operational without user intervention.
7.1.3 Requirements
When you configure the settings, note the following points.
- You cannot add a port to a trunk group if LACP is enabled on the port.
- You must connect all ports point-to-point to the same Ethernet device and configure them for LACP trunking if required.
- LACP only works on full-duplex links.
- All ports on the same trunk group must have the same media type, speed, duplex mode and flow control settings.
- Configure trunk groups or LACP before you connect the Ethernet device to prevent network topology loops.
7.2 Configuring Port Trunking
Port trunking lets you group up to eight consecutive ports into a single dedicated connection.
To configure port trunking, click Administrator, Trunking and the Aggregator Setting tab.
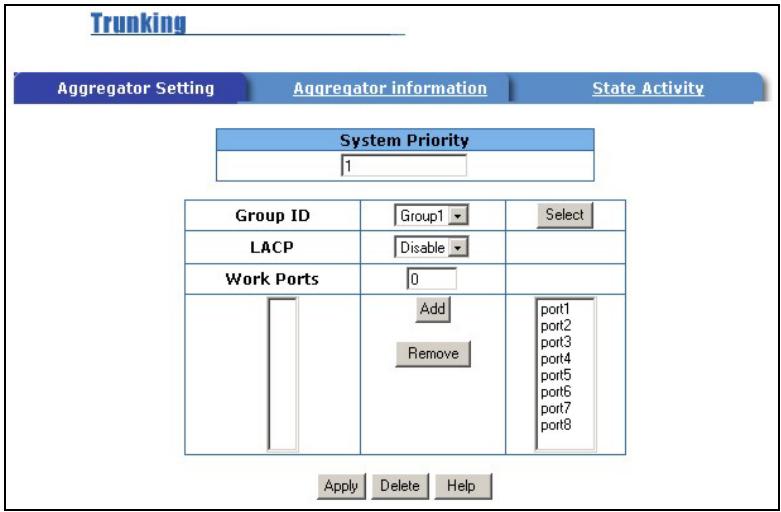
Figure 7-1 Trunking: Aggregator Setting
Follow the instruction in the table next to change the settings.
Table 7-1 Trunking: Aggregator Setting
| FIELD | DESCRIPTION |
| System Priority | Enter a number to identify and set the priority of an active Link Aggregate Control Protocol (LACP). The smaller the number, the higher the priority level. |
| Group ID | Select a trunk group ID from the drop-down list menu and click Select to display the configured settings. |
| LACP | Select Enable from the drop-down list box to set the trunk group as a dynamic trunk group. Select Disable to set the trunk group as a local trunk group. |
Table 7-1 Trunking: Aggregator Setting
| FIELD | DESCRIPTION |
| Work Ports | Enter the number of ports that to be aggregated. If you select Enable in the LACP field, then enter any number greater than 0 and smaller than the total number of the trunk ports. The excess ports are in standby and can be aggregated if any of the other ports fail. If you select Disable in the LACP field, then the number of ports must be the same as the number of the trunk ports. By default, the total number of trunk ports is displayed. |
| Add | Select a port number on the right selection box and click Add to add the port to the trunk group on the left. Any ports that remain on the right are ports not assigned to any trunk groups. |
| Remove | Select a port number on the left selection box and click Remove to remove the port from the trunk group. |
7.3 Viewing Static Trunk Group Information
The Aggregator Information screen displays static trunk groups (with the LACP feature).
Click Administrator, Trunking and then the Aggregator Information tab. A screen displays as follows.
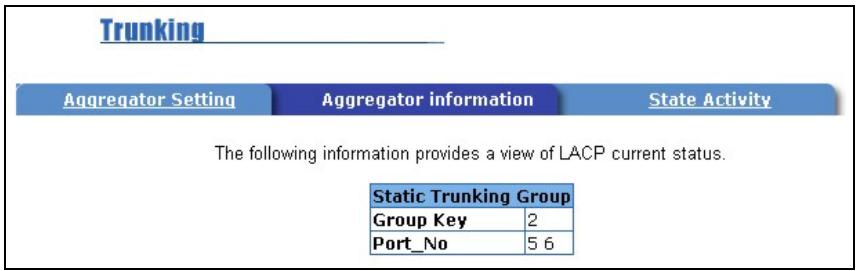
Figure 7-2 Trunking: Aggregator Information.
The following table describes the fields in this screen.
Table 7-2 Aggregator Information
| FIELD | DESCRIPTION |
| Group Key | This field displays the trunk group number. |
Table 7-2 Aggregator Information
| FIELD | DESCRIPTION |
| Port No | This field displays the port number(s) belonging to a static trunk group. |
7.4 State Activity
Ports in a dynamic trunk group can be in either active or passive state.
If a port is in active state, the port automatically sends LACP packets to negotiate a trunk link configuration with another link aggregation port on the other side of the link.
If a port is in passive state, the port only responds to LACP packets but cannot negotiate a trunk link configuration with another trunk port on the other end of the link.
Use the State Activity screen to set the state of the port(s) in a dynamic trunk group.
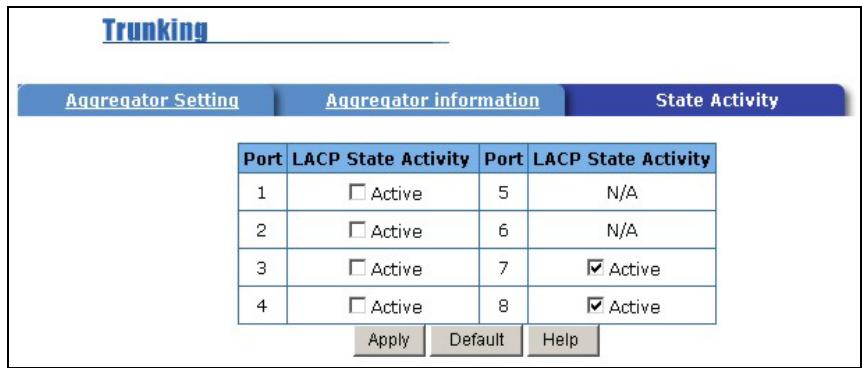
Figure 7-3 Trunk State Activity
The following table describes the fields in this screen.
Table 7-3 Trunk State Activity
| FIELD | DESCRIPTION |
| Port | This field displays the port numbers. |
| LACP State Activity | This field is N/A for ports not in a dynamic trunk group. Select the Status check box to set the port to active state. If the Status check box is not selected, the port is set to passive state. This is the default setting for all ports in a dynamic trunk group. |
Chapter 8
Filter and Security Setup
This chapter shows you how to set IGMP and MAC filters and port security.
8.1 IGMP
Traditionally, IP packets are transmitted in one of either two ways -Unicast (1 sender to 1 recipient) or Broadcast (1 sender to everybody on the network). Multicast delivers IP packets to just a group of hosts on the network.
IGMP (Internet Group Multicast Protocol) is a session-layer protocol used to establish membership in a multicast group - it is not used to carry user data. Refer to RFC 1112 and RFC 2236 for information on IGMP versions 1 and 2 respectively.
A layer-2 switch can passively snoop on IGMP Query, Report and Leave (IGMP version 2) packets transferred between IP multicast routers/switches and IP multicast hosts to learn the IP multicast group membership. It checks IGMP packets passing through it, picks out the group registration information, and configures multicast accordingly. Without IGMP snooping, multicast traffic is treated in the same manner as broadcast traffic, that is, it is forwarded to all ports. With IGMP snooping, group multicast traffic is only forwarded to ports that are members of that group. IGMP Snooping generates no additional network traffic, allowing you to significantly reduce multicast traffic passing through your switch.
For each attached network, an IGMP server periodically sends a query message to request for group membership information. Hosts on the network that are members of a multicast group send report messages back to the IGMP server. When a host leaves a group, it sends a leave group message.
The following table describes the types of IGMP messages.
Table 8-1 IGMP Message Descriptions
| TYPE | DESCRIPTION |
| Query | An IGMP server sends query messages asking for a response from each host belonging to the multicast group. |
| Report | A host sends report messages to the IGMP server to indicate that the host wants to be or is a member of a given group indicated in the report message. |
| Leave Group | A host sends a leave group message to the IGMP server to indicate that the host has terminated its membership of a specific multicast group. |
8.1.1 Configuring IGMP
Follow the steps below to activate IGMP on the switch.
Step 1. Click Administrator and then Switch Configuration.
Step 2. In the Switch Configuration screen, click the Advanced tab.
Step 3. Select the Enable IGMP Protocol check box under Protocol Enable Setting.
Step 4. Select a choice from the IGMP Query Mode field drop-down list box.
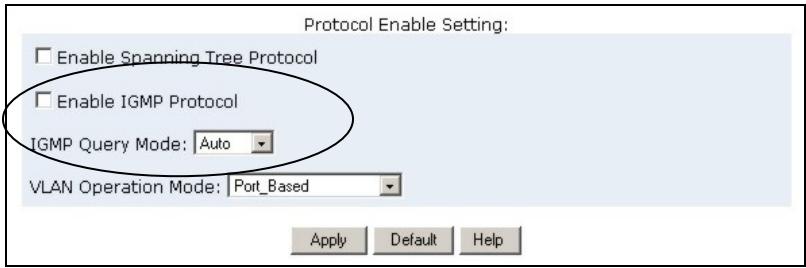
Figure 8-1 Configuring IGMP
The following table describes the options in the IGMP Query Mode field.
Table 8-2 IGMP Query Mode
| FIELD | DESCRIPTION |
| IGMP Query Mode | Select Auto to allow the network to automatically find the IGMP server. The multicast device with the lowest numerical IP address to be the IGMP server. This is the default setting. Select Enable to force this switch to be the IGMP server even when there is already an IGMP server on the network. Selecting this option may affect network performance. Select Disable to forcibly disallow this switch from being an IGMP server. |
8.1.2 IGMP Examples
This section presents IGMP examples for each IGMP query mode.
A source of multicasts, such as the Video-on-Demand server in our examples, should be as close to the IGMP server as possible in order to reduce broadcasts.
Example 1: Select an IGMP Server Automatically
In the figure below, when you select Auto in the IGMP Query Mode field on all switches, Switch C will become the IGMP server since it has the lowest numerical IP address on the network.
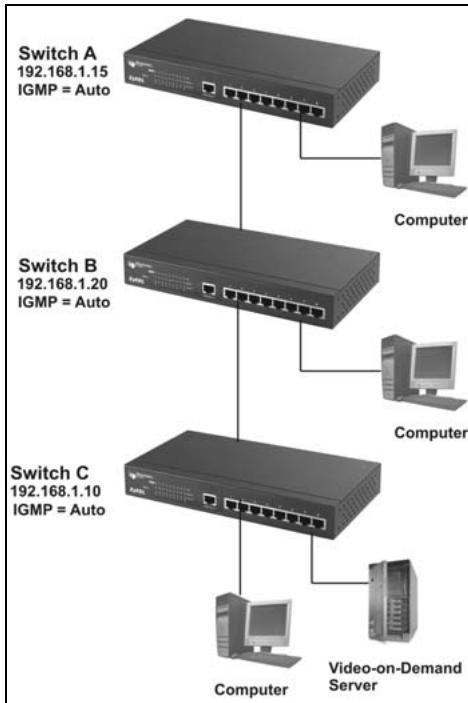
Figure 8-2 IGMP Example 1
Example 2: Select an IGMP Server Manually
To force Switch A to be the IGMP server, select Enable in the IGMP Query Mode field. However if another multicast device is set to Auto and it has a numerically lower IP address, it will act as the IGMP server also. This results in duplicated IGMP messages that might decrease your network performance.
Unless you can disable IGMP on the other multicast devices on your network, it is not recommended you select the Enable option.
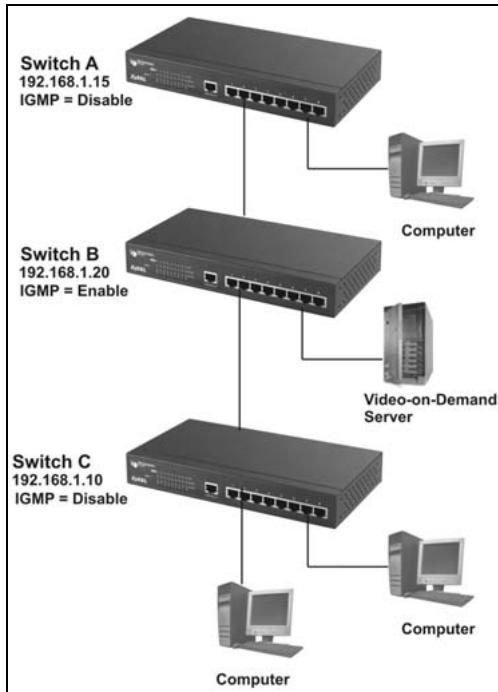
Figure 8-3 IGMP Example 2
Example 3: Disable IGMP on the Switch
When you want to set a multicast router on your network to be the IGMP server but the router does not have the lowest IP address, disable IGMP on all other multicast devices.
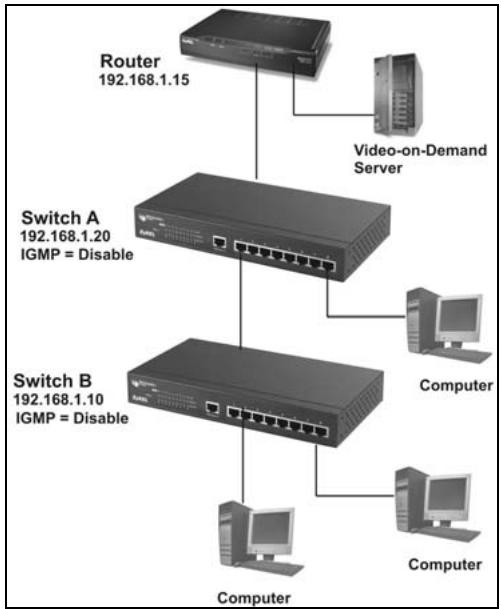
Figure 8-4 IGMP Example 2
8.1.3 Viewing IGMP Snooping Information
Click Filter Setup and then IGMP Snooping to display IGMP snooping information.
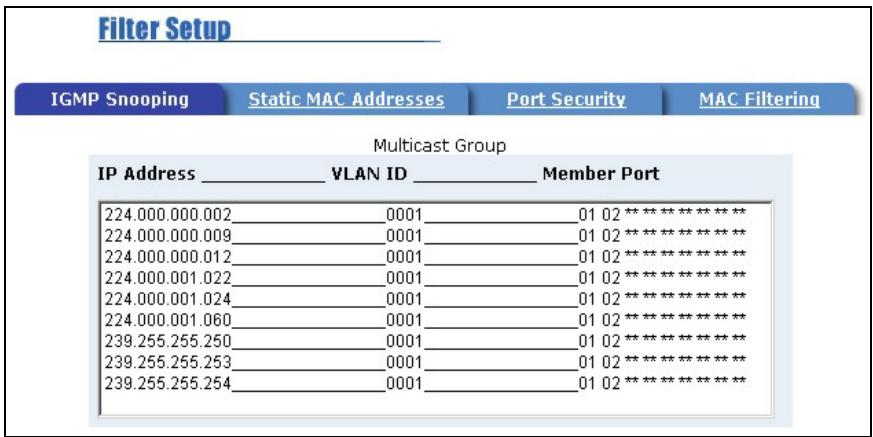
Figure 8-5 IGMP Snooping
The following table describes the read-only fields in this screen.
Table 8-3 IGMP Snooping
| FIELD | DESCRIPTION |
| IP Address | This field displays the IP multicast address in the range 224.0.0.0 through 239.255.255.254. |
| VLAN ID | This field displays the VLAN or multicast group ID. |
| Member Port | This field displays the port number to which the Ethernet device is connected. |
8.2 Static MAC Address
You can add a MAC address to the MAC address table on the switch. A static MAC address will remain in the MAC address table permanently even if the Ethernet device is not connected to the switch.
With static MAC addresses, the switch avoids re-learning the MAC addresses of the Ethernet devices every time the switch reboots or disconnects from the network.
8.2.1 Adding Static MAC Address
Follow the steps to add static MAC addresses.
Step 1. Click Administrator and then Filter Setup.
Step 2. Click the Static MAC Addresses tab to display the screen as shown in the figure below.
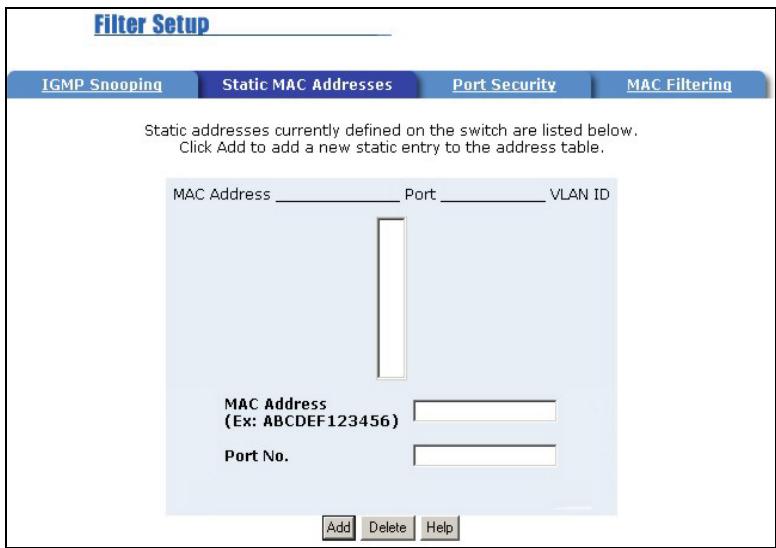
Figure 8-6 Static MAC Address
Step 3. Enter the MAC address (without the “:” separator) of an Ethernet device in the MAC Address field.
Step 4. Enter the port number that the Ethernet device is connected to in the Port No. field.
8.3 Port Security
A port with security mode turned on is prevented from re-learning a new MAC address of an Ethernet device. To secure a port, disable the port from learning new MAC addresses and then define a list of MAC addresses that are allowed to use the secured port. Thus, only incoming packets with the defined MAC addresses will be forwarded.
Follow the steps below to secure the ports on the switch.
Step 1. Click Administrator and then Filter Setup.
Step 2. Click the Port Security tab to display the screen as shown next.
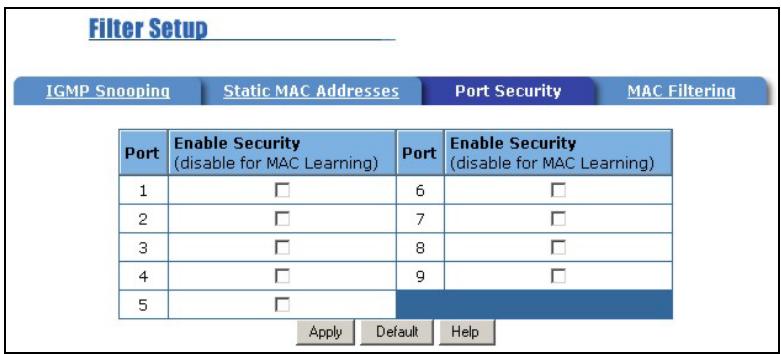
Figure 8-7 Port Security
Step 3. Select the check box beside the port number to stop the port from learning new MAC addresses.
Step 4. Click Apply.
Step 5. Follow Section 8.2.1 to define static MAC addresses on the ports to allow only the computers with the static MAC addresses to send packets through the ports
If you do not configure static MAC address(es) on the port with port security feature, the port will drop all packets.
8.4 MAC Address Filtering
You can set up the switch to drop packets from a computer based on the computer's MAC address. Follow the steps set up MAC address filtering.
Step 1. Click Administrator, Filter Setup and then the MAC Filtering tab.
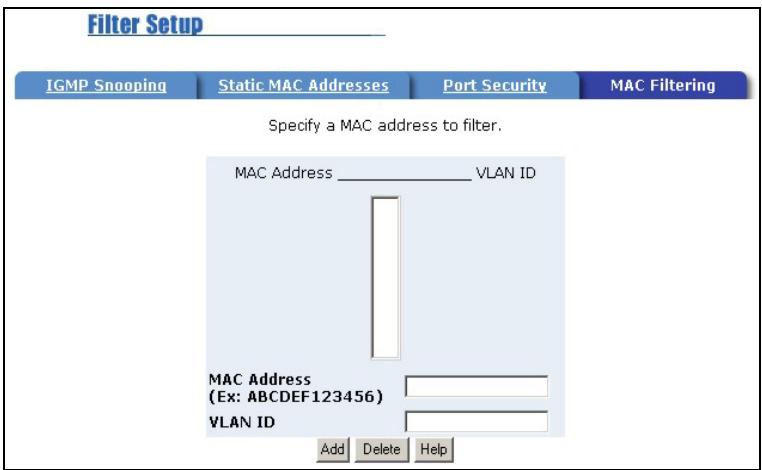
Figure 8-8 MAC Address Filtering
Step 2. Enter the MAC address (without the “:” separator) of an Ethernet device in the MAC Address field.
Step 3. If VLAN is enabled, enter the VLAN ID of a VLAN group the port belongs to in the VLAN ID field. This field is N/A if VLAN is not enabled.
Step 4. Click Apply to save the settings.
Part III:
Advanced Applications
Part III covers VLAN, Port Mirroring, STP, SNMP and firmware and configuration maintenance.
Chapter 9 VLAN
This chapter shows you how to set up Virtual LANs on the switch.
9.1 Introduction
A Virtual LAN (VLAN) is a logical network grouping that limits the broadcast domain. It allows you to isolate network traffic so only members of the VLAN group receive traffic from the same VLAN group members. Members on a different VLAN group cannot communicate with each other even though they are physically connected to the same switch.
Your switch supports port-based and tag-based VLANs.
By default, all ports belong to a default VLAN (VLAN ID 1). You cannot delete the default VLAN.
9.2 VLAN Types
The following sections discussed the types of VLANs your switch supports.
9.2.1 Port-Based VLAN
Port-based VLAN is the most common and simplest form of VLAN. In a port-based VLAN, some ports are assigned to a VLAN group. A port can only belong to one VLAN group.
By default, all the ports on the switch belong to a VLAN group (VID 1). You cannot delete the default VLAN.
9.2.2 Tag-Based VLANs (IEEE 802.1Q VLAN)
Tag-based VLAN on the switch is based on the IEEE 802.1Q specification that allows you to create VLANs across switches from different vendors. IEEE 802.1Q VLAN inserts a "tag" into the Ethernet frames. The tag contains a VLAN Identifier (VID) that indicates the VLAN numbers.
The following lists the advantages of IEEE 802.1Q.
- Multicast data traffic across different Ethernet devices is contained, thus improving performance.
- A port can belong to more than one IEEE 802.1Q VLAN.
- Improved security with logical grouping of users.
Dynamic VLANs
GARP VLAN Registration Protocol (GVRP) is a Generic Attribute Registration Protocol (GARP) application that provides VLAN registration services through dynamic configuration (or registration) and distribution of VLAN membership information across the network.
With GVRP, the switch is able to register necessary VLAN members to create IEEE 802.1Q-compliant VLANs on links with other devices that are running GVRP. GVRP automatically provides consistent VLAN ID across the network to reduce VLAN configuration errors. GVRP propagates VLAN information to other GVRP-aware devices automatically, without the need to manually configure the VLANs on each device. In addition, if the VLAN configuration on a device changes, GVRP automatically changes the VLAN configurations of the affected devices.
9.3 Selecting VLANSupport
Select the type of VLANs to support in the Switch Configuration screen. Click Administrator, Switch Configuration and then the Advanced tab to set the VLAN Operation Mode field.
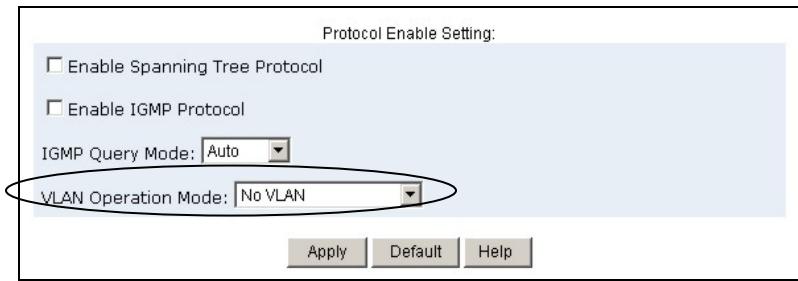
Figure 9-1 Switch Configuration: Enable Protocols
Follow the instructions in the table next to select the VLAN mode.
Table 9-1 VLAN Operation Mode
| FIELD | DESCRIPTION |
| VLAN Operation Mode | Select No VLAN, 802.1Q with GVRP, 802.1Q without GVRP or Port-Based from the drop-down list box. Select No VLAN to disable VLANs. Select 802.1Q with GVRP to set up tag-based VLAN groups that extend beyond the local switch. Select 802.1Q without GVRP to set up tag-based VLAN groups on the switch only. Select Port-Based to set up port-based VLANs. |
9.4 Port-Based VLAN Configuration
Follow the steps below to configure port-based VLANs.
Step 1. In the Switch Configuration screen, select Port-Based from the VLAN Operation Mode drop-down list box. Then click Apply.
Step 2. Click VLAN Configuration in the navigation menu to display the setup screen as shown next.
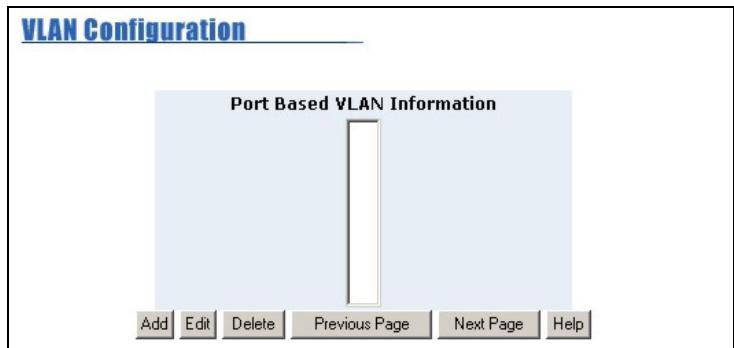
Figure 9-2 VLAN Setup: Port-based VLAN Information
Step 3. Click Add to configure a new port-based VLAN. The following screen displays.
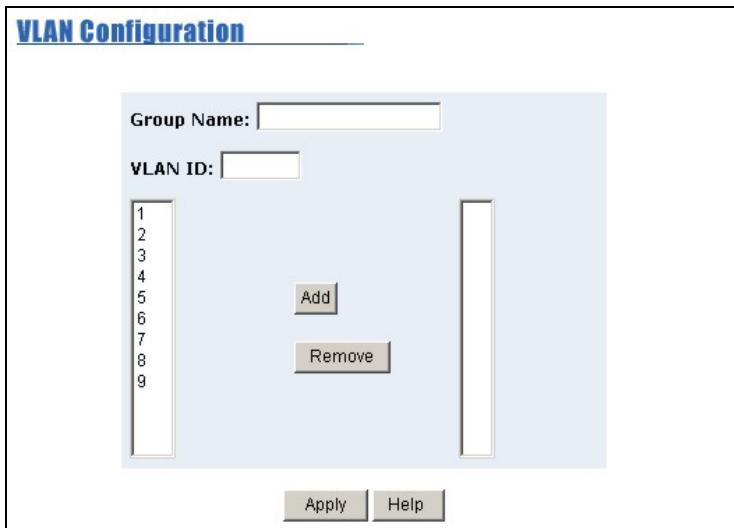
Figure 9-3 VLAN Setup: Port-based Configuration
Follow the instructions in the table next to configure this screen.
Table 9-2 VLAN Setup: Port-based Configuration
| FIELD | DESCRIPTION |
| Group Name | Enter a descriptive name to identify the VLAN. |
| VLAN ID | Enter a VLAN identification number. The number must be between 1 and 4094. |
| Add | Select a port number from the left selection list and click Add to add the port to the VLAN. |
| Remove | Select a port number from the right selection list and click Remove to remove the port from the VLAN. |
Ports in the same VLAN must be in the same trunk group.
9.5 Tag-Based VLAN Configuration
Follow the steps below to configure VLANs on the switch.
Step 1. In the Switch Configuration screen, select either 802.1Q with GVRP or 802.1Q without GVRP from the VLAN Operation Mode drop-down list box. Then click Apply.
Step 2. Click Administrator and then VLAN Configuration to display the basic VLAN screen as shown next.
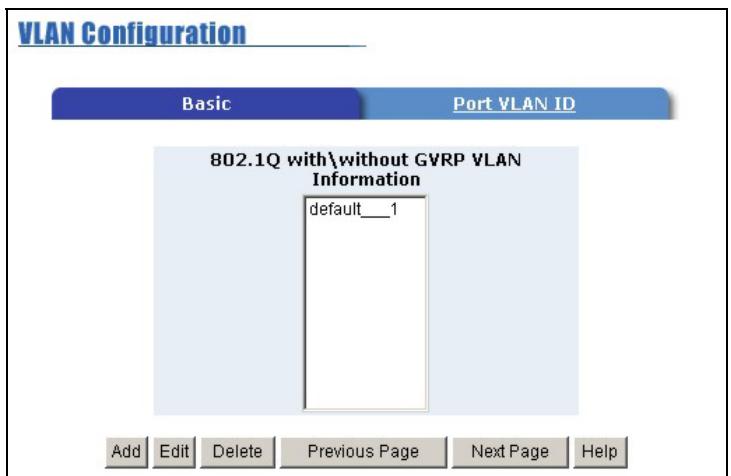
Figure 9-4 VLAN Setup - 802.1Q with/without GVRP VLAN Information
Step 3. Click Add to add a new VLAN. A setup screen displays.
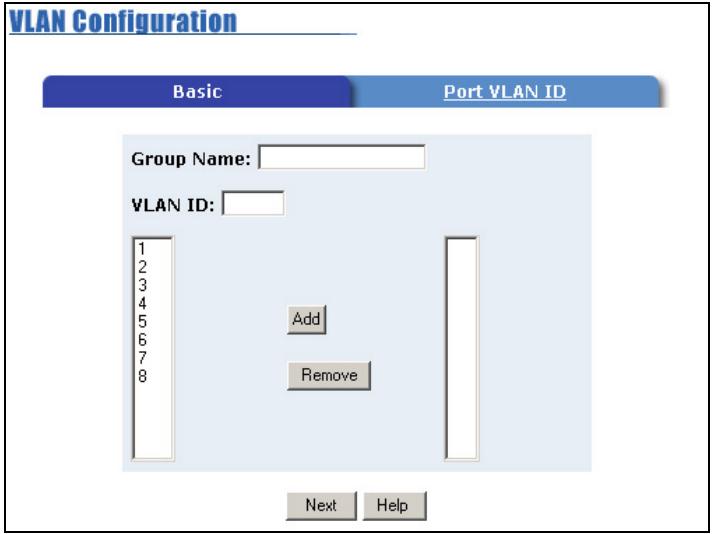
Figure 9-5 Tag-Based VLAN: 802.1 Q VLAN Basic Setup
Follow the instructions in Table 9-2 to set the fields in this screen.
All ports in the same VLAN must be in the same trunk group.
Step 4. Click Next to continue.
VLAN Configuration
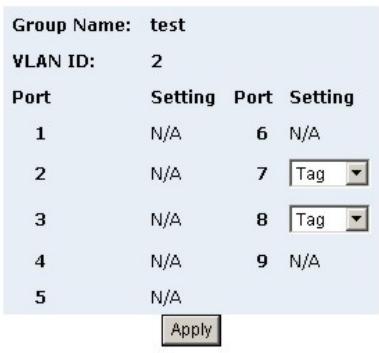
Figure 9-6 VLAN Setup: 802.1Q VLAN Port Tagging
Follow the instructions in the next table to set the fields in this screen.
Table 9-3 VLAN Setup: 802.1Q VLAN Port Tagging
| FIELD | DESCRIPTION |
| VLAN Name | This read-only field displays the name of the VLAN. |
| VLAN ID | This read-only field displays the identification number of the VLAN group. |
| Port No | This read-only field displays the port number on the switch. |
| Setting | Select Tag from the drop-down list box to add VLAN ID to the outgoing frames on this port. Otherwise select Untag. |
9.5.1 Configure Port Settings
Click Administration, VLAN Configuration and then Port VLAN ID to display the screen as shown next.
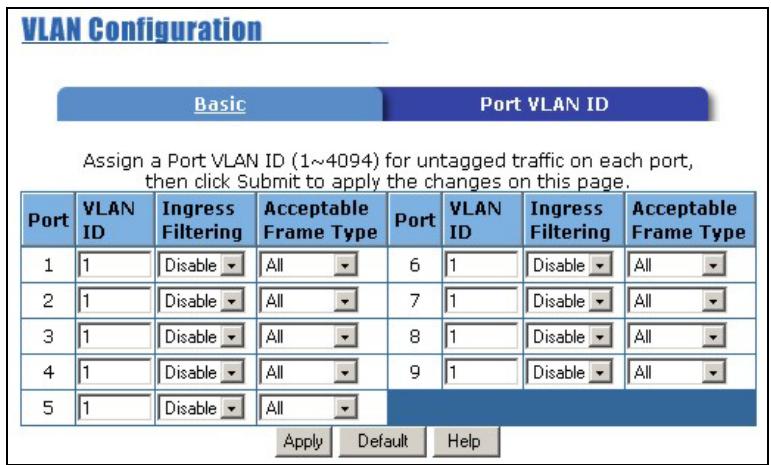
Figure 9-7 Tag-Based VLAN: Port VLAN ID
The following table describes the fields in this screen.
Table 9-4 Tag-Based VLAN: Port VLAN ID
| FIELD | DESCRIPTION |
| Port | This read-only field displays the port number on the switch. |
| VLAN ID | Enter the VLAN ID (between 2 and 4094) that will be assigned to untagged traffic on a given port. For example, if the default VLAN ID of port 5 is 100, all untagged packets on port 5 will belong to VLAN 100. |
| The default VLAN ID for all ports is 1. This feature is useful for accommodating devices that you want to participate in the VLAN but that don't support tagging. Only one untagged VLAN is allowed per port. | |
| Ingress Filtering | Select Enable from the drop-down list box to forward a frame whose VID is the same as the VID of the port. Select Disable to forward all frames, regardless of the port's VID. |
| Acceptable Frame Type | Select All from the drop-down list box to accept all untagged or tagged frames. Select Tag Only to drop all untagged frames. |
Chapter 10
Spanning Tree Protocol
This chapter describes the basics and configuration of STP.
10.1 Introduction
Spanning Tree Protocol) is a standardized method (IEEE 802.1D) that eliminates loops in a network by disabling some ports and allowing other ports to forward traffic based on the parameters you configured. STP ensures that there is only one path between a specific source and destination so packets will not travel in loops.
STP provides path redundancy while preventing undesirable loops in the network. STP detects and breaks network loops and provides backup links between switches, bridges or routers. It allows a device to interact with other STP-aware devices in your network to ensure that only one path exists between any two stations on the network.
The root bridge is the base of the spanning tree; it is the bridge with the lowest identifier value (MAC address). Path cost is the cost of transmitting a frame onto a LAN through that port. It is assigned according to the speed of the link to which a port is attached. The slower the media, the higher the cost. Refer to the following table for the recommended path cost (in the allowed range between 1 and 65535) for each link speed.
Table 10-1 Recommended Path Cost
| LINK SPEED | RECOMMENDED VALUE | RECOMMENDED RANGE |
| 4Mbps | 250 | 100 to 1000 |
| 10Mbps | 100 | 50 to 600 |
| 16Mbps | 62 | 40 to 400 |
| 100Mbps | 19 | 10 to 60 |
| 1Gbps | 4 | 3 to 10 |
| 10Gbps | 2 | 1 to 5 |
On each bridge, the root port is the port through which a bridge communicates with the root. It is the port on this switch with the lowest path cost to the root (the root path cost). If there is no root port, then this switch has been accepted as the root bridge of the spanning tree network.
10.2 Activating Spanning Tree Protocol
Use the Switch Configuration screen to activate STP on the switch.
Step 1. Click Administrator, Switch Configuration and then the Advanced tab.
Step 2. Select the Enable STP Protocol check box under Protocol Enable Settings:.
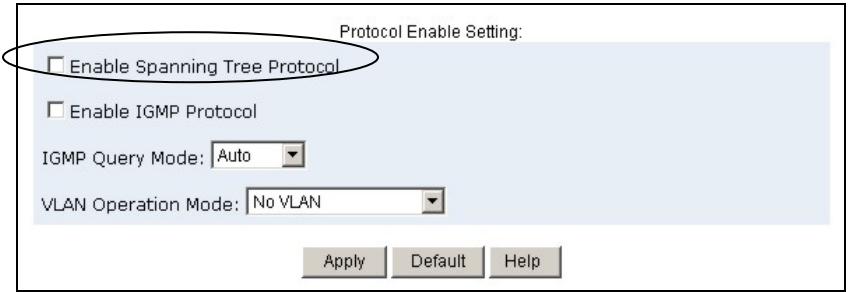
Figure 10-1 Activating STP
Step 3. Click Apply to save the changes.
10.3 Configuring Spanning Tree Parameters
To configure STP on the switch, click Administrator and then Spanning Tree.
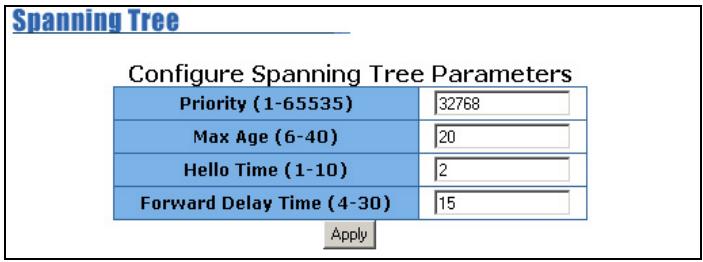
Figure 10-2 Configure Spanning Tree Parameters
The following table describes the related fields to configure on a global basis (for the entire switch).
Table 10-2 Configure STP Parameter
| FIELD | DESCRIPTION | EXAMPLE |
| Priority | To set the priority of this switch in a spanning tree, enter a number between 1 and 65535.A higher value indicates a lower priority; thus 0 means the highest priority. The default is 32768. | 32768 |
Table 10-2 Configure STP Parameter
| FIELD | DESCRIPTION | EXAMPLE |
| MAX Age | A time interval (in seconds) a root bridge waits without receiving a STP configuration message before initiating a topology change. Specify a number between 6 and 40. | 20 |
| Hello Time | The number of seconds the switch waits between STP configuration message transmissions. Specify a number between 1 and 10. | 2 |
| Forward-Delay Time | The number of seconds the switch waits before changing from its STP learning/listening state to forwarding state. Specify a number between 4 and 30. | 15 |
10.4 Viewing Root Bridge Information
View the STP root bridge information in the Spanning Tree screen. These fields display the spanning tree parameter settings for the switch currently acting as the root.
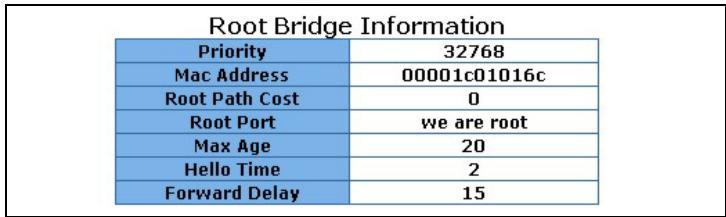
Figure 10-3 View STP Root Bridge Information
Refer to the following table for the field descriptions.
Table 10-3 View STP Root Bridge Information
| FIELD | DESCRIPTION |
| Priority | This field displays the priority (between 1 and 65535) of the root bridge in a spanning tree. A higher value indicates a lower priority; thus 0 means the highest priority. |
| MAC Address | This field displays the MAC address of the root bridge. |
Table 10-3 View STP Root Bridge Information
| FIELD | DESCRIPTION |
| Root Path Cost | This field displays the path cost from this switch to the root bridge. The bigger the number, the higher the path cost. This field is 0 to indicate that this switch is the root bridge in a spanning tree. |
| Root Port | This field displays the port number through which your switch communicates with the root |
| MAX Age | A time interval (in seconds) a root bridge waits without receiving a STP configuration message before initiating a topology change. |
| Hello Time | The number of seconds root bridge waits between STP configuration message transmissions. |
| Forward-Delay Time | The number of seconds the root bridge waits before changing from its STP learning/listening state to forwarding state. |
10.5 Configuring Spanning Tree Port Parameters
Configure the port parameters in the Set Spanning Tree screen.
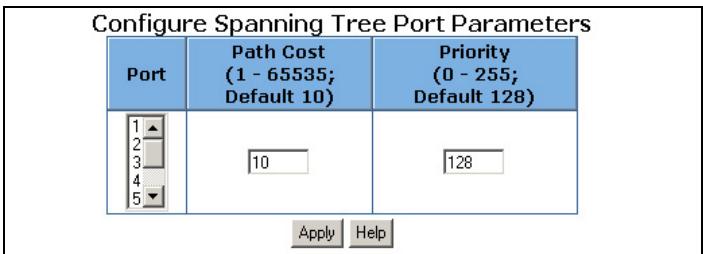
Figure 10-4 Configuring STP Port Parameters
Follow the steps below to configure the port parameters.
Step 1. Select a port number from the Port scroll down list menu.
Step 2. Enter a number between 1 and 65535 in the Path Cost field. The smaller the number the lower the path cost is for the port. Refer to Table 10-1 for recommended path cost.
Step 3. Enter a number between 0 and 255 in the Priority field. The smaller the number, the higher the priority.
Step 4. Click Apply to save the changes.
10.6 Viewing STP Port Status
View the STP port status information at the bottom of the Spanning Tree screen.
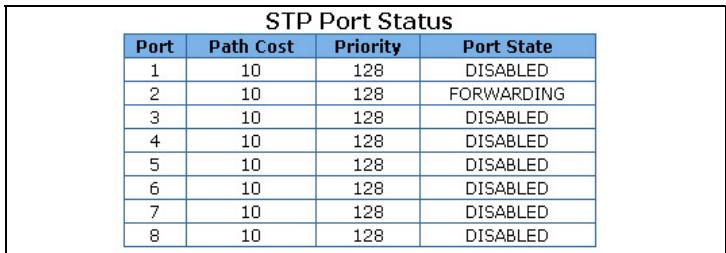
Figure 10-5 STP Port Status
The following table describes the read-only port status fields in this screen.
Table 10-4 STP Port Status
| FIELD | DESCRIPTION |
| Port | This field displays the port number on the switch. |
| Path Cost | This field displays the cost of using this port to reach the root bridge. The bigger the number, the higher the path cost. |
| Priority | This field displays the priority level of the port. The higher the number the lower the priority level. |
| Port State | This field displays the state of the port. The state can be FORWARDING, DISABLED, BLOCKING, LEARNING and LISTENING. |
Chapter 11
Port Mirroring
This introduces the port mirroring or port sniffer feature of the switch.
11.1 Introduction
You can monitor traffic on the ports by duplicating or mirroring the traffic to a port. You can monitor input traffic, output traffic or both. A port that mirrors the traffic of other ports is the analysis port or the sniffer port. A port whose traffic is analyzed is the monitor port or the source port.
You can configure up to nine monitor ports but only one mirror port.
11.2 Configuring Port Mirroring
Click Administrator and then Port Mirroring to display the screen shown next.
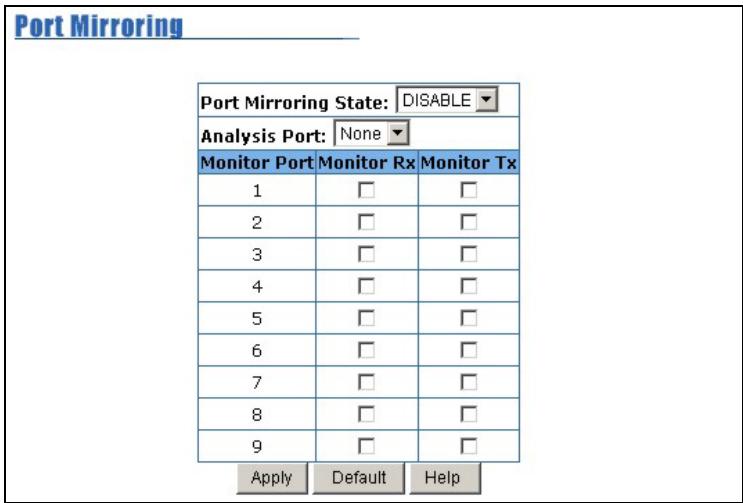
Figure 11-1 Port Mirroring
Follow the instructions in the table next to configure this screen.
Table 11-1 Port Mirroring
| FIELD | DESCRIPTION |
| Port Mirroring State | Select ENABLE from the drop-down list box to activate port mirroring feature. Select DISABLE to deactivate port mirroring. This is the default setting. |
| Analysis Port | You must select a port from the drop-down list box to act as the sniffer port when you select ENABLE in the Port Mirroring State field. This field is NONE if the Port Mirroring State field is DISABLE. |
| Monitor Ports | This read-only field displays the port number of the switch. |
| Monitor Rx | Select this check box to monitor incoming traffic of the port. |
| Monitor Tx | Select this check box to monitor outgoing traffic of the port. |
Chapter 12 SNMP
This chapter explains SNMP in the web configurator.
12.1 About SNMP
Simple Network Management Protocol (SNMP) is a protocol used for exchanging management information between network devices. SNMP is a member of the TCP/IP protocol suite. Your switch supports SNMP version one (SNMPv1). The next figure illustrates an SNMP management operation.
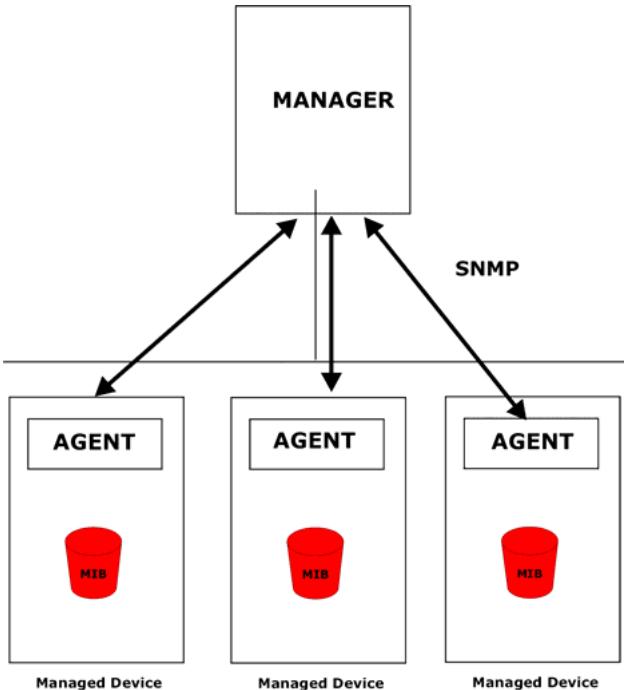
Figure 12-1 SNMP Management Model
An SNMP managed network consists of two main components: agents and a manager. An agent is a management software module that resides in a managed device. An agent translates the local management information from the managed device into a form compatible with SNMP. The manager is the console through which network
administrators perform network management functions. It executes applications that control and monitor managed devices.
The managed devices contain object variables/managed objects that define each piece of information to be collected about a device. Examples of variables include such as number of packets received, node port status etc. A Management Information Base (MIB) is a collection of managed objects. SNMP allows a manager and agents to communicate for the purpose of accessing these objects.
SNMP itself is a simple request/response protocol based on the manager/agent model. The manager issues a request and the agent returns responses using the following protocol operations:
- Get - Allows the manager to retrieve an object variable from the agent.
- GetNext - Allows the manager to retrieve the next object variable from a table or list within an agent. In SNMPv1, when a manager wants to retrieve all elements of a table from an agent, it initiates a Get operation, followed by a series of GetNext operations.
- Set - Allows the manager to set values for object variables within an agent.
- Trap - Used by the agent to inform the manager of some events.
12.1.1 Trap Manager
A trap manager is a management station that receives traps (the system alerts generated). If no trap manager is defined, then no traps are generated.
12.2 Configuring SNMP
Click Administrator and then SNMP Management to display the screen shown next.
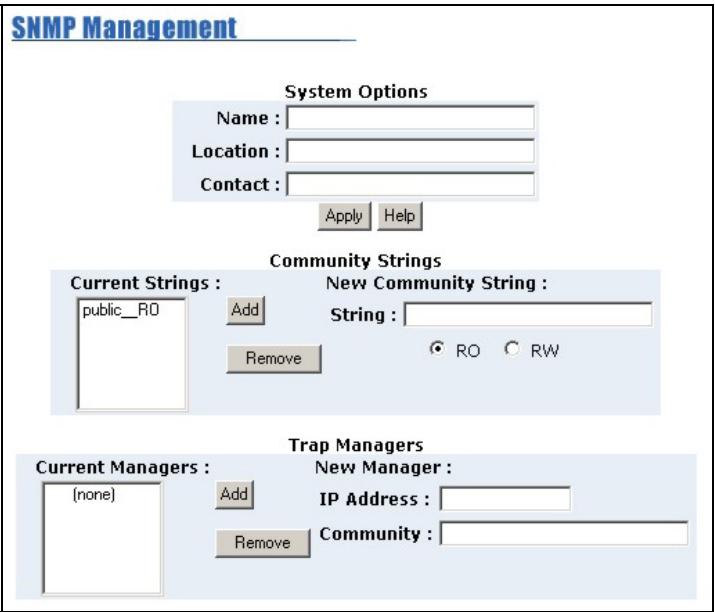
Figure 12-2 SNMP Management
The following table describes the fields in this screen.
Table 12-1 SNMP Management
| FIELD | DESCRIPTION |
| System OptionsYou must fill in all three fields. | |
| Name | Enter a descriptive name for the switch for identification purposes. |
| Location | Enter the location of the switch. |
| Contact | Enter the name of the contact person for the switch. |
| Community Strings | |
| CurrentStrings | This list box displays the current configured community strings of the switch.To remove a string, select the string in the list and click Remove. |
| NewCommunityStrings | Fill in the field below to add a new community string (or password) and click Add. |
| String | Enter a new community string or password. |
Table 12-1 SNMP Management
| FIELD | DESCRIPTION |
| RO | Select RO to enable the request accompanied by this string to display MIB information. |
| RW | Select RW to enable the request accompanied by this string to display MIB information and set MIB objects on the switch. |
| Trap Managers | |
| Current Manager | This field displays the current configured management station (the trap manager) on the switch. To remove a trap manager, select the trap manager in the list and click Remove. |
| New Manager | Fill in the fields below to add a new trap manager and click Add. |
| IP Address | Enter the IP address of the management station. |
| Community | Enter the community string (or the password) of the management station. |
Part IV:
Using the SMT and System Maintenance
Part IV introduces configuration using the SMT screens and firmware/ configuration maintenance.
Chapter 13
Introducing the SMT
This chapter introduces the basics of managing the switch.
13.1 Introduction
The System Management Terminal (SMT) is a menu - driven interface that you use to configure the switch. You may access the SMT using either Telnet or the console port.
If there is no activity for longer than 5 minutes after you log in, your switch will automatically log you out.
13.2 Accessing the SMT Using Telnet
Follow the steps below to access the SMT screens using a Telnet program.
Step 1. Launch a Telnet program. In Windows, click Start and then Run.
Step 2. Type "telnet" followed by a space and the IP address of the switch, (192.168.1.1 is the default) and then click OK to display the password screen. Refer to Figure 13-3.
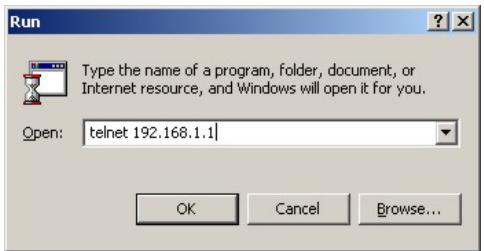
Figure 13-1 Starting a Telnet Session
13.3 Accessing the SMT Using the Console Port
The console configuration is for local management and initial configuration of the switch. Use an RS-232 console cable with a female DB-9 connector to connect a terminal or computer to the console port.
13.3.1 Establishing a Console Port Connection
After the switch is directly connected to a computer, turn on the computer and run a terminal emulation program (for example, Hyper Terminal in Windows) and configure its communication parameters as follows:
9600 bits per second.
Parity none, 8 data bits, 1 stop bit, flow-control none.
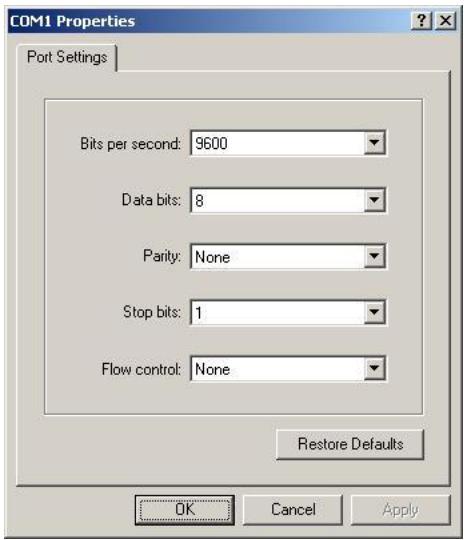
Figure 13-3 SMT: Login Screen
Figure 13-2 HyperTerminal Communication Parameter Settings Example
13.4 Initial SMT Screen
Press [ENTER] to display the login screen. For your first login, enter the default user name "admin" and default password "1234" and then press [ENTER].
The user name and password are case sensitive.
Dimension Switch ES-2008 User Name: Password:
13.5 The SMT Overview
The following figure gives you an overview of the various SMT menu screens of your switch.
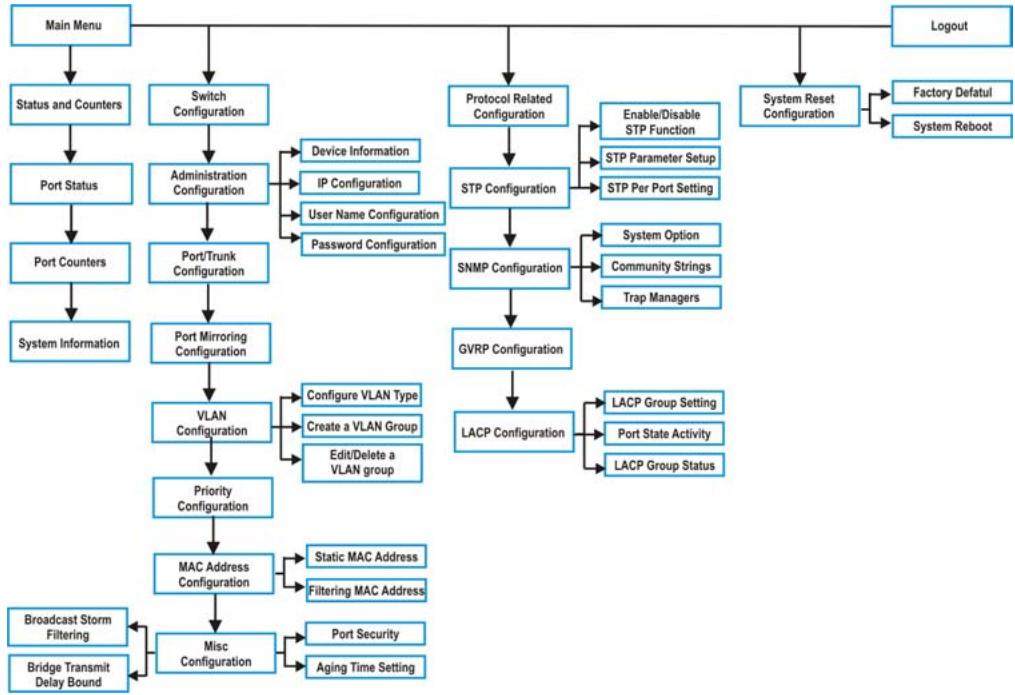
Figure 13-4 SMT Overview
13.6 Navigating the SMT Interface
Familiarize yourself with the SMT operations before you attempt to modify the configuration.
13.6.1 SMT Screen Navigation
The following figure shows the breakdown of most SMT screens.
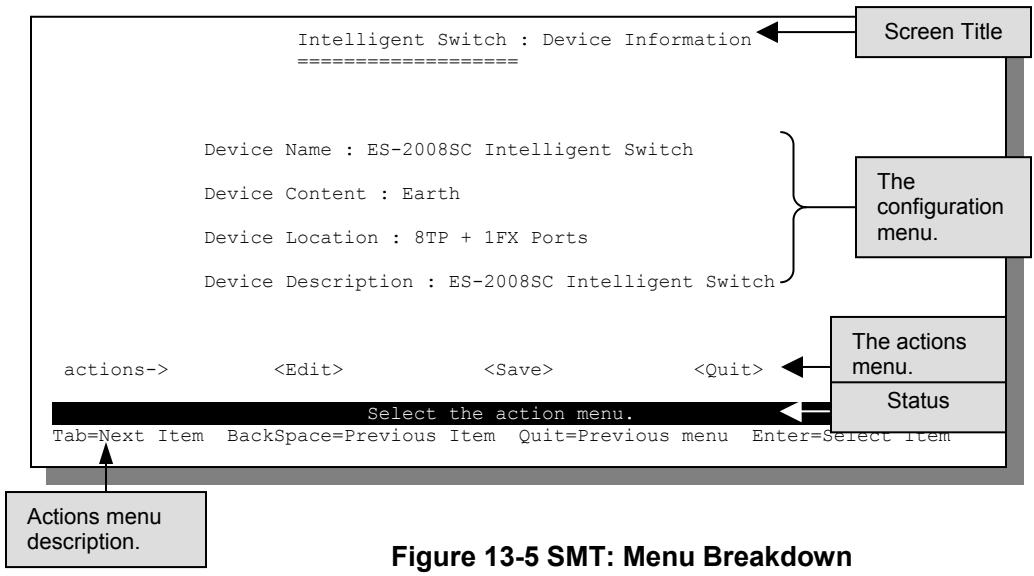
Figure 13-5 SMT: Menu Breakdown
13.6.2 The Control Keys
The following table describes common control keys that you use in the SMT screens.
Table 13-1 Control Key Descriptions
| KEY | DESCRIPTION |
| [TAB] | To move down through fields in the configuration menu. To move through fields in the actions menu. |
| [BACK SPACE] | To move up through fields in the configuration menu. To move back through fields in the actions menu. |
| [ENTER] | To select an item in the menu. |
| [SPACE BAR] | To cycle through the available choices in a field. |
| [ESC] | Press [ESC] to go back to the previous screen. Press [ESC] to move from the configuration menu to the actions menu. |
Do NOT use the arrow keys to move between SMT menus. Changes will be lost once you move to another menu using the arrow keys.
13.7 SMT Main Menu
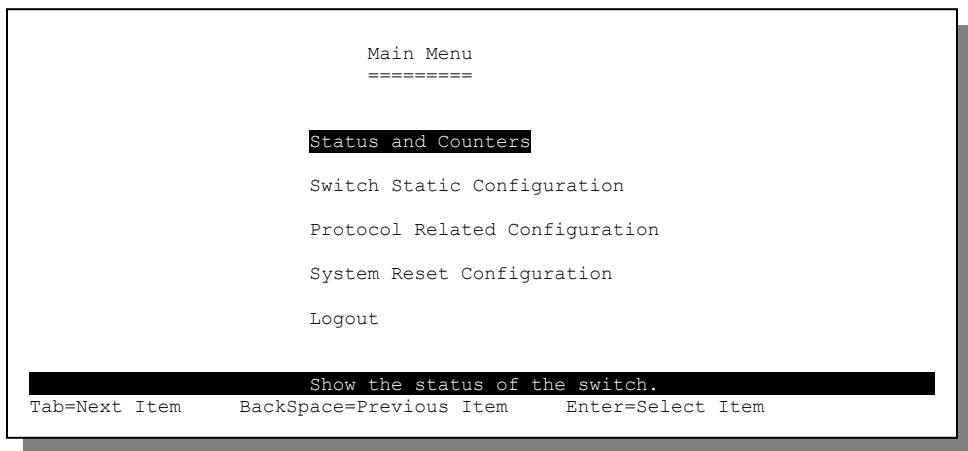
Figure 13-6 SMT: Main Menu
13.7.1 SMT Main Menu Summary
Table 13-2 SMT Menu Summary
| MENU TITLE | FUNCTION |
| Status and Counters | Displays system or port statistics and information. |
| Switch Static Configuration | Use this menu to perform switch configuration such as port and VLAN settings and change login information. |
| Protocol Related Configuration | Use this menu to configure STP, SNMP, GVRP and LACP settings. |
| System Reset Configuration | Select this option to reset the switch. |
| Logout | Select this option to log out of the SMT menus. |
Chapter 14
Basic System Setup
This chapter shows you how to set up the switch for administrative purposes.
14.1 Introduction
Use the menus in the Switch Configurations screen to configure the switch.
In the main menu, press [TAB] to select Switch Configuration and press [ENTER] to display the Switch Configuration menu as shown next.
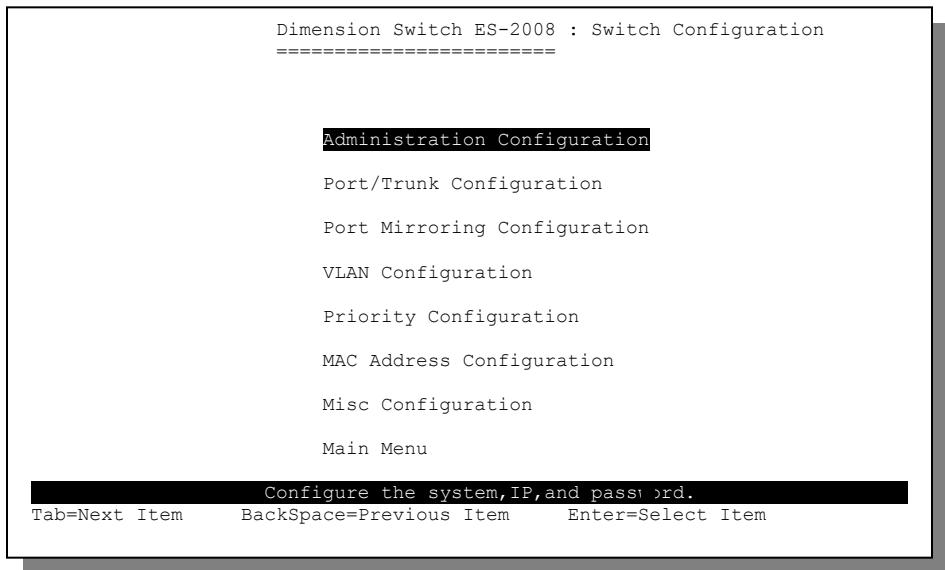
Figure 14-1 SMT: Switch Configuration
The following table describes each submenu in this screen.
Table 14-1 Switch Configuration Menu Choice
| SUBMENU | DESCRIPTION |
| Administration Configuration | Use this menu to set the system name, IP address and password |
| Port/Trunk Configuration | Use this menu to configure and display port settings and set up trunk groups. |
Table 14-1 Switch Configuration Menu Choice
| SUBMENU | DESCRIPTION |
| Port Mirror Configuration | Use this menu to configure port mirroring. |
| VLAN Configuration | Use this menu to display or set VLAN settings. |
| Priority Configuration | Use this menu to set the priority of each port on the switch. |
| MAC Address Configuration | Use this menu to add static MAC addresses to the MAC address table in the switch. |
| Misc Configuration | Use this menu to set other switch related parameters. |
14.2 Administration Configuration
The menus in Administration Configuration allow you to change administrative settings of the switch.
In the main menu, select Switch Configuration and then Administration Configuration to display the screen as shown in the figure below.

Figure 14-2 SMT: Device Configuration
14.2.1 General Setup
The Device Information menu contains system-related information.
In the Administration Configuration screen, select Device Information and press [ENTER] to display the screen shown next.
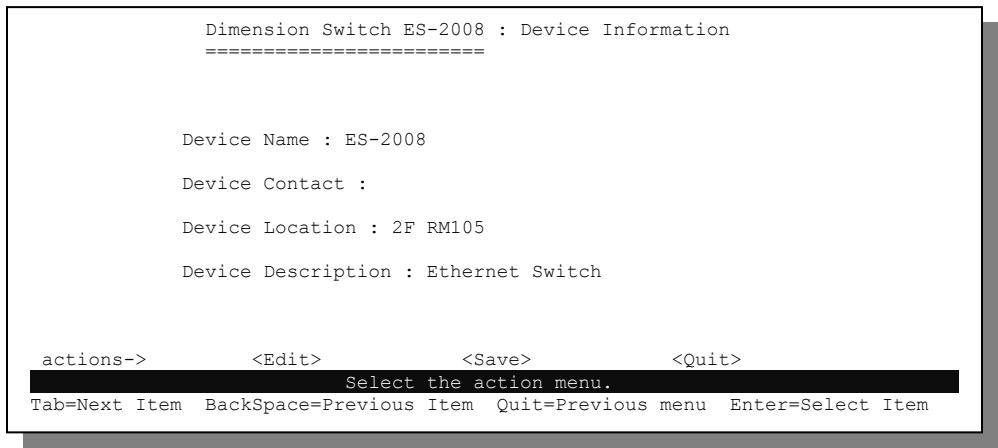
Figure 14-3 SMT: Device Information
To move to the configuration menu, press [TAB] to select
Table 14-2 SMT: Device Information
| FIELD | DESCRIPTION | EXAMPLE |
| Device Name | Enter a descriptive name for identification purposes. | ES-2008 |
| Device Contact | Enter the name of the person in charge of this device. | |
| Device Location | Enter the location of the switch for administrative purposes. | 2F RM105 |
| Device Description | Enter a short description of the switch for administrative purposes. | Ethernet Switch |
| Press [ESC] to move the cursor back to the actions menu. Press [TAB] to select <Save> and press [ENTER] to save the settings back to the switch. | ||
14.2.2 Ethernet IP Configuration
Use the IP Configuration screen to change the TCP/IP settings of the switch.
Step 1. In the Administration Configuration screen, press [TAB] to select IP Configuration and press [ENTER].
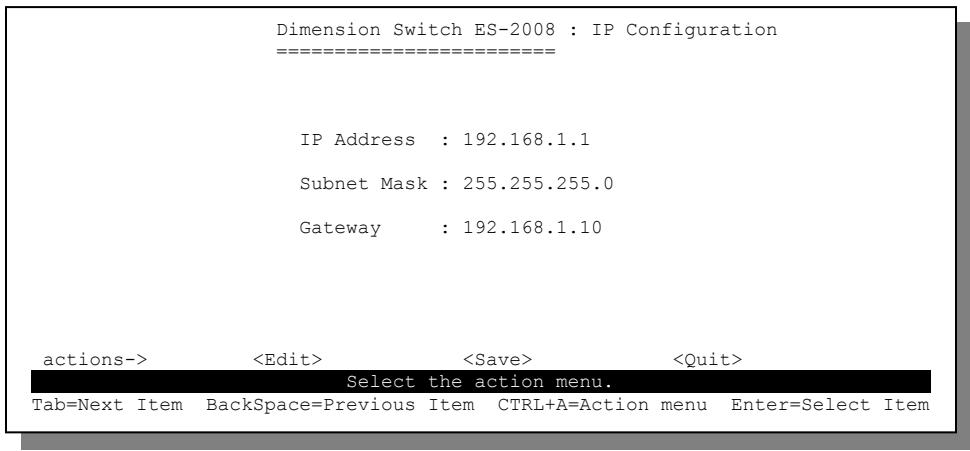
Figure 14-4 SMT: IP Configuration
To move to the configuration menu, press [TAB] to select
Table 14-3 SMT: IP Configuration
| FIELD | DESCRIPTION | EXAMPLE |
| IP address | Enter the (LAN) IP address for the switch in dotted decimal notation. | 192.168.1.1 |
| Subnet mask | Enter the subnet mask in dotted decimal notation. Refer to the Subnetting appendix to calculate a subnet mask if you are implementing subnetting. | 255.255.255.0 |
| Gateway | Enter the LAN gateway IP address in dotted decimal notation. | 192.168.1.10 |
| Press [ESC] to move the cursor back to the actions menu. Press [TAB] to select <Save> and press [ENTER] to save the settings back to the switch. | ||
14.2.3 Changing the System User Name
Follow the steps to change the default system user name.
Step 1. In the Administration Configuration screen, press [TAB] to select User Name Configuration and press [ENTER].
Step 2. To move to the configuration menu, press [TAB] to select
Step 3. Type in your new system user name in the User Name field.
Step 4. Press [ESC] to move the cursor back to the actions menu. Press [TAB] to select
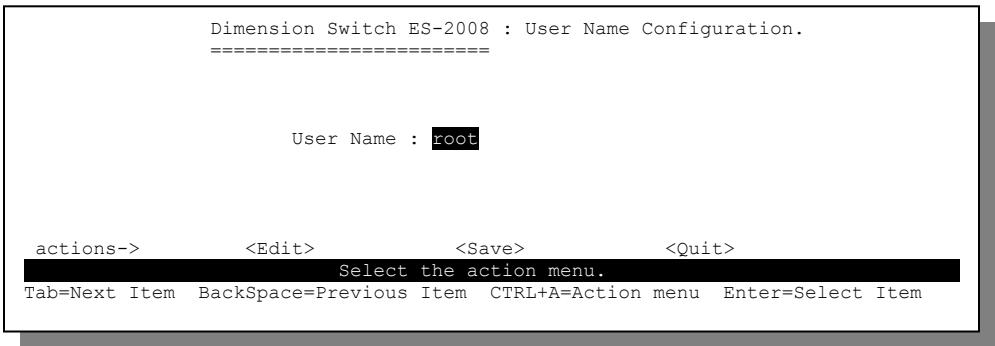
Figure 14-5 SMT:Username Configuration
14.2.4 Changing the System Password
Follow the steps to change the default system password of the switch.
Step 1. In the Administration Configuration screen, press [TAB] to select Password Configuration and press [ENTER].
Step 2. Type in your existing system password in the Old Password field and press [ENTER].
Step 3. Type in your new system password in the new Password field and press [ENTER].
Step 4. Re-type your new system password in the enter again field and press [ENTER].
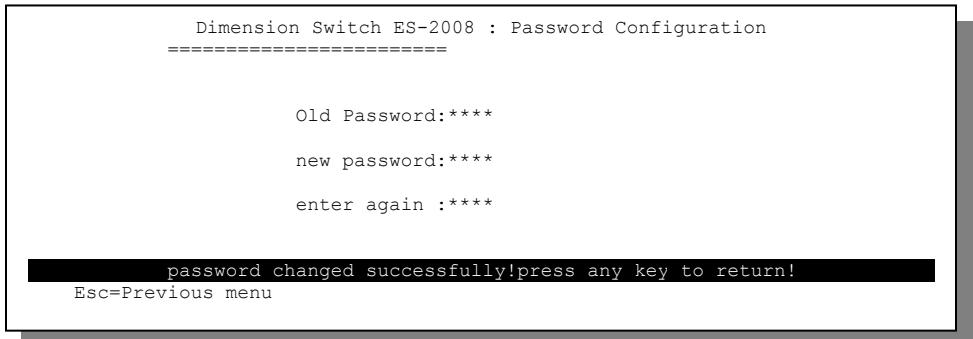
Figure 14-6 SMT: Password Configuration
Chapter 15
Switch Configuration
This chapter introduces various switch configurations.
15.1 Port and Trunk Group Settings
Refer to the Port Trunking chapter for background information on trunking.
Follow the steps below to configure port parameters and set up trunk groups.
Step 1. In the Switch Configuration screen, select Port/Trunk Configuration and press [ENTER] to display the screen as shown next.
Step 2. Select
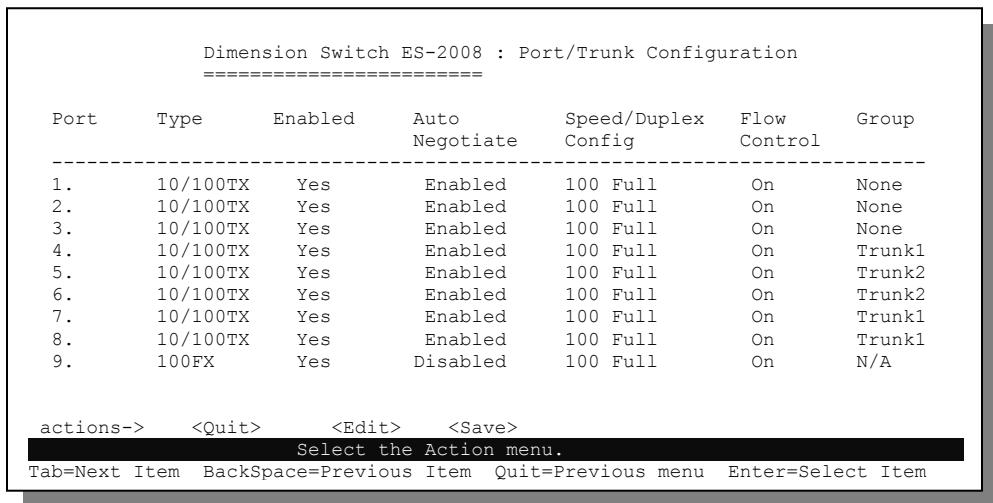
Figure 15-1 SMT: Port/Trunk Configuration
Follow the instructions in the next table to set the fields in this screen.
Table 15-1 SMT: Port/Trunk Configuration
| FIELD | DESCRIPTION |
| Port | This read-only field displays the port number (from 1 to 9 including the fiber/gigabit port) on the switch. |
Table 15-1 SMT: Port/Trunk Configuration
| FIELD | DESCRIPTION |
| Type | This read-only field displays the type of the port: 10/100TX for Ethernet ports or 100FX for the fiber port. |
| Enabled | Press [SPACE BAR] and [ENTER] to select Yes to activate the port. |
| Auto Negotiation | Press [SPACE BAR] and [ENTER] to select Enabled to activate the auto negotiation feature on the port. |
| Speed/Duplex Config | Press [SPACE BAR] and [ENTER] to select one 10 Half, 10 Full, 100 Half or 100 Full to set the speed and duplex mode of the port. |
| Flow Control | Press [SPACE BAR] and [ENTER] to select On to activate the flow control feature on the port. |
| Group | Press [SPACE BAR] and [ENTER] to select a trunk group this port belongs to. Trunk group choices are Trunk1, Trunk2, Trunk3 and Trunk4. |
| Press [ESC] to move the cursor back to the actions menu. Press [TAB] to select <Save> and press [ENTER] to save the settings back to the switch. | |
The Type field for port 9 varies depending on your switch model.
15.2 Port Mirroring
The port mirroring feature allows you to monitor port traffic on the switch. Refer to the Port Mirroring chapter for more information.
Select Port Mirroring Configuration and press [ENTER] to display the screen as shown next.

Figure 15-2 SMT: Port Monitoring Configuration
The Type field for port 9 varies depending on your switch model.
Follow the instructions in the table next to configure the fields in this screen.
Table 15-2 SMT: Port Monitoring Configuration
| FIELD | DESCRIPTION |
| Port Mirror State | Press [SPACE BAR] and [ENTER] to select YES to activate the port mirroring feature and set the related fields below. |
| Analysis Port | Press [SPACE BAR] and [ENTER] to select a port number as the mirror port. |
| Port | This read-only field displays the trunk group number or port numbers for ports not in a trunk group. Note: This field is 0 to indicate that a port is in a trunk group. |
| Type | This read-only field displays either 10/100 TX for Ethernet ports or 100FX for the fiber port on the switch. |
Table 15-2 SMT: Port Monitoring Configuration
| FIELD | DESCRIPTION |
| Action | Press [SPACE BAR] and [ENTER] to select direction of data traffic on the port to monitor. Select RX to monitor only the incoming traffic on the port. Select TX to monitor only the outgoing traffic on the port. Select Both to monitor both the incoming and outgoing traffic on the port. If this field is None, no traffic on the port is monitored. |
| Press [ESC] to move the cursor back to the actions menu. Press [TAB] to select <Save> and press [ENTER] to save the settings back to the switch. | |
15.3 VLAN
Use the VLAN Configuration screen to configure VLANs.
In the main menu, press [TAB] to select Switch Configuration, VLAN Configuration and press [ENTER] to display the screen as shown in the figure below.
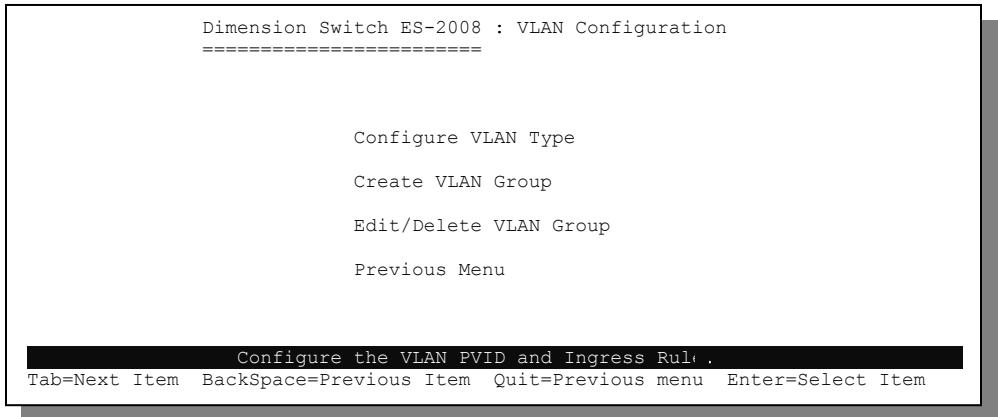
Figure 15-3 SMT: VLAN Configuration
Refer to the VLAN chapter for more information.
15.3.1 Setting VLAN Mode
In the VLAN Configuration screen, select Configure VLAN Type and press [ENTER] to display the screen as shown next.
Select Disabled, 802.1Q, 802.1QwithGVRP or Port-Based in the VLAN Mode field.
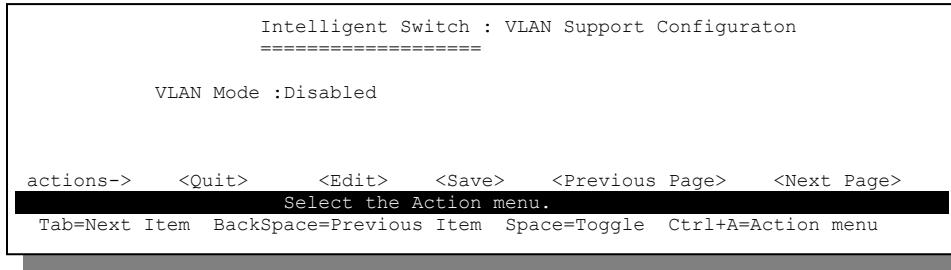
Figure 15-4 SMT: VLAN Support Configuration: Setting VLAN Mode
The following sections describe how to configure various VLAN modes.
15.3.2 Tag-Based VLAN Configuration
Step 1. In the Configure VLAN Type screen select either 802.1Q or 802.1Q with GVRP in the VLAN Mode field.
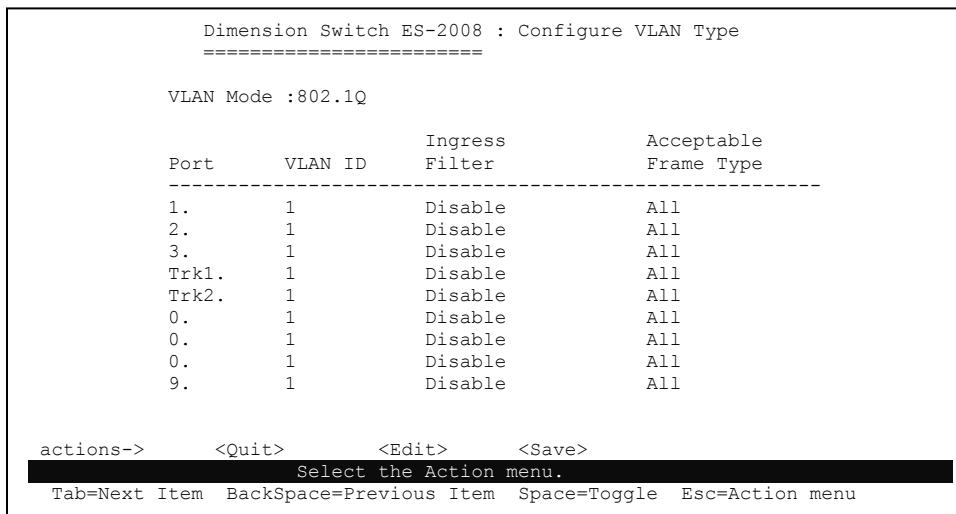
Figure 15-5 SMT: VLAN Support Configuration: 802.1Q
The following table describes the fields in this screen.
Table 15-3 SMT: VLAN Support Configuration: 802.1Q
| FIELD | DESCRIPTION |
| VLAN Mode | Press [SPACE BAR] and [ENTER] to select either 802.1Q or 802.1QwithGVRP. The following fields display on the screen. |
Table 15-3 SMT: VLAN Support Configuration: 802.1Q
| FIELD | DESCRIPTION |
| Port | This read-only field displays the port number or the trunk group on the switch. Note: This field is 0 to indicate that a port is in a trunk group. |
| VLAN ID | Enter the VLAN ID number that will be assigned to untagged traffic on a given port. For example, if the default VLAN ID of port 10 is 100, all untagged packets on port 10 will belong to VLAN 100. The default setting for all ports is 1. This feature is useful to accommodate devices that you want to participate in the VLAN but that don't support tagging. Only one untagged VLAN is allowed per port. |
| Ingress Filtering | Select Enable from the drop-down list box to forward frames belonging to a specific VLAN if the port belongs to that VLAN. Select Disable to forward all frames, regardless of the port's VLAN setting. |
| Acceptable Frame Type | Select All from the drop-down list box to accept all untagged frames. Select Tag Only to drop all untagged frames. |
| Press [ESC] to move the cursor back to the actions menu. Press [TAB] to select <Save> and press [ENTER] to save the settings back to the switch. | |
Step 2. After saving the settings, press any key to display the screen shown next.
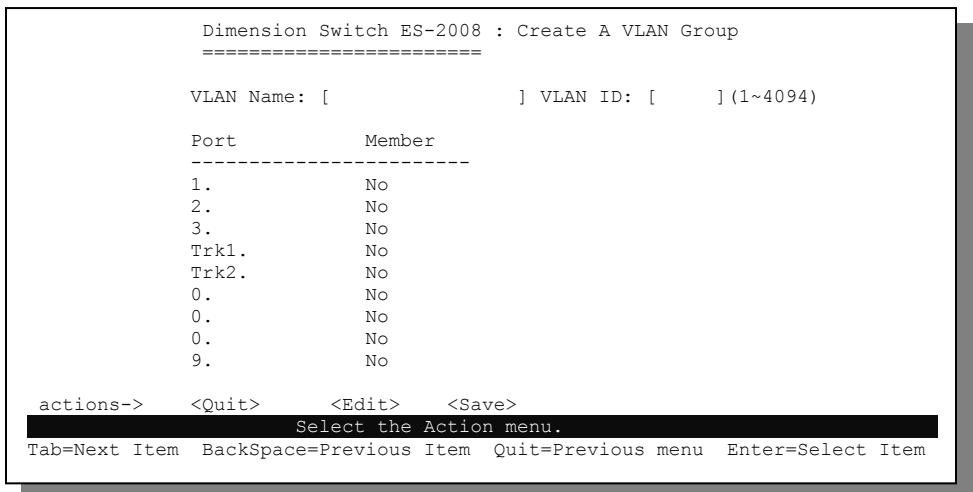
Figure 15-6 SMT: Add a VLAN Group
Follow the instructions in the table below to configure this screen.
Table 15-4 SMT: Add a VLAN Group
| FIELD | DESCRIPTION |
| VLAN Name | Enter a descriptive name for the VLAN group for identification purposes. |
| VLAN ID | Enter a number between 1 and 4049 as the identification number for the VLAN group. |
| Port | This read-only field displays the trunk group number or port numbers for ports not belonging to a trunk group. Note: This field is 0 to indicate that a port is in a trunk group. |
| Member | Ports are assigned membership in a VLAN by associating a VLAN ID with the ports Press [SPACE BAR] to select Tagged, UnTagged or No. Select Tagged to tag all outgoing frames on this port. Select Untagged not to tag all outgoing frames on this port. Select No to prevent a port from joining a VLAN group |
| Press [ESC] to move the cursor back to the actions menu. Press [TAB] to select <Save> and press [ENTER] to save the settings back to the switch. | |
15.3.3 Port-Based VLAN Configuration
Step 1. In the Configure VLAN Type screen and select Port-Based in the VLAN Mode field.
Step 2. Press any key to display the screen as shown in Figure 15-6. Follow the instruction in Table 15-3 to set the fields in the Create a VLAN Group screen.
15.3.4 Creating a New VLAN Group
You can add a new port-based or tag-based VLAN group.
Follow the steps below to create a new tag-based VLAN group.
Step 1. In the Configure VLAN Type screen, select Create a VLAN Group and press [ENTER] to display the Create a VLAN Group screen as shown in Figure 15-6.
Step 2. Select Add a VLAN Group. Refer to Table 15-3 to set the fields.
15.3.5 Changing VLAN Group Settings
Follow the steps below to change VLAN group settings or delete a VLAN group.
Step 1. In the VLAN Configuration main menu, select Edit/Delete VLAN Group and press [ENTER] to display the screen as shown next.
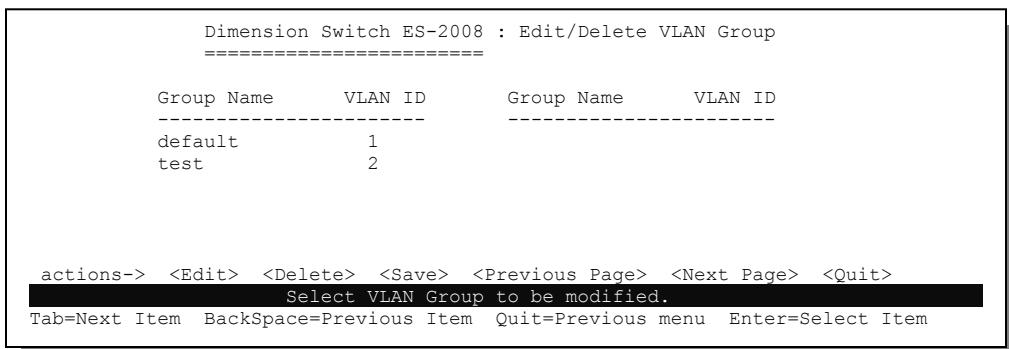
Figure 15-7 SMT: Edit/Delete a VLAN Group
Step 2. Press [TAB] to select
Step 3. Follow the steps in Section 15.3.2 (for tag-based VLAN) or Section 15.3.3 (for port-based VLAN) to make changes.
15.3.6 Deleting a VLAN Group
Use the Edit/Delete a VLAN Group screen to delete an existing VLAN.
Follow the steps below to delete a VLAN group.
Step 1. In the VLAN Configuration main menu, select Edit/Delete a VLAN Group and press [ENTER] to display the screen as shown in Figure 15-7.
Step 2. Press [TAB] to select
Step 3. Select an entry and press [ENTER] to delete the VLAN group.
Step 4. Press [ESC] and select
15.4 Priority Configuration
Priority is a value between 0 and 7 assigned to each frame with 7 being the highest priority. Frames assigned a higher priority are transmitted before frames with a lower priority. Each priority number is mapped either the Low or High traffic class (or queue), and frames are transmitted based on what queue they are in. Frames in the High queue are transmitted out a port first.
In the Switch Configuration screen select Priority Configuration and press [ENTER] to display the screen as shown next.
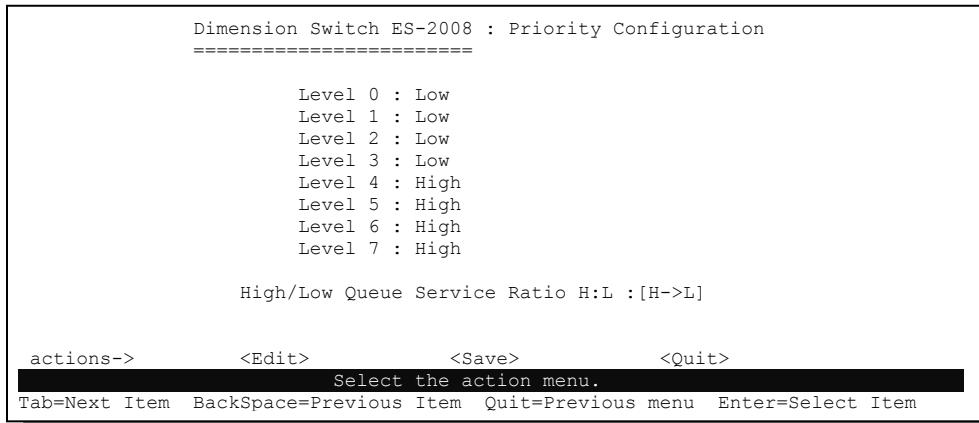
Figure 15-8 SMT: Priority Configuration
The following table describes the fields in this screen.
Table 15-5 SMT: Priority Configuration
| FIELD | DESCRIPTION |
| Level 0..7 | Press [SPACE BAR] and [ENTER] to select High to set high priority for level. |
| High/Low Queue Service Ratio H:L | Press [SPACE BAR] and [ENTER] to select the type of queue service. Refer to the Advanced Switch Configuration chapter for descriptions of each option. |
| Press [ESC] to move the cursor back to the actions menu. Press [TAB] to select <Save> and press [ENTER] to save the settings back to the switch. | |
15.5 MAC Address Configuration
Use the menus in the MAC Address Configuration screen to set static MAC addresses and configure MAC address filter.
In the Switch Configuration screen, select MAC Address Configuration to display the screen as shown.
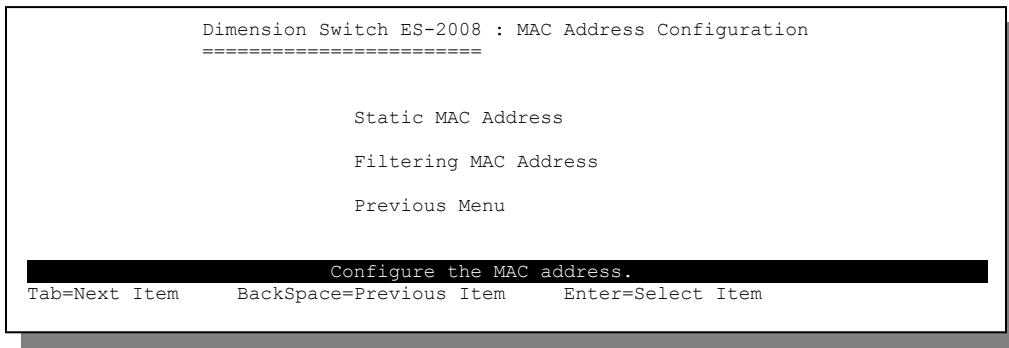
Figure 15-9 SMT: MAC Address Configuration
15.5.1 Static MAC Address
Follow the steps below to add a static MAC address.
Step 1. In the MAC Address Configuration screen select Static MAC Address and press [ENTER] to display the MAC address table.
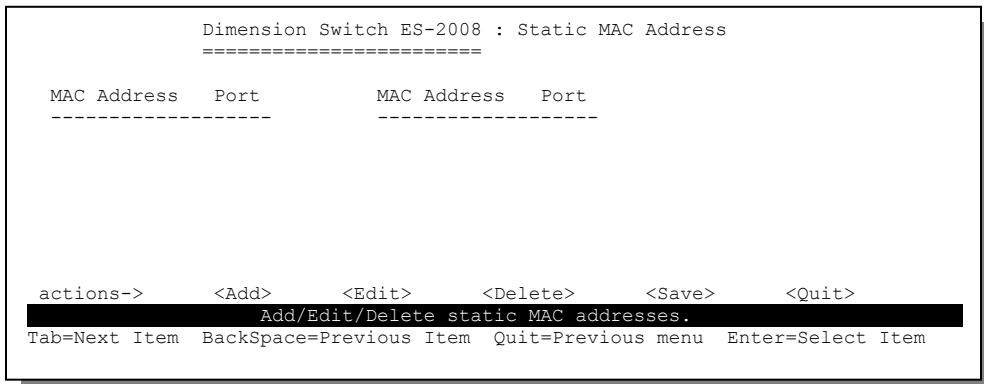
Figure 15-10 SMT: Static MAC Address
Step 2. Press [TAB] to select
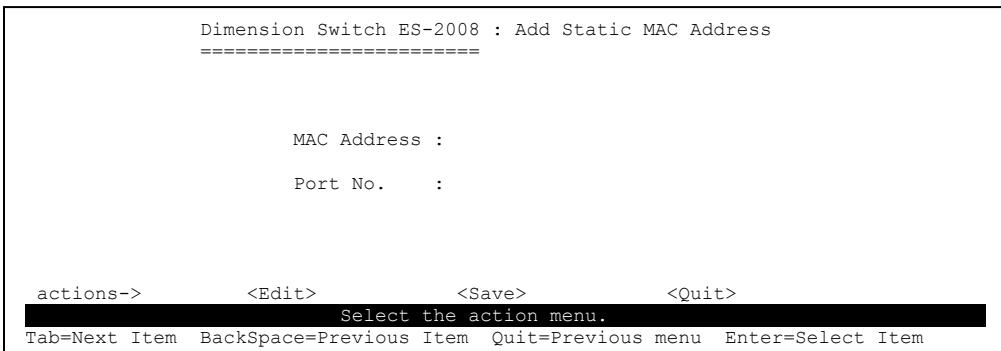
Figure 15-11 SMT: Add Static MAC Address
Step 3. Select
Step 4. Enter a MAC address in the MAC Address field.
Step 5. Press [TAB] and enter a port number in the Port Num field.
Step 6. Save the settings.
Editing a Static MAC Address
To change a static MAC address entry in the table, press [TAB] to select
Deleting a Static MAC Address
To remove a static MAC address entry from the table, press [TAB] to select
15.5.2 MAC Address Filtering
Follow the steps below to set up MAC address filtering.
Step 1. In the MAC Address Configuration screen, select Filtering MAC Address and press [ENTER] to display the screen as shown.
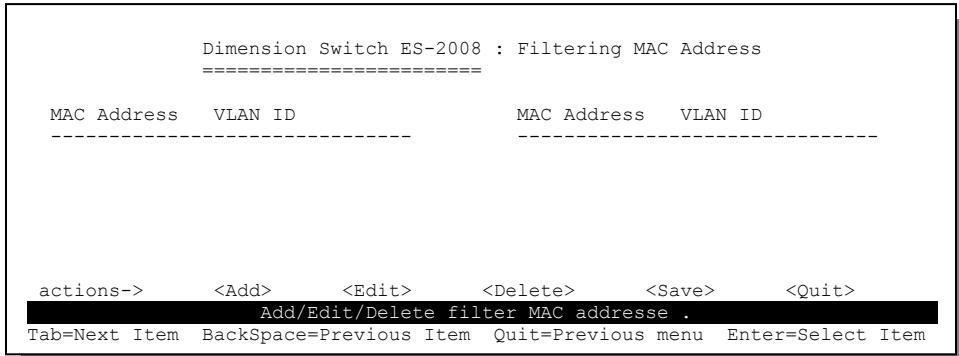
Figure 15-12 SMT: MAC Address Filtering
Step 2. Press [TAB] to select

Figure 15-13 SMT: Edit MAC Address Filtering
Follow the instruction in the table next to set the fields in this screen.
Table 15-6 Edit MAC Address Filtering SMT Field Descriptions
| FIELD | DESCRIPTION |
| MAC Address | Enter the MAC address of the Ethernet device you wish to block in hexadecimal notation. |
| VLAN ID | If VLAN is enabled, enter the number of the VLAN group to which this port belongs in the VLAN ID field. |
| Press [ESC] to move the cursor back to the actions menu. Press [TAB] to select <Save> and press [ENTER] to save the settings back to the switch. | |
Editing MAC Address Filter
To change a MAC address filter entry in the table, press [TAB] to select
Deleting MAC Address Filter
To remove a MAC address filter entry from the table, press [TAB] to select
15.6 Miscellaneous Configuration
This section shows you configuration menus in Misc Configuration menu.
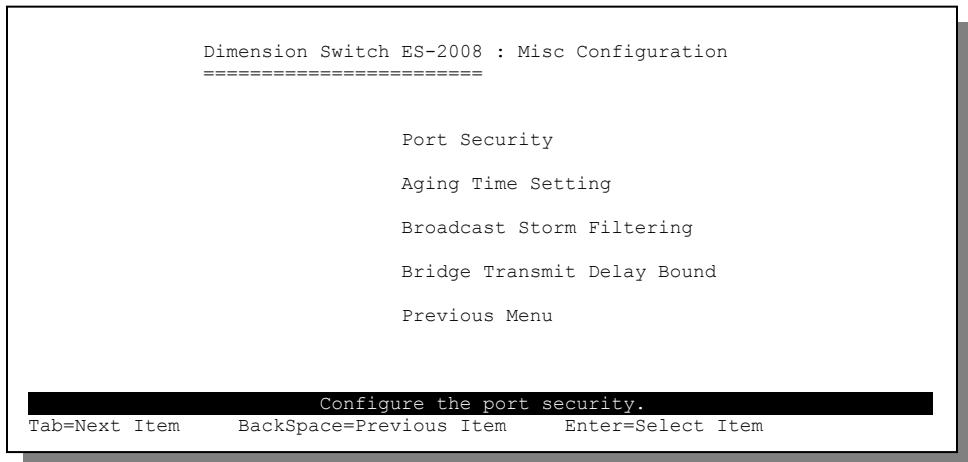
Figure 15-14 SMT: Misc Configuration
15.6.1 Port Security
Refer to the section on Port Security for background information.
Select Port Security and press [ENTER] to display the screen as shown next.
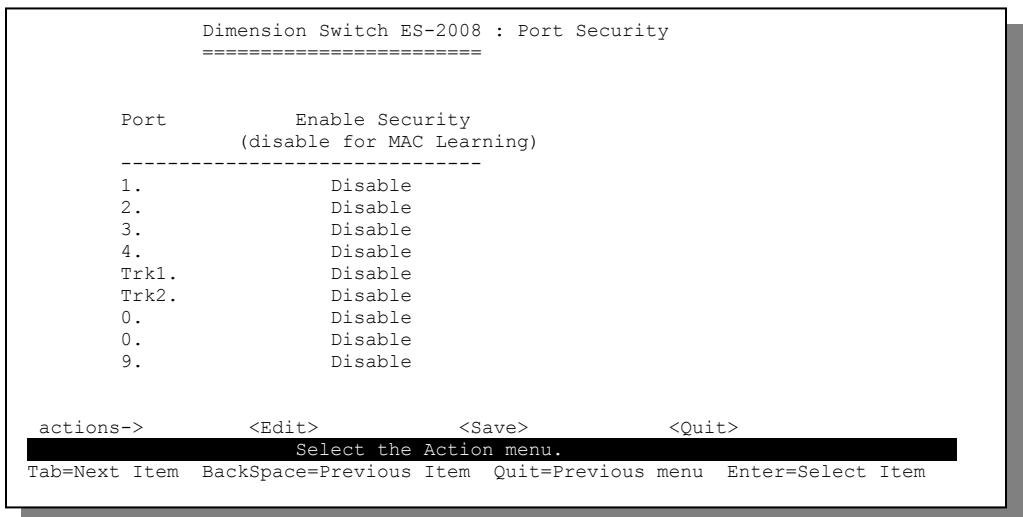
Figure 15-15 SMT: Port Security
The following table describes the fields in this screen.
Table 15-7 SMT: Port Security
| FIELD | DESCRIPTION |
| Port | This read-only field displays the port number or the trunk group on the switch Note: This field is 0 to indicate that a port is in a trunk group. |
| Enable Security | Press [SPACE BAR] and [ENTER] to select Enable to prevent the port from learning new MAC addresses. |
| Press [ESC] to move the cursor back to the actions menu. Press [TAB] to select <Save> and press [ENTER] to save the settings back to the switch. | |
15.6.2 MAC Address Time Out
To specify the time out period for inactive MAC addresses, select Aging Time Setting to display the screen as shown next.
Enter a time interval between 300 and 765 (in seconds) in the MAC Age Interval (sec) field. If you enter 0, the MAC addresses will never timeout.
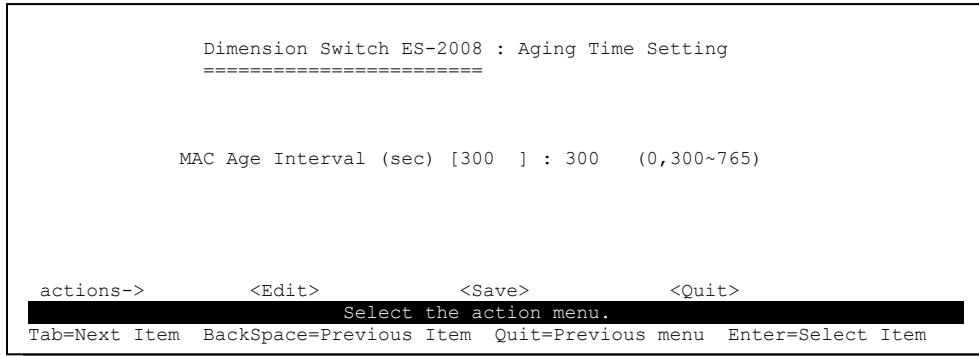
Figure 15-16 SMT: Aging Time Setting
15.6.3 Broadcast Storm Filter Mode
In the Broadcast Strom Filter Mode filed, press [SPACE BAR] and [ENTER] to select Yes to activate broadcast storm filter.
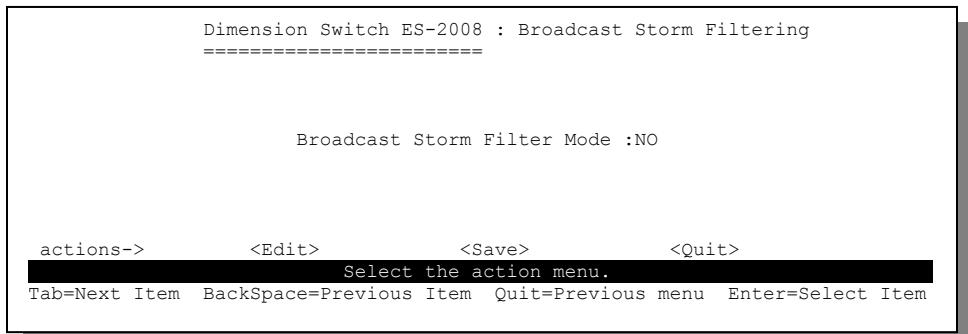
Figure 15-17 SMT: Broadcast Storm Filter Mode
15.6.4 Setting Max Bridge Transmit Delay Bound
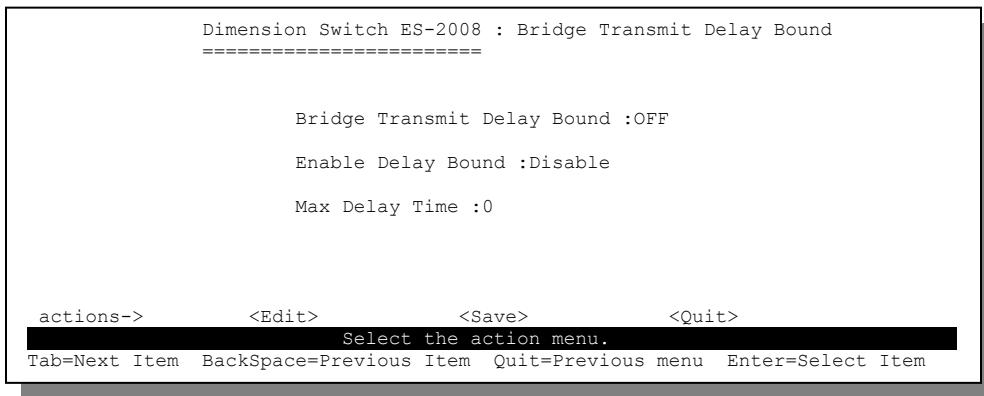
Figure 15-18 SMT: Max Bridge Transmit Delay Bound
Follow the instructions in this table to configure this screen.
Table 15-8 SMT: Max Bridge Transmit Delay Bound
| FIELD | DESCRIPTIONS |
| Bridge Transmit Delay Bound | Press [SPACE BAR] and [ENTER] to select one of 1 sec, 2 sec and 4 sec to set the packets queuing time in the switch. Packets queued beyond the time period will be dropped. Select off to disable this feature. Default is 1 sec. |
| Enable Delay Bound | Press [SPACE BAR] and [ENTER] to select Enable and specify a time in the MAC Delay Time ms (in milliseconds) to limit the time a low priority packet is allowed to queue in the switch. |
| Max Delay Time | Specify a time interval a low priority packet is allowed to queue in the switch. |
| Press [ESC] to move the cursor back to the actions menu. Press [TAB] to select <Save> and press [ENTER] to save the settings back to the switch. | |
Chapter 16
Protocol Related Configuration
This chapter shows you how to configure STP, SNMP, GVRP and LACP.
16.1 Introduction
In the main menu, press [TAB] to select Protocol Related Configuration and press [ENTER]. The following screen displays.
Dimension Switch ES-2008 : Protocol Related Configuration
STP Configuration
SNMP Configuration
GVRP Configuration
LACP Configuration
Previous Menu
Configure the Spanning Tree Protocol.
Tab=Next Item
BackSpace=Previous Item Enter=Select Item
Figure 16-1 SMT: Protocol Related Configuration
16.2 STP Configuration
To access the STP menus, select STP Configuration in the Protocol Related Configuration screen. Refer to the STP chapter for more background information.
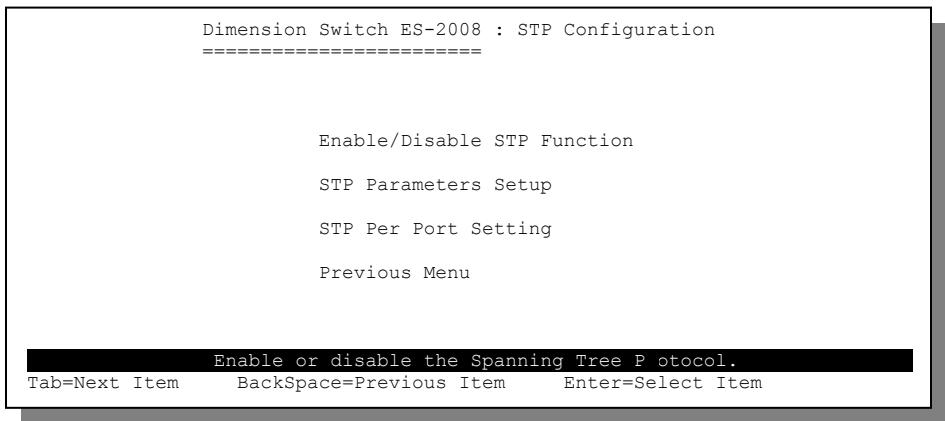
Figure 16-2 SMT: STP Configuration
16.2.1 Enable STP
To enable STP, select Enable/Disable STP Function in the STP Configuration screen and press [ENTER] to display the screen as shown next.
Press [SPACE BAR] and [ENTER] to select Enable in the STP field and save the settings.
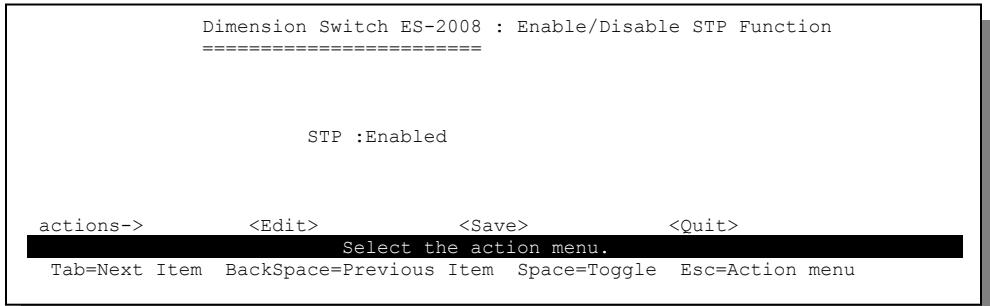
Figure 16-3 SMT: Enable STP
16.2.2 Configure System Parameters
Use the STP Parameters Setup screen to configure the system parameters for STP. Refer to the Configuring Spanning Tree Parameters section for field descriptions.
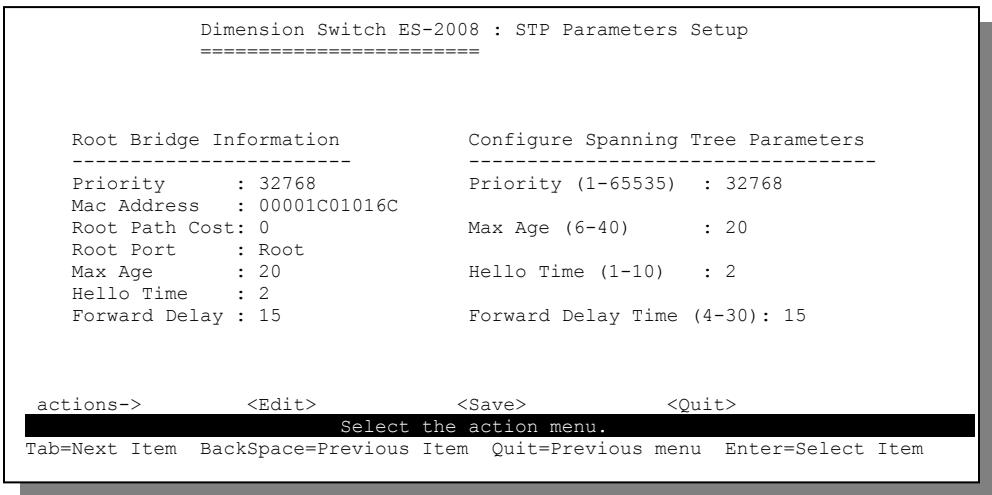
Figure 16-4 SMT: STP Parameters Setup
16.2.3 Configuring STP Parameters Per Port
Use the STP Per Port Setting screen to set up STP parameters for each port on the switch.
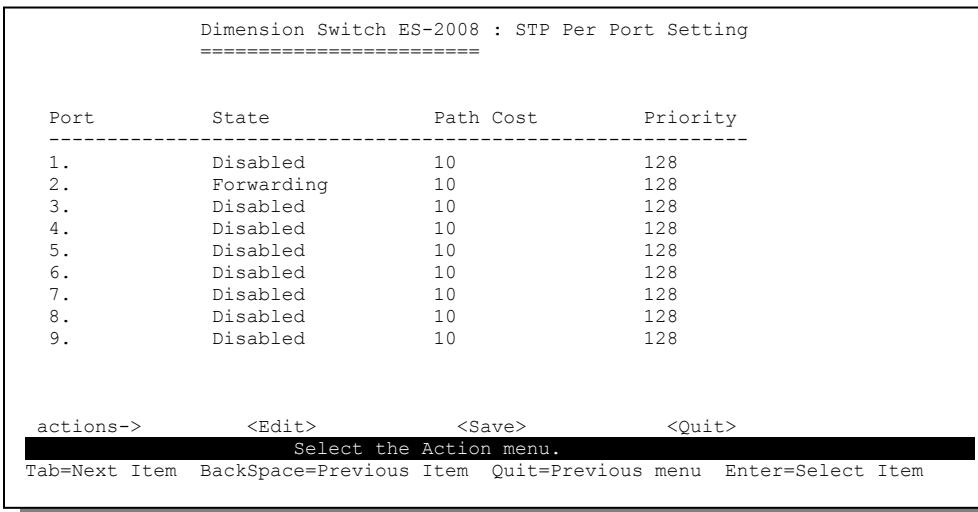
Figure 16-5 SMT: STP Per Port Setting
The following table describes the fields in this screen.
Table 16-1 SMT: STP Per Port Setting
| FIELD | DESCRIPTION |
| Port | This read-only field displays the port number on the switch. |
| State | This read-only field displays the state of the port. The state can be Forward, Disable, Blocking, Learning and Listening. |
| Path Cost | Enter a number between 1 and 65535 in the Path Cost field. The smaller the number the lower the path cost is for the port. |
| Priority | Enter a number between 0 and 255 in the Priority field. The smaller the number, the higher the priority. |
| Press [ESC] to move the cursor back to the actions menu. Press [TAB] to select <Save> and press [ENTER] to save the settings back to the switch. | |
16.3 SNMP Configuration
Refer to the SNMP chapter for more information on SNMP.
To configure SNMP, use the menus in the SNMP Configuration screen as shown next.
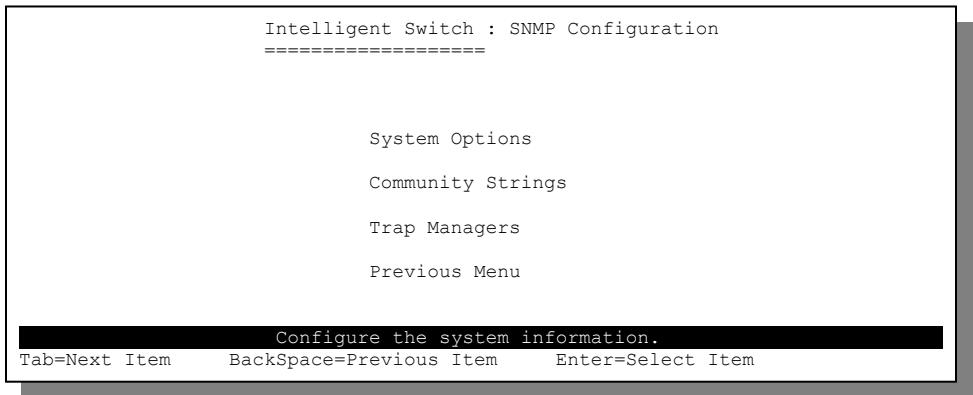
Figure 16-6 SMT: SNMP Configuration
16.3.1 System Options
Use the System Options screen to set up system parameters for SNMP.
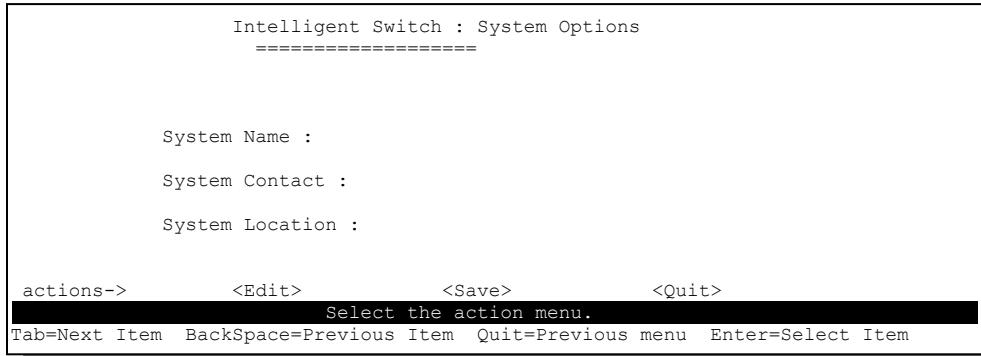
Figure 16-7 SMT: SNMP System Options
Refer to the Configuring SNMP section for field descriptions.
16.3.2 Community Strings
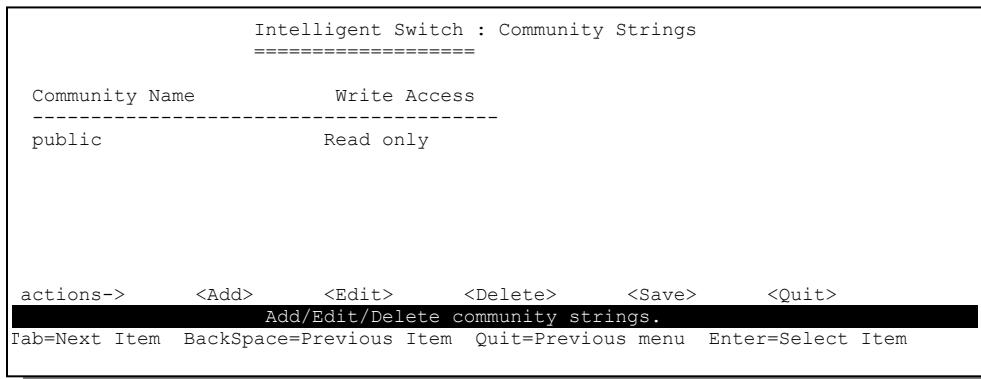
Figure 16-8SMT: SNMP Community Strings
Refer to the Configuring SNMP section for field descriptions.
16.3.3 Trap Manager
Follow the steps below to add trap management stations.
Step 1. Select Trap Managers in the SNMP Configuration screen and press [ENTER] to display the screen as shown next.
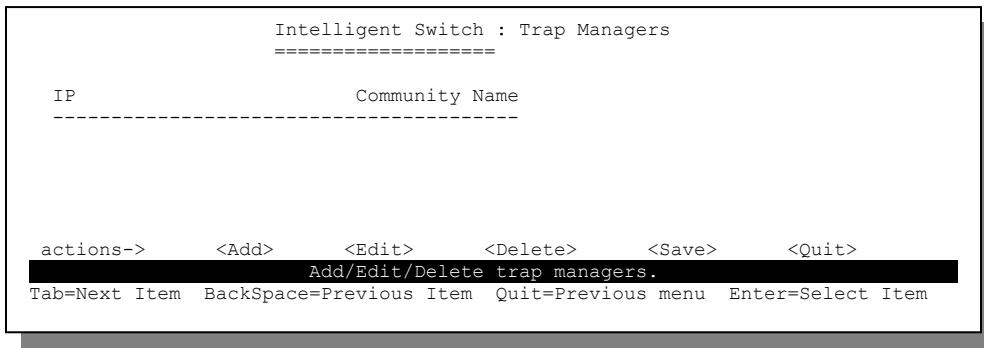
Figure 16-9 SMT: SNMP Trap Manager
Step 2. Select

Figure 16-10 SMT: Add SNMP Trap Manager
Step 3. Enter the IP address of the trap management station in the IP field in dotted decimal notation.
Step 4. Enter a community string (or password) in the Community Name field of the trap management station.
Step 5. Save the changes.
16.4 GVRP Configuration
Refer to the VLAN chapter for more information on GVRP.
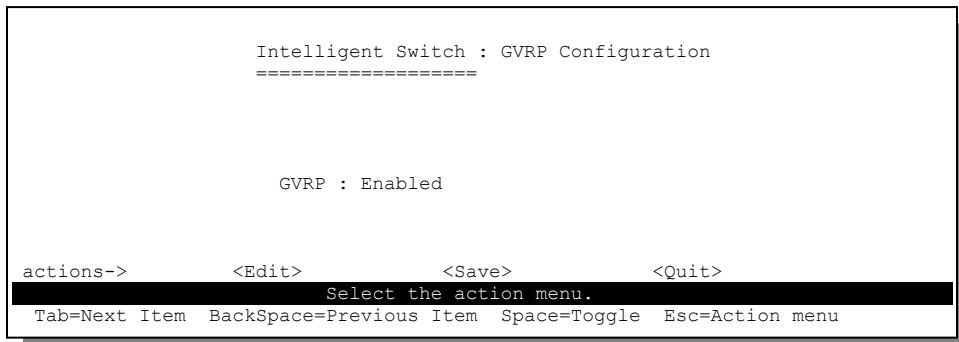
Figure 16-11 SMT: GVRP Configuration
To enable dynamic VLAN, press [SPACE BAR] and [ENTER] to select Enabled in the GVRP field.
16.5 LACP Configuration
Refer to the Port Trunking chapter for more information on LACP (Link Aggregate Control Protocol).
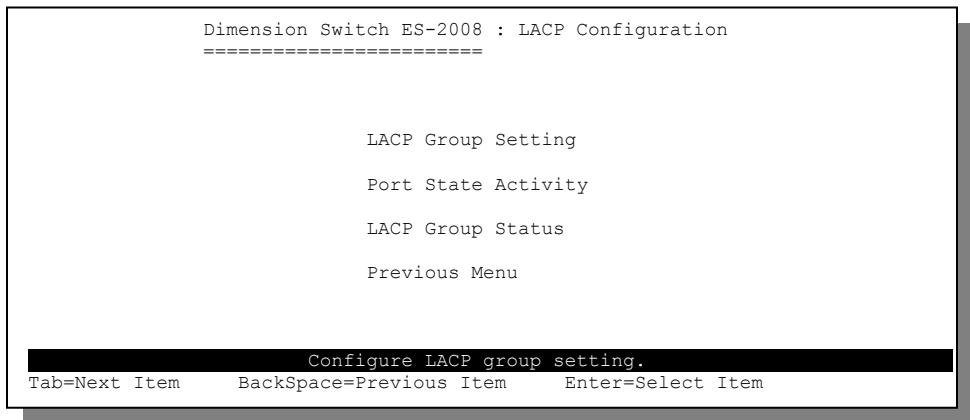
Figure 16-12 SMT: LACP Configuration
16.5.1 LACP Group Setting
Select LACP Group Setting in the LACP Configuration screen and press [ENTER] to display the screen shown next.
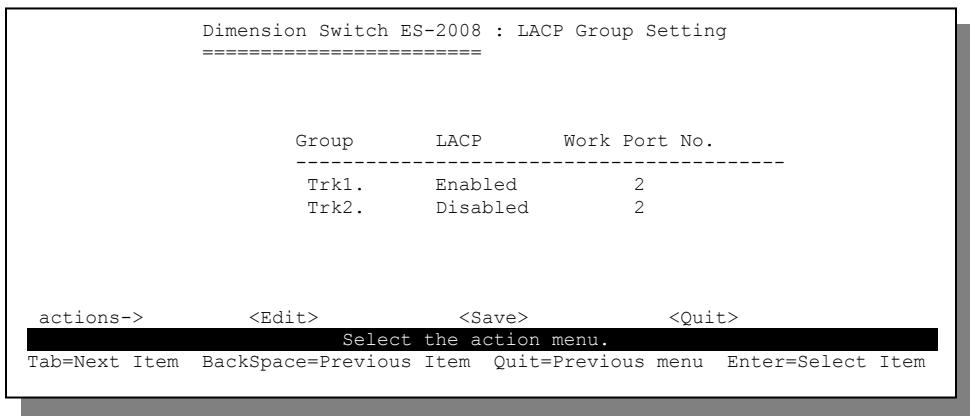
Figure 16-13 SMT: LACP Group Setting
Before you configure LACP, you must set the trunk groups first. Refer to the chapter on Port Trunking.
The following table describes the fields in this screen.
Table 16-2 SMT: LACP Group Setting
| FIELD | DESCRIPTION |
| Group | This read-only field displays the trunk group number. |
| LACP | Press [SPACE BAR] and [ENTER] to select Enable to activate dynamic trunking on this trunk group. |
| Work Port No. | Enter the number of ports in the trunk group. If dynamic trunking is not activated on the trunk group then the number must be the same as the number of ports in the trunk group. If dynamic trunking is activated, you may enter a number bigger than the number of ports in a trunk group. |
| Press [ESC] to move the cursor back to the actions menu. Press [TAB] to select <Save> and press [ENTER] to save the settings back to the switch. | |
16.5.2 Port State Activity
Select Port State Activity in the LACP Configuration screen and press [ENTER] to display the screen as shown.
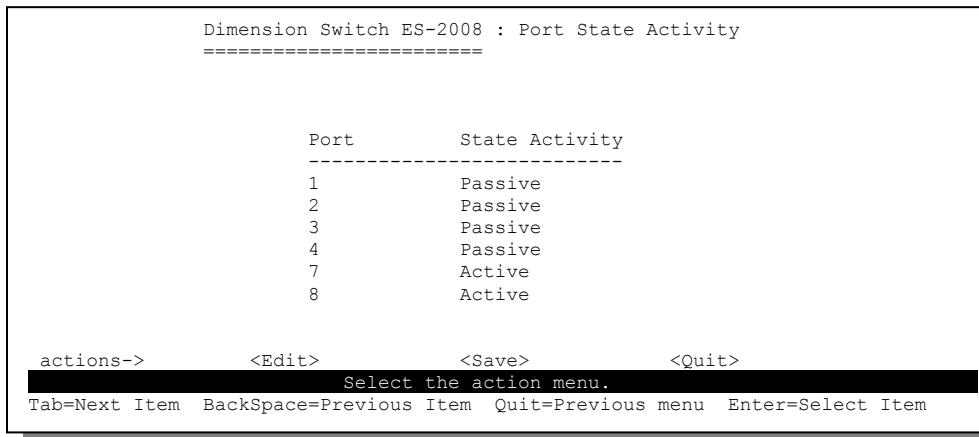
Figure 16-14 SMT: LACP State Activity
The following table describes the fields in this screen.
Table 16-3 SMT: LACP State Activity
| FIELD | DESCRIPTION |
| Port | This read-only field displays only the port number in a dynamic trunk group. For example, in Figure 16-14, port 5 and 6 (not shown) are not in a dynamic trunk group. |
| State Activity | Press [SPACE BAR] to select either Passive or Active and press [ENTER]. Select Active to have the port automatically send LACP packets to another trunk port on the other side of the link to negotiate a trunk link configuration. Select Passive to have the port respond to LACP packets but cannot negotiate a trunk link configuration with another trunk port on the other end of the link. This is the default setting for all ports. |
| Press [ESC] to move the cursor back to the actions menu. Press [TAB] to select <Save> and press [ENTER] to save the settings back to the switch. | |
16.5.3 LACP Group Status
The LACP Group Status screen displays the ports in a static trunk group.
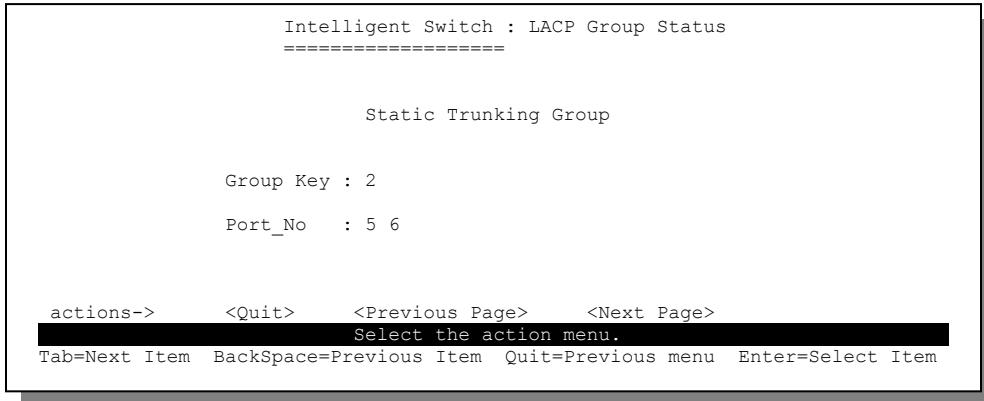
Figure 16-15 SMT: LACP Group Status
The following table describes the fields in this screen.
Table 16-4 SMT: LACP Group Status
| FIELD | DESCRIPTION |
| Group Key | This read-only field displays the static trunk group number. |
| Port | This read-only field displays the port number in the static trunk group. |
| Press [ESC] to move the cursor back to the actions menu. Press [TAB] to select <Save> and press [ENTER] to save the settings back to the switch. | |
Chapter 17
Status and Counters
This chapter describes how to view port status and statistics and general switch
information.
17.1 Status and Counters
In the SMT main screen, select Status and Counters and press [ENTER]. A screen displays as shown.
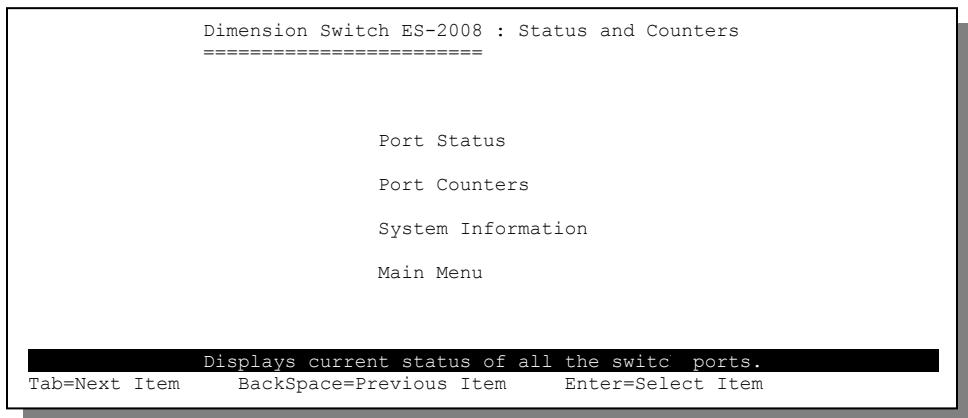
Figure 17-1 SMT: Status and Counters
17.1.1 Port Status
In the Status and Counters screen, select Port Status and press [ENTER] to display the Port Status screen.
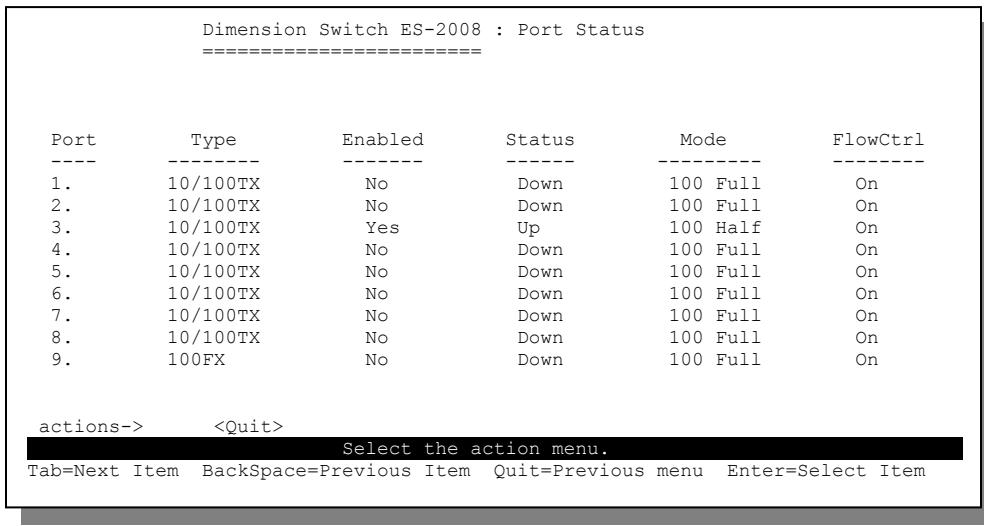
Figure 17-2 SMT: Port Status
Refer to the Port Control chapter for field descriptions.
17.1.2 Port Statistics
In the Status and Counters screen, select Port Counters and press [ENTER] to display the Port Counters screen.

Figure 17-3 SMT: Port Counters
Refer to the Port Control chapter for field descriptions.
17.1.3 General Switch Information
In the Statistics and Counter screen select Switch Information and press [ENTER] to display the Switch Information screen.
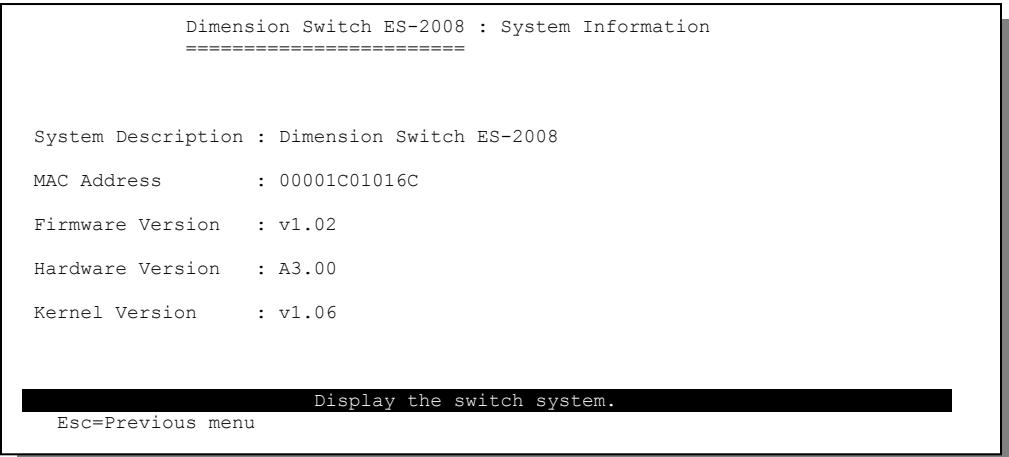
Figure 17-4 SMT: Switch Information
Refer to the General Switch Information section for field descriptions.
Chapter 18
Firmware and Configuration File Maintenance
This chapter shows you how to upgrade the firmware and configuration file and create configuration backup files.
18.1 Filename Convention
The firmware or the configuration files do not have any filename conventions. There is not specific file extension or filenames that you need to follow. Therefore, you can specify any names or file extensions for the firmware and the configuration files.
However, it is recommended to use the ".bin" file extension for the firmware file and ".rom" for the configuration file to manage the files.
The filename must be less than 15 ASCII characters if you use the web configurator.
Visit www.zyxel.com to download the latest version of firmware for your switch.
18.2 Firmware Upgrade
This section shows you how to perform firmware upgrades.
Download the correct firmware for your switch model from www.zyxel.com
Upgrading wrong firmware version will render the fiber/gigabit port useless for switch models with a fiber/gigabit port.
WARNING!
DO NOT INTERRUPT THE FILE TRANSFER PROCESS AS THIS MAY PERMANENTLY DAMAGE YOUR SWITCH.
To upload firmware to your switch via the web configurator, you need to run tftp server on your computer. In the event of your network being down, uploading files is only possible with a direct connection to your switch via the console port.
18.2.1 Firmware Upgrade Via Console Port
Connect your computer to the console port on the switch.
Step 1. Run a terminal emulation program (Hyper Terminal in Windows screen shots are used in this User's Guide) and configure its communication parameters. Refer to the section on Accessing the SMT Using the Console Port.
Step 2. Reboot the switch. The following screen displays.
$$ Switch LOADER Checksum O.K !!!
$$ Press X key to start Xmodem receiver: Key = 78
$$ Download IMAGE through console(1K Xmodem;baudrate=57600bps)
$$ Start Xmodem Receiver:
Figure 18-1 SMT: Startup Message
Step 3. At the "$$$$ Press X key to start Xmodem receiver:" message, press "x".
Step 4. You must change your terminal emulation program console port baud rate setting to 57600bps.
Step 5. Click Transfer, then Send File to display the following screen.
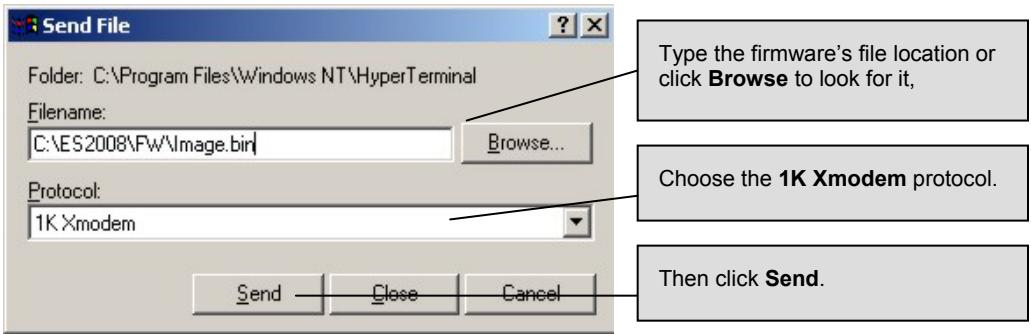
Figure 18-2 1K Xmodem Firmware Upload Example
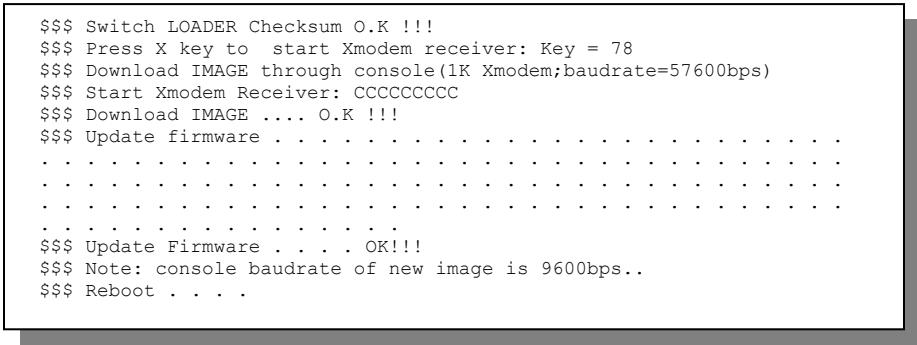
Figure 18-3 SMT: Firmware Upload Process
Step 6. After the firmware upload process has completed, the switch will automatically restart. You must change the console port rate back to 9600bps.
Step 7. Check the System Information screen to confirm that you have uploaded the correct firmware version.
18.2.2 Firmware Upgrade Using the Web Configurator
Follow the steps below to upgrade firmware via the web configurator.
Step 1. Follow the steps in the Accessing the Web Configurator section to log in to the web configurator.
Step 2. Run a TFTP server program on the computer and specify the location of the firmware file and the communication mode.
Step 3. Click TFTP Update Firmware to display the screen as shown next.
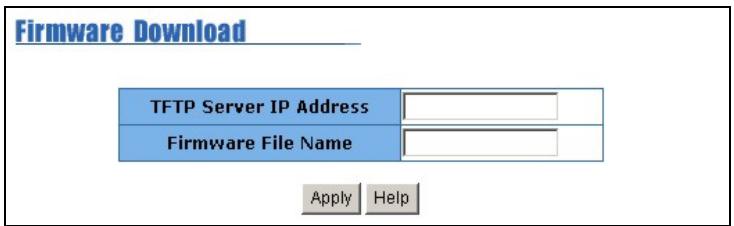
Figure 18-4 Web Configurator: Firmware Upgrade
Step 4. Enter the IP address of the TFTP server, where the new firmware file resides, in the TFTP Server IP Address field.
Step 5. Specify the name of the firmware file in the Firmware File Name field. The firmware filename must not be more than 15 ASCII characters and must be exactly the same as the firmware file on the computer.
Step 6. Click Apply. The switch will download the new firmware file from the TFTP server. The following screen displays when the firmware is retrieved successfully from the TFTP server.
Image download complete, click to finish upgrade.
Update Firmware
Figure 18-5 Web Configurator: Successful Firmware Retrieval
Step 7. Click Update Firmware to save the firmware file to the switch.
Step 8. Click Reboot to restart the switch.
Step 9. Check the Firmware Version field in Switch Setting:Basic screen to confirm that you have uploaded the correct firmware version.
18.3 Configuration File Maintenance
You can only use the web configurator to perform configuration file backup and restore.
WARNING! DO NOT INTERRUPT THE FILE TRANSFER PROCESS AS THIS MAY PERMANENTLY DAMAGE YOUR SWITCH.
18.3.1 Backup Configuration
Backup is highly recommended once your switch is functioning properly.
Step 1. Run a TFTP server program on a computer and specify the location for saving the configuration file and set the communication mode.
Step 2. Click Configuration Backup and click on the TFTP Backup Configuration tab to display the screen as shown next.
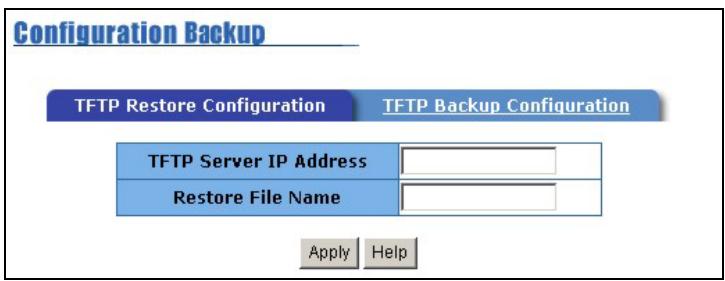
Figure 18-6 Backup Configuration
Step 3. Enter the IP address of the TFTP server, where the backup configuration file will be stored, in the TFTP Server IP Address field.
Step 4. Specify the name of the configuration in the Backup File Name field.
Step 5. Click Apply. The switch saves the system configuration file to the TFTP server. The following screen displays when the backup process is successful.
Backup configuration is completed, go to main.
Figure 18-7 Web Configurator: Backup Configuration File Successful
Step 6. Click on the message to go back to the main screen.
18.3.2 Restore Configuration
This section shows you how to restore a previously saved configuration.
WARNING! DO NOT INTERRUPT THE FILE TRANSFER PROCESS AS THIS MAY PERMANENTLY DAMAGE YOUR SWITCH.
This function erases the current configuration before restoring a previous back up configuration; please do not attempt to restore unless you have a backup configuration file stored on disk.
Step 1. Run a TFTP server program on the computer and specify the location of a previously saved configuration file and set the communication mode.
Step 2. Click Configuration Backup and then the TFTP Configuration Restore tab to display the screen as shown next.
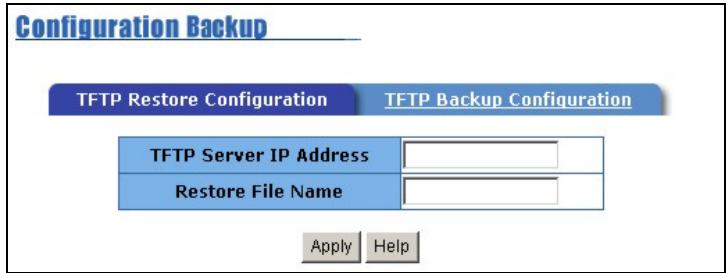
Figure 18-8 Web Configurator:Restore Configuration
Step 3. Enter the IP address of the TFTP server, where a configuration file resides, in the TFTP Server IP Address field.
Step 4. Specify the name of the configuration file in the Retore File Name field.
Step 5. Click Apply. The switch will download the configuration file from the TFTP server.
Step 6. Restart the switch. Make sure you enter the correct IP address to access the web configurator. The following message displays when the configuration file is retrieved successfully from the TFTP server.
Restore configuration is completed, please reboot system. reboot
Figure 18-9 Web Configurator: Successful Configuration File Retrieval
Step 7. Click reboot to restart the switch.
Part V:
Additional Information
Part V consists of troubleshooting, product specifications, appendices and an index.
Chapter 19
Troubleshooting
19.1 Using LEDs to Diagnose Problems
The LEDs are useful aides for finding possible problem causes.
19.1.1 Power LED
The PWR LED on the front panel does not light up.
Table 19-1 Troubleshooting Power LED
| STEPS | CORRECTIVE ACTION |
| 1 | Check the connections from your switch to the power source. Make sure you are using the supplied power cord and proper power supply. Refer to the product specifications. |
| 2 | Make sure the power source is turned on and that the switch is receiving sufficient power. |
| 3 | If these steps fail to correct the problem, contact your local distributor for assistance. |
19.1.2 The LK/ACT LED
The LK/ACT LED does not light up when a device is connected.
Table 19-2 Troubleshooting LK/ACT LED
| STEPS | CORRECTIVE ACTION |
| 1 | Verify that the attached device(s) is turned on and properly connected to the switch. |
| 2 | Make sure the network adapters are working on the attached devices. |
| 3 | Verify that 10/100/1000 M Ethernet cable length does not exceed 100 meters. For more information on network cables, see the section on network cable types. |
19.1.3 The 100 LED
The 100 LED does not show the speed of my Ethernet device.
Table 19-3 Troubleshooting 100 LED
| STEPS | CORRECTIVE ACTION |
| 1 | Check the connection between the switch and your Ethernet device(s). |
| 2 | Check that the port is enabled. |
| 3 | Make sure you’re using the correct table type and that the distance between the switch and the device does not exceed 100 meters. |
19.1.4 The FD/COL LED
Use this LED to check the duplex mode of the attached Ethernet device.
Table 19-4 Troubleshooting FD/COL LED
| STEPS | CORRECTIVE ACTION |
| 1 | The Ethernet device is connected at full-duplex mode if the FD/COL LED is yellow. |
| 2 | The Ethernet device is connected at half-duplex mode when the FD/COL LED is off. |
| 3 | Make sure you have the correct speed and flow control enabled for each port. Refer to the Port Control chapter. |
| 3 | This LED blinks if packet collisions are occurring. Collisions are normal, but if the FD/COL LED blinks very frequently, you may need to segment your network. |
19.2 Console Port
I cannot access the switch through the console port.
Table 19-5 Troubleshooting Console Port
| STEPS | CORRECTIVE ACTION | |
| 1 | Check to see if the switch is connected to your computer using the RS-232 cable. | |
| 2 | Check to see if the communications program is configured correctly. Set the communication parameters as stated here. | Emulation: auto detectBaud Rate: 9600 bpsNo Parity, 8 data bits, 1 stop bitFlow Control: None |
Table 19-5 Troubleshooting Console Port
| STEPS | CORRECTIVE ACTION |
| 3 | Make sure you entered the correct username and password. The default username is “admin” and the default password is “1234”.If you have forgot your username or password, refer to Section 19.5. |
19.3 Telnet
I cannot telnet into the switch.
Table 19-6 Troubleshooting Telnet
| STEPS | CORRECTIVE ACTION |
| 1 | Make sure you are using the correct IP address of the switch. Check the IP address of the switch. |
| 2 | Ping the switch from your computer. If you cannot ping the switch, check the IP addresses of the switch and your computer. Make sure that both IP addresses are in the same subnet. |
| 3 | Make sure you entered the correct username and password. The default username is “admin” and the default password is “1234”. If you have forgot your username or password, refer to Section 19.5. |
| 4 | If these steps fail to correct the problem, contact the distributor. |
19.4 Web Configurator
I cannot access the web configurator.
Table 19-7 Troubleshooting Web Configurator
| STEPS | CORRECTIVE ACTION |
| 1 | Make sure you are using the correct IP address of the switch. Check the IP address of the switch. |
| 2 | Make sure you entered the correct username and password. The default username is “admin” and the default password is “1234”.If you have forgot your username or password, refer to Section 19.5. |
| 3 | Ping the switch from your computer.If you cannot ping the switch, check the IP addresses of the switch and your computer. Make sure that both IP addresses are in the same subnet. |
The web configurator does not display properly.
Table 19-8 Troubleshooting Internet Browser Display
| STEPS | CORRECTIVE ACTION |
| 1 | Make sure you are using Internet Explorer 5.0 and later versions. |
| 2 | Delete the temporary web files and log in again..In Internet Explorer, click Tools, Internet Options and then click the DeleteFiles ... button. When a Delete Files window displays, select Delete all offlinecontent and click OK. (Steps may vary depending on the version of yourInternet browser.) |
19.5 LoginUsername and Password
I forgot my login username and/or password.
Table 19-9 Troubleshooting LoginUsername and Password
| STEPS | CORRECTIVE ACTION |
| You need to set the switch back to factory default settings. This will erase all custom configurations. | |
| 1 | Use a terminal emulation program to connect your computer to the console port on the switch. Refer to the Accessing the SMT Using the Console Port section. |
| 2 | At the login screen, type “superuser” in the User Name field and “zyxel” in the Password field. When you see a “INET>” prompt, you are logged in with safe mode on. |
| 4 | At the “INET>” prompt, type “flashd” and press [ENTER]. A “Writing flash to default value ...please wait” message displays. |
| 5 | When the “INET>” prompt displays again, unplug the power cord to turn off the switch, then turn on the switch. The default switch IP address is 192.168.1.1, default user name is “admin” and the default password is “1234”. |
| 6 | It is highly recommended to change the default username and password. Make sure you store the username and password in a save place. |
19.6 Improper Network Cabling and Topology
Improper network cabling or topology setup are common causes of poor network performance or even network failure.
Table 19-10 Troubleshooting Improper Network Cabling and Topology
| DESCRIPTION | PROBLEMS AND CORRECTIVE ACTION |
| Faulty cables | Using faulty network cables may affect data rates and have an impact on your network performance. Replace with new standard network cables. |
| Non-standard network cables | Non-standard cables may increase the number of network collisions and cause other network problems that affect your network performance; refer to Chapter 2. |
| Cabling Length | If you use longer cables than are needed, transmission quality may be affected. The network cables should not be longer than the limit of 100 meters. |
| Too many hubs between the computers in the network | Too many hubs (or repeaters) between the connected computers in the network may increase the number of network collision or other network problems. Remove unnecessary hubs from the network. |
| A loop in the data path | A data path loop forms when there is more than one path or route between two networked computers. This results in broadcast storms that will severely affect your network performance. Make sure there are no loops in your network topology. |
Appendix A
Setting up Your Computer's IP
Address
All computers must have a 10M or 100M Ethernet adapter card and TCP/IP installed. Windows 95/98/Me/NT/2000/XP, Macintosh OS 7 and later operating systems and all versions of UNIX/LINUX include the software components you need to install and use TCP/IP on your computer. Windows 3.1 requires the purchase of a third-party TCP/IP application package.
TCP/IP should already be installed on computers using Windows NT/2000/XP, Macintosh OS 7 and later operating systems.
After the appropriate TCP/IP components are installed, configure the TCP/IP settings in order to "communicate" with your network.
If you manually assign IP information instead of using dynamic assignment, make sure that your computers have IP addresses that place them in the same subnet as the Prestige's LAN port.
Windows 95/98/Me
Click Start, Settings, Control Panel and double-click the Network icon to open the Network window.
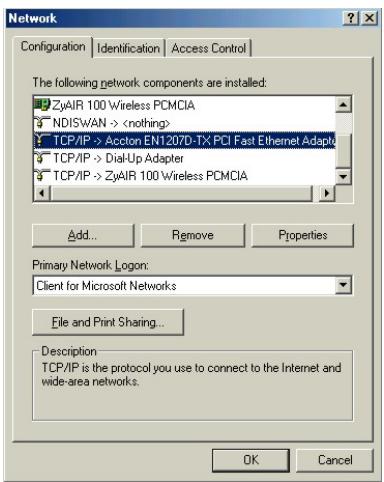
Installing Components
The Network window Configuration tab displays a list of installed components. You need a network adapter, the TCP/IP protocol and Client for Microsoft Networks.
If you need the adapter:
a. In the Network window, click Add.
b. Select Adapter and then click Add.
c. Select the manufacturer and model of your network adapter and then click OK.
If you need TCP/IP:
a. In the Network window, click Add.
b. Select Protocol and then click Add.
c. Select Microsoft from the list of manufacturers.
d. Select TCP/IP from the list of network protocols and then click OK.
If you need Client for Microsoft Networks:
a. Click Add.
b. Select Client and then click Add.
c. Select Microsoft from the list of manufacturers.
d. Select Client for Microsoft Networks from the list of network clients and then click OK.
e. Restart your computer so the changes you made take effect.
Configuring
In the Network window Configuration tab, select your network adapter's TCP/IP entry and click Properties.
- Click the IP Address tab.
-If your IP address is dynamic, select Obtain an IP address automatically.
-If you have a static IP address, select Specify an IP address and type your information into the IP Address and Subnet Mask fields.
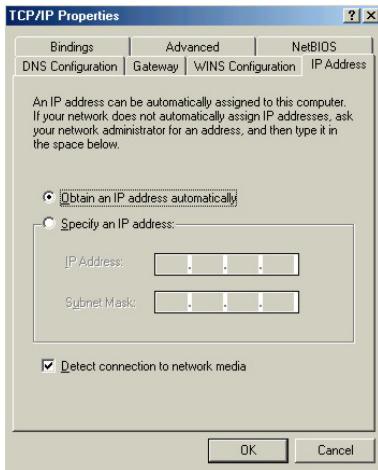
- Click the DNS Configuration tab.
-If you do not know your DNS information, select Disable DNS.
-If you know your DNS information, select Enable DNS and type the information in the fields below (you may not need to fill them all in).
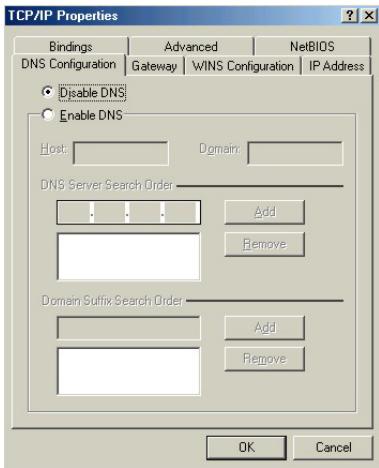
- Click the Gateway tab.
-If you do not know your gateway's IP address, remove previously installed gateways.
-If you have a gateway IP address, type it in the New gateway field and click Add.
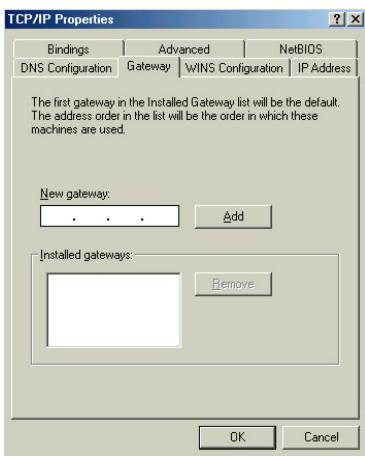
- Click OK to save and close the TCP/IP Properties window.
- Click OK to close the Network window. Insert the Windows CD if prompted.
- Turn on your Prestige and restart your computer when prompted.
Verifying Settings
- Click Start and then Run.
- In the Run window, type "winipcfg" and then click OK to open the IP Configuration window.
- Select your network adapter. You should see your computer's IP address, subnet mask and default gateway.
Windows 2000/NT/XP
1 For Windows XP, click start, Control Panel. In Windows 2000/NT, click Start, Settings, Control Panel.
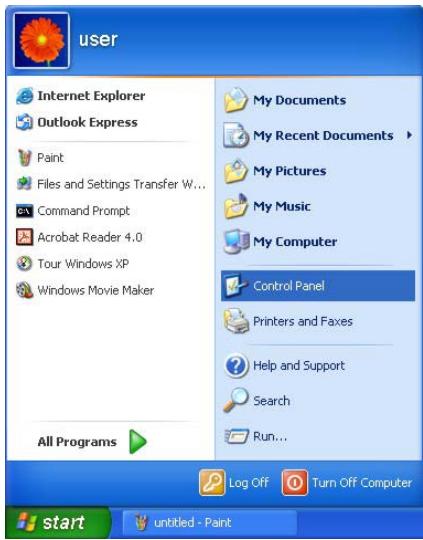
2 For Windows XP, click Network Connections. For Windows 2000/NT, click Network and Dial-up Connections.
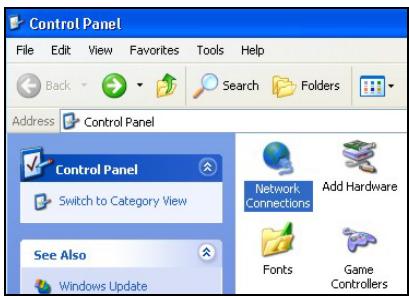
3 Right-click Local Area Connection and then click Properties.
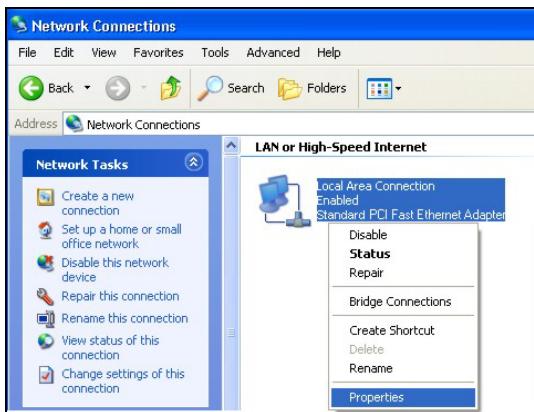
4 Select Internet Protocol (TCP/IP) (under the General tab in Win XP) and click Properties.
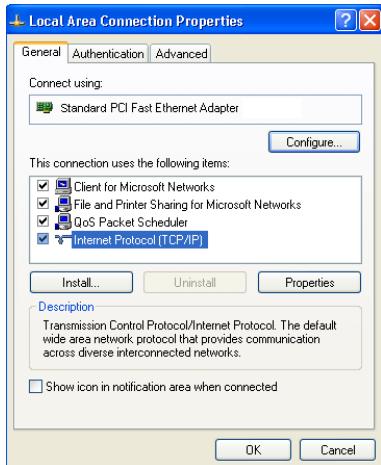
5 The Internet Protocol TCP/IP Properties window opens (the General tab in Windows XP).
-If you have a dynamic IP address click Obtain an IP address automatically.
-If you have a static IP address click Use the following IP Address and fill in the IP address, Subnet mask, and Default gateway fields. Click Advanced.
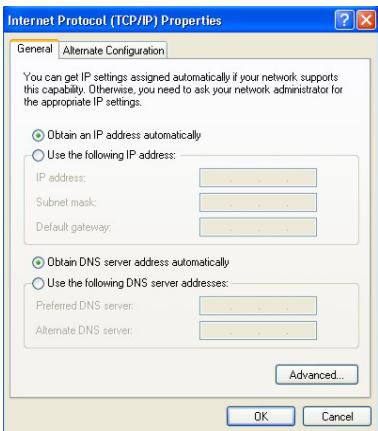
6 -If you do not know your gateway's IP address, remove any previously installed gateways in the IP Settings tab and click OK.
Do one or more of the following if you want to configure additional IP addresses:
-In the IP Settings tab, in IP addresses, click Add.
-In TCP/IP Address, type an IP address in IP address and a subnet mask in Subnet mask, and then click Add.
-Repeat the above two steps for each IP address you want to add.
- Configure additional default gateways in the IP Settings tab by clicking Add in Default gateways.
-In TCP/IP Gateway Address, type the IP address of the default gateway in Gateway. To manually configure a default metric (the number of transmission hops), clear the Automatic metric check box and type a metric in Metric.
-Click Add.
-Repeat the previous three steps for each default gateway you want to add.
-Click OK when finished.
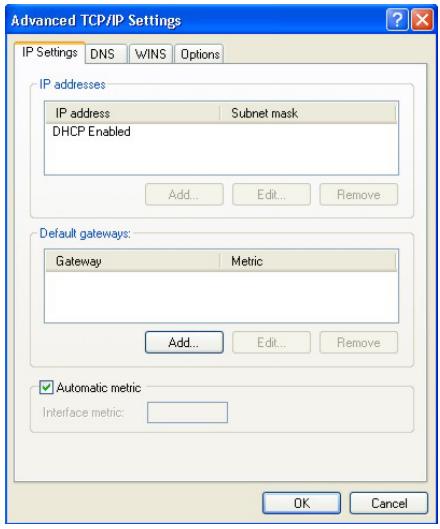
- In the Internet Protocol TCP/IP Properties window (the General tab in Windows XP):
-Click Obtain DNS server address automatically if you do not know your DNS server IP address(es).
-If you know your DNS server IP address(es), click Use the following DNS server addresses, and type them in the Preferred DNS server and Alternate DNS server fields.
If you have previously configured DNS servers, click Advanced and then the DNS tab to order them.
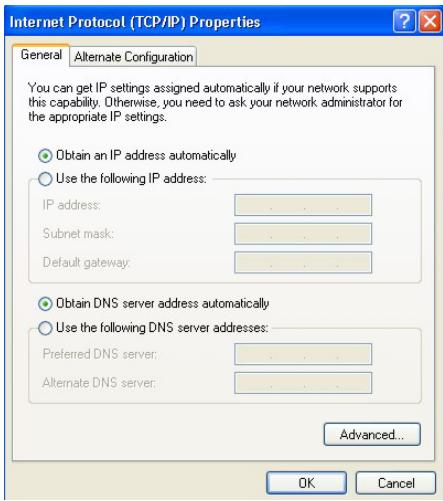
- Click OK to close the Internet Protocol (TCP/IP) Properties window.
- Click OK to close the Local Area Connection Properties window.
- Turn on your Prestige and restart your computer (if prompted).
Verifying Settings
- Click Start, All Programs, Accessories and then Command Prompt.
- In the Command Prompt window, type "ipconfig" and then press [ENTER]. You can also open Network Connections, right-click a network connection, click Status and then click the Support tab.
Macintosh OS 8/9
- Click the Apple menu, Control Panel and double-click TCP/IP to open the TCP/IP Control Panel.
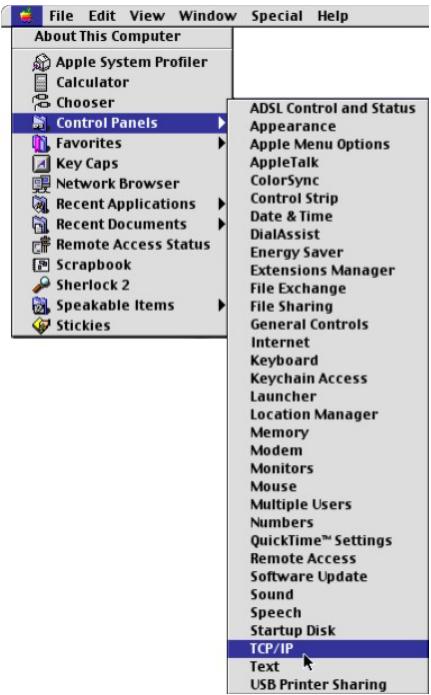
- Select Ethernet built-in from the Connect via list.
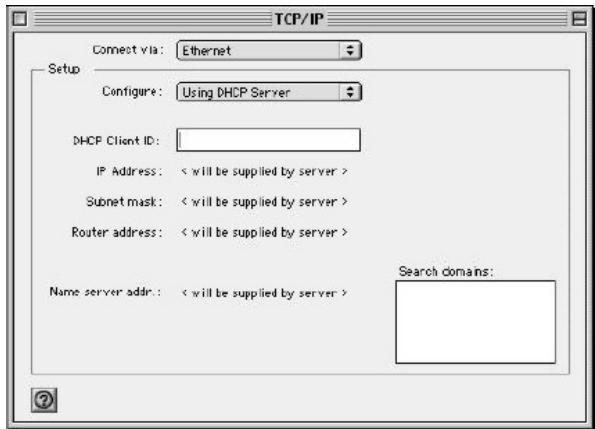
- For dynamically assigned settings, select Using DHCP Server from the Configure: list.
- For statically assigned settings, do the following:
-From the Configure box, select Manually.
-Type your IP address in the IP Address box.
-Type your subnet mask in the Subnet mask box.
-Type the IP address of your Prestige in the Router address box.
- Close the TCP/IP Control Panel.
- Click Save if prompted, to save changes to your configuration.
- Turn on your Prestige and restart your computer (if prompted).
Verifying Settings
Check your TCP/IP properties in the TCP/IP Control Panel window.
Macintosh OS X
- Click the Apple menu, and click System Preferences to open the System Preferences window.
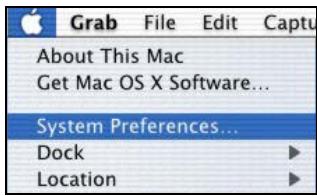
-
Click Network in the icon bar.
-
Select Automatic from the Location list.
- Select Built-in Ethernet from the Show list.
- Click the TCP/IP tab.
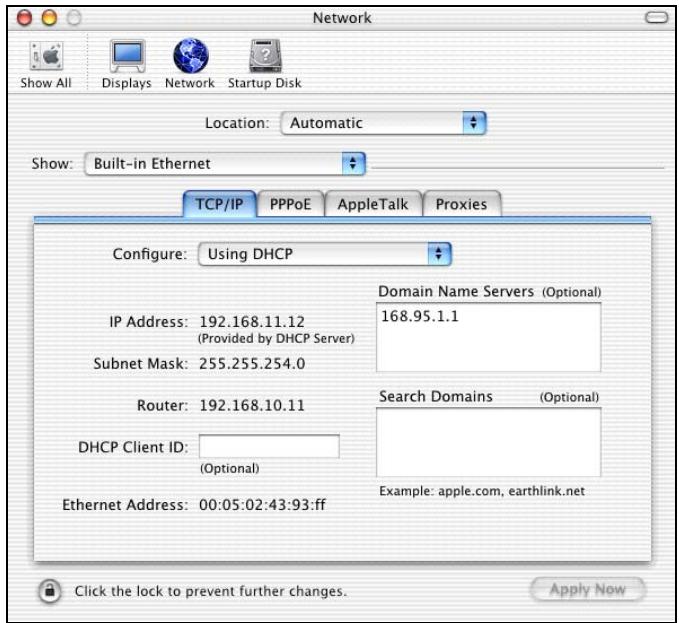
-
For dynamically assigned settings, select Using DHCP from the Configure list.
-
For statically assigned settings, do the following:
-From the Configure box, select Manually.
-Type your IP address in the IP Address box.
-Type your subnet mask in the Subnet mask box.
-Type the IP address of your Prestige in the Router address box.
- Click Apply Now and close the window.
- Turn on your Prestige and restart your computer (if prompted).
Verifying Settings
Check your TCP/IP properties in the Network window.
Appendix B
IP Subnetting
IP Addressing
Routers "route" based on the network number. The router that delivers the data packet to the correct destination host uses the host ID.
IP Classes
An IP address is made up of four octets (eight bits), written in dotted decimal notation, for example, 192.168.1.1. IP addresses are categorized into different classes. The class of an address depends on the value of its first octet.
Class "A" addresses have a 0 in the left most bit. In a class "A" address the first octet is the network number and the remaining three octets make up the host ID.
Class "B" addresses have a 1 in the left most bit and a 0 in the next left most bit. In a class "B" address the first two octets make up the network number and the two remaining octets make up the host ID.
Class "C" addresses begin (starting from the left) with 1 1 0. In a class "C" address the first three octets make up the network number and the last octet is the host ID.
Class "D" addresses begin with 1 1 1 0. Class "D" addresses are used for multicasting. (There is also a class "E" address. It is reserved for future use.)
Chart 1 Classes of IP Addresses
| IP ADDRESS: | OCTET 1 | OCTET 2 | OCTET 3 | OCTET 4 | |
| Class A | 0 | Network number | Host ID | Host ID | Host ID |
| Class B | 10 | Network number | Network number | Host ID | Host ID |
| Class C | 110 | Network number | Network number | Network number | Host ID |
Host IDs of all zeros or all ones are not allowed.
Therefore:
A class "C" network (8 host bits) can have 2^8 - 2 or 254 hosts.
A class "B" address (16 host bits) can have 2^16 - 2 or 65534 hosts.
A class "A" address (24 host bits) can have 2^24 - 2 hosts (approximately 16 million hosts).
Since the first octet of a class "A" IP address must contain a "0", the first octet of a class "A" address can have a value of 0 to 127.
Similarly the first octet of a class "B" must begin with "10", therefore the first octet of a class "B" address has a valid range of 128 to 191. The first octet of a class "C" address begins with "110", and therefore has a range of 192 to 223.
Chart 2 Allowed IP Address Range By Class
| CLASS | ALLOWED RANGE OF FIRST OCTET (BINARY) | ALLOWED RANGE OF FIRST OCTET (DECIMAL) |
| Class A | 00000000 to 01111111 | 0 to 127 |
| Class B | 10000000 to 10111111 | 128 to 191 |
| Class C | 11000000 to 11011111 | 192 to 223 |
| Class D | 11100000 to 11101111 | 224 to 239 |
Subnet Masks
A subnet mask is used to determine which bits are part of the network number, and which bits are part of the host ID (using a logical AND operation). A subnet mask has 32 bits; each bit of the mask corresponds to a bit of the IP address. If a bit in the subnet mask is a "1" then the corresponding bit in the IP address is part of the network number. If a bit in the subnet mask is "0" then the corresponding bit in the IP address is part of the host ID.
Subnet masks are expressed in dotted decimal notation just as IP addresses are. The "natural" masks for class A, B and C IP addresses are as follows.
Chart 3 "Natural" Masks
| CLASS | NATURAL MASK |
| A | 255.0.0.0 |
| B | 255.255.0.0 |
| C | 255.255.255.0 |
Subnetting
With subnetting, the class arrangement of an IP address is ignored. For example, a class C address no longer has to have 24 bits of network number and 8 bits of host ID. With subnetting, some of the host ID bits are converted into network number bits. By convention, subnet masks always consist of a continuous sequence of ones beginning from the left most bit of the mask, followed by a continuous sequence of zeros, for a total number of 32 bits.
Since the mask is always a continuous number of ones beginning from the left, followed by a continuous number of zeros for the remainder of the 32 bit mask, you can simply specify the number of ones instead of writing the value of each octet. This is usually specified by writing a “/” followed by the number of bits in the mask after the address.
For example, 192.1.1.0/25 is equivalent to saying 192.1.1.0 with mask 255.255.255.128.
The following table shows all possible subnet masks for a class "C" address using both notations.
Chart 4 Alternative Subnet Mask Notation
| SUBNET MASK IP ADDRESS | SUBNET MASK “1” BITS | LAST OCTET BIT VALUE |
| 255.255.255.0 | /24 | 0000 0000 |
| 255.255.255.128 | /25 | 1000 0000 |
| 255.255.255.192 | /26 | 1100 0000 |
| 255.255.255.224 | /27 | 1110 0000 |
| 255.255.255.240 | /28 | 1111 0000 |
| 255.255.255.248 | /29 | 1111 1000 |
| 255.255.255.252 | /30 | 1111 1100 |
The first mask shown is the class "C" natural mask. Normally if no mask is specified it is understood that the natural mask is being used.
Example: Two Subnets
As an example, you have a class "C" address 192.168.1.0 with subnet mask of 255.255.255.0.
| NETWORK NUMBER | HOST ID | |
| IP Address | 192.168.1. | 0 |
| IP Address (Binary) | 11000000.10101000.00000001. | 00000000 |
| Subnet Mask | 255.255.255. | 0 |
| Subnet Mask (Binary) | 11111111.11111111.11111111. | 00000000 |
The first three octets of the address make up the network number (class "C"). You want to have two separate networks.
Divide the network 192.168.1.0 into two separate subnets by converting one of the host ID bits of the IP address to a network number bit. The "borrowed" host ID bit can be either "0" or "1" thus giving two subnets; 192.168.1.0 with mask 255.255.255.128 and 192.168.1.128 with mask 255.255.255.128.
In the following charts, shaded/bolded last octet bit values indicate host ID bits "borrowed" to form network ID bits. The number of "borrowed" host ID bits determines the number of subnets you can have. The remaining number of host ID bits (after
"borrowing") determines the number of hosts you can have on each subnet.
Chart 5 Subnet 1
| NETWORK NUMBER | LAST OCTET BIT VALUE | ||
| IP Address | 192.168.1. | 0 | |
| IP Address (Binary) | 11000000.10101000.00000001. | 00000000 | |
| Subnet Mask | 255.255.255. | 128 | |
| Subnet Mask (Binary) | 11111111.11111111.11111111. | 10000000 | |
| Subnet Address: 192.168.1.0 | Lowest Host ID: 192.168.1.1 | ||
| Broadcast Address: 192.168.1.127 | Highest Host ID: 192.168.1.126 | ||
Chart 6 Subnet 2
| NETWORK NUMBER | LAST OCTET BIT VALUE | ||
| IP Address | 192.168.1. | 128 | |
| IP Address (Binary) | 11000000.10101000.00000001. | 10000000 | |
| Subnet Mask | 255.255.255. | 128 | |
| Subnet Mask (Binary) | 11111111.11111111.11111111. | 10000000 | |
| Subnet Address: 192.168.1.128 | Lowest Host ID: 192.168.1.129 | ||
| Broadcast Address: 192.168.1.255 | Highest Host ID: 192.168.1.254 | ||
The remaining 7 bits determine the number of hosts each subnet can have. Host IDs of all zeros represent the subnet itself and host IDs of all ones are the broadcast address for that subnet, so the actual number of hosts available on each subnet in the example above is 2^7 - 2 or 126 hosts for each subnet.
192.168.1.0 with mask 255.255.255.128 is the subnet itself, and 192.168.1.127 with mask 255.255.255.128 is the directed broadcast address for the first subnet. Therefore, the lowest IP address that can be assigned to an actual host for the first subnet is 192.168.1.1 and the highest is 192.168.1.126. Similarly the host ID range for the second subnet is 192.168.1.129 to 192.168.1.254.
Example: Four Subnets
The above example illustrated using a 25-bit subnet mask to divide a class "C" address space into two subnets. Similarly to divide a class "C" address into four subnets, you need to "borrow" two host ID bits to give four possible combinations of 00, 01, 10 and 11. The
subset mask is 26 bits (11111111.11111111.11111111.11000000) or 255.255.255.192.
Each subnet contains 6 host ID bits, giving 2^6 - 2 or 62 hosts for each subnet (all 0's is the subnet itself, all 1's is the broadcast address on the subnet).
Chart 7 Subnet 1
| NETWORK NUMBER | LAST OCTET BIT VALUE | ||
| IP Address | 192.168.1. | 0 | |
| IP Address (Binary) | 11000000.10101000.00000001. | 00000000 | |
| Subnet Mask (Binary) | 11111111.11111111.11111111. | 11000000 | |
| Subnet Address: 192.168.1.0 | Lowest Host ID: 192.168.1.1 | ||
| Broadcast Address: 192.168.1.63 | Highest Host ID: 192.168.1.62 | ||
Chart 8 Subnet 2
| NETWORK NUMBER | LAST OCTET BIT VALUE | ||
| IP Address | 192.168.1. | 64 | |
| IP Address (Binary) | 11000000.10101000.00000001. | 01000000 | |
| Subnet Mask (Binary) | 11111111.11111111.11111111. | 11000000 | |
| Subnet Address: 192.168.1.64 | Lowest Host ID: 192.168.1.65 | ||
| Broadcast Address: 192.168.1.127 | Highest Host ID: 192.168.1.126 | ||
Chart 9 Subnet 3
| NETWORK NUMBER | LAST OCTET BIT VALUE | ||
| IP Address | 192.168.1. | 128 | |
| IP Address (Binary) | 11000000.10101000.00000001. | 10000000 | |
| Subnet Mask (Binary) | 11111111.11111111.11111111. | 11000000 | |
| Subnet Address: 192.168.1.128 | Lowest Host ID: 192.168.1.129 | ||
| Broadcast Address: 192.168.1.191 | Highest Host ID: 192.168.1.190 | ||
Chart 10 Subnet 4
| NETWORK NUMBER | LAST OCTET BIT VALUE | ||
| IP Address | 192.168.1. | 192 | |
| IP Address (Binary) | 11000000.10101000.00000001. | 11000000 | |
| Subnet Mask (Binary) | 11111111.11111111.11111111. | 11000000 | |
| Subnet Address: 192.168.1.192 | Lowest Host ID: 192.168.1.193 | ||
| Broadcast Address: 192.168.1.255 | Highest Host ID: 192.168.1.254 | ||
Example Eight Subnets
Similarly use a 27-bit mask to create 8 subnets (001, 010, 011, 100, 101, 110). The following table shows class C IP address last octet values for each subnet.
Chart 11 Eight Subnets
| SUBNET | SUBNET ADDRESS | FIRST ADDRESS | LAST ADDRESS | BROADCAST ADDRESS |
| 1 | 0 | 1 | 30 | 31 |
| 2 | 32 | 33 | 62 | 63 |
| 3 | 64 | 65 | 94 | 95 |
| 4 | 96 | 97 | 126 | 127 |
| 5 | 128 | 129 | 158 | 159 |
| 6 | 160 | 161 | 190 | 191 |
| 7 | 192 | 193 | 222 | 223 |
| 8 | 224 | 223 | 254 | 255 |
The following table is a summary for class "C" subnet planning.
Chart 12 Class C Subnet Planning
| NO. “BORROWED” HOST BITS | SUBNET MASK | NO. SUBNETS | NO. HOSTS PER SUBNET |
| 1 | 255.255.255.128 (/25) | 2 | 126 |
| 2 | 255.255.255.192 (/26) | 4 | 62 |
| 3 | 255.255.255.224 (/27) | 8 | 30 |
Chart 12 Class C Subnet Planning
| NO. “BORROWED” HOST BITS | SUBNET MASK | NO. SUBNETS | NO. HOSTS PER SUBNET |
| 4 | 255.255.255.240 (/28) | 16 | 14 |
| 5 | 255.255.255.248 (/29) | 32 | 6 |
| 6 | 255.255.255.252 (/30) | 64 | 2 |
| 7 | 255.255.255.254 (/31) | 128 | 1 |
Subnetting With Class A and Class B Networks.
For class "A" and class "B" addresses the subnet mask also determines which bits are part of the network number and which are part of the host ID.
A class "B" address has two host ID octets available for subnetting and a class "A" address has three host ID octets (see Chart 1) available for subnetting.
The following table is a summary for class "B" subnet planning.
Chart 13 Class B Subnet Planning
| NO. “BORROWED” HOST BITS | SUBNET MASK | NO. SUBNETS | NO. HOSTS PER SUBNET |
| 1 | 255.255.128.0 (/17) | 2 | 32766 |
| 2 | 255.255.192.0 (/18) | 4 | 16382 |
| 3 | 255.255.224.0 (/19) | 8 | 8190 |
| 4 | 255.255.240.0 (/20) | 16 | 4094 |
| 5 | 255.255.248.0 (/21) | 32 | 2046 |
| 6 | 255.255.252.0 (/22) | 64 | 1022 |
| 7 | 255.255.254.0 (/23) | 128 | 510 |
| 8 | 255.255.255.0 (/24) | 256 | 254 |
| 9 | 255.255.255.128 (/25) | 512 | 126 |
| 10 | 255.255.255.192 (/26) | 1024 | 62 |
| 11 | 255.255.255.224 (/27) | 2048 | 30 |
| 12 | 255.255.255.240 (/28) | 4096 | 14 |
| 13 | 255.255.255.248 (/29) | 8192 | 6 |
Chart 13 Class B Subnet Planning
| NO. “BORROWED” HOST BITS | SUBNET MASK | NO. SUBNETS | NO. HOSTS PER SUBNET |
| 14 | 255.255.255.252 (/30) | 16384 | 2 |
| 15 | 255.255.255.254 (/31) | 32768 | 1 |
Appendix C
Product Specifications
| General | |
| Standards | IEEE802.3 10BASE-T Ethernet (twisted-pair copper) IEEE802.3u 100BASE-TX Fast Ethernet (twisted-pair copper) ANSI/IEEE802.3 Auto-negotiation IEEE802.3x Flow Control IEEE802.1p Priority Queues IEEE802.1Q VLAN IEEE802.1d Spanning Tree |
| Interface | Eight 10/100BASE-T Ethernet port One SC connector for 100FX fiber (ES-2008-SC, ES-2008-SC30) One RJ-45 connector for 1000Base-T (ES-2008-GTP) One console port |
| Data Transfer Rate | Ethernet: 10Mbps(half duplex), 20Mbps (full duplex) Fast Ethernet: 100Mbps (half duplex), 200Mbps(full duplex) |
| Cabling | 10BASE-T: UTP Cat.3, 4, 5 (100 m) 100BASE-TX: UTP Cat.5 (100 m max.) 1000Base-T: UTP Cat.5 (100m Max) (ES-2008-GTP) 100BASE-FX: (ES-2008-SC, ES-2008-SC30) 50~62.5/125-micron multi-mode fiber-optics (ES-2008-SC) 8~10/125 micron single-mode fiber-optics (ES-2008-SC30) |
| Full/Half Duplex | Full/Half duplex for 10/100Mbps speeds |
| Media Interface Exchange | All ports MDI-II/MDI-X auto-sensing. |
| Performance and Management | |
| Backplane | Non-blocking full wire speed forwarding rate at 3.8Gbps |
| Packet Forwarding Rate | 14880 PPS for 10BASE-T 148800 PPS for 100BASE-TX/FX |
| Switching Method | Store-and-forward |
| MAC Address Table | 8000 entries per main switch |
| Data Buffer | 256 Kbyte |
| VLAN | IEEE 802.1Q tag-based VLAN, 4095 Max Port-based VLAN |
| IEEE 802.1p Priority Queues | 2 queues |
| Port Trunking | IEEE802.1ad port trunking, up to 4 groups, up to 8 ports for each group |
| Port Security | Static MAC address filtering |
| Multicasting | Support IGMP snooping |
| Broadcast Storm | Support broadcast storm control |
| Port Mirroring | All ports support port mirroring |
| Management | Local console Telnet Web-Based management SNMP |
| Management Security | Username/Password needed for Console, Telnet and Web management authentication |
| MIBs | RFC 1213(MIB-II) RFC 1493(Bridge MIB) RFC 1643 |
| RMON | Support RMON 4 groups (1,2,3,9) |
| Console Port | DB-9 RS-232C |
| Physical and Environmental | |
| Weight | Main switch: 1.08Kg |
| LED | Main switch: power, 10/100Mbps, LK/ACT, FD/COL 100FX Fiber (ES-2008-SC and ES-2008-SC30): LK/ACT, FD/COL 1000Base-T (ES-2008-GTP): 1000M, LK/ACT, FD/COL |
| Dimensions | 250(W) x 132(D) x 37(H) mm |
| Power Supply | 100 - 240VAC 50/60Hz internal universal power supply |
| Power Consumption | 17W max |
| Operating Temperature | 0°C~45°C (32°F to 113°F) |
| Operational Humidity | 10% to 90% (Non-condensing) |
| EMI | FCC Class A CE |
| Safety | UL, cUL |
Index
A
Acceptable Frame Type 9-7, 15-6
Accessing the SMT
Console Port. 13-1
Telnet 13-1
Aggregator Information. 7-3
All High Before Low 5-2
Analysis Port. 11-2, 15-3
Auto Negotiation. 6-2
B
Bridge Transmit Delay Bound 5-2
Broadcast Storm Filter Mode.5-2, 15-15
C
Cabling Length 19-5
Calculating Subnet Mask.
Change Switch IP Address. 14-3
Change System Password 14-5
Change SystemUsername 14-4
Classes of IP Addresses .L
Configuration File
Restore 18-5
Configuration File. 18-4
Restore. 18-5
Backup 18-4
Console Port Communication Settings 19-2
Console Port Settings. 13-2
D
Data path loop. 19-5
Device Information 14-3
Dynamic Port Trunking 7-1
Advantages. 7-1
Requirements 7-1
Dynamic VLAN. 9-2
E
Enable Delay Bound 5-2
F
Faulty cables 19-5
FIFO......See First Come First Served
Filename Convention
Firmware and Configuration Files 18-1
Note for web configurator. 18-1
Firmware Upgrade 18-1
Requirement for web configurator 18-1
Via Console Port. 18-2
Warning 18-1
Web Configurator 18-3
Firmware Version 17-3
Firmware Version Warning 18-1
First Come First Served 5-2
Flow Control. 6-2, 13-2
Forgot My Login Password 19-4
G
GARP.... See Generic Attribute
Registration Protocol
GARP VLAN Registration Protocol.9-2
General Switch Setup. 14-2
Generic Attribute Registration Protocol 9-2
GVRP ... See GARP VLAN Registration Protocol
GVRP Configuration, SMT 16-6
1
IEEE 802.1D. 10-1
IEEE 802.1Q......See Tag-Based VLAN
IEEE 802.1Q VLAN......See Tag-Based VLAN
IEEE802.3ad 7-1
IGMP. 5-3,8-5
Configure 8-6
Examples 8-6
Message Types 8-5
placement of multicast source .... 8-6
Query Mode. 8-6
IGMP Query Mode. 5-3, 8-6
IGMP snooping 8-5, 8-9
IGMP Snooping view 8-9
Ingress Filtering. 9-7, 15-6
Internet Group Multicast Protocol.... See IGMP
Introducing the SMT 13-1
IP Subnetting.. L
IP Classes.. L
L
LACP......See Link Aggregate Control Protocol
Port State Activity 16-9
Status 7-4
LACP Group Setting
SMT. 16-7
LACP State Activity. 7-4
LACP Status
SMT. 16-9
LACP Work Ports. 7-3
Link Aggregate Control Protocol .... 7-1
Link Aggregation......See Port Trunking
M
MAC Address Filter 15-9
MAC Address Filtering.....8-12, 15-11
MAC Address Time Out. 15-14
MAC Table Address Entry Age-out time 5-2
Management Information Base (MIB) 12-2
Mirror port 11-1
Miscellaneous Configuration 15-13
Monitor port. 11-1
Monitor Ports. 11-2
N
Non-standard network cables 19-5
P
Path Cost. 10-1
Port Configuration 6-1
Port Mirror State 15-3
Port Mirroring. 11-1
Configuring. 11-1, 15-2
Mirror port 11-1
Monitor port. 11-1
Port Mirroring State 11-2
Port Security 8-11
Port Security 15-13
Port Statistics. 6-2, 17-2
Port Status. 17-1
Port Status. 6-2
Port Trunking. 7-1
Configuring. 7-2, 15-1
System Priority 7-2
Port VLAN ID 9-6
Port-Based VLAN. 9-1, 9-3, 15-7
Priority Configuration 15-8
Priority Level 15-8
Priority Queue Assignment 5-3
Protocol Enable Settings 5-3
Protocol Related Configuration 16-1
R
Recommended Path Cost. 10-1
Root Path Cost 10-1
Root Port 10-1
S
Setting Max Bridge Transmit Delay Bound. 15-16
Setting up Your Computer's IP Address
Macintosh OS 8/9 H
Macintosh OS X. I
Windows 2000/NT/XP. D
Windows 95/98/Me. A
Simple Network Management Protocol 12-1
SMNP Community Strings 16-5
SMT See System Management Terminal Control Key. 13-4
Idle time out. 13-1
Login Screen 13-2
Main Menu. 13-5
Menu Breakdown 13-4
Navigation. 13-3
Overview. 13-3
Sniffer port.... See Mirror Port
SNMP .See Simple Network Management Protocol
Agent 12-1
Community strings. 12-3
Configuring 12-2
Get. 12-2
Manager 12-1
Trap. 12-2
Trap Manager. 12-2
Trap Managers 12-4
Version 12-1
SNMP Agent. 12-1
SNMP Configuration SMT 16-4
SNMP Manager 12-1
SNMP System Options 16-4
SNMP Trap Manager 16-5
Source port.... See Monitor Port
Spanning Tree Protocol.... See STP
Speed. 19-1
Static MAC Address 8-10
Add 8-10, 15-10
Advantages. 8-10
Static MAC Address 15-10
Static Trunk Group Information .... 7-3
STP 10-1
Activating 10-2, 16-2
Configuring 16-1
Forward-Delay Time 10-3
Hello Time 10-3
MAX Age 10-3
Parameters. 10-2, 16-2
Port Configuration 10-4
Port State. 10-5
Port Status 10-5
Priority 10-3
Root Bridge. 10-3
Root Path Cost 10-4
Root Port. 10-4
STP Parameters Per Port. 16-3
Subnet Masks.. .M
Switch Configuration 5-1
Switch Information 17-3
System Management Terminal 13-1
T
Tag-Based VLAN. 9-1, 9-4, 15-5
Advantages 9-1
Port Settings. 9-6
Tag-Based VLAN Member 15-7
Traffic class 15-8
Trap Managers. 12-4
Troubleshooting 100M LED. 19-1
FD/COL LED 19-2
Troubleshooting Console Port 19-2
Improper Network Cabling and Topology. 19-5
Internet Browser Display 19-4
LK/ACT LED 19-1
Login Password 19-4
Power LED. 19-1
Telnet. 19-3
Web Configurator 19-3
Trunk groups 7-1
Trunk State 7-4
Trunking 7-1
State Activity 7-4
U
Using LEDs To Diagnose Problems 19-1
V
VID...... See VLAN Identifier
Virtual LAN.... See VLAN
VLAN
Create New Group 15-7
Dynamic 9-2
Tag-Based. 9-4
VLAN 9-1
Change Group Settings 15-7
Delete Group 15-8
Port-Based 9-3
SMT Configuration. 15-4
Types 9-1
VLAN 15-4
VLAN Identifier 9-1
VLAN Mode. 5-3,9-2,15-4
VLAN Type. 9-2, 15-4
Port-Based 9-1, 15-7
Tag-Based. 9-1, 15-5
W
Weighted Round Robin 5-2
WRR...... See Weighted Round Robin
Z
ZyNOS F/W Version. 18-4
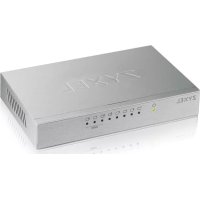
- Dimension ES-2008
- User's Guide
- Copyright
- Copyright ©2003 by ZyXEL Communications Corporation
- Disclaimer
- Trademarks
- ZyXEL Limited Warranty
- NOTE
- Online Registration
- Information for Canadian Users
- Caution
- Interference Statements andWarnings
- FCC Interference Statement
- FCC Warning
- CE Mark Warning:
- Taiwanese BCIQ A Warning:
- Certifications
- Customer Support
- Table of Contents
- Chapter 8 Filter and Security Setup 8-5
- Chapter 9 VLAN. 9-1
- Chapter 10 Spanning Tree Protocol. 10-1
- Chapter 11 Port Mirroring 11-1
- Chapter 12 SNMP 12-1
- Chapter 13 Introducing the SMT 13-1
- Chapter 14 Basic System Setup 14-1
- Chapter 15 Switch Configuration. 15-1
- Chapter 16 Protocol Related Configuration 16-1
- Chapter 17 Status and Counters 17-1
- Chapter 18 Firmware and Configuration File Maintenance. 18-1
- Chapter 19 Troubleshooting. 19-1
- Appendix A Setting up Your Computer's IP Address .A
- Appendix B. L
- IP Subnetting .L
- Appendix C Product Specifications.
- Index W
- List of Figures
- List of Tables
- Preface
- About The ES-2008 Series Switches
- About this User's Guide
- General Syntax Conventions
- Glossary
- Part I:
- Getting Started
- Chapter 1
- Getting to Know Your ES-2008
- Features
- Management Features
- Management Methods
- Console and Telnet Management
- Web Configurator
- Applications
- Standalone Workgroup
- Bridging Application
- VLAN Application
- Chapter 2 Hardware Description and Installation
- Hardware Installation
- Hardware Connections
- Front Panel
- The Ethernet Connections
- Auto-Sensing 10/100Base-TX RJ-45 Ports (Auto MDI/MDIX)
- Auto-Negotiating 10/100Base-TX RJ-45 Ports
- Network Cable Types
- Front Panel LEDs
- The PWR LED
- 10/100M Ethernet Port LEDs
- The Fiber Port
- The Gigabit Port
- Rear Panel
- Console Port
- Turning On the Switch
- Chapter 3
- Introducing the Web Configurator
- Accessing the Web Configurator
- You must use Internet Explorer 5.0 or later versions.
- The Navigation Panel
- The Web Configurator Front Panel Display
- Commonly Used Buttons
- General Switch Information
- Switch Console Port Settings
- Chapter 4
- Basic Switch Configuration
- Setting the IP Address of the Switch
- Changing SystemUsername and Password
- Resetting the Switch
- Factory Default
- Rebooting the Switch
- Part II:
- Advanced Settings
- Chapter 5
- Advanced Switch Configuration
- Switch Configuration
- Chapter 6
- Port Control
- Configuring the Ethernet Ports
- Port Status
- View Port Status
- Port Statistics
- Port Statistics
- Chapter 7
- Port Trunking
- Introduction
- Trunk Groups
- Dynamic Port Trunking
- Requirements
- Configuring Port Trunking
- Viewing Static Trunk Group Information
- State Activity
- Chapter 8
- Filter and Security Setup
- IGMP
- Configuring IGMP
- IGMP Examples
- Example 1: Select an IGMP Server Automatically
- Example 2: Select an IGMP Server Manually
- Example 3: Disable IGMP on the Switch
- Viewing IGMP Snooping Information
- Static MAC Address
- Adding Static MAC Address
- Port Security
- MAC Address Filtering
- Part III:
- Advanced Applications
- Chapter 9 VLAN
- Introduction
- VLAN Types
- Port-Based VLAN
- Tag-Based VLANs (IEEE 802.1Q VLAN)
- Dynamic VLANs
- Selecting VLANSupport
- Port-Based VLAN Configuration
- Tag-Based VLAN Configuration
- All ports in the same VLAN must be in the same trunk group.
- VLAN Configuration
- Configure Port Settings
- Chapter 10
- Spanning Tree Protocol
- Introduction
- Activating Spanning Tree Protocol
- Configuring Spanning Tree Parameters
- Viewing Root Bridge Information
- Configuring Spanning Tree Port Parameters
- Viewing STP Port Status
- Chapter 11
- Port Mirroring
- Introduction
- Configuring Port Mirroring
- Chapter 12 SNMP
- About SNMP
- Trap Manager
- Configuring SNMP
- Part IV:
- Using the SMT and System Maintenance
- Chapter 13
- Introducing the SMT
- Introduction
- Accessing the SMT Using Telnet
- Accessing the SMT Using the Console Port
- Establishing a Console Port Connection
- Initial SMT Screen
- The user name and password are case sensitive.
- The SMT Overview
- Navigating the SMT Interface
- SMT Screen Navigation
- The Control Keys
- SMT Main Menu
- SMT Main Menu Summary
- Chapter 14
- Basic System Setup
- Introduction
- Administration Configuration
- General Setup
- Ethernet IP Configuration
- Changing the System User Name
- Changing the System Password
- Chapter 15
- Switch Configuration
- Port and Trunk Group Settings
- Port Mirroring
- VLAN
- Setting VLAN Mode
- Tag-Based VLAN Configuration
- Port-Based VLAN Configuration
- Creating a New VLAN Group
- Changing VLAN Group Settings
- Deleting a VLAN Group
- Priority Configuration
- MAC Address Configuration
- Static MAC Address
- Editing a Static MAC Address
- Deleting a Static MAC Address
- MAC Address Filtering
- Editing MAC Address Filter
- Deleting MAC Address Filter
- Miscellaneous Configuration
- Port Security
- MAC Address Time Out
- Broadcast Storm Filter Mode
- Setting Max Bridge Transmit Delay Bound
- Chapter 16
- Protocol Related Configuration
- Introduction
- STP Configuration
- Enable STP
- Configure System Parameters
- Configuring STP Parameters Per Port
- SNMP Configuration
- System Options
- Community Strings
- Trap Manager
- GVRP Configuration
- LACP Configuration
- LACP Group Setting
- Port State Activity
- LACP Group Status
- Chapter 17
- Status and Counters
- Status and Counters
- Port Status
- Port Statistics
- General Switch Information
- Chapter 18
- Firmware and Configuration File Maintenance
- Filename Convention
- Firmware Upgrade
- Firmware Upgrade Via Console Port
- Firmware Upgrade Using the Web Configurator
- Figure 18-5 Web Configurator: Successful Firmware Retrieval
- Configuration File Maintenance
- Backup Configuration
- Figure 18-7 Web Configurator: Backup Configuration File Successful
- Restore Configuration
- WARNING! DO NOT INTERRUPT THE FILE TRANSFER PROCESS AS THIS MAY PERMANENTLY DAMAGE YOUR SWITCH.
- Figure 18-9 Web Configurator: Successful Configuration File Retrieval
- Part V:
- Additional Information
- Chapter 19
- Troubleshooting
- Using LEDs to Diagnose Problems
- Power LED
- The LK/ACT LED
- The 100 LED
- The FD/COL LED
- Console Port
- Telnet
- Web Configurator
- LoginUsername and Password
- Improper Network Cabling and Topology
- Appendix A
- Setting up Your Computer's IP
- Address
- Windows 95/98/Me
- Installing Components
- Configuring
- Verifying Settings
- Windows 2000/NT/XP
- Macintosh OS 8/9
- Macintosh OS X
- Appendix B
- IP Subnetting
- IP Addressing
- IP Classes
- Host IDs of all zeros or all ones are not allowed.
- Therefore:
- Subnet Masks
- Subnetting
- Example: Two Subnets
- "borrowing") determines the number of hosts you can have on each subnet.
- Example: Four Subnets
- Example Eight Subnets
- Subnetting With Class A and Class B Networks.
- Appendix C
- Product Specifications
- Index
- A
- B
- C
- D
- E
- F
- G
- 1
- L
- M
- N
- P
- R
- S
- T
- U
- V
- W
- Z
Marque : ZYXEL
Modèle : ES-2008
Catégorie : Switch réseau