TS512MMP810EU - Lecteur multimédia portable TRANSCEND - Notice d'utilisation et mode d'emploi gratuit
Retrouvez gratuitement la notice de l'appareil TS512MMP810EU TRANSCEND au format PDF.

| Type de produit | Lecteur multimédia portable MP3/photo |
| Marque | TRANSCEND |
| Modèle | TS512MMP810EU |
| Mémoire interne | 512 Mo |
| Type d'écran | LTPS LCD 2 pouces (640 x 240 pixels) |
| Formats audio pris en charge | MP3, WMA |
| Formats photo pris en charge | JPEG |
| Radio FM | Oui, avec mémoire pour 10 stations |
| Enregistrement vocal | Oui, via microphone intégré |
| Sortie vidéo | Oui, port A/V pour TV ou projecteur |
| Impression directe | Oui, compatible PictBridge |
| Extension mémoire | Slot carte SD/MMC (jusqu'à 4 Go) |
| Connectique | USB 2.0/1.1, prise casque 3,5 mm, port A/V, port DC |
| Alimentation | Batterie lithium-ion rechargeable intégrée 1800 mAh |
| Autonomie | 8 à 10 heures de lecture |
| Dimensions (L x l x h) | 87,9 x 70,2 x 21,7 mm |
| Poids (avec batterie) | 145 g |
| Température de fonctionnement | 0°C à 60°C |
| Entretien et nettoyage | Ne pas utiliser de chiffon humide ; éviter l'humidité et les températures extrêmes |
| Sécurité | Verrouillage des touches, arrêt automatique réglable |
| Pièces détachées | Batterie spécifique Transcend (référence non communiquée) |
| Réparabilité | Ne pas ouvrir le boîtier ; contacter un service agréé |
FOIRE AUX QUESTIONS - TS512MMP810EU TRANSCEND
Questions des utilisateurs sur TS512MMP810EU TRANSCEND
0 question sur cet appareil. Repondez a celles que vous connaissez ou posez la votre.
Poser une nouvelle question sur cet appareil
Téléchargez la notice de votre Lecteur multimédia portable au format PDF gratuitement ! Retrouvez votre notice TS512MMP810EU - TRANSCEND et reprennez votre appareil électronique en main. Sur cette page sont publiés tous les documents nécessaires à l'utilisation de votre appareil TS512MMP810EU de la marque TRANSCEND.
MODE D'EMPLOI TS512MMP810EU TRANSCEND
T.sonic Photo User's Manual
Introduction
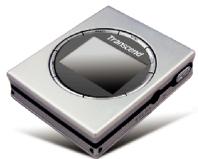
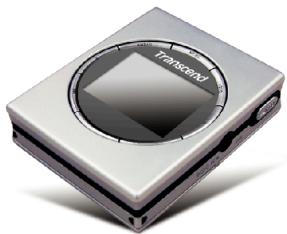
Congratulations on purchasing Transcend's MP3 Photo Player - T.sonic Photo. Transcend's T.sonic Photo does more than just your usual MP3 Player. The Player is a high quality, high spec, multifunctional device that includes a 2" High-Resolution color LCD screen for viewing photos. T.sonic Photo includes a video-out port that allows you to connect to a TV or projector for viewing photos or making presentations. The unit supports MP3, WMA music playing, and JPEG photo viewing; it also has an expansion slot that supports SD/MMC memory cards. The MP3 player's functions have extended features like 5 EQ (Equalizer) modes and voice recording. T.sonic Photo from Transcend is your best choice of personal digital partner. With Transcend's T.sonic Photo, you can make your music and photo collections mobile, it brings sight to your ears.
Specifications
| 2" High Resolution LCD Panel (640 x 240 pixels) |
| Embedded Flash memory (512MB) |
| Supports MP3/WMA with 5 EQ Effects |
| Colorful JPEG Photo Viewing and Storage |
| Voice Recording |
| Video-Out Port |
| FM Tuner: Memory for 10 stations |
| A-B Repeating Function |
| Supports SD/MMC Card Reading |
| PictBridge compatible for direct printing to any PictBridge-enabled printer |
| Rechargeable lithium-ion battery (lasts 8~10 hours on a full charge) |
| Dimensions: 87.9 mm x 70.2 mm x 21.7 mm |
| Weight: 145 g (including battery) |
Caution: Safety Instructions
Use the following safety guidelines to help protect you and your T.sonic Photo from potential damage.
For Use
- Avoid using or placing this product in an environment above 60^ or below 0^ .
- Do not allow this product to become damp or wet from water or any other liquids.
- Do not place this product in an environment with a strong magnetic field.
- Do not place this product in an environment that vibrates or is unstable.
- Do not use a damp/wet cloth to wipe or clean the exterior case and/or the LCD panel.
- Only the DC adapter specified for this product can be used.
-
Do not use or store your T.sonic Photo in the environments listed below:
-
Direct sunlight
- Next to an air conditioner, electric heater or other heat sources
- In a closed car that is in direct sunlight
For Transporting
- Do not pack this product into luggage without the proper padded support. Other items in the luggage may damage the T.sonic Photo without the proper padding.
- Avoid squeezing the product to prevent damage to the LCD panel.
- Avoid placing objects onto the T.sonic to prevent damage.
Caution: Storage
PLEASE BACK UP YOUR DATA REGULARLY. TRANSCEND WILL NOT BE HELD RESPONSIBLE FOR LOSS OF DATA.

Warning: Battery Use
ONLY USE THE TRANSCEND PROVIDED BATTERY. USE OF ANOTHER BATTERY MAY PRESENT A RISK OF FIRE OR EXPLOSION.

Warning: Power
- ONLY USE THE TRANSCEND PROVIDED DC ADAPTER APPROVED FOR USE WITH THE PORTABLE MP3 PHOTO PLAYER. USE OF ANOTHER DC ADAPTER MAY CAUSE A FIRE OR EXPLOSION.
- Before you connect T.sonic Photo to an electrical outlet; check the DC adapter voltage rating to ensure that the required voltage and frequency match the available power source.
- To remove T.sonic Photo from all power sources, turn T.sonic Photo off and disconnect the DC adapter from the electrical outlet.
- Be sure that nothing rests on your DC adapter's power cable and that the cable is not located where it can be tripped over or stepped on.

Caution: Audio
- Repeated or regular use of headphones or earphones at volume levels above 80 decibels can give a false impression that the audio level is not adequate. End users may try to progressively increase the volume control therefore risking damage to their ears.
- To protect your health and your hearing, keep the volume of your MP3 player below 80 decibels and do not use for an extended period of time. Stop use if symptoms like headaches, nausea, or hearing disorders occur.
- Your MP3 player is limited to a volume level of 100 decibels.
- Both the MP3 player and the earphones are compliant with the French regulation concerning musical Walkmans (24th July 1998 Order).
- Before using other earphones, confirm that their technical features are similar to those of the original set.
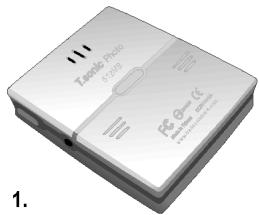
Product Overview
Front View
Side View
Rear View
Side View

Top View
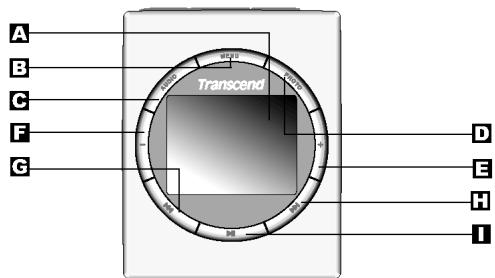
Front View
A 2” LTPS LCD Panel - Colorful display interface.
- Menu Button -Press the menu button to view Menu options. Press the Menu Button repeatedly to move between different Menu configurations and modes (e.g. Audio / File / Settings).
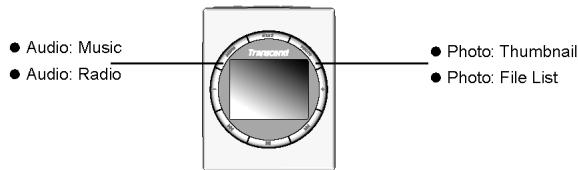
Audio Button -
Press the Audio Button to switch to the Audio Mode: Music (Pressing the Audio Button again can shift between Music and Radio).
Press and hold the Audio Button to switch the data source between embedded Flash memory and external memory cards.
D Photo Button -
There are two ways to view the photo files, File List and Thumbnail. Press the photo button to shift between these two file-browsing types.
Press and hold the Photo Button to switch the data sources between embedded Flash memory and external memory cards.
Volume (Up) Button + - Press the Volume Up Button to increase the volume.
F Volume (Down) Button - Press the Volume Down Button to decrease the volume.
Previous Button - Press the Previous Button to move the cursor to the previous item, play the previous item, or select the previous item in the menu.
Next Button - Press the Next Button to move the cursor to the next item, play the next item, or select the next item in the menu.
Enter/Play Button - Press the Enter/Play Button to execute selected functions, display selected photos or play music. Press the Enter/Play Button again to pause the music while listening to a song. Pressing and holding the Enter/Play Button will stop all functions and the device will return to Audio/Photo mode.
Side View
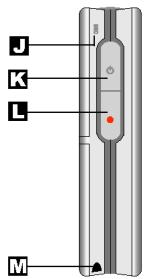
Mic. - Integrated microphone allows you to voice record.
Power Button - Press and hold the Power Button for 2 seconds to turn the T.sonic Photo on and off.
Record Button - Press and hold the record button for 2 seconds to start the recording function. Press a second time to stop the recording.
Hand Strap Hole - Attach the hand strap.
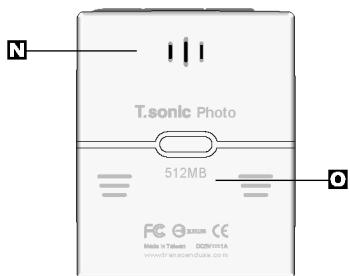
Rear View
Speaker - Speaker for playing music or recorded files
Battery Slot - Rechargeable Battery Slot.
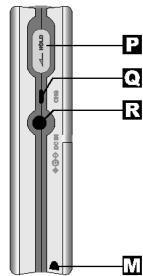
Side View
Lock Switch - Move this switch to lock all buttons when you want to prevent them from being pressed accidentally (Note: When your T.sonic Photo is locked, you cannot turn your T.sonic Photo on or off).
Battery LED Indicator - Red light indicates the battery is charging, green light indicates the battery has finished charging.
DC Adapter Port - Connect the DC Adapter.
M Hand Strap Hole - Attach the hand strap
Top View
S Earphones Port - Attach the earphones/speakers.
USB 2.0/1.1 Port - Connect your T.sonic Photo to your computer.
SD/MMC Card Slot - Supports SD and MMC memory cards.
A/V Out Port - Connect A/V Cable.
Interface and Icon Description
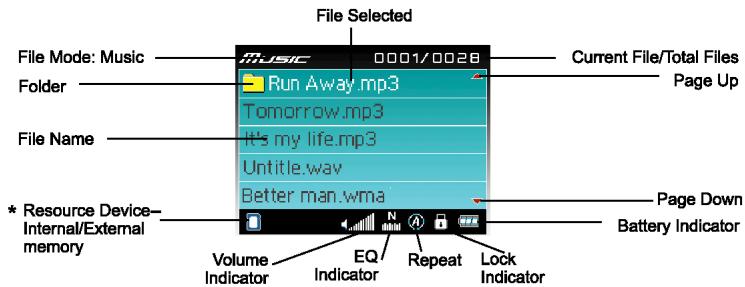
Audio Mode: Music

: Battery Indicator

: Battery in charge

: EQ indicator - Normal

: EQ indicator—Jazz
- If a memory card is inserted in the card slot it is automatically selected as the default resource device.

: EQ indicator - Pop

: Resource Device: Internal Flash Memory

: EQ indicator - Rock

: Resource Device: External SD/MMC C

: EQ indicator - Classic

:Repeat-All songs

: Lock indicator

:Repeat-One song

:Volumeindicator

: Random
Audio Mode: Radio
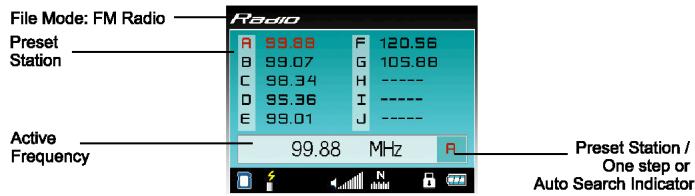

: Radio Station Searching
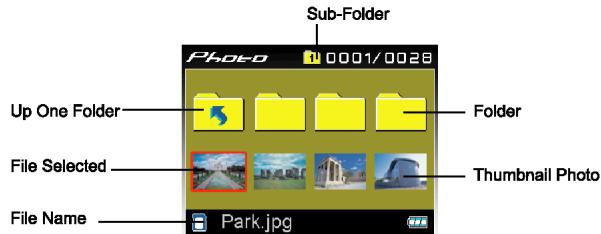
Photo Mode : Thumbnail Mode

Sub-Folder-T.tonic Photo can support up to 10 levels of sub folders.
Interface and Icon Description
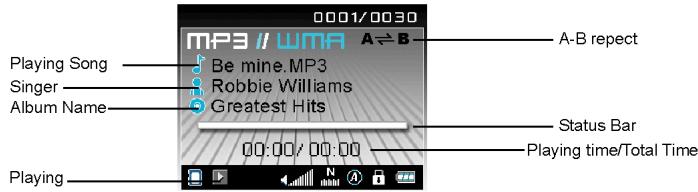
Music Playing

:Rewind

: Forward

:Pause
Voice Recording
Setup
System Requirements
To connect your T.sonic Photo to a computer, the system requirements are:
- Desktop or notebook computer with a USB port
-
One of the following operating systems:
-
Windows 98/98SE
-
Windows ME (No driver needed)
-
Windows 2000 SP3 or later (No driver needed)
-
Windows XP (No driver needed)
Driver Installations
Windows® 98/98SE:
- Turn on the computer. Verify the USB port is enabled and working properly (Do not plug your T.sonic Photo into the USB port at this time).
- Insert the Driver CD into the CD-ROM drive.
- If the CD doesn't auto-start, then execute Setup.exe in the
:\Driver\Windows98 for Windows 98 of the driver CD. The setup menu will appear. - After selecting the Install Driver button from the setup menu, the InstallShield Wizard will guide you through the installation process.
- Restart your computer to complete the driver installation.
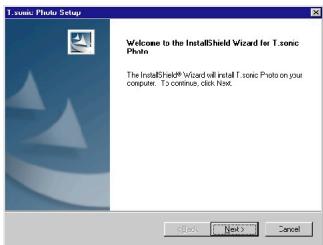
Fig1: Installation Wizard
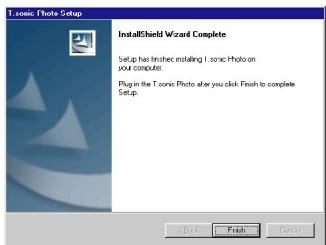
Fig2: Installation Complete
Connecting to a Computer
Using the USB cable provided, connect your T.sonic Photo to a computer to transfer photo, audio or other data files. Note: If your computer operating system is Windows 98, please install the driver first.
- Connect the smaller end of the USB cable to the USB port on your T.sonic Photo.
- Connect the larger end of the USB cable to the USB port on your computer.
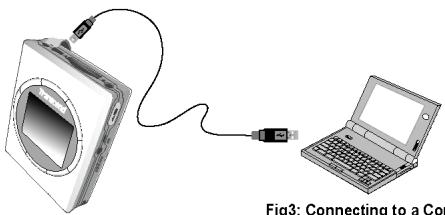
Fig3: Connecting to a Computer
Charging the Battery
Your T.sonic Photo has an integrated, rechargeable, lithium-ion battery (1800 mAh). Before you use your T.sonic Photo for the first time, you must charge the battery for at least 8 hours.
Warning
ONLY USE THE TRANSCEND PROVIDED BATTERY. USE OF ANOTHER BATTERY MAY PRESENT A RISK OF FIRE OR EXPLOSION.
- Connect the DC header of the adapter cable to the DC adapter port on your T.sonic Photo.
- Connect the power cord of the adapter cable to an electrical outlet. The Battery LED indicator on your T.sonic Photo will turn red. This means the lithium-ion polymer battery is charging.
- Once the Battery LED indicator turns green, your T.sonic Photo has finished charging and the battery is at a full charge.
- After charging for the first time, it will take approximately 4 hours to completely recharge the battery.
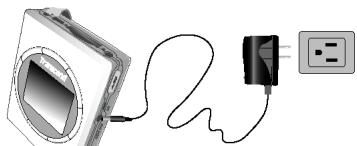
Fig 4: Charging the battery
Performing a Reset
www.transcendusa.com
If your T.sonic Photo stops responding, perform a reset. Files that are being transferred may be lost but other data is normally retained.
To perform a reset, press the Power Button and Menu Button simultaneously. The T.sonic Photo will turn off immediately. Then you can press the Power Button to turn on your T.sonic Photo again.
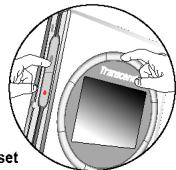
Fig 5:Performing a Reset
Operation
Turning the Power On/Off
Power On: Press & Hold the Power Button for 2 seconds to turn on your Tsonic Photo. The default screen is the Audio Mode - Music.
Power Off: Press & Hold the Power Button for 2 seconds to turn off your T.sonic Photo.
Power Save Mode: T.sonic Photo supports the auto power save function. If the T.sonic Photo is idle for a certain period of time, it will enter the power save mode automatically. You can set your power save mode time in the Menu options (The default Power Save time is disabled).
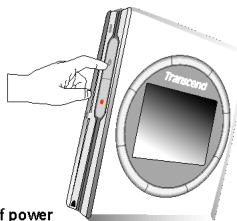
Fig 6: Press and hold to turn on/off power
Lock
Move the Lock Switch to lock or unlock the buttons on your T.sonic Photo. Lock the buttons when you want to prevent them from being pressed accidentally.
Note: When your T.sonic Photo is locked, you cannot turn your T.sonic Photo on or off.
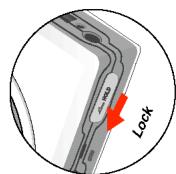
Fig 7: Lock Button
Downloading files from a PC to the T.sonic Photo
- Use the USB cable included in the package to connect T.sonic Photo to the USB port of your PC.
- A new USB mass-storage device will be found and T.sonic Photo will be listed as a new drive under your operating system.
- T.sonic Photo will automatically recognize your music (MP3/WMA/WAV) and photo (JPEG) files. In Audio Mode, you will only be able to select from your music catalogue; In Photo Mode, you will only be able to choose from your photo collection.
Note: If you store files other than MP3/WMA/WAV/JPEG in a folder and transfer the folder to T.sonic Photo. The device will only recognize those files listed above and will not recognize any other files, but these files will take up memory.
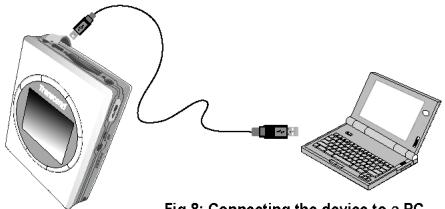
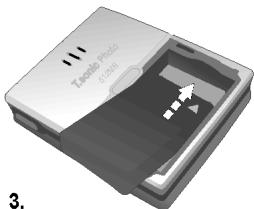
Fig 8: Connecting the device to a PC
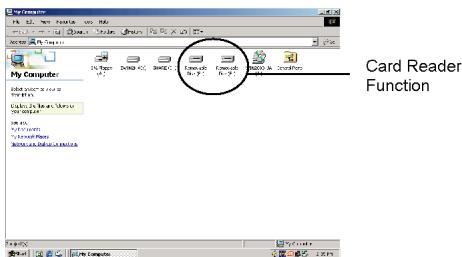
Fig 9: File Management in PC
Switching Between Audio and Photo Modes
www.transcendusa.com
- There are two modes on your T.sonic Photo, Audio Mode and Photo Mode.
- Press the Audio Button to switch to the Audio Mode: Music. Press the Audio Button again and you can switch to the Radio. Press the Audio Button repeatedly and you can switch between these two audio functions.
Note: Please insert your earphones when you switch to the FM Radio mode.
- Press the Photo Button to switch to the Photo Mode. There are two file-browsing types for photo files, Thumbnail and File List. Press the Photo Button repeatedly and you can switch between these two photobrowsing types.
Browsing Music Files
- Press the Audio Button to switch to the Music files (MP3\WMA) browsing page.
- Press the Next or Previous Button to select a file you want to play.
- Press and hold the Next or Previous Button to scroll between pages.
- Press the Enter/Play Button to play the music.
- Press the Volume Up or Down Button to adjust the music volume.
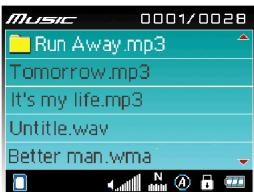
Fig10: Browsing music files
Playing Music Files
- Press the Enter/Play Button to play the music.
- While playing music, press the Enter/Play Button to pause the music.
- While playing music, press and hold the Enter/Play Button to stop the music, then return back to the Music browsing page.
- To begin using the A-B repeat function while playing music, press the Record Button once to mark the beginning of the track and press the Record Button again to mark the end section of the track you wish to repeat. To cancel the A-B repeat function, press the Record Button for a third time.
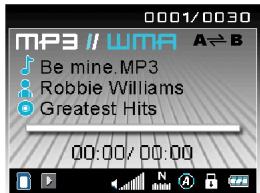
Fig11: Playing MP3/WMA music file
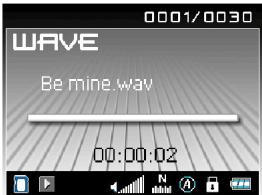
Fig12: Playing Wave voice file
Audio Mode: Radio
- Press the Audio Button repeatedly to switch between Music and Radio
- Press the Audio Button and switch to Radio. Note: Please insert your earphones when you switch to the FM Radio mode.
- Press the Next or Previous Button to search for available radio stations manually.
- Press and hold the Next or Previous Button to automatically search for available radio stations.
- If you would like to save a preferred radio station, press the Record Button. To listen to your preset stations, press the Enter/Play Button to hear each preset station one by one.
- If you would like to delete one or all of the preset radio stations, press the Menu Button and follow the Delete process as described in the " section in the Menu Chapter.
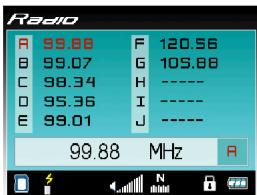
Fig13: FM radio
Browsing Photo Files
- There are two ways to view your photo files.
-File List
-Thumbnail
- Press the Photo Button repeatedly and
- you can switch between these two browsing methods.
- Press the Next or Previous Button to select a file you want to play.
- Press the Enter/Play Button to view the photo.
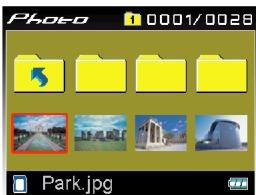
Fig14: Thumbnail Browsing
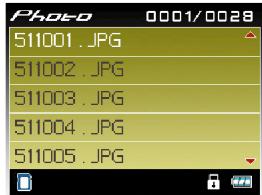
Fig15: File List Browsing
Viewing Photos and Automatic Slide Show
- In the Photo browsing page, press the Enter/Play Button to view the photo.
Note: Certain JPEG files cannot be recognized by the T.sonic Photo. In this instance, please use the bundled "T.sonic Photo Converter" Software to convert the files so that they can be recognized by the T.sonic Photo. - Press the Next or Previous Button to select the next or previous photo.
- While viewing photos, press the Enter/Play Button again to begin the auto slideshow.
- During the slideshow, press the Enter/Play Button again to pause the auto slideshow.
- While pausing the slideshow, press the Enter/Play Button again to resume the auto slideshow.
- Press and hold the Enter/Play Button to stop the auto slide show and return to the Photo browsing page.


Fig16: Photo Slide Show
Setting the Automatic Slide Show Timer
- The time in-between slides being displayed can be set to 1, 3, 5 or 7-second intervals.
- Press the Next or Previous Button to pan through the time interval settings and choose the delay you want.


Fig 17: Automatic Slide Show Timer
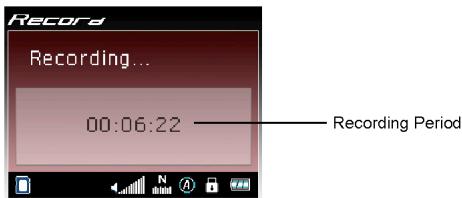
Recording
- Press and hold the Record Button to begin recording.
- The recording page will show the recording time.
- For better recording quality, hold the microphone as close as possible to the voice or sound being recorded.
- Press the Record Button again to stop recording and it will switch to the Audio Mode.
5 Press the Enter/Play Button to play the file you just recorded.
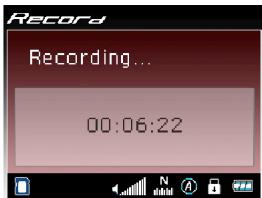
Fig 18: Recording Voice
Viewing Photos from a TV or Projector
- Use the A/V cable included in the package to connect the T.sonic Photo to the A/V port of your TV or projector.
- Plug the end with the yellow connector into the Video-In port and Red connector into the Audio-In port of your TV or projector.
- Plug the other end of the A/V cable into the A/V Port of your T.sonic Photo.
- Press and hold the Power Button for 2 seconds to turn on your T.sonic Photo.
- Insert the memory card into the card slot or choose the internal memory resource and your T.sonic Photo can slideshow the available JPEG photos stored on the memory card.
- The same operation applies when plugging the device into LCD screen for photo viewing.

Fig 19:Viewing Photos from a TV or Projector
Displaying a PowerPoint presentation
- Save a copy of your PowerPoint presentation as a JPEG file (*.jpg).
- Each slide in the presentation will be saved as an individual JPEG file.
Note: Certain JPEG files cannot be recognized by the T.sonic Photo. In this instance, please use the bundled "T.sonic Photo Converter" Software to convert the files so that they can recognized by the T.sonic Photo.
- Copy these files directly to your T.sonic Photo or to an MMC/SD memory card.
- Plug your T.sonic Photo directly into a projector using the units A/V port and cable.
- Choose the presentation slides that you want to show or set up an automatic slide show of your presentation.
Connecting to a Photo Printer(PictBridge)
Using the USB cable provided, connect your T.sonic Photo to a photo printer(PictBridge compatible) to print photo files.
- Display the photo you wish to print, press and hold the Record Button until the message box pops up
- Connect the smaller end of the USB cable to the USB port on your T.sonic Photo.
- Connect the larger end of the USB cable to the USB port on the photo printer.
Note: Please consult your photo printer manual for any special instructions regarding connecting devices
-
Follow the on-screen steps listed below to choose the hard copy picture type you wish to print:
-
Size: Photo Size. Sizes are dependent on the type of photo printer and the paper you are using.
- Copies: How many copies do you wish to print.
Note: These settings are dependent on the photo printer you use.
- Use Enter/Play Button to change the settings
- Press the Enter/Play Button to start printing or remove the USB cable to cancel the printing.
Setting Menu Operations
Menu Operations
- Press the Menu Button to open the settings menu.
- There are three setting menus: Audio Menu(Audio/File/Setting), Photo Menu(Photo/File/Setting) and Radio Menu(Radio/Setting)
- Press the Menu Button repeatedly to switch between these three configuration modes.
- After choosing one mode, press the Next or Previous Button to select the item you want to configure and then press the Enter/Play Button to change the value.
- After selecting the Basic Settings Mode, press the Menu Button again or press the Audio or Photo Button to cancel the settings menu operation.
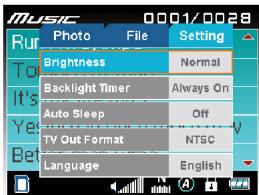
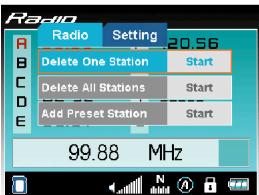
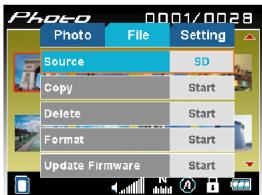
Fig 20: Pop Up Menu
Menu Introduction
1. Audio Control Mode
EQ Effectsrom: You can change your music tone to a different equalizer status. There are four modes to choose from:
- Normal (Default): Normal mode for music playing
Rock: Rock & Roll mode for music playing - Pop: Pop music mode for music playing
- Jazz: Jazz style mode for music playing
Classic: Classic style mode for music playing
Repeat and Random: When playing the music, you can repeat one selected song or all songs listed in the data source.
- Off (Default): Repeat function off.
- Single: Repeat playing a selected song
- All: Repeat all songs on the selected data source.
- Random: Randomly play different songs
2. Radio Control Mode(Radio Menu)
- Delete One Station: You can delete the currently selected preset station
- Delete All Stations: You can delete all preset stations
- Add Preset Station: You can add a new preset station.
3. Photo Control Mode(Photos Menu)
Slideshow Timer
- 1 Sec.: Change the photo delay time to 1 sec.
- 3 Sec. (Default): Change the photo delay time to 3 sec.
- 5 Sec.: Change the photo delay time to 5 sec.
- 7 Sec.: Change the photo delay time to 7 sec.
Browsing Type
- Thumbsail (Default): Pan through the stored photos by Thumbsail.
- File List: Pan through the stored photos by Listed Files
4. File Control Mode
Source: Select the data source for playing the music or photos. You can select the same function by pressing and holding the Audio or Photo Button. If a flash memory card is inserted in the card slot and a memory source is not specified the memory card will be automatically selected as the default memory source.
- SD/MMC: Select the external SD or MMC memory cards as your data source.
- Memory: Select the embedded flash memory as your data source.
Copy: Copy the selected file from the memory card to the embedded flash memory, or vice versa.
Delete: Delete the selected file
Format: Format the selected device.
(A Warning: Formatting the selected device will erase all the data.)
Update Firmware: You can download the latest firmware from Transcend's Web site to upgrade the functions of your
T.sonic Photo
Note: You must be connected to the Transcend website to download the latest firmware for your player.
5. Basic Settings Mode
Brightness: Adjust the brightness of the screen (If you choose a high level of brightness, it may reduce your battery life due to higher power consumption).
- Normal (Default): Standard screen brightness
High: Higher screen brightness. - Low: Lower screen brightness.
Backlight Timer: Turn off the backlight while playing the music. If there's no button action, the device will automatically turn off the backlight.
- 10 Sec.: The backlight will be turned off in 10 seconds.
- 30 Sec.: The backlight will be turned off in 30 seconds.
Always On (Default): The backlight will not be turned off automatically.
Auto Sleep: Will automatically turn off T.sonic Photo after a specified time frame
- 10 Min.: Power will be turned off after the device is idle for 10 minutes
- 30 Min.: Power will be turned off after the device is idle for 30 minutes
- 60 Min.: Power will be turned off after the device is idle for 60 minutes
- Off (Default): T.sonic Photo will not turn off automatically.
(Note: When you are playing MP3 music, listening to FM radio program, or slide-showing your photo collections,
T.sonic Photo's auto sleep function is overridden.)
TV Out Format: Adjusts the TV system
- NTSC (Default): Changes the Video-out signal to the NTSC TV system signal.
PAL: Changes the Video-out signal to the PAL TV system signal.
Language: Change the settings menu language. Supports 11 different languages.
- English (Default)
Italian
-
Portuguese
-
Simplified Chinese
French
Japanese
Russian
- Traditional Chinese
German
Korean
- Spanish
FAQ
This section covers common problems or questions you might encounter while using your Transcend T.sonic Photo. Do not try to open the case of your T.sonic Photo or the warranty will be voided. If a fault occurs, first check the points listed below. If you are unable to solve the problem with this information, please consult your dealer or service center.
Q: I cannot turn my Transcend T.sonic Photo on.
A: You may not be holding the Power Button down for long enough. Please press and hold the Power button down for at least 2 seconds. Check to see if the Lock Button is in the locked position. If so, move it to the unlocked position to turn on the device. If that doesn't solve the problem, T.sonic Photo may be out of power. You can connect the adapter to the T.sonic Photo then turn on the T.sonic Photo.
Q: What if the battery runs out of power?
A: If you see the capacity of the battery icon on your screen is empty, please recharge your battery by using the adapter.
See "Charging the Battery" section in the Setup Chapter.
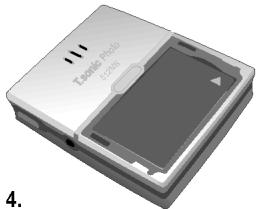
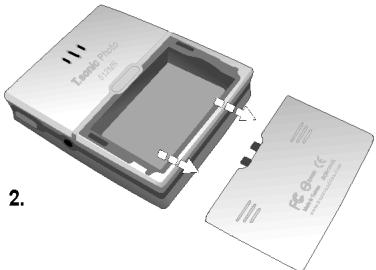
Q: How do I change the battery of my T.sonic Photo? (This will not void the warranty)
A: Verify that you are using a Transcend certified battery. Please be aware using another battery, which is not provided by Transcend, may cause a fire or explosion.
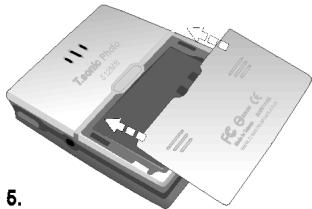
- Push the battery cover switch located on the rear of the unit and slide open the cover.
- Remove the battery
- Reinsert the screw before closing the cover.
Note: Do NOT force the battery into its slot. If the battery does not easily fit, make sure that you are inserting it correctly.
Warning
THERE IS A DANGER OF EXPLOSION IF THE BATTERY IS INSTALLED INCORRECTLY.
Warning
USE ONLY TRANSCEND APPROVED BATTERIES; USE OF ANOTHER BATTERY MAY PRESENT A RISK OF FIRE OR EXPLOSION.
Please contact your dealer or service center if you are not sure you can replace the battery by yourself.
Q: Where is my Stop button?
A: The Play/Pause button also functions as the Stop Button when it is held in for about 2 seconds.
Q: I cannot see or access music or photo files stored on my T.sonic Photo's internal memory?
A: Check that you do not have a memory card selected as the preferred memory source in the Menu settings.
Q: I am unable to hear music or recorded sounds through the Player's speaker.
A: First check that you do not have earphones plugged into the unit's earphone port, next check that you have the volume set to a high enough level.
Q: What size of external MMC/SD cards can my T.sonic Photo take?
A: Currently your T.sonic Photo can take MMC/SD cards up to 4GB in size.
Q: How much MP3 music can I store on my T.sonic Photo's internal memory?
A: You can store approximately 17 hours on the 512MB player.
Q: Transcend T.sonic Photo hangs/lags/stalls.
A: Whenever the Transcend T.sonic Photo hangs; you can follow the Reset process as described in the "Performing a Reset" section in the Setup Chapter.
Ordering Information
T.sonic Photo
Transcend P/N Capacity
TS512MMP810EU 512MB