
RL5010 Quick 1 - Lave-linge BLAUPUNKT - Notice d'utilisation et mode d'emploi gratuit
Retrouvez gratuitement la notice de l'appareil RL5010 Quick 1 BLAUPUNKT au format PDF.


| Type de produit | Lave-linge frontal ménager |
| Marque | Blaupunkt |
| Modèle | RL5010 Quick 1 |
| Capacité de lavage | 7 kg |
| Vitesse d'essorage maximale | 1200 tr/min |
| Classe énergétique | A++ |
| Nombre de programmes | 15 programmes incluant le cycle rapide Quick 1 |
| Programme Quick | Cycle rapide en 30 minutes pour petites charges |
| Dimensions (L × H × P) | 59,8 × 85 × 54 cm |
| Poids net | 65 kg |
| Alimentation électrique | 220-240 V, 50 Hz |
| Puissance absorbée | 2000 W |
| Consommation d'eau par cycle | 45 L |
| Niveau sonore en essorage | 78 dB |
| Affichage | Écran LED avec indicateur de programme |
| Sécurité enfants | Verrouillage des touches disponible |
| Détection de fuite | Système de protection anti-fuite intégré |
| Entretien du tambour | Fonction nettoyage du tambour à haute température |
| Indice de réparabilité | 8,2/10 |
| Pièces détachées | Disponibles pour le hublot, pompe de vidange, résistance, etc. |
FOIRE AUX QUESTIONS - RL5010 Quick 1 BLAUPUNKT
Questions des utilisateurs sur RL5010 Quick 1 BLAUPUNKT
0 question sur cet appareil. Repondez a celles que vous connaissez ou posez la votre.
Poser une nouvelle question sur cet appareil
Téléchargez la notice de votre Lave-linge au format PDF gratuitement ! Retrouvez votre notice RL5010 Quick 1 - BLAUPUNKT et reprennez votre appareil électronique en main. Sur cette page sont publiés tous les documents nécessaires à l'utilisation de votre appareil RL5010 Quick 1 de la marque BLAUPUNKT.
MODE D'EMPLOI RL5010 Quick 1 BLAUPUNKT
Step 1
Maintain a minimum 1.5 m/5 ft. straight boundary wire in front and behind of the docking station.
Strong WIFI

Nearby power

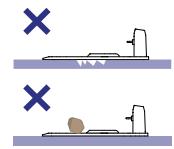


Warning: Please place the docking station on a flat and soft surface to ensure that the 40 cm long metal ground nails can be smoothly inserted into the ground. Watch for underground pipes.
Step 2
Peel off the insulation layer of the wire end by 10-15 mm/0.39-0.59 in., and properly insert the boundary wire into the black socket.

Step 3
To ensure stability, we recommend securing the boundary wire with pegs every 75 cm/2.5 ft.
Between 2 pegs: 75 cm/2.5 ft.


Warning:
Make sure the boundary wire is tightly attached to the ground. Do not place objects around the boundary wire to avoid affecting the robot's movement.
Step 4
Peel off the insulation layer of the other wire end by 10-15 mm/0.39-0.59 in., the boundary wire need to be properly inserted into the red socket.


Warning:
Please cut off the excess boundary wire.
Please don't put the boundary wire under the docking station.
Step 5
Install the back cover to make sure the docking station waterproof.

Step 6
Hammer the 2 metal nails into the lawn at the docking station head.

Step 7
Tighten the 4 plastic screws with a hex wrench to secure the station.

Step 8
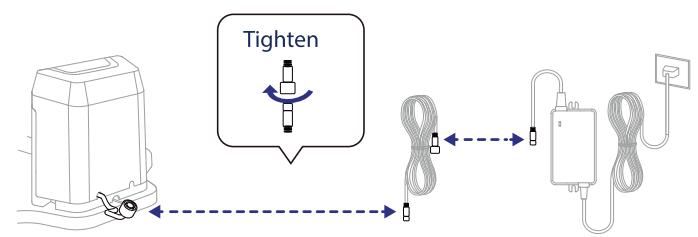
Connect the aviation plug at one end of the adapter to the docking station, then connect the adapter to the power supply.
Step 9
If the docking station light is solid white, it indicates that the installation of the boundary wire has been completed.

Step 10
Move the mower onto the docking station and clear away obstacles such as branches on the lawn to prepare for operation.
Step 1
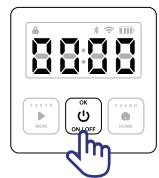
Power on/off

Press and hold 3s
Step 2
Unlock the mower
Enter the 4-digit PIN code to unlock it, the default PIN code is 0000. Click the OK button 4 times to confirm.
Confirm

Step 3
Start global mowing
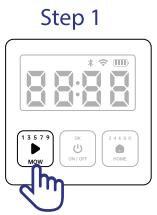

Warning: On error, consult manual for code solutions, then press MOW+OK to start mowing.
Step 4
Mower returns to the docking station


Download the Intelligent mower app


Download the Intelligent mower App
Intelligent mower APP can be downloaded from Apple APP Store or Google Play. Or scan the QR code to download and install Intelligent mower APP.
Follow the APP prompts to add the device.
Precautions:
Please make sure that the WIFI network is 2.4G before adding a device.
Install The Boundary Wire

Marque : BLAUPUNKT
Modèle : RL5010 Quick 1
Catégorie : Lave-linge