
TRIUM GALAXY - Téléphone mobile MITSUBISHI - Notice d'utilisation et mode d'emploi gratuit
Retrouvez gratuitement la notice de l'appareil TRIUM GALAXY MITSUBISHI au format PDF.


| Type d'appareil | Téléphone mobile |
| Services réseau | Appels, messagerie, répertoire |
| Messagerie vocale | Oui |
| Répertoire téléphonique | Oui, avec numéros et alertes |
| Messages | Boîte de réception, boîte d'envoi, rédaction, alertes |
| Journal des appels | Historique des appels, durée, coûts |
| Services GSM | Détournement d'appel, appel en attente, identification de l'appelant |
| Diffusion | Activation/désactivation, types de messages, alertes |
| Paramètres | Verrouillage clavier, langue, tonalités, affichage, sécurité |
| Outils bureautiques | Scratchpad, convertisseur de devises |
| Alertes | Oui, pour appels et messages |
| Sécurité | Fonctions de sécurité intégrées |
| Affichage | Personnalisable |
| Clavier | Verrouillable |
| Langues | Multilingue |
FOIRE AUX QUESTIONS - TRIUM GALAXY MITSUBISHI
Questions des utilisateurs sur TRIUM GALAXY MITSUBISHI
0 question sur cet appareil. Repondez a celles que vous connaissez ou posez la votre.
Poser une nouvelle question sur cet appareil
Téléchargez la notice de votre Téléphone mobile au format PDF gratuitement ! Retrouvez votre notice TRIUM GALAXY - MITSUBISHI et reprennez votre appareil électronique en main. Sur cette page sont publiés tous les documents nécessaires à l'utilisation de votre appareil TRIUM GALAXY de la marque MITSUBISHI.
MODE D'EMPLOI TRIUM GALAXY MITSUBISHI
Remove this card, fold it and put it in your wallet.
Galaxy
Menu Map
Trium
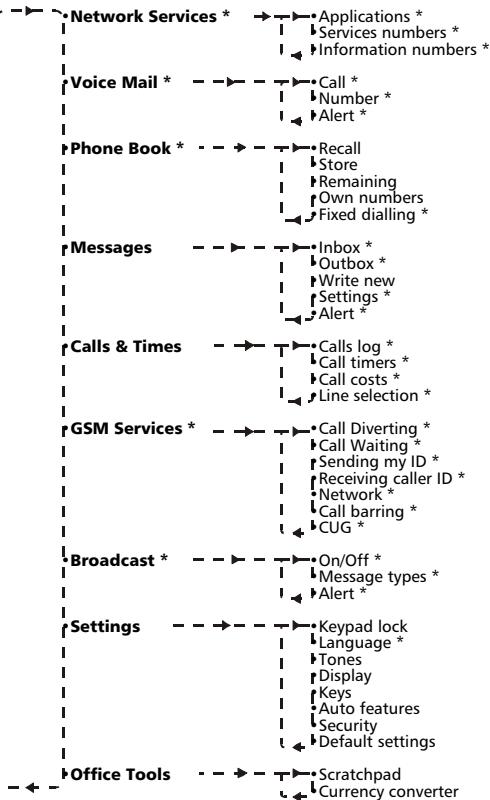
* The availability and appearance of these features in the menu are dependent upon your subscription and the services provided by your network operator
| L | # |
| # | sn#d |
suee eoe
a
/xe/e0
wnl
General operations
| Holding/retrieving a call |
| Viewing the last dialled numbers |
| Calling the voice mail centre |
| Reading a new SMS message |
| Choosing another ring tone |
| Press |
| Press and press ∩ or ∨ |
| Press and hold down ① |
| Press Read ∨ |
| Select Ring tone from the Set - Tones menu. Press ∅ or ∨ choose the ring tone and press |
Phonebook operations
| Storing a number | Press Ⓒ, select Phonebook, select Store, select Phone names or SIM names, enter the number and name |
| Dialling a stored number | Press ⓠ, select the entry, press ⓥ |
User Guide
Galaxy
USER OPERATIONS
This guide describes the operation of the Trium dual band GSM telephone the GALAXY
Edition 1, 1999.
Introduction
Thank you for purchasing the Trium Galaxy dual band mobile telephone. The mobile telephone described in this guide is approved for use on both the GSM 900 and 1800 networks. Services and display messages may be different dependant upon your operators implementation.
As with all types of radio transceivers this mobile telephone emits electromagnetic waves and conforms to international regulations in so far as it is used under normal conditions and in accordance with the safety and warning messages given below and on pages 11 - 13 and 16.
General safety
It is important to follow any special regulations regarding the use of radio equipment, due to the possibility of radio frequency, RF, interference. Please follow the safety advice given below.

Switch off phone and remove the battery when in an aircraft. The use of mobile telephones in an aircraft may endanger the operation of the aircraft, disrupt the cellular mobile phone network and is illegal. Failure to observe this instruction may lead to suspension or denial of mobile telephone services to the offender, or legal action, or both.

Switch off phone when at any refuelling point or near inflammable material.

Switch off phone in hospitals and any other place where medical equipment may be in use.

Respect restrictions on the use of radio equipment in fuel depots, chemical plants or where blasting operations are in progress.

There may be a hazard associated with the operation of phones close to inadequately protected personal medical devices such as hearing aids and pacemakers. Consult your doctor or the manufacturers of the medical device to determine if it is adequately protected.

Operation of phone close to other electronic equipment may also cause interference if the equipment is inadequately protected. Observe any warning signs and manufacturers recommendations.

Avoid prolonged contact between the antenna and your skin when the phone is switched on.
This apparatus is intended for use only when supplied with power from AC/DC adaptor chargers (FZA-0002A, FZA-0003A, FZA-0004A or FZA-0005A), desk top charger (FZA-0014A), and vehicle kits (FZA-0009A, FZA-0024A, FZA-0021A, FZA-0010A, FZA-0012A, FZA-0013A, FZA-0023A). Use of any other charger or adaptors will invalidate any approval given to this apparatus and may be dangerous.
The phone at glance
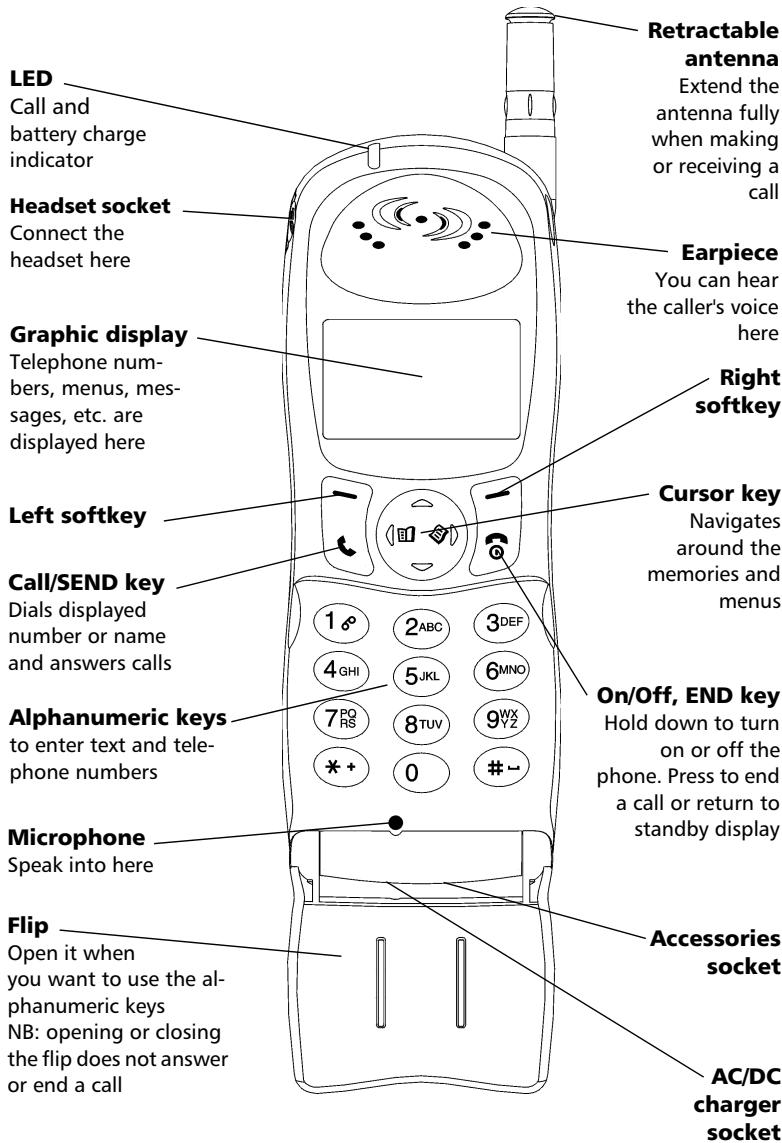
Keypad layout
List of keys

Softkeys or selection keys.
Perform the functions indicated by the text above it.

End, On/Off key. Long press to turn the phone on or off.
Press briefly to end or reject a call.
Short press during a menu operation will exit to the standby display

Send key. Press to make or answer a call.
Press in standby display recalls last dialled numbers.

Cursor key.
Press to the left to view the phonebook entries or return to the previous display.
Press to the right to enter the main menu and/or select a feature from displayed list.
Short press upwards to scroll up the menus. Press to enter volume adjustment menu from the standby display.
Short press downwards to scroll down the menus. Press to enter alert mode setting from the standby display.
This key is also used in 'Edit Mode' to move the cursor through the displayed text.

Alphanumeric keys, 0 - 9, *, #.
Enters numbers, characters and punctuation marks.
① or press and hold down to call the voice mail number.
② to ⑨ keys. Press and hold to speed dial preferred numbers.
串 or press and hold down to enter international ^+ prefix, ^ symbol or 'underscore wildcard.
Used with keypad lock softkey to lock/unlock the keypad
Table of contents
1. Using this guide 6
2. Getting started 8
Preparing to make your first calls 8
Basic operations 9
3. Safety information .... 11
Vehicle safety 11
Care and maintenance 11
Your responsibility 12
Security codes 12
Code supplied by the airtime service provider .... 13
Code supplied by the manufacturer 13
Emergency calls 13
Disposing of waste packaging 13
4.Preparing the phone for operation 14
SIM card 14
Battery 14
5. Basic operations 17
Turning on the phone, the standby display and turning off the phone .... 17
Making and receiving calls 19
Unanswered call, voice mail and new SMS message indicators 20
6. General operations .... 22
Dialling from memory 22
Speed dialling 22
Silent alert mode 23
Muting 23
Volume adjustment 23
SendingDTMF tones 23
Pause feature 24
7. In-call options 25
Holding and retrieving a call 25
Call waiting, swapping and multi-party conference calls 25
8. The menu (MMI) system 27
Access to the menus 27
Menu map 27
Entering text 29
Network services 30
Voice mail 31
Phonebook 32
Messages (SMS) 36
Calls & Times 39
GSM services 43
Broadcast - cell broadcast (CB) messages 49
Phone settings - customising your phone 51
Using the office tools 59
GSM man machine interface codes 60
9. Appendix 61
Accessories list 61
Glossary 62
Troubleshooting 63
Error messages 64
Using this guide
Please take time to read this user guide. It contains a lot of useful information about your phone and the way that it operates on the network. The GSM network is now worldwide and allows you to make and receive calls to and from other countries (called roaming) as if you were in your home country. Some features included in this guide are called network features and are supplied by service providers. However before you can take advantage, or even activate many of the network features offered by the networks, you must subscribe to the services you require. For a full list and explanation of network features please consult with your service provider.
Some networks may provide you with Data & Fax services. To use these special services the Data & Fax kit is needed (see "Accessories list" on page 61). For further information please refer to the instructions contained in the Data & Fax kit and/or contact your service provider for details.
Using the keys to follow the actions described in this guide To help you quickly understand your way around this manual we have used symbols and expressions that are present on the keys and in the display itself
| means the left softkey. | |
| means the right softkey. | |
| means the right arrow on the round cursor. | |
| means the left arrow on the round cursor. | |
| means the up arrow on the round cursor. | |
| means the down arrow on the round cursor. | |
| means the SEND key. | |
| means the END key. |
Function means the softmax with the corresponding function name. For example, SMS means press the softmax under the word SMS.
Messages words seen in this format are the actual words seen in the display.
| Select | means use Ⓒ and Ⓞ on the round cursor key to scroll to the required item in the menu and validate by pressing Ⓛ. For example, select Phonebook means scroll to the menu item Phonebook and validate by pressing Ⓜ. |
Press means press the corresponding key. Press means press the SEND key.
Understanding the Graphic Display Indicators (Icons)
The graphic display has a main area capable of displaying up to four lines of characters plus one row of special display indicators or icons.
These icons are used to display the phone's operational condition during use.
The display also shows alphabet characters and numbers as well as the phones menu list and instructions to the user.
The special icons which appear in the display during operation have the following meaning:
SIM memory in use
Phone memory in use.
Roaming. Is displayed when the phone is logged on to a network different from its home network.
Short message service (SMS). Is displayed when one or many short messages have been received and have not been read. It flashes when the SMS message bank is full and cannot store new messages. The availability of this feature is network dependent.
Voice mail. Is displayed when a voice mail message has been received and stored by the networks voice mail centre. The availability of this feature is network dependent.
Call diverting. Indicates whether incoming calls are permanently being diverted. The availability of this feature is network dependent.
Battery level indicator. Is permanently displayed to indicate the current charge level of the battery. Three levels are shown. low, medium, full. It flashes when the battery is almost empty.
Arrow keys. These icons are seen during menu operation to indicate that more items in the menu can be displayed if or are pressed. More than one arrow may show at any one time.
Line 2. It indicates the second line is in use. The availability of this feature is network and subscription dependent.
Unanswered call. Is displayed when a incoming call is unanswered.
Signal strength level. There are four levels. It indicates the strength of the received signal. The more bars the stronger the signal. If no network is available the display remains blank.
Keypad lock. It indicates whether keypad lock is on or off.
CUG. It indicates this service active.
Silent mode. All tones are off.
Getting started
In order to become familiar with the phone straightaway follow these simple steps.
Preparing to make your first calls
Inserting the SIM card
Unpack the phone and insert the SIM card into the holder.
Open the SIM card holder as shown below.
2 Insert the SIM card gently as shown with the gold contacts facing down and the bevelled corner of the card at the top left.
Push the SIM card holder back into position.
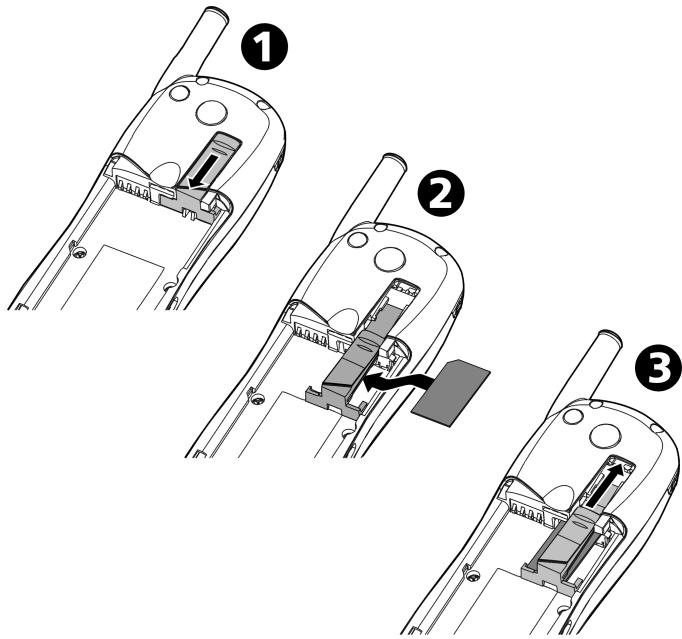
If the SIM card has been inserted the wrong way round or is damaged Check SIM! will be displayed. Remove the SIM card, check that it is the right way round and re-insert it as described.
Fitting the battery
Connect the battery as shown below.
Position the battery onto the phone as shown
Push down the opposite end of the battery onto the phone until the battery catch 'clicks' shut. Check the battery is securely in place.
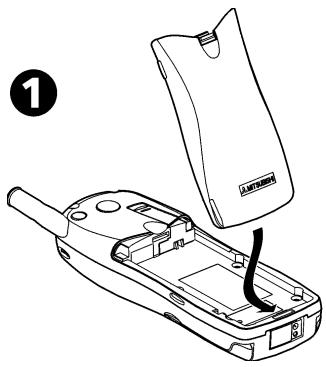
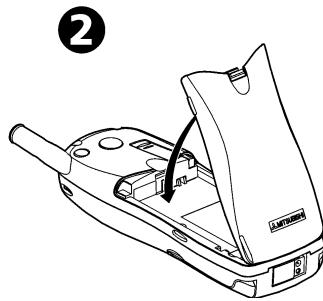
If there is not enough charge in the battery to power the phone follow the instructions for battery charging on page 15.
Basic operations
Turning on the phone
1 Press and hold down . A switch on tone will be heard.
2 If the mobile is locked, Code: will be displayed. Enter the 4 digit phone lock code and press OK
3 If your SIM is PIN protected, Enter PIN will be displayed. Enter the PIN code and press OK
See pages 12 and 55 for more details on your PIN and lock codes.
A screen animation will be displayed.
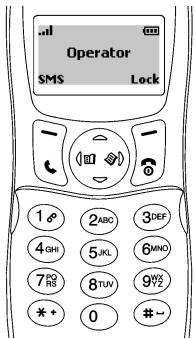
Standby display
This is followed by a registration tone after which the name of the network and/or service provider will be displayed together with signal and battery level indicators and the SMS and Lock softkey functions.
This is the normal standby display:
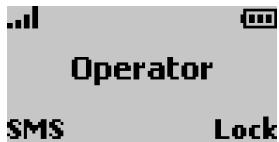
Making a call
1 Enter the desired telephone number using the numeric keys (1 - 9 and 0). A maximum of 46 digits can be entered. Correct any mistakes by pressing Clear. Holding down this key will clear the whole display.
To dial (send) the number press
When the call is connected the conversation will be heard in the earpiece and a call timer will be displayed.
NB: For best results use the antenna fully extended when making or receiving calls.
Receiving a call
When a call is received the phone will ring. The LED on the top of the phone will flash green and the flashing will be shown. The backlight will also come on if the phone was set to do so or if in silent mode.
To accept (answer) the call,
Press
If the ring tone volume is set to zero (off) or if the phone is in 'Silent mode' no audible sound will be heard.
To reject, or return the busy signal to the caller.
Press
Ending a call
Press
Closing the flip does not end a call.
Waiting a few seconds or pressing the Exit softkey will return to the standby display.
Turning off the phone
Press and hold down
A switch off tone will sound to confirm your action. During switch off a display animation will be shown. The mobile will then turn off.
Do not turn off the phone by removing the battery as data which may need to be saved in the SIM will be lost. See also page 51 for more 'customising your phone' details.
Safety information
Vehicle safety
- Respect national regulations on the use of mobile telephones in vehicles.
- Road safety always comes first! Always give your full attention to driving.
- Do not use a handheld phone whilst driving. If you don't have a handsfree car kit, stop and park your vehicle safely before using your phone.
- If equipped with a correctly installed vehicle kit allowing "hands free" operation and you need to make or receive a call ensure that it is done sensibly and safely. Use pre-programmed numbers where possible and keep calls short and routine.
- If incorrectly installed in a vehicle the operation of mobile telephones could interfere with the correct operation of the vehicle electronics, such as ABS anti-lock brakes or air bags. To avoid such problems ensure that only qualified personnel carry out the installation. Verification of the protection and operation of the vehicle electronics should form part of the installation. If in doubt consult with the manufacturer.
- Do not place the phone on the passenger seat or where it could break loose during sudden breaking or a collision. Always use the holder.
- The use of an alert device to operate a vehicle's lights or horn on public roads is not permitted.
Care and maintenance
This mobile telephone is the product of advanced engineering, design and craftsmanship and should be treated with care. The suggestions below will help you to enjoy this product for many years.
- Do not expose the phone to any extreme environment where the temperature or humidity is high.
- Do not expose or store in cold temperatures. When the phone warms up after switch on, to its normal temperature, moisture can form inside where it may damage the electrical parts.
- Do not attempt to disassemble the phone. There are no user serviceable parts inside.
- Do not expose the phone to water, rain or spilt beverages. It is not waterproof.
- Do not abuse this phone by dropping, knocking or violent shaking. Rough handling can damage it.
- Do not clean the phone with strong chemicals or solvents. Wipe it only with a soft, slightly dampened cloth.
-
Do not place the telephone alongside computer discs, credit or travel cards or other magnetic media. The information contained on discs or cards may be affected by the phone.
-
Do not connect incompatible products. The use of third party equipment or accessories, not made or authorised by Mitsubishi Electric, may invalidate the warranty of your phone and may be a safety risk.
- Do not remove the labels. The numbers on it are important for service and other related purposes.
- Do contact an authorised service centre in the unlikely event of a fault.
Your responsibility
This GSM mobile telephone is under your responsibility. Please treat it with care respecting all local regulations. It is not a toy therefore keep it in a safe place at all times and out of the reach of children.
Try to remember the phonelock and PIN codes associated with the use of this phone.
Become familiar with and use the security features to block unauthorized use. If your phone and/or SIM card are lost or stolen. Call your service provider immediately to prevent illegal use.
When not in use lock, turn off the phone and remove the battery.
Security codes
The phone and SIM card are delivered to you pre-programmed with codes that protect the phone and SIM card against unauthorised use.
When requested to enter any of the codes, key in the number (appears as * asterisks in the display) and press OK.
Keying mistakes can be erased by pressing Clear
If you enter the wrong code an appropriate message will be displayed.
Codes supplied with the SIM card are:
PIN and PIN2 codes (4-8 digits)
The PIN (Personal Identity Number) is supplied with all SIM cards and protects the card against unauthorised use.
The PIN2 code, supplied with some SIM cards, is required to gain access to some features in the phone (such as fixed dialling numbers) for which another level of security is required.
If Enter PIN appears in the display, enter the code and press OK. Entering the wrong PIN code three times in succession will disable the SIM card and the message SIM Restricted. Enter PUK: will appear in the display. To unlock the SIM you will need the PUK (PIN Unblock Key) code, obtainable only from your service provider.
PUK and PUK2 codes (8 digits)
The PUK code is supplied with the SIM card and is used to unblock a disabled SIM card.
When requested enter the PUK code and press OK. You will be requested to reset the PIN code. Follow the instruction in the display.
The PUK2 code is required to unblock the PIN2 code.
Code supplied by the airtime service provider
Call barring password (4 digits)
This password is used to bar various types of calls, made or received, from the phone. See page 47 for more details.
Code supplied by the manufacturer
Phonelock code (4 digits)
This code is set to all zeros on delivery and is user re-settable. Once changed it cannot be identified by the manufacturer over the phone. See page 55 for more details.
It is strongly recommended that you remember and make yourself familiar with the purpose and operation of these codes.
Emergency calls
In Europe, provided the phone has GSM service, emergency calls can be made using the European standard emergency number, 112. Emergency calls can even be made if the phone is PIN or electronically locked or call barred. In some countries local emergency numbers can still be used for emergency purposes but the phone may have to contain a valid SIM card.
When making an emergency call remember to give all the necessary information as accurately as possible. The phone may be the only means of communication at the scene of an emergency therefore do not cut off the call until told to do so.
Mobile phones rely on wireless and landline networks which cannot be guaranteed in all conditions. Therefore you should never rely solely on wireless phones for essential emergency communications.
Disposing of waste packaging
The packaging used for this phone is made of recyclable materials and as such should be disposed of in accordance with your national legislation on the protection of the environment.
Please take care to separate the cardboard and plastic elements and to dispose of them in the correct manner.
Preparing the phone for operation
SIM card
Before you can use your phone a valid SIM card must be inserted into the SIM card holder.
If a SIM card is not inserted, or inserted incorrectly Check SIM! will be displayed when the phone is turned on. See "Inserting the SIM card", page 8.
Battery
Fitting
See "Fitting the battery", page 9.
Removing
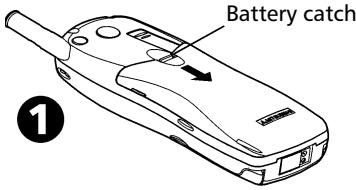
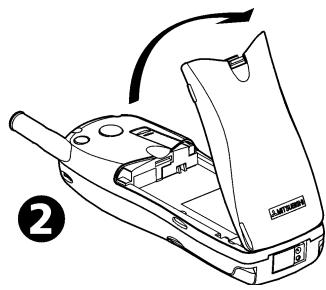
Push and hold up the battery catch.
The battery will be released and can now be removed.
Low battery warning
When the battery power falls to its lowest level the message Low Battery! will be displayed and a low battery warning tone will sound. If you are on a call terminate the call and turn off the phone by pressing and holding down .
Recharge the battery as shown below or swap it for a charged one. Do not turn off the phone by removing the battery. Data that needs to be saved by the SIM may be lost.
Charging
To ensure a long life for your battery, re-charge it only when the Low Battery! warning is displayed and the 'low battery' tone is heard. Connect the charger to the phone as shown.
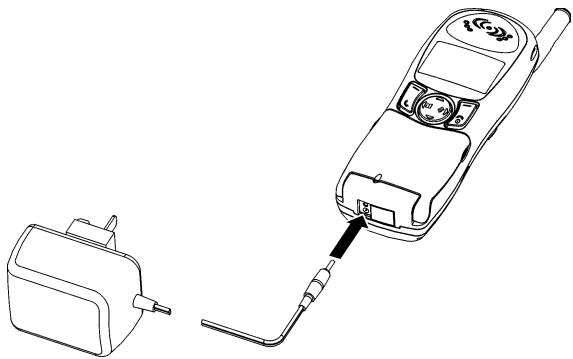
Plug the charger into the wall socket and turn on the mains. The battery will start to charge.
The phone can be used whilst charging but it will increase the charging time.
Charging indicators when the mobile is off

During charging Charging... will be displayed. The LED will be red. When charging is finished, Battery full will be displayed and the LED will change to green.
Charging indicators when the mobile is on
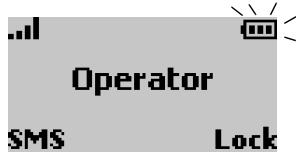
During charging the three section battery icon will flash 1-2-3 bars continuously. When charging is completed the battery indicator will
show three solid bars. The LED is not used as a charging indicator when the mobile is on. If a call is received during charging the LED will flash rapidly green.
It is normal for the battery to get warm during charging. At the end of charging disconnect the charger from the phone, switch off and remove the plug from the mains.
Typical charging times using the AC adaptor, FZA-0003A
| Battery type | Typical charging time |
| Small battery, FZA-0001A | 2 hrs 30 |
Battery use and safety information
A battery can be charged hundreds of times but will gradually wear out. When the operating time (standby and talk time) is noticeably shorter than normal it is time to buy a new one.
- Do not leave batteries connected to a charger longer than necessary, overcharging will shorten battery life.
- Disconnect battery chargers from the power source when not in use.
- Do not expose batteries to high temperatures or humidity.
- Do not dispose of the batteries in fire. They may explode.
- Avoid putting the batteries into contact with metal objects which may short circuit the battery terminals (e.g. keys, paper clips, coins, chains etc).
- Do not drop or subject the batteries to strong physical shocks.
- Do not try to disassemble any of the battery packs.
- Use only the recommended battery chargers (see pages 2 and 61)
- If the battery terminals become soiled, clean them with a soft cloth.
- It is normal for batteries to become warm during charging.
- Old batteries must be returned to the place of purchase or to a place where used batteries are properly disposed of. Do not dispose of old batteries together with household waste.
Battery disposal
Please dispose of your old batteries in accordance with your national legislation on the protection of the environment. If in doubt please consult with your local authorities environmental department who will be able to offer you advice on disposal.
Basic operations
Turning on the phone, the standby display and turning off the phone
Turning on the phone
Press and hold down . A switch on tone will be heard.
If the mobile is locked, Code: will be displayed. Enter the 4 digit phone lock code and press OK
3 If your SIM is PIN protected, Enter PIN will be displayed. Enter the PIN code and press OK
See pages 12 and 13 for more details on your PIN and lock codes.
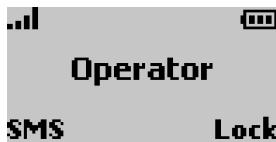
A display animation will be shown. This is followed by a registration tone after which the name of the network and/or service provider will be displayed together with signal and battery level indicators and the SMS and Lock softkey functions.
This is the normal standby display:
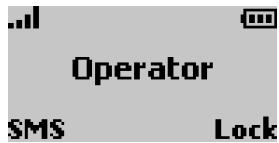
In this condition the phone is ready to receive or make calls or perform many of the operations contained in its feature list.
From the standby display pressing ① will give direct access to numbers stored in your phonebook (see page 32). Pressing ⑤ will enter the phone menu. Pressing 当 gives access to the volumes control (see page 53) and pressing 当 allows you to silence the incoming ring tone. Pressing any of the number keys (1 - 9 and 0) will enter that number in the display (see also "Speed dialling", page 35).
Pressing will dial a displayed number whilst pressing will stop the dialling or end a call.
Keypad lock
When activated (turned on) keypad lock prevents accidental calls or actions being made by user when the phone is carried in a pocket, briefcase or handbag. When on keypad lock does not prevent calls being received, which are answered in the normal way. On completion of a received call keypad lock is automatically reactivated.
To turn keypad lock on:
Press Lock plus #
will be displayed.
To turn keypad lock off:
Press Unlock 一 plus #.
See page 51 for more keypad lock details.
Messages (SMS)
Pressing SMS in the standby display allows you to access to the short messages menu with the same functions as when accessing it from the main menu. Please refer to page 36 to learn about the available functions in this menu.
Backlight operation
The backlight is normally off. When a key is pressed the display and keypad backlight will come on for 10 seconds. If an incoming call is received the backlight will come on and remain on for 10 seconds after the call has been answered.
See pages 54 and 58 for backlight adjustment.
Turning off the phone
Press and hold down
A switch off tone will sound to confirm your action. During switch off a display animation will be shown. The mobile will then turn off.
Do not turn off the phone by removing the battery as data which may need to be saved in the SIM will be lost.
Making and receiving calls
The phone can only make and receive calls when it is switched on, unlocked, has a valid SIM card inserted and is located in an area that has GSM network service coverage. If the phone cannot find a network the display remains blank. For best results use the antenna fully extended when making or receiving calls.
Making calls
1 Enter the desired telephone number using the numeric keys (1 - 9 and 0).
International calls can be prefixed either with 00 or +. To enter the + symbol before a number press and hold down ※ .
A maximum of 46 digits can be entered. Correct any mistakes by pressing Clear. Holding down this key will clear the whole display.
Press to dial (send) the number.
The dialled number together with the animated icon will be shown in the display. When the call is connected a ringing tone will be heard in the earpiece and a call timer will be displayed. When answered proceed with the call in the normal way.
- Busy in the display indicates that the called party is engaged. If Auto Retry is on, the phone will attempt to call again (see page 55 for details).
- Not allowed (fixed dialling) in the display means that the number dialled is not authorised by the FDN list (see page 34 for details).
- If the dialled number matches one stored in the phonebook then the associated name of the called person will appear in the display.
- The line 2 icon (图2) will appear once the call is established (if this service is active) indicating that the call was made using this line (see page 43 for details).
Ending calls
Press
The call timer will stop and will disappear. Waiting a few seconds or pressing Exit will return to the standby display.
NB: closing the flip does not end a call.
Receiving calls
When a call is received the phone will ring. The LED on the top of the phone will flash green, the backlight will come on and the flashing

will be shown. If the ring tone volume is set to zero (off) or
'Silent mode' no audible sound will be heard. To accept (answer) the call,
Press
Pressing the No ring softkey will stop the sound of the ring tone allowing you to silence the phone and go out of a room before pressing.
NB: opening the flip does not answer a call.
To reject or return the busy signal to the caller,
Press
If accepted will be displayed. Proceed with the call in the normal way.
- If the callers number is not available Unknown number will be displayed during call presentation; then Call1 will be displayed during call connection.
- If the callers number is available but does not match one stored in your phonebook it will appear in the display. If it does match a stored number then the associated name will appear instead.
- If the caller has withheld their number Withheld number will be displayed during call presentation; then Call 1 will be displayed during connection.
- A call timer will also appear.
- will appear if the call has been received on your line 2 number (see page 25 for details).
To end the call,
Press
The caller's number, if available will be stored in the received calls log (see page 39 for details).
NB: closing the flip does not end a call.
Unanswered call, voice mail and new SMS message indicators
- If some received calls remain unanswered, will be displayed. Press Read to view the callers' numbers if available. Press to call the number. Unanswered call numbers will be stored in the unanswered calls log (see page 39 for details).
- When you receive notification that a voice message has been deposited in your voice mail box an alert tone will sound and G^ will appear in the display. Press Read to view the message or press ① to speed dial your voice mail message centre (see pages 7 and 31 for details).
NB: If more than one indicator (e.g. Messages:2 and Voice mail:1) is shown, pressing Read will display a menu allowing you to choose between different items (in our example: Messages and Voice mail).
- When a new SMS message is received an alert tone will sound and will be displayed. Then press Read to view the SMS inbox messages.
If is flashing you will have to delete at least one old received message to be able to receive new ones (see page 36 for details).
The display will show the quantity and type of messages:
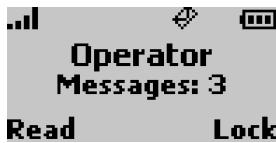
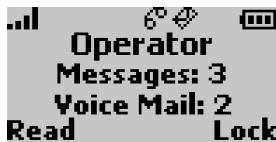
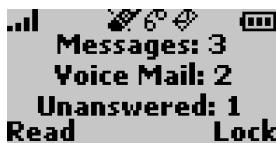
Press Read to select the type of message to be read. Press Select or to view the message.
General operations
Dialling from memory
Any number stored in the SIM, or the phone memory, which can be recalled to the display can be dialled
...from the phonebook
Press to enter the phonebook list.
Use or to scroll to the number required.
Press to dial the number.
See "Phonebook", page 32.
...from the last dialled numbers list
The last 10 numbers dialled are stored in the phone.
Press to display the last numbers dialled.
Use or to scroll to the number required.
Press to dial the number.
...from the calls log memory list
The last 10 numbers dialled, the last 5 unanswered call numbers (if available) and the last 5 received answered numbers (if available) are stored by the phone in the calls log memory location menu.
Press . Select Calls & Times.
2 Select Calls log.
Select Last dial, Unanswered or Received.
Use or to scroll to the number required.
Press to dial the number.
See "Calls & Times", page 39.
Speed dialling
Any number stored in the SIM can be allocated to the speed dialling keys of 1-9.
Press and hold down the key (1 - 9). The number will be recalled to the display and be dialled in the normal way.
By default, ① is always allocated to the voice mail number. See page 35 on how to allocate numbers to the speed dialling keys.
Silent alert mode
To avoid disturbing others you can silence the incoming ring, alert and key tones.
Turning on
1 Press 豆
2 Select Silent.
is shown in the display when this feature is turned on.
Turning off
1 Press 念
2 Select Ring.
-
If the ring tone volume is set to 0 the silent mode icon remains in the display as a warning.
-
The silent mode setting is not saved when the phone is switched off.
See also "Alert mode", page 52.
Muting
When engaged on a call the microphone can be muted (turned off) to allow you to confer privately with people nearby without being heard by the other party.
Turning the microphone off
During conversation,
Press Mute
Turning the microphone on
Press Unmute
The microphone is automatically restored on receiving a new call.
Volume adjustment
To adjust the received audio level during conversation,
Use or to decrease or increase the volume through eight levels as shown on the display.
Press Exit or wait 2 seconds to return back to the previous display.
See also "Volume adjustments", page 53.
Sending DTMF tones
DTMF tones are used to access answer phones, voice mail boxes and computerised home banking, etc. These tones are a method to communicate passwords and callback numbers.
Manually
To send individual DTMF tones directly from the keypad during conversation,
Press the required keys.
The tones will be heard in the earpiece and sent immediately.
Automatically
To send a consecutive string of DTMF tones during conversation,
1 Press Options
2 Select Auto-DTMF.
3 Enter the DTMF numbers into the display either directly using the keypad or from a number stored in the phonebook (under Names).
4 Press OK. After the tones have been sent the normal conversation display will be shown.
DTMF tones cannot be sent when a call is on hold.
Pause feature
Telephone numbers and a sequence of DTMF tones can be entered in the display or stored in memory together provided they are separated by a 'pause'. A pause is entered between numbers by pressing and holding down ※ . The letter p will appear in the display. Any number of pauses can be stored together with a maximum of 20-46 characters (dependent upon the SIM and the phones memory capacity).
In-call options
Holding and retrieving a call
To put a call on hold during conversation,
Press
To retrieve a call,
Press
To make a second call when one call is on hold,
1 Enter a number in the display. Press to dial the number.
After the second call has been established press to swap between the two calls.
To end either the current call or the held call select End active or End held call in the Options menu. The remaining call is automatically retrieved.
4 Press to end the remaining call.
Both calls can be ended at the same time by pressing
The alternative way to hold, retrieve and make a second call during conversation is to use the Options feature to display a menu of the actions described above. Scroll to the required option and press Select or (see also "Multi-party or conference calls", page 26).
Call waiting, swapping and multi-party conference calls
Call waiting
Call waiting is a network feature that allows you to receive a second incoming call when already engaged on a call. This means that you can put an existing call 'on hold' whilst you answer or make a second call. To turn on or off the call waiting service,
Press 口 . Select GSM Services.
Select Call Waiting.
3 Select Activate or Cancel. After some time (your request is sent to the network) the display will confirm your request.
4 Press Exit or to return to the standby display.
Action when receiving a second call
When a second incoming call is received you will hear a 'double beep'; an animated phone icon will be displayed as well as the phone number if available. Either press to answer the call and put the first
call on hold or press Reject to reject the call and return a busy signal to the caller. Press to swap between the two connected calls.
Multi-party or conference calls
This feature gives you the ability to make or receive between 2 to 5 calls at the same time with all parties being able to hear and talk with each other.
Make and establish a call in the normal way and press
2 Enter another number into the display and press The first call will be put on hold whilst the second call becomes active.
3 Press Options for the following menu:
| Option | Description |
| Auto-DTMF | Allows a DTMF string to be entered to the active call only |
| Swap | Swaps between active and call on hold |
| Join | Joins active and call on hold to make a multi-party or conference call |
| Mute/Unmute | Turns on or off the microphone |
| End held | Ends the call on hold |
| End active | Ends the active call and connects with the call on hold |
| End all | Ends all the calls |
| * Private with | Allows you to select and have a private conversa-tion with one of the conference callers whilst putting all the other calls on hold |
| Hold/Retrieve | Holds or retrieves the conference call |
| * End one | Allows you to select and end one of the confer-ence call participants |
- These items in the Options menu will appear if more than 2 calls are joined in the conference call.
Throughout the conference call the display will confirm and show the actions you have selected from the options menu.
For alternate line service (ALS) subscribers conference calls cannot be made between Line 1 and Line 2. For further information see "Phone settings - customising your phone", pages 51-58.
The menu (MMI) system
The phone contains many functions and features that can be seen and entered through the easy to use menu system via the round cursor key.
Through your SIM card the phone is also able to detect and display, in the menu, features that have been requested from your service provider as well as suppress ones that have not been subscribed too.
Access to the menus
From the standby display and for convenience all stored telephone numbers in the phonebook can be viewed immediately by pressing ① To enter the main menu from the standby display press ② .
All other functions and features are then selected by a press on or Select. To return to a previous menu press 1 or (short press) Exit. To exit from the menus press and hold Clear 1 or 2 , if no call is in progress.
Menu map
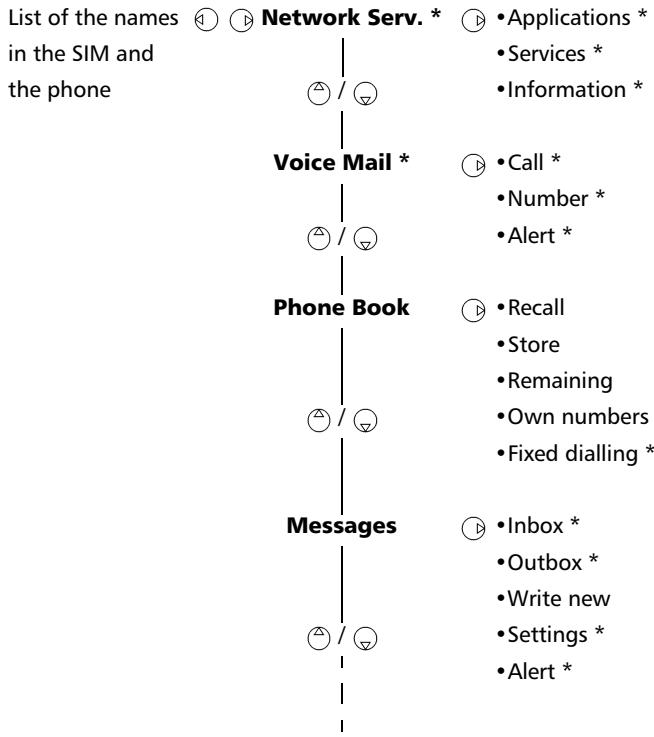

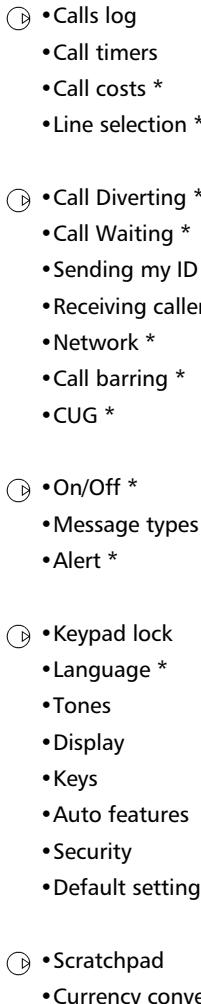
* The availability and appearance of these features in the menu are dependent upon your subscription and the services provided by your network operator
Entering text
Some features and functions, e.g. storage of names into memory or sending SMS text messages, require you to know how to enter and edit text in the display. In the display this will be indicated by u in lower case mode and by A in upper case mode. Text and alphabet characters can then be entered or edited directly from the keypad. The characters available, which are language dependent, are shown below:
| Key | Character | |
| Lower case | Upper case | |
| 1 | 1., -'@:? | |
| 2 | a b c 2 | A B C 2 |
| 3 | d e f 3 | D E F 3 |
| 4 | g h i 4 | G H I 4 |
| 5 | j k l 5 | J K L 5 |
| 6 | m n o 6 | M N O 6 |
| 7 | p q r s 7 | P Q R S 7 |
| 8 | t u v 8 | T U V 8 |
| 9 | w x y z 9 | W X Y Z 9 |
| 0 | 0 | 0 |
| * | Short press changes next letter from upper to lower case or vice versa. Long press changes all next letters to upper or lower case or vice versa. | |
| # | Short press, enters space. Long press gives access to special characters. ( ) %!; " _ i i + # * / & = < > ¥ £ | |
| ®®® | Moves the cursor left, up, down or right. | |
A brief press on any key will display the first character associated with that key as well as show all the other available characters at the top of the display. To enter text, press the key with the required character repeatedly until it appears in the display.
A long press will enter the figure corresponding to the key.
If two characters are on the same key wait for the display at top of screen to
clear or press before pressing the same key again.
Correct mistakes by a short press on Clear. A long press on this key will delete all the text.
Use 心 ,,or to locate the cursor in the text to insert characters or make corrections.
A long press on gives access to 21 special characters spread over 3 pages.
Display and selection of the characters is as follows:
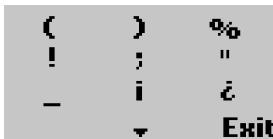
To select and insert a character into the text:
The characters are arranged as the 1 - 9 characters of the keypad.
In this example pressing ② would select)and insert it directly into the text.
Use or to scroll to the next page.
Example
To enter 'Card' in the display,
- Press and select Messages.
- Select Write New.
- Press and hold ⑧ until is displayed. Press ② briefly three times, C will appear in the display.
- Wait for the available characters to go from the display, press and hold ⑧ until is displayed. Press ② briefly once, a will appear.
- Press ⑦ briefly three times, r will appear.
- Press ③ briefly once, d will appear. The word Card will now be in the display.
- Press to exit from this example.
Network services
Your network operator may provide value added services and contact phone numbers. These services and phone numbers will be stored in your SIM and if available will modify the menu of the phone to be included under the item Network Serv. at the beginning of the menu (contact your service provider for details).
There will be three possible ways in which an operator may present these value added services and contact phone numbers:
SIM application tool kit
An automatic way to provide services related to your network and not to your phone. These services will be SIM dependent.
SDN numbers stored in the SIM
Up to 32 numbers may be stored in the SIM which cannot be changed by the user.
Information numbers
A list or a menu to enable you to call network or information services offered by your network.
Some operators will be able to provide two of the above services on the same SIM in which case the Network Serv. item in the main menu will provide two menu items, Applications and Services or Information.
Voice mail
Your network provider may offer a voice mail service which operates like an answering machine. Contact your service provider for details.
Storing a voice mail centre number
If your SIM does not automatically include the voice mail centre number it will have to be manually stored:
Press Select Voice Mail.
2 Select Number. When prompted enter the number manually or from a stored memory.
Press OK to validate your entry.
4 Press Exit to return to a previous display or to return to the standby display.
If you subscribe to the 'Line 2' service the voice mail centre number will need to be stored separately for that line.
The voice mail number is automatically assigned to speed dial location number 1 (see "Speed dialling" on page 35).
Turning on/off the voice mail alert tone
If you wish a tone to sound alerting you of the receipt of a voice mail message,
Press Select Voice Mail.
2 Select Alert. Select On or Off.
Press Exit to return to a previous display or to return to the standby display.
Calling the voice mail centre to check for messages
There are two ways:
- To dial the voice mail centre directly after the receipt of a message,
Press and hold down ①.
- Alternatively,
Press Select Voice Mail.
2 Select Call.
Dialling will proceed as for a normal call.
If a voice mail number has not been stored when Call is selected you will be asked to enter the voice mail number. Proceed as described in "Storing a voice mail centre number", page 31.
Phonebook
The SIM and the phone have areas of memory used for storing names and telephone numbers known as the phonebook.
The phone has the capacity to store up to 20 digits and 16 alphabet characters in each of its 99 memory locations. The phone also supports SIM cards with up to 255 memories but the actual number and capacity is dependent upon the SIM itself. The phone and SIM memory locations are interconnected. Both the SIM and the phone memories are searched when the recall function is used.
Storing names and telephone numbers
Names and numbers can be stored directly in the phonebook or moved from other stored areas such as from SMS messages, scratchpad or last dialled number list, etc.
It is advisable to store numbers in international format using the +^ prefix before the country code followed by the telephone number. This will ensure that the number can be dialled from within your home country as well as abroad.
Text entry is as described on page 29.
There are three ways to store numbers into the phonebook:
- Directly from the standby display,
1 Enter the number. Press Store
2 Select Phone names or SIM names.
3 Confirm the number by pressing OK
4 Enter the name (if required) and press OK. Confirmation of your entry and the remaining locations will be briefly displayed.
Press Exit or to return to the standby display.
Using the menu,
Press D. Select Phonebook.
2 Select Store. Select Phone names or SIM names.
3 Enter the number and press OK. Enter the name and press OK. Confirmation of your entry and the remaining locations will be briefly displayed.
4 Press Exit or to return to the standby display.
From other stored locations,
Numbers stored in the last dialled, received, unanswered, scratchpad and SMS message locations can all be stored into the phonebook:
1 Display a number from one of the above, press Options
2 Follow the display instructions as for point 2 in the previous item.
During number and name entry a short press on Clear will clear the last character. A long press will clear the whole display.
The characters *, +, P (pause), # and _ can be stored together with numbers. If the SIM or phone's memory is full a warning message will be displayed when selecting the phonebook.
Free space in the phonebooks
To see how many empty phonebook spaces remain in the SIM or the phone,
Press D. Select Phonebook.
2 Select Remaining and use or to display the remaining memories in the phone or SIM.
Press Exit or to return to the standby display.
If available the free memories in the FDN list will also be shown.
Viewing and calling numbers in the phonebook
Phonebook entries can be recalled into the display to be edited, deleted, copied, moved or called to or from either the phone or SIM.
There are two ways to view and call numbers in the phonebook:
- Directly from the standby display,
Press ① to display the phonebook list.
Using the menu,
Press and select Phonebook.
2 Select Recall.
Either press OK or enter up to the first 3 initials of the name required and then press OK.
If no initial was entered the display will show the first alphabet entry in the phonebook. The list of phonebook entries will be displayed in alphabetical order together with the telephone number and whether stored in the SIM or the phone memory.
4 Press to dial the number.
Pressing or will scroll through the phonebook.
To go directly to another entry press the corresponding alphabet key. For example to go directly to entries starting with 'N' press ⑥ twice.
Pressing Options will display the following menu choices:
| Item | Function |
| Edit | Edits the name and number entry |
| Delete | Deletes the entry |
| Copy | Copies the entry to the SIM or the phone or vice versa. Editing allowed before copying |
| Move | Moves the entry to another position. Editing allowed before moving |
| Call | Calls the number displayed |
Press Exit or to return to the normal display.
Own number display
The phone can display your main 'Line 1' voice mobile number, the voice mobile number for Line 2 (Alternate Line Service) and your data and fax numbers. These numbers, if available, are stored in the SIM. If not then they can be entered manually. Numbers can be given names. Line 1 for example can be named 'Office' etc.
To view, name and edit your own number(s),
1 Press D. Select Phonebook.
2 Select Own Numbers. The mobile number for Line 1 will be displayed.
Use or 已 to view line 2, data and fax numbers.
4 To add or edit a name or number press Edit
Press Exit or to return to the standby display.
Fixed dialling numbers (FDN)
Fixed dialling is a feature that restricts outgoing calls to 'fixed' numbers or 'prefixes' contained in SIMs that support this feature. When turned on, dialling numbers not in the FDN list will not be allowed.
The maximum number of FDN numbers that can be stored is dependent upon the capacity of the SIM. Call diverting and sending SMS messages to numbers not in the FDN list will be prevented. Turning on or entering numbers into the FDN list is PIN 2 protected.
To turn on or off FDN operation,
1 Press D. Select Phonebook.
2 Select Fixed Dialling. Select Status.
3 Select On or Off. Enter the PIN2 number.
4 Press OK to validate and confirm the setting.
To view the numbers in the list,
Press D. Select Phonebook.
2 Select Fixed Dialling.
3 Select View and use or to view all the entries. Pressing Options will allow you to edit, delete and copy numbers to the phone or SIM.
To enter, edit or delete numbers in the FDN list,
Press D. Select Phonebook.
2 Select Fixed Dialling.
3 Select Add New. You will be prompted to enter the PIN2 number if it has not been entered yet. It is now possible to add new numbers as well as edit, delete and copy numbers to the phone or SIM.
Wild card spaces can be used with the numbers stored in the FDN list. For example the number +441707278_9 will allow calls to all numbers between 278009 to 278999 to be dialled. The number can be edited and dialled in the standby display.
Speed dialling
Phonebook numbers can be assigned to keys 2 - 9 which when held down will dial those numbers. ① is reserved exclusively for the voice mail number and is assigned automatically when the voice mail number is stored (see "Voice mail", page 31). Numbers stored in the SIM and in the phone (fixed dialling numbers excepted) can be selected.
To assign phonebook numbers to the speed dialling keys,
Press . Select Settings.
2 Select Keys.
3 Select Speed Dial.
Use or to scroll to the next key.
Select Names to choose the phonebook entry and
press to validate your choice.
Press Exit or to return to the standby display.
If a number which has been assigned to a speed dial key is deleted from the phonebook the corresponding number is automatically deleted from the speed dial key.
Messages (SMS)
The SMS message service enables you to send or receive short text messages of up to 160 characters to or from other mobile phones provided with the same capability. The messages are not sent directly to the other mobile phone but go via a message centre provided by your network operator. You can also store, edit and forward messages as well as saving any of the numbers they may contain.
Reading a received SMS message
When the phone receives an SMS message a new SMS alert tone will sound and will be displayed. The message is automatically stored in the SIM. If is flashing there is no more space in the SIM to store messages. Delete previous messages to make space for new ones.
Press Read to read all received messages ( Inbox).
Reading stored SMS messages
Press D. Select Messages.
2 Select In Box to display the first message header.
Press or select Options /Read text to read the message text.
It is now possible to read all stored messages. Use the arrow keys to scroll between pages or between messages. Unread messages are indicated by 2 , previously read messages are shown by 3 .
Managing received and stored SMS messages
After reading the SMS message press Options for the following menu:
| Item | Function |
| Read text | Displays the remainder of the text |
| Delete | Deletes the message |
| Reply | Reply to the sender of the message |
| Forward | Forwards the message to another user |
| Numbers | Stores or calls the number(s) contained in the SMS header or text |
The items of this menu may vary and are dependent upon the type of message received.
Turning on or off the message alert tone
Each time a message is received a new SMS alert tone will sound. To turn on or off this tone,
Press D. Select Messages.
2 Select Alert. Select On or Off.
Press Exit or to return to the standby display.
Preparing the phone to send SMS messages
You can write and send text messages. Before doing so the networks message centre number (obtainable from your service provider) needs to be stored:
Press . Select Messages.
2 Select Settings.
3 SelectMsgCentre.
If a number already appears it means that it was taken directly from the information stored in your SIM. If empty enter the number manually (in international format) or from a stored memory.
4 Press Exit or to return to the standby display.
If required you can also choose the validity period, format, paid reply request and request a Delivery report. Default settings are assumed if not set.
| Option | Description | Default |
| Validity Period | Time held at message center. 12 hrs, 1 day, 2 days or Maximum (defined by operator) | Maximum |
| Format | Selects format of message, text, voice, fax or pager | Text |
| Paid Reply to | Reply requested | Off |
| Status report to | Delivery report | Off |
Sending a new SMS message
Press B. Select Messages.
2 Select Write New.
3 Enter the message text and press OK
4 Select Send or Store.
If you selected Send enter the destination number or select Names to choose a number from a phonebook entry
and press to validate your choice. Press OK. Sent confirmation will be given.
Select whether to Store or Send another message.
7 Press Exit or to return to the standby display.
Messages in the outbox
The outbox contains unsent draft messages, stored sent messages as well as sent but undelivered messages, identified by their headers.
These messages can be selected from the outbox menu and can be modified and resent as new SMS messages in the normal way.
To select an outbox message,
1 Press . Select Messages.
2 Select Outbox and use or to scroll to the desired message.
Messages will either be "transmitted" or "to be sent".
Press Options to read, delete, request a status report, send (or re-send) and edit a sent message.
4 Follow the instructions displayed on the screen.
Status request on outbox messages
If the status is requested on a delivered message the date and time of delivery may be shown. If the status is requested on a sent message a status request will be sent to the network (must be network supported). The network will answer by sending a status report (SR) back to the phone which can be acknowledged by pressing OK
To action a status request on outbox messages,
1 Press Options. The following menu will be displayed:
| Item | Action |
| Delete Msg. | Deletes the corresponding sent SMS message and the status report |
| Clear | To acknowledge the status report and clear the display |
| Associated msg | Displays the corresponding sent SMS message |
2 Select the action required and press OK
Re-usable message templates
If your network operator provide SIMs that allow users to store pre-programmed message templates, then Msg . templates will appear in the Messages - Settings menu. Templates are sets of pre-programmed settings to be used when sending messages. Each of these
templates can be given a name for easy identification and can be selected and used whenever required.
To create a message template,
Press B. Select Messages. Select Settings.
2 SelectMsgtemplates.Chooseanyblank template.
The display will prompt you to enter the template Name,Msg Centre number, Validity period and Format.
Default settings for pay reply and status are assumed 'off' unless set. If only one template is set it is automatically used by default. If more than one template is programmed any one can be selected for use when writing new messages.
Calls & Times
Details of the incoming and outgoing calls as well as the time duration of the last and accumulated total of all calls made are stored by the phone under the Calls & Times menu.
Calls log
This feature stores details of the last 10 numbers dialled, the last 5 received unanswered calls and the last 5 received calls. The call logs are common for both Line 1 and Line 2.
Press 日 .Select Calls & Times.
2 Select Calls Log.
3 Select Last Dial, Unanswered or Received.
Use or to scroll through the call lists.
The last number dialled or received is displayed first. For unanswered and received calls if the calling parties number is known it will be shown otherwise Unknown number will be displayed.
Pressing on a highlighted number will call that number.
Pressing Options will give access to the following menu:
| Item | Action |
| Store | Stores the number into phonebook |
| Delete | Deletes the entry |
| Delete all | Deletes all the entries |
| Edit | Edits the displayed number |
| Details | Views the details, name, number and possible call time of the highlighted number |
| Call | Makes a call to the number |
Use or to select the required option and follow the display prompts.
Press Exit or to return to the standby display.
In the standby display 'One Touch' access for the 10 last dialled calls may be available by pressing.
Call times
The duration time of the last call, total accumulated time of all calls and total time for Line 1 and Line 2 are stored.
Times for calls made and received through the subscription network and through other (national and international) networks are displayed under the Details sub-menu.
1 Press 日 .Select Calls & Times.
2 Select Call Timers.
3 Select Show.
Use or to view all the timer information.
The call type and the accumulated times of outgoing and incoming calls will be displayed.
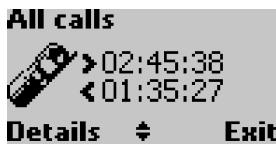
Pressing Details will display details of roaming and international calls etc.
Press or Exit to return to the previous display.
Press and hold Exit or to return to the standby display.
If Line 2 is subscribed too 'All Calls' for Line 1 and Line 2 will be displayed separately.
Balance information (subscription service only)
This is a subscription service provided by some networks and enables you to ask for your remaining airtime balance. This information is sent by the network.
Contact your service provider on availability and details.
Press . Select Calls & Times.
2 Select Call Timers.
3 Select Balance information.
4 Select Call or Set Number.
If Call is selected and the balance information number has already been entered a call will be made to the balance information centre. If a number has not been entered select Set Number and enter the number. Press OK to store your number or to store and call the information centre number.
Press when the call is completed.
Call timer - reset
This feature enables you to reset all the call timers. You will need the 4 digit lock code to operate this feature.
1 Press . Select Calls & Times.
2 Select Call Timers.
3 Select Reset.
4 Select Yes or No.
Enter the phone lock code and press OK. The action will be confirmed.
Press Exit or to return to the standby display.
Call costs - management (subscription service only)
Some networks offer an Advice of Charge (AoC) subscription service in which it is possible to see the cost of the last call made, the accumulated total cost of all calls and the remaining balance in units or currency of any 'cost limit' set by the user.
To display these costs in the currency of your choice you must first select the currency and cost per unit otherwise call costs in units will be displayed.
To set currency and cost per unit,
1 Press B. Select Calls & Times.
2 Select Call costs.
3 Select Display cost type.
4 Select Currency. The present currency settings will be displayed.
Press Edit. Enter the PIN 2 code and press OK
6 Enter the abbreviated letters of the currency. Press OK to validate.
7 Enter the cost per unit in the selected currency. Press OK to validate. The display will confirm your selection.
3 Press Exit or to return to the standby display.
To set call cost type to units,
Press 已 .Select Calls & Times.
2 Select Call costs.
3 Select Display cost type.
4 Select Units.
Press Exit or to return to the standby display.
When the cost type is set to units the credit limit and the remaining credit are shown in units.
Setting the credit limit - in units or currency
After setting the currency and cost per unit, if required and available on your subscription, you are also able to set a credit limit in units or an amount in the currency of your choice. When the credit limit is reached the phone will be prevented from making and receiving all chargeable calls. This will not prevent the phone from making emergency calls.
1 Press D. Select Calls & Times.
2 Select Call costs.
Select Credit Limit. The display will show the present credit limit setting.
4 Press Edit. Enter the PIN 2 code and press OK
Enter the credit limit (use # to enter a decimal point). Press OK to validate.
Press Exit or to return to the standby display.
When a credit limit is entered the selection from the 'Credit Limit' display will be Edit or Set No Limit.
Show costs
Press . Select Calls & Times.
2 Select Call costs.
3 Select Show.
Use or to display the cost of the Last Call, All Calls and the Remaining credits.
Press Exit or to return to the standby display.
The remaining credit is shown in either units or currency as set by Cost Type menu above.
Call costs - resetting all costs to zero
To reset all the call costs to zero,
Press . Select Calls & Times.
2 Select Call costs.
3 Select Reset.
4 Select Yes to reset the costs or No to exit. If Yes is selected, enter the PIN 2 number and press OK All Costs Reset will briefly be displayed.
Press Exit or to return to the standby display.
Alternate line service - selecting line 2 (subscription service)
Some GSM 1800 operators support the use of a second line which can be made available to existing users. This is normally a subscription service and allows, for example, the separation of incoming and outgoing calls for business or private use. The second line will have its own mobile number. To select the line for outgoing calls,
1 Press 0 . Select Calls & Times.
2 Select Line selection.
The current line selection will be displayed.
Use or to scroll to the line required and press
Select or to validate your choice.
4 Press Exit or to return to the standby display.
Names can be given to Line 1 (Office) and Line 2 (Home) for example. Refer to the Own Number menu see page 34 for details. Whichever line is selected to make outgoing calls, incoming calls are still able to be received on either line.
GSM services
Diverting incoming calls (network service)
Call diverting is a service which diverts incoming calls, whether voice, fax or data, to another number.
To turn on a call divert,
Press . Select GSM Services.
2 Select Call Diverting for the following menu:
| Divert options | Action |
| Always | Diverts all incoming voice calls unconditionally |
| When not reachable | Diverts all voice calls when the phone cannot be reached, i.e. out of service |
| On no reply | Diverts all voice calls when the phone does not answer |
| When busy | Diverts all voice calls when the phone is busy |
| All conditions | Diverts all voice calls when Not Reachable, No Reply and When Busy |
| Cancel all | Cancel all diverts |
| All FAX calls | Diverts unconditionally all incoming fax calls |
| All DATA calls | Diverts unconditionally all incoming data calls |
Use 口 or 口 to select the divert condition and validate by pressing Select 口 or 口 .
4 Select Activate.
Use or to choose between Voice Mail, Names or Number.
Press Select or to validate your selection. The display will confirm your request.
7 Press Exit or to return to the standby display.
- If the 'On No Reply' option is selected you will be requested to enter a delay period of 5, 15 or 30 seconds.
- Call diverts for both Line 1 and Line 2 must be set for each line. During call divert programming, only the line currently selected is affected by the call divert selected. To carry out a call divert on the other line you must select this other line first (menu Calls & Times - Line).
To turn off or check the status of call divert,
Press . Select GSM Services. Select Call diverting.
2 Select from the divert options and press 1 .
Select Cancel or Status. Your selection will be confirmed.
4 Press Exit or to return to the standby display.
To cancel all (multiple) diverts,
Press Select GSM Services. Select Call Diverting.
2 Select Cancel all. Confirmation will be displayed.
Press Exit or to return to the standby display.
This action cancels all voice diverts (for voice, taxes and data calls) for the line currently in use. To cancel call diverts for the other line you must select this other line first (menu Calls & Times - Line selection).
Caller Line Identity - showing/hiding your mobile number
Most networks allow the Caller Line Identity feature (CLI) i.e. the feature which shows the incoming number (ID) while receiving a call. Selecting Receiving caller ID will allow you to check the availability of such a feature.
Receiving caller ID
This feature enables you to find out whether a network presents the ID of incoming calls.
Press 日 .Select GSM Services.
Select Receiving caller ID. The network will return either Calling user ID available or Calling user ID unavailable.
Press Exit or to return to the standby display.
On networks which allow caller line identity you can disable the sending of your own number, on a call by call basis, by adding #31# before the number you are calling. Alternatively you can ask your service operator to always disable the sending of your mobile number. In this
case if you wish to reveal your number, on a call by call basis, you can do so by adding *31# before the number you wish to call.
Standard network setting
To reset the standard network setting for sending your mobile ID,
Press D. Select GSM Services.
2 Select Sending my ID.
3 Select My settings.
4 Select Preset. The phone will reset to the network setting agreed with your service provider.
Press Exit or to return to the standby display.
Hiding or showing your number
Press 1 . Select GSM Services.
2 Select Sending my ID.
3 Select My settings.
4 Select Hide my ID or Show my ID.
Press Exit or to return to the standby display.
Finding out your current ID setting
1 Press . Select GSM Services.
Select Sending my ID.
Select Status.
The phone will display your current setting taking into account both network and phone settings.
4 Press Exit or to return to the standby display.
Network
When the phone is turned on, it automatically searches for the last network it was registered on (usually the home network). If this is not available, the phone will automatically search and select a network from the preferred network list contained in the SIM.
Editing the preferred list
The phone contains a list of networks which can be selected and transferred to the preferred networks list stored in the SIM. This list can be changed to suite your travel arrangements.
The order and name of the networks in the preferred networks list can be changed and edited.
Press D. Select GSM Services.
2 Select Network.
3 Select Preferred List. A list of networks will be displayed.
Use or to view the list.
Press Options to change it. The following items are displayed:
| Option | Description |
| Modify by list | Displays the general list of all known networks contained in the phone in alphabetical order |
| Edit by code | Edits or enters a network number (MCC MNC) if you know this information. |
| Delete | Deletes an entry |
6 Press Select to confirm the selection.
7 Press Exit or to return to the standby display.
Your SIM may contain a forbidden list of networks which cannot be used. To view the forbidden list or show the home network,
1 Press D. Select GSM Services.
2 Select Network.
3 Select either Forbidden or Home network.
A list of the forbidden networks or the home network will be displayed.
4 Press Exit or to return to the standby display.
Selecting manual search
There may occasions when you wish to select a specific network, which has better coverage in your current location for example.
1 Press 1 . Select GSM Services.
2 Select Network.
3 Select Search.
4 Select Manual. A confirmation screen and Scanning for Networks will be displayed.
Use or 念 to select a network from the list shown.
6 Press to confirm the selection.
Requesting followed by the name of the network will be shown after which the phone will return to the standby display.
You cannot delete a network from the forbidden list. This list will be automatically updated when the manual network selection is performed.
Selecting automatic search (normal default setting)
To perform an automatic search from the preferred list proceed as follows:
Press D. Select GSM Services.
2 Select Network.
3 Select Search.
4 Select Automatic.
Press Exit or to return to the standby display.
Call barring (network service)
This is a network service which allows you to stop different types of calls being made and received on the phone.
It requires the use of a network barring password available only from your service provider.
To put on a call bar,
1 Press . Select Services.
2 Select Call barring.
3 Select Outgoing calls or Incoming calls. Choose from the following:
| Select | Meaning |
| Outgoing - All outgoing | All outgoing calls will be barred |
| - Int'nal calls | All outgoing international calls only will be barred |
| - Int'nal excl. home | All outgoing international calls except to other subscribers within the users home network |
| Incoming - All incoming | All incoming calls will be barred |
| - Roaming only | All incoming calls when not on the home network |
4 Select the option using or . Press Select .
Select Activate. Enter the password and press Select The network will confirm the selection.
Press Exit or to return to the standby display.
To take off or check the status of a call bar,
Press . Select GSM Services.
2 Select Call Barring.
Use or to select the bar to be taken off (Cancel) or check the Status and press D.
If choosing to take off a call bar the password will be required.
4 Press Exit or to return to the standby display.
To change the password,
Press .Select GSM Services.
2 Select Call barring.
3 Select Change password. The old password will be requested followed by two requests to enter the new password. Confirmation will be displayed.
4 Press Exit or to return to the standby display.
Closed user group, CUG (subscription service only)
This is a network service feature and allows the phone to make or receive calls only from selected groups of people. The groups, level of access and whether one of the groups has preferential calling access is set up at the time of subscription. This is not a single user feature and is mainly for businesses wishing to benefit from closed, internal communications.
Up to 10 groups may be set up. Unless authorised calls made or received to or from numbers outside the group are not permitted. To turn on and off CUG and select type of CUG service,
Press 已 .Select GSM Services.
2 Select CUG. The current CUG status will be displayed. Pressing Set will display the following options:
| Options | Meaning |
| No CUG | CUG is off. No groups active. Calls can be made outside the group |
| Partial CUG | Limited calls to and from users outside the group and from users within the group |
| CUG Only | Only able to make and receive calls from users within the group |
Use or to select the required option. Press Follow the display prompts.
4 Press Exit or to return to the standby display.
No CUG' is the setting for normal use.
Broadcast - cell broadcast (CB) messages
These are messages broadcast by the networks to all GSM users and may provide general information about local area dialling codes, weather reports and traffic news etc. Each type of message is numbered enabling you to select the type of information you want to receive. Up to 5 different types of messages can be programmed into your selection list but only one can be displayed at any one time.
There are 16 standard message types pre-programmed into the phone to select from. New message types can be programmed into the selection list using the 3 digit cell broadcast type number. Contact your service provider for details on the number and types of messages broadcast.
Before you can turn on the broadcast service you have to put at least one message type into the selection list.
To enter a message type in the selection list
Up to 5 message types can be entered into the selection list.
Press 已 .Select Broadcast.
2 Select Message types. Press Options
3 Select Get From List (or Edit if type number is known).
4 Scroll to the message type required. Press Select to validate your selection. The display will confirm your choice.
Press Options again to select more message types from the list, enter a message type number if known or delete a message type.
Press Exit or to return to the standby display.
To turn on or off the broadcast service
Press B. Select Broadcast.
Select On/Off.
3 Select On or Off.
4 Press Exit or to return to the standby display.
Reading broadcast messages
Broadcast messages are shown in the standby display only and are suppressed during conversation or menu operation. A message can be up to 93 characters in length and cover several pages. Pages will automatically change approximately every five seconds or by a press on .
Options during message display
A press on Exit will clear the CB currently displayed.
Pressing will dial the number shown in the display within the message.
Pressing Options will display the following menu:
| Option | Action |
| Delete | Delete the current message |
| Delete All | Deletes all messages stored in the queue |
| Numbers | Displays all phone numbers found in the message text and allows to dial or store them in the scratchpad if required |
| Broadcast Off | Turns off cell broadcast |
To turn on or off the alert tone
If required an alert tone can be turned on to 'beep' every time a new or updated broadcast message is received.
1 Press 已 .Select Broadcast.
2 Select Alert.
3 Select On or Off.
4 Press Exit or to return to the standby display.
To delete or edit a message from the list
Message types put into the selection list can be deleted and changed.
Press 已 .Select Broadcast.
2 Select Message types. Select Options
3 Select Delete, Edit or Get from list.
4 Press Exit or to return to the standby display.
Broadcast language
If provided, the cell broadcast language used is the same as the one selected for use in the phone's menu.
Standard predefined list of area information type numbers
| Type No. | Description | Type No. | Description |
| 000 | Index | 040 | Weather Reports |
| 010 | Information Flashes | 050 | District Messages ( STD Codes) |
| 020 | Hospitals | 052 | Network Information |
| 022 | Doctors | 054 | Operator Services |
| 024 | Pharmacies | 056 | Directory Services (National) |
| 030 | Long distance Road Reports | 057 | Directory Service (International) |
| 032 | Local Road Report | 058 | Customer Care (National) |
| 034 | Taxis | 059 | Customer Care (International) |

Having the broadcast service continuously on reduces the battery standby time.
Phone settings - customising your phone
Keypad lock
When keypad lock is turned on it prevents accidental operation of the keys and access into the menus. The key tones are also silenced. Keypad lock is suspended during incoming calls and resumed when the call is terminated. Emergency calls can still be made. If a key is pressed the display will give a reminder that keypad lock is on.
There are two ways to turn keypad lock on and off:
- Directly from the keypad in the standby display,
Press Lock plus # to turn keypad lock on. The display will show
2 Press Unlock l plus # to turn keypad lock off.
Using the menu,
1 Press 已 .Select Settings.
2 Select Keypad lock to turn keypad lock on.
3 Press Unlock plus # to turn keypad lock off.

Keypad lock is cancelled when connected to the handsfree car kit.
Language selection
All the display messages can be shown in one of eight languages: English, Dutch, French, German, Italian, Spanish, Portuguese, Greek. To select the language of your choice,
1 Press . Select Settings.
2 Select Language.
Use or to select a language from the displayed list.
Press to validate.
4 Press Exit or to return to the standby display.
To reset the phone to the language of the SIM enter *#0000#.
To reset the phone language to English enter # 0044#
Alert mode
To avoid disturbing others you can turn off the incoming ring tone, key tones and all alert tones.
There are two ways:
- Directly from the standby display,
1 In the standby display, pressing will display Ring or Silent.
2 Scroll to the desired setting. Press l to validate your choice.
will appear in the display.
Using the menu,
Press 日 .Select Settings.
2 Select Tones.
3 Select Alert tones.
4 Select Ring or Silent.
Press Exit or to return to the standby display.
When silent mode is on all tones are off. This setting is not saved when the phone is turned off.
Ring tone selection
You can choose the sound of the incoming ring tone from a selection of 12 ring tone melodies stored in the phone.
To hear your chosen ring tone melody, wait several seconds before confirming your choice. The melody will be played.
Ring tone selection is made through the Settings menu:
1 Press 日 .Select Settings.
2 Select Tones.
3 Select Ring Tone.
Use or to listen to the different ring tones. Press to select the current tone.
Press Exit or to return to the standby display.
Separate tones must be selected for Line 1 and Line 2.
Volume adjustments
The volume levels of the ring tone, key tones and incoming audio can all be individually adjusted from the standby display by pressing or in the Settings menu:
1 Press 已 .Select Settings.
2 Select Tones.
3 Select Volume.
4 Select Ring, Ramping, Keys or Conversation.
The display will confirm the selection naming the volume to be adjusted.
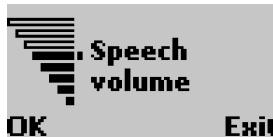
Use or to adjust the setting.
Press OK to validate the setting.
7 Press Exit or to return to the standby display.
During a call, you can adjust the conversation by using or .
For ring tone and key tone, the lowest setting is off.
Ramping
Ramping is a feature that when turned on will cause the incoming ring tone to gradually increase to the maximum volume level if the call is not answered after the first ring.
1 Press , Select Settings.
2 Select Tones.
3 Select Volume.
4 Select Ramping.
5 Select On or Off.
Press Exit or to return to the standby display.
When turned on the volume of the incoming ring tone will start from the minimum and rise to the maximum volume until answered.
Backlight - setting
This option allows the user to control the operation of the backlight during key entry or incoming ring tone.
There are two settings:
- On for 10 sec.: the display and key backlight will stay on for 10 seconds after the last key press or incoming call.
- Off: the backlights will stay off.
Press 日 .Select Settings.
2 Select Display.
Select Backlight.
4 Select either of the two settings. Press to validate.
Press Exit or to return to the standby display.
Display contrast
The contrast of the display can be adjusted to suit the surrounding light conditions.
To modify the display contrast,
1 Press 日 . Select Settings.
2 Select Display.
3 Select Contrast.
4 Adjust the contrast using or .
Press OK to validate the setting.
Press Exit or to return to the standby display.
Any key answer
This feature enables any key (except and No ring ) to be pressed to answer an incoming call.
Press 日 .Select Settings.
2 Select Keys. Select Any Key Answer.
3 Select On or Off.
4 Press Exit or to return to the standby display.
Auto answer
This feature only works when the phone is connected to a handsfree car kit or headset and enables the phone to automatically answer an incoming call after approximately 5 seconds without having to press any keys.
Press . Select Settings.
2 Select Auto features.
3 Select Auto-answer.
4 Select On or Off.
Press Exit or to return to the standby display.
Auto retry
This feature enables the phone to automatically redial the number of a failed call, due to a system busy or unavailable signal from the network, for up to 10 times after which it will stop.
Press . Select Settings.
2 Select Auto features.
3 Select Auto-retry.
4 Select On or Off.
Press Exit or to return to the standby display.
When activated, Auto-retry and a countdown timer to the next call attempt will appear in the display. An auto-retry warning tone will sound each time a new call attempt is made.
If the automatic redialling is successful proceed with the call as normal. Pressing Exit or any key during the retrying process will cancel auto-retry and end the dialling process for that call.
Security features
The security features described in this section protects your phone from unauthorised use.
When requested, enter the code, which appear as asterisks (*) and press OK.
If you make a mistake press Clear and enter the correct digit(s).
Avoid using codes similar to emergency numbers such as 999 or 112 to prevent accidental dialling of these numbers.
KEEP A RECORD OF YOUR CODES AND KEEP THEM IN A SAFE PLACE.
FAILURE TO DO SO WILL CAUSE YOU CONSIDERABLE
INCONVENIENCE.
Phone lock code
A phone lock code is supplied with the phone for security purposes. It prevents unauthorised access to the phone.
The factory setting is 0000. We suggest that you reset this code and keep it in a safe place, separate from the phone.
The phone lock code is also required to reset the call timers. When enabled the code will be asked for each time the phone is turned on.
To change the phone lock code,
1 Press . Select Settings.
Select Security. Select Phone lock.
3 Select Change Code and follow the display prompts.
4 Press OK to validate the new code.
Press Exit or to return to the standby display.
To turn on or off the phone lock code,
1 Press 日 .Select Settings.
2 Select Security. Select Phone lock.
3 Select On or Off.
4 The phone lock code will be requested to authorize your selection.
Press Exit or to return to the standby display.
When phone lock is on emergency calls can still be made.
PIN code
Your SIM is provided with a 4-8 digit PIN code to protect it from unauthorized usage. When enabled the PIN code will be asked for each time the phone is turned on. If you enter the wrong PIN code three times in succession your SIM card will be blocked and you will need the 8 digit PUK code from your service provider (see page 57).
To turn on and off the PIN,
Press . Select Settings.
2 Select Security.
If already off, PIN enable will be shown.
If already on, PIN disable and PIN change will be shown.
Press Select and follow the display prompts.
4 Press OK to validate your entry.
PIN enabled or PIN disabled briefly displayed will confirm your action.
Press Exit or to return to the standby display.
To change the PIN code (PIN must first be enabled),
Press . Select Settings.
2 Select Security.
3 Select PIN change and follow the display prompts.
4 Press OK to validate your new PIN. Confirmation will be displayed.
Press Exit or to return to the standby display.
PIN2 code
The PIN2 code prevents unauthorised access to some features of the phone such as turning on or off FDN operations, modifying the FDN
phonebook, setting calls costs to zero, modifying the costs display features. It can be changed but not turned on or off.
To change the PIN2 code,
1 Press . Select Settings.
2 Select Security.
3 Select PIN2 Change and follow the display prompts.
4 Press OK to validate your new PIN2 code.
Press Exit or to return to the standby display.
PUK code
The PUK (PIN unblock key) is an 8 digit code supplied by your service provider. It is used to 'unblock' a PIN whose code has been entered incorrectly three times. A PUK code cannot be changed.
When requested enter the PUK code and press OK. You will then be asked to enter a new PIN code. Follow the display prompts to reset the PIN code.
If you enter the wrong PUK code 10 times in succession your SIM card cannot be used again. Contact your service provider for a new card.
PUK2 code
The PUK2 is an 8 digit code supplied by your service provider. It is used to unblock a PIN2 whose code has been entered incorrectly three times. A PUK2 code cannot be changed. When requested enter the PUK2 code. You will then be asked to enter a new PIN2 code. Follow the display prompts to reset the PIN2.
If you enter the wrong PUK2 code 10 times in succession you will be unable to use the features requiring the PIN2 code. Contact your service provider for a new card.
Call barring password
The call barring password is used to select the call barring levels outlined in the Services - Call Barring menu (see page 47). It is obtained from your service provider.
To change the password,
1 Press D. Select GSM Services.
2 Select Call barring.
3 Select Change password and follow the display prompts.
4 Press OK to validate.
Press Exit or to return to the standby display.
Summary of code/password entry chart
| Password | Length | Number of tries allowed | If blocked or forgotten |
| Unlock code | 4 digits | Unlimited | Return phone to manufacturer |
| PIN | 4-8 digits | 3 tries | Unblocked by use of PUK code |
| PIN2 | 4-8 digits | 3 tries | Unblocked by use of PUK2 |
| PUK | 8 digits | 10 tries | Contact your service provider |
| PUK2 | 8 digits | 10 tries | Contact your service provider |
| Call barring password | 4 digits | Network determined | Contact your service provider |
Default (factory) settings
Use the Settings menu to return the phone settings back to the factory settings. This has no effect on the phonebook entries or phone lock code.
1 Press . Select Settings.
2 Select Default settings.
3 Select Yes or No.
4 Press Exit or to return to the standby display.
The following are the factory default settings:
| Feature | Factory setting |
| Alert Tones | Ring |
| Ring Tones | Trium |
| Volumes, Ring, Key and Speech. | Mid values |
| Backlight and Contrast | On for 10 sec. and mid value |
| Any Key, Auto-Retry and Auto Answer features. | Off |
| Ramping | Off |
Using the office tools
The Office Tools menu contains a scratchpad and currency-converter calculator.
Scratchpad
Up to 5 separate entries of 20 characters can be stored in the scratchpad
1 Press B. Select Office Tools.
2 Select Scratchpad.
3 Select Read. Use or to scroll through the entries. Select Write to make a new scratchpad entry.
Pressing Options when reading entries will give access to the following menu:
| Item | Action |
| Store | To save a number to the phonebook |
| Edit | Modifies an entry |
| Delete | Deletes an entry |
| Delete All | Deletes all entries |
| Call | Calls the number displayed in the entry |
Currency-converter
This useful feature converts currencies. However to use the converter the currencies and the exchange rate have first to be set up. The conversion is calculated on the per unit exchange rate of the second currency selected.
To select the currencies and the exchange rate,
1 Press D. Select Office Tools.
2 Select Currency converter.
3 Select Settings.
4 Enter the first currency name (e.g. Dollar). Press OK. Enter the second currency name (e.g. Yen). Press OK.
5 Enter the exchange rate using # to enter a comma. Press OK to validate the entry.
Press Exit or to return to the standby display.
If you wish to use your Currency-converter as a Euro converter for participating currencies to the European Monetary Union ("Euroland currencies"), please enter the complete Euro exchange rate with six significant figures. For example: 1 Euro = £ 1.52.
To calculate the conversion between the chosen currencies,
1 Press D. Select Office tools.
2 Select Currency converter.
3 Select one of the two first options. In our example: either Dollar->Yen or Yen->Dollar.
4 Enter the amount to be converted. Press # to insert a comma, if needed. Press OK . The converted amount will be displayed.
Press Exit or to return to the standby display.
Conversion from one Euroland currency to another, or to non-Euroland currencies, should normally follow "triangulation" rules (i.e. conversion of local currency to Euro and then Euro to other local currency). Your Currency-converter does not provide this possibility. Accordingly, the result you obtain shall only be a close approximation.
GSM man machine interface codes
The phone supports the standard GSM key sequences using the * and # characters sent directly from the keypad to the network. These sequences are used to activate all the supplementary services provided by the network.
Consult your service provider for a complete list.
Appendix Accessories list
The following are the main accessories available for the phone:
| Vehicle kits | Part numbers |
| CLA car adaptor | FZA-0009A |
| Headset | FZA-0024A |
| Simple holder | FZA-0021A |
| Simple handsfree adaptor (with CLA base & micro) | FZA-0010A |
| Full handsfree adaptor (with power cable) | FZA-0012A |
| Handsfree microphone | FZA-0013A |
| External speaker | FZA-0023A |
| Chargers and batteries | Part numbers |
| AC adaptor (UK) | FZA-0003A |
| AC adaptor (European version) | FZA-0002A |
| AC adaptor (Asian version) | FZA-0005A |
| AC adaptor (Australian version) | FZA-0004A |
| Desktop charger (for phone + spare battery) | FZA-0014A |
| Standard battery | FZA-0001A |
| Data and miscellaneous | Part numbers |
| PC cable (RS232C) | FZA-0016A |
| Contact Trium software kit (Contact Trium S/W + PC cable) | FZA-0019A |
| Data kit (Data + Contact Trium S/W + PC cable) | FZA-0017A |
| Belt clip | FZA-0027A |
Expression
AC/DC charger
Active call
ALS
AoC
CB
CLI
Conversation mode
CUG
Diverting
DTMF
FDN
GSM
IN
LCD
LED
MMI
PIN/PIN2
PUK/PUK2
Roaming (Rm)
SDN
SIM
SMS
SR
Standby mode
Meaning
Alternating Current/Direct Current charger
The call currently in conversation
Alternate Line (Line 2) Service
Advise of Charge - subscription service
Cell Broadcast
Caller Line Identity - displays callers telephone number
When the phone is making or receiving a call
Closed User Group - requires network support
Diverts incoming calls to the phone to another number
Dual Tone Multifrequency Tones
Fixed Dialling Number
Global System for Mobile communications
Information Numbers of your operator or service provider
Liquid Crystal Display
Light Emitting Diode
Man machine Interface
Personal Identification Number. Supplied by your network/service provider
PIN Unblocking Key. Used to unlock PIN and PIN2. Supplied by your network/service provider
The ability to use your telephone on networks other than your home network at home or abroad.
Service Dialling Number. Of your operator or service provider
Subscriber Identity Module. Supplied by your network/ service provider
Short Message Service
Status Report - relates to SMS messages
When the phone is on, registered onto a network but not making or receiving a call
Problem
Phone will not switch on
Charging LED not lit red and no flashing battery Icon
Short standby and talk times
Calls cannot be made or received
Stored telephone numbers cannot be recalled
Numbers cannot be entered in the display
Phone switches on but there is no display
Battery icon not flashing 1-2-3 during charging
Flashing
Possible cause and solution
Check that the battery is fully charged and correctly connected to the phone.
There may be no mains supply. Check mains supply. The AC/DC charger may be faulty. Return to your dealer and try substitution with another Mitsubishi adaptor. If faulty contact your dealer.
Cell broadcast is permanently on, using more battery power.
Phone is in a poor signal area and therefore always on full power.
Incorrect charging and discharging. Always charge and discharge your battery fully.
The battery is wearing out. Replace the battery
Check that you have at least one signal strength bar () . Try in a stronger signal strength area.
If the name of a network is not displayed, check your SIM is OK, check registration with your network/service provider.
Call barring option is turned on. Turn it off (see page 47).
Call cost limit is reached (see page 42).
Fixed Dialled Number or Call Barring features are turned on. Check features and turn them off (see pages 34 and 47).
Keypad lock is on (is displayed). Press Unlock and to turn off.
Display contrast is turned down to low. Reset contrast (see page 54).
Indicates a charging or battery problem. Turn off and disconnect the charger. Reconnect and try again. If the problem remains contact your dealer.
There is not enough memory to store another SMS message. You must delete one or more of the existing stored messages (see page 36).
| Problem | Possible cause and solution |
| Allowed credit reached! | You are trying to place an outgoing call and the allowed credit is already reached.The allowed credit limit is reached during an outgoing call (the call is then aborted). |
| Busy | You are trying to make a call and the call fails because the destination number is already engaged in conversation. |
| Call failed | The user is unreachable.The outgoing call fails due to:CUG is in use and the call is not allowed/unrecognised by the network or the network cannot take the call due to system busy or the number is out of order or the number is unreachable or the network does not answer or the option to hide your phone number when calling is not supported by the networkControl and verification of CUG parameters not confirmed, CUG availability on network.Control the ability to hide your ID when making a call (service availability in network). |
| Cancelled. No type se- lected | Cell broadcast activation has been requested but no message type has been selected. |
| Cannot execute com- mand | You have made a request which is impossible to be ex- ecuted in the current call situation. |
| Can't display message | The short message text cannot be displayed (characters not recognised, incorrect format etc...) |
| Check SIM! | There is no SIM present or the SIM is incorrectly insert- ed. See page 8 for more details. |
| Check your password | You changed the call barring password or You changed the call barring service status.The entered password seems to be wrong or incorrect. |
| Check your request | You made a request for a service that seems to be im- possible to fulfil. |
| Check your subscri- tion | You tried to activate a GSM service. You are requested to check your subscription regarding the related service rights of use/access. |
| CUG call failed | You tried to make a call in a CUG (Closed user group) and the call is rejected by the network because the network does not recognise the CUG parameters or the called user is not in the same CUG or the called user has no CUG association. |
| Error! | The network cannot perform your request and generates an error result. |
| Failed | An SMS sending process failed (the short message cannot be sent). |
| Incorrect entry | You entered a character string with a syntax error. |
| Invalid number | You tried to make a call and the call is rejected by the network because the network does not recognise the phone number structure or you tried to store a phone number that is too long to be stored in the selected location or you tried to move a phone entry to a location that is unable to receive the phone number (phone number too long) |
| Keypad locked "Unlock" # to unlock | A press on any key is made with keypad locked. |
| Low battery! | This text is displayed when the battery becomes too low and the mobile will soon be switched off automatically. |
| Network busy | You tried to make a call. The call is rejected by the network due to congestion problems. |
| Network not allowed | When selecting network manual search, you have selected a network that rejects the connection. |
| New PIN incorrect. Try again | Changing PIN: the new PIN code values differ (value control). |
| New PIN2 incorrect. Try again | Changing PIN2: the new PIN2 code values differ (value control). |
| No action performed | When a copy/move operation is made on memories but no conditions have been changed (same memory, number and name). |
| No response | You made a call to a remote user and no response has been received. |
| Not allowed | Your number/character entry is not allowed. |
| Not allowed (fixed dialling) | A call is tried, but cancelled due to fixed dialling control (the number dialled does not match with one of the fixed dialling numbers in memory). |
| Not Available | There is no more SIM storage. |
| Number changed | The called number has changed. |
| PIN blocked | A wrong PIN code has been entered 3 times. |
| PIN2 blocked | A wrong PIN2 code has been entered 3 times. |
| PUK2 blocked | A wrong PUK2 code has been entered 10 times. The SIM services protected by the PIN2 code have now been permanently disabled. |
| Reaching allowed credit! | The cost limit is about to be reached. The connected call will end automatically when the limit is reached. |
| Ring volume Off | The ring volume is set to 0 (no volume). |
| Service not available | Activating some GSM services that are not available on the network |
| SIM blocked. Contact provider | A wrong PUK has been entered 10 times. The SIM card has been permanently disabled and needs to be replaced by a new one. |
| SIM blocked. Enter PUK: | A wrong PIN code has been entered 3 times. Enter the PUK code to unblock the SIM card. |
| SIM fixed full SIM names full Phone names full | The corresponding memory is full. |
| SMS memory locations are full | The storage of new messages (when writing a new SMS) is impossible. |
| Wrong code. Try again | A wrong phone lock code has been entered. |
| Wrong new code. Try again | The new phone lock codes do not match (value control). |
| Wrong PIN, try again | The wrong code has been entered. |
| Wrong PIN2, try again | |
| Wrong PUK, try again | |
| Wrong PUK2, try again |
Index
A
Accessories 61
Alert mode 52
Alert tone Turning on/off 37
Any key answer 54
Auto answer 54
retry 55
Automatic search 47
B
Backlight 18,54
Balance Info 40
Balance information 40
Barring password Call 57
Basic operations 14
Calling 19
Making a call 19
Receiving a call 19
SMS 20
Unanswered call 20
Voice Mail 20
Battery 9
Charging 14
Disposal 16
Fitting 14
Low battery warning 14
Removing 14
Safety information 16
Use 16
Broadcast 49
Language 52
Message types 49, 50
On/Off 49
C
Call
Conference 26
Holding 25
Multi-party 26
Retrieving 25
Call barring 47
Password 13
Call costs
Reset 42
Call timer
Reset 41
Call times 40
Call waiting 25
Caller line identity 44
Calling 10, 19
Calls & Times 39
Call costs 41, 42
Call Timers 41
Calls Log 39
Costs 41
Timers 40
Calls Log 39
Care and maintenance 11
CB 49
CB messages Deleting 50
Editing 50
Reading 49
Cell broadcast 49
CLI 44
Closed user group 48
Conference call 26
Cost management 41
Credit limit 42
CUG 48
Currency-converter 59
D
Dialling Calls Log memory 22
Last dialled numbers 22
Phonebook 22
Dialling from memory 22
Display contrast 54
Diverting 43
DTMF tones 23
E
Emergency calls 13
Ending a call 10, 19
Entering text 29
Error messages 64
F
Factory settings 58
FDN 34
Fixed dialling numbers 34
G
General operations 22 safety 2
Getting started 8
Glossary 62
Graphic display icons 6
GSM man machine interface codes 60 Services 43
H
Holding a call 25
1
Icons 6
In-call options 25
Incoming Calls Diverting 43
Information numbers 31
K
Keypad 4 lock 17,51
Keys 4
L
Language selection 52
M
Making a call 10, 19
Managing SMS messages 36
Menu 27
Menu map 27
Message templates 38
Messages 18,36
Alert 37
Broadcast 49
In Box 36
Msg. Templates 39
Outbox 38
Settings 37
Write New 37
Mobile number Hiding 44
Showing 44
Multi-party call 26
Muting 23
N
Network 45
Network Serv. 30, 31
Network services 30
0
Office Tools Currency converter 59 Scratchpad 59
Office tools 59
Outbox 38
P
Pause feature 24
Phone customising 51 diagram 3 lock 56 lock code 13, 56 settings 51
Phonebook 32
Calling numbers 33
Fixed Dialling 35
Free space 33
Own Numbers 34
Recall 33
Remaining 33
Store 33
Viewing numbers 33
PIN code 12,56
PIN2 code 12,57
Problems 63, 64
PUK code 12,57
PUK2 code 12,57
R
Ramping 53
Reading an SMS message 36
Receiving a call 10, 19
Responsibility 12
Retrieving a call 25
Ring tone 52
s
Safety information 2
Battery 16
Care and maintenance 11
Emergency calls 11
Responsibility 11
Security codes 11
Vehicle safety 11
Scratchpad 59
SDN numbers 31
Second call 25
Security 55
codes 12
features 55
Sending an SMS message 37
Services
Call Barring 47, 58
Call diverting 43
CUG 48
Network 46
Receiving ID 44
Send ID 45
Settings 51
Auto features 54, 55
Display 54
Keypad lock 51
Keys 35, 54
Language 52
Security 55
Tones 53
Show costs 42
Silent alert mode 23
SIM
application tool kit 31
card 8,14
SMS 18,36
SMS messages
Managing 36
Preparing your phone 37
Reading 36
Sending 37
Solutions 63, 64
Solving problems
Speed dialling 22,35
Standby display 9,17
Storing names and numbers 32
T
Trouble shooting 63
Turning
off 10, 18
on 9,17
V
Vehicle safety 11
Voice Mail
Alert Tone 31
Call 32
Number 31
Voice mail
Volume 23,52
adjustment 23
If you require service then in the first instance, you should contact your supplier.
Should you experience any difficulty then please contact your nearest MITSUBISHI location listed below for information on other service centers.
UNITED KINGDOM Tel: +44 (870) 6060351
SVERIGE
Tel: +46(8) 625 10 00
Fax: +46 (8) 625 10 86
FRANCE
Tél: +33 01.55.68.56.66
Fax: +33 01.55.68.57.37
DEUTSCHLAND Tel: +49 (01803) 337184
SPAIN
Tel: +34 (91) 5560503
Fax: +34 (91) 5563497
ITALIA
Tel: +39 (39) 60531
Fax: +39 (39) 6057694
IRELAND
Tel: +353 (1) 4505007
Fax: +353 (1) 4561337
GSM Service Card
To obtain warranty Service, you will require your original equipment purchase invoice or irrefutable proof of purchase, plus this card, please fill in missing information: Please see warranty terms and conditions for in warranty service.
Date of purchase:
Invoice number:
Dealer name:
Location:
Dealer tel. number:
- You can benefit from this guarantee only if you are the original end-user purchaser.
- MITSUBISHI guarantees that for a period of twelve (12) months from the date of purchase from your dealer, the Product shall be free from defects in materials and workmanship. Subject to the conditions below, Mitsubishi will indemnify you against all cost of parts and labour for repairs to or replacement of the product or parts (which may include equipment of similar type) where conducted by an authorised MITSUBISHI GSM service centre. MITSUBISHI shall be entitled to retain product which has been replaced.
- Any claims must be made to an authorised MITSUBISHI GSM service centre in the countries mentioned in the service card enclosed with the product. In case of difficulty you can contact the Mitsubishi companies listed in the service card to obtain details of your nearest authorised MITSUBISHI GSM service centre. As a condition of this guarantee, the date of your purchase must be confirmed by producing your original invoice from your supplier or your sales receipt, showing the serial number, together with the service card. Final determination of guarantee claim eligibility shall be made by MITSUBISHI. MITSUBISHI shall not be liable for shipment costs to and from an authorised GSM MITSUBISHI service centre and the product travels at your risk.
- This guarantee does not cover:
a) battery defects of any nature;
b) non-compliance with directions for use;
c) installation or removal charges where the product is installed in a vehicle;
d) defects or failures caused by accident, misuse, improper installation or improper repair by an unauthorized repairer, alteration or modification, neglect, failure to use for normal purpose, Acts of God, water ingress, use in adverse environmental conditions (humidity or temperature);
e) cost of or performance of modifications to product to adapt or adjust to conform to national or local safety laws, where such safety laws go beyond harmonised European Union standards;
f) loss of use of the product or consequential loss of any nature;
g) loss of use of air-time, loss of use of any loaned equipment or ancillary equipment;
h) provision of incorrect or insufficient signal on air-time network, upgrading of product software to changes in network operating parameters, mains supply voltage fluctuations, incorrect SIM card (memory card) parameters for connection to airtime retailer;
i) damage caused by non-MITSUBISHI accessories.
- Any guarantee claim or service does not extend the original guarantee period unless so required by prevailing national law.
- This guarantee is valid only if the product is purchased and used in the European Union, Norway, Iceland or Switzerland.
THIS GUARANTEE DOES NOT AFFECT YOUR STATUTORY RIGHTS.