
PDX2240I-TOP - Platine vinyle AKAI - Notice d'utilisation et mode d'emploi gratuit
Retrouvez gratuitement la notice de l'appareil PDX2240I-TOP AKAI au format PDF.

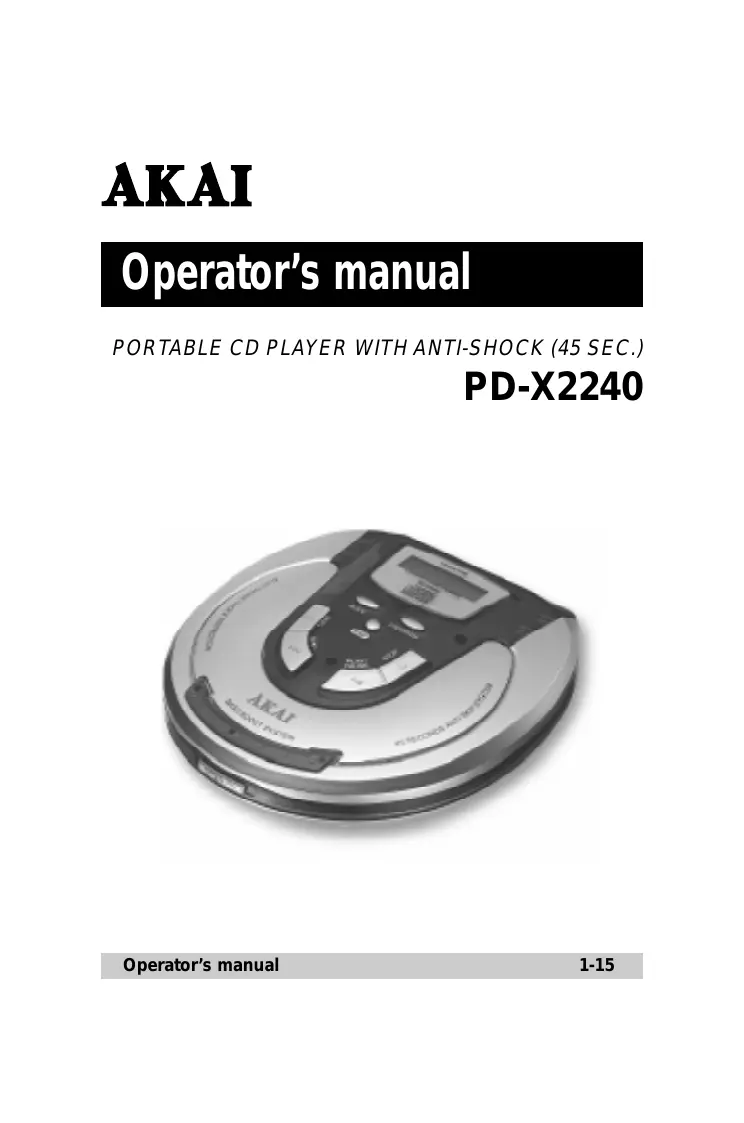

| Type de produit | Lecteur CD portable avec anti-choc |
| Marque | AKAI |
| Modèle | PDX2240I-TOP |
| Dimensions (L x P x H) | 142 mm x 134 mm x 29 mm |
| Poids | 212 grammes |
| Alimentation | 2 piles AA (1,5 V) ou adaptateur secteur 220 V / 4,5 V CC |
| Types de disques compatibles | CD 8 cm et 12 cm |
| Réponse en fréquence | 20 Hz - 20 kHz |
| Fréquence d'échantillonnage | 44,1 kHz |
| Convertisseur N/A | 1 bit |
| Anti-choc numérique | 45 secondes de mémoire tampon |
| Fonctions de lecture | Lecture normale, répétition d'une piste, répétition de toutes les pistes, lecture intro (10 s), aléatoire, programmée (jusqu'à 24 pistes) |
| Fonctionnalités supplémentaires | Bass Boost, fonction HOLD (verrouillage des touches), arrêt automatique |
| Sorties audio | Prise casque (3,5 mm), prise Line Out (3,5 mm) |
| Batteries rechargeables | Ni-Cd 1,2 V / 650 mAh (non fournies), temps de charge ≈ 15 h |
| Entretien et nettoyage | Nettoyer la lentille avec un coton-tige, le boîtier avec un chiffon doux et de l'eau savonneuse |
| Sécurité | Ne pas toucher l'adaptateur avec les mains mouillées ; éviter l'exposition prolongée au volume élevé avec le casque |
| Informations générales | Spécifications et conception sujettes à modifications sans préavis |
FOIRE AUX QUESTIONS - PDX2240I-TOP AKAI
Questions des utilisateurs sur PDX2240I-TOP AKAI
0 question sur cet appareil. Repondez a celles que vous connaissez ou posez la votre.
Poser une nouvelle question sur cet appareil
Téléchargez la notice de votre Platine vinyle au format PDF gratuitement ! Retrouvez votre notice PDX2240I-TOP - AKAI et reprennez votre appareil électronique en main. Sur cette page sont publiés tous les documents nécessaires à l'utilisation de votre appareil PDX2240I-TOP de la marque AKAI.
MODE D'EMPLOI PDX2240I-TOP AKAI
AKAI
Operator's manual
PORTABLE CD PLAYER WITH ANTI-SHOCK (45 SEC.)
PD-X2240
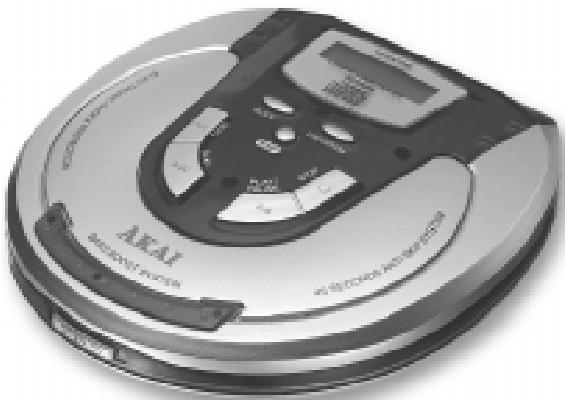
LOCATION OF CONTROLS
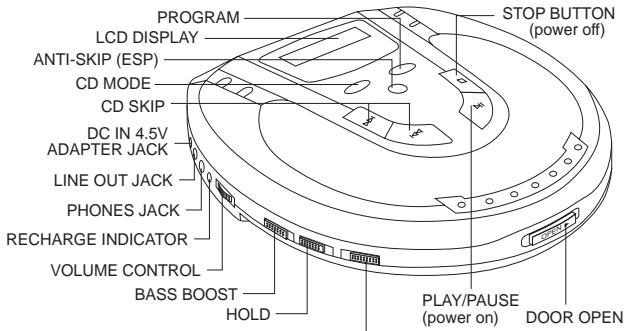
CONTROL OPERATION AND FUNCTION POWER SUPPLY
Your CD player requires 2 size "AA" alkaline batteries (not include), or use the AC adapter
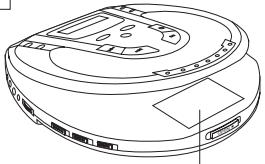
BATTERY DOOR
AC ADAPTER OPERATION
Plug one end of the AC adapter into the DC 4.5V jack, then plug the other end into AC wall outlet.
PRECAUTIONS ON USING THE AC ADAPTER
Don't touch the AC adapter with wet hands. Doing so is dangerous, as this could result in an electric shock.
If the adapter plug is insert into the DC Jack of the Player, the power supply automatically switch to the AC/DC power and the batteries supply will be disconnected.
DC OPERATION
ALKALINE BATTERY INSTALLATION (NOT SUPPLIED)
Insert two AA batteries (not supplied) into the battery compartment on the bottom of the unit. Be sure to observe the proper polarity.
NOTE ON ALKALINE BATTERIES
- When replacing the alkaline batteries, use two new batteries of the same type. Do not mix a used battery with a new one or mix different types of batteries.
- When inserting the batteries, be sure to place the batteries as the sketch shown, mistakenly inserting even one with improper polarity will cause leakage.
- When not use the unit for an extended period of time, or not use the batteries for a long time, remove them to prevent possible acid leakage or corrosion resulting in damage to your player or personal injury such as skin burns.
- Bear in mind that battery life expectancy is based upon playing mode. Maximum battery power consumption happens at maximum settings. If sound gets distorted or if the unit fails to switch tracks, your batteries are weak. Replace both batteries, or use AC adaptor.
-
Never charge, heat, disassemble, or throw batteries into a fire.
-
If the display shows the symbol “ ”, this means your batteries are weak, replace them or use the AC adaptor.
- If the display is blank - no numbers show when power is turned on, the batteries are dead.
Replace them or use the AC adapter.
CHARGING AND USE OF RECHARGEABLE BATTERIES
This unit can fully recharge the specified rechargeable batteries, in approximately 15 hours. The rechargeable batteries (NOT supplied) should be recharged before they are used for the first time or they have not been used for a long period of time because they are low in power (over 60 days).
- Open the battery compartment cover and insert two of the recommended rechargeable batteries, matching polarity. (1.2V 650mA).
ALL BATTERIES MUST BE OF RECHARGEABLE NICKEL-CADMIUM TYPE, OTHERWISE THE BATTERIES MAY EXPLODE OR LEAK.
- Plug in the AC ADAPTOR.
- Slide the charge switch to CHARGE position to start charging.
USE ONLY THE AC ADAPTOR FOR CHARGING.
- After 15 hours, please unplug the AC ADAPTOR and slide the recharge switch to normal position.
DO NOT CHARGE CONTINUUSLY FOR 24 HOURS OR MORE. DOING SO CAN CAUSE THE PERFORMANCE OF THE RECHARGEABLE BATTERIES TO DETERIORATE.
NOTE: You may play DISC'S whilst charging the batteries.
If the operating time decreases drastically even when the rechargeable nickel-cadmium batteries are properly recharged, purchase a new set of rechargeable nickel-cadmium batteries. When charging for the first time or after a long time, playing time may be reduced. In this case, charge and discharge the batteries several times.
AUTO POWER ON FUNCTION
The power turns on automatically when the PLAY/PAUSE button is pressed.
AUTO POWER OFF FUNCTION
The power turns off immediately after the disc compartment is opened.
When all the tracks on a disc have been played, or the Stop button is pressed, the power turns off automatically within 60 seconds if no button is pressed.
If you pressed the Stop button twice the power will turn off
THE HOLD FUNCTION
It is useful during playing, the function will lock the key on the panel to protect the mistake in the Playing.
During playing slide the HOLD switch to "ON" position, the "HOLD" will appear in the display, the key on the panel will be locked, the panel key is disable.
Slide the HOLD Switch to "OFF" position to stop the function.
LISTENING WITH HEADPHONE (EARPHONE)
Connect the plug of the stereo headphone (earphone) into the headphone jack (marked phones) before use the unit.
CAUTION: Hearing experts advise against exposure to continuous extended play at loud volume levels while using headphones (earphone), possible hearing loss may result. If you experience a ringing in the ears, reduce volume or discontinue use. We want you listening for a life time.
PLAYING A DISC
Be sure to reduce the volume before plugging in or unplugging the headphones/earphones
- Plug the cord from a pair of headphone/earphone into the PHONES jack.
- Slide the Door Open button to open the CD door.
- Hold the disc with the label side up and press it onto the spindle until it "clicks" into place.
- Close the disc compartment, press PLAY/PAUSE button, the disc will begin to spin, the display will indicate "01", play will begin immediately from track number 1.
- Adjust the volume as desired.
- Set the BASS BOOST function as desired.
-
To stop play temporarily, press the PLAY/PAUSE button.
-
The elapsed playing time flashes in the display.
-
Press the PLAY/PAUSE button again to resume.
-
To stop play, press the Stop Button, and the power turns off automatically after a while.
Note: Both 8cm and 12cm discs can be played in the unit.
Place only one disc at a time in the CD compartment.
TRACK SEARCH
- Press the and button during play to skip to the desired track.
- Press the to skip to the next track on the disc.
- Press the to skip to the beginning of the track currently playing.
- Press the twice or more to skip to previous tracks.
FORWARD/REVERSE SEARCH
Press and hold the skip (▶▶) button during play to scan the disc at high speed.
forward
- If you press and hold the skip button (▶) while playing, it will scan the current playing track forward at high speed.
- If you press and hold the skip button (▶) while playing, it will scan the current playing track backwards at high speed.
BASS BOOST
Use the Bass Boost function to increase the bass output when listening with headphones. During bass boost on setting, sometimes, you may hear some distortion, adjust the volume control to a lower level when using the bass boost feature.
PROGRAMMED PLAY
The tracks on the disc can be programmed for play in any order. (Up to 24 tracks can be programmed.)
During programming, "PROG" flashes in the display.
NOTE: Programming is possible in the STOP mode.
| Program number | 1 | 2 | 3 |
| Track number | 3 | 5 | 9 |
- Press the PROGRAM button in the STOP MODE. The "PGM" appears in the display.
- Press the skip button (H) to select the first track to be programmed.
-
Press the PROGRAM button again to enter the track into the memory.
-
Repeat steps 2 to 3 to program other track till you finish.
- After programming is finished, press the PLAY/PAUSE Button.
Note: Programmed play will begins automatically if you program 24 tracks.
"PGM" shows steady in the display and programmed play begins.
- The player stops automatically after all programmed tracks have been played. To play the same program again, press the PLAY/PAUSE Button.
The programming will be cleared if
- Open the door
- Power off
- After random play
- To check the program, press the STOP Button and then the PROGRAM button.
| THE CD MODE BUTTON This button can be pressed during play to accomplish many different kinds of play. | |
| CD Mode button pressed | Once for single track repeat. Twice for all tracks repeat. 3 times for INTR play. 4 times for RANDOM (SHUFFLE) play. 5 times for return to normal play. |
SINGLE TRACK REPEAT
Press the CD Mode button once during play, and the “ 1” will appear in the display.
The current track will be played over and over again until Stop button is pressed.
ALL TRACKS REPEAT/CONTINUOUS PLAY
Press the CD Mode button twice during play. And the “ ALL” will appear in the display.
The all tracks on disc will be played over and over again until Stop button is pressed.
INTRO PLAY
Plays the first 10 seconds of all tracks once, then stops.
This is useful if you do not remember the song titles.
- During playback press the STOP button.
- Press the CD Mode button 3 times.
- Press the PLAY/PAUSE button and wait for a while.
- The "INTR" will appear in the display.
- To stop the intro play and start the normal play. Press the CD Mode button twice more or press the stop button.
Note: If you press the button during playing, it will start the INTR play after the song finished.
RANDOM OR SHUFFLE PLAY
Plays all the tracks in random order.
- Press the CD Mode button 4 times during playing.
- The "RAND" will appear in the display.
- The display will show the first track the CD player select.
- Press the skip button to skip the next random song.
- To stop the function, press the CD Mode button once more or press the Stop button.
THE ANTI-SKIP MEMORY FUNCTION (45SEC.)
The digital anti-skip function uses semiconductor memory to prevent the sound from skipping when the unit is subjected to shocks and vibration during play.
- When the ESP button is pressed during play, the indicator appears in the display and the digital anti-skip function turns on. The digital data equivalent to approximately 3 seconds (45 seconds) of music is stored in a read-ahead memory buffer before it is decoded and played. The display changes from the mark to the mark, indicating that the data has been stored.
- When the unit is subjected to a shock during play, the data stored in memory continues to be decoded and continue reading new data. As the data is read from memory, the indicator changes to . Once the pickup returns to its original position, new data is stored in memory and the display changes back to the mark.
- If the set is subjected to repeated shocks and all the data stored in memory is used up, the mark is displayed and the sound will skip or stop for a brief period until the memory base fills up again.
- to turn off the anti-skip function, press the ESP button again.
NOTE: Keep the digital anti-skip function off when using the set in stable and no vibration area, where it will not receive shocks. The battery power consumption is less than when it is on.
NOTE: When the digital anti-S function is switched on or off, the sound will be interrupted for 1 to 2 seconds, this is normal (the interrupted time is used for the memory on or off).

CONNECTING TO HOME STEREO SYSTEMS
The line out jack is made to accept a stereo mini plug (3.5mm). By using a commercially available audio line cable, simply connect the cable's mini plug to line out jack on your player, and the other appropriate end to CD/AUX input(s) of your home stereo system.
NOTE: Always switch the power off before making any connections between the player and any other set.
NOTE: The volume control or the player become inoperable when the line out jack is used. Adjustments are made on your audio system.

CLEANING
CLEANING THE PICKUP LENS
A dirty lens will cause sound skipping. If the lens is very dirty, the player may not work. Open the CD door and clean the lens as follows:
FINGERPRINTS ON LENS
Use a cotton swab starting in the middle and working to the outside edge, pay attention in doing this operation or the pick up lens could be damaged.
CLEANING THE CABINET
Wipe with a soft cloth. If the cabinet is very dirty, dampen (not dripping wet) the cloth with a weak solution of soap water, and then wipe clean.
HANDLING COMPACT DISCS
-
This unit is designed to play compact discs bearing the identification logo to the right. Discs that do not carry this logo may not conform to the CD standard and may not play properly.
-
Dirty, scratched or warped discs may cause skipping or noise. Pay attention to the following: Handle the disc only by the edges. To keep the disc clean, do not touch the surface of the disc.


- Discs should be returned to their cases after use to avoid serious scratches that could cause the laser pickup to skip.
- Do not expose discs to direct sunlight, high humidity, or high temperatures for extended periods. Prolonged exposure to high temperatures can warp the disc.
- Do not stick or write anything on either side of the compact disc. Sharp writing instruments, or the inks used in some felt-tip pens, may damage the surfaces of the disc.
- Always place the compact disc to the in the CD compartment with the label facing upward. CD can be played on only one side.
CLEANING DISCS
-
Fingerprints should be wiped from the surface of the disc with a soft cloth. Unlike conventional records, compact discs have no grooves to collect dust and microscopic debris, so gently wiping them with cloth should remove most of the particles. Wipe in a straight motion from the inside to the outside of the disc.
-
Never use such chemicals as record cleaning sprays, anti- static sprays, benzene or thinner to clean compact disc. Such chemicals can damage the plastic of the disc.
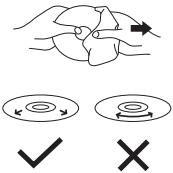
- The unit will not play a disc that has been inserted upside down, or discs that do not conform to the Compact Disc standard. Also, the unit might not play discs that are scratched, soiled or carry fingerprints.
- Both 8cm and 12cm discs can be played in this unit.
TECHNICAL SPECIFICATIONS
CD PLAYER SECTION
Frequency response
20Hz-20KHz
Wow and flutter
below measure limits
Sampling frequency
44.1KHz
D/A converter
1-bit
Error correction method
CIRC
Pick-up
optical 3-beam semiconductor laser (780 nM wavelength)
GENERAL
Power supply DC
3V using two "AA" batteries
AC/DC adaptor 220V - 4.5V
Dimensions
142mm(W)x134mm(D)x29mm(H)
Weight
212 grams
Note: Specification and the design are subject to possible modification without notice due to improvements.
TROUBLE SHOOTING GUIDE
| SYMPTOM | CAUSE | SOLUTION |
| CD Player will not turn on. | Dead or weak batteries. | Replace both batteries. |
| The AC adapter not connected properly. | Check the AC adapter connection at AC outlet and side of set. | |
| Disc will not play. | Disc inserted incorrectly | Re-insert disc with label side facing up. |
| Defective or wrong type compact disc. | Try another audio compact disc. | |
| CD door not closed. | Close lid securely (push down left corner of door) | |
| Moisture has condensed inside the CD deck. | Take out the CD and leave the CD door open for about an hour to dry the moisture condensation. | |
| No sound from headphones | Headphone plug not inserted properly. | Re-insert headphone plug into the headphone jack (marked phones). |
| Headphone plugged into the line out jack. | Plug headphone into the headphone jack (not the line out jack). | |
| The volume control set to minimum | Increase the volume. | |
| Weak batteries. | Replace with fresh batteries or use the AC adapter. | |
| Defective compact disc. | Try another compact disc. | |
| Sound is skipping | The compact disc or lens is dirty. | Clean or replace the compact disc or clean the lens with a camera brush or blower. |
| Too much movement of the CD player. | Reduce movement of CD player. | |
| Sound in distorted | Music is too loud. | Decrease the volume control level. |
| Weak batteries. | Batteries are getting weak, replace both batteries or use the AC adapter. | |
| Bass boost is on and music is too loud. | Lower volume control or slide bass boost switch to off. | |
| Tracks do not change or set does not play normally | Batteries are too weak and the battery symbol will show in display | Replace both batteries with fresh alkaline batteries, or use a AC Adapter. |
| Buttons do not work | Electronic or static error caused circuitry to lock. | Remove batteries and AC adapter. Wait a few seconds and re-insert. Make sure batteries are fresh or adapter has power. |
| The HOLD function is on. | Slide the HOLD switch to OFF position. |


- AKAI
- Operator's manual
- LOCATION OF CONTROLS
- CONTROL OPERATION AND FUNCTION POWER SUPPLY
- AC ADAPTER OPERATION
- PRECAUTIONS ON USING THE AC ADAPTER
- DC OPERATION
- ALKALINE BATTERY INSTALLATION (NOT SUPPLIED)
- NOTE ON ALKALINE BATTERIES
- CHARGING AND USE OF RECHARGEABLE BATTERIES
- AUTO POWER ON FUNCTION
- AUTO POWER OFF FUNCTION
- THE HOLD FUNCTION
- LISTENING WITH HEADPHONE (EARPHONE)
- PLAYING A DISC
- TRACK SEARCH
- FORWARD/REVERSE SEARCH
- BASS BOOST
- PROGRAMMED PLAY
- SINGLE TRACK REPEAT
- ALL TRACKS REPEAT/CONTINUOUS PLAY
- INTRO PLAY
- RANDOM OR SHUFFLE PLAY
- THE ANTI-SKIP MEMORY FUNCTION (45SEC.)
- CONNECTING TO HOME STEREO SYSTEMS
- CLEANING
- CLEANING THE PICKUP LENS
- CLEANING THE CABINET
- HANDLING COMPACT DISCS
- CLEANING DISCS
- TECHNICAL SPECIFICATIONS
- CD PLAYER SECTION
- GENERAL
Marque : AKAI
Modèle : PDX2240I-TOP
Catégorie : Platine vinyle