
ADVANTIX 3700IX - Appareil photo argentique KODAK - Notice d'utilisation et mode d'emploi gratuit
Retrouvez gratuitement la notice de l'appareil ADVANTIX 3700IX KODAK au format PDF.

| Type de produit | Appareil photo argentique |
| Marque | KODAK |
| Modèle | ADVANTIX 3700IX |
| Type de film | KODAK ADVANTIX Film pour tirages couleur |
| Objectif | 24mm f/3.6 KODAK EKTON |
| Système de mise au point | Autofocus passif à 200+ zones avec verrouillage |
| Viseur | Image réelle avec affichage des formats C, H, P et indicateur autofocus |
| Sensibilité film | DXIX (ISO) 25, 50, 100, 200, 400, 800, 1600 |
| Flash | KODAK SENSALITE, automatique, fill-in, désactivé |
| Portée du flash | de 0,60 m à 14 m (selon ISO) |
| Vitesse d'obturation | 1/2 à 1/250 s électronique programmée |
| Ouvertures | f/3.6, f/7.2, f/14.4 |
| Retardateur | Oui, avec délai de 10 secondes |
| Sélecteur de format | Classique (C), HDTV (H), Panoramique (P) |
| Alimentation | 1 pile lithium 3V KODAK KCR 2 (ou équivalent) |
| Dimensions | 38 x 63 x 119 mm |
| Poids | 195 g (avec pile et film) |
| Affichage | Écran LCD avec indicateurs |
| Verrouillage de mise au point | Oui |
| Compensation de contre-jour | Flash fill-in automatique |
| Autres fonctions | Indicateur d'état du film (FSI), horodatage, arrêt automatique après 1 min |
| Entretien | Nettoyer avec un chiffon doux et sec, éviter l'humidité et les chocs |
| Sécurité | Garder hors de portée des enfants, ne pas démonter la pile |
| Pièces détachées | Contacter le service client Kodak |
| Garantie | Conserver le ticket de caisse comme preuve d'achat |
FOIRE AUX QUESTIONS - ADVANTIX 3700IX KODAK
Questions des utilisateurs sur ADVANTIX 3700IX KODAK
0 question sur cet appareil. Repondez a celles que vous connaissez ou posez la votre.
Poser une nouvelle question sur cet appareil
Téléchargez la notice de votre Appareil photo argentique au format PDF gratuitement ! Retrouvez votre notice ADVANTIX 3700IX - KODAK et reprennez votre appareil électronique en main. Sur cette page sont publiés tous les documents nécessaires à l'utilisation de votre appareil ADVANTIX 3700IX de la marque KODAK.
MODE D'EMPLOI ADVANTIX 3700IX KODAK
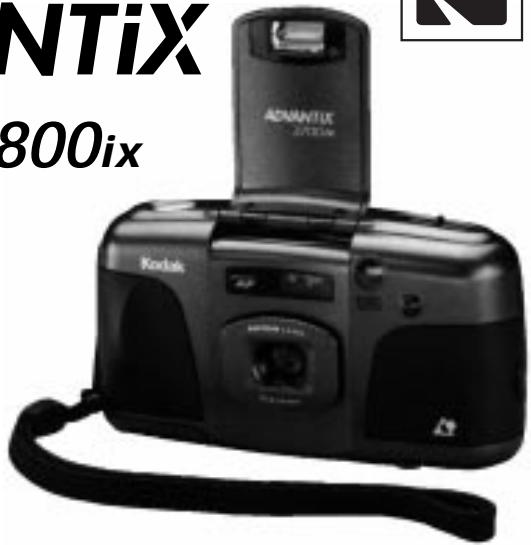
Kodak
ADVANTIX
3700ix/3800ix Camera

ADVANCED PHOTO SYSTEM


Look for this logo to be certain that the film you buy is made for this camera.

Look for this logo to select a certified photofinisher for developing your film and to assure that you get all the features of the Advanced Photo System.
Film Status Indicator (FSI)
A highlighted indicator advances from one symbol to another to identify the status of the film inside the cassette.
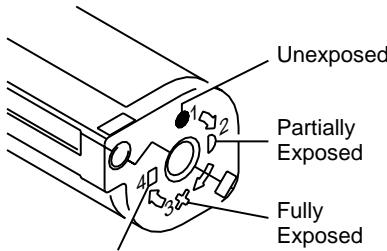
Processed Negatives


LCD
(a)
(b)

(c)
LCD
(d)
Need help with your camera or more information about the new Advanced Photo System? Call Kodak (United States only) toll free from 8:00 a.m. to 8:00 p.m. (Eastern time) Monday through Friday at 1 (800) 242-2424. The toll free number (in Canada only) from 8:30 a.m. to 5:00 p.m. (Eastern time) Monday through Friday is 1 (800) 465-6325; please ask for ext. 36100.
For warranty purposes, please keep your sales receipt as proof of the date of purchase.
This device complies with part 15 of the FCC Rules. Operation is subject to the following two conditions: (1) This device may not cause harmful interference, and (2) this device must accept any interference received, including interference that may cause undesired operation.
NOTE: Your model camera has been tested and found to comply with the limits for a Class B digital device, pursuant to Part 15 of the FCC Rules. These limits provide reasonable protection against interference in residential use. The camera generates, uses and can radiate radio frequency energy and, if not used in accordance with the instructions, may cause interference to radio communications. There is no guarantee that interference will not occur. If this camera does cause interference to radio or television reception, which can be determined by turning the camera off and on, you may reduce the interference by the following:
Reorient or relocate the receiving antenna.
— Increase the separation between the camera and the receiver.
— Consult the dealer or an experienced radio/television technician for help.
Changes or modifications not approved by the party responsible for compliance could void the user's authority to operate the equipment.
This Class B digital apparatus meets all requirements of the Canadian Interference-Causing Equipment Regulations.
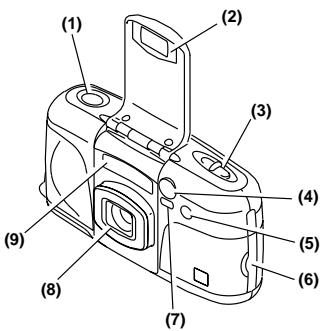
CAMERA IDENTIFICATION
See inside cover flaps of manual for camera diagrams.
(1) Shutter Button
(2) Lens Cover/Flash
(3) Print-Size Selector
(4) Self-Timer/Focus-Ranging Assist
(5) Meter-Cell Window
(6) Battery Door
(7) Viewfinder
(8) Lens
(9) Focus-Ranging Sensors
(10) LCD Panel
(11) Menu Button
(12) Select/Flash Button
(13) Enter/Self-Timer Button
(14) Rewind Button
(15) Viewfinder Eyepiece
(16) Focus/Flash Lamp
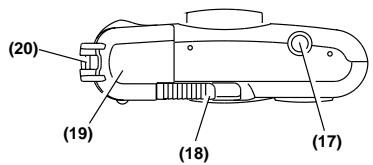
(17) Tripod Socket
(18) Film-Door Latch
(19) Film Door
(20) Strap Post
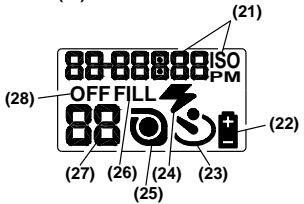
(21) Date & Time/ISO Film-Speed Display
(22) Battery Symbol
(23) Self-Timer Indicator
(24) Auto-Flash Indicator
(25) Film-Presence Indicator
(26) Fill-Flash Indicator
(27) Frame Counter/No Film in Camera Indicator
(28) Off-Flash Indicator
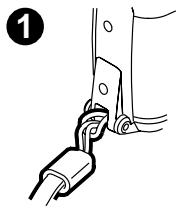
BATTERY
This camera uses a 3-volt lithium KODAK KCR 2 (or equivalent) Battery that supplies power for all camera operations. This camera automatically turns off after 1 minute.
Battery Indicator
When the battery symbol (22) "blinks," you will need to replace the battery soon. When the battery symbol is solid (non-blinking) and the shutter button does not operate, replace the battery immediately.
Battery Tips:
- Keep a spare battery with you at all times. Lithium batteries perform consistently until they suddenly die.
- Read and follow all warnings and instructions supplied by the battery manufacturer.
- Keep battery away from children.
- Do not attempt to disassemble, recharge or short circuit the battery, or subject it to high temperature or fire.
- Store battery in its original packaging prior to use.
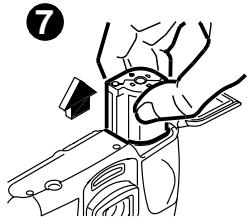
LOADING THE FILM
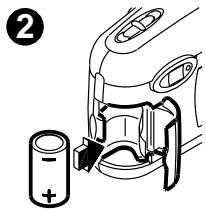
- Slide the film-door latch (18) and insert the film cassette completely into the film chamber ③. Do not force the film cassette into the film chamber.
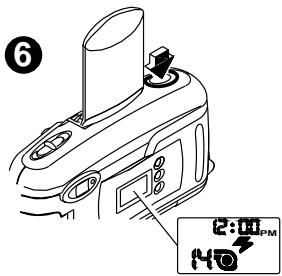
- Close the film door (19) to start the auto-film advance. The LCD panel (10) will show the total number of exposures (b). After you close the safety-interlock film door, you cannot open the film door until the film is completely rewound into the film cassette.
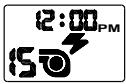
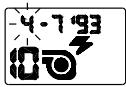
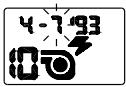
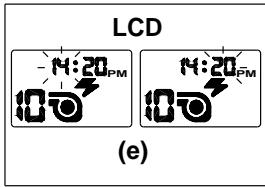
SETTING THE DATE AND TIME
With this camera, you can record the date and time of each exposure directly onto the film. The information appears on the back of your prints when processed. It features a clock and automatic calendar that includes leap years.
- Press the menu button (11) to choose date. You must press this button to activate the date and time function.
- Press the hold the select/flash button (12) to view and change the "blinking" month (d).
- Press the enter/self-timer button (13) to store the selected month and move to the next blinking date option (follow steps 2 and 3 to complete your selection.)
- Repeat steps 1-3 to choose and set time.
NOTE: If you don't press the select/flash button within a minute, the camera turns off and returns to the picture-taking mode.
Choosing Optional Date and Time Formats (mm, dd, yy / dd, mm, yy, / yy, mm, dd and 12/24 hour)
- Press the menu button (11) to choose date. You must press this button to activate the date and time function.
- Press and hold for 3 seconds the enter/self-timer button (13) until desired date format appears. (See SETTING THE DATE AND TIME, steps 2-3 above to set date.)
- Press the menu button (11) to choose time.
- Press and hold the enter/self-timer button (13) until desired time format appears. (See SETTING THE DATE AND TIME, steps 2-3 above to set time.)
NOTE: If you don't press the select/flash button within a minute, the camera turns off and returns to the picture-taking mode.
TAKING PICTURES
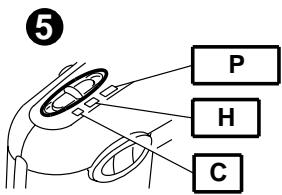
You can take Classic (C), HDTV (H), and Panoramic (P) pictures on the same film cassette (see following table for Typical Print Sizes). Your photo-processing cost will be based on the format size(s) that you use to expose the film.
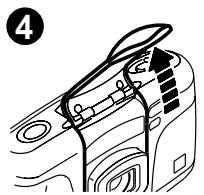
- Lift the lens cover/flash (2), 4 completely up.
- Move the print-size selector (3), 5 to desired format.
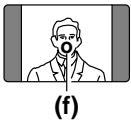
- Look through the viewfinder eyepiece (15) and place the auto-focus circle (f) on the subject. For a sharp picture, stand at least 2 ft (0.60 m) from your subject.
- Press the shutter button (1), 6 to take a picture.
Typical Print Sizes
| C | H | P |
| Classic | Group & Wide (HDTV) | Panoramic |
| 31/2 x 5" or 4 x 6" | 31/2 x 6" or 4 x 7" | 31/2 x 10" to 4 x 11 1/2" |
| (88.9 x 127 mm or 102 x 152 mm) | (88.9 x 152 mm or 102 x 178 mm) | (88.9 x 254 mm to 102 x 292.7 mm) |
Using the Focus Lock
This camera automatically focuses on whatever is within the auto-focus circle of the viewfinder eyepiece (15). To get a sharp photograph, make sure the auto-focus circle is on your main subject. If you want to take a picture with the subject positioned outside of the auto-focus circle, use the focus lock as follows:
- Place the auto-focus circle (f) on the subject that you want focused in the picture.
- Partially depress and hold the shutter button (1) until the focus/flash lamp (16) glows green to lock in the focus position.
- While still depressing the shutter button, move the camera until your subject is where you want it within the viewfinder.
- Press the shutter button completely down to take the picture.
Special Focusing Situations
Some subjects or scenes, such as those described below, are difficult for the autofocus system to detect correctly; even though the focus lamp may glow green, the focus/exposure may not be correct. To insure proper focus in the following situations, first lock the focus on another object at the same distance from you as your main subject, then recompose your picture and press the shutter button.
- Subject is near a very bright area or object such as a table lamp(s).
- A very bright- or low-contrast area fills the center of the auto-focus circle of the viewfinder.
Using the Self-Timer
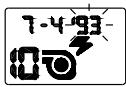
- Use a tripod (tripod socket [17]) or place the camera on another firm support.
- Lift the lens cover/flash (2), 4 completely up.
- Press the enter/self-timer button (13) to the self-timer (23) position.
- Press the shutter button (1). The self-timer lamp (4) will "blink" 10 seconds before the picture is taken.
NOTE: If you want to stop the self-timer operation before the picture is taken, press the self-timer button again or close the lens cover/flash.
Tips for Better Pictures
- Hold the camera steady when taking pictures
- Keep your pictures simple. Move close enough to your subject so it fills the viewfinder but not closer than 2 ft (0.60 m).
- Take pictures at the subject's level. Kneel down to take pictures of children and pets.
- Hold your camera vertically to capture tall, narrow subjects, such as a waterfall, skyscraper, or single person.
- Add interest to your picture by framing it with a tree branch, window, or even the rails of a fence.
- Keep the sun behind you for best subject illumination.
TAKING FLASH PICTURES
In dim light, such as indoors or outdoors in heavy shade or on dark overcast days, you need flash. Your camera features automatic flash that fires when you need it. It also provides automatic daylight fill flash under certain bright-light conditions where shadows may exist. If the focus/flash lamp (16) "blinks" red, the flash is not fully charged. Wait for the light to turn green before you take a picture.
Focus/Flash Lamp Operation
| Lamp Indicator | Situation |
| Glows green | Auto-focus operation complete and flash fully charged. (Okay to take a picture.) |
| "Blinks" red | Warning signal for flash needed or not ready, flash out of range, or unable to focus. (Okay to take a picture but picture may be under-exposed or out of focus.) |
| Glows red | Shutter button locks when subject is closer than 2 ft (0.60 m) from camera. (You cannot take a picture until subject is beyond 2 ft [0.60 m]). |
Flash-to-Subject Distance
| ISO Film Speed | Flash-to-Subject Distance |
| 25 | 2 to 5.6 ft (0.60 to 1.7 m) |
| 50 | 2 to 8 ft (0.60 to 2.0 m) |
| 100 | 2 to 11.3 ft (0.60 to 3.5 m) |
| 200 | 2 to 16 ft (0.60 to 5 m) |
| 400 | 2 to 22.6 ft (0.60 to 6.8 m) |
| 800 | 2 to 32 ft (0.60 to 10 m) |
| 1600 | 2 to 45 ft (0.60 to 14 m) |
Flash Tips
- Turn on room lights and have the subject face the lights to minimize red eyes in pictures.
- Stand at an angle to shiny surfaces like windows or mirrors to avoid flash reflection and bright spots in your pictures.
- Keep your fingers and other objects away from the picture-taking lens, flash, and meter-cell window to avoid dark or light pictures.
Using Fill Flash and Off Flash
Fill Flash — Bright light indoors or outdoors from backlit subjects can create dark shadows (especially on faces) in high-contrast scenes. Use fill flash to lighten the shadows.
Off Flash — When you do not want to use the flash, especially indoors where flash is prohibited, such as in theaters and museums, or in dim lighting situations, use off flash. Use a tripod (tripod socket [17]) or place the camera on another firm support.
- Lift the lens cover/flash (2), 4 completely up.
- Press the select/flash button (12) to select fill flash (26) or off flash (28).
- Press the shutter button (1) to take a picture.
- Press the select/flash button to return to the auto-flash/start position (24).
UNLOADING THE FILM
After you take the last picture on the film cassette, the film automatically starts to rewind. When the film is fully rewound, the LCD panel (10) displays "0" and an empty film cassette (c). When you remove the cassette from the camera, the LCD panel displays "E," (a).
Using the Rewind Button
If you don't want to take pictures on the entire film cassette, you can automatically rewind the film by pressing the rewind button (14). Once you've used this feature, you cannot reload the same film cassette into the camera.
TROUBLESHOOTING
| What happened | Probable cause | Solution |
| Camera will not operate | There are no more pictures remaining | Remove the film |
| Battery weak, dead, missing, or improperly loaded | Replace or reload the battery | |
| Subject closer than 2 ft (0.60 m) | Stand beyond 2 ft (0.60 m) from your subject | |
| Focus/flash lamp glows red and shutter button locks | Subject closer than 2 ft (0.60 m) from camera | Move beyond 2 ft (0.60 m) until red light disappears |
| Film does not advance or rewind | Battery weak, dead, missing, or improperly inserted | Replace or reload the battery |
| LCD panel is blank (Flash may fire inadvertently) | (See Probable cause above) | (See Solution above) |
| Film door does not close | Loaded exposed, partially exposed, or processed film in the camera | Load only unexposed film into the camera |
| All LCD indicators "blink" | Camera mechanism problem | Press shutter button or close and open the lens cover/flash, or replace or reload the battery |
SPECIFICATIONS
Film Type: KODAK ADVANTIX Film for color prints
Lens: 24mm f/3.6 KODAK EKTON Lens
Focus System: 200 plus zones, passive auto focus with focus lock
Viewfinder: Real image with C, H, and P format display; auto-focus indicator
Film-Speed Range: DXIX (ISO) 25, 50, 100, 200, 400, 800 &1600 for color print films
Flash Unit: KODAK SENSALITE™ Flash
Focus Range: Daylight: 2 ft (0.60 m) to infinity
Apertures: f/3.6, f/7.2, f/14.4
Shutter: Programmed electronic; speeds from 1/2 to 1/250 sec.
Power Source: one 3-volt lithium KODAK KCR 2 (or equivalent) Battery; auto power off after 1 minute
Dimensions: Approx. 1.5 × 2.5 × 4.7 in (38 x 63 x 119 mm)
Weight: Approx. 7 oz (195 g) with battery and film

Consumer Imaging
EASTMAN KODAK COMPANY
Rochester, NY 14650
© Eastman Kodak Company, 1997
Pt. No. 916 3064
1-97
Printed in U.S.A.
- Kodak
- ADVANTIX
- 3700ix/3800ix Camera
- Film Status Indicator (FSI)
- CAMERA IDENTIFICATION
- BATTERY
- Battery Indicator
- Battery Tips:
- LOADING THE FILM
- SETTING THE DATE AND TIME
- TAKING PICTURES
- Using the Focus Lock
- Special Focusing Situations
- Using the Self-Timer
- Tips for Better Pictures
- TAKING FLASH PICTURES
- Focus/Flash Lamp Operation
- Flash Tips
- Using Fill Flash and Off Flash
- UNLOADING THE FILM
- Using the Rewind Button
- SPECIFICATIONS
- Consumer Imaging
- EASTMAN KODAK COMPANY
- Rochester, NY 14650
Marque : KODAK
Modèle : ADVANTIX 3700IX
Catégorie : Appareil photo argentique