
DF-4100 - Aspirateur DAEWOO - Notice d'utilisation et mode d'emploi gratuit
Retrouvez gratuitement la notice de l'appareil DF-4100 DAEWOO au format PDF.
| Type de produit | Combiné Enregistreur DVD + Magnétoscope |
| Modèle | DF-4100 / DF-4150 / DF-8100 / DF-8150 |
| Dimensions (L x H x P) | 430 x 91 x 354 mm |
| Poids | 6,18 kg |
| Alimentation | 200-240 V ~, 50/60 Hz |
| Consommation électrique | 32 W |
| Système de signal | PAL Couleur |
| Formats d'enregistrement | DVD Video Recording, DVD-VIDEO |
| Disques compatibles (enregistrement) | DVD+R, DVD+RW |
| Disques compatibles (lecture) | DVD Vidéo, DVD-R, DVD-RW, Audio CD, CD-R/RW (MP3/JPEG) |
| Temps d'enregistrement DVD | HQ 1 h, SP 2 h, EP 4 h, SLP 6 h |
| Temps d'enregistrement VHS | SP 3 h (E-180), LP 6 h (E-180) |
| Têtes vidéo VHS | 4 têtes vidéo, 2 têtes Hi-Fi |
| Vitesse de bande VHS | SP 23,39 mm/s, LP 11,70 mm/s |
| Antenne | 75 ohms (VHF/UHF) |
| Couverture canaux | VHF 00-14, UHF 27-69, CATV 1-41 |
| Réponse en fréquence audio | 20 Hz - 20 kHz |
| Rapport signal/bruit vidéo | DVD > 60 dB, VHS > 43 dB |
| Rapport signal/bruit audio | Hi-Fi > 65 dB, Mono > 40 dB |
| Résolution vidéo | DVD > 500 lignes, VHS > 240 lignes |
| Laser DVD | Semi-conducteur, 650 nm |
| Entrées | Antenne, Vidéo (RCA), Audio (RCA), DV (i.LINK) sur modèles 8100/8150 |
| Sorties | Vidéo composite, Composante Y Pb Pr, S-Vidéo, Audio analogique et numérique coaxiale, Péritel (x2) |
| Accessoires fournis | Câble RF, télécommande, câble RCA, piles, DVD+RW vierge |
| Température de fonctionnement | 5 °C à 35 °C |
| Humidité de fonctionnement | 5 % à 90 % |
FOIRE AUX QUESTIONS - DF-4100 DAEWOO
Questions des utilisateurs sur DF-4100 DAEWOO
0 question sur cet appareil. Repondez a celles que vous connaissez ou posez la votre.
Poser une nouvelle question sur cet appareil
Téléchargez la notice de votre Aspirateur au format PDF gratuitement ! Retrouvez votre notice DF-4100 - DAEWOO et reprennez votre appareil électronique en main. Sur cette page sont publiés tous les documents nécessaires à l'utilisation de votre appareil DF-4100 de la marque DAEWOO.
MODE D'EMPLOI DF-4100 DAEWOO

DVD Recorder + VCR
DF-4100/4150/8100/8150
User Manual
Please keep the DVD Recorder+VCR's guarantee sheet and receipt in a safe place.
Precautions
- Read this booklet carefully.
- Make sure the rating of your household electricity supply matches that shown on the back of your DVD Recorder+VCR.
- Read this page and chapter 'Setting up your DVD Recorder+VCR' to help you set up and adjust your product correctly.
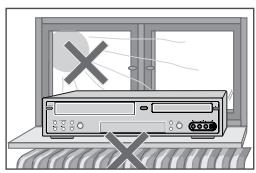
- Do not put the DVD Recorder+VCR in a hot or humid place.
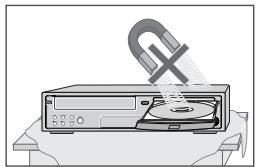
- Do not open the DVD Recorder+VCR. Get a qualified technician to carry out any repairs.
- Do not connect the DVD Recorder+VCR to the power supply if you have just moved it from a cold environment to a warm room. This can lead to condensation inside the DVD Recorder+VCR, which can damage it. Wait for approx. 2 hrs for it to reach room temperature.
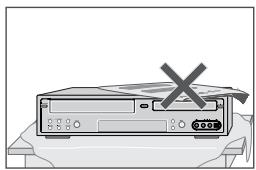
- Make sure the DVD Recorder+VCR is placed at least 10cm apart from other home appliances or obstacles to ensure sufficient ventilation.
- The apparatus should not be exposed to dripping or splashing and no objects filled with liquids, such as vases should be placed on top of the recorder.
- Before a storm and/or lightning, unplug the DVD Recorder+VCR from the mains supply and aerial.
- Put the recorder on a steady flat surface.
- Only clean the recorder with a soft, lint-free cloth. Do not use harsh or alcohol-based cleaning agents.
For your own Safety


- There are no components in this product you can service or repair yourself.
- Do not open the case of the DVD Recorder+VCR. Only allow a qualified engineer to repair or service your DVD Recorder+VCR.
- This DVD Recorder+VCR is designed to work continuously. Switching it off (stand-by mode) does not disconnect it from the mains. To disconnect it from the mains you have to unplug it.

CAUTION
RISK OF ELECTRIC SHOCK DO NOT OPEN

CAUTION:
TO REDUCE THE RISK OF ELECTRIC SHOCK, DO NOT REMOVE COVER (OR BACK). NO USER-SERVICEABLE PARTS INSIDE. REFER SERVICING TO QUALIFIED SERVICE PERSONNEL.

The lightning flash with arrowhead symbol, within an equilateral triangle, is intended to alert the user to the presence of uninsulated 'dangerous voltage' within the product's enclosure that may be of sufficient magnitude to constitute a risk of electric shock.

The exclamation point within an equilateral triangle is intended to alert the user to the presence of important operating and servicing instructions in the literature accompanying the appliance.
WARNING TO REDUCE THE RISK OF FIRE OR ELECTRIC SHOCK, DO NOT EXPOSE THIS APPLIANCE TO RAIN OR MOISTURE.
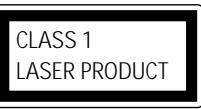
IMPORTANT FOR LASER PRODUCTS
LASER
This Digital Video Disc Player employs a Laser System. To ensure proper use of this product please read this owner's manual carefully and retain for future reference. Should the unit require maintenance, contact an authorized service location - see service procedure.
Use of control adjustments or the performance of procedures other than those specified may result in hazardous radiation exposure.
To prevent direct exposure to the laser beam, do not try to open the enclosure. Visible laser radiation when open and interlocks defeated.
DO NOT STARE INTO THE BEAM.
DANGER
Visible laser radiation when open and interlock failed or defeated.
Avoid direct exposure to beam
CAUTION
Do not open the top cover. There are no user serviceable parts inside the Unit; leave all servicing to qualified service personnel.
CAUTION Any changes or modification in construction of this device which are not expressly approved by the party responsible for compliance could void the user's authority to operate the equipment.
- Make sure the unit should be placed at least 8cm apart from the other home appliances or the obstacles to get sufficient ventilation.
This unit shall not be exposed to dripping or splashing and no objects filled with liquids, such as vases, shall be placed on this unit. - Switching it off does not disconnect it from the mains (stand-by). To disconnect it from the mains, you have to unplug it.
This set has been designed and manufactured to assure personal safety. Improper use can result in electric shock or fire hazard. The safeguards incorporated in this unit will protect you if you observe the following procedures for installation, use and servicing. This unit is fully transistorized and does not contain any parts that can be repaired by the user.
1 READ INSTRUCTIONS
All the safety and operating instructions should be read before the unit is operated.
2 RETAIN INSTRUCTIONS
The safety and operating instructions should be retained for future reference.
3 HEED WARNINGS
All warnings on the unit and in the operating instructions should be adhered to.
4 FOLLOW INSTRUCTIONS
All operating and use instructions should be followed.
5 CLEANING
Unplug this unit from the wall outlet before cleaning. Do not use liquid cleaners or aerosol cleaners. Use a damp cloth for cleaning.
6 ATTACHMENTS
Do not use attachments unless recommended by the unit's manufacturer as they may cause hazards.
7 WATER AND MOISTURE
Do not use this unit near water- for example, near a bath tub, wash bowl, kitchen sink or laundry tub, in a wet basement, or near a swimming pool.
8 ACCESSORIES
Do not place this unit on an unstable cart, stand, tripod, bracket, or table. The unit may fall, causing serious injury to a child or adult as well as serious damage to the unit. Use this unit only with a cart, stand, tripod, bracket, or table recommended by the manufacturer.
8A A unit and cart combination should be moved with care. Quick stops, excessive force and uneven surfaces may cause the product and cart combination to overturn.
PORTABLE CART WARNING (symbol provided by RETAC)

9 VENTILATION
Slots and openings in the case are provided for
ventilation to ensure reliable operation of the unit and to protect it from overheating. These openings must not be blocked or covered. These openings must not be blocked by placing the unit on a bed, sofa, rug, or other similar surface. This unit should never be placed near or over a radiator or heat radiator. This unit should not be placed in a built-in installation such as a bookcase or rack unless proper ventilation is provided or the manufacturer's instructions have been adhered to.
10 POWER SOURCES
This unit should be operated only from the type of power source indicated on the marking label. If you are not sure of the type of power supply to your home, consult your dealer or local power company. For units intended to operate from battery power, or other sources, refer to the operating instructions.
11 POWER-CORD PROTECTION
Power-supply cords should be routed so that they are not likely to be walked on or pinched by items placed upon or against them, paying particular attention to cords at plugs, convenience receptacles, and the point where they exit from the unit.
12 LIGHTNING
For added protection for this unit during a lightning storm, or when it is left unattended and unused for long periods of time, unplug it from the wall outlet and disconnect the antenna or cable system. This will prevent damage to the unit due to lightning and power line surges.
13 DISC TRAY
Keep your fingers well clear of the disc as it is closing. It may cause serious personal injury.
14 OVERLOADING
Do not overload wall outlets of extension cords as this can result in a risk of fire or electric shock.
15 OBJECT AND LIQUID ENTRY
Never push objects of any kind into this unit through openings as they may touch dangerous voltage points or 'short-out' parts that could result in a fire or electric shock. Never spill liquid of any kind on the unit.
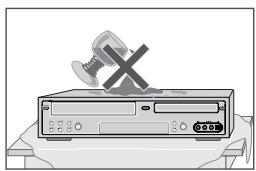
16 BURDEN
Do not place a heavy object on or step on the product. The object may fall, causing serious
personal injury and serious damage to the product.
17 DISC
Do not use a cracked, deformed or repaired disc. These discs are easily broken and may cause serious personal injury and product malfunction.
18 SERVICING
Do not attempt to service this unit yourself as opening or removing covers may expose you to dangerous voltage or other hazards. Refer all servicing to qualified service personnel.
19 DAMAGE REQUIRING SERVICE
Unplug this unit from the wall outlet and refer servicing to qualified service personnel under the following conditions.
A. When the power-supply cord or plug is damaged.
B. If liquid has been spilled, or objects have fallen into the unit.
C. If the unit has been exposed to rain or water.
D. If the unit does not operate normally by following the operating instructions. Adjust only those controls that are covered by the operating instructions. Improper adjustment of other controls may result in damage and will often require extensive work by a qualified technician to restore the unit to its normal operation.
E. If the unit has been dropped or the cabinet has been damaged.
F. When the unit exhibits a distinct change in performance this indicates a need for service.
20 REPLACEMENT PARTS
When replacement parts are required, have the service technician verify that the replacements he uses have the same safety characteristics as the original parts. Use of replacements specified by the unit manufacturer can prevent fire, electric shock, or other hazards.
21 SAFETY CHECK
Upon completion of any service or repairs to this unit, ask the service technician to perform safety checks recommended by the manufacturer to determine that the unit is in safe operating condition.
22 WALL OR CEILING MOUNTING
The product should be mounted to a wall or ceiling only as recommended by the manufacturer.
23 HEAT
The product should be situated away from heat sources such as radiators, heat registers, stoves, or other products (including amplifiers) that produce heat.
Introduction
Safety Instructions 1
Important Safeguards 2
Table of Contents 5
Overview 6
Identification of Controls 10
Connections
Connecting Antenna/Cable 15
Connecting a TV 16
Connecting an Amplifier/Receiver 17
Connecting Optional Equipment 18
Connecting a Digital Camcorder 18
Setup
Initial Installation 19
Initial Setup 21
Setup Menu Overview 21
Menu Navigation 21
INSTALLATION Settings 21
RECORDING OPTIONS Settings 24
LANGUAGE Settings 25
PREFERENCES/Video Settings 27
PREFERENCES / Audio Settings 28
PREFERENCES / Parental Controls 29
PREFERENCES/Auto Settings 31
PREFERENCES/VCR 32
System Information 32
Restore Defaults 32
On-Screen Display Overview 33
Recording
Basic Recording 42
Recording from TV 42
One Touch Record (OTR) 42
Checking the Recording Time 43
To Pause the Recording 43
One Touch Copy - DVD to VHS 43
Copy Edit (DVD VCR) 44
One Touch Copy - VHS to DVD 44
Copy Edit (VCR DVD) 44
Timer Recording 45
Timer Recording using Manual Set Record Screen 45
Timer Recording using ShowView system 46
Canceling a Timer Recording 47
Stopping a Timer Recording in Progress 47
Timer Recording Troubleshooting 47
Recording from an External Input 48
Editing
DISC Initialize 50
Disc Menu 50
Title Menu 53
Editing 55
Reference
Troubleshooting 57
Technical Specifications 59
Playback
DVD Playback 35
VCRPlayback 38
Other Disc Playback 40
DVD, DVD+R, DVD+RW?
What is a DVD?
DVD (Digital Versatile Disc) is a storage medium that combines the convenience of the compact disc with the latest digital video technology. DVD video uses modern MPEG2 data compression technology that enables an entire feature film to be stored on a single five inch disc.
How good is the resolution of DVD compared with VHS?
The razor-sharp digital images have more than 500 lines of resolution at 720 pixels per line. This is more than twice as high as VHS and even better than laser disc quality. DVD picture quality is easily comparable to the digital masters produced in recording studios.
What is a DVD+RW?
DVD+ReWritable uses 'phase change' media, the same technology on which rewritable CDs are based. A high-performance laser is used to change the reflective properties of the recording layer; this process can be repeated more than a thousand times.
What is a DVD+R?
Unlike a DVD+RW disc, a DVD+R (write-once DVD) can only be written to once. If it is not finalized after a recording, further recordings can be added to it. Old recordings can be deleted but they can no longer be overwritten. The deleted recordings (titles) are marked 'deleted title'.
Before a DVD+R can be played in a DVD player, it must be finalized in the DVD Recorder+VCR. Once this process is complete, no further recordings can be added.
What can I do with my DVD Recorder+VCR?
Your DVD Recorder+VCR is a machine for recording and playing back digital video discs with 'two-way' compatibility with the universal DVD video standard. This means:
- existing DVD video discs can be played on the recorder.
- recordings made on your DVD Recorder+VCR can be played on other DVD video players and DVD-ROM drives.
Regional code


If the region number on your DVD disc does not correspond to the region number of this player, the disc cannot be played.
Which discs you can use
The following discs can be used in your DVD Recorder+VCR:
Playback and recording
DVD+RW (Digital Versatile Disc + ReWritable)
DVD+R (Digital Versatile Disc + Write-Once)
Playback only
DVD Video (Digital Versatile Disc)
DVD-R (DVD-Recordable): These discs can only be played back if the recording was made in 'Video mode' and the recording was finalized.
DVD-RW (DVD-Rerecordable): These discs can only be played back if the recording was made in 'Video mode' and the recording was finalized.
Audio CD (Compact Disc Digital Audio)
CD-R (CD recordable) Audio/ MP3 files
CD-RW (CD rewritable) Audio/ MP3 files

Not all recordable CDs may be played by your player.
This recorder does not support some 8 x discs. This recorder was manufactured to supports 4 x disc's
Disc-related Terms
Title (DVD only)
The main film, accompanying feature content, or music album. Each title is assigned a title reference number enabling you to locate it easily.
Chapter (DVD only)
Sections of a movie or a musical piece that are smaller than titles. A title is composed of one or several chapters. Each chapter is assigned a number to enable you to easily locate the chapter you want. Depending on the disc, chapters may not be labeled.
Track (Audio CD only)
Sections of a movie or a musical piece on an audio CD. Each track is assigned a number, enabling you to easily locate the track you want.
About DVD Recording
Notes on Recording
- The recording times shown are not exact because the DVD Recorder+VCR uses variable bit-rate video compression. This means that the exact recording time will depend on the material being recorded.
- When recording a TV broadcast, if the reception is poor or the picture contains interference, the recording times may be shorter.
- Discs recorded at high speeds (equal to or greater than 2X) may not be recognized.
- If you record still pictures or audio only, the recording time may be longer.
- The displayed times for recording and time remaining may not always add up to the exact length of the disc.
- The available recording time may decrease if you heavily edit a disc.
- When using a DVD+R disc, you can keep recording until the disc is full, or until you finalize the disc. Before you start a recording session, check the amount of recording time left on the disc.
Recording TV Audio Channels
The DVD Recorder+VCR can record one or two channel audio. For TV broadcasts, this usually means mono or stereo, but some programs are broadcast in bilingual audio channel. You can record either BIL I, BIL II or both.
Restrictions on Video Recording
- You cannot record copy-protected video using this DVD Recorder+VCR. Copy-protected video includes DVD-Video discs and some satellite broadcasts. If copy-protected material is encountered during a recording, recording will pause or stop automatically and an error message will be displayed on-screen.
- Video that is 'copy-once only' can only be recorded using DVD+RW discs with CPRM.
Copyright Notice
Audio and video recordings you make using the DVD Recorder+VCR are for your personal use only. You may not sell, lend, or rent them to other people.
- This product incorporates copyright protection technology that is protected by method claims of certain U.S.patents and other intellectual property rights owned by Macrovision Corporation and other rights owners. Use of this copyright protection technology must be authorized by Macrovision Corporation, and is intended for home and other limited viewing uses only unless otherwise authorized by Macrovision corporation. Reverse engineering or disassembly is prohibited.
Precautions
Handling the Unit
When shipping the unit
The original shipping carton and packing materials come in handy. For maximum protection, re-pack the unit as it was originally packaged at the factory.
When setting up the unit
The picture and sound of a nearby TV, VCR, or radio may be distorted during playback. In this case, position the unit away from the TV, VCR, or radio, or turn off the unit after removing the disc.
To keep the surface clean
Do not use volatile liquids, such as insecticide spray, near the unit. Do not leave rubber or plastic products in contact with the unit for a long period of time. They will leave marks on the surface.
Cleaning the Unit
To clean the cabinet
Use a soft, dry cloth. If the surfaces are extremely dirty, use a soft cloth lightly moistened with a mild detergent solution. Do not use strong solvents such as alcohol, benzine, or thinner, as these might damage the surface of the unit.
To obtain a clear picture
The DVD Recorder+VCR is a high-tech, precision device. If the optical pick-up lens and disc drive parts are dirty or worn, the picture quality will be poor. Regular inspection and maintenance are recommended after every 1,000 hours of use. (This depends on the operating environment.) For details, please contact your nearest dealer.
Remote Control Operation Range
Point the remote control at the remote sensor and press the buttons.
Distance: Within 23 ft (7 m) of the remote sensor.
Angle: Within 30^ in each direction of the remote sensor.
Remote Control Battery Installation
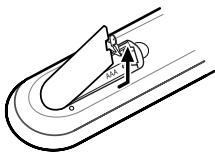
Detach the battery cover on the rear of the remote control, and insert two AAA batteries. Make sure the polarities (+ and -) are aligned correctly.

Caution
Do not mix old and new batteries. Never mix different types of batteries (standard, alkaline, etc.).
Notes on Discs
Handling Discs
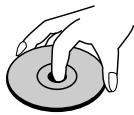
Do not touch the playback side of the disc. Hold the disc by the edges so that fingerprints will not get on the surface. Do not stick paper or tape on the disc.

Storing Discs
After playing, store the disc in its case.
Do not expose the disc to direct sunlight or sources of heat, or leave it in a parked car exposed to direct sunlight, as there may be a considerable temperature increase inside the car.
Cleaning Discs
Fingerprints and dust on the disc can cause poor picture quality and sound distortion. Before playing, clean the disc with a clean cloth. Wipe the disc from the center outward.
Do not use strong solvents such as alcohol, benzine, thinner, commercially available cleaners, or anti-static spray intended for older vinyl records.

No

About Symbols
About the Symbol
' ^ may appear on the TV screen during operation. This icon means the function explained in this User's Guide is not available on that specific disc.
Front Panel
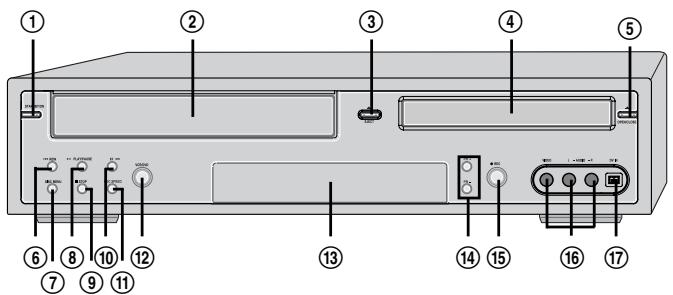
① STANDBY/ON
Turns the DVD Recorder+VCR on and off.
Lock/Unlock the front panel and Remote control by pressing and holding it over 5 seconds.
Cassette Compartment (VCR deck)
Insert a video cassette here.
③ EJECT(VCR)
Ejects the tape in the VCR deck.
④ Disc Tray (DVD deck)
Insert a disc here.
⑤ OPEN/CLOSE (DVD)
Opens or closes the disc tray.
⑥ REW
DVD: Skips to previous chapter.
VCR: Rewinds the tape during Stop mode. Press during Play mode for fast reverse picture search.
⑦ DISC MENU
⑧ PLAY/PAUSE
Starts playback of a disc or tape. Pauses playback or recording temporarily.
STOP
Stops playback.
⑩ FF
DVD: Skips to next chapter.
VCR: Advances the tape during Stop mode. Press during Play mode for fast forward picture search.
11 REC SPEED
12 SELECT DVD/VCR
Toggles control between the DVD deck and the VCR deck.
13 Front Panel Display
Shows the current status of the DVD. Recorder ^+ VCR.
⑭ PR + / -
Scans up or down through memorized channels.
Also moves up and down in DVD navigation menus.
15 REC
Starts recording. Press repeatedly to set the
recording time. Lights red when the DVD Recorder+VCR is recording.
16 AVF (VIDEO, L-AUDIO-R)
Connects to the audio/video output of an external source (VCR, Camcorder, etc.).
⑦ DV IN
DF-8100/8150 only
Connects to the DV output of a digital camcorder, video deck, or DVD+R/RW recorder.
Front Panel Display
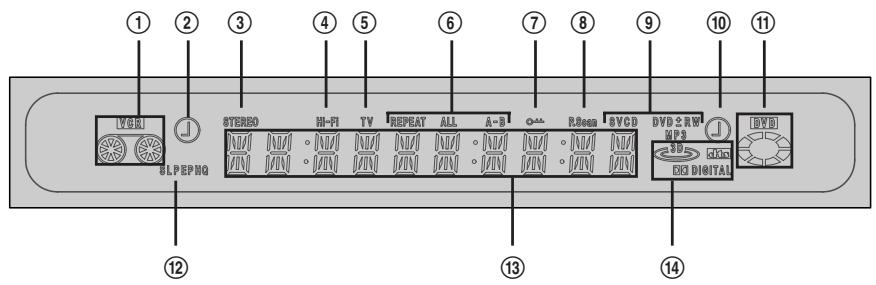
① Indicates a VHS tape is inserted in the VCR deck.
② Circle : Indicates the VCR is recording.
Clock : Indicates a VCR Timer Recording is set.
③ Indicates that a stereo broadcast is being received.
④ Indicates when the DVD Recorder+VCR is playing or recording a tape with Hi-Fi sound.
⑤ Indicates the DVD Recorder ^+ VCR is in TV mode (as set by the [TV/DVD] button).
⑥ Indicates the current Repeat mode.
⑦ Indicates when the DVD Recorder+VCR is locked.
8 Indicates when the DVD Recorder+VCR is outputting the video signal in Progressive Scan mode.
⑨ Disc Type indicators
Indicates the type of disc loaded.
10 Circle : Indicates a DVD+R(+RW) is recording.
Clock : Indicates a DVD Timer recording is set.
11 Indicates a disc is inserted in the DVD deck.
⑫ Indicates the current Recording mode.
13 Front Panel Display Message
Indicates clock, total playing time, elapsed time, remaining time, title number, chapter/track number, channel, VCR counter, etc.
14 DTS: Indicates a DVD is playing with a DTS soundtrack.
Dolby : Indicates a DVD is playing with a Dolby Digital soundtrack.
Remote Control
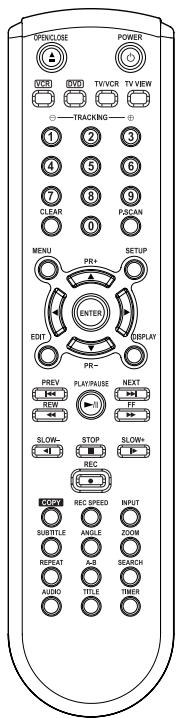

Turns the DVD Recorder +VCR on and off.

-
Opens and closes the disc tray in DVD mode.
-
Ejects the tape in the VCR deck in VCR mode

Selects DVD mode.

Selects VCR mode.

Switches between the DVD Recorder + VCR tuner and your TV tuner.

Switches the view on your TV to the DVD Recorder+VCR tuner.

- Selects numbered options in menus.

- Selects TV channels.

- Manually adjusts tracking.

Resetstape counterinVCRmode.

Press and hold for 3 seconds to switch between Progressive Scan and Interlace Scan mode.

Accesses DVD disc menus.

Displays or exits the Setup menu.

Edits chapters or splits titles of DVD+R(+RW) discs.

Displays information about the currently loaded disc, VHS tape, or TV channel.
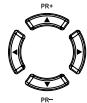
: Selects menu options
- PR +/- : Selects channels.

Confirms menu selections.

Skipping to the next or previous chapter/track.

DVD: Searches backward/forward.
- VCR: Rewinds/advances during Stop mode. Press during Play mode for fast reverse/forward picture search.

Increases or decreases the slow motion speed when playing a DVD or VHS tape.

-
Starts playback.
-
Pauses playback or recording temporarily. Press again to exit Pause mode.

Stops playback or recording
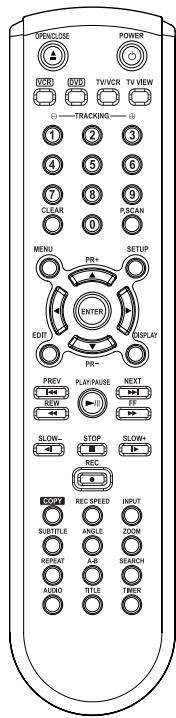
| RECOG | Starts recording. Press repeatedly to set the recording time. For more details, Refer to One Touch Record (OTR) on page 42. |
| COG | Copies from DVD to VCR (or from VCR to DVD). |
| RECOGPEED | Selects Recording mode: - DVD : HQ (1hr), SP (2hrs), EP (4hrs) or SLP (6hrs). - VCR : SP or LP. |
| INPUT | Switches the DVD Recorder+VCR input to Tuner, AV, AVF, or DV. (DV:DF-8100/8150 only) |
| SUBTITLE | Selects a subtitle language, if available. |
| ANGLED | Selects a DVD camera angle, if available. |
| ZOOM | Enlarges the DVD video image. |
| REPEAT | Repeats the current chapter, track, title or the entire disc. |
| A-B | Repeats playback between two points (A and B). |
| SEARCH | Searches for a specific title or a chapter. |
| AUDIO | Selects an audio language (DVD), audio channel (CD) or audio type (TV). |
| TITLE | Displays a disc's Title menu, if available. |
| TIMER | Displays the Timer Recording menu. |

Progressive Scan Mode
- If your TV supports Progressive Scan, you can view high quality video by setting the DVD Recorder+VCR to Progressive Scan mode. If your TV does not support Progressive Scan, do NOT change to Progressive Scan mode. If you do so accidentally, press and hold the [P.SCAN] button for 3 seconds to restore normal viewing.
Rear panel
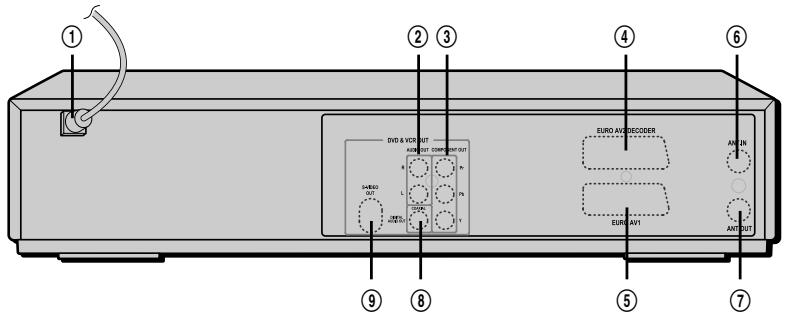
① AC Power Cord
Plug into a power outlet.
② AUDIO OUT (L, R)
Connect to a TV or other equipment with audio inputs.
③ COMPONENT/PROGRESSIVE VIDEO OUT (Y Pb Pr)
Connect to a TV with Component Video (Y Pb Pr) inputs.
④ Scart socket 2
Connection of an additional device (satellite receiver, set-top box, video recorder, camcorder, etc.)
⑤ Scart socket 1
Connection of a TV set. Composite-output and RGB-output
⑥ RF IN (FROM ANT.)
Connect to your antenna or cable TV outlet.
⑦ RFOUT(TOTV)
Connect to a TV with an RF coaxial input.
⑧ COAXIAL (Digital Audio Out)
Connect to an amplifier with a coaxial digital audio input.
S-VIDEO OUT
Connect to a TV with an S-Video Input.

Caution
- Do not touch the inner pins of the jacks on the rear panel. Electrostatic discharge may cause permanent damage to the DVD Recorder+VCR.
Connections

- There are a variety of ways to connect the DVD Recorder+VCR to your TV and other equipment. Use only one of the connections described below. Whichever TV connection you use will work with all input sources.
- Please refer to the manuals for your TV, VCR, stereo system, or other devices as necessary to make the best connections.
- For better sound reproduction, connect the DVD Recorder+VCR's AUDIO OUT jacks to the audio in jacks of your amplifier, receiver, stereo, or audio/video equipment. See 'Connecting an Amplifier/Receiver' on page 17.

Caution
- Make sure the DVD Recorder+VCR is connected directly to the TV, and the TV is set to the correct video input.
- Do not connect the DVD Recorder+VCR's AUDIO OUT jack to the phono in jack (record deck) of your audio system.
- Do not connect the DVD Recorder+VCR via your VCR. The DVD image could be distorted by the copy protection system.
Connecting Antenna/Cable
1 Disconnect the antenna/cable from the rear of your TV.
2 Connect this cable to the jack marked RF IN (FROM ANT.) on the rear panel of the DVD Recorder+VCR.
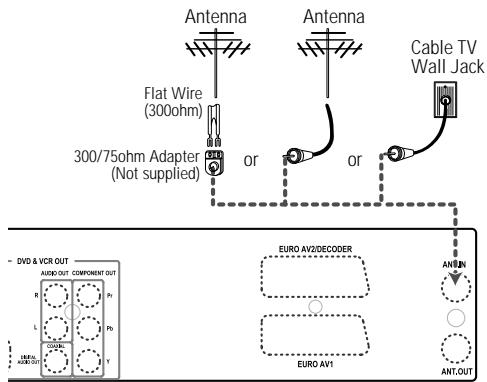
Rear of DVD Recorder+VCR
If your cable wire is connected to your TV without a converter or descrambler box, unscrew the wire from your TV and attach it to the RF IN (FROM ANT.) jack on the rear panel of the DVD Recorder+VCR.
Use the supplied RF cable to connect between the DVD Recorder+VCR's OUT (TO TV) jack and the antenna input jack on your TV. With this connection, you can receive all midband, superband, and hyperband channels (all cable channels).
Connecting a TV
Choose one of the following TV connections, depending on the capabilities of your equipment.
RF Connection
Connect the RF OUT (TO TV) jack on the DVD Recorder+VCR to the antenna in jack on your TV using the supplied 75-ohm RF cable (R).

This set doesn't apply the modulator output. However, still apply the RF through Output.
Scart Connection
1 Plug a scart cable into the scart socket EURO AV1 at the back of the DVD Recorder+VCR and the corresponding scart socket at the back of the TV set. (V)
2 Plug a scart cable into the blue scart socket EURO AV2/DECODER at the back of the DVD Recorder+VCR and the corresponding scart socket at the back of the Decoder.
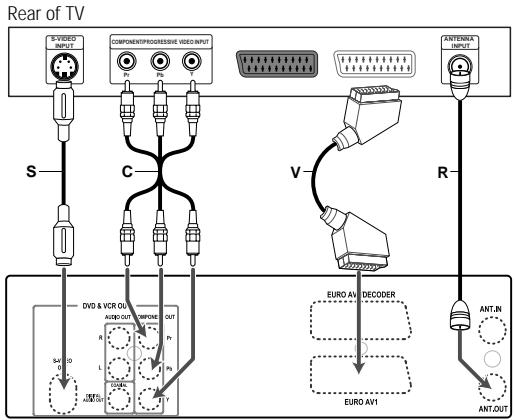
Rear of DVD Recorder+VCR
S-Video Connection
1 Connect the S-VIDEO OUT jack on the DVD Recorder+VCR to the S-Video in jack on your TV using an S-Video cable (S).
2 Connect the Left and Right AUDIO OUT jacks from the DVD Recorder+VCR to the left/right audio in jacks on your TV using the audio cables.
Component Video Connection
1 Connect the COMPONENT/PROGRESSIVE VIDEO OUT jacks on the DVD Recorder+VCR to the corresponding in jacks on your TV using a Y Pb Pr cable (C) if the component (Y, Pb, Pr) is available on your TV.
2 Connect the Left and Right AUDIO OUT jacks from the DVD Recorder+VCR to the left/right audio in jacks on your TV using the audio cables.
Progressive Scan Connection
- If your television is a high-definition or 'digital ready' television, you may take advantage of the DVD Recorder+VCR's Progressive Scan output for the highest video resolution possible.
- If your TV does not accept the Progressive Scan format, the picture will appear scrambled.
1 Connect the COMPONENT/PROGRESSIVE VIDEO OUT jacks on the DVD Recorder+VCR to the corresponding in jacks on your TV using an optional Y Pb Pr cable (C).
2 Connect the Left and Right AUDIO OUT jacks from the DVD Recorder+VCR to the left/right audio in jacks on your TV using the audio cables.

- Be sure to set the DVD Recorder+VCR to Progressive Scan mode by pressing and holding [P.SCAN] for 3 seconds (or changing the 'Video Output' in the Setup Menu; see page 27).
- Progressive Scan does not work with the RF, Audio/Video or S-Video connections.
Connecting an Amplifier/Receiver
Connecting to an amplifier equipped with two channel analog stereo or Dolby Pro Logic II/Pro Logic
Connect the Left and Right AUDIO OUT jacks on the DVD Recorder+VCR to the left and right audio in jacks on your amplifier, receiver, or stereo system, using the supplied audio cables (A).
Connecting to an amplifier equipped with two channel digital stereo (PCM) or to an Audio/Video receiver equipped with a multi-channel decoder (Dolby Digital™, MPEG 2, or DTS)
1 Connect the DVD Recorder+VCR's DIGITAL AUDIO OUT jack (Coaxial) to the corresponding in jack on your amplifier. Use an optional digital coaxial audio cable. (X)
2 You will need to activate the DVD Recorder+VCR's digital output; see 'Audio' Settings on page 28.
Digital Multi-Channel Sound?
A digital multi-channel connection provides the best sound quality. For this you need a multi-channel audio/video receiver that supports one or more of the audio formats supported by your DVD Recorder+VCR (MPEG 2, Dolby Digital, and DTS). Check the receiver manual and the logos on the front of the receiver.

- Due to the DTS Licensing agreement, the digital output will be in DTS digital out when DTS audio stream is selected.

- If the audio format of the digital output does not match the capabilities of your receiver, the receiver will produce a strong, distorted sound or no sound at all.
- 5.1 channel digital surround sound via the digital connection can only be obtained if your receiver is equipped with a digital multi-channel decoder.
To see the audio format of the current DVD on the on-screen display, press [AUDIO].
The DVD Recorder+VCR does not perform internal (2- channel) decoding of DTS sound tracks. To enjoy DTS multi-channel surround, you must connect the DVD Recorder+VCR to a DTS compatible receiver via one of the DVD Recorder+VCR's digital audio outputs.

Rear of DVD Recorder+VCR
Amplifier (Receiver)
Connecting Optional Equipment
To receive audio/video signals from other equipment, connect the AVF jacks on the DVD Recorder+VCR to the audio/video out jacks on your external component, using optional audio/video cables.
Jack Panel of Accessory Component (VCR, Camcorder, etc.)
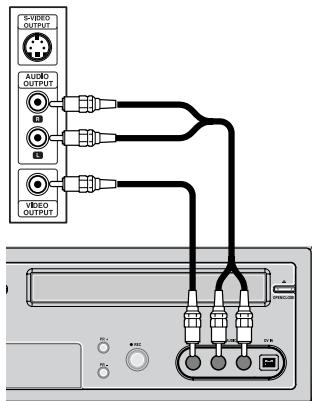
Front of DVD Recorder+VCR
Connecting a Digital Camcorder
DF-8100/8150 only
Using the front panel DV IN jack, it is possible to connect a DV digital camcorder, video deck or DVD+R/RW recorder and digitally transfer DV tapes or DVD+R/RW discs to DVD+R/RW.
Use a DV cable (not supplied) to connect the DV In/Out jack of your DV camcorder/video deck to the front panel DV IN jack of the DVD Recorder+VCR.

This jack is for connection to DV equipment only. It is not compatible with digital satellite tuners or D-VHS video decks.
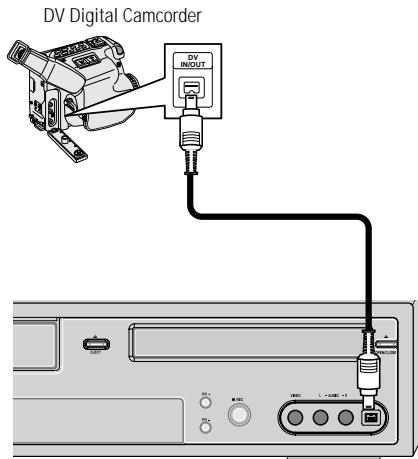
Front of DVD Recorder+VCR
Initial Installation
After successfully connecting your DVD Recorder+VCR to your TV and other devices, this chapter will show you how to complete the initial installation.

- You must follow the initial installation process to set the time, date, channels, and language preferences for the DVD Recorder+VCR.
1 A 'Welcome' message is displayed on the screen. Make sure the RF cable from your antenna or cable TV jack is connected. Press [ENTER] to begin initial installation.
2 Select the desired language for the on-screen menu using [/] . Press [ENTER] to confirm.
3 Select the desired country using [ / ] .Press [ENTER] to confirm.
4 Select the desired disc menu language using [/] . Press [ENTER] to confirm.
5 Select the desired disc playback audio language using [ / ] . Press [ENTER] to confirm.
Installation
Welcome.
Press [Enter] to begin auto channel search.
Ensure aerial is connected.
Instructions
Setup-Exit
Installation
Please select your language to begin auto install procedure:
English
Spanis
French
Czech
Danish
German
Dutch
Instructions
Enter-Confirm Setup-Exit Move ▲
Installation
Please select your country of use:
Australia
Belgium
Denmark
Finland
France
Instructions
Enter-Confirm Setup-Exit Move ▲
Installation
Please select disc menu language:
Default
English
Spanish
French
Czech
Danish
German
Instructions
Enter-Confirm Setup-Exit Move ▲
Installation
Please select disc audio language:
Default
English
Spanish
French
Czech
Danish
German
Instructions
Enter-Confirm Setup-Exit Move ▲
6 Select the desired disc playback subtitle language using [ / ] . Press [ENTER] to confirm.
7 The DVD Recorder+VCR detects channels automatically and stores them in memory.
Installation
Please select disc subtitle language:
Default
English
Spanish
French
Czech
Danish
German
Instructions
Enter-Confirm Setup-Exit Move
Installation
Searching for available TV stations:

2 channels found Please wait...
Instructions Setup-Exit
8 After finishing Auto Channel Search, set the clock.
9 Use [ / ] to move left/right and use [ / ] to change the settings.
10 After setting the clock, press [ENTER] to confirm. If you cancel the process during Initial Installation, you should repeat this procedure.
Set Clock
Please set the clock:
Time: 13:00
Date: 02\Jan\2010 (Sat)
Instructions
Enter-Confirm Setup-Exit Move ▲▼

Re-Installation
This set is equipped with the multi-tuner for receiving many countries' broadcasting. In order to receive broadcasting of different countries, follow as below.
1 Press [SETUP] and select the 'Restore Defaults' using [/] . Then, RESET the set. (see page 32)
2 Power On, then you see the 'Initial Installation'.
3 Select the contry which you want to (see step 3 on page 19), then repeat the steps 4-10 on page 19-20
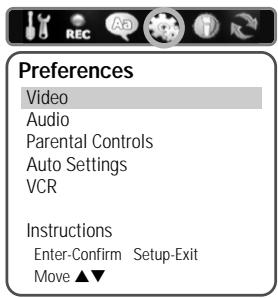
Setup Menu Overview
The DVD Recorder+VCR Setup menu includes six categories, including: Installation, Recording Options, Languages, Preferences, System Info, and Restore Defaults. Press [SETUP] and [ / ] on the remote control to view the first and second levels of the Setup menu.
Menu Navigation
1 Press [SETUP]. The Setup menu appears.
2 Use [ / ] to select the desired category
3 While the desired category is selected, press [ / ] to move to the second level.
4 Press [ENTER] to move to the third level.
5 Use [ / ] to select the desired setting, then press [ENTER] to confirm your selection. Some items require additional steps. Press [SETUP] at any time to return to the previous menu.
6 Press [SETUP] to exit the Setup menu.
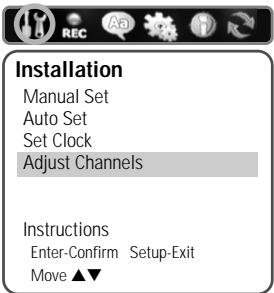
INSTALLATION Settings
Manual Set
To complete the set-up of your DVD Recorder+VCR when the auto set has not stored all of the channels or when you wish to store a new channel.
1 Press [SETUP]. The Setup menu appears.
2 Use [ / ] to select 'Installation'.
3 While 'Installation' is selected, press [▼] to select 'Manual Set'.
4 Press [ENTER]. The 'Manual Setup' menu appears.
5 Use [ / ] to select 'Standard'. Press [ENTER] to move to the second level.
6 Use [ / ] to select the desired 'Standard' (PAL-BG, PAL-II, PAL-DK, or SECAM-L), then press [ENTER].

This set is equipped with the Multi-Tuner. You can search broadcasts of other countries. If the set can not search the channels, please Re-Install. (see page 20.)
7 Use [ / ] to select 'Reception'. Press [ENTER] to move to the second level.
Use [ / ] to select the desired broadcast system (Aerial or Cable), then press [ENTER].
Aerial: If you are using a standard antenna to receive channels.
Cable: If you are using basic cable to receive channels.

Installation
Manual Set
Auto Set
Set Clock
Adjust Channels
Instructions Enter-Confirm Setup-Exit
Move
Manual Setup
Standard P Select The
Reception standard.
Auto Search Fine Tune PAL-BG
Decoder PAL-II
Store Channel PAL-DK
Program Name SECAM-L
Instructions
Enter-Confirm Setup-Exit Move
Manual Setup
Standard PAL-BG
Reception Select The
Auto Search Reception. Fine Tune Aerial
Decoder Aerial
Store Channel Cable
Program Name
Instructions Enter-Confirm Setup-Exit Move
9 Use [ / ] to select 'Auto Search'.
10 Search the real channel number by pressing [ / ] .
11 Select 'Fine Tune'. You can adjust the fine tuning
12 Use [ / ] to select 'Store Channel'. Press [ENTER] to move to the second level.
13 Use [ / ] to select program number to store and press [ENTER] to confirm.
14 Use [ / ] to select 'Program Name'. Press [▶] to move to the second level. If your DVD Recorder+VCR is showing no station name or is showing a station name incorrectly, you can correct this.
15 Either select the name from the stored list or you create the station name and enter a 4-digit name. Change the letters with the [ / ] , move the next letter with the [ / ] .
Manual Setup
Standard PAL-BG
Reception Aerial
Auto Search CH-02
Fine Tune N/A
Decoder N/A
Store Channel PR01
Program Name P-01
Instructions Enter-Confirm Setup-Exit Move ▲
Manual Setup
Standard PAL-BG
Reception Aerial
Auto Search CH-02
Fine Tune
Decoder N/A
Store Channel PR01
Program Name P-01
Instructions
Enter-Confirm Setup-Exit Move ▲
Manual Setup
Standard PAL-BG
Reception Aerial
Auto Search CH-02
Fine Tune
Decoder N/A
Store Channel Select Ch
Program Name To Store
Instructions
Enter-Confirm Setup PR-0
Manual Setup
Standard PAL-BG
Reception Aerial
Auto Search CH-02
Fine Tune N/A
Decoder Edit Channe
Store Channel Name
Program Name
Instructions P 0 1
Enter-Confirm Setup

To save the 'Program Name', you must set the 'Store Channel' again. Repeat the same procedure 12-13.
Auto Set
The DVD Recorder+VCR has a frequency synthesized tuner capable of receiving up to 99 channels. These include VHF channels 00-14, UHF channels 27-69 and CATV channels 1-41.
Preparation:
Connect the DVD Recorder+VCR to the desired type of antenna or cable TV system, as shown in 'Connecting Antenna/Cable' on page 15.
1 Follow steps 1-2 as shown under 'Manual Set'.
2 While 'Installation' is selected, press [ / ] to select 'Auto Set'.
3 Press [ENTER] to begin the channel search.
The tuner will automatically search for all available channels in your area and place them in the tuner's memory.

- After Auto Set is complete, follow the instructions above to make sure that Tuning Band is set correctly.
Set Clock
1 Follow steps 1-2 as shown under 'Manual Set'.
2 Use [ / ] to select Set Clock'.
3 Press [ENTER]. The 'Set Clock' menu appears.
4 Enter the date and time.
/ (left/right): Moves the cursor to the previous or next column.
/ (up/down): Changes the setting at the current cursor position.
5 Press [ENTER] to confirm your setting, then press [SETUP] to exit the Setup menu.


Installation
Manual Set
Auto Set
Set Clock
Adjust Channels
Instructions
Enter-Confirm Setup-Exit
Move ▲▼
Installation
Searching for available TV stations:
5 channels found
Please wait...
Instructions
Setup-Exit


Installation
Manual Set
Auto Set
Set Clock
Adjust Channels
Instructions
Enter-Confirm Setup-Exit
Move ▲
Set Clock
Please set the clock:

Date: 02\Jan\2010 (Sat)
Instructions
Enter-Confirm Setup-Exit Move ▲▼
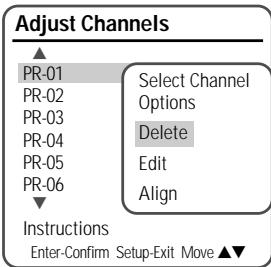
Adjust Channels
1 Follow steps 1-2 as shown under 'Manual Set'.
2 Use [ / ] to select 'Adjust Channels'.
3 Press [ENTER]. The Adjust Channels menu appears.
4 Use [ / ] to select the PR number you want to adjust. Then press [ENTER].
Delete
After tuning TV stations into your DVD Recorder +VCR, you may wish to delete a station.
1 Use [ / ] to select 'Delete' and press [ENTER].
Edit
After tuning TV stations into your DVD Recorder +VCR, you may wish to put a name into any channel you want to.
1 Use [ / ] to select 'Edit' and press [ENTER].
2 You can put a name by pressing [ / ] and [ />
3 Press [ENTER] to confirm.
Align
After tuning TV stations into your DVD Recorder +VCR, you may wish to change the order of PR's you have in your set, as your preference.
1 Use [ / ] to select 'Align' and press [ENTER].
2 Press [ / ] to select the PR number you want to move to.
3 Press [ENTER]. The selected PR will be moved to the new PR number.
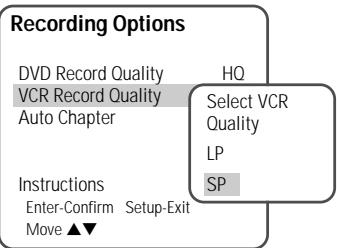
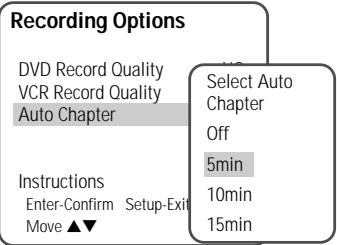
RECORDING OPTIONS Settings
DVD Record Quality
You can set the default DVD recording quality to: HQ (High Quality - 1 hr/disc), SP (Standard Play - 2 hrs/disc), EP (Extended Play - 4 hrs/disc), or SLP (Super Long Play - 6 hrs/disc).
1 Press [SETUP]. The Setup menu appears.
2 Use [ / ] to select 'Recording Options'.
3 While 'Recording Options' is selected, press [▼] to select 'DVD Record Quality'.
4 Press [ENTER] to move to the second level.
5 Use [ / ] to select the desired Record Quality (HO, SP, EP, or SLP).
6 Press [ENTER] to confirm your selection, then press [SETUP] to exit the menu.
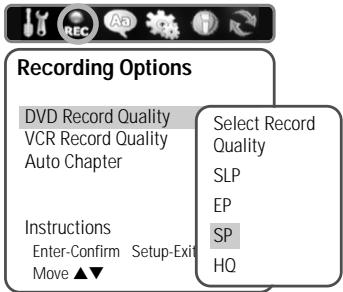
VCR Record Quality
You can set the default VCR recording quality to SP (Standard Play) or LP (Long Play). SP is higher quality, but LP provides 2 times the recording time; e.g., a 2 hour tape will record for 4 hours in LP mode. Follow the same procedure as the 'DVD Record Quality'.
Auto Chapter
During recording, chapter markers are added automatically at fixed intervals. You can set this interval to 5 minutes, 10 minutes or 15 minutes. To turn off automatic chapter marking, select 'Off'.
Follow the same procedure as the 'DVD Record Quality'.
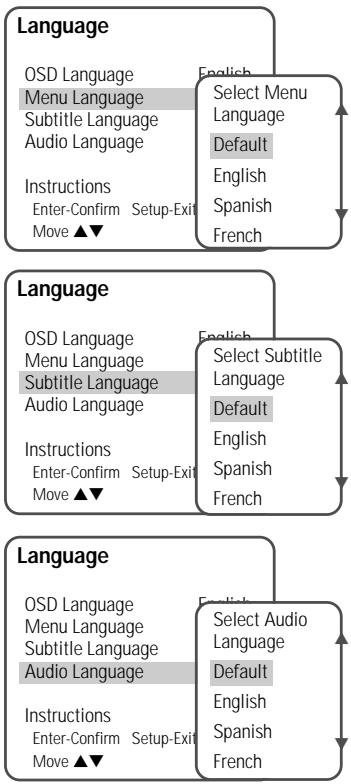
LANGUAGE Settings
OSD Language
Select a language for the DVD Recorder+VCR Setup menu and on-screen displays.
1 Press [SETUP]. The Setup menu appears.
2 Use [and] to select 'Language'.
3 While 'Language' is selected, press [▼] to select 'OSD Language'.
4 Press [ENTER] to move to the second level.
5 Use [ / ] to select the desired language.
6 Press [ENTER] to confirm your selection, then press [SETUP] to exit the menu.
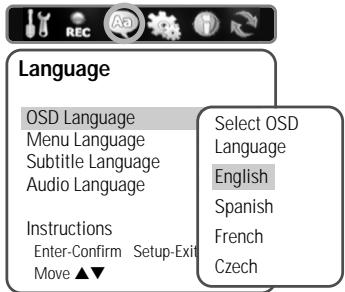
Menu/Subtitle/Audio Language
Select your preferred language for Disc Menus, Subtitles, and Audio soundtracks.
Follow the same procedure as the OSD Language.
Default: The disc's default language is selected.
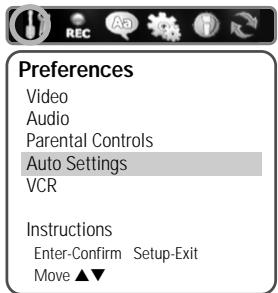
PREFERENCES / Video Settings
1 Press [SETUP].
2 Use [ / ] to select 'Preferences'.
3 While 'Preferences' is selected, press [▼] to select 'Video'.
4 Press [ENTER]. The 'Video' submenu is displayed.
TV Aspect Ratio
1 Use [ / ] to select 'TV Aspect' while the 'Video' submenu is displayed.
2 Press [ENTER] or to go to the second level.
3 Use [ / ] to select the desired 'TV Aspect'.
4 Press [ENTER] to confirm your selection.
5 Press [SETUP] to exit the menu.
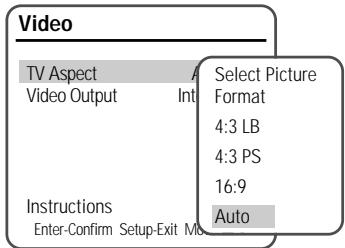
4:3 LB: Select when a standard 4:3 TV is connected. Displays theatrical images with masking bars above and below the picture.
4:3 PS: Select when a standard 4:3 TV is connected. Displays pictures cropped to fill your TV screen. Both sides of the picture are cut off.
16:9: Select when a 16:9 wide screen TV is connected.
Auto: Convert to the appropriate aspect ratio automatically.
Video Output
Progressive Scan Video provides the highest picture quality with reduced flickering.
Interlace or Progressive: If you connect the DVD Recorder+VCR to a digital television (DTV) or Monitor using the COMPONENT jacks, set Video Output to 'Interlace' or 'Progressive'.
Follow the same procedure as 'TV Aspect Ratio' to change the 'Video Output'.


- Once the Progressive Scan setting is entered, an image will only be visible on a Progressive Scan compatible TV or monitor. Press and hold [P.SCAN] for 3 seconds to return to Interlace Scan mode.
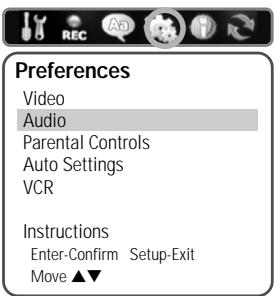
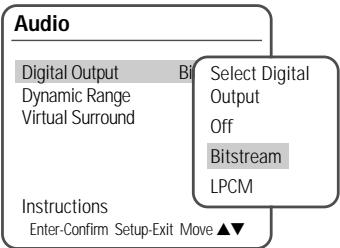
PREFERENCES / Audio Settings
Follow the same procedure as 'Video' Settings to select 'Audio' Settings.
Digital Output
1 Use [ / ] to select 'Digital Output' while the 'Audio' submenu is displayed.
2 Press [ENTER] or to go to the second level.
3 Use [ / ] to select the desired digital output type.
4 Press [ENTER] to confirm your selection.
5 Press [SETUP] to exit the menu.
Off
No signal will be output from the Digital Audio Out jacks.
LPCM
Select when connected to a 2 channel digital stereo amplifier. The DVD Recorder+VCR's digital audio signal will be output in the PCM 2ch format
when you play a DVD (or VHS tape) recorded with a Dolby Digital (only for DVD) or MPEG soundtrack. If the DVD is recorded with a DTS sound track then no sound will be heard.
Bitstream
Select when connected to a Dolby Digital or DTS decoder (or an amplifier or other equipment with a Dolby Digital or DTS decoder).
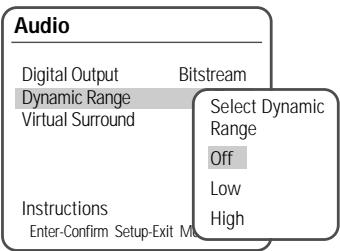
Dynamic Range
While watching DVD movies, you may wish to compress the dynamic range of the audio output (the difference between the loudest and quietest passages). This allows you to listen to a movie at a lower volume without losing clarity of sound. Set 'Dynamic Range' to Low or High for this effect.
Follow the same procedure as 'Digital Output' to set the 'Dynamic Range'.
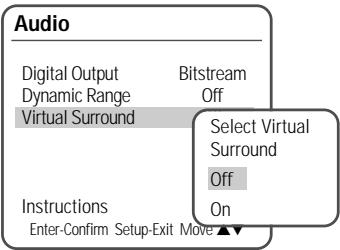
Virtual Surround
You can enjoy a simulated 3D effect from two speakers by setting Virtual Surround to On.
Follow the same procedure as 'Digital Output' to set the 'Virtual Surround' option.
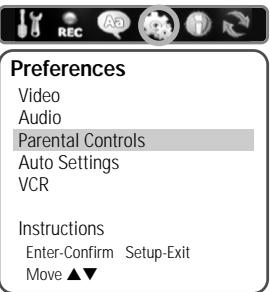
PREFERENCES / Parental Controls
Set Parental Level
The Parental Controls feature allows you to prevent DVDs from being played based on their ratings or to have certain discs played with alternative scenes. You can set the parental level from 'ADULT' to 'KIDS'.
1 Press [SETUP].
2 Use [ / ] to select 'Preferences'.
3 While 'Preferences' is selected, press [▼] to select 'Parental Controls'. And press [ENTER].
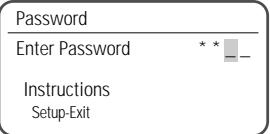
4 Use [ / ] to select 'Set Parental Level' and press [ENTER]. The Password Input dialog will appear. Enter a 4-digit password using the [0-9] buttons. If this is the first time you have entered a password, you will be prompted to enter the password again to confirm it.

- The initial password is '0000'. You must enter this password before you can change the Parental Level.
5 After setting the password, press [ENTER] while 'Set Parental Level' is displayed.
6 Enter your new password.

- Set the new password to something other than '0000'
7 Use [ / ] to select the desired parental level and press [ENTER] to confirm.
Off: If you select Unlock, the Lock feature is not active. All discs will play in full.
ADULT to Kid Safe: Some discs contain scenes not suitable for children. If you set a rating for the DVD Recorder+VCR, all scenes with the same rating or lower will be played. Higher rated scenes will not be played unless an alternative scene is available on the disc. The alternative must have the same rating or a lower one. If no suitable alternative is found, playback will stop. You must enter the 4-digit password or change the rating level in order
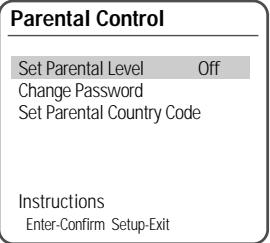

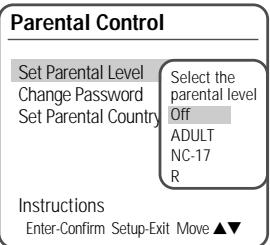
Press [ENTER] to confirm your rating selection, then press [SETUP] to exit the menu.
Parental Control
Set Parental Level
ADULT
Change Password
Set Parental Country Code
Instructions
Enter-Confirm Setup-Exit Move ▲
Change Password
1 While 'Preferences' is selected, press [] to select 'Parental Controls'.
2 Press [ENTER]. The 'Parental Controls' submenu appears.
3 Use [ / ] to select 'Change Password' then press [ENTER].
4 The 'Change Password' submenu appears. Enter your current 4-digit password.
5 Enter a new 4-digit password. Re-enter the new password to confirm, press [ENTER].

- Master Password : If you forget your password, press 3,3,0,8 on the remote control and then press [ENTER].
- Set the new password to something other than '0000'.
Parental Control
Set Parental Level
ADULT
Change Password
Set Parental Country Code
Instructions
Enter-Confirm Setup-Exit Move ▲▼
Set Parental Country Code
1 While 'Preferences' is selected, press [▼] to select 'Parental Controls'. Then press [▼] to select 'Set Parental Country Code'.
2 Press [ENTER]. Enter your current 4-digit password then press [ENTER].
3 Use [ / ] to select the desired country and press [ENTER] to confirm.
Change Password
Current Code
****
Enter New Code
****
Confirm Code
*
Instructions
Setup-Exit
Parental Control
Set Parental Level
ADULT
Change Password
Set Parental Country Code
Instructions
Enter-Confirm Setup-Exit Move ▲
Parental Country Code
Please select Country for Parental Setup
Australia
Belgium
Denmark
Finland
France
Instructions
Enter-Confirm Setup-Exit Move ▲▼
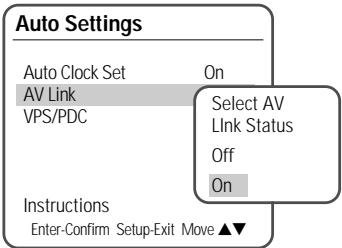
PREFERENCES / Auto Settings
1 While 'Preferences' is selected, press [] to select 'Auto Settings'.
2 Press [ENTER] to display the submenu.
Auto Clock Set
Auto Clock enables the DVD Recorder+VCR to set the clock automatically whenever it is in Standby mode (plugged in but powered off).
Auto Clock is only available for models with the VPS/PDC function.
Some broadcasting stations may send the time and date along with the VPS/PDC data. The video will automatically use this time and date during the initial setting up procedure during normal use, and every time you switch the video off at the mains. If you find that this time and date is incorrect you can remove this feature by following the steps below changing it to the OFF mode, you will then have to manually set the time and date, see above.
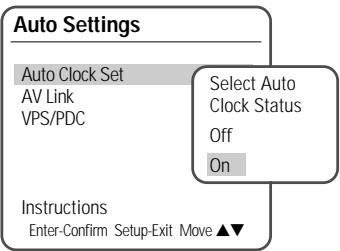
1 Use [ / ] to select 'Auto Clock Set' and press [ENTER].
2 Use [ / ] to change the 'Auto Clock Set' status, and press [ENTER] to confirm.
AV Link
If your TV is AV Link available, you can download the channels information from your TV set, connecting the SCART1 jack to TV.
Follow the same procedure as 'Auto Clock Set' to set the 'AV Link' status.
VPS/PDC
VPS/PDC is a service provided by some stations to enable you to perform timer recordings precisely even if the broadcaster delays the start time of the programme slightly. The time you enter is the VPS/PDC time so this must be correct. Not all stations offer VPS/PDC, in which case the player will start at the time you enter and not the actual start time of the programme.
If you wish to start recording at a specific time without it being adjusted by the VPS/PDC system in the event of a delay, switch VPS/PDC off otherwise the player will not record.
Follow the same procedure as 'Auto Clock Set' to set the 'VPS/PDC' status.
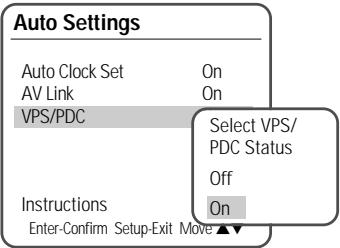

- "VPS/PDC" and "Auto Clock Set" are not provided for some countries.
PREFERENCES / VCR
This feature enables you to search for Index marks or specific times on your VHS tapes.
1 While 'Preferences' is selected, press [▼] to move to the second level.
2 Use [ / ] to select VCR
3 Press [ENTER] to display the submenu.
4 Select 'Index+', 'Index-' or 'Go to Zero'.
5 If you select 'Index+' (or 'Index-) and press [ENTER], your DVD Recorder+ VCR will locate your index mark and begin playback.
6 If you select 'Go-To Search' and press [ENTER], your DVD Recorder+ VCR will wind to the position 0:00:00 and stop.
| VCR |
| Index+ |
| Index- |
| Go to Zero |
| VCR |
| Index+ |
| Index- |
| Go to Zero |
| VCR |
| Index+ |
| Index- |
| Go to Zero |

- The VCR menu is activated only when a video cassette tape is inserted.
System Information
System Information helps service personnel identify key firmware information about your DVD Recorder+VCR in case service is required.
| System Info | |
| Version | EP Set 1.0 |
| Main Build | DR3-1.0.2 |
| Micom Software | 0.0.0 |
| DVD Navigation | 1.0.0 |
| Loader Version | DVS-RA20 |
| Instructions | |
| Enter-Confirm | Setup-Exit |
| Move ▲▼ | |
Restore Defaults
If you wish, you can reset the DVD Recorder+VCR to its original factory settings.
1 Press [SETUP]
2 Use [ / ] to select 'Restore Defaults'
3 Press [ENTER].
4 The Initialize menu will appear. Use the [ / ] buttons to select 'Yes' and press [ENTER].
| Restore Defaults | |
| If you select this function all settings will be removed and the pt initia | Are you sure you want to restore default settings? |
| Yes | |
| No | |
| Instru | Enter-Confirm Setup-Exit |
| Move ▲▼ | |

- Some options cannot be reset, including Parental Controls, Password, and Country Code.
- After Restoring Defaults the unit reboots automatically and the Installation menu appears. You must set the country, language, channel, and clock settings again.
On-Screen Display Overview
The On-Screen Display provides feedback on the status of the DVD Recorder+VCR and/or the currently loaded disc or tape. To access the On-Screen Display (or OSD), press [DISPLAY].
Displaying Disc Information
To display information about the currently loaded disc or tape:
On-screen display operation
1 Press [DISPLAY] repeatedly to display/change the information displayed on-screen.
2 To remove the on-screen display, press [DISPLAY] repeatedly until it disappears. See the descriptions below for detailed explanations of the on-screen displays for each media type.

- Some discs may not provide all the features shown in the on-screen display examples.
Temporary Feedback Icons

Action prohibited or not available
Changing TV Channels
If no disc is playing, you can change TV channels using the [0-9] or [PR + / - ] buttons on the remote control or [PR + / - ] buttons on the front panel.
Changing the TV Audio Channel
You can change the TV audio using the [AUDIO] button.
Press [AUDIO] repeatedly to change the TV audio, according to the Broadcast audio signal as shown below.
STEREO Audio Signal
Stereo Mono Stereo
BIL Audio Signal
BIL I BIL II (BIL Off) BIL I
- MONO Audio Signal
Mono
The current audio channel is displayed on-screen.
- If the sound is poor quality when set to Stereo, you can often improve it by changing to Mono.
- When an external input is selected, the audio channel can be switched only to Stereo.
OSD Menu Options for DVD
During DVD playback, press [DISPLAY] to show information about the current disc. While the disc information is displayed, press [DISPLAY] again to show the disc remaining time.
Title
Shows the current title number and total number of titles, and skips to the desired title number.
1 Press [DISPLAY] during playback. The on-screen display appears on the TV screen.
2 Use [ ] to select the 'Title' icon on the on-screen display. Press [ENTER] to display a submenu.
3 Use [ ] to change the numbers. Press [ENTER] to confirm.
Chapter
Shows the current chapter number and total number of chapters, and skips to the desired chapter number.
1 Press [DISPLAY] during playback. The on-screen display appears on the TV screen.
2 Use [▲▼] to select the 'Chapter' icon on the on-screen display. Press [ENTER] to display a submenu.
3 Use [ ] to change the numbers. Press [ENTER] to confirm.
Angle
Shows the current angle number and total number of angles, and changes the angle number.
1 Press [DISPLAY] during playback. The on-screen display appears on the TV screen.
2 Use [ ] to select the 'Angle' icon on the on-screen display. Press [ENTER] to display a submenu.
3 Use [ ] to change the numbers. Press [ENTER] to confirm.
Audio
Shows the current audio soundtrack language, encoding method, and channel number, and changes the setting.
1 Press [DISPLAY] during playback. The on-screen display appears on the TV screen.
2 Use [ ] to select the 'Audio' icon on the on-screen display. Press [ENTER] to display a submenu.
3 Use [ ] to change the numbers. Press [ENTER] to confirm.
Subtitle
Shows the current subtitle language, and changes the setting.
1 Press [DISPLAY] during playback. The on-screen display appears on the TV screen.
2 Use [ ] to select the 'Subtitle' icon on the on-screen display. Press [ENTER] to display a menu.
3 Use [ ] to change the numbers. Press [ENTER] to confirm.
Elapsed
Shows the elapsed playing time, and skips to the desired time.
1 Press [DISPLAY] during playback. The on-screen display appears on the TV screen.
2 Use [ ] to select the 'Elapsed' icon on the on-screen display. Press [ENTER] to search by time. The submenu appears.
3 Use [ ] to change the numbers and use [ ] to move left or right. Within 7 seconds, press [ENTER] to confirm the start time. Playback starts from the selected time on the disc.

- For the title recorded without DVD navigation information, such as the one from broadcast or line input, 'Elapsed function does not work.
Playing a DVD
| DVD | |
| Title | 1 of 3 |
| Chapter | 1 of 12 |
| Angle | 1 of 1 |
| Audio | 1.Def |
| Subtitle | Off |
| Elapsed | 00:01:39 |
| Instructions | |
| Enter-Confirm | Setup-Exit |
| Choose △V | |
1 Press [DVD] to set the remote control to operate the DVD deck.
Turn the TV on and select the video input source connected to the DVD Recorder+VCR.
Audio system: Turn the audio system on and select the input source connected to the DVD Recorder+VCR.
2 Press [OPEN/CLOSE] to open the disc tray.
3 Load your disc in the tray with the playback side down (label side up).
4 Press [OPEN/CLOSE] to close the tray.
5 'READING' appears on the front panel display, and playback starts automatically. If playback does not start, press [PLAY (▶)]. In some cases, the Disc menu might appear instead.
Playing a DVD +R (+RW)
When a DVD+RW or unfinalized DVD+R is inserted, no title is played automatically but the current TV channel displays on the screen.
If you want to play a title on the DVD+R (+RW), you must press [MENU] or [PLAY] to display the disc menu.
Select a title to play then press [ENTER].

If a Disc menu is displayed
- A Disc menu may be displayed when you load a DVD. Use the [▲▶▲▼] buttons to select the title/chapter you want to view, then press [ENTER] to start playback. Press [TITLE] or [MENU] to return to the Disc menu.

- If the Parental Level feature is set and the disc is below the current Parental Level setting, the 4-digit code must be entered and/or the disc must be authorized; see 'Set Parental Level' on page 29.
- The DVD Recorder+VCR will not play discs with Region codes different from the DVD Recorder+VCR. The Region code for this DVD Recorder+VCR is 2 (two).
- Unless stated otherwise, all operations described below use the remote control. Some features may also be available in the Setup menu.
- A disc which is recorded by computer at high speeds (greater than or equal to 2x) may not be recognized.
- A disc which is recorded with unauthorized movie material may not be played.
- A disc which is recorded by other recorder or not recorded correctly may not be recognized or played.
Still Picture and Frame-by-Frame Playback
1 Press [PLAY/PAUSE] during playback. The DVD Recorder+VCR will go into Still mode.
2 You can back up or advance the picture frame-by-frame by pressing [FF (▶)] repeatedly during Still mode.
Fast Forward/Backward
1 Press [REW (▶)] or [FF (▶)] during playback. The DVD Recorder+VCR will go into Search mode.
2 Press [REW] or [FF] to select the desired speed: X2, X4, X8, X16, X32 (forward) or X2, X4, X8, X16, X32 (backward).
Slow Motion
Press [SLOW+] to enter Slow Motion mode. The default speed is 1/2. When you press [SLOW+] repeatedly, the speed will be set to 1/4, 1/8, and normal speed.

- Slow reverse playback is not supported.
Changing the Audio Language
Press [AUDIO] and then press [AUDIO] repeatedly during playback to hear a different audio language or audio track.
Subtitles
Press [SUBTITLE] and then press [SUBTITLE] repeatedly during playback to select among all available subtitle languages.
Camera Angle
If a DVD contains scenes recorded at different camera angles, angle icon displays automatically. You can select among these angles during playback.
Press [ANGLE] and then press it repeatedly during playback to select the desired angle.
The number of the current angle appears on the TV screen.

- The Camera Angle icon is displayed on the TV screen when alternate angles are available.
Zoom
The Zoom function allows you to magnify the video image and scroll around the enlarged image.
1 Press [ZOOM] during Play mode to activate the Zoom function.
Each press of the [ZOOM] button changes the Zoom level as follows: X1 (normal size) X2 X4 X1 (normal size)
2 Use the [ ] buttons to scroll around the zoomed picture.
3 To resume normal playback, press [ZOOM] repeatedly until the X1 (normal picture) appears.

- The Zoom function may not work on some DVDs.
- The Zoom function does not work in PAUSE mode.
Repeat
1 To repeat the currently playing chapter, press [REPEAT]. 'REPEAT CHAPTER' appears on the TV screen.
2 To repeat the currently playing title, press [REPEAT] twice. 'REPEAT TITLE' appears on the TV screen.
3 To repeat the whole disc, press [REPEAT] three times. 'REPEAT DISC' appears on the TV screen.
4 You can play in other modes (including Repeat, Shuffle, or Scan) by pressing [REPEAT] repeatedly.
A-B
You can repeat a scene between two points (A and B):
1 Press [PLAY/PAUSE] play to the start of the desired scene.
2 Press [A-B] to mark the start point.
3 Use [FF], [NEXT] to search the end point.
4 Press [A-B] to mark the end point.
5 The marked scenes are repeated continuously until you stop the repeat by pressing [A-B] button again.
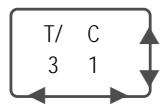
Search
1 Press [SEARCH] to display the Search menu.
2 Use [▲▶] to move to Title (T) or Chapter (C) and use [▲▼] to set the title or chapter number.
Selecting Titles
When a disc has more than one title, you can select among all available titles as follows:
1 Press [DISPLAY] and use [ ] to select the Title icon. Press [ENTER] to display a submenu. Use [ ] to select the desired title number and press [ENTER] to confirm.
Selecting Chapters
When a title on a disc has more than one chapter, you can select among all available chapters as follows:
1 Press [PREV (I)] or [NEXT (B)] briefly during playback to select the next or previous chapter.
2 To skip directly to any chapter during playback, press [DISPLAY]. Use [ ] to select the Chapter icon, then press [ENTER] to display a submenu. Use [ ] to select the desired chapter number and press [ENTER] to confirm.
Disc Menu
Many DVDs contain Disc menus that allow you to access special features. To open a Disc menu, press [MENU]. Then use the [0-9] buttons to directly select the desired options, or use the [ ] buttons to highlight your desired selection and press [ENTER].
1 Press [MENU]. The Disc menu is displayed.
2 To exit the Disc menu, press [STOP] or [TV VIEW].
Title Menu
1 Press [TITLE]. If the current title has a menu, the Title menu will appear on the TV screen. Otherwise, the Disc menu may appear.
2 The Title menu may contain camera angles, spoken languages and subtitle options, as well as the chapters for the title.
Before You Begin
Press the VCR button to set the remote control to operate the VCR deck.
Turn the TV on and select the video input source connected to the DVD Recorder+VCR.
Audio system: Turn the audio system on and select the input source connected to the DVD Recorder+VCR.
Playing a VHS Tape
1 Insert a prerecorded video cassette.
If the DVD Recorder+VCR is powered off, it will power on automatically.
Make sure the TIMER indicator on the front panel display is not lit. If it is, press [POWER] once.
If a tape without a safety tab is inserted, the DVD Recorder+VCR will start playback automatically.

- If the DVD Recorder+VCR is powered on by inserting a video cassette, playback will not start automatically.
2 Press [PLAY/PAUSE].
The PLAY icon appears on the TV screen. It is not necessary to select the tape speed (SP, LP) for playback. It will be automatically selected by the DVD Recorder+VCR.
3 Press [STOP] to stop playback.
The STOP icon appears on the TV screen. If the tape reaches the end before [STOP] is pressed, the DVD Recorder + VCR will automatically stop, rewind, and eject the tape.
Tracking Control
Auto Tracking
The automatic tracking function adjusts the picture to remove snow or streaks. It works in the following cases:
- When a tape is played for the first time.
- When the tape speed (SP, LP) changes.
- When streaks or snow appear because of scratches on the tape
Manual Tracking
If noise appears on the screen during playback, press the [TRACKING +/-] buttons on the remote control until the noise on the screen is reduced.
- In case of vertical jitter, adjust these controls very carefully.
- Tracking is automatically reset to normal when the tape is ejected or the power cord is unplugged for more than 3 seconds.
Special Playback Features
Notes on special playback features
Horizontal lines (noise bars) will appear on the TV screen. This is normal.
The audio is automatically muted during special playback modes, so there is no sound during search, slow motion, etc.
During high-speed picture search, a short time is needed to stabilize tape speed when re-entering Play mode. Slight interference may be observed during this time.
Fast Forward/Backward
This function lets you visually search forward and backward for a desired scene on your tape.
1 Press [REW] or [FF] during playback.
Search mode will be activated
If the DVD Recorder+VCR is left in Search mode for more than 3 minutes, the DVD Recorder+VCR will automatically resume Play mode to protect the tape and video heads.
2 To return to normal playback, press [PLAY].
Still Picture
1 Press [PLAY/PAUSE] during playback.
A still picture appears on the TV screen.
If a still picture vibrates vertically, stabilize it by using the [TRACKING +/-] buttons on the remote control.
If the DVD Recorder+VCR is left in Still mode for more than 5 minutes, the DVD Recorder+VCR will
automatically enter Stop mode to protect the tape and video heads.
2 To return to normal playback, press [PLAY].
Slow Motion
1 Press [SLOW + ] for Slow Motion playback.
2 Press [SLOW + ] and [SLOW - ] repeatedly to adjust the Slow Motion playback speed
Counter Memory Function
This is useful if there is a section of tape you want to view immediately after recording or if you want to return to the same point several times.
1 Begin recording or playing a tape.
2 At the point you want to locate later, reset the real-time counter to 0:00:00 by pressing [CLEAR]. Continue to play or record.
3 Press [STOP] when recording or playback finishes.
4 You can make the tape automatically stop when the counter returns to about '0:00:00' by setting the counter to '0:00:00' in the 'Go-To Search' function under 'Setup' 'Preferences' 'VCR'; see page 32.
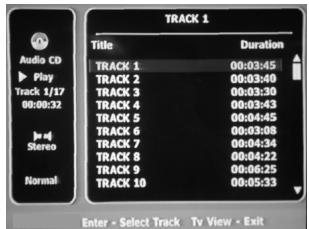
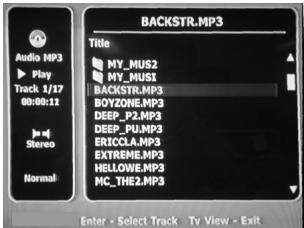
Audio CD/MP3 PLAYBACK
The DVD Recorder+VCR can play audio CDs and MP3 files on CD-ROM, CD-R or CD-RW discs.
1 Insert the CD disc and close the tray. The Audio CD or MP3 CD menu appears on the TV screen after a few moments to load the disc.
2 Use [ ] to select a track or a file, then press [ENTER].
During playback, the current track's elapsed playing time will appear on the front panel display and menu. Playback will stop at the end of the disc.

- On the MP3 CD menu, you can display the folders on the disc. Use [▲▼►] to select the folder icon on the MP3 CD menu then press [ENTER]. You can also display just the tracks in the folders. Use [▲▼►] to select a folder then press [ENTER].
3 While playing an Audio CD, use [FF] or [REW] for 2x speed playback.
4 Use [PLAY/PAUSE] to pause playback while the disc is playing.
5 To stop playback at any time, press [STOP].

- Press [REPEAT] to repeat a track (file) and press again to repeat the whole disc.
- If the disc contains JPEG files as well as MP3 files, you can change the Play mode to display JPEG image files by pressing [TITLE].
Audio CD
MP3
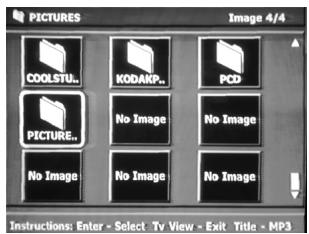
JPEG PLAYBACK
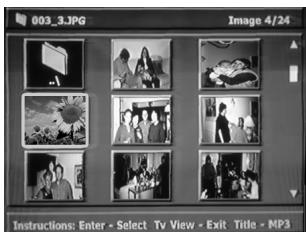
The DVD Recorder+VCR can display JPEG files on CD-R/RW.
1 Insert your CD and close the tray. The JPEG CD folder tree appears.
2 If there are folders which contain JPEG files, select the desired folder using [ ] and press [ENTER].
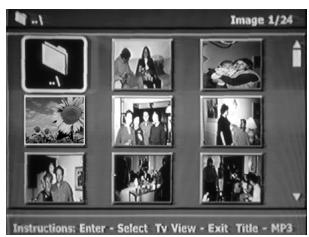
3 Select the thumbnail you want to display using [ ] and press [ENTER].
4 The full size image will be displayed and a slide show starts automatically with a time interval of 10 seconds.
5 Press [NEXT] or [PREV] to manually skip to the next or previous image.
6 Press [▶] (or [◁]) to rotate the image (counter) clockwise.
7 Press [STOP] to exit the slideshow.

- If the disc contains MP3 files as well as JPEG files, you can change the Play mode to play MP3 files by pressing [TITLE].
- When a CD contains both MP3 files and JPEG files, the default Play mode is JPEG image files.
- The DVD Recorder+VCR can playback up to 1000 files per disc.
- MP3 files encoded below 64kbps are not supported.


Playing MP3 Files During a Slide Show
You can enjoy a slide show while listening to MP3 music files.
1 Prepare a CD which includes both MP3 and JPEG files.
2 Insert the CD and play an MP3 file.
3 Press [TITLE] while playing the MP3 file to change the Play mode. The music playback will not stop.
4 Select an image file and press [ENTER] to start the slide show.
5 The MP3 file you selected continues to play during the JPEG slide show.
Recording from TV
Follow the instructions below to record a TV program.
1 Turn on the DVD Recorder+VCR and load a recordable disc or tape. Make sure your TV input is set to view the DVD Recorder+VCR.
2 Set the desired Recording mode by pressing [REC MODE] repeatedly.
DVD: HQ (High Quality - 1 hr/disc), SP (Standard Play - 2 hrs/disc), EP (Extended Play - 4 hrs/disc), or SLP (Super Long Play - 6 hrs/disc).
VCR: SP (Standard Play), LP (Long Play - 2 times SP)
3 If your DVD Recorder + VCR does not show a TV program, press [TV VIEW] on the remote control. Use [PR + / - ] to select the TV channel you wish to record.
4 Press [AUDIO] to select the audio channel to record (Stereo, BIL, or Mono).
The table below shows what audio channel will be recorded with different settings and different types of broadcasts.
The last column (Monitor Audio) shows what you will hear during recording. For example, if the TV broadcast is in Stereo, then setting the DVD Recorder+VCR to Stereo will record the broadcast in Stereo, and the Monitor Audio will also be in Stereo.
| TV Broadcast | Selected Audio | Broadcast Audio | Monitor Audio | |
| L Ch | R Ch | |||
| MONO | MONO | MONO | MONO | MONO |
| STEREO | STEREO | L | R | STEREO |
| MONO | MONO | MONO | MONO | |
| BIL | BIL I | BIL I | BIL I | BIL I |
| BIL II | BIL II | BIL II | BIL II | |
| (BIL Off) | (BIL I) | (BIL I) | (BIL Off) | |
5 Press [REC (●)] once.
Recording will start. The REC indicator lights on the front panel display. Recording continues until you press [STOP] or the disc is full. To record for a fixed length of time, see One Touch Record.
6 Press [STOP]) to stop recording.

- The maximum number of DVD titles per disc is 49. If the DVD Recorder+VCR is powered off during DVD recording, the recording will not be saved.
- If a DVD+RW or unfinalized DVD+R disc is inserted in the tray, no title is played automatically after loading is finished.
- If you are recording to a blank DVD+R (+RW) disc, it may take up to 7 minutes (it depends on disc) for post processing after recording.
One Touch Record (OTR)
One Touch Recording allows you add recording time in fixed increments at the touch of a button
1 Follow steps 1-4 under Recording from TV.
2 Press [REC (●)] repeatedly to set the length of the recording.
Recording starts after the first press. Each subsequent press increases the recording time by 15 minutes (DVD) within the available space or 30 minutes (VCR, to a maximum of 10 hours). The recording time is displayed on the front panel display.
Checking the Recording Time
Total time and recorded time are displayed on the TV screen after pressing [DISPLAY]. Recorded time is displayed on the front panel display.
To Pause the Recording
1 Press [PLAY/PAUSE] to pause the disc or tape during recording.
2 When you want to continue recording, press [PLAY/PAUSE] or [REC ( )] in DVD mode and press [REC ( )] in VCR mode.

Note
- To quit One Touch Recording, press and hold [STOP] for 3 seconds.
- The DVD Recorder+VCR will automatically power off when One Touch Recording ends.
Tip (VCR mode only)
- Always use [PLAY/PAUSE] for best results when making changes during recording. For example: To change channels during recording, first press [PLAY/PAUSE] to put the unit in Pause mode. Then select the desired channel on the DVD Recorder+VCR, and press [REC (●)] again to resume recording.

- You cannot record on the VCR deck and DVD deck at the same time.
- While the VCR is recording, DVD playback is possible. However, while the DVD is recording, all VCR functions are disabled.
One Touch Copy - DVD to VHS

- If the DVD you are attempting to copy is copy-protected, you will not be able to copy the disc. It is not permitted to copy Macrovision encoded DVDs.
- Copy to VCR does not work in Progressive Scan Mode.
1 Insert a Disc.
Insert the disc you wish to copy in the DVD deck and close the disc tray.
2 Insert a VHS Tape.
Insert a blank VHS videotape into the VCR deck.
3 Press [COPY] on the remote control.
4 Select (DVD VCR) and press [ENTER] or [COPY] to confirm.
5 Press [REC SPEED] or [ / ] to select the desired Record Mode in 'Copy to Tape' menu:
- SP (Standard Play) - LP (Long Play, 2 times SP).
6 Press [COPY] again to start copying.
7 Stop the Copy Process
To stop copying at any time, press [STOP]. You must stop the Copy process manually when the DVD movie ends, or the unit may replay and record over and over again.
Quick-Copy Menu
Please Select the copy Option
DVD->VCR
VCR->DVD
Instructions
Enter-Confirm Move ▲▼

Copy to Tape
Choose speed then press COPY:

Stop

If you want to start copy any point of disc
- Find the place on the DVD (or Disc) from which you want to start recording using the [PLAY/PAUSE], [REW] and [FF] functions.
- Press [COPY] while DVD is in pause mode or in resume stop ( STOP) mode
- Follow the same procedure 5-7.
Copy Edit (DVD VCR)
During one touch copy you can search or change REC SPEED and resume copy.
1 During One Touch Copy press [PLAY/PAUSE] to enter COPY EDIT mode.
2 Search with [FF/REW] or [NEXT/PREV] button.
3 Press [COPY] and you can change REC SPEED.
4 Press [COPY] again to resume copy.
One Touch Copy - VHS to DVD
You can copy the contents of a VHS tape to a DVD+R or DVD+RW using the [COPY] button. This allows you to archive your old VHS tapes to DVD.

If the VHS videotape you are attempting to copy is copy-protected, you will not be able to copy the tape. It is not permitted to copy Macrovision encoded tapes.
1 Insert a VHS Tape.
Insert the VHS videotape you wish to copy into the VCR deck.
2 Insert a DVD+R or DVD+RW disc.
Insert a blank DVD+R or DVD+RW disc in the DVD deck and close the disc tray.

- When using a DVD+RW disc, you must initialize before copying; see page 50.
3 Find the place on the VHS tape from which you want to start recording using the [PLAY/PAUSE], [FF] and [REW] functions. And press [STOP].
4 Press [COPY] on the remote control.
5 Select (VCR DVD) and press [ENTER] or [COPY].
6 Press [REC SPEED] or [/] to select the desired Record Mode in 'Copy to Disc' menu:
Please Select the copy Option
DVD->VCR
VCR->DVD
Instructions
Enter-Confirm Move
HQ (High Quality - 1 hr/disc)
- SP (Standard Play - 2 hrs/disc)
- EP (Extended Play - 4 hrs/disc)
SLP (Super Long Play - 6 hrs/disc)
7 Press [COPY] again to start copying.
8 Stop the Copy Process
To stop copying at any time, press [STOP].
Copying will stop automatically when the VHS tape ends.
Copy Edit (VCR DVD)
During one touch copy you can search and resume copy.
1 Press [PLAY/PAUSE] to enter COPY EDIT mode.
2 Press [PLAY/PAUSE] again to playback.
3 Search with [FF/REW] button.
4 Press [COPY] to resume copy.
Quick-Copy Menu

Copy to Disc
Choose quality then
press COPY:
HQ
SP
EP
SLP
DVD Status
■ Stop 0:00:10
Copy to Disc
Updating the disc. This may take a few minutes. Please wait...
Instructions
Setup-Exit
Timer Recording using Manual Set Record Screen
The Timer Recording function allows you to record up to 8 programs within a period of one month.
1 Insert recordable media such as DVD+R ,DVD+RW, recordable VHS tape.
2 Press [TIMER].
The 'Select Record Method' menu appears.
3 Select 'Manual edit timer' with [ / ] and confirm with [ENTER].
The 'Timer Recording' menu appears.
Use [ ] to move to a timer recording slot, and press [ENTER] to modify it. If you did not set the clock on the DVD Recorder+VCR, you must do so before programming a timer recording.
Media - Choose desired media (DVD or VHS) using [ ]
- PR No. - Choose the desired channel, or one of the external inputs from which to record.
- Date - Choose a date up to 1 month in advance, or select a daily or weekly program.
- Start Time - Set the recording start time.
- End Time - Set the recording end time.
Mode - Choose a Record mode.
DVD: HQ, SP, SLP or EP
VCR:SP,LP
- Repeat-Choose frequency of the recording. Once, Daily, Weekly, Weekday.
4 Enter the necessary information for your Timer Recording(s).
- - Moves the cursor left/right.
- - Changes the setting at the current cursor position.
- Press [SETUP] to exit the Timer Record menu.
- Press [ENTER] after filling in all the program information.
- Press [TIMER] to display the Timer Record List.
5 Press [ENTER] to save the program.
The Timer Record List will appear.
6 Press [SETUP] to exit the Timer Record List.
7 Timer indicator will light or blinking. Power Off the DVD Recorder+VCR to start the Timer Recording.

Note
- The Timer indicator lights on the front panel display when the DVD Recorder+VCR is ready for the Timer Recording.
- The tape timer indicator is blinking if any of the following meets if no recordable tape is inserted. Both the disc and tape timer indicators are blinking if tape and disc timer recordings are overlapped.
- The DVD Recorder+VCR will automatically power off when the Timer Recording ends.
- There is a short delay when a timer recording finishes to confirm the recorded program. If two timer recordings are set to record sequentially (one right after the other), the very beginning of the later program may not be recorded.
Select Record Method
Please choose your preferred method for scheduling a recording
Manual edit timer
ShowView
Instructions
Enter-Confirm Setup-Exit Move
Timer Recording
PR No. Date Start End Mode
--- --/--- ------ -----
--- --/--- --:-- --:--
--- --/-- --:-- --:-- --
--- --/-- --:-- --:-- --
Instructions
Enter-Edit Setup-Exit Move ▲
Edit Timer
Media
PR No.
Date
Start 13:30
End 14:30
Mode H0
Repeat Once
Delete
Instructions
Enter-Save Setup-Exit
Timer Recording
PR No. Date Start End Mode
PR03 01/02 13:30 14:30 HQ()
--- --/--- --:-- --:--
nstructions
Enter-Edit Setup-Exit Move ▲▼
Timer Recording using ShowView system
Thanks to this programming system, you no longer need to tediously enter the date, programme number, start and end time. All the information needed by the DVD recorder for programming is contained in the ShowView programming number. This ShowView number is found in most TV listings.
1 Insert recordable media such as DVD+R, DVD+RW, recordable VHS tape.
2 Press [TIMER].
The 'Select Record Method' menu appears.
3 Select 'ShowView' with [ / ] and confirm with [ENTER].
Enter the entire 'ShowView' number. This number is up to 9 digits long and can be found next to the start time of the TV programme in your TV listings magazine.
The 'GCode' menu appears.
e.g.: 5-234-89 or 5 234 89
Enter 523489 for the 'ShowView' number.
If you make a mistake, you can clear it with [CLEAR].
4 Press [ENTER] to confirm.
5 The decoded information appears after confirmation. You can go back at any time to change the information by pressing [ENTER]. Select the appropriate input field using [ ] . If required, change the information using [ ] . If all the information is correct, press the [ENTER] button. The programming information is stored in a TIMER block.
6 Press [SETUP] to exit the Timer Record List.
7 Timer indicator will light or blinking. Power Off the DVD Recorder+VCR to start the Timer Recording.
Select Record Method
Please choose your preferred method for scheduling a recording. Manual edit timer ShowView
Instructions Enter-Confirm Setup-Exit Move
GCode
Please enter your GCode Code.
Instructions Enter-Edit Setup-Exit Move
Timer Recording PR No. Date Start End Mode PRO3 01/02 13:30 14:30 HQ
Instructions Enter-Edit Setup-Exit Move
Edit Timer
Media
PR No. PR-03
Date Jan/02 Sun
Start 13:30
End 14:30
Mode HQ
Repeat Once
Delete
Instructions
Enter-Save Setup-Exit

As ShowView is optional function, some models may not be available. If there's no ShowView Column on "Menu" window, ShowView is not available.
Canceling a Timer Recording
You can clear a Timer Recording any time before the recording actually starts.
- Use [ ] to select the program you want to erase on the Timer Recorder List, then press [ENTER] to modify it. Use [ ] to select 'Delete' then press [ENTER].
Stopping a Timer Recording in Progress
After a Timer Recording has started, you can still cancel the program by pressing and holding [STOP] for 3 seconds.
Timer Recording Troubleshooting
Even if a Timer Recording is set, the DVD Recorder ^+ VCR will not record if:
- No disc is loaded.
- A non-recordable disc is loaded.
- DISC Lock is set to ON in the DISC Settings menu; see page 50.
- There are already 49 titles recorded on the disc.
You cannot enter a Timer Recording if:
- A recording is already under way.
The start time has already passed.
Eight Timer Recordings have already been set.
If two or more Timer Recordings overlap:
- The earlier program takes priority.
- When the earlier program finishes, the later program starts.
- If two programs are set to start at exactly the same time, the program entered first takes priority.
Confirmation is not possible when:
- The DISC Protect setting is set to ON.
- There are already 49 titles recorded on the disc.
If the disc is damaged, the recording may not complete successfully, even if the Check field shows 'Rec. OK'.

Recording Priority
- Timer Recording and OTR (One Touch Record) have the same priority but they have lower priority than manual recording. During manual recording, Timer Recording or OTR will be ignored.
Recording from External Components
You can record from an external component, such as a camcorder or VCR, connected to any of the DVD Recorder+VCR's external inputs.
1 Make sure the component you want to record from is connected properly to the DVD Recorder+VCR; see pages 15~18.
2 Use [PR + / - ] or [INPUT] to select the external input to record from.
3 Load a recordable disc or tape.
4 Set the desired Recording mode by pressing [REC SPEED] repeatedly.
DVD: HQ (High Quality - 1 hr/disc), SP (Standard Play - 2 hrs/disc), EP (Extended Play - 4 hrs/disc), or SLP (Super Long Play - 6 hrs/disc).
VCR: SP (Standard Play), LP (Long Play - 2 times SP)
5 Press [REC (●)] once.
Recording will start. The REC indicator lights on the front panel display.
Recording continues until you press [STOP] or the disc is full.
To record for a fixed length of time, see 'One Touch Record' on page 42.
6 Press [STOP (■)] to stop recording.

Note
- If your source is copy-protected, you will not be able to record it using the DVD Recorder+VCR. See 'Copyright Notice' on page 8 for more details.
Recording from a Digital Camcorder
DF-8100/8150 only
You can record from a digital camcorder connected to the DV IN jack on the front panel of the DVD Recorder+VCR.
You can use the DVD Recorder+VCR remote to control both the camcorder and the DVD Recorder+VCR. Before recording, make sure the digital camcorder is properly connected to the front panel DV IN jack; see page 18.

The source signal must be DVC SD format.
Some camcorders cannot be controlled using the DVD Recorder+VCR remote.
If you connect a second DVD recorder using a DV cable, you cannot control the second recorder from this one.
You cannot control the DVD Recorder+VCR remotely from a component connected to the DV IN jack.
You cannot record date and time information from a DV cassette.
1 Make sure your digital camcorder is connected to the front panel DV IN jack; see page 18.
2 Press [INPUT] repeatedly to select the DV input.
DV appears on the front panel display and the TV screen.
3 Find the place on the camcorder tape from which you want to start recording.
For best results, pause playback at the point you want to start recording. Depending on your camcorder, you can use the DVD Recorder+VCR remote to control the camcorder using the STOP, PLAY, and PAUSE functions.
4 Press [REC] once to start recording.
Recording is automatically stopped if the DVD Recorder+VCR detects no signal. You can pause or stop the recording by pressing [PLAY/PAUSE] or [STOP]. You cannot control the camcorder from the remote control during recording.
What is DV?
Using DV, also known as i.LINK, you can connect a DV-equipped camcorder to the DVD Recorder+VCR using a single DV cable for input and output of audio, video, data and control signals.
The i.LINK interface is also known as IEEE 1394-1995.
'i.LINK' and the 'i.LINK' logo are trademarks.
- The DVD Recorder+VCR is only compatible with DV-format (DVC-SD) camcorders. Digital satellite tuners and Digital VHS video recorders are not compatible.
- You cannot connect more than one DV camcorder at a time to the DVD Recorder+VCR.
- You cannot control the DVD Recorder+VCR from external equipment connected via the DV IN jack (including two DVD Recorders).
- It may not always be possible to control the connected camcorder via the DV IN jack.
- Audio input to the DV IN jack should be 32 or 48kHz (not 44.1kHz ).
- Picture disturbance on the recording may occur if the source component pauses playback or plays an unrecorded section of tape, or if the power fails in the source component, or if the DV cable becomes disconnected.
DISC Initialize
- If you load a blank DVD+R(+RW) disc, it will be initialized (formatted to enable recording).
- Do not start recording until disc initialization is complete.
- If you load a DVD+RW that has already been used you can record a program immediately.
Disc Menu
For recordable DVD media, such as DVD+R and DVD+RW discs, you can manage the disc using the Disc Menu. The DVD+R Disc Menu allows you to rename your disc or finalize it so it will be compatible with most other DVD players.
The DVD+RW Disc Menu allows you to erase, lock, or unlock your disc. You can also make it compatible with most other DVD players.
Information / Erase the disc (DVD+RW)
1 Press [MENU] to go to Disc Menu mode.
2 In Disc Menu mode, press [▲] to move to the top menu.
3 Press [▶] to display the Disc Menu.
4 The Disc Menu shows you disc information, such as disc type, number of recordings, total titles, free space, etc.
5 Use [ / ] to select the Disc Erase menu.
6 If you want to erase the whole disc, press [ENTER].
7 To confirm, select 'Yes'. To cancel, select 'No'. If you select 'Yes' and press [ENTER], all the contents of the disc will be lost.
Type DVD · RW Recordings 5 Total Title 00:57:57 Free Space 01:48:48 Finalized
Locked No Compatible Yes
Instructions Setup-Exit

DVD+R discs cannot be locked (unlocked) or erased.
- The 'Disc Menu' will not be available for recordable media created in order machine. In order to be able to access 'Disc Menu', the disc must be erased and created in this recorder. To erase the disc, press [REC] and select 'YES' in 'Make Compatible' menu.

Information

Erase the disc
Press [Enter] if you want to erase the disc. All existing recordings will be cleared.
Instructions Enter-Confirm
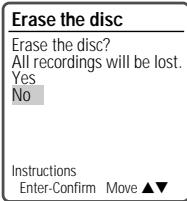
Lock/Unlock Disc (DVD+RW)
If you want to protect a disc from accidental recording, editing, or erasing, you can lock the disc. Later, if you change your mind, you can unlock the disc.
1 Use [▲] to go to the top menu.
2 Press [▶] to display the Disc Information Menu.
3 Use [▶] to select 'Lock/Unlock Disc'.
4 Press [ENTER] as shown on the screen.
5 You can see the current disc status (Locked or Unlocked).
6 You can change the disc status by selecting 'Yes' and pressing [ENTER].
7 The 'Changing Disc Status' bar will appear. This process takes a few seconds.
8 After the process is finished the menu disappears automatically.
Instructions Enter-Confirm

Lock/Unlock Disc
Press [Enter] to lock the disc. This prevents future disc operations or recordings.
Lock/Unlock Disc
Disc is unlocked.
Do you want to lock it?
Yes
No
Instructions Enter-Confirm Move ▲
Lock/Unlock Disc
Changing disc lock status.
Please wait a moment...
Finalize (Make Compatible)
Finalizing a DVD+R 'locks' its recordings in place so the disc can be played on most standard DVD players or computers equipped with DVD-ROM drives.
'Make Compatible' for a DVD+RW will automatically create a menu screen for navigating the disc. This menu screen is accessible by pressing [MENU] or [TITLE].

- Once you have finalized a DVD+R disc, you cannot edit or record anything else on that disc.
DVD +R disc

DVD+RW disc
Finalise
Press [Enter] if you want to finalise the disc.

Make Compatible
Press [Enter] to make any previous title editing compatible with your DVD player.
Instructions Enter-Confirm
Instructions Enter-Confirm
1 Use [▲] to go to the top menu.
2 Press [▶] to display the Disc Information Menu.
3 Press [▶] and select 'Finalize' for a DVD+R, or 'Make Compatible' for DVD+RW.
4 Press [ENTER] as shown on the screen.
5 Select 'Yes' using [] and press [ENTER] to finalize the disc (or make the disc compatible if it is a DVD+RW).
6 Press [ENTER] again.
7 Press [SETUP] to go to the top disc menu.
Finalise
No changes can be made afterwards. Continue?
Yes No
Instructions
Enter-Confirm Move
Make Compatible
Make disc compatible with your DVD player.
Yes No
Instructions
Enter-Confirm Move

- 'Finalize (Make Compatible)' can take up to 3-4 minutes depending on the type of disc, how much is recorded on the disc, and the number of titles on the disc.
- If you do not make your DVD+RW disc compatible, your edits will not be recognized by other DVD players.
- It may take over 7 minutes for finalizing the edited disk, you'd better wait till the set finish the finalizing operation.
Make Compatible
Finished.
This Disc should already be compatible.
ok.
Instructions Enter-Confirm Move ▲
Change Disc Name
You can rename your disc to any name you choose. The default disc name is 'MY DVD'.
1 Use [▲] to go to the top menu.
2 Press [▶] to display the Disc Information Menu.
3 Press [▶] and select 'Change Disc Name'.
4 Press [ENTER] as shown on the screen.
5 The Keyboard Menu appears.
6 Use [ ] to select and press [ENTER] to enter the name of the disc.
CLR: Clear the disc name
SP : Space
DEL : Delete a character
SAVE: Save the disc name
7 Press [ENTER] again.
8 To save the name of the disc, select 'SAVE' and press [ENTER].

- If 'Lock Disc' is set to 'On' in the DISC Settings menu, you cannot rename your disc; see page 50.

Change Disc Name
Press [Enter] to change the disc name.
Instructions Enter-Confir
Change Disc Name
MY DVD CLR SP DEL SAVE 1234567890 ABCDDEFGHHIJ KLMNOPQRST UVWXYZ(). :&;
Enter-Confirm Move
Change Disc Name
Problem. This disc is locked. It cannot be renamed. ok
Instructions Enter-Confirm Move ▲
Title Menu
You can manage the titles on your DVD+R/RW discs using the Title menu.
Play a Title
To play a title:
1 Press [MENU] to display the disc menu.
2 Select the desired title you want to manage using [ ]
3 Press [▶] to display the title menu.
4 Select 'Play Title' using [▲▶]
5 Press [ENTER] to play the title.
Erase a Title
1 Follow steps 1 to 3 under 'Play Title'.
2 Select 'Erase Title' using [▲▶].
3 Press [ENTER] to erase the title.
4 Select 'Yes' and press [ENTER] to confirm.
5 The Erase Title progress bar will be displayed. This may takes several seconds.
6 After erasing is complete, the erased title remains as an empty title.

- You can erase titles on DVD+RW discs only.


Play Title
Press [Enter] to begin playback of title.
Instructions
Enter-Confirm

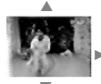


Erase Title
Press [Enter] to erase this title.
Instructions Enter-Confirm

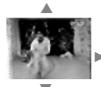


Erase Title
Would you like to Erase the title?
Yes No


Erase Title
Title is being erased

Please wait a moment...


Change Name
To change the name of a title:
1 Follow steps 1 to 3 under 'Play Title'.
2 Select 'Change Name' using [▲▶].
3 Press [ENTER] to change the title name.
4 The Keyboard Menu will be displayed. Use [▲▶▲▼] to select a character or function and press [ENTER].
CLR : Clear the whole title.
SP:Add a space
DEL : Delete a character
SAVE: Save the title name
5 After the new title name is complete, select 'SAVE' and press [ENTER].
Record Option
To set DVD+R and DVD+RW recording options:
1 Follow steps 1 to 3 under 'Play Title'.
2 Select 'Record Options' using [ ] and press [ENTER].
3 Select your preferred record options for each disc type (DVD+R and DVD+RW):
For DVD+R
The last recorded title : Allows you to append your new recording to the end of your last recording, or record it as a new title.
Others : Allows you to record your new title until the end of the disc.
For DVD+RW
The last blank title : Allows you to record your new title until the end of the disc.
The last recorded title : Allows you to record over your last recorded title and then stop.
Allows you to record over your last recorded title and continue recording until the end of the disc.
Allows you to append your new recording to the end of your last recording. (option) Others : Allows you to record over the title and then stop. Allows you to record over the title and continue recording until the end of the disc.


Change Name
Press [Enter] to change the title name.
Instructions Enter-Confirm

Change Name
TITLE CLR SP DEL SAVE 1234567890 A B C D E F G H I J K L M N O P Q R S T U V W X Y Z ( ) . . . & &
Enter-Confirm Move ▲▼


Record Options
Press [Enter] to select a method for overwriting this title.
Instructions Enter-Confirm

Record Options
You can choose Overwrite then stop Overwrite and continue (Append to existing)
Instructions Enter-Confirm Move ▲

- As overwriting function may take several minutes to finish and save recording, we recommend to delete title and record function.
Editing
When you insert a DVD+R or DVD+RW disc already recorded by your DVD Recorder+VCR, you can edit the titles and chapters in a variety of ways.
To edit a recorded title, select the title on the disc menu and press [EDIT].
The selected title will begin playing automatically.

- After editing is complete, a DVD+RW disc will not be compatible with other DVD players until you make the disc compatible; see page 51.
Titles and Chapters
When you insert a DVD+R or DVD+RW disc already recorded by your DVD Recorder+VCR, all titles recorded on the disc appear on your screen. If a selected title has chapters, you can skip to the next or previous chapter by pressing [NEXT] or [PREV].
You can also see how many chapters are in a title by pressing [DISPLAY] during playback.
Title
To select a specific title:
1 Use [▲▼] to select 'Title'.
2 Press [ENTER] to display the submenu.
3 Use [ ] to select the desired title number and then press [ENTER].
Chapter
To select a specific chapter:
1 Use [ ] to select 'Chapter'.
2 Press [ENTER] to display the submenu.
3 Use [ ] to select the desired chapter number and then press [ENTER].
Edit Chapters
You can add a chapter marker anywhere in a title during playback.
Once the chapter is marked, you can use the chapter search feature as described above.
You can add/delete chapter markers or delete all chapter markers in a title.
1 Use [ ] to select 'Edit Chapters'.
2 Press [ENTER] to display the submenu.
3 Use [ ] to select one of the various chapter marker functions (Add, Delete, or Delete All).
4 Press [ENTER] to confirm.
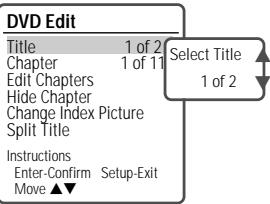
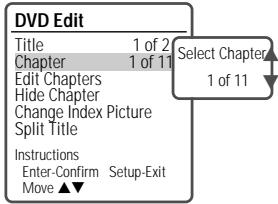
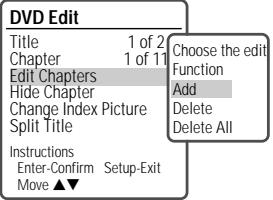
Hide Chapters
This feature allows you to hide or unhide a chapter. After hiding a chapter, the chapter is not deleted but only hidden. If a chapter is hidden then it shows 'Unhide Chapter' and vice versa.
| DVD Edit | |
| Title | 1 of 2 |
| Chapter | 1 of 11 |
| Edit Chapters | |
| Hide Chapter | |
| Change Index Picture | |
| Split Title | |
| Instructions | |
| Enter-Confirm | Setup-Exit |
| Move▲▼ | |
Change Index Picture
Each title displayed in the Playlist menu is represented by a thumbnail picture taken from the start of that title or chapter. If you prefer, you can select a different still picture from within the title.
1 Use [ ] to select 'Change Index Picture'.
2 Press [ENTER] to display the submenu.
3 Use [ ] to select 'Yes' if you prefer to change the picture.
4 Press [ENTER] when the preferred picture is on your TV screen.
Split Title
This feature allows you to split a title into two titles.
1 Use [ ] to select 'Split Title'.
2 Press [ENTER] to display the submenu.
3 Use [ ] to select 'Yes' if you prefer to split the title.
4 Press [ENTER] to confirm. It may take a few minutes to split the title.

- Split Title may take several minutes.
| DVD Edit | |
| Title | 1 of 2 |
| Chapter | 1 of 11 |
| Edit Chapters | |
| Hide Chapter | |
| Change Index Picture | |
| Split Title | |
| Instructions | |
| Enter-Confirm | Setup-Exit |
| Move▲▼ | |
| DVD Edit | |
| Title | 1 of 2 |
| Chapter | 1 of 11 |
| Edit Chapters | |
| Hide Chapter | |
| Change Index Picture | |
| Split Title | Split the title in two? |
| Yes | |
| Instructions | No |
| Enter-Confirm | Setup-Exit |
| Move▲▼ | |
| Split Title |
| Splitting title into 2 titles. |
| Please wait a moment.... |
| Instructions |
| Setup-Exit |
Check the following guide for the possible cause of a problem before contacting customer support.
| Symptom | Cause | Solution |
| No power. | The power cord is disconnected. | Plug the power cord into the wall outlet securely. |
| No picture. | The TV is not set to receive DVD Recorder+VCR signal output. | Select the appropriate video input on the TV so the picture from the DVD Recorder+VCR appears on the TV screen. Connect the video cable securely. |
| The video cable is not connected securely. | ||
| The TV power is turned off. | Turn on the TV. | |
| No sound. | The equipment connected with the audio cable is not set to receive DVD Recorder+VCR signal output. | Select the correct input mode on the audio receiver so you can listen to the sound from the DVD Recorder+VCR. |
| The audio cables are not connected securely. | Connect the audio cables securely. | |
| The power on the equipment connected with the audio cable is turned off. | Turn on the equipment connected with the audio cable. | |
| The audio cables are damaged. | Replace with new ones. | |
| Playback picture is poor. | The disc is dirty. | Clean the disc. |
| Tape heads are dirty. | Clean the video heads. | |
| Tape is a rental or was recorded on another VCR. | Use [Tracking +/-] for manual tracking adjustment while a tape is playing. | |
| DVD Recorder+VCR does not start playback. | No disc is inserted. No tape is inserted. | Insert a disc or tape. (Check that the disc indicator on the front panel display is lit.) |
| An unplayable disc is inserted. | Insert a playable disc. (Check the disc type, color system, and regional code.) | |
| The disc is placed upside down. | Place the disc with the playback side down. | |
| The disc is not placed within the guide. | Place the disc on the disc tray correctly inside the guide. | |
| The disc is dirty. | Clean the disc. | |
| The Parental Control level is set. | Cancel the Parental Control function or change the rating level. | |
| Picture from external input is distorted. | The video signal from the external component is copy-protected. | You cannot connect via the DVD Recorder+VCR. Connect the component directly to your TV. |
| Some channels are skipped over when using [PR+/-]. | The skipped channels were deleted with the 'Adjust Channels' feature. | Use the 'Adjust Channels' feature to restore channels. |
| Picture or sound of broadcasting channel is weak or missing. | Antenna or cables are loose. | Tighten connections or replace cable. |
| Wrong Tuning Band is selected in the DVD Recorder+VCR Setup menu. | Try all 'Auto Set' options; see page 23 for details. | |
| Camcorder image not shown. | Camcorder is off. | Turn camcorder on and operate properly. |
| Camcorder image via A/V input to DVD Recorder+ VCR is not shown on TV screen. | DVD Recorder+VCR's source is not set to AV, AVF, or DV. (DV: DF-8100/8150 only) | Use [INPUT] to select AV input channel (AV, AVF, or DV). |
| Can't play disc recorded on this DVD | The disc was not finalized (or not made compatible if using a DVD+RW). | Finalize the disc; see page 50. |
| Recorder+VCR on another DVD player. | Some players will not play even a finalized disc. | No solution. |
| Discs recorded with copy-oncematerial cannot be played on otherplayers. | No solution. | |
| Cannot record or did notrecord successfully. | The remaining blank space on thedisc is insufficient.The source you are trying to record iscopy-protected.When setting the recording channel,the channel is tuned on your TV'stuner. | Use another disc.You cannot record the source SELECT the channel on the DVDRecorder+VCR's built-in TV tuner. |
| Timer Recording notpossible. | Clock in DVD Recorder+VCR is not setto correct time.Timer has been programmedincorrectly.TIMER indicator light does not appearafter programming timer. | Set clock to correct time. See ‘Set Clock'on page 23.Reprogram Timer. See ‘Timer Recording'on page 45.Reprogram Timer. |
| Stereo Audio Recordand/or Playback notpresent. | TV is not Stereo-compatible.Broadcast program is not in stereoformat.DVD Recorder+VCR A/V Out jacks arenot connected to TV A/V In jacks.DVD Recorder+VCR Audio/Video Out isnot selected for viewing at the TV.DVD Recorder+VCR's TV audiochannel is set to BIL or MONO.The remote control is not pointed atthe remote sensor of the DVDRegger+VCR. | No solution.No solution.Make A/V connections. Stereo is availableonly via A/V output from DVDRegger+VCR.Select AUX or A/V source as TV input.Set TV audio channel mode to Stereo.See‘Changing the TV Audio Channel' onpage 33.Point the remote control at the remotesensor of the DVDRegger+VCR. |
| Remote control does notwork properly. | The remote control is too far from theDVDRegger+VCR.There is an obstacle in the path of themeretrol control and the DVDRegger+VCR.The batteries in the remote control aredead. | Operate the remote control within 23 ft(7m).Remove the obstacle.Replace the batteries. |

DVD RESET : If the set is in malfunction, press [DVD/VCR] key on the front panel for 4 seconds. As this set is Digital Multimedia Product, malfunction may occurs.
Moisture Condensation
| Moisture condensation can occur: | In locations where moisture condensation may occur: |
| When the DVD Recorder+VCR is moved from a cold place to a warm place. | Keep the DVD Recorder+VCR plugged into an AC power outlet with the power on. This will help prevent condensation. |
| Under extremely humid conditions. | When condensation has occurred, wait a few hours for the DVD Recorder+VCR to dry before using it. |
Technical Specifications
General
Power requirements
Power consumption
Dimensions, Mass (approx.)
Operating temperature
Operating humidity
Signal system
200-240V\~,50/60Hz
32W
16.9 x 3.54 x 14.0 inches (430 x 91 x 354 mm) (w x h x d), 13.5 lbs (6.18 kg)
41^ to 95^ (5°C to 35°C)
5% to 90%
PAL Colour
Recording
Recording formats
Recordable discs
Recordable time
DVD Video Recording, DVD-VIDEO
DVD+R, DVD+RW
[DVD] Approx. 1 hour (HQ mode), 2 hours (SP mode), 4 hours (EP mode), 6 hours (SLP mode)
[VCR] SP: 3 hours (E-180), LP: 6 hours (E-180)
Video recording format
Sampling frequency
Compression format
Audio recording format
Sampling frequency
Compression format
27MHz
MPEG2
48kHz
MPEG1 Layer2
VCR Specifications
Head system
Timer
Tape speed
Tape width
ewind time
Antenna
Channel coverage
Frequency range
Video S/N
Audio S/N
Resolution
4 Head Video, 2 Head Hi-Fi helical scan azimuth system
24-hour display type
SP: 23.39 mm/sec, LP: 11.70 mm/sec
12.7 mm
less than 150 seconds (E-180)
75 ohms (VHF/UHF)
VHF: 00-14 / UHF: 27-69 / CATV: 1-41
20Hz to 20kHz
Over 43 dB (Standard recording)
Over 65 dB (Hi-Fi), Over 40 dB (Mono)
Over 240 lines (Standard recording)
DVD Specifica
Laser system
Frequency response
Video S/N, Audio S/N
Harmonic distortion
Dynamic range
Resolution
Semiconductor laser, wavelength 650 nm
DVD (PCM 48 kHz): 8 Hz to 22 KHz, CD: 8 Hz to 20 kHz
More than 60 dB, More than 90 dB
Less than 0.04%
More than 90 dB
Over 500 lines (HQ Recording)
Inputs
Antenna In/Out
Video In
Audio In
DV In
U/V-mixed: 75 Ω unbalanced
1.0 Vp-p, unbalanced
-8.8 dBm
4 pin (i.LINK/IEEE 1394 standard)
DF-8100/8150 only
Outputs
Video output (DVD/VCR)
Video output (DVD)
Audio output (DVD/VCR)
Audio output (DVD)
S-Video output (Y)
Video output terminal, 1.0 Vp-p, unbalanced, RCA jack
Component output (75Ω in load, R: 0.7Vp-p, G: 0.7Vp-p, B: 0.7Vp-p)
Audio output terminal (2 kinds), -5.8dBm (VCR), 2Vrms (DVD)
Analog audio output : 2.0Vrms , Digital audio output : coaxial
1.0Vp-p, 75Ω unbalanced, Mini DIN 4-pin x 1, C: 0.286Vp-p, 75Ω
Design and specifications are subject to change without notice.
Accessories
RF cable 1
Remote control 1
RCA cable 1
Batteries 2
Blank DVD+RW disc 1
Manufactured under license from Dolby Laboratories. 'Dolby', 'Pro Logic' and the double-D symbol are trademarks of Dolby Laboratories.
DTS and DTS Digital Out are registered trademarks of Digital Theater Systems, Inc.