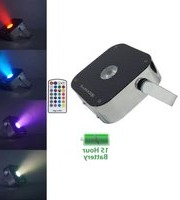
MINI RF1 - Éclairage Rockville - Notice d'utilisation et mode d'emploi gratuit
Retrouvez gratuitement la notice de l'appareil MINI RF1 Rockville au format PDF.


| Type de produit | Lampe LED portable |
| Marque | Rockville |
| Modèle | MINI RF1 |
| Dimensions (L x l x H) | 10 x 5 x 5 cm |
| Poids | 100 g |
| Alimentation | Batterie rechargeable USB (câble inclus) |
| Capacité de la batterie | 500 mAh |
| Autonomie | Jusqu'à 6 heures |
| Température de couleur | 3000K (blanc chaud) - 6500K (blanc froid) |
| Flux lumineux | 200 lumens |
| Angle d'éclairage | 120° |
| Fonctions principales | Allumage/extinction, variation d'intensité, modes couleur |
| Commande | Bouton tactile unique |
| Matériau | Aluminium et plastique ABS |
| Indice de protection | IP20 (usage intérieur uniquement) |
| Accessoires inclus | Câble USB, support de fixation |
| Entretien et nettoyage | Essuyer avec un chiffon doux et sec. Ne pas utiliser de produits abrasifs. |
| Sécurité | Ne pas exposer à l'eau ou à l'humidité. Débrancher avant nettoyage. |
| Pièces détachées et réparabilité | Aucune pièce remplaçable par l'utilisateur. En cas de panne, contacter le SAV. |
| Garantie | 2 ans |
FOIRE AUX QUESTIONS - MINI RF1 Rockville
Questions des utilisateurs sur MINI RF1 Rockville
0 question sur cet appareil. Repondez a celles que vous connaissez ou posez la votre.
Poser une nouvelle question sur cet appareil
Téléchargez la notice de votre Éclairage au format PDF gratuitement ! Retrouvez votre notice MINI RF1 - Rockville et reprennez votre appareil électronique en main. Sur cette page sont publiés tous les documents nécessaires à l'utilisation de votre appareil MINI RF1 de la marque Rockville.
MODE D'EMPLOI MINI RF1 Rockville
MINI RF1 Operating Instructions
Scan the QR code for full training video or to show everything you need to know about the product. Should you need assistance, please call our technical help line at 1-646-758-0144, 24 hour a day/7 days a week.
Functions
- Adjustable mounting bracket
- Mounting bracket adjustment knobs
- Mode LED indicator
- Mode button
- Power button
-
Power input port
-
Battery status LED indicator
Green: 75% - 100%
Yellow: 50% - 75%
Red: 25% - 50%
Flashing Red: 0% - 25% - Non-slip rubber feet

Settings
Press MODE to change between modes (see the chart below). The sequence is as follows: Red > Green > Blue > Yellow > Pink > Light Blue. To switch between master/slave mode, hold the MODE button for 1 second. The LED will begin to flash red, green, blue, or yellow indicating it is a master unit.
| Signal Light | Function | Description |
| Red | Color cycle | Automatically cycle through colors. |
| Green | Color fade | Automatically fades from one color to the next. |
| Blue | Strobe | Automatically strobes white. |
| Yellow | Sound control | Color changes to the beat. |
| Pink | Remote mode | Use the remote control to operate the unit. |
| Light Blue | Slave Mode/Wireless DMX | Syncs the unit to a master unit/wireless DMX receiver. Units will only look to pair with other units that are in master (flashing mode) or for a wireless DMX console. In this mode, they cannot be master units, only slave units. To sync with a console, press the wireless DMX channel button on the console until it is paired with the lights. All units in Light Blue mode will follow console commands |

ATTENTION: THE REMOTE CONTROL WILL ONLY WORK IN THE REMOTE MODE. PRESS THE MODE BUTTON UNTIL THE UNIT IS IN REMOTE MODE (PINK LED). PLEASE REFER TO THE SETTINGS SECTION ABOVE FOR MORE INFORMATION.
MASTER/SLAVE Mode: Hold the MODE button for 1 seconds to switch between master and slave mode within any of the functions. When a unit is in master mode, its signal is sent to all slave units. Please note, when you set a unit to master mode, the LED indicator will begin to flash. Make sure the slave units are set to "Slave Mode/Wireless DMX". Their indicator LEDs of the will show solid light blue color.
DMX Controller Functions
When using a DMX controller, use the charts below to reference each channel's function. Be sure to set the lights to Light Blue mode 10-Channel Mode
| Channel | Function | Value | Description |
| 1 | Master dimmer | 0 – 255 | Adjust overall brightness |
| 2 | Red | 0 – 255 | Adjust individual color brightness |
| 3 | Green | 0 – 255 | |
| 4 | Blue | 0 – 255 | |
| 5 | White | 0 – 255 | |
| 6 | Amber | 0 – 255 | |
| 7 | UV | 0 – 255 | |
| 8 | Strobe | 0 – 9 | Strobe off |
| 10 – 255 | Set strobe speed | ||
| 9 | Manual dimming (CH1 – CH8 valid) | 0 – 50 | Adjust function settings |
| Color cycle change | 51 – 100 | ||
| Color fade change | 101 – 150 | ||
| Color pulse change | 151 – 200 | ||
| Sound mode | 201 – 255 | ||
| 10 | Color speed | 000 – 255 | Adjust color change speed functions for CH9 |
©2022 ROCKVILLE // The information presented is subject to change and/or improvement without notice.
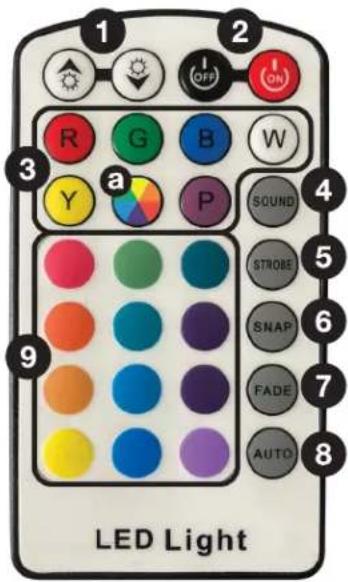
Remote Control Functions
-
⬆/∅ (+/-): Adjust speed, brightness, or sensitivity depending on the function the unit is set to.
-
ON/OFF: Turns the LEDs on or off. Please note, this button is strictly for the LEDs. The unit will remain on and continue to use battery power. To turn it off, use the power button on the unit (no. 5 on the functions diagram).
-
COLORS: Directly select red, green, blue, white, yellow, or purple/UV LED color. Use the ⚙/💡 buttons to adjust the bightness. Press the COLOR WHEEL button (a) then use the ⚙/💡 buttons to cycle through the 32 color presets.
-
SOUND: Sets the unit to sound control mode. Use the ⚙/💡 buttons to adjust the sensitivity of the internal microphone.
-
STROBE: Sets the unit to strobe mode. First select the desired color, then press the strobe button. Use the ⏻/♥ buttons to set the strobe speed.
-
SNAP: The unit will snap/pulse through colors. Use the ⚙/💡 buttons to set the snap/pulse speed.
-
FADE: The unit will fade from one color to next. Use the ⚙/💡 buttons to set the speed at which the unit will fade between colors.
-
AUTO: Cycles through 32 colors. Use the 🔊/💡 buttons to set the speed at which the unit will cycle through colors.
-
COLOR PAD: Use the color pad to directly select a variety of preset colors.
Marque : Rockville
Modèle : MINI RF1
Catégorie : Éclairage