
MD 80383 - Télécommande universelle MEDION - Notice d'utilisation et mode d'emploi gratuit
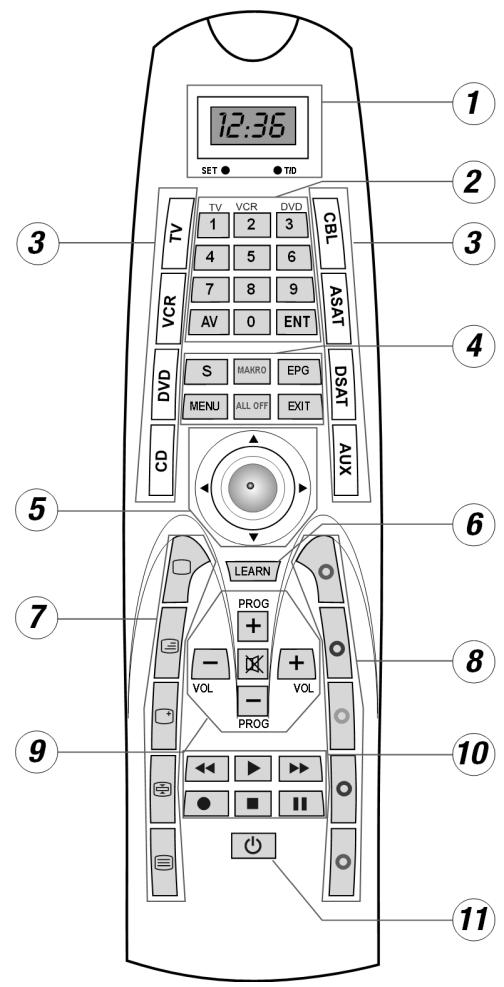
Retrouvez gratuitement la notice de l'appareil MD 80383 MEDION au format PDF.
| Type de produit | Télécommande universelle |
| Marque | MEDION |
| Modèle | MD 80383 |
| Alimentation | 2 piles micro LR03/AAA 1,5 V (non fournies) |
| Nombre d'appareils contrôlables | Jusqu'à 8 |
| Types d'appareils compatibles | TV, magnétoscope, lecteur/enregistreur DVD, lecteur CD, décodeur TV payante, récepteur satellite analogique/numérique, AUX |
| Portée infrarouge | Environ 10 mètres |
| Dimensions (L x l x h) | Environ 220 x 55 x 25 mm |
| Poids (avec piles) | Environ 150 g |
| Fonctions principales | Recherche de codes manuelle/automatique/par marque, identification de code, fonction d'apprentissage (jusqu'à 150 commandes), macros (3 macros de 10 commandes), fonction SHIFT, coupure générale (ALL OFF), fonctions universelles volume/muet, horloge avec date, rétroéclairage des touches sources |
| Sécurité | Ne pas exposer à l'humidité, ne pas tenter de réparer soi-même, remplacer les piles par des neuves de même type |
| Entretien et nettoyage | Nettoyer avec un chiffon doux et sec, ne pas utiliser de produits corrosifs ou agressifs |
| Pièces détachées et réparabilité | Non applicable (aucune pièce détachable, ne pas réparer soi-même) |
| Informations générales | Télécommande universelle MEDION MD 80383, notice disponible en français |
FOIRE AUX QUESTIONS - MD 80383 MEDION
Questions des utilisateurs sur MD 80383 MEDION
0 question sur cet appareil. Repondez a celles que vous connaissez ou posez la votre.
Poser une nouvelle question sur cet appareil
Téléchargez la notice de votre Télécommande universelle au format PDF gratuitement ! Retrouvez votre notice MD 80383 - MEDION et reprennez votre appareil électronique en main. Sur cette page sont publiés tous les documents nécessaires à l'utilisation de votre appareil MD 80383 de la marque MEDION.
MODE D'EMPLOI MD 80383 MEDION

Univ-FB_MD80383_AUS.fm Side 2 Dienstag, 24. Januar 2006 8:57 08
Contents
Overview 4
Safety instructions 7
Scope of application 7
Inserting batteries 8
Setting the date and time 8
Programming device codes 10
Entering the device code according to the Code List 10
Manual code search 11
Automatic search 12
Code searching by brand name 13
Code identification 14

Normal operation 15
Operating individual devices 15
Recording with the video recorder 15
Operating combined devices 16
Learn function 17
Notes on learn function 17
Programming the functions 18
SHIFT function 19
Deleting functions 19
Programming macros 20
Incorporating delays 21
Executing macros 21
Deleting macros 21
2


Univ-FB_MD80383_AUS.fm Side 4 Dienstag, 24. Januar 2006 8:57 08
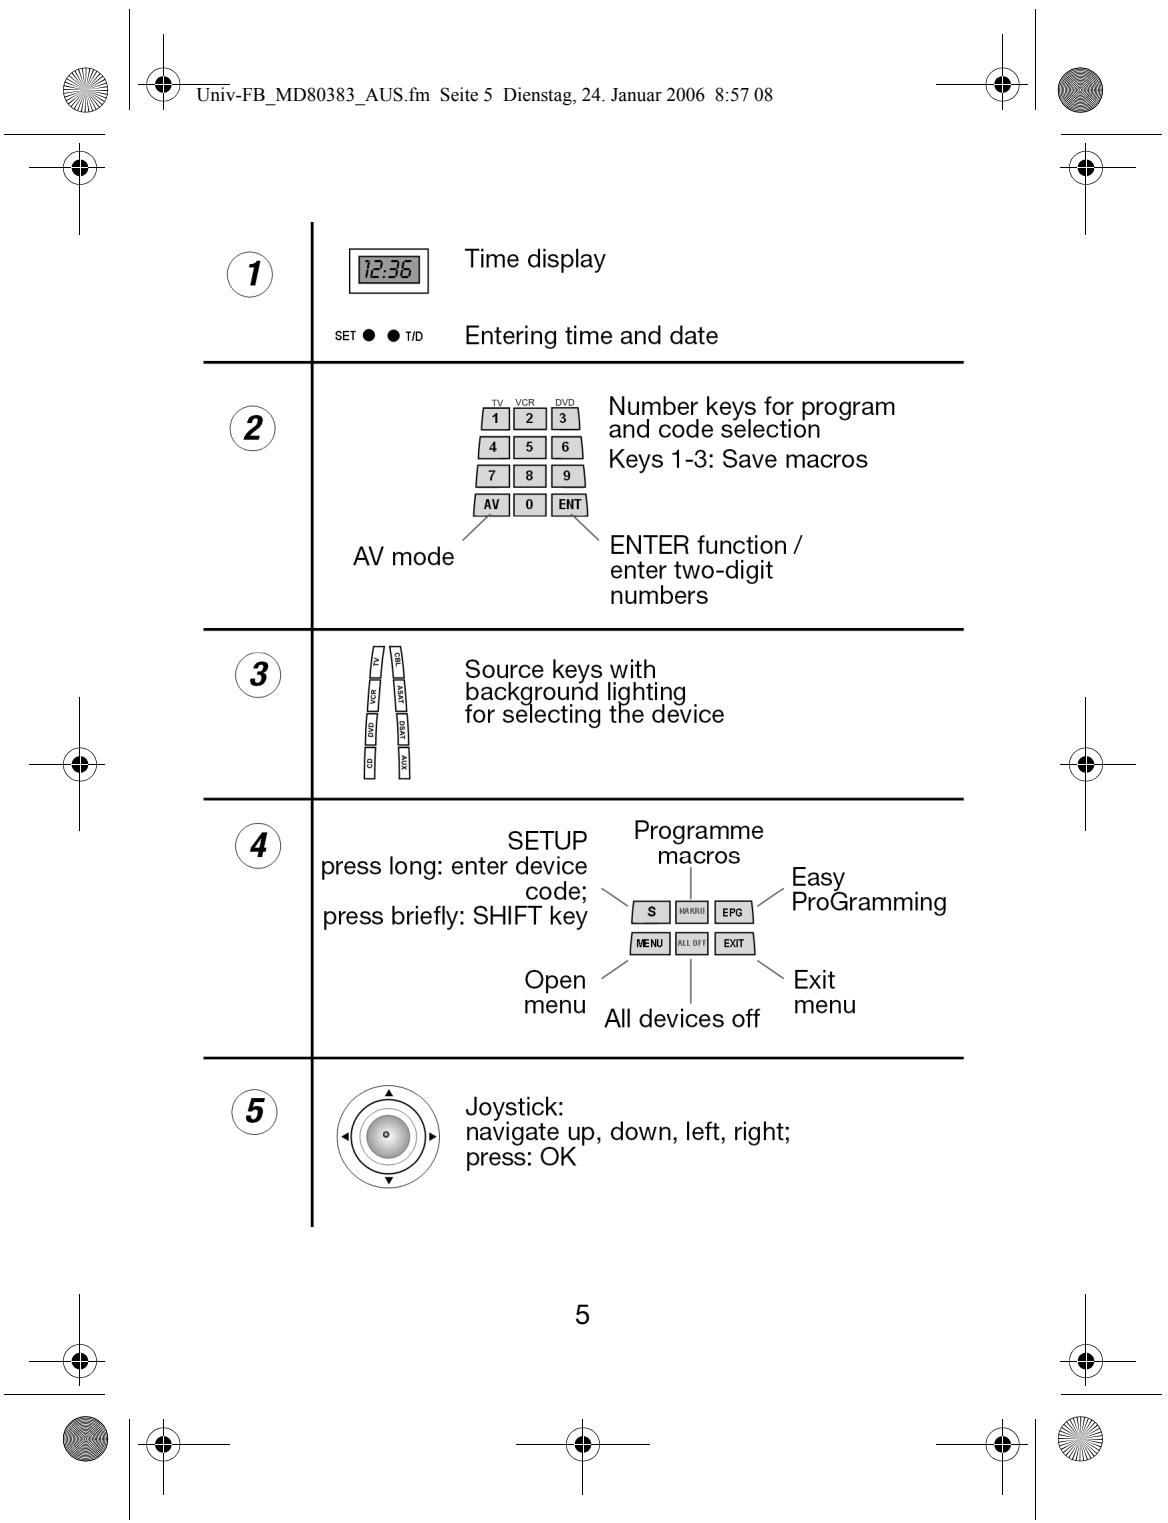
Overview
4


Safety instructions

Before using the remote control for the first time, please read these instruction carefully. Keep the instructions in a safe place for reviewing purposes or for passing them on to third parties.
The appliance is not intended for use by young children or infirm persons without supervision.
- Young children should be supervised to ensure that they do not play with the appliance.
Do not attempt to repair the remote control yourself.
The universal remote control has a class 1M infrared diode.
Do not examine the laser with optical instruments!
- Do not subject your remote control to dust, strong sunlight, moisture, high temperatures or strong vibrations.
- Never use old and new batteries together.
- Do not use any corrosive or aggressive cleaning products.
Scope of application
This universal remote control can replace up to eight normal remote controls and is able to operate the following device types:
TV Television set with video text, projector
VCR Video recorder
DVD DVD player and DVD recorder
CD CD player
CBL Pay TV decoder
ASAT Analogue satellite receiver
DSAT Digital satellite receiver
AUX for additional devices (amplifier, tuner, MD, etc.)
The names on the TV, VCR, etc. source keys are only for overview purposes. Of course, you may assign the keys to other device types ("Flex Mode").

7
Inserting batteries
2 micro batteries LR03 AAA are required. We recommend using alkaline batteries for longer durability.
- Remove the battery compartment cover by pushing the clip in the direction of the cover.
Insert both batteries into the compartment while observing the + / - polarity.
Replace the cover.
If the batteries have been inserted correctly, the time display 0:00 will appear in the display.
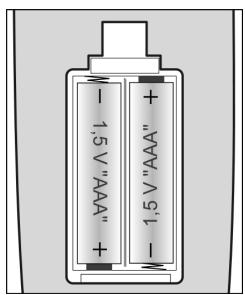
The programmed settings (codes, learn function and macros) will remain stored in the universal remote control when you remove the batteries. Date and time will be retained during battery change but the internal clock will not continue to run without the batteries and will need to be reset after the batteries have been inserted.
Setting the date and time
Set the date and time using both SET and T/D keys below the display. To do so, insert a sharp object, such as an unbent paperclip, into the depressions.
- Press SET twice. The number 12. will appear in the display.
- Continue pressing T/D, until the current month appears.
- Press SET to save the month and to call up the settings for the date.
- Continue pressing T/D, until the current date appears.
- Press SET to save the date and to call up the settings for the hours.

8


Time settings in 24 and 12 hour mode
An 'H' in the display indicates the 24-hour mode.
If you press the T/D key beyond "24", an 'A' will appear. You are now in the morning hours of the 12-hour mode.
If you press the T/D key beyond "12", a 'P' will appear. You are now in the afternoon hours of the 12-hour mode.
- Continue pressing T/D, until the current hour appears.
- Press SET once to save the hour and to call up the settings for the minutes.
- Continue pressing T/D, until the current minute appears.
- Press SET once more and the set time will be displayed.
- Press T/D to start the clock (the double dots will flash at one-second intervals).
Displaying the date and time
After completing the settings, the time will be displayed.
To display the date for a few seconds, briefly press the T/D key.
If you would like to see alternating date and time, press SET. To shut off this function, continue pressing T/D until the time is displayed.
Displaying the seconds
When the clock appears in the display, you can display the seconds by pressing T/D twice.
When the date appears in the display, you can display the seconds by pressing T/D once.
Using SET, you can set the seconds display to "0".
T/D takes you back to the time.


9


Programming device codes
For every device that you would like to operate using the universal remote control, you must program a three-digit device code to a source key (TV, VCR, DVD, CD, CBL, ASAT, DSAT, AUX). The names on the keys are only for reminder purposes. You can assign any key to any device ("Flex Mode").
For combined devices (e.g. TV set with video recorder, TV set with DVD player, DVD and video recorder) it is often necessary to assign two source keys with the respective code for each part of the device. However, there are also combined devices with only one code for both device parts (see also "Operating combined devices", page 16).
Entering the device code according to the Code List
The codes of the corresponding devices can be found in the Code List enclosed with these operating instructions. Proceed as follows:
- Switch the relevant device on manually.
- Keep the S (SETUP) key pressed down for approx. 3 seconds, the background lighting of the source key will flash for a short time and then remain permanently lit. (Briefly pressing the SETUP key will activate the SHIFT function.)
- Briefly press the desired source key (TV, VCR, DVD, CD, CBL, ASAT, DSAT, AUX) 2.
- Enter the three-digit code from the Code Table.

The background lighting will extinguish briefly each time the key is pressed.

10


If the entered code was valid, the light of the source key will extinguish after the last digit has been entered. If an invalid code was entered, the source key will flash for three seconds before extinguishing.
If the device does not respond as expected, repeat the programming, or try a different code. Please try all the codes specified for your brand. Select the code that causes all the available commands of your remote control to respond correctly!
If this is not successful either, then try using the search method described in the chapter "Automatic Search".
Manual code search
Carry out a manual search as follows:
- Switch the relevant device on manually.
- Keep the S (SETUP) key pressed down for approx. 3 seconds, the background lighting of the source key will flash for a short time and then remain permanently lit. (Briefly pressing the SETUP key will activate the SHIFT function.)
- Briefly press the desired source key (TV, VCR, DVD, CD, CBL, ASAT, DSAT, AUX).
- Keep pressing the (up to 350 times) l , PROG+ or PROG- or PLAY (VCR only) key until the device that is to be controlled switches off, changes channels, or responds accordingly. The code search begins at the currently stored three-digit number.
- Briefly press OK or ENTER to save the code.
Due to the considerable quantity of different code numbers, up to 350 different codes are pre-programmed per device type. In individual cases it may be possible that only the most common main functions are available. For some particular device models, the described method may not lead to success.
The code search for VCR's must be done while a tape is inserted and played back. Please note.


Automatic search
If your device does not respond to the remote control even though you have tried all of the codes listed for your device type and the relevant brand, then try using the automatic search. This will enable you to find codes for brands that were not listed in the device Code List.
- Switch the relevant device on manually.
- Keep the S (SETUP) key pressed down for approx. 3 seconds, the background lighting of the source key will flash for a short time and then remain permanently lit. (Briefly pressing the SETUP key will activate the SHIFT function.)
- Briefly press the desired source key (TV, VCR, DVD, CD, CBL, ASAT, DSAT, AUX).
- Point the remote control at the device and briefly press the PROG+ key once. If the device does not have a program function, then instead of pressing PROG+ press the PLAY key or 0 . The remote control will begin the code search after 6 seconds and will transmit all codes consecutively at one-second intervals (see also the next section). The source key will light up for each transmission.
- As soon as the device responds to the remote control, press OK with the joystick. - If you missed pressing OK on time, you can go back by steps to the code to which the device responded by using the PROG- key.
To cancel the search, press EXIT.
1 second or 3 second intervals
If you want the remote control to transmit a new code every 3 seconds instead of every second, proceed as follows:
Within 6 seconds of pressing the PROG+ key (or PLAY or ) as described in Point 4, press the PROG+ or PROG- key again. The remote control will now only transmit a new code every 3 seconds. This gives you more time, but the procedure will also take longer.


Code searching by brand name
This function offers you the option of searching by brand name. You can find the brand name in the Code Table under "Code Search by Brand Name". This is done as follows:
- Switch the relevant device on manually.
- Keep the S (SETUP) key pressed down for approx. 3 seconds, the background lighting of the source key will flash for a short time and then remain permanently lit. (Briefly pressing the SETUP key will activate the SHIFT function.)
- Briefly press the desired source key (TV, VCR, DVD, CD, CBL, ASAT, DSAT, AUX).
- Enter the one-digit code according to the following table:
Key 1 = Medion, Tchibo
Key 2 = Philips, Radiola, Philco, Erres, Pye
Key 3 = Sony, Akai, Panasonic, JVC, Sharp, Toshiba, Daewoo
Key 4 = Thomson, Brandt, Fergusson
Key 5 = Saba, Nordmende, Telefunken
Key 6 = Grundig, Blaupunkt
Key 0 = all brands.
- Continue pressing the PROG+ key (or for video recorders, or PLAY), until the device responds accordingly. Proceed quickly otherwise the automatic code search will start.
- Save the code by pressing OK with the joystick.
If all the codes have been searched, the source key will flash for approx. 3 seconds.


Code identification
Code identification gives you the opportunity to determine codes that have already been entered and stored in the remote control. Proceed as follows:
- Switch the relevant device on manually.
- Keep the S (SETUP) key pressed down for approx. 3 seconds, the background lighting of the source key will flash for a short time and then remain permanently lit. (Briefly pressing the SETUP key will activate the SHIFT function.)
- Briefly press the desired source key (TV, VCR, DVD, CD, CBL, ASAT, DSAT, AUX).
- Briefly press the SETUP button. The source key will briefly extinguish after the key has been pressed.
- To find the first number, press the number keys from 0 to 9. If the source key extinguishes briefly, then it is the first stored number.
- To determine the second number, press the number keys again from 0 to 9. Repeat the procedure for the third number.
- The source key will extinguish as soon as the button for the third number has been pressed.
Code identification has now been completed.

14

Normal operation
Operating individual devices
After you have finished programming your remote control for your audio/video devices, the remote control will work in the common main functions just like the original remote control of the respective device.
Point your remote control at the desired device and press the relevant source key. The key will light up briefly but will not remain lit.
Activate the functions by pressing the corresponding function key of your universal remote control. The source key will light up briefly each time the key is pressed.
Please note: In certain c
- In certain circumstances, not every function of your original remote control may be directly available on the universal remote control.
- Especially for newer devices, it might be possible that the functions are stored to different keys than expected or may not even be available at all.
In these cases you can use the learn function to transfer the functions of your original remote control to the desired keys of the universal remote control ("Learn function", page 17).
Recording with the video recorder
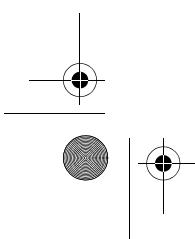
The RECORD key for recording to video recorder must be pressed twice. This acts as a protection from accidental recordings.

15


Operating combined devices
Several controlling options are available to combined devices.
Combined devices with two device codes
Some combined devices (e.g. TV set with video recorder) require two device codes - one for each device part. The combined device is then controlled like two separate devices.
Combined devices with one device code
Other combined devices only require one code. In this case, you must first select the device part you would like to operate.
Example: The device is a combined DVD recorder/video recorder.
The device code was stored on the DVD source key.
- Now activate the DVD part in the combined device by holding down the DVD source key for longer than one second.
To activate the video recorder in the combined device, first briefly press the S (SETUP) key, then the DVD source key.
If your combined unit only requires one code but you would like to operate it with two source keys, then proceed as follows:
Programme the device code to two source keys.
Operate one of the unit parts with one of the two source keys.
Use the learn function (see next chapter) to transfer the desired functions of the other unit part to the other source key.


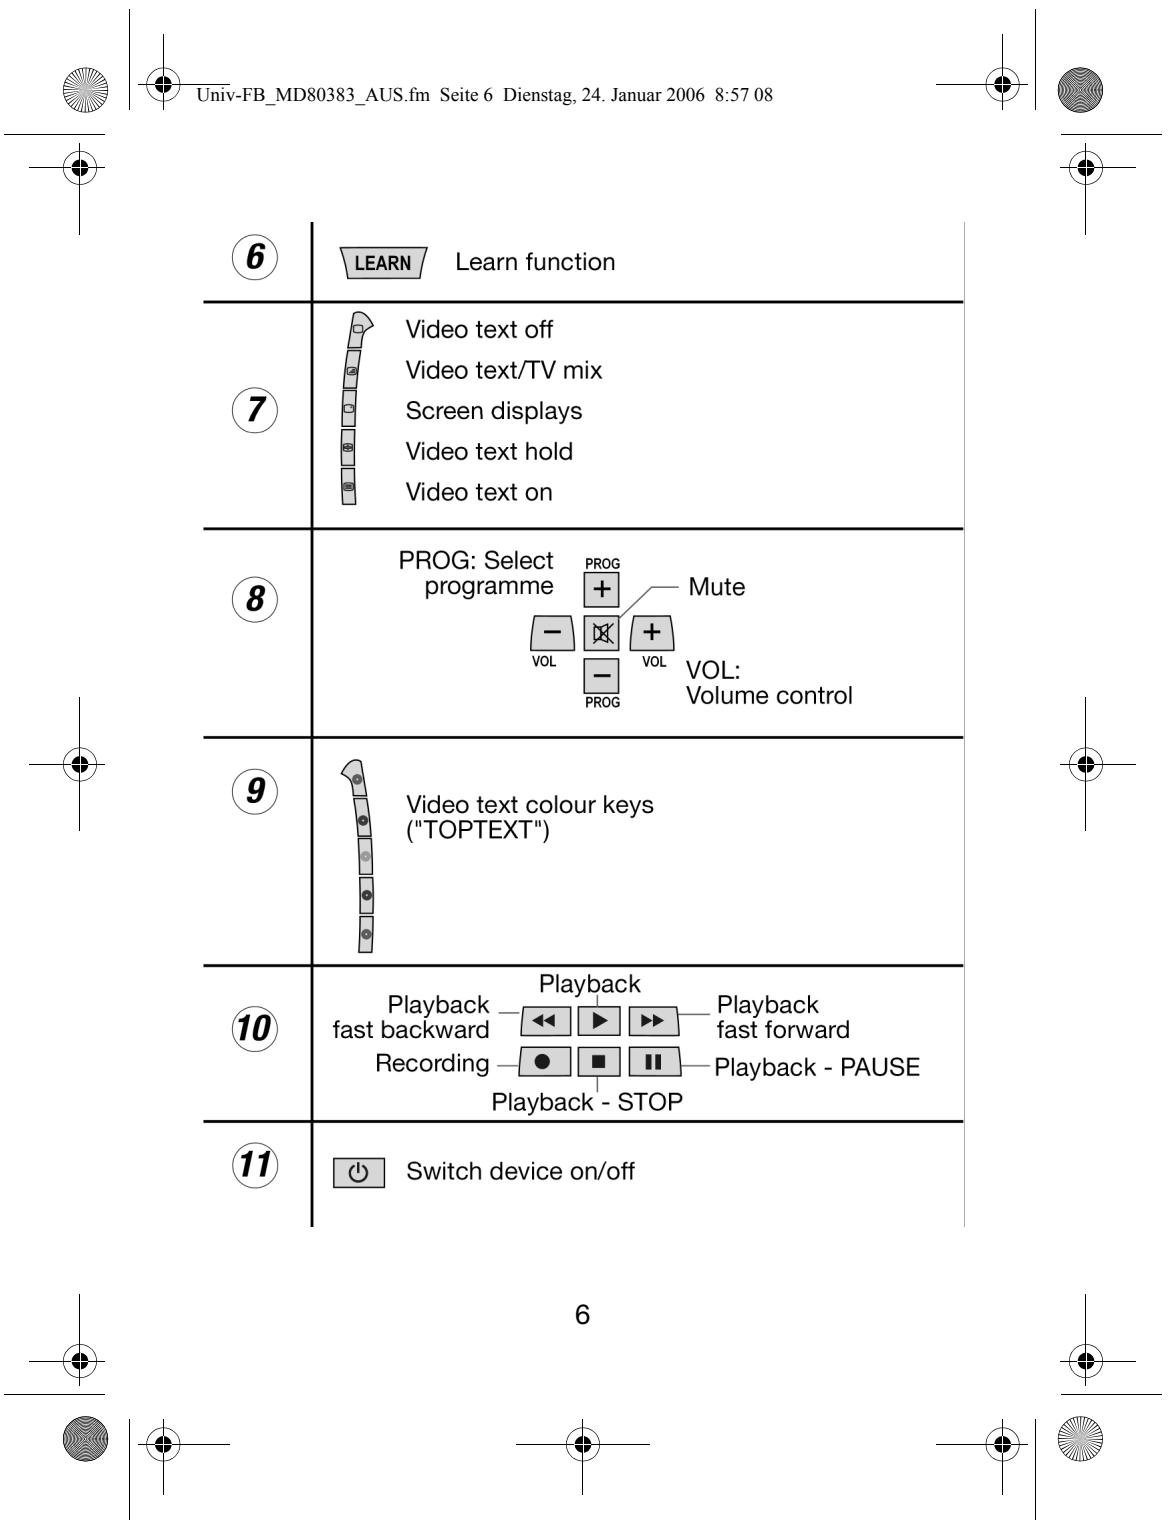
Learn function
You can manually save the functions of an original remote control to your universal remote control. The universal remote control can "learn" up to 150 commands.
Notes on learn function
Use new batteries for both remote controls.
One original remote control can be saved to every source key (8-in-1 function).
Once the memory is full, the background lighting of the source key will flash for 3 seconds.
□ Programming each key can take approx. 3 seconds.
□ If you are programming an additional function to an existing code, please take note which keys are still unassigned beforehand.
The following keys cannot be assigned to functions: LEARN, S (SETUP), ALL OFF, MACRO, EPG and all source keys.
Some original remote controls (for DVD, video recorder, SAT) can themselves be programmed with the device codes of some TV brands to carry out basic TV set functions (volume, mute, channel search).
Do not attempt to transfer the functions of an original remote control that has been programmed with the code of a different TV set to your universal remote control. This could cause programming errors.
- First try to program any type of command and then test it. Then delete all commands ("Deleting commands for all source keys", page 19) and begin with the actual programming.

Do not execute the learn function under a low-energy lamp. Such lamps (e.g. fluorescent lamps) can contain infrared light components that could influence the learn function.
17


Programming the functions
To programme, proceed as follows:
Place the remote controls with the infrared diodes facing each other spaced 15 to 50~mm apart on the table.

15 - 50 mm
- Keep the S (SETUP) key pressed down for approx. 3 seconds, the background lighting of the source key will flash for a short time and then remain permanently lit. (Briefly pressing the SETUP key will activate the SHIFT function.)
- Briefly press the desired source key (TV, VCR, DVD, CD, CBL, ASAT, DSAT, AUX) for this original remote control.
- Press the LEARN key.
- Now press the key on the universal remote control that is to be assigned to the relevant function (the source key is permanently lit).
- Now keep the key of your original remote control pressed down until the source key of the universal remote control extinguishes once (each faulty programming will be indicated by a flashing key).
- Repeat steps 4 and 5 until all of the desired functions have been saved.
- Stop the programming by pressing the SETUP key.

SHIFT function
Some of the keys of the universal remote control can have double assignations. To use these functions, briefly press the S (SETUP) key (the source key will light up) and then press one of the function or number keys.
If no other key is pressed for 15-20 seconds after the SETUP key was briefly pressed, the SHIFT function will not become active.
Deleting functions
Deleting commands for only one source key
- Keep the S (SETUP) key pressed down for approx. 3 seconds, the background lighting of the source key will flash for a short time and then remain permanently lit. (Briefly pressing the SETUP key will activate the SHIFT function.)
- Briefly press the desired source key (TV, VCR, DVD, CD, CBL, ASAT, DSAT, AUX).
- Press the LEARN key twice.
- Press the SETUP key.
All commands of the relevant source key have now been deleted.
Deleting commands for all source keys
To delete all commands altogether, proceed as follows:
- Keep the S (SETUP) key pressed down for approx. 3 seconds, the background lighting of the source key will flash for a short time and then remain permanently lit. (Briefly pressing the SETUP key will activate the SHIFT function.)
- Press the LEARN key twice.
- Press the SETUP key.
All codes that were programmed using the learn function have now been deleted.


Programming macros
Using a macro, you can save a chain of commands, meaning that several functions can be executed consecutively. You can program three macros and store them on the number keys 1, 2 and 3.
Each macro can include up to ten key commands. A macro can include different devices. In this way you could, for example, switch on the TV set, the desired channel, the video recorder and the recording function.
- Switch the device(s) on.
- Keep the SETUPkey pressed down for approx. 3 seconds until the background lighting of the source key will flash for a short time and then remain permanently lit. (Briefly pressing the SETUP key will activate the SHIFT function.)
- Press the MACRO key. The source key will flash briefly.
- Press the number under which the macro should be stored, i.e. "1", "2", or "3".
- Press a source key (device selection, e.g. VCR) for the device with which you would like to start (first key command).
- Now carry out the functions that you would like to save as a macro in the desired sequence. You may now carry out nine key commands. The source key will extinguish briefly each time the button is pressed.
- To save the macro, press MACRO (the macro will be saved automatically after the 10th key has been pressed). The source key will extinguish permanently.


20


Incorporating delays
It can be useful to incorporate a time delay before a command step in order to take the warm-up phase of the TV set into consideration, for example.
- While entering the steps (see Point 6 above) press the PAUSE key at the spot where the time delay should be incorporated.
- Press a number key corresponding to the seconds by which you would like to delay (e.g. "4" for a 4-second delay). The maximum delay is 9 seconds.
Executing macros
- To execute a macro, briefly press the MACRO key once in the normal mode.
- Then press the number key where the macro was saved within 20 seconds (1, 2 or 3).
Deleting macros
- Keep the SETUPkey pressed down for approx. 3 seconds until the background lighting of the source key will flash for a short time and then remain permanently lit. (Briefly pressing the SETUP key will activate the SHIFT function.)
- Press the MACRO key. The source key will extinguish briefly.
- Press the number key ("1", "2" or "3") of the stored macro that you would like to delete.
- Keep the SETUP key pressed down until the source key extinguishes. The macro is now deleted.

21


Special functions
ALL OFF function
You can switch off all pre-programmed devices at the same time. This is done as follows:
- Briefly press the ALL OFF key. The selected device switches off and the relevant source key will light up.
- Immediately press the ALL OFF key again and keep it pressed down for 3 seconds. Now all pre-programmed devices will be switched off consecutively. This takes about 3 seconds. The source key will extinguish afterwards.
Keep the remote control pointed at the devices to be operated until the source key extinguishes.
Some devices can be switched on and off with the -key. Devices switched off in such a way will be switched back on after carrying out the ALL OFF function.

Easy ProGramming and TV Channel Preview
Easy ProGramming (EPG)
The button EPG (Easy ProGramming) refers to scheduled recording features that would give you access to codes associated with TV and/ or Radio programs. The central concept of this system is a unique number (G-Code) that is assigned to every broadcasted program. This code is published in TV listings in newspapers and magazines. By using these codes the correct program with the correct channel and the correct time will be recorded. (Please note that not all devices are compatible with this EPG button, and functionality may also vary in different countries).
Please note: In some cases the EPG button may not be compatible with your device for the above-described function. There may be the possibility that this is allocated to another button on your remote control (e.g. the MENU button).


TV Channel Preview
In the TV mode, after pressing the EPG key once, all stored channels will be switched through (the remote control must be pointed permanently at the device). To stop the function, press PROG+ or PROG-.
Universal functions ("Punch Through")
The universal functions (also called "Punch Through" functions) enable you to carry out certain functions on a different device type than the programmed one. These are the volume, mute and playback functions.
□ If the remote control is in VCR, DVD, SAT or CBL mode, the VOLUME (VOL) and MUTE keys (☑) control the TV set (provided the other devices do not have their own volume control);
- if the remote control is in TV mode or in another mode without playback function, the PLAY, STOP, PAUSE, FAST FORWARD/ BACK, SKIP keys and perhaps RECORD will actuate a connected video recorder, DVD player or DVD recorder. The last selected device is actuated.
Programming the volume/mute universal functions to another device type
In its delivered state, the universal remote control is programmed in such a way that the volume and mute functions automatically control the TV set if a source key for a device with image transmission (DVD, video recorder) is pressed.
You can program the universal remote control so that the universal functions "Volume" and "Mute" will actuate another device type than the TV set.
- Keep the SETUP key pressed down for approx. 3 seconds until the background lighting of the source key will flash for a short time and then remain permanently lit. (Briefly pressing the SETUP key will activate the SHIFT function.)
- Press the key. The source key will extinguish briefly.


- Press a source key for the device to which the volume and mute functions should be transferred to. The light for this source key will remain lit.
- Press the key; the source key light will extinguish. If you accidentally selected a device that does not have its own volume control, the source key will flash for 3 seconds.
Programming the volume/mute universal functions to a particular device
You can program the universal remote control in such a way that it will use only that particular device's own volume and mute functions. The universal function for this mode or device type is therefore switched off.
- Keep the SETUP key pressed down for approx. 3 seconds until the background lighting of the source key flashes for a short time and then remains permanently lit. (Briefly pressing the SETUP key will activate the SHIFT function.)
- Press the key until the source key light extinguishes.
- Press the source key for the device that is only to have its own volume and mute functions.
- Press one of the two VOL keys. The light of the source key remains lit.
- Press the key again, and the source key light will extinguish.
Restoring the universal volume/mute functions
If you have changed the universal volume and mute functions, as described in the previous two sections, you can reset the functions back to the factory settings and thus restore the "Punch Through" effect.
- Keep the SETUP key pressed down for approx. 3 seconds until the background lighting of the source key flashes for a short time and then remains permanently lit. (Briefly pressing the SETUP key will activate the SHIFT function.)
- Keep the key pressed down until the source key light extinguishes briefly.


- Press again. The source key light will extinguish completely. The volume and mute functions are now restored to their factory defaults.
Troubleshooting
The remote control does not work:
- Check whether your devices have been properly connected and are switched on.
- Check whether the remote control batteries have been correctly inserted and have matching +/- polarity.
If the batteries are too weak then replace them with new ones.
There are several device codes listed under the brand name of my device. How do I determine the correct device code?
To determine the correct device code for your device, try each consecutive code until most of the functions of the device function properly.
The devices only respond to a few remote control commands:
- Continue testing further codes until the devices respond to the commands accordingly.
□ If manual code entry and automatic code search are unsuccessful, it may be that the device is not compatible to your universal remote control.
25


Univ-FB_MD80383_AUS.fm Side 26 Dienstag, 24. Januar 2006 8:57 08


Disposal
Packaging

Your universal remote control is wrapped in packaging to protect it against transportation damage. Packaging is raw material and can be re-used or added to the recycling system.
Device

At the end of its life, the universal remote control should not be disposed of in household rubbish. Seek the advice of your local authority on correct, environmentally-friendly disposal.
Batteries


Do not dispose of used batteries in the household rubbish! They should be deposited at a collection point for used batteries.
Technical data
Batteries:
(not included)
2 x 1.5V Micro (LR03/AAA)
(Alkaline recommended)
Laser class
1

26

- Contents
- Safety instructions
- Scope of application
- Inserting batteries
- Setting the date and time
- Time settings in 24 and 12 hour mode
- Displaying the date and time
- Displaying the seconds
- Programming device codes
- Entering the device code according to the Code List
- Manual code search
- Automatic search
- second or 3 second intervals
- Code searching by brand name
- Code identification
- Normal operation
- Operating individual devices
- Recording with the video recorder
- Operating combined devices
- Combined devices with two device codes
- Combined devices with one device code
- Learn function
- Notes on learn function
- Programming the functions
- SHIFT function
- Deleting functions
- Deleting commands for only one source key
- Deleting commands for all source keys
- Programming macros
- Incorporating delays
- Executing macros
- Deleting macros
- Special functions
- ALL OFF function
- Easy ProGramming and TV Channel Preview
- Easy ProGramming (EPG)
- TV Channel Preview
- Universal functions ("Punch Through")
- Programming the volume/mute universal functions to another device type
- Programming the volume/mute universal functions to a particular device
- Restoring the universal volume/mute functions
- Troubleshooting
- Disposal
- Packaging
- Device
- Batteries
- Technical data
Marque : MEDION
Modèle : MD 80383
Catégorie : Télécommande universelle