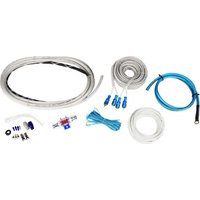
RMWK4 V2 - Amplificateur audio Rockville - Notice d'utilisation et mode d'emploi gratuit
Retrouvez gratuitement la notice de l'appareil RMWK4 V2 Rockville au format PDF.


| Type de produit | Système de microphone sans fil |
| Marque | Rockville |
| Modèle | RMWK4 V2 |
| Nombre de microphones | 4 |
| Type de micro | Dynamique sans fil |
| Fréquence de fonctionnement | UHF (600-900 MHz) |
| Portée maximale | Environ 30 à 50 mètres |
| Alimentation des micros | 2 piles AA chacun |
| Alimentation du récepteur | Adaptateur secteur 12V DC |
| Sorties audio | XLR et jack 6,35 mm |
| Fonctions principales | Transmission sans fil, réglage volume, indicateur de batterie |
| Entretien | Nettoyer avec un chiffon sec, éviter l'humidité |
| Consignes de sécurité | Ne pas exposer à la pluie, ranger dans un endroit sec |
| Dimensions du récepteur | Environ 200 x 150 x 50 mm |
| Poids du récepteur | Environ 500 g |
| Garantie | 1 an |
| Réparabilité | Pièces détachées disponibles auprès du fabricant |
FOIRE AUX QUESTIONS - RMWK4 V2 Rockville
Questions des utilisateurs sur RMWK4 V2 Rockville
0 question sur cet appareil. Repondez a celles que vous connaissez ou posez la votre.
Poser une nouvelle question sur cet appareil
Téléchargez la notice de votre Amplificateur audio au format PDF gratuitement ! Retrouvez votre notice RMWK4 V2 - Rockville et reprennez votre appareil électronique en main. Sur cette page sont publiés tous les documents nécessaires à l'utilisation de votre appareil RMWK4 V2 de la marque Rockville.
MODE D'EMPLOI RMWK4 V2 Rockville
Ground Cable
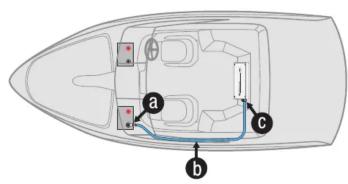
- Cut the ground cable to the appropriate length and trim half an inch of insulation from both ends. Attach a ring connector to one end and attach it to the NEGATIVE (−) terminal of the house battery (a).
- Route the ground cable through the firewall and along the inside of the vessel to the amplifier (b). Make sure run it on the side opposite the RCA cables. Now insert the other end into the amplifier's GROUND (GND) terminal (c). Screw it down tightly.
5
Remote and RCA
- Ensure that the head unit is turned off.
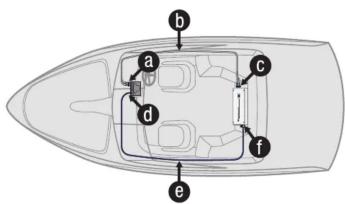
- Connect the RCA cables to the head unit (a) and route through the inside of the vessel to the amplifier (b). Connect to the RCA inputs on the amplifier (c).
- Make sure that you run the RCA cables on the side opposite the power cable.
- Connect the blue remote cable to the remote turn-on terminal of the headunit (d). Route through the inside of the vessel to the amplifier (e). Connect to the amplifier terminal marked REMOTE (REM)(f).


RMWK V2 Series MARINE AMPLIFIER WIRING KITS
OWNER'S MANUAL
ATTENTION: WATCH THIS VIDEO BEFORE FIRST USE!
Who reads manuals?
Scan the QR code or go to the URL of the appropriate kit to access how-to video(s), the owner's manual, and other important information you know need to put the most out of your items.
If you prefer written instructions, please read ahead!
With Rockville you get many options.

rockvillesupport.com/rmwk4-v2

rockvillesupport.com/rmwk8-v2
RockvilleAudio.com
©2022 ROCKVILLE // The information presented is subject to change and/or improvement without notice.
RWK Series High Power Amp Wiring Kit
Thank you for purchasing this RMWK Series Marine Amplifier Wiring Kit. No expense has been spared in the engineering and manufacturing of this kit. All cables and accessories have been tested and are sure to meet the highest quality standards. If properly installed this kit will provide you with years of uninterrupted service. Please read this installation guide carefully for proper use of your RMWK Series wiring kit. Read the entire guide before attempting your installation. Should you need assistance, please call our help line at 1-646-758-0144, 24 hours a day/7 days a week.
Attention
Before you begin your installation, disconnect the NEGATIVE (-) terminal from your vessel's battery. This safety precaution will avoid possible short circuits while wiring your amplifier.
It is recommended that you lay out your sound system design on paper first. This will help you during the installation so that you will have a wiring flow chart and not miss-wire any of your components.
Be sure to observe proper polarity when wiring the speakers.
Always run the RCA cables on the side of the vessel opposite to the side used to route the power and ground leads of the amplifier. The high-quality, shielded RCA patch cords included with this kit reduce and eliminate unwanted electrical noise to your system. Cheaper cables usually have poor shielding that can cause interference pickup.
2
Fuse Installation
- Securely mount the fuse holder 18 inches or less from the house battery.
- Cut power cable to proper length. Trim half an inch of the power cable insulation and insert into one end of the fuse holder. Screw it down tightly. Attach a large ring connector to the other end. Secure it to the POSITIVE (+) terminal of the house battery.

Power Cable
- Depending on the location of your fuse block (see page 2), cut an appropriate length section of power cable. Trim half an inch of insulation from both ends. Attach a ring connector to one end and attach it to the POSITIVE (+) terminal of the HOUSE BATTERY (a). Insert the other end into the fuse holder. Screw it down tightly (see page 2).
- Cut another section of power cable long enough to go from the fuse holder to the amplifier. Trim half an inch of insulation from both ends. Insert one end into the fuse holder (see page 2). Route the power cable through the firewall and along the inside of the vessel to the amplifier (b). Make sure to run it on the side opposite the RCA cables. Insert the other end into the POSITIVE (12V+) terminal of your amplifier (c). Screw it down tightly.


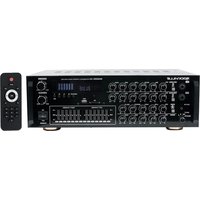

Marque : Rockville
Modèle : RMWK4 V2
Catégorie : Amplificateur audio