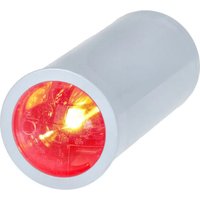
Mini Halo - Éclairage Rockville - Notice d'utilisation et mode d'emploi gratuit
Retrouvez gratuitement la notice de l'appareil Mini Halo Rockville au format PDF.


| Type de produit | Éclairage LED annulaire (halo) |
| Dimensions | Diamètre 15 cm, épaisseur 2,5 cm |
| Poids | 200 g |
| Alimentation | USB 5 V (câble inclus) |
| Puissance | 6 W |
| Température de couleur | 3000 K à 6500 K (réglable) |
| Luminosité | 10 niveaux réglables |
| Indice de rendu des couleurs (IRC) | Ra > 80 |
| Angle d'éclairage | 120° |
| Fonctions principales | Éclairage annulaire, réglage intensité et température, support rotatif à 360° |
| Matériau | Aluminium et ABS |
| Couleur du boîtier | Noir |
| Entretien et nettoyage | Essuyer avec un chiffon doux et sec. Ne pas utiliser de produits abrasifs. |
| Sécurité | Ne pas immerger, éviter l'humidité excessive, débrancher avant nettoyage |
| Pièces détachées et réparabilité | Câble USB standard (remplaçable), LED intégrée non remplaçable par l'utilisateur |
| Accessoires inclus | Lampe, support rotatif, câble USB, manuel d'utilisation |
| Garantie | 1 an |
| Marque | Rockville |
| Modèle | Mini Halo |
FOIRE AUX QUESTIONS - Mini Halo Rockville
Questions des utilisateurs sur Mini Halo Rockville
0 question sur cet appareil. Repondez a celles que vous connaissez ou posez la votre.
Poser une nouvelle question sur cet appareil
Téléchargez la notice de votre Éclairage au format PDF gratuitement ! Retrouvez votre notice Mini Halo - Rockville et reprennez votre appareil électronique en main. Sur cette page sont publiés tous les documents nécessaires à l'utilisation de votre appareil Mini Halo de la marque Rockville.
MODE D'EMPLOI Mini Halo Rockville
MINI HALO Operating Instructions
Thank you for purchasing this Rockville MINI HALO. Please read these operating instructions carefully. Should you need assistance, please call our technical help line at 1-646-758-0144, 24 hours a day/7 days a week. For how-to videos, this DMX guide, and other helpful information, visit the URLs or scan the QR codes.

rockvillesupport.com/mini-halo-white
rockvillesupport.com/mini-halo-black
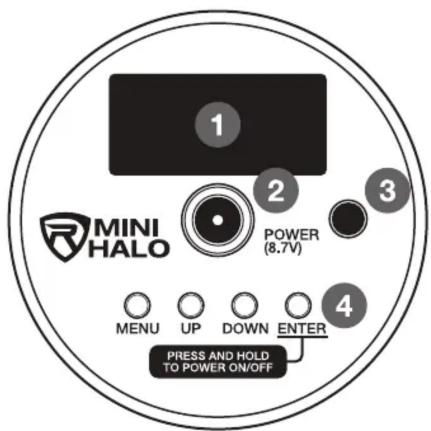
Functions
- LED screen
- Power input port
- Mounting bracket attachment point
- MENU: Press to switch between modes
UP: Scroll up through values for selected mode
DOWN: Scroll down through values for selected mode
ENTER: Press to access available submenus for the selected mode.
Press and hold to power ON or OFF.
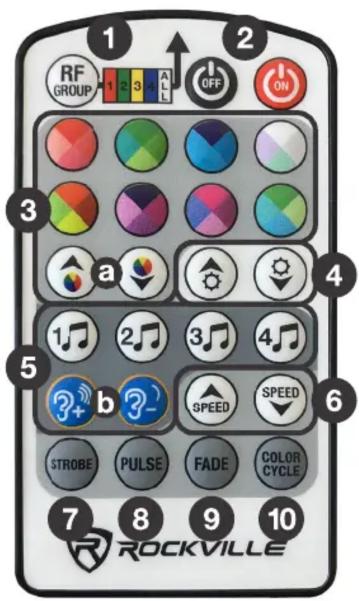
Remote Control Functions
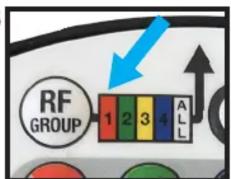
If the remote is not working, make sure the units are in RF mode (refer to the rF section) and the screen says "SLAVE." Also, the RF group color/number must match the corresponding RF group/color on the remote. Refer to the rF section for more details and point 1 (below) for RF functions via the remote.
- RF GROUP: This button changes the RF group of the remote. Keep pressing to cycle through the modes: RED, GREEN, YELLOW, BLUE, and ALL (WHITE). ALL will adjust all 4 groups. The remote also flashes the color of the group you are in when you press the RF button or any other button.
- ON/OFF: Turns the LEDs on/off. Please note, this button is strictly for the LEDs. The unit will remain on and continue to use battery power. To turn it off, use the POWER/MODE button on the unit (no. 5 on the functions diagram).
3.COLOR WHEELS: There are eight color wheels, each with four color options. Use the color wheel buttons (a) to cycle through the color options in the selected color wheel. Press the BRIGHTNESS buttons (4) to adjust the brightness. - BRIGHTNESS: Adjust overall brightness in any mode.
- SOUND MODES: Press these buttons to select the desired sound mode: 1 is color cycle sound mode, 2 is color pulse sound mode, 3 is color strobe sound mode, and 4 is color cycle + pulse + strobe sound mode. Use the blue buttons (b) to adjust the selected mode's sensitivity.
- SPEED: Changes the speed of the modes (STROBE, PULSE, FADE, and COLOR CYCLE).
- STROBE: Sets the unit to strobe mode. Use the color wheels to select the desired color, then press the strobe button. Use the SPEED buttons (6) to set the strobe speed.
- PULSE: The unit will pulse through colors. Use the SPEED buttons (6) to set the pulse speed.
- FADE: The unit will fade from one color to next. Use the SPEED buttons (6) to set the speed at which the unit will fade between colors.
- COLOR CYCLE: Cycles through 32 colors. Use the SPEED buttons (6) to adjust the speed at which the unit will cycle through colors.
Modes
DMX/SLAVE
If not already on the DMX screen, press the MENU button until you see DMX on the top left side of the LED screen. Here you can set the DMX address and channel mode. This will allow the light to communicate wirelessly with other lights. When the slave lights connect to the master they will flash, indicating that thet are synced.
Address
The ADD (address) submenu appears first. Use the UP/DOWN buttons to set the DMX address (001 - 512). Press the ENTER or MENU buttons to proceed to the next submenu, CH.

Channel
In the CH. (channel) submenu press the UP/DOWN buttons to switch between 6 or 10 channel modes. Press the MENU button to proceed to the next mode, COLOR.

DMX Controller Functions
When using a DMX controller, use the charts below to reference each channel's function.
6-Channel Mode
| Channel | Function | Value | Description |
| 1 | Red | 0 – 255 | Adjust individual color brightness |
| 2 | Green | 0 – 255 | |
| 3 | Blue | 0 – 255 | |
| 4 | White | 0 – 255 | |
| 5 | Amber | 0 – 255 | |
| 6 | UV | 0 – 255 |
10-Channel Mode
| Channel | Function | Value | Description |
| 1 | Master dimmer | 0 – 255 | Adjust overall brightness |
| 2 | Red | 0 – 255 | Adjust individual color brightness |
| 3 | Green | 0 – 255 | |
| 4 | Blue | 0 – 255 | |
| 5 | White | 0 – 255 | |
| 6 | Amber | 0 – 255 | |
| 7 | UV | 0 – 255 | |
| 8 | Strobe | 0 – 9 | Strobe off |
| 10 – 255 | Set strobe speed, slow to fast | ||
| 9 | Manual dimming (CH1 – CH8 valid) | 0 – 39 | Set functions |
| Color cycle change | 40 – 79 | ||
| Color fade change | 80 – 119 | ||
| Color pulse change | 120 – 159 | ||
| Color cycle sound mode | 160 – 189 | Set specific sound mode. | |
| Color pulse sound mode | 190 – 219 | ||
| Color strobe sound mode | 220 – 249 | ||
| Color cycle + pulse + strobe sound mode | 250 – 255 | ||
| 10 | CH9 Speed | 0 – 255 | CH 9 function speeds, slow to fast |
COLOR (Solid Static Color)
From the DMX menu, press the MENU button (twice if the unit is in the ADD submenu) to enter the COLOR menu. Press the ENTER button to switch between the two submenus, SUB and SPEED.
Sub
The SUB submenu appears first. Use the UP/DOWN buttons to select one of the 32 preset colors (01 - 32). Press the ENTER or MENU buttons to proceed to the next submenu.

Speed
In the SPEED submenu press the UP/DOWN buttons to set the strobe speed, 00 (off) - 09 (fast). Press the MENU button to proceed to the next mode, JUMP.


JUMP (Color Cycle Change)
From the COLOR menu, press the MENU button (twice if the unit is in the SUB submenu) to enter the JUMP menu. In this mode the unit cycles through all colors. Press the UP/DOWN buttons to set the speed, 01 (slow) – 09 (fast). Press the MENU button to proceed to the next mode, FADE.
FADE (Color Fade Change and Color Pulse Change)
From the JUMP menu, press the MENU button to enter the FADE menu. Press the ENTER button to switch between the two submenus, SUB and SPEED.
Sub
The SUB submenu appears first. Use the UP/DOWN buttons to select one of the two settings. SUB 01 will continuously fade from one color to another (color fade). SUB 02 also fades through colors, but fully fades before moving to the next color (color pulse).

Speed
In the SPEED submenu press the UP/DOWN buttons to set the speed, 01 (slow) - 09 (fast). Press the MENU button to proceed to the next mode, ♪ (sound).


(SOUND)
From the FADE menu, press the MENU button (twice if the unit is in the SUB submenu) to enter the ♪ (sound) menu. Press the ENTER button to switch between the two submenus, SUB and SPEED. There are four sound modes: 1 Color Cycle sound mode: cycles to a different solid color whenever sound is sensed, 2 Color Pulse sound mode: pulses to a different color when sound is sensed and if there is no sound or a lull in the sound, the light will fade, 3 Color Strobe sound mode: strobes a different color when ever sound is sensed, and 4 Color cycle + pulse + strobe sound mode: cycles through the three sound modes.
Sub
The SUB submenu appears first. Use the UP/DOWN buttons to select one of the 4 sound modes. (see above). Press the ENTER to proceed to the next submenu.

Speed
In the SPEED submenu press the UP/DOWN buttons to set the sensitivity, 01 (least sensitive) - 09 (most sensitive). Press the MENU button to proceed to the next mode, AP

rF
From the AP menu, press the MENU button to access the rF (RF Group) menu. When the rF function is enabled, you can use the remote to control the units. There are four individual 2.4GHz groups, each represented by a color: (rF1: red, rF2: green, rF3: yellow, rF4: blue).
Remote Only
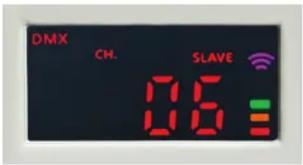
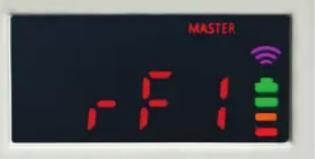
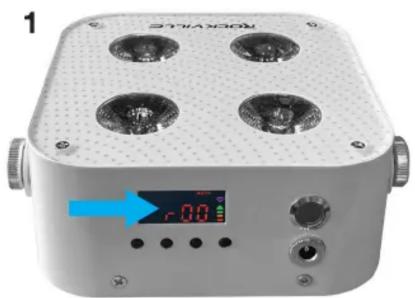
To use the rF function [remote only], first press the ENTER button to switch the units from MASTER mode (image 1) to SLAVE mode (image 2). Use the UP/DOWN buttons to select one of the 4 rF groups. In this example, the units are set to rF1 (red). Ensure the lights are set to the same RF GROUP (rF1 (red) on the remote. Refer to the remote control functions section and diagrams 3 and 4 below. You can now use the remote to control all the lights.
With Wireless Groups
Set all units to the same wireless group id (refer to Wireless Group ID Settings section). For this example the wireless group ID is 5 (pink). Select ONE unit to be the master. Set it to Rf mode, in this case Rf1. All other units in the group should be set to DMX/SLAVE mode (refer to the DMX/SLAVE section). To configure the master unit to be adjusted with the remote, press ENTER until SLAVE appears on the screen. Ensure the lights are set to the same RF GROUP (rF1 (red) on the remote. Refer to the remote control functions section and diagrams 3 and 4 below. Once the desired mode is selected, press ENTER on the master unit. It will now be set to MASTER mode. In MASTER mode, this unit will send the selected settings to all the slave units. Note: When in MASTER mode, the unit will not respond to the remote. To make further changes via the remote, press ENTER to switch the unit back to SLAVE mode.
1
2

3
4

CoL (Custom Color Mixing)
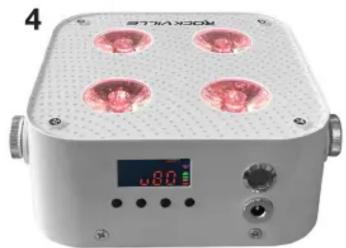
From the rF menu, press the MENU button to enter the CoL (custom color mixing) menu. Press the ENTER button to switch between colors: r (red), G (green), b (blue), u (white), Y (amber), and P (UV), in that order. Use the UP/DOWN buttons to adjust each individual color's brightness, 00 (off, image 1) to 99 (brightest setting, image 2). MINI RF4 V2 shown for reference.

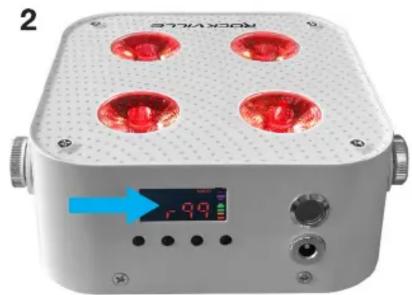
You can adjust an individual color's brightness (image 3) or multiple colors at once. Please note that if you have more than one color "on", it will affect the final color output. For example, if you have red and white on together, the color you see will be a mixture of white and red (image 4). As you add or subtract colors, or adjust the colors' bightness, the hue of the light output will change. Image 5 shows the color output when UV is added to the red and white mix. MINI RF4 V2 shown for reference.


dSP (LCD Screen Time Out Setting)
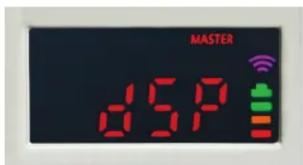
From the br menu, press the MENU button to enter the dSP (LCD screen time out setting) menu. This will determine how long the LCD menu screen will remain on after after no input from the remote or pressing any of the four panel buttons. This feature is especially useful when truss mounting the units. To activate, press ENTER, then use the UP/DOWN buttons to cycle through and select one of the time settings (on: always on, 10: screen remains on for 10 secs, 20: screen remains on for 20 secs, 30: screen remains on for 30 secs.)
WIRELESS GROUP ID SETTINGS
From the dSP menu, press the MENU button to enter the wireless group ID settings menu. This feature is used for wireless DMX consoles, master slave of units, and phone app function. To sync with a DMX controller or master light, the slave light(s) need to be in the same color grouping. Multiple different groups can run at once. Use the UP/DOWN buttons to cycle through the wireless frequency settings (off: wireless option is off, 1: red wireless frequency group, 2: green wireless frequency group, 3: yellow wireless frequency group, 4: blue wireless frequency group, 5: purple wireless frequency group, 6: cyan wireless frequency group, 7: white wireless frequency group).


MASTER/SLAVE
From the wireless group ID settings menu, press the MENU button to enter the MASTER (Master/Slave) menu. Press the UP/DOWN buttons to turn this function on or off. When set to off, the unit will not send a signal and the word "MASTER" will not be visible on the screen once you leave the Master/Slave mode menu.
1

2

Master Mode: When Master mode is turned on, the particular unit will control any units that are within the same wireless group ID. This means that all slave units will respond to any commands sent from the master unit.
Slave Mode: When Master mode is turned off, the unit will not send a signal. When placed in a wireless group ID, the slave unit (or units) will respond to any commands received by the master unit (see Master Mode above). Please note, the slave unit must be in the same wireless group ID as the master unit. Refer to the Wireless Group ID Settings section on the previous page.
- MINI HALO OPERATING INSTRUCTIONS
- FUNCTIONS
- REMOTE CONTROL FUNCTIONS
- MODES
- DMX/SLAVE
- ADDRESS
- CHANNEL
- DMX CONTROLLER FUNCTIONS
- COLOR (SOLID STATIC COLOR)
- JUMP (COLOR CYCLE CHANGE)
- FADE (COLOR FADE CHANGE AND COLOR PULSE CHANGE)
- (SOUND)
- RF
- REMOTE ONLY
- WITH WIRELESS GROUPS
- COL (CUSTOM COLOR MIXING)
- DSP (LCD SCREEN TIME OUT SETTING)
- WIRELESS GROUP ID SETTINGS
- MASTER/SLAVE
Marque : Rockville
Modèle : Mini Halo
Catégorie : Éclairage