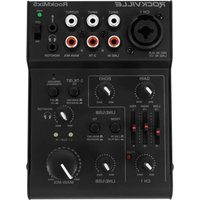
RockMix 5 - Table de mixage Rockville - Notice d'utilisation et mode d'emploi gratuit
Retrouvez gratuitement la notice de l'appareil RockMix 5 Rockville au format PDF.


| Type de produit | Table de mixage audio compacte |
| Marque | Rockville |
| Modèle | RockMix 5 |
| Dimensions (approx.) | 250 x 200 x 80 mm |
| Poids (approx.) | 1,5 kg |
| Alimentation | USB 5V ou adaptateur secteur (non inclus) |
| Nombre de canaux | 5 canaux (2 micro + 3 ligne) |
| Fonctions principales | Mélangeur audio, réglages de tonalité, effets intégrés, sortie casque et enregistrement |
| Entrées | 2 x XLR (micro), 3 x Jack 6,35 mm (ligne), 1 x RCA stéréo |
| Sorties | 2 x Jack 6,35 mm (principale), 1 x Jack 3,5 mm (casque), 1 x RCA (enregistrement) |
| Entretien et nettoyage | Essuyer avec un chiffon doux et sec. Ne pas utiliser de produits abrasifs. |
| Sécurité | Ne pas exposer à l'humidité ou à des températures extrêmes. Débrancher avant nettoyage. |
| Pièces détachées et réparabilité | Non fournies. Contacter le SAV Rockville pour toute réparation. |
| Informations générales | Notice d'utilisation disponible en téléchargement sur notice-facile.com |
FOIRE AUX QUESTIONS - RockMix 5 Rockville
Questions des utilisateurs sur RockMix 5 Rockville
0 question sur cet appareil. Repondez a celles que vous connaissez ou posez la votre.
Poser une nouvelle question sur cet appareil
Téléchargez la notice de votre Table de mixage au format PDF gratuitement ! Retrouvez votre notice RockMix 5 - Rockville et reprennez votre appareil électronique en main. Sur cette page sont publiés tous les documents nécessaires à l'utilisation de votre appareil RockMix 5 de la marque Rockville.
MODE D'EMPLOI RockMix 5 Rockville
ROCKVILLE
RockMix 5
5-CHANNEL PRO MIXER w/USB INTERFACE, WIRELESS STREAMING, ECHO, and EQ
OWNER'S MANUAL
ATTENTION:
WATCH THIS VIDEO BEFORE FIRST USE!

Scan the QR code or go to rockvillesupport.com/rockmix-5 for essential information, guides (video and/or written), and tips to make the most out of your purchase.
If you prefer written instructions, please read ahead!
With Rockville you get many options.
Missing items? If you ordered a bundle that includes more than one product and you are missing part of your bundle, then it just means your order shipped from two different warehouses. You will receive the remaining items very soon. If you have any concerns or inquiries, feel free to call our customer support center at 1-646-758-0144, 24 hours a day/7 days a week.
Thank you for purchasing the Rockville RockMix 5 Mixer with a USB Interface, Wireless Streaming, Echo, and 2 Band EQ. Please read the owner's manual carefully for proper use of your Rockville RockMix 5. Should you need technical assistance please call our technical help line at 1-646-758-0144, 24 hours a day/7 days a week.
Includes
- Mixer
• Power adapter w/USB cable - USB interface
- Rubber feet
- User manual
IMPORTANT SAFETY INSTRUCTIONS

TO REDUCE THE RISK OF ELECTRICAL SHOCK, NEVER OPEN THE UNIT. WE RECOMMEND CONTACTING THE ROCKVILLE SERVICE CENTER FOR ANY REPAIRS
Retain these safety and operating instructions for future reference. Heed all warnings printed here and on the equipment. Follow the operating instructions printed in this owner's manual.
- Do not open: There are no user serviceable parts inside.
- Power sources: Only connect the unit to mains power of the type described in this user guide or marked on the rear panel. The power source must provide a good ground connection.
- Power cord: Use the power cord with sealed mains plug appropriate for your local main supply as provided with the equipment. If the provided plug does not fit into you outlet consult your service agent. Route the power cord so that it is not likely to be walked on, stretched or pinched by items placed upon or against.
-
Moisture: To reduce the risk of fire or electrical shock, do not expose the unit to rain, moisture or use in damp or wet conditions. Do not place container of liquid on it, which may spill into any openings
-
Heat: Do not locate the unit in a place close to excessive heat or direct sunlight, as this could be a fire hazard. Locate the unit away from any equipment, which produces heat such as: power supplies, power amplifiers and heaters.
- Environment: Protect from excessive dirt, dust, heat, and vibration when operating and storing. Avoid tobacco ash, drink spillage and smoke especially that associated with smoke machines.
- Handling: Protect the controls from damage during transit. Use adequate padding if you need to ship the unit. To avoid injury to yourself or damage to the equipment take care when lifting, moving or carrying the unit.
- Servicing: Switch off the equipment and unplug the power cord immediately if it is exposed to moisture, spilled liquid or the power cord or plug becomes damaged during a lightning storm or if smoke odor or noise is noted. Refer servicing to qualified technical personnel only.
- Heat: Do not locate the unit in a place close to excessive heat or direct sunlight, as this could be a fire hazard. Locate the unit away from any equipment, which produces heat such as: power supplies, power amplifiers and heaters.
- Environment: Protect from excessive dirt, dust, heat, and vibration when operating and storing. Avoid tobacco ash, drink spillage and smoke especially that associated with smoke machines.
- Handling: Protect the controls from damage during transit. Use adequate padding if you need to ship the unit. To avoid injury to yourself or damage to the equipment take care when lifting, moving or carrying the unit.
- Servicing: Switch off the equipment and unplug the power cord immediately if it is exposed to moisture, spilled liquid or the power cord or plug becomes damaged during a lightning storm or if smoke odor or noise is noted. Refer servicing to qualified technical personnel only.
Functions

-
Type B USB Port: Can be connected to a computer or a power supply with USB output. When the mixer is connected to a computer, the USB port serves as a audio output (mixed signal) and as an audio input (audio data from source).
-
Line In RCA Stereo Input: These jacks are used for connecting any number of line level signal sources: mixing consoles, samplers, CD players, cassette decks, DAT machines, and other audio interfaces. Mono audio sources can be connected using an RCA "Y" cable connector.
-
Mic/Line Input: This XLR/1/4" combo input accepts XLR type connectors for mic input and 1/4" for line level devices. When connecting a mic, be sure to use a balanced cable. The XLR jack will deliver 18V of phantom power and is suitable for condenser microphones.
-
2-TK RCA Stereo Input: These jacks are used for connecting any number of stereo line level signal sources.
-
Main Mix RCA Stereo Outputs: These jacks are used to send the main mix signal to an amplifier or speakers. It is also used to send the main mix signal to a recording device.
-
Power On LED Indicator: Will be green when the unit is powered on.
-
Power Switch
-
3.5mm Microphone input. This jack will deliver 18V of phantom power and is suitable for condenser microphones (controlled via Ch1 section).
-
3.5mm Monitor Headphone Jack: Allows you to monitor input and output signals.
-
Channel 1: a. Gain control: adjusts the input volume
b. Echo control: adjusts the echo effect
c. High tone control: 12kHz ±15dB
Low tone control: 80Hz ±15dB
d. Pan control
e. Peak LED: indicates when clipping is occurring
f. Level control: adjust the output volume
-
Wireless Streaming LED Indicator: Indicates when a wireless streaming connection is established.
-
Wireless Streaming Pairing Button: Press the button and the unit will automatically go into pairing mode. The wireless streaming LED indicator will flash once every second. You can connect any wireless streaming device. Devices running bluetooth 3.0 or less may require a password: 0000. Once a wireless streaming device is successfully connected, the LED indicator will flash twice every five seconds. The unit will automatically connect to the last paired device. If no device is available is discovered within 30 seconds, the unit will go into stand-by mode and the LED indicator will flash once every five seconds.
-
2-TK Button: This button is used to determine where the 2-TK RCA input signal will go. When the button is in the down position, the signal will
be assigned to the 3.5mm Monitor output. When the button is in the up position, the signal will be assigned to Main Mix RCA outputs and USB output on the back of the unit.
- Monitor control: Adjust the volume of the 3.5mm headphone output.
- Left/Right Clip LEDs: Indicate when the stereo output signal is clipping.
- Line/USB Selector Buttons: From - This button allows you to select the input signal source. When the button is in the down position, the signal source will be the USB input. When the button is in the up position, the signal source will be the from the Line In or 2-TK RCA inputs.
- Main Mix: Used to set the level of the stereo output signal of the Main Mix RCA outputs and the USB output on the back of the unit.
- Line/USB Control: Used to set the level of the Line In RCA inputs and the USB input on the back of the unit.
Operation
- Prior to connection/disconnection and prior to powering on, the output controls Monitor and Main Mix should be turned all the way down.
- Mono channel CH1: Combined XLR / 1/4 " jack are available as inputs.
- Connect microphones to the balanced CH1 XLR jack or 3.5mm mic in (1) jack. These jacks always supply 18 volts of phantom power and are thus suitable for condenser microphones.
- The line level input of the Line/USB stereo channel allows you to connect an audio source with line level signal (e.g. CD player) via RCA plugs: L = left channel, R = right channel.
• The 2-TK input of the stereo channel allows you to connect an audio source with line level signal (e.g. Recorder, MP3 player, etc.) - The 3.5mm Monitor headphone out (💡) jack allows you to connect stereo headphones (impedance ≥16 ohm). Thus, you will be able to monitor the output signal and the input signal of the 2-TK via headphones.
- The output signal of the stereo Main Mix can be adjusted with the Main Mix Control. This output allows you to connect an amplifier or a second mixer via 3.5mm connection.
Computer Operation
When operating the mixer with a computer, either use the audio software supplied with the operating system or an audio software installed additionally. Various programs for audio reproduction/ recording are available on the internet free of charge.
-
Start the computer. Connect the RockMix 5's USB port to the computer's USB port using the included cable.
-
Switch on the mixer. The Power LED indicator will light up green.
-
The computer should recognize the USB interface of the mixer as an external device for audio input and audio output, e.g. as "USB EarMicrophone", depending on the operating system. The required drivers (standard operating system drivers) should be available on the computer.
Note: If the required drivers are not available on the computer, install them via the original CD of the operating system or download them online. Restart the computer after installation, if necessary.
- Open the reproduction/recording program and change the required settings for audio reproduction via the mixer or audio recording from the mixer (check the user manual of your program for information on how to change the audio settings). If it is not possible to record or reproduce any sound, be sure to activate the USB interface for audio input or audio output in the system settings of the computer.
Hint: If the mixer is connected to a computer and to any units grounded via their mains cables (e.g. amplifier), there may be a hum noise due to ground loops. To eliminate this noise, connect the mixer to the corresponding unit via a ground isolator.
Power Supply Operation:
PLEASE NOTE: Use a USB power source with an output of 5V/500mA.
- Connect the mixer to the power source via the supplied USB cable.
- Power on the mixer. The power indicator LED should be green.
General Settings:
- Set the Gain, EQ, and Pan controls to the mid position. Turn all level controls to Min.
- When connecting a microphone to the 3.5mm mic in (1) jack, speak into the microphone and turn up the Monitor Level control until you obtain a good signal. If you need to turn it up completely but still haven't achieved a good signal, turn up the CH1 Gain control until you do. However, if the Peak LED indicator lights up and does not turn off immediately, turn down the Gain control unit it turns off. The Peak LED indicator must only briefly light up with level peaks.
- Use the Pan control to place the microphone signal on the stereo bus. Adjust the sound with the High and Low tone controls.
- Turn up the Line/USB level control until you obtain a good signal. You can select the Line/USB audio source using the "FROM" button in the Line/USB section of the mixer. For a line level signal from the Line In RCA inputs, the button must be in the up position. For a signal from the USB input, the button must be in the down position. Use the CH1 and Line/USB level controls to mix the input signals of CH1 and Line/USB or to fade them in and out. When a channel is not used, set it's control to "MIN".
- Use the Main Mix control to set the level of the output signal that is sent via the Main Mix RCA jacks and the USB port. If one of the Left/Right Clip LED indicators lights up red, turn down the Main Mix control accordingly.
Operation (continued)
- The 3.5mm Monitor headphone out (💡) jack allows you to monitor the output signal of the mixer. For this purpose, the 2-TK/BT TO button must be in the down position to monitor the 2TK input.
- Adjust the headphone volume with the Monitor level control.
WARNING: Listening to music at high volume for extended periods of time is not recommended as it may damage your hearing. Over time, your ears will adapt to the volume level, so that a volume level that may not cause discomfort might still damage your hearing.
Features
• (1) Combo jack (XLR and 1/4 ) Mic/Line input with volume control, 2-band EQ, and Pan as well as 18V phantom power
• (1) Stereo channel with RCA inputs and level control assignable to either headphone or main output
• (1) Stereo channel with RCA input assignable to either headphone or main output
• RCA main mix output with monitor knob to plug into your speakers
• Additional 3.5mm mic input
• 3.5mm headphone output
- Echo effect with independent control
• Main mix master volume knob
• Built-in Wireless audio streaming
• Built-in USB interface will send the master mix to your favorite DAW
- Interface will be identified and addressed as an external sound card in your DAW
- Peak LED indicator detects clipping on channel 1
- Main mix has left and right clip indicators
• Power on LED indicator
- Super linear mic preamp with low noise (this uses a top of the line mic pre normally found in very expensive mixers)
• This mixer is built out of solid steel metal and when you pick it up you immediately can feel the weight and how solid it is
- All knobs and potentiometers are super sturdy and linear
• 18V phantom power for condenser microphones
- Unit is BUS powered, allowing you to power the mixer by plugging it into the USB of your computer or laptop
• USB Power/Link cable included - You can power the mixer through any power bank that you normally use to power your phone (this mixer is highly efficient and only requires 5 volts of power)
• British EQ circuitry designed to emulate the classic EQ from the legendary mixers that came out in the 1950's, 60's and 70's
Specifications
• Mic: 1mV/1.7kΩ (Gain max)
• Line, channel 1: 3mV/10kΩ (Gain max)
• Line, channel 2/3: 300mV/22kΩ
• Line channel 4/5: 300mV/22kΩ
• Output level: 5.8V max (Main, Monitor, Tape)
• Frequency range: 20 – 25kHz
- THD: ≤0.05%
• S/N ratio: 81dB
• Equalizer: Bass range: ±15dB/80Hz
High range: ±15dB/12kHz
• Headphone impedance: ≥16Ω
• USB interface: USB 2.0
• 16-Bit Delta-Sigma, 44.1kHz Sampling rates; 48kHz max,
- Wireless Streaming: Compliant with bluetooth specification V3.0 + EDR
- Phantom power for XLR and 3.5mm jack: 18V
• Power supply Via USB port: (5V/500mA) of the computer or via a power supply unit connected to AC110-220V/50-60Hz outlet.
Specifications (continued)
• Dimensions (inches): 5.31" x 3.94" x 1.57"
• Weight: 0.95lb
- Suitable operating system for data transfer via USB interface: Windows 2000, XP or higher; Mac OS 9.0.4 or higher, 10.X or higher
Troubleshooting
NO SOUND:
- Make sure the USB power cable is properly plugged into the unit as well as the computer's USB port.
- Make sure that all input cables (XLR, 1/4", RCA, and 3.5mm) are properly connected.
- Check the input gains, levels, and main mix volume to make sure they are properly set.
NO SOUND - HEADPHONES:
- Be sure your headphones are properly plugged in.
- Check that the Monitor level control, CH 1 level control, Line/USB level control, and the Main Mix volume control are all properly set.
MICROPHONE DOES NOT WORK:
- Be sure your microphone is properly plugged into the correct port and that you are using the appropriate cable type.
- Make sure the CH1 Gain is properly set.
LINE INPUT DISTORTION:
- Turn down the input Gain and level controls.
- Check your High and Low tone settings.
NOISE/HUM:
- Make sure you are using good quality audio cables. We recommend Rockville Pro Audio cables.
- Check the condition of your audio cables.
- Keep cables away from other AC power cables as well as AC transformers.
- Ensure that the unit is not too close to amplifiers, lighting power supplies or ballasts.
- Use a ground isolater.
Troubleshooting (continued)
FEEDBACK:
- If a microphone is being used, make sure you are not too close to the speakers or headphones.
FEDERAL COMMUNICATIONS COMMISSION COMPLIANCE INFORMATION
Responsible party name: Rockville
Address: 600 Bayview Ave, Entrance A, Inwood, NY 11096
Hereby declares that the product(s) RockMix 5 complies with FCC rules as mentioned in the following paragraph:
This device complies with Part 15 of the FCC rules. Operation is subject to the following two conditions: (1) this device may not cause harmful interference, and (2) this device must accept any interference received, including interference that may cause undesired operation.
Note: This equipment has been tested and found to comply with the limits for a Class B digital device, pursuant to Part 15 of the FCC rules. These limits are designed to provide reasonable protection against harmful interference in a residential installation. This equipment generates, uses and can radiate radio frequency energy and, if not installed and used in accordance with the instructions, may cause harmful interference to radio communications. However, there is no guarantee that interference will not occur in a particular installation. If this equipment does cause harmful interference to radio or television reception, which can be determined by turning the equipment off and on, the user is encouraged to try to correct the interference by one or more of the following measures:
• Reorient or relocate the receiving antenna.
- Increase the separation between the equipment and receiver.
- Connect the equipment to an outlet on a circuit different from that to which the receiver is connected.
- Consult the dealer or an experienced radio/TV technician for help.

RockvilleAudio.com
© 2025 ROCKVILLE // Features and specifications are subject to change and/or improvement without notice.

- ROCKVILLE
- ROCKMIX 5
- ATTENTION
- INCLUDES
- IMPORTANT SAFETY INSTRUCTIONS
- TO REDUCE THE RISK OF ELECTRICAL SHOCK, NEVER OPEN THE UNIT. WE RECOMMEND CONTACTING THE ROCKVILLE SERVICE CENTER FOR ANY REPAIRS
- OPERATION
- COMPUTER OPERATION
- POWER SUPPLY OPERATION
- GENERAL SETTINGS
- OPERATION (CONTINUED)
- FEATURES
- SPECIFICATIONS
- SPECIFICATIONS (CONTINUED)
- TROUBLESHOOTING
- NO SOUND
- NO SOUND - HEADPHONES
- MICROPHONE DOES NOT WORK
- LINE INPUT DISTORTION
- NOISE/HUM
- TROUBLESHOOTING (CONTINUED)
- FEEDBACK
- FEDERAL COMMUNICATIONS COMMISSION COMPLIANCE INFORMATION
- ROCKVILLEAUDIO.COM
Marque : Rockville
Modèle : RockMix 5
Catégorie : Table de mixage