
GC720R - Motoculteur MTD - Notice d'utilisation et mode d'emploi gratuit
Retrouvez gratuitement la notice de l'appareil GC720R MTD au format PDF.

| Type de produit | Attelage motoculteur pour débroussailleuse |
| Marque | MTD |
| Modèle | GC720R |
| Poids de l'attelage | 4,65 kg (10,25 lbs) |
| Alimentation | Dépend de l'unité motrice (essence ou électrique) |
| Nombre de fraises | 4 fraises amovibles |
| Matériau principal | Acier et plastique |
| Utilisation | Préparation du sol, aération, désherbage |
| Système de fixation | Coupleur à vis sans fin (Split Boom) |
| Sécurité | Lunettes de protection, éloigner les enfants et animaux, ne pas utiliser sous l'emprise de drogues ou d'alcool |
| Entretien | Nettoyer les fraises après usage, huiler les arbres, vérifier les vis |
| Remplacement des fraises | Oui, remplacer les 4 fraises simultanément |
| Garantie | 2 ans pour l'utilisateur particulier |
| Service après-vente | USA : 1-800-345-8746, Canada : 1-800-265-6778 |
| Stockage | À l'intérieur, dans un endroit sec, à l'abri des engrais |
| Compatibilité | Débroussailleuses avec coupleur Split Boom (RYOBI, MTD) |
| Particularité | Utilisable en rangs étroits en retirant les fraises extérieures |
FOIRE AUX QUESTIONS - GC720R MTD
Questions des utilisateurs sur GC720R MTD
0 question sur cet appareil. Repondez a celles que vous connaissez ou posez la votre.
Poser une nouvelle question sur cet appareil
Téléchargez la notice de votre Motoculteur au format PDF gratuitement ! Retrouvez votre notice GC720R - MTD et reprennez votre appareil électronique en main. Sur cette page sont publiés tous les documents nécessaires à l'utilisation de votre appareil GC720R de la marque MTD.
MODE D'EMPLOI GC720R MTD
RYOBI
GARDEN
CULTIVATOR
MODEL GC720r
OPERATOR'S
MANUAL
INTRODUCTION
THANK YOU
Thank you for purchasing this quality product. This modern outdoor power tool is designed to provide you with many hours of useful service. You will find it to be a great labor-saving device.
This manual provides you with easy-to-understand operating instructions. Read the entire manual and follow all of the maintenance and service procedures to keep your new outdoor power tool in top operating condition.
PRODUCT REFERENCES, ILLUSTRATIONS AND SPECIFICATIONS
All information, illustrations and specifications in this manual are based on the latest product information available at the time of printing. We reserve the right to make changes at any time without notice.
SERVICE INFORMATION
Service on this unit both within and after the warranty period should be performed only by an authorized and approved service dealer.
Dial 1-800-345-8746 in the United States or 1-800-265-6778 in Canada to obtain the listing of the authorized service dealer nearest you.
Do not return the unit to the retailer.
SAFETYWARNINGS
THE PURPOSE OF SAFETY SYMBOLS IS TO
ATTRACT YOUR ATTENTION TO POSSIBLE
DANGERS. THE SAFETY SYMBOLS, AND THE
EXPLANATIONS WITH THEM, DESERVE YOUR
CAREFUL ATTENTION AND UNDERSTANDING. THE
SAFETY WARNINGS DO NOT BY THEMSELVES
ELIMINATE ANY DANGER. THE INSTRUCTIONS OR
WARNING THEY GIVE ARE NOT SUBSTITUTES FOR
PROPER ACCIDENT PREVENTION MEASURES.
SYMBOL
MEANING

WARNING:
Failure to obey a safety
warning can result in injury
to yourself and others.

NOTE:
Advises you of information
or instructions vital to the
operation or maintenance
of the equipment.

WARNING
Always follow the safety precautions to reduce the risk of fire, electric shock and personal injury.
Make sure this manual is carefully read and understood before starting or operating this equipment.
Also refer to the operator's manual of the power unit for additional safety warnings.
IMPORTANT SAFETY INSTRUCTIONS - SAVE THESE INSTRUCTIONS!
BEFORE OPERATION:
- Carefully read and understand the operator's manual of the unit that powers this attachment.
- Inspect the area before starting the unit. Remove all debris and hard and sharp objects such as rocks, vines, branches, rope, string, etc.
WHILE OPERATING:
Always wear safety goggles/glasses at all times when using the unit. They provide protection against flying objects and dust.
- Do not operate the unit while under the influence of drugs, alcohol or medication.
- Dress properly. Avoid wearing clothing with loose strings, chains, ties, etc.
- Wear substantial footwear that will improve footing on slippery surfaces.
- Keep clothing and body parts away from the rotating tines.
- Avoid heavy contact with solid objects that might stop the tines. If heavy contact occurs, stop the motor/engine and inspect the unit for damage.
- Never operate the cultivator without the tine cover in place and properly secured.
- Keep the tines and guard clear of debris.
- Never attempt to clear the tines and guard of debris with the engine/motor running.
After striking a foreign object, stop the motor/engine, inspect the unit for damage and repair before restarting.
Exercise caution to avoid slipping or falling.
- Keep bystanders, especially children, and pets at least 30 feet (9.1 m) away.
- Look behind and use care when backing up.
- Never operate the unit without good visibility or light.
- Keep hands and feet away from the tine area.
- Use the cultivator only in a well-ventilated area.
AFTER OPERATING:
- Do not store the cultivator in damp rooms, in stables or other places where artificial fertilizer is stored because this will cause severe corrosion.
- Disconnect from the drive engine/motor assembly before cleaning the tines with a hose and water to remove any buildup. Then oil the tines with machine oil to prevent rust.
Always wear gloves when servicing or cleaning the tines because they become very sharp from use. - Inspect the complete unit for loose screws or bolts for damage. Adjust or repair prior to next use.
- Only qualified personnel should perform any repairs or maintenance procedures that are not described in this manual.
SPECIAL SAFETY WARNINGS FOR ELECTRIC TRIMMERS AND CULTIVATORS
- Do not use in rain.
- Avoid dangerous environments - never operate cultivator in damp or wet conditions.
- To reduce the risk of electric shock, do not expose the unit to rain or operate unit on wet ground.
Always unplug the unit and allow it to cool before putting it into storage. Store indoors.
Always unplug the unit when not in use and before performing any maintenance or repairs.
SPECIAL SAFETY WARNINGS FOR GAS TRIMMERS AND CULTIVATORS
- Avoid spilling the fuel when mixing the oil.
- Do not smoke while fueling the power unit.
- Fuel the power unit in a well-ventilated area.
- Move away from the fueling area when starting the unit.
- Do not smoke while operating the unit.
- Store in an area free of potential fuel vapor ignition sources such as open flames (pilot lights) or electrical sparking devices (switches, electric motors).
- Turn off the engine and let it cool before refueling or before putting the unit in storage.
SAFETY WARNINGS (Continued)
SAFETY AND INTERNATIONAL SYMBOLS
This operator's manual describes safety and international symbols and pictographs that may appear on this product. Read the operator's manual for complete safety, assembly, operating and maintenance and repair information.
| SYMBOL | SIGNIFICATION |
| A | · SAFETY ALERT SYMBOL. Indicates caution, warning, or danger. May be used in conjunction with other symbols or pictographs. |
| · READ OPERATOR'S MANUAL. Failure to follow operating instructions and safety precautions in operator's manual can result in serious injury. Read operator's manual before starting or operating this unit. | |
| · WEAR EYE AND HEARING PROTECTION. Warning. Thrown objects and loud noise can cause severe eye injury and hearing loss. Wear ear and eye protection when operating this unit. | |
| i | · FOR SERVICE INFORMATION, CALL: USA: 1-800-345-8746 CANADA: 1-800-265-6778 |
| · CULTIVATORS - ROTATING TINES CAN CAUSE SEVERE INJURY. Warning. Keep away from rotating tines. Stop the engine before unclogging tines or making repairs. |
ASSEMBLY INSTRUCTIONS
NOTE: This cultivator attachment has been completely assembled. Other than attaching the cultivator to the trimmer, no additional assembly is required.
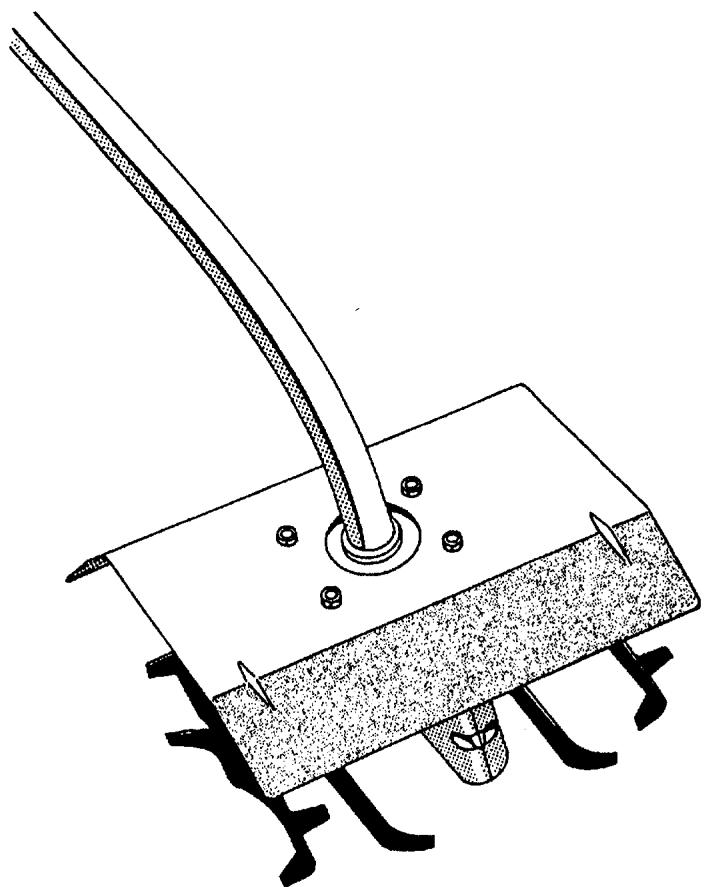
- Loosen the wing screws of the Split Boom coupler. This will allow the lower (attachment) boom to be inserted into the coupler (Fig. 1).

Fig. 1
- Remove the protective cover from the lower boom. Push the lower boom into the coupler (Fig. 2).
- Before locking the release button into the coupler, rotate the boom 90 degrees; then rotate the lower boom back 90 degrees. This will ensure the drive shafts in both the upper and lower booms are engaged.
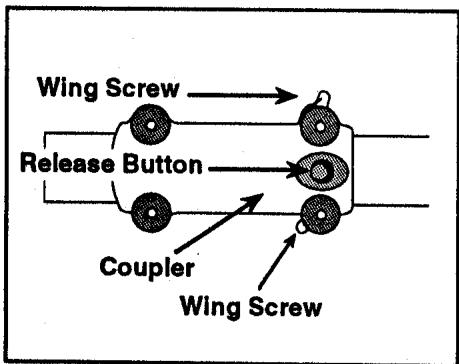
Fig. 2
- Locate and lock the release button into the hole in coupler (Fig. 2). Check the sight hole to make sure both ends of the boom are together (Fig. 3). Tighten the wing screws.
- To remove the attachment, loosen the wing screws, push the release button, and pull the lower boom straight out of the coupler (Fig. 1).
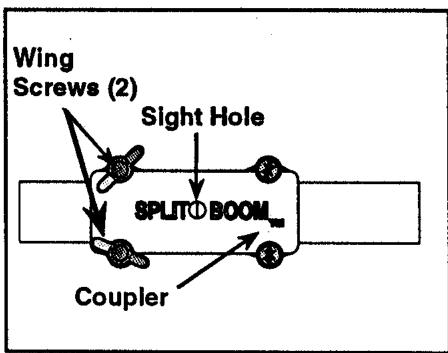
Fig. 3
OPERATING INSTRUCTIONS

WARNING
- To avoid personal injury, never carry the cultivator while the engine/motor is running.
-
The gear housing gets very warm after extended periods of use. To avoid burns, do not touch the housing until it has cooled down.
-
Move the cultivator to the work area prior to starting the engine.
-
With the engine running and the tines off the ground, depress the throttle trigger to increase the engine speed.
-
Holding handles firmly, slowly lower the cultivator until the tines make contact with the ground (Fig. 4).

Fig. 4
- As cultivating action begins, pull back on the cultivator so the tines can penetrate the ground (Fig. 5).

Fig. 5
- Once the ground has been broken, continue at a moderate pace until you are familiar with the controls and the handling of the cultivator.
- Pull the cultivator backwards to improve the depth of cultivation and reduce your effort.
- To cultivate in confined areas or narrow rows, remove the left and right outer tines. Refer to Tine Replacement on page 6.
MAINTENANCE INSTRUCTIONS

WARNING
Always wear gloves when working with tines because they get very sharp from use.
Make general visible inspection of the cultivator for loose or damaged parts.
TINE REPLACEMENT
All 4 tines should be replaced at the same time because they will wear evenly through normal use. Work on one side at a time.
- For gas trimmers: Turn ignition switch to the OFF position and disconnect the spark plug wire.
For electric trimmers: stop motor and unplug unit. - Remove the hitch pin clips and clevis pins (Fig. 6).
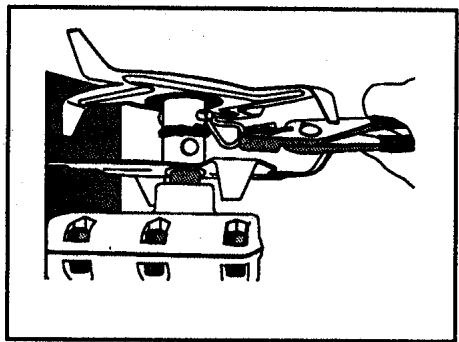
Fig. 6
- Remove the tines and felt cushions from the shaft.
-
Clean and oil the shaft.
-
Replace the tines and felt cushions by reversing steps 2 and 3 (Fig. 7).
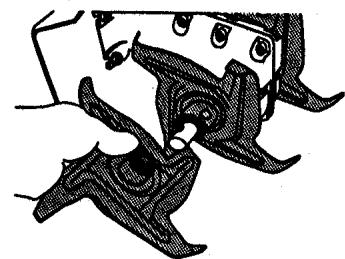
Fig. 7
- Repeat this procedure on the opposite side.
NOTE: When installed correctly, the hubs on the tines will face each other. The letters "R" stamped on the tines will be on the right side of the cultivator and the letters "L" will be on the left side.
SPECIFICATIONS
Operating Weight of the Attachment: 10.25 lbs. (4.65 kg)
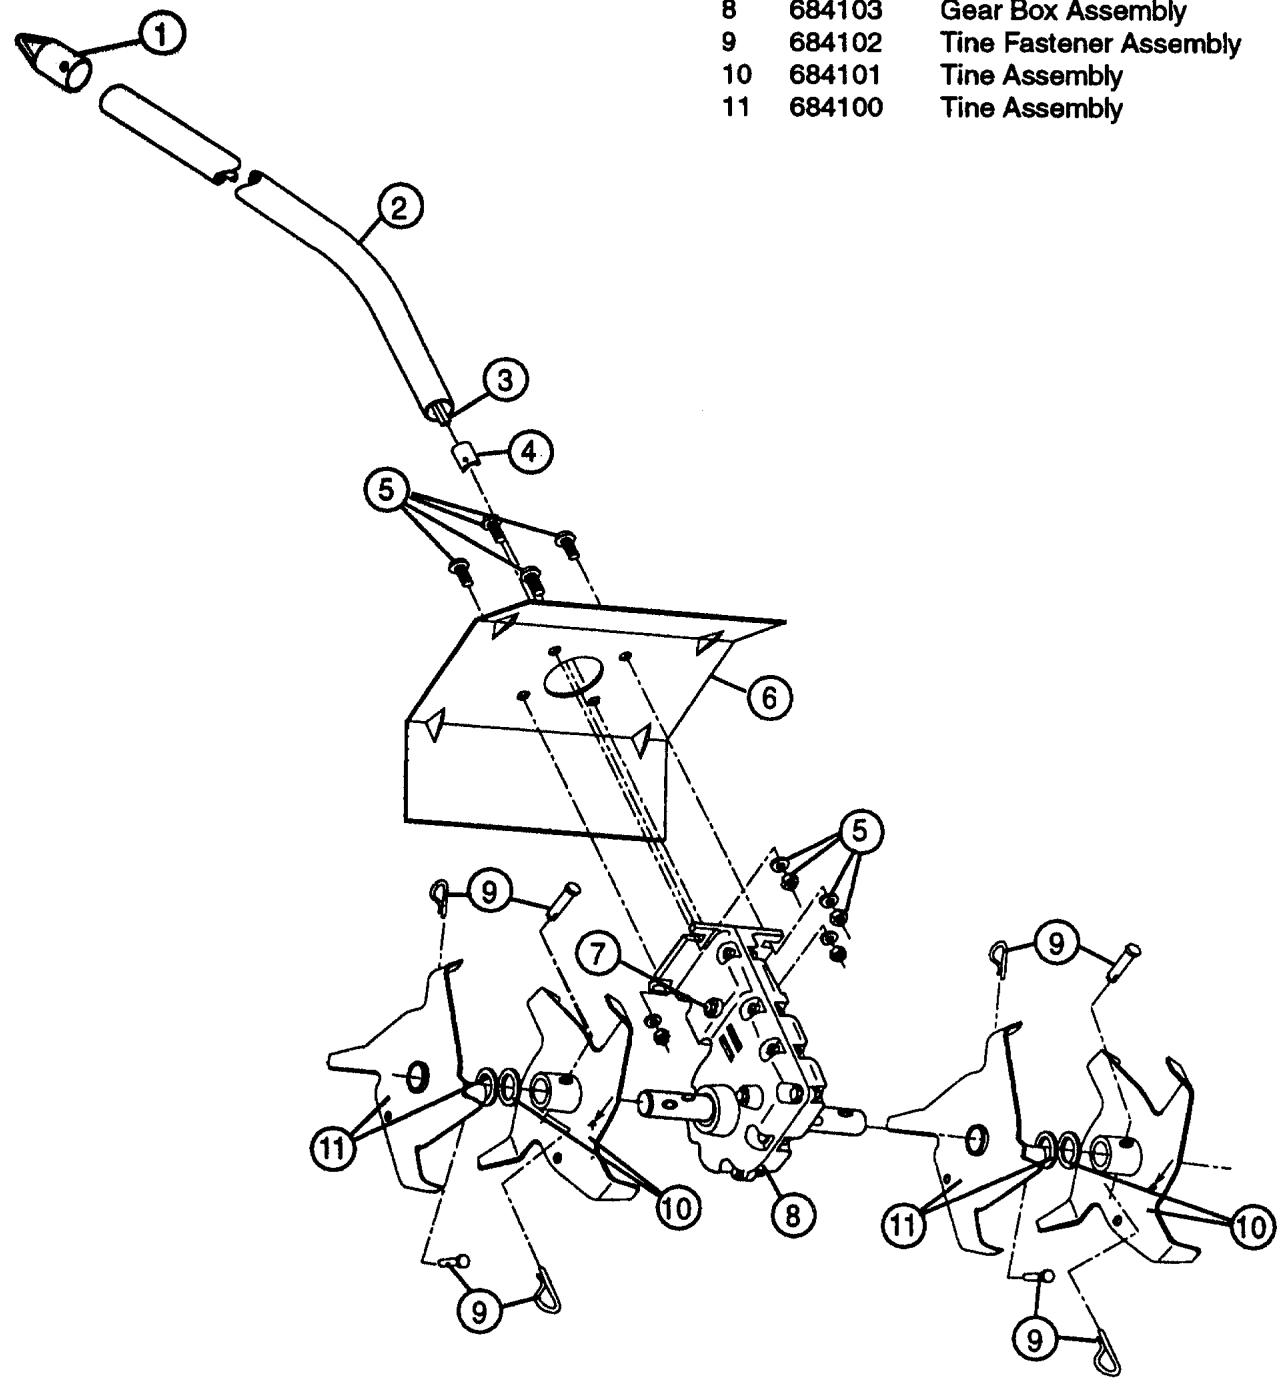
ITEM PART NO. PART NAME
1 612605 Accessory Hanger
2 180112 Drive Shaft Housing Assembly
3 613300 Flexible Drive Shaft
4 145890 Retainer Sleeve
5 684098 Guard Mounting Hardware Set
6 180111 Guard
7 683298 Bolt
8 684103 Gear Box Assembly
9 684102 Fine Fastener Assembly
10 684101 Fine Assembly
11 684100 Fine Assembly
Limited Two-Year Warranty
RYOBI AMERICA CORP. warrants each new RYOBI Product for two (2) years according to the following terms.
This warranty extends to the original retail purchaser only and commences on the date of original retail purchase.
Any part of the RYOBI Product manufactured or supplied by RYOBI and found in the reasonable judgement of RYOBI to be defective in material or workmanship will be repaired or replaced by an authorized RYOBI service dealer without charge for parts and labor.
The RYOBI Product Including any defective part must be returned to an authorized service dealer within the warranty period. The expense of delivering the RYOBI Product to the dealer for warranty work and the expense of returning it back to the owner after repair or replacement will be paid for by the owner. RYOBI's responsibility in respect to claims is limited to making the required repairs or replacements and no claim of breach of warranty shall be cause for cancellation or resiccation of the contract of sale of any RYOBI Product. Proof of purchase will be required by the dealer to substantiate any warranty claim. All warranty work must be performed by an authorized RYOBI service dealer.
This warranty is limited to ninety (90) days from the date of original retail purchase for any RYOBI Product that is used for rental or commercial purposes, or any other income-producing purpose.
This warranty does not cover any RYOBI Product that has been subject to misuse, neglect, negligence, or accident, or that has been operated in any way contrary to the operating instructions as specified in the RYOBI Operator's Manual. This warranty does not apply to any damage to the RYOBI Product that is the result of improper maintenance or to any RYOBI Product that has been altered or modified so as to adversely affect the products operation, performance or durability or that has been altered or modified so as to change its intended use. The warranty does not extend to repairs made necessary by normal wear or by the use of parts or accessories which are either incompatible with the RYOBI Product or adversely affect its operation, performance or durability.
In addition, this warranty does not cover:
A. Tune-ups · Spark Plugs, Carburetor Adjustments, Filters
B. Wear Items - Bump Knobs, Outer Spools, Cutting Line, Inner Reels, Starter Pulley, Starter Ropes
RYOBI reserves the right to change or improve the design of any RYOBI Product without assuming any obligation to modify any product previously manufactured.
ALL IMPLIED WARRANTY ARE LIMITED IN DURATION TO THE TWO (2) YEAR WARRANTY PERIOD OR NINETY (90) DAYS FOR PRODUCTS USED FOR ANY COMMERCIAL PURPOSE. ACCORDINGLY, ANY SUCH IMPLIED WARRANTY INCLUDING MERCHANTABILITY, FITNESS FOR A PARTICULAR PURPOSE, OR OTHERWISE, ARE DISCLAIMED IN THEIR ENTIRETY AFTER THE EXPIRATION OF THE APPROPRIATE TWO-YEAR OR NINETY DAY WARRANTY PERIOD. RYOBI'S OBLIGATION UNDER THIS WARRANTY, IS STRICTLY AND EXCLUSIVELY LIMITED TO THE REPAIR OR REPLACEMENT OF DEFECTIVE PARTS, AND ROP DOES NOT ASSUME OR AUTHORIZE ANYONE TO ASSUME FOR THEM ANY OTHER OBLIGATION. SOME STATES DO NOT ALLOW LIMITATIONS ON HOW LONG AN IMPLIED WARRANTY LASTS, SO THE ABOVE LIMITATION MAY NOT APPLY TO YOU.
RYOBI ASSUMES NO RESPONSIBILITY FOR INCIDENTAL, CONSEQUENTIAL OR OTHER DAMAGES INCLUDING, BUT NOT LIMITED TO EXPENSE OF RETURNING THE RYOBI PRODUCT TO AN AUTHORIZED SERVICE DEALER AND EXPENSE OF DELIVERING IT BACK TO THE OWNER, MECHANIC'S TRAVEL TIME, TELEPHONE OR TELEGRAM CHARGES, RENTAL OF A LIKE PRODUCT DURING THE TIME WARRANTY SERVICE IS BEING PERFORMED, TRAVEL, LOSS OR DAMAGE TO PERSONAL PROPERTY, LOSS OF REVENUE, LOSS OF USE OF THE PRODUCT, LOSS OF TIME, OR INCONVENIENCE. SOME STATES DO NOT ALLOW THE EXCLUSION OR LIMITATION OF INCIDENTAL OR CONSEQUENTIAL DAMAGES, SO THE ABOVE LIMITATION OR EXCLUSION MAY NOT APPLY TO YOU.
This warranty gives you specific legal rights, and you may also have other rights which vary from state to state.
This warranty applies to all RYOBI Products manufactured by RYOBI and sold in the United States and Canada.
To locate your nearest service dealer dial 1-800-345-8746 in the United States or 1-800-265-6778 in Canada.
RYOBI.
RYOBI AMERICA CORP.
5201 Pearman Dairy Rd
Anderson, SC 29622-1207 U.S.A.
RYOBI CANADA INC.
275 Industrial Rd
Cambridge, Ontario NIR 6K2 CANADA