
2-STROKE TRIMMER 790 TB-TRIMMERBLOWER - Équipement de jardinage MTD - Notice d'utilisation et mode d'emploi gratuit
Retrouvez gratuitement la notice de l'appareil 2-STROKE TRIMMER 790 TB-TRIMMERBLOWER MTD au format PDF.


| Type d'appareil | Tondeuse thermique |
| Alimentation | Essence |
| Puissance moteur | Non précisé |
| Capacité du réservoir | Non précisé |
| Largeur de coupe | Non précisé |
| Hauteur de coupe | Réglable, détails non précisés |
| Type de lame | Non précisé |
| Utilisation recommandée | Pelouses et petites zones difficiles d'accès |
| Âge minimum utilisateur | 16 ans |
| Consignes de sécurité | Porter des protections oculaires et auditives, ne pas utiliser sous influence |
| Entretien | Utiliser des pièces d'origine, vérifier l'état des pièces avant usage |
| Stockage | Dans un endroit ventilé, hors de portée des enfants |
| Précautions avant usage | Vérifier l'absence de fuites, nettoyer la zone de coupe |
| Instructions de démarrage | Non précisées |
| Instructions d'arrêt | Couper le moteur et laisser refroidir avant stockage |
| Recommandations environnementales | Éviter de fumer pendant le remplissage, ne pas mélanger carburant et huile |
FOIRE AUX QUESTIONS - 2-STROKE TRIMMER 790 TB-TRIMMERBLOWER MTD
Questions des utilisateurs sur 2-STROKE TRIMMER 790 TB-TRIMMERBLOWER MTD
0 question sur cet appareil. Repondez a celles que vous connaissez ou posez la votre.
Poser une nouvelle question sur cet appareil
Téléchargez la notice de votre Équipement de jardinage au format PDF gratuitement ! Retrouvez votre notice 2-STROKE TRIMMER 790 TB-TRIMMERBLOWER - MTD et reprennez votre appareil électronique en main. Sur cette page sont publiés tous les documents nécessaires à l'utilisation de votre appareil 2-STROKE TRIMMER 790 TB-TRIMMERBLOWER de la marque MTD.
MODE D'EMPLOI 2-STROKE TRIMMER 790 TB-TRIMMERBLOWER MTD
Contents
Safe operating practices 4
Getting to know your appliance . . 6
Assembly instructions 7
Oil and fuel recommendations . . . 8
Operating manual 8
Maintenance and repair 9
Warranty 10
Troubleshooting 11
Technical specifications 12
Details on the ratings plate
Enter all information on the rating plate of your unit in the following field.
You can find the rating plate near the engine.
These specifications are very important for subsequent identification when ordering spare parts and for customer service.
These and other details for your appliance can be found on the separate CE declaration of conformity that forms an integral part of these operating instructions.
Safe operating practices
Using the unit correctly
This unit is designed
- to be used in accordance with the descriptions and safety instructions indicated in this operating manual
- for private use
- for trimming lawn edges and small inaccessible areas of grass (e.g. under bushes),
- and as a leaf blower for smaller surfaces (e.g. along fences, walls, and flowerbeds or around trees).
It is not permitted to use this unit for any other purposes. The user is liable for all injuries to third parties and damage to their property.
Operate the unit only in the technical condition as stipulated and delivered by the manufacturer.
Arbitrary changes to the unit will exclude the manufacturer from any liability for resulting injury and/or damage.
Read all instructions before operating
- Please read these instructions carefully. Familiarize yourself with the operation and handling of the unit.
- Do not use this unit if you are tired or ill or under the influence of alcohol, drugs or medication.
Children and young people under 16 years of age must not operate the unit. - Check the unit before using it. Replace damaged parts. Check whether fuel is leaking out. Ensure that all connections are attached and tight. Replace cutting attachment parts which are cracked, flawed or damaged in any other way. Ensure that the cutting attachment has been installed correctly and attached securely. Ensure that the guard for the cutting attachment has been attached correctly and is in the recommended position. If these instructions are not followed, the user and bystanders may be injured or the unit damaged.
- Use only original replacement lines which have a diameter of 2.67 ~mm . Never use a metal-reinforced string, wire, chain, rope, etc. These may break off and become dangerous projectiles.
Always be aware of the risk of injury to head, hands and feet. - Depress the throttle. It must automatically return to the home position. Perform all settings and/or repairs before operating the unit.
Before using the unit, always clear the area which you want to trim. Remove all objects such as stones, broken glass, nails, wire or string which could be ejected or become entangled in the cutting attachment. Remove children, bystanders and animals from the area. Keep children, bystanders and animals at a minimum distance of 15m ; there is always a risk of bystanders being hit by ejected objects. Bystanders should wear eye protection. If somebody approaches, immediately switch off the engine and cutting attachment.
Safety instructions for petroldriven lawn trimmers
Petrol is highly flammable and the vapours may explode if ignited. Take the following precautions:
- Store petrol in designated and permitted containers only.
- Keep ignition sources away from spilled petrol. Do not start the engine until the petrol vapours have evaporated.
Before filling the tank, always switch off the engine and leave it to cool down. Never remove the tank cap and never fill the tank while the engine is hot. Before using the unit, ensure that the tank cap is screwed on tightly. Slowly unscrew the tank cap to reduce the pressure in the tank gradually. - Mix petrol and fill the tank in a clean, well ventilated outdoor area only where there are no sparks or flames. After switching off the engine, slowly unscrew the tank cap. Do not smoke while mixing petrol or filling the tank. Immediately wipe any spilled petrol off the unit.
Before switching on the engine, carry the unit at least 10m away from the filling station. While filling the tank or using the unit, do not smoke and keep sparks and naked flames out of the area.
Operating the unit
- Never start the unit and never leave it running in a closed room or building. The inhalation of exhaust gases may be fatal. Use the unit outdoors only.
- Wear eye and ear protection when using the unit. If working in a dusty environment, wear a face or dust mask. A long-sleeved shirt is recommended.
- Wear thick, long trousers, boots and gloves. Do not wear loose clothing, jewellery, short trousers, sandals and do not walk barefoot. Pin your hair above your shoulders.
- The cutting attachment guard must always be attached when the unit is being used as a lawn trimmer. Both trim lines must be pulled out and the correct line must be installed. The trim line must not be pulled out over the end of the guard.
- The unit has a clutch. The cutting attachment stops when the unit is running at no load. If it does not stop, have the unit adjusted by a mechanic at your authorised dealer.
Before switching on the unit, ensure that the line spool/cutting blade cannot strike an object. - Keep these instructions in a safe place!
- Do not touch the cutting attachment on the unit.
- Operate the unit in daylight or adequate artificial lighting only.
- Avoid starting the unit unintentionally. Be ready to operate the unit when you pull the starter rope. User and unit must be in a stable position when the unit is started. Follow the Start/Stop instructions.
- Use this unit for its designated purpose only.
-
Do not stretch too far over the unit. Always have a secure footing and keep your balance.
-
When operating the unit, always hold the unit firmly with both hands.
- Keep your hands, face and feet away from all moving parts. Do not touch the cutting attachment while it is rotating and do not attempt to stop it.
If extremely violent vibrations occur, switch off the engine IMMEDIATELY. Vibrations are a sign of problems. Check thoroughly for loose bolts, nuts or other damage before you continue cutting. If required, repair or replace the affected parts. - Do not touch the engine or muffler. These parts become very hot while the unit is being used. They remain hot for a short time even when the unit is switched off.
- Do not let the engine run quicker than required for cutting or trimming of lawn edges. Do not run the engine at high speed when it is not cutting.
Always switch off the engine if you cannot start cutting immediately or if you are moving from one place to another.
If you strike or ensnare a foreign object, immediately switch off the engine and check whether the unit has been damaged. Never use the unit with loose or damaged parts. - Stop and switch off the engine for maintenance, repairs or when changing the cutting attachment or other attachments. Also pull out the spark-plug terminal.
- Use only original spare parts for repairs. These parts can be purchased from your authorised dealer.
-
Never use parts, accessories or attachments which are not authorised for this unit. Otherwise, the user may be seriously injured and the unit damaged. In addition, your warranty may be deemed null and void.
-
Keep the unit clean and ensure that there are no plants or other objects caught between the cutting attachment and guard.
- To reduce the risk of fire, please replace damaged mufflers and spark extinguishers and remove grass, leaves, excess lubricants and layers of soot from the engine and muffler.
Have all repairs carried out by a repair shop only.
Operating times
Observe the national/municipal regulations concerning times of use (if required, ask your local authority).
Other safety instructions
- As long as the tank still has petrol in it, never store the unit in a building where vapours could come into contact with sparks or naked flames.
- Leave the engine to cool down before transporting or conveying the unit. Attach the unit securely for transportation.
- Store the unit in a dry condition, locked away or high up to prevent unauthorised use and damage. Keep the unit away from children.
- Never douse or splash the unit with water or other liquids. Keep the handle bar dry, clean and dust-free. Clean the unit after each use and follow the instructions for cleaning and storage.
- Dispose of waste petrol/oil or any packaging remnants in accordance with local regulations.
- Keep this manual. Read it frequently and use it to instruct other users. If you lend this unit to somebody else, also include this manual.
Keep this manual in a safe place
Symbols on the appliance
This operating manual describes safety and international symbols and pictograms which may be displayed on this unit. Read this user handbook in order to familiarise yourself with all safety, installation, operating and repair instructions.

Safety and warning symbol
Indicates danger, warning
or a reason to be cautious.
Can be used together with other symbols or pictograms.

Read operating manual!
Failing to follow these rules and precautionary measures may cause grievous injury. Read the operating manual before starting or operating the unit.

Wear eye and ear protection.
Ejected objects may cause serious eye injuries and excess noise may cause loss of hearing.
When operating the unit, wear eye and ear protection.

Wear head protection!
Falling objects may cause serious head injuries. Wear head protection when operating the appliance.
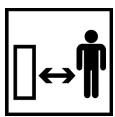
Keep bystanders away!
All bystanders, especially children and pets, must be kept at least 15m from the working area.

Petrol!
Always use clean and fresh lead-free petrol for mixing petrol.

Oil!
Use only authorised oil according to the operating manual for mixing petrol.
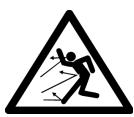
Ejected objects and rotating parts may cause serious injuries!
Do not use the unit if the protective housing has not been correctly positioned for cutting. Keep away from the rotating line coil and cutting blade.

Sharp blade!
Sharp blade on the guard as well as sharp cutting blade. To prevent grievous injury do not touch the blade.

Blowing turbine can cause grievous injuries!
Before any cleaning, adjusting, and maintenance work always stop the engine and wait until all moving parts have come to a stop.
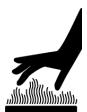
Beware of hot surfaces!
Do not touch hot muffler cover, gearbox or cylinder. You could burn yourself. These parts become extremely hot while the unit is being used. They remain hot for a short time even when the unit is switched off.


Wear foot and hand protection!
While operating this unit, wear heavy duty boots and protective gloves.

Ignition switch ON / START / RUN

Ignition switch OFF or STOP
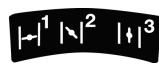
Choke settings
1 Full choke start position
2 Half choke intermediate position
3 Operating position
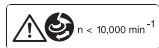
Maximum rpm!
Do not let the unit run more quickly than the maximum rpm.
Getting to know your appliance
Caution. Damage to the appliance
This first describes the control and display functions. Do not execute any of these functions yet!
Fig. 1
- Engine
- Tank cap
- Starter handle
- Spark plug
- Choke lever (Depending on model)
- Intake pump/primer
-
Air filter/muffler cover
-
Shoulder belt holder
- ON/OFF switch / ignition switch
- Throttle
- D-shaped handle
- EZ-LinkTM
- Shaft
- Cutting attachment cover
- Toggle
- Toggle lock
- Blower
- Cutting attachment
- Line cutting blade
- Spacing collar
Fig. 2-3
- D-shaped handle
- Shaft
- Shaft handle
- Screw
- Washer
- Wingnut
- Min distance 15.2cm
- Shoulder belt holder
- Spacing collar
Fig. 4-6 (Depending on model)
- EZ-LinkTM
- Release button
- Button
- Guide groove
- Main hole
- Upper shaft tube
- Lower shaft tube
Fig.7-8
- Lock pin
- Mount
- Nut
- Screw
Fig. 9-11
- Throttle
- ON/OFF switch / ignition switch
- Full choke position (1) *
- Half choke intermediate position (2) *
- Operating position (3) *
- Choke lever *
- Intake pump/primer
-
Starter rope
-
Depending on model
Fig. 13-14
- Toggle
- Toggle lock
Fig. 19-20
- Choke lever (Depending on model)
- Screw
- Air filter
Fig. 24-25
- Idle speed controller
- Spark plug
Installation manual
Installing the D-shaped handle
- For your safety the D-shaped handle must be installed before the distance collar. Push down the handle bar over the shaft so that the handle is at angle to the engine (Fig. 2).
Caution
Do not push the D-shaped handle bar over the distance collar. Otherwise the handle bar or unit may be damaged.
- Attach and tighten bolt, washer and wing nut.
Adjusting the D-shaped handle
- Loosen the wing screw. It is not required to remove the screws and the washer.
- Rotate the D-shaped handle until the handle is positioned over the shaft. Minimum distance 15.2 cm (Fig. 2).
While holding the unit in the operating position (Fig. 12), move the D-shaped handle into the position which ensures the best possible handling of the unit and tighten the wing screw (Fig. 2).
Attaching and adjusting the shoulder belt (Depending on model)
Pull the belt through the buckle.
Pull the shoulder belt over your head and place the pad on your shoulder.
- Latch the hook of the shoulder belt into the metal holder (Fig. 3). Adjust the belt to a comfortable length.
Using the EZ-LINK™ system
Note
To facilitate installation and removal of attachments, place the unit on the ground or a workbench.
Removing cutter/blower and other attachments
To loosen the attachment, rotate the screw handle (3) to the left (Fig. 6).
Press and hold down the release button (2) (Fig. 4).
- Hold the upper shaft housing (7) securely and pull the attachment directly out of the EZ-Link™ coupling (Fig. 5).
Installing the cutter/blower and other attachments
To loosen the attachment, rotate the screw handle to the left (Fig. 6).
Hold the attachment securely and push directly into the EZ-Link™ coupling (Fig. 5).
Note
Alignment of the release button (2) with the guide groove (4) facilitates installation (Fig. 4).
- Secure the attachment by rotating the button (3) to the right (Fig. 6). Before operating the unit, ensure that the rotary handle is secure.
Installing the cutter attachment cover
- Attach the cover with the guide hole over the lock pin (1; Fig 7).
Align the cover so that its holes agree with those in the locking sleeve. - Attach the cover to the mount with the screw (4) on the right and the nut (3) on the left (Fig 8).
- Check that the connections sit tightly and correctly.
Oil and fuel recommendations
Recommended oil grade
Use quality oil only, API classification TC (TSC-3) which is offered for air-cooled two-stroke engines. Mix the oil for two-stroke engines according to the instructions on the container, 1:40 (2.5%).
Recommended petrol grade
Danger
Under certain conditions petrol is extremely flammable and explosive.
- Refuel only in a well ventilated area and with the engine switched off. Do not smoke and switch off all ignition sources in the vicinity of the tank or at the fuel storage depot.
- Do not overfill the petrol tank (there must be no fuel in the inlet nozzle). After filling up the petrol tank, ensure that the tank cap is closed and secured.
- When filling up the petrol tank, do not spill any fuel. Spilled fuel or petrol vapours may ignite. If fuel has been spilled, ensure that the area is dried before the engine is restarted.
- Prevent repeated or prolonged skin contact or inhalation of the vapours.
Always use clean, fresh lead-free petrol (maximum 60 days old).
Fill the tank with petrol.
Remove the tank cap.
Fill fuel tank. Never overfill!
Firmly close the petrol tank again.
- Move the unit approx. 10m from the filling station/fuel container before starting the engine.
See instructions on mixing oil and petrol
Age and/or incorrectly mixed fuel are the main reasons for the unit not running properly. Use fresh,
clean, lead-free petrol only.
Follow exactly the instructions for the correct petrol/oil mixture.
Correctly mix two-stroke engine oil and lead-free petrol, 1:40 (2.5%). Do not mix directly in the tank.
Operating manual
Starting the engine
Note:
The engine uses Advanced Starting Technology™ (spring-supported starting process) which significantly reduces the energy expenditure required to start the engine.
You must pull out the starter rope until the engine starts by itself (spring-supported). It is not necessary to pull violently on the rope – the pulled rope does not resist greatly. Please note that this method of starting theengine is quite different (and much easier) from what you are used to.
- Mix petrol (gasoline) with oil. Fill the tank with the mixture. See instructions on mixing oil and petrol.
Put the ignition switch in the START [I] position (Fig. 9).
i Tip:
If starting a unit which has not been used for a long time (or brand new or difficult to start), press the intake pump 20 times.
- Slowly and fully press the intake pump (7) 10 times. The fuel must be visible in the pump (Fig. 10). If this is not the case, press a further three times or until the fuel can be seen.
On appliances with a choke lever
- Move the choke lever to position 1 (Fig. 10).
-
Place the unit on the ground, actuate the choke and hold down the lever. Pull the starter cord three times in a controlled, constant movement (Fig 11).
-
Move the choke lever to position 2 (Fig. 10).
To start the engine, pull the starter rope (8) in a controlled and continuous movement 1-5 times (Fig. 11).
Press on the throttle to warm up the engine for 15-30 seconds.
Note
At lower temperatures the engine may require longer to warm up and reach maximum speed.
The unit has warmed up adequately when the engine accelerates without faltering.
- When the engine has warmed up, move the choke lever to position 3 (Fig. 10). The unit is now ready to use. If the engine falters, move the choke lever to position 2 (Fig. 10) and leave the engine to warm up longer.
If the engine does not start, repeat steps 3-7.
Notes:
- It is not necessary to use the choke to start a hot engine. Move the switch to the On [I] position and the choke lever to position 2.
- Move the choke lever to position 3 if the engine floods when attempting to start it. Press the throttle. Pull on the starter rope. The engine must start after 3 (three) to 8 (eight) attempts.
On appliances without a choke lever
Pull the starter rope in controlled and continuous movement, until the engine starts (Fig. 11).
NOTE: During the starting process do not actuate the throttle.
After starting the engine, wait 10-15 seconds before you actuate the throttle.
Notes
If the engine fails to start repeat the procedure.
Stop the engine
Take your hand off the throttle (1) (Fig. 9). Leave the idling engine to cool down.
- Move the ignition switch to the Stop (O) position (Fig. 9).
Hold the appliance
Before using the unit, place yourself in the operating position (Fig. 12).
Check the following:
The user is wearing eye protection and the correct clothing.
- Your right arm is bent slightly and your hand holds the shaft handle.
- Your left arm is straight and holds the D-shaped handle.
The unit is below waist height.
- Hold the cutting attachment parallel to the ground so that the vegetation to be cut can easily be reached without the user having to bend forward.
Toggling between trimmer and blower

Caution
Before toggling between trimmer and blower you must first stop the engine and wait until all moving parts have come to a stop.
Trimmer
To operate the appliance as a trimmer you must move the toggle to the top position before starting the appliance.
Blower
To operate the appliance as a blower you must move the toggle to the bottom position before starting the appliance.
Toggling
- Switch off the engine and wait until all moving parts have come to a stop.
Press the red toggle lock (2) on the toggle (1) until the lock is released (Fig 14). - Move the toggle to the respective position (top/bottom) until the red toggle lock engages correctly.
Starting the engine again.
Tips for best trim results
- Keep the cutting attachment parallel to the ground.
- Use only the tip of the line for cutting, especially along walls. If more than the tip is used for cutting, the cutting capacity is reduced and the engine may overload.
Cut grass which is taller than 20 cm from the top down in small stages to prevent premature wear of the line and engine resistance.
If possible, cut from left to right. Cutting to the right improves the cutting capacity of the unit. Grass clippings are then ejected by the user. - Slowly move the lawn trimmer at the required height in and out of the cutting area. Walk either forwards and backwards or from side to side. Better results are achieved by cutting shorter pieces.
- Cut dry grass and weeds only. The service life of the cutting line depends on the following:
- Follow the previous cutting tips;
- for the vegetation which is to be cut;
- where it is cut.
For example, a line wears out more quickly if it is cutting against a house wall than around a tree.
Decorative cutting
You will receive a decorative cut if you cut all vegetation around trees, posts, fences, etc.
Rotate the whole unit until you are holding the cutting attachment at an angle of 30^ to the ground. (Fig. 13).
Tips on operating the blower
- Excessive noise can be avoided when the appliance is operated at the required speed.
- Use a rake or sweep to collect together loose leaves before using the blower.
In dusty conditions moisten the ground slightly. This helps to suppress excessive dust clouds when the appliance is operating.
- Keep an eye on persons, children, animals, open windows, etc., when using the blower.
After using the appliance collect and dispose of the collected leaves or other material.
Maintenance and repair
Installing the precut replacement cord
Use only original replacement cords with a diameter of 2.67mm that the manufacturer has approved. Cords with other specifications can cause the engine to overheat or damage the appliance.
- Introduce each end of the replacement cord into the holes next to the mounting hooks (Fig 15).
Feed in the cord ends until they project out of the cord head on the left and right (Fig 16).
Pull out both cord ends (Fig 17). The cord ends must have the same length on each side. If necessary push back the longer and pull out the shorter end to make up for the difference. - Press the trimming cord behind the mounting hook to secure this (Fig 18).
Servicing the air filter
Remove the air filter/muffler cover
- Set the choke lever (if provided) to the half choke position (2).
Note
The choke lever must be in the half choke position (2) before the air filter/muffler cover can be removed (Fig. 19).
- Remove the four (4) screws which secure the air filter/muffler cover (Fig. 19). Use a flat screwdriver or T20 Torx screwdriver bit.
Pull the cover off the engine.
Cleaning the air filter
After every ten operating hours clean and oil the air filter. This is an important part of maintenance. If the air filter is not serviced, the warranty will be deemed NULL AND VOID.
- Remove the air filter/muffler cover. See Removing the air filter/ muffler cover.
- Remove the air filter behind the air filter/muffler cover (Fig. 20).
- Wash the filter with water and detergent (Fig. 21). Flush out the filter thoroughly. Press out excess water. Leave filter to dry completely.
Lightly lubricate the filter with clean oil (Fig. 22).
Press out the filter to distribute the oil and remove excess oil (Fig. 23). - Reinstall the air filter in the air filter/muffler cover (Fig. 20).
Note
If the unit is used without the air filter and air filter/muffler cover, the warranty will be deemed NULL AND VOID.
Installing the air filter/muffler cover
- Place the air filter/muffler cover over the rear part of the carburettor and muffler.
Note
The choke lever must be at HALFWAY (2) before the air filter/silencer cover can be installed (Fig 19).
- Insert the four (4) screws into the holes of the air filter/muffler cover (Fig. 19) and tighten. Use a flat screwdriver or T20 Torx screwdriver bit. Do not tighten too tightly.
Adjust carburettor
The idle speed can be set with the screw (Fig. 24). Have this setting carried out by a specialist company only.
Check/replace spark plug
Use a Champion RDJ7Y spark plug (or an equivalent spark plug). The correct electrode gap is 0.63 mm . Every 50 operating hours take out the spark plug and check its condition.
- Stop the engine and leave it to cool down.
Remove spark-plug terminal. - Remove dirt from around the spark plug.
- Unscrew spark plug to the left with a spark plug wrench.
- Check/set the electrode gap 0.63 mm (Fig. 25).
Note
Replace a damaged, sooted or dirty spark plug.
Screw in spark plug and tighten to a torque of 12.3-13.5 Nm. Do not tighten too tightly.
Cleaning
Use a small brush for cleaning the outside of the unit. Do not use abrasive detergents. Household cleaners which contain aromatic oils such as pine oil or lemon as well as solvents such as kerosene may damage the plastic housing and handle. Wipe damp areas with a soft cloth.
Storage
- Never store the unit with fuel in the tank or where fumes are within reach of a spark or naked flame.
- Before storing the unit, leave the engine to cool down.
- Store the dry unit locked away or high up to prevent unauthorised use and damage. Keep the unit away from children.
Long-term storage
If the unit is to be stored for a prolonged period, proceed as follows:
Drain all the fuel out of the tank and pour into a container with the same two-stroke mixture. Do not use fuel which has been stored for longer than 60 days.
- Start the engine and leave running until it stops. This ensures that there is no fuel left in the carburettor.
- Leave the engine to cool down. Take out the spark plug and pour a high-quality engine oil or two-stroke oil into the cylinder. Slowly pull the starter rope to distribute the oil. Reinstall the spark plug.
Note
Before starting the lawn trimmer after storage, take out the spark plug and pour all the oil out of the cylinder.
Thoroughly clean the unit and check for loose and damaged parts. Repair or replace damaged parts and tighten loose screws, nuts and bolts. The unit can now be stored.
- Store the unit locked away or high up to prevent unauthorised use and damage. Keep the unit away from children.
Warranty
The warranty regulations issued by our company or the importer are valid in all countries. We shall repair any faults on your unit free of charge in accordance with the warranty, provided the fault was due to defective materials or manufacturing. If claiming under the warranty, please contact your seller or your nearest branch
Troubleshooting
| Error | Cause | Remedial action |
| Engine does not start. | Ignition switch set to OFF. | Set switch to ON. |
| Fuel tank empty. | Fill fuel tank. | |
| Primer not depressed adequately. | Slowly and fully depress primer 10 x. | |
| Engine flooded. | On appliances with a choke lever: Implement the starting process with the choke lever in the operating position. | |
| On appliances without a choke lever: Press the throttle and pull the starter cable. | ||
| Old or incorrectly mixed fuel. | Empty the tank / fill with fresh fuel mixture. | |
| Dirty spark plug. | Replace or clean spark plug. | |
| Engine does not run constantly at no load. | Air filter blocked. | Clean or replace air filter |
| Old or incorrectly mixed fuel. | Empty the tank / fill with fresh fuel mixture. | |
| Carburettor incorrectly adjusted. | Have carburettor adjusted by customer service personnel. | |
| Engine does not accelerate. | Old or incorrectly mixed fuel. | Empty the tank / fill with fresh fuel mixture. |
| Carburettor incorrectly adjusted. | Have carburettor adjusted by customer service personnel. | |
| Engine has no power or stops during cutting. | Cutting head entangled with grass. | Stop the engine and clean the cutting attachment. |
| Dirty air filter. | Clean or replace air filter. | |
| Old or incorrectly mixed fuel. | Empty the tank / fill with fresh fuel mixture. | |
| Carburettor incorrectly adjusted. | Have carburettor adjusted by customer service personnel. |
If you have any further questions, please contact your authorised dealer on site.
All information, diagrams and specifications in these operating instructions are based on the latest product information at the time of going to press.
We reserve the right to make changes without prior notice.
Technical specifications
Engine
Engine type.. air-cooled, two-stroke
Ignition . electronic
Cubic capacity 31 cm³
Maximum engine power according to ISO 8893. 0.75 kW (1 PS)
Electrode gap 0.63 mm
Idle running 2800 min-1
Operating revolutions (lawn trimmer) 7700 min-1
Lubrication. . Petrol/oil mixture (40:1) 2.5%
Ignition switch .... Toggle switch
Starter Automatic return (AST)
Tank capacity 443 ml
Drive shaft and cutting attachment
Drive shaft housing Steel pipe (EZ-LinkTM)
Throttle . Finger actuation
Weight of the unit (without fuel) approx. 6.4 kg
Cutting mechanism. Simplex cord cutting head
Trim line diameter. 2.67 mm
Cutting path diameter 45.7 cm