
SRT L 351 - Téléviseur STRONG - Notice d'utilisation et mode d'emploi gratuit
Retrouvez gratuitement la notice de l'appareil SRT L 351 STRONG au format PDF.

| Type de produit | Téléviseur LCD portable |
| Marque | STRONG |
| Modèle | SRT L 351 |
| Taille de l'écran | 3,5 pouces (8,9 cm) |
| Type d'écran | TFT LCD |
| Dimensions (sans batterie) | 134 x 87 x 22 mm |
| Poids (TV + batterie lithium) | 360 g |
| Alimentation secteur | Adaptateur 100-240 V AC, sortie 9 V / 1,66 A DC |
| Batterie rechargeable | Lithium 7,4 V / 1800 mAh (externe) |
| Batterie alcaline | 6 piles AA (externe) |
| Autonomie typique | 2,5 heures (sur batterie lithium ou piles) |
| Récepteur | DVB-T (TNT) |
| Gamme de fréquences | 177,5 ~ 862 MHz (UHF+VHF) |
| Antenne | Télescopique intégrée (UHF) |
| Haut-parleur | Intégré 0,5 W / 8 Ω |
| Sorties | Vidéo 3,5 mm, audio/casque 3,5 mm |
| Télécommande | Infrarouge, piles CR2025 incluse |
| Commandes | Touche menu, navigation, volume, marche/arrêt |
| Langues OSD | Français, anglais, allemand, portugais, espagnol, italien, néerlandais |
| Fonctions principales | TV/Radio DVB-T, recherche auto, EPG, preview, télétexte, sous-titres |
| Accessoires fournis | Notice, télécommande, batterie lithium, pack piles alcalines, câble A/V, adaptateur, casque, dragonne |
| Sécurité | Ne pas exposer à l'eau, ne pas ouvrir, utiliser uniquement les accessoires recommandés |
| Entretien | Débrancher avant nettoyage, utiliser un chiffon humide, pas de produits liquides |
| Recyclage | Ne pas jeter avec les ordures ménagères, rapporter en déchèterie |
FOIRE AUX QUESTIONS - SRT L 351 STRONG
Questions des utilisateurs sur SRT L 351 STRONG
0 question sur cet appareil. Repondez a celles que vous connaissez ou posez la votre.
Poser une nouvelle question sur cet appareil
Téléchargez la notice de votre Téléviseur au format PDF gratuitement ! Retrouvez votre notice SRT L 351 - STRONG et reprennez votre appareil électronique en main. Sur cette page sont publiés tous les documents nécessaires à l'utilisation de votre appareil SRT L 351 de la marque STRONG.
MODE D'EMPLOI SRT L 351 STRONG
3,5” LCD TV SRT L 351
User Manual
Thank you for purchasing this Strong portable LCD TV. This LCD TV is of our latest development and it is designed to be capable of safely install your LCD TV and to achieve its optimum performance. This user manual is applicable for Strong SRT L 350 LCD TV (DVB-T) and its related accessories. It is advised that first -time and experienced user read this manual in order to safely install the unit.
Accessories
Please check and identify the accessories.

□ Operating instructions (this manual)
Remote control x 1
Battery inside the remote control (for the remote control)

Lithium battery x 1

Alkaline battery pack x 1

Audio/Video cord x 1

Power adapter x 1

□ Headphone x 1

Carrying strap x 1

Table of Contents
Getting started
Accessories 2
Safety information 3
Precautions 7
Battery pack for use 8
Operation panel 14
Menu 16
The remote control 22
Basic connection
Basic connection 23
Player settings
Trouble shooting 24
Specification 25
User memo:
DATE OF PURCHASE
DEALER NAME
MODEL NUMBER
SERIAL NUMBER
The model number and serial number of this
product can be found on the back of the unit.
Please note them in the space provided and keep for future reference.
IMPORTANT SAFETY INSTRUCTIONS & CAUTION

CAUTION
RISK OF ELECTRIC SHOCK DO NOT OPEN

CAUTION: TO REDUCE THE RISK OF ELECTRIC SHOCK DO NOT REMOVE COVER (OR BACK). NO USER-SERVECABLE PARTS INSIDE REFER SERVICING TO QUALIFIED SERVICE PERSONNEL.

The lighting flash with arrowhead symbol, within an equilateral triangle, is intended to alert the user to the presense of uninsulated dangerous voltage within in the product's enclosure that may be of sufficient magnitude to constitute a risk of electric shock to persons.

The exclamation point within an equilateral triangle is intended to alert the user to the presence of important operating and maintenance (servicing) instructions in the literature accompanying the appliance.
WARNING: TO REDUCE THE RISK OF FIRE OR ELECTRIC SHOCK, DO NOT EXPOSE THIS APPLIANCE TO RAIN OR MOISTURE
CAUTION: TO PREVENT ELECTRIC SHOCK, MATCH WIDE BLADE OF POWER PLUG TO WIDE SLOT OF AC OUTLET AND FULLY INSERT.
- Read Instructions. All the safety and operating instructions should be read before the product is operated.
- Retain Instructions. The safety and operating instructions should be retained for future reference.
- HeedWarnings. All warnings on the product and in the operating instructions should be adhered to.
- Follow Instructions. All operating and use instructions should be followed.
- Cleaning. Unplug this product from the wall outlet before cleaning. Do not use liquid cleaners or aerosol cleaners. Use a damp cloth for cleaning.
- Attachments. Do not use attachments not recommended by the product manufacturer as they may cause hazards.
-
Water and Moisture. Do not use this product near water-for example, near a bath tub, wash bowl, kitchen sink, or laundry tub, in a wet basement, or near a swimming pool, and the like.
-
Accessories. Do not place this product on an unstable cart, stand, tripod, bracket, or table. The product may fall, causing serious injury to a child or adult, and serious damage to the product. Any mounting of the product should follow the manufacturer's instructions, and should use a mounting accessory recommended by the manufacturer.
- Ventilation. Slots and openings in the cabinet are provided for ventilation and to ensure reliable operation of the product and to protect it from overheating, and these openings must not be blocked or covered. The openings should never be blocked by placing the product on a bed, sofa, rug, or other similar surface. This product should not be placed in a built-in installation such as a bookcase or rack unless proper ventilation is provided or the manufacturer's instructions have been adhered to.
- Power Sources. This product should be operated only from the type of power source indicated on the marking label. If you are not sure of the type of power supply to your home, consult your product dealer or local power company. For products intended to operate from battery power, or other sources, refer to the operating instructions.
- Grounding or Polarization. This product may be equipped with a polarized alternating-current line plug (a plug having one blade wider than the other). This plug will fit into the power outlet only one way. This is a safety feature. If you are unable to insert the plug fully into the outlet, try reversing the plug. If the plug should still fail to fit, contact your electrician to replace your obsolete outlet. Do not defeat the safety purpose of the polarized plug.
AlternateWarnings. This product is equipped with a three-wire grounding-type plug, a plug having a third (grounding) pin. This plug will only fit into a grounding-type power outlet. This is a safety feature. If you are unable to insert the plug into the outlet, contact your electrician to replace your obsolete outlet. Do not defeat the safety purpose of the grounding-type plug.
- Power-Cord Protection. Power-supply cords should be routed so that they are not likely to be walked on or pinched by items placed upon or against them, paying particular attention to cords at plugs, convenience receptacles, and the point where they exit from the product.
-
Protective Attachment Plug. The product is equipped with an attachment plug having overload protection. This is a safety feature. See Instruction Manual for replacement or resetting of protective device. If replacement of the plug is required, be sure the service technician has used a replacement plug specified by the manufacturer that has the same overload protection as the original plug.
-
Outdoor Antenna Grounding. If an outside antenna or cable system is connected to the product, be sure the antenna or cable system is grounded so as to provide some protection against voltage surges and built up static charges.
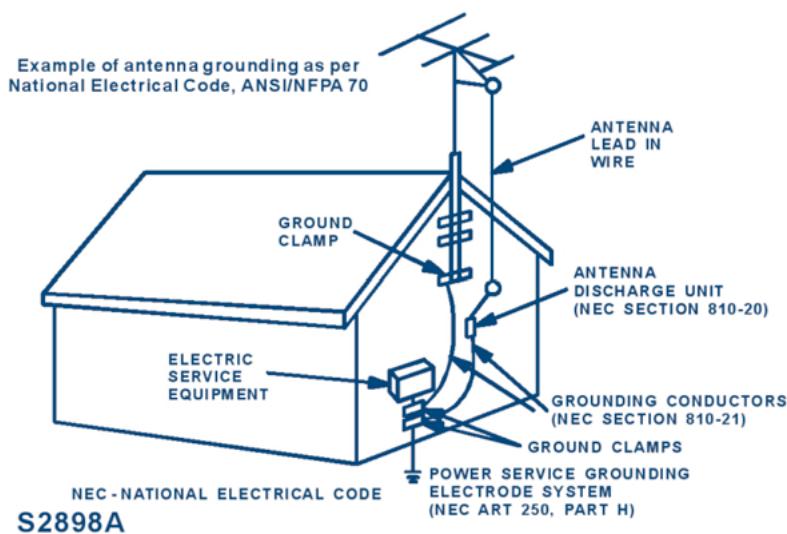
- Lightning. For added protection for this product during a lightning storm, or when it is left unattended and unused for long periods of time, unplug it from the wall outlet and disconnect the antenna or cable system. This will prevent damage to the product due to lightning and power-line surges.
- Power Lines. An outside antenna system should not be located in the vicinity of overhead power lines or other electric light or power circuits, or where it can fall into such power lines or circuits. When installing an outside antenna system, extreme care should be taken to keep from touching such power lines or circuits as contact with them might be fatal.
- Overloading. Do not overload wall outlets, extension cords, or integral convenience receptacles as this can result in a risk of fire or electric shock.
-
Object and Liquid Entry. Never push objects of any kind into this product through openings as they may touch dangerous voltage points or short-out parts that could result in a fire or electric shock. Never spill liquid of any kind on the product.
-
Servicing. Do not attempt to service this product yourself as opening or removing covers may expose you to dangerous voltage or other hazards. Refer all servicing to qualified service personnel.
- Damage Requiring Service. Unplug this product from the wall outlet and refer servicing to qualified service personnel under the following conditions:
a) When the power-supply cord or plug is damaged,
b) If liquid has been spilled, or objects have fallen into the product,
c) If the product has been exposed to rain or water,
d) If the product does not operate normally by following the operating instructions.
Adjust only those controls that are covered by the operating instructions as an improper adjustment of other controls may result in damage and will often require extensive work by a qualified technician to restore the product to its normal operation,
e) If the product has been dropped or damaged in any way, and
f) When the product exhibits a distinct change in performance this indicates a need for service.
- Replacement Parts. When replacement parts are required, be sure the service technician has used replacement parts specified by the manufacturer or have the same characteristics as the original part. Unauthorized substitutions may result in fire, electric shock, or other hazards.
- Safety Check. Upon completion of any service or repairs to this product, ask the service technician to perform safety checks to determine that the product is in proper operating condition.
- Wall or Ceiling Mounting. The product should be mounted to a wall or ceiling only as recommended by the manufacturer.
- Heat. The product should be situated away from heat sources such as radiators, heat registers, stoves, or other products (including amplifiers) that produce heat.
PRECAUTIONS
On Safety
- Do not use wet hands to pull out the plug. It may cause electrical shock.
If the product does not work, please pull out the plug for safety. Contact us for further technical support.
Before moving the product, please make sure the power adapter is disconnected from the wall outlet. - Should any solid object or liquid fall into the cabinet, unplug the player and have it checked by qualified personnel before operating it any further.
If you are not going to use the product for a long while, be sure to disconnect the product from the wall outlet. To disconnect the power adapter, grasp the plug itself; never pull the cord.
On Placement
- Please keep a sufficient distance between the product and a radio set. A sufficient distance is also needed between the product and any other devices with electromagnetic field.
- Please place the product in a location with adequate ventilation to prevent heat build-up in the product.
- Do not place the product on a soft surface such as a rug that might block the ventilation holes on the bottom.
- Do not place the product in a location near heat sources, or in places subject to direct sunlight, excessive dust, or mechanical shock.
- Do not place the product in a location exposed to cool air. Condensation may occur and cause the product work incorrectly.
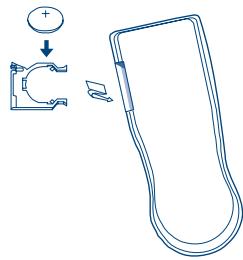
BATTERIES
- Insert the CR2025 type battery (3V) in the battery compartment into the remote control (the polarity "+" on top) then push the battery compartment into the remote control.
Do not:
Place near or expose to flame.
Take apart or short circuit.
Attempt to recharge alkaline or manganese battery.
Use battery if the covering has been peeled off.
- Mishandling of battery can cause electrolyte leakage which can damage items and may cause a fire.
If electrolyte leaks from the battery, consult your dealer.
Wash thoroughly with water if electrolyte comes in contact with any part of your body.
- Remove Battery if the remote control is not going to be used for a long period of time. Store in a cool, dark place.
- Replace Battery if the unit does not respond to the remote control even when held close to the front panel.
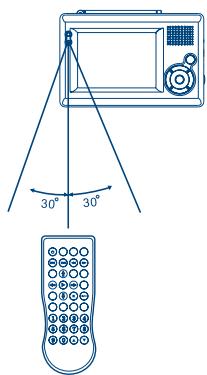
USING THE REMOTE CONTROL
- Aim at the sensor, avoiding obstacles, at a maximum range of 7m (23 feet) directly in front of the unit.
- Keep the transmission window and the unit's sensor free from dust.
Operation can be affected by strong light sources, such as direct sunlight, and the glass doors on cabinets.
Do not:
Put heavy objects on the remote control.
Take the remote control apart.
Spill liquids onto the remote control.
Remote control signal sensor
PREPARING THE BATTERY PACK FOR USE (Lithium )
The HANDHELD DTV with battery pack allows playing without any AC power.
Make sure the Lithium battery pack is properly attached to the player and fully charged when use.
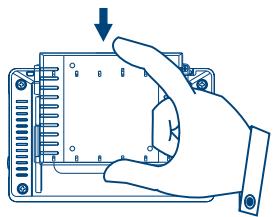
USING THE BATTERY PACK
ATTACHING THE BATTERY PACK
- Matching the battery pack into the back of the Handheld DTV.
- Press the battery pack downward until the battery pack locks onto the Handheld DTV.
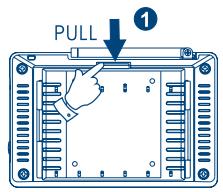
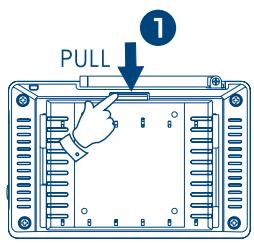
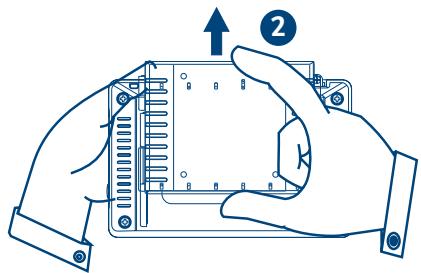
DETACHING THE BATTERY PACK
- Detach the battery pack from Handheld DTV if you will be storing the unit for a long period of time.
The unit will continue to consume power while the battery pack is attached and turned off.
Ensure the unit is turned off before detaching the battery pack. -
Detach the battery pack from the Handheld DTV by the following steps.
-
Press the locker on the Handheld TV.
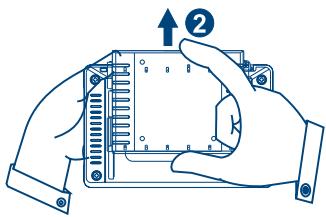
- Push out the battery pack upward unit the battery pack unlocks from the Handheld DTV.

IMPORTANT
The Handheld DTV will turn off automatically when the battery is getting low.
However, you can recharge your battery pack according the following correct method.
Charge your battery pack for a minimum of 4 hours to get fully charged.
- When the battery pack is being charged, the LED will glow red.
After successfully charging the battery pack, the LED turns green.
Please un-pack the battery when the battery is not working.
The average lifetime of the lithium rechargeable is about 300 recharging cycles.
After so many times of recharges, please consider replacing the battery.

WARNING
- Do not disassemble, crush, puncture, or short external connectors contact.
Use only with specified charger and players.
Do not expose to high temperature above 50^ (122^)
Store the battery between -20^ (4^) and 35^ (95^)
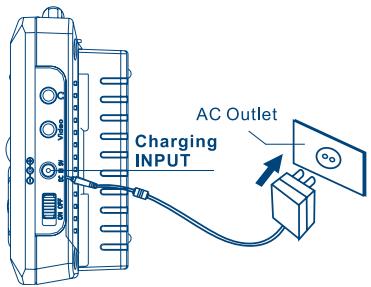
CHARGING METHODS
1. Charge battery pack alone:
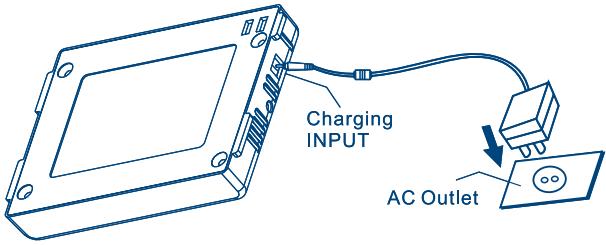
- Connect the large power adaptor head firmly into wall AC outlet and firmly into charging input socket on the side of battery pack with the smaller plug of the adaptor.
Leave battery pack alone to charge for 4 hours.
2. Use Handheld TV and charge battery pack simultaneously.
- Attach battery pack to back of handheld TV and connect the large power adaptor head firmly into wall AC outlet and firmly into charging input socket on the side of battery pack with the smaller plug of the adaptor.
- Turn handheld TV power switch on/off unit to ON to use handheld TV and charge battery pack simultaneously.
For faster charging, please turn handheld TV power switch on/off unit to OFF.
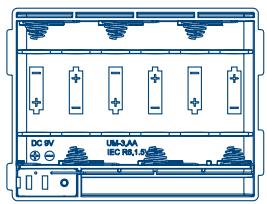
PREPARING THE BATTERY PACK FOR USE (Alkaline Battery)
The Handheld DTV with battery pack allows playing without any AC power.
Make sure the Alkaline battery pack is properly attached to the player.
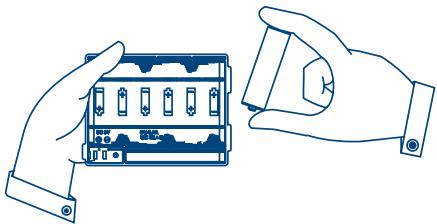
USING THE BATTERY PACK
ATTACHING THE BATTERY PACK
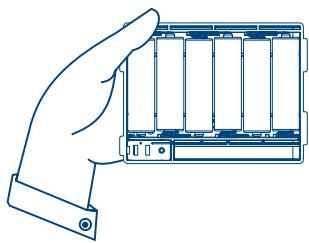
- Referring to the right diagram, please watch out the plus and minus signs of the batteries.
- Referring to the next diagram, insert the alkaline batteries (AA x 6 PCS) in the battery pack.
- Move the battery pack downward until the battery pack is locked onto the Handheld DTV.
- Press the battery pack downward until the battery pack is locked onto the Handheld DTV.

DETACHING THE BATTERY PACK
- Detach the battery pack from Handheld DTV, if you will be storing the unit for a long period of time.
The unit will continue to consume power while the battery pack is attached and turned off.
Ensure the unit is turned off before detaching the battery pack. -
Detach the battery pack from the Handheld DTV by the following steps.
-
Press the locker on the Handheld DTV.
- Push out the battery pack upward unit the battery pack separates from the Handheld DTV.
- Take out alkaline battery from the battery pack.

IMPORTANT
The Handheld DTV will turn off when the battery is getting low,
Please un-pack the battery when the battery is not working.

WARNING
- Do not disassemble, crush, puncture, or short external connectors contact.
Do not expose to high temperature.
Please don't use different batteries to avoid causing any danger.
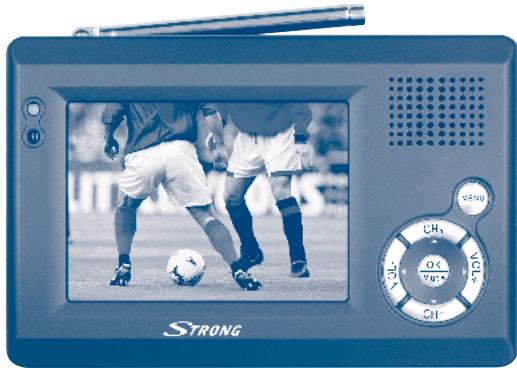
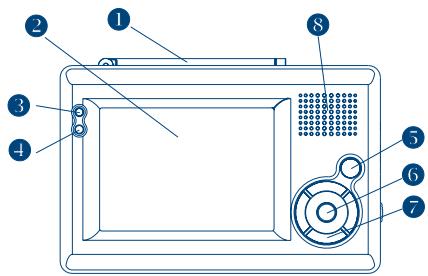
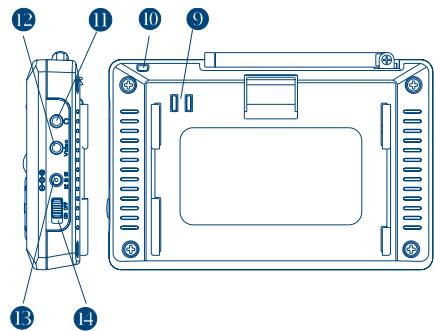
OPERATION PANEL
FRONTSIDE
- Antenna
- LCD panel
- Power LED
When the unit operates, the LED will glow green
- Infrared remote sensor
Allow remote controller to navigate this unit. - MENU
- OK/MUTE
- Multi selector (CH + () / CH - () / VOL + () / VOL - ())
- Speaker
5, 6, 7. see also next page.
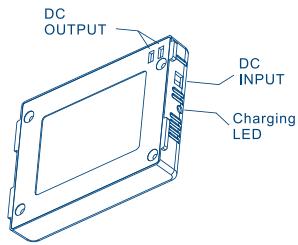
SIDE AND BACK
- Battery connector
- Eyelet for TV strap
- Earphone/Audio out connector Output the stereo audio signal.
- Video out connector Output the video signal
- DC power connector Connect with the AC/DC power adapter
- Power switch
KEY FUNCTION
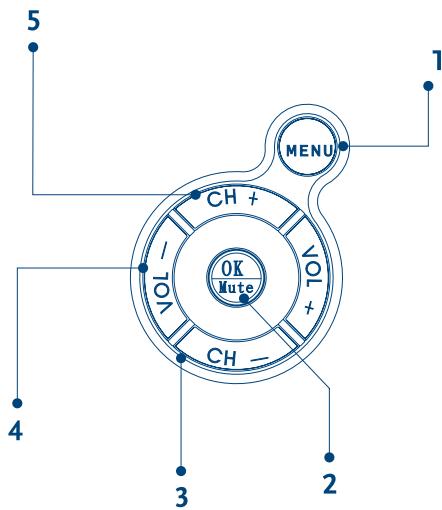
- Menu
Press this button to enter or exit the menu mode
- Mute control
Press this button to mute or restore the volume
Make selection
In menu mode, press this button to make your selection
- Navigation the menu
In menu mode, press CH+ button and CH- button to move cursor up and down.
Press VOL- button and VOL+ button to move cursor left and right.
- Volume adjustment
Press VOL- button or VOL+ button to adjust the volume
- Channel selection
Press CH + button or CH- button to select he TV/Radio channel
MENU
By pressing the VOL- button, you can switch between the program and system page.
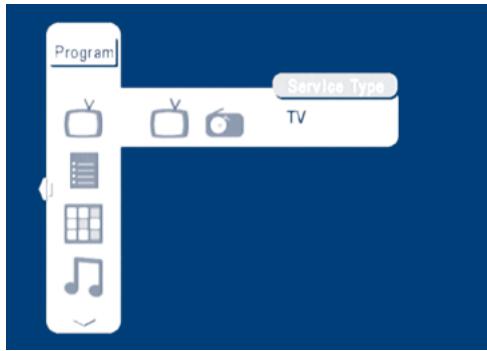
PROGRAM PAGE

- Service Type: selection of either TV or Radio
- Program list: to show the information of available channels
- Preview: of up to 9 selected channels
- Audio channel: selection of master or secondary language
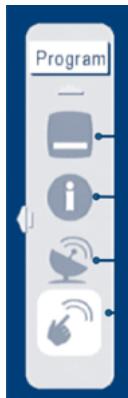
- Subtitle language: if supported by system operator, press OK and use VOL+ /- buttons to select Subtitle system and CH +/- to choose language. Confirm your choice with OK button
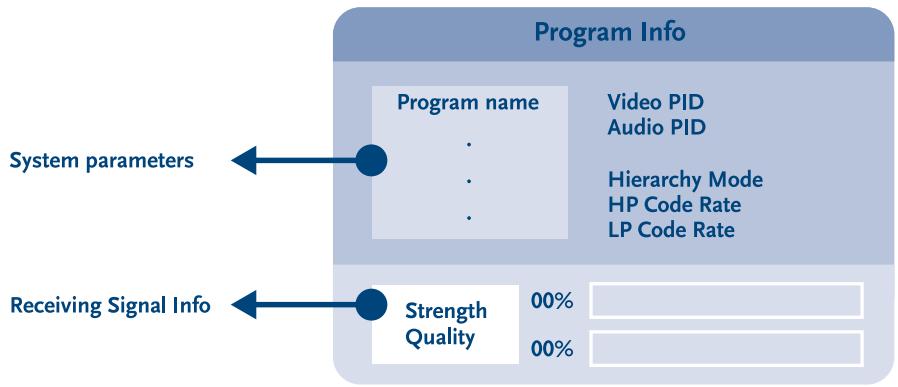
- Program info: system parameters and signal information
- Automatic search
- Manual search
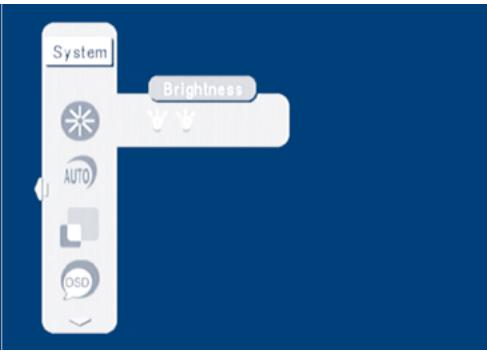
SYSTEM PAGE
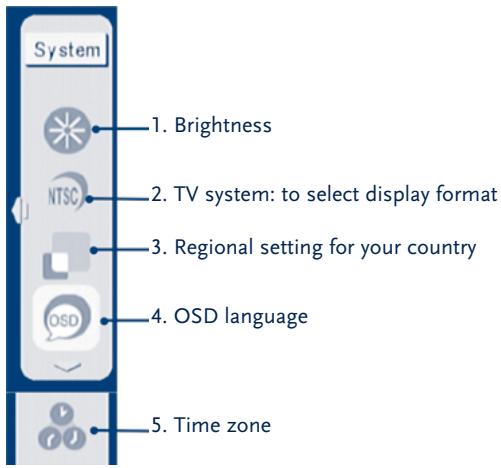
You can use CH+ button and CH- button to highlight the item and press VOL+ or VOL- button to select your choice. Press OK button to set your settings.
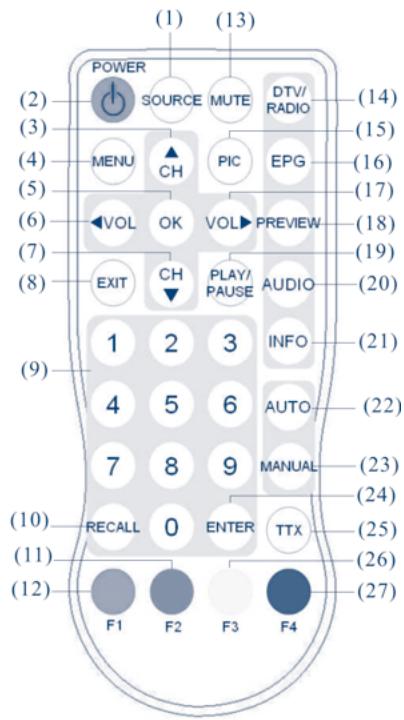
BUTTONS ON YOUR REMOTE CONTROL
Electronic Program Guide
It shows the information of all available channels. Use CH+ button and CH- button to select the channel, with VOL+ and VOL- you see details of the channel.
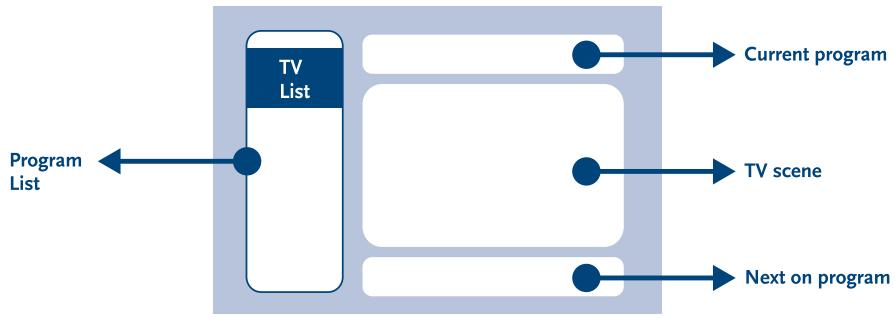
Digest
Get the snapshots of 9 programs simultaneously for user to quickly browse among different programs.
Program 1
Program 2
Program 3
Program 4
Program 5
Program 6
Program 7
Program 8
Program 9
Audio
Master/secondary language selection. Use VOL+ and VOL- button to select the language you like to listen.
Channel
Searching
Audio PID
1003
Sound Mode
LR
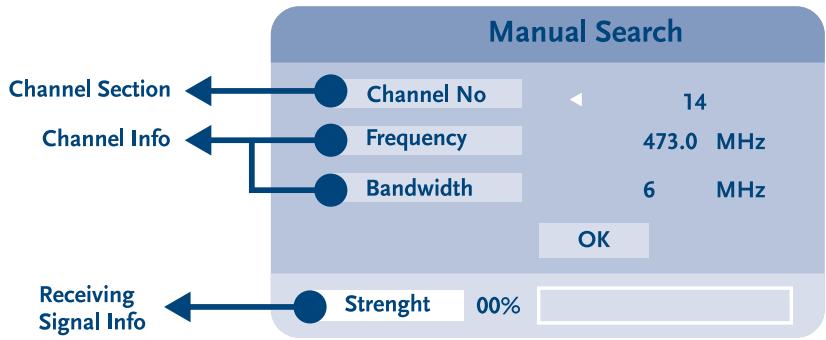
Manual Search
Perform program searching in the desired channel only. (Found programs will be appended to the program list)
Audio channel
Program information
Provides information about system parameters and signal. Press MENU button to exit.
FIRST SETUP
When the unit is turned on the first time, please follow these steps to initialize.
- Press MENU button, then VOL- button to enter the menu for system configuration.
- Press VOL+ button to adjust the brightness level of the display, exit with OK and then CH- button for the next step.
- Press VOL+ button, choose your TV system output, exit with OK and then CH- button for the next step.
- Press CH+ or CH- button, choose your OSD language, exit with OK and then CH- button for the next step.
- Time will be automatically set. If you need to correct it, press CH+ or CH- to adjust.
- Go back to the top menu and press VOL- to enter program menu screen.
- Highlight the automatic search item, press OK button.
- Highlight the OK item, press OK button.
- Channel searching will need a few minutes.
- When channel searching is completed, press CH+ or CH- to select the program.
- To adjust the volume, press VOL+ or VOL-.
AUTOMATIC CHANNEL SEARCHING
When you move to a new region and the system provider is different, you need to re-search for program channels. Please follow these steps.
- Press the MENU button to enter menu screen.
- Press VOL- button, highlight your region settings, select country and exit with OK.
- Highlight the automatic search item and press the OK button.
- Highlight the OK item and press the OK button.
- Channel searching will need a few minutes.
- When channel searching is completed, press CH+ or CH- to select the program.
THE REMOTE CONTROL
Normal KEYS
- SOURCE: no function.
- POWER: power on/stand-by selection.
- Channel selection up or move the cursor up.
- MENU: enter the setup menu.
- OK: select the highlighted item.
- VOLUME down or move the cursor left.
- Channel selection down or move the cursor down.
- EXIT: exit the current setup.
- Digital keys
- RECALL: return to the last selected channel.
- RED button: sub-title key in the normal operation mode or a hot key to go to the browsed Teletext pages in Teletext mode.
- GREEN button: a hot key to go to the browsed Teletext pages in Teletext mode.
- MUTE: mute control.
- DTV/Radio selection.
- PIC: no function.
- EPG: electronic program guide.
- Volume up or move the cursor right.
- PREVIEW: preview selected programs.
- PLAY/PAUSE selection.
- AUDIO: second language and stereo selection.
- INFO: DTV system information.
- AUTO: automatic channel scanning.
- MANUAL: manually select channels.
- ENTER: enter the selected channel number.
- TTX: Teletext key to display Teletext (has to be supported by broadcaster).
- YELLOW button: page up in the EPG mode or a hot key to go to the browsed Teletext pages in the Teletext mode.
- BLUE button: page down in the EPG mode or a hot key to go to the browsed Teletext pages in the Teletext mode.
BASIC CONNECTION
CAUTION:
Refer to the owner's manual of the connected equipment as well.
Before connecting the Handheld DTV to other equipments, please turn the power off and unplug all of the equipments from the outlet.
CONNECTION TO A TV SET
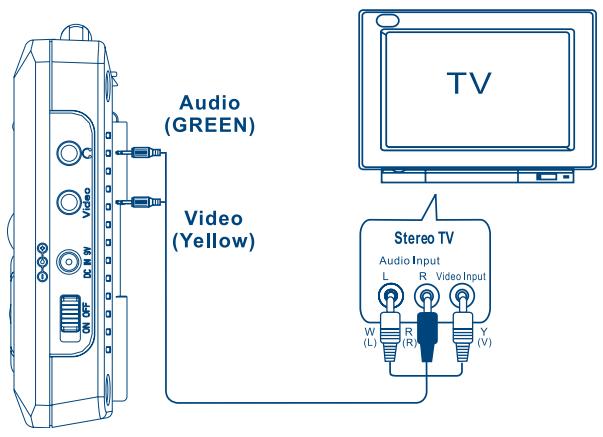
Connect Your Unit Directly To Your Television.
Do not connect unit through your video cassette recorder when setting up your home entertainment system, because the picture may not be played correctly due to the copy guard. If your TV set does not have the proper A/V plugs, please go to your local electronics store to purchase a video RF modulator.
TROUBLE SHOOTING Q&A
Before requesting service for this player, please check the following table illustrating possible reasons of the problems that you might encounter. Certain simple checks or adjustments on your DTV may eliminate the problem and restore the proper operation.
| Trouble | Possible Reason | Solution |
| No picture, no audio | The battery power is too low | Recharge the battery power |
| Power cord is not properly hooked up. | Check the power cord connection. | |
| The receiver is not powered on. | Click the “POWER” button to turn on the receiver. | |
| The number of DVBT channels is not as many as we expected. | The no. of stored channels is small. | Please click the “AUTO” button or “MANUAL” button key to re-scan all of the channels. |
| Signal Quality Level of certain TV channels is too low. | Please put unit closer to a window or to a more free view place to increase the signal. | |
| Certain TV channels are not provided locally. | No way to watch these channels. | |
| All of the channels show “No Signal” or Mosaic tiles appear on the display | No DVBT service is provided in the area. | No way to watch these channels. |
| Video is good, but no audio | The voice volume is turned to low. | Click the “VOL+” button to raise the volume. |
| The audio is muted. | Click the “MUTE” button to disable the mute function. | |
| Remote control does not work | No power. | Check the battery of the remote controller. |
| The Handheld DTV does not work at all | No power. | Check the battery pack! It is placed up side down! |
SPECIFICATION
| Model number | SRT L 351 |
| Display window | 3.5” TFT LCD |
| Tuner | Frequency range: 177.5 ~ 862 MHz (UHF+VHF) |
| Channel bandwidth: 6/7/8 MHz | |
| Antenna | Built-in telescopic antenna for UHF band reception |
| Speaker | Built-in 0.5 W/8 Ohm speaker |
| Output | 3.5 mm Video connector |
| Interfaces | 3.5 mm Earphone/Audio connector |
| LED indicators | Power LED (Operation: green) |
| Controls | Infrared Remote control, 6 keys, Power on/off slide switch |
| OSD languages | English, German, French, Portuguese, Spanish, Italian, Dutch |
| Features | DVB-T TV/Radio, auto channel search, EPG, channel preview, teletext, subtitle |
| Power supply | 100–240 V AC power adapter with 9 V/1.66 A DC output |
| Battery | External battery pack (6 AA batteries) for extended operations or External 7.4 V/1800 mA rechargeable lithium battery |
| Operating time | Typical 2.5 hours (when powered by external rechargeable lithium battery or external battery pack) |
| Dimensions | 134 x 87 x 22 mm (without battery pack) |
| Weight | 360 g (TV + Lithium battery) |
Technical alterations reserved.
Environmental Issues
Strong is committed to reducing the impact of its products on the environment. To maximise the benefits of our design enhancements, your co-operation is required.
Electronic product recycling
Do not dispose of this product with your domestic rubbish
At the end of its useful life, this product contains materials which when processed correctly can be recovered and recycled. By participating in the responsible recycling of this product you will be reducing the requirement for new raw materials and reducing the amount of material that would otherwise end up in landfill. When you purchase a new, similar product your retailer may offer to take this old one off you. Alternatively, you can take it to your local recycling centre. Your retailer or local municipal authority will advise you of the collection facilities available for waste electronically products in your area. User of this service will be free to you.
Within the scope of the European legislation on Waste Electrical and Electronic Equipment (Directive 2002/96/EC valid as of August 2005) STRONG provides a recycling system free of charge for consumers to returning products after end of life. For more information about STRONG's environmental policy to you:
www,strongsat.com - select "About us" and Environmental Policy" from the submenu.

Packaging
When disposing of this product packaging, please ensure that it is recycled. Packaging material is to be depolluted in waste separation.

Power Saving
To save power and money, please put the product into standby mode when not in use. We also recommend disconnection from mains supply when not in use for longer periods of time.

Batteries
Do not dispose of the batteries from your handset with your domestic waste

Where they are available, participate in your local municipal or retailer collection schemes for spent batteries. Batteries discarded in landfill sites or incinerated increases the chances of pollutants being dispersed into the atmosphere.
Alternations reserved
- Accessories
- Table of Contents
- Getting started
- Basic connection
- Player settings
- User memo:
- IMPORTANT SAFETY INSTRUCTIONS & CAUTION
- CAUTION
- WARNING: TO REDUCE THE RISK OF FIRE OR ELECTRIC SHOCK, DO NOT EXPOSE THIS APPLIANCE TO RAIN OR MOISTURE
- CAUTION: TO PREVENT ELECTRIC SHOCK, MATCH WIDE BLADE OF POWER PLUG TO WIDE SLOT OF AC OUTLET AND FULLY INSERT.
- PRECAUTIONS
- On Safety
- On Placement
- BATTERIES
- Do not:
- USING THE REMOTE CONTROL
- PREPARING THE BATTERY PACK FOR USE (Lithium )
- USING THE BATTERY PACK
- ATTACHING THE BATTERY PACK
- DETACHING THE BATTERY PACK
- IMPORTANT
- WARNING
- CHARGING METHODS
- Charge battery pack alone:
- Use Handheld TV and charge battery pack simultaneously.
- PREPARING THE BATTERY PACK FOR USE (Alkaline Battery)
- OPERATION PANEL
- FRONTSIDE
- SIDE AND BACK
- KEY FUNCTION
- MENU
- PROGRAM PAGE
- SYSTEM PAGE
- BUTTONS ON YOUR REMOTE CONTROL
- Electronic Program Guide
- Digest
- Audio
- Manual Search
- Program information
- FIRST SETUP
- AUTOMATIC CHANNEL SEARCHING
- THE REMOTE CONTROL
- Normal KEYS
- CAUTION:
- CONNECTION TO A TV SET
- Connect Your Unit Directly To Your Television.
- TROUBLE SHOOTING Q&A
- SPECIFICATION
- Environmental Issues
- Electronic product recycling
- Packaging
- Power Saving
Marque : STRONG
Modèle : SRT L 351
Catégorie : Téléviseur