3500 - Arrosage automatique RAIN BIRD - Notice d'utilisation et mode d'emploi gratuit
Retrouvez gratuitement la notice de l'appareil 3500 RAIN BIRD au format PDF.


| Type de produit | Arroseur rotatif à turbine |
| Marque | Rain Bird |
| Modèle | 3500 |
| Rayon de couverture | 6,1 à 11,6 mètres |
| Angle de couverture | 20° à 360° réglable |
| Pression de fonctionnement | 1,7 à 4,5 bar |
| Débit | 0,37 à 1,23 m³/h |
| Matériau du corps | Plastique ABS résistant aux UV |
| Matériau de la buse | Acier inoxydable |
| Raccordement | Filetage femelle 1/2" ou 3/4" |
| Hauteur totale | Environ 18 cm |
| Diamètre du corps | Environ 5 cm |
| Poids | Environ 150 g |
| Alimentation | Aucune, fonctionnement hydraulique |
| Fonction principale | Arrosage de pelouses et jardins |
| Réglages | Arc, secteur et portée |
| Entretien | Nettoyage régulier du filtre et de la buse |
| Sécurité | Aucune pièce sous tension, utilisation extérieure |
| Pièces détachées disponibles | Buses, ressorts, joints, filtres |
| Réparabilité | Facile, démontage sans outil |
FOIRE AUX QUESTIONS - 3500 RAIN BIRD
Questions des utilisateurs sur 3500 RAIN BIRD
0 question sur cet appareil. Repondez a celles que vous connaissez ou posez la votre.
Poser une nouvelle question sur cet appareil
Téléchargez la notice de votre Arrosage automatique au format PDF gratuitement ! Retrouvez votre notice 3500 - RAIN BIRD et reprennez votre appareil électronique en main. Sur cette page sont publiés tous les documents nécessaires à l'utilisation de votre appareil 3500 de la marque RAIN BIRD.
MODE D'EMPLOI 3500 RAIN BIRD
3504 Series Nozzle Performance
| IMPERIAL | |||||
| Pressure psi | Nozzle ft. | Radius ft. | Flow gpm | Precip In/h | Precip In/h |
| 25 | 0.75 15 0.54 0.46 0.53 | ||||
| 1.0 20 0.77 0.37 0.43 | |||||
| 1.5 23 1.06 0.39 0.45 | |||||
| 2.0 27 1.40 0.37 0.43 | |||||
| 3.0 29 2.17 0.50 0.57 | |||||
| 4.0 31 2.97 0.59 0.69 | |||||
| 35 | 0.75 17 0.67 0.45 0.52 | ||||
| 1.0 21 0.92 0.40 0.46 | |||||
| 1.5 23 1.28 0.47 0.54 | |||||
| 2.0 27 1.69 0.45 0.52 | |||||
| 3.0 31 2.60 0.52 0.60 | |||||
| 4.0 33 3.58 0.63 0.73 | |||||
| 45 | 0.75 17 0.77 0.51 0.59 | ||||
| 1.0 21 1.06 0.46 0.53 | |||||
| 1.5 24 1.48 0.49 0.57 | |||||
| 2.0 27 1.93 0.51 0.59 | |||||
| 3.0 31 3.00 0.60 0.69 | |||||
| 4.0 35 4.13 0.65 0.75 | |||||
| 55 | 0.75 18 0.85 0.51 0.58 | ||||
| 1.0 22 1.18 0.47 0.54 | |||||
| 1.5 24 1.65 0.55 0.64 | |||||
| 2.0 28 2.15 0.53 0.61 | |||||
| 3.0 32 3.25 0.61 0.71 | |||||
| 4.0 35 4.60 0.72 0.83 | |||||
Precipitation rates based on half-circle operation
■ Square spacing based on 50% diameter of throw
▲ Triangular spacing based on 50% diameter of throw
Performance data collected in zero wind conditions
Performance data derived from tests that conform with ASABE Standards, ASABE S398.1.
| METRIC | |||||
| Pressure bar | Nozzle Radius m | Flow m^3/h | Flow U/m | Precip mm/h | Precip mm/h |
| 1.7 | 0.75 4.6 | 0.12 | 2.04 12 | 14 | |
| 1.0 6.1 | 0.17 | 2.91 9 | 11 | ||
| 1.5 7.0 | 0.24 | 4.01 10 | 11 | ||
| 2.0 8.2 | 0.32 | 5.30 9 | 11 | ||
| 3.0 8.8 | 0.49 | 8.21 13 | 15 | ||
| 4.0 9.4 | 0.67 | 11.24 15 | 17 | ||
| 2.0 | 0.75 4.8 | 0.13 | 2.24 12 | 13 | |
| 1.0 6.2 | 0.19 | 3.14 10 | 11 | ||
| 1.5 7.0 | 0.26 | 4.35 11 | 12 | ||
| 2.0 8.2 | 0.34 | 5.74 10 | 12 | ||
| 3.0 9.1 | 0.53 | 8.87 13 | 15 | ||
| 4.0 9.7 | 0.73 | 12.17 16 | 18 | ||
| 2.5 | 0.75 5.2 | 0.16 | 2.58 12 | 13 | |
| 1.0 6.4 | 0.21 | 3.55 10 | 12 | ||
| 1.5 7.0 | 0.30 | 4.94 12 | 14 | ||
| 2.0 8.2 | 0.39 | 6.51 12 | 13 | ||
| 3.0 9.4 | 0.60 | 10.03 13 | 16 | ||
| 4.0 10.1 | 0.83 | 13.82 16 | 19 | ||
| 3.0 | 0.75 5.2 | 0.17 | 2.86 13 | 15 | |
| 1.0 6.4 | 0.24 | 3.93 12 | 13 | ||
| 1.5 7.3 | 0.33 | 5.49 12 | 14 | ||
| 2.0 8.2 | 0.43 | 7.17 13 | 15 | ||
| 3.0 9.4 | 0.67 | 11.13 15 | 17 | ||
| 4.0 10.6 | 0.92 | 15.32 16 | 10 | ||
| 3.5 | 0.75 5.4 | 0.19 | 3.09 13 | 15 | |
| 1.0 6.6 | 0.26 | 4.27 12 | 14 | ||
| 1.5 7.3 | 0.36 | 5.97 13 | 15 | ||
| 2.0 8.4 | 0.47 | 7.79 13 | 15 | ||
| 3.0 9.6 | 0.71 | 11.90 15 | 18 | ||
| 4.0 10.7 | 1.00 | 16.66 18 | 20 | ||
| 3.8 | 0.75 5.5 | 0.19 | 3.22 13 | 15 | |
| 1.0 6.7 | 0.27 | 4.47 12 | 14 | ||
| 1.5 7.3 | 0.37 | 6.25 14 | 16 | ||
| 2.0 8.5 | 0.49 | 8.14 13 | 15 | ||
| 3.0 9.8 | 0.74 | 12.30 16 | 18 | ||
| 4.0 10.7 | 1.04 | 17.41 18 | 21 | ||
RAIN BIRD®
Rain Bird Corporation
6991 E. Southpoint Road
Tucson, AZ 85756
Phone: (520) 741-6100
Fax: (520) 741-6522
Rain Bird Corporation
970 West Sierra Madre Avenue
Azusa, CA 91702
Phone: (626) 812-3400
Fax: (626) 812-3411
www.rainbird.com
® Registered trademark of Rain Bird Corporation
© 2023 Rain Bird Corporation 10/25
D#: D42377

3500 Series Rotor
Installation Instructions

natural_image
Technical line drawing of a mechanical assembly with no visible text or symbolsNozzle Identification
Tapón de Identificación de la Boquilla
Nozzle Retention
Ranura de Ajuste del Eadio

Pull-Up Slot
Ranura de Levante
Arc Adjustment Slot
Ranura de Ajuste del Arco de Cobertura
natural_image
Illustration of a hand using a tool to adjust or install a mechanical component, with an arrow indicating direction (no text or symbols present)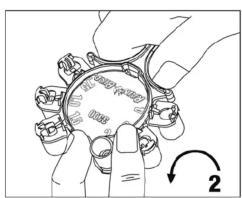
natural_image
Illustration of a hand holding a mechanical gear with a circular motion arrow labeled '2' (no text or symbols on the gear itself)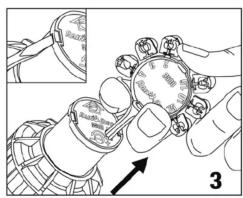

natural_image
Diagram of a hand holding a small mechanical component, labeled '4a' (no text or symbols on the diagram itself)
natural_image
Diagram of a rice cooker with a rotating handle and base, labeled '4b' (no text or symbols on the diagram itself)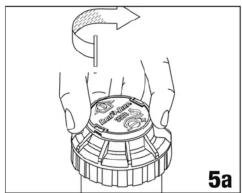
English
Installation Instructions
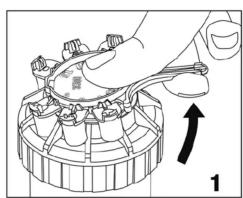
- Remove nozzle TREE from rotor.
- Select desired nozzle.
- Lift up stem.
- Installing nozzles:
4a. Insert nozzle, (press firmly until nozzle seats).
4b. Turn nozzle retention screw to retain nozzle. - Setting the arc: Arc is adjustable from 40–360 degrees.
5a. Find fixed LEFT edge.
5b. To increase arc, turn right (clockwise).
5c. To decrease arc, turn left (counterclockwise).
6. Removing nozzles.
7. Cleaning filter screen:
7a. Remove internals from case.
7b. Remove Filter screen.

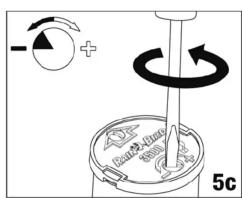
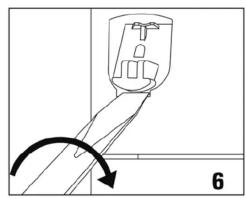
natural_image
Diagram of a hand holding a device with a curved arrow indicating rotation (no text or symbols)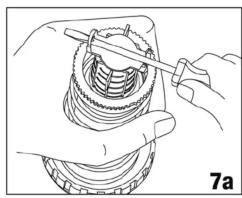
natural_image
Illustration of hands assembling a mechanical component with a tool (no text or symbols visible)
natural_image
Illustration of a hand using a tool to lift a spring-like structure over grass, labeled '7b' (no text or symbols on the diagram itself)
Español
Instrucciones para la Instalación
- Remueva el portaboquilla "TREE" del aspersor de turbina.
- Seleccione la boquilla.
- Levante el vástago.
- La instalación de las boquillas:
4a. Introduzca la boquilla (presione firmemente hasta que la boquilla se asiente).
4b. Gire el tornillo de ajuste del radio para fijar la boquilla. - El reglaje del arco de cobertura: El arco de cobertura puede ser ajustado desde 40 hasta 360 grados.
5a. Ubique el borde izquierdo del punto de parada.
5b. Para aumentar el arco de cobertura, gire hacia la derecha (en el sentido de las manecillas del reloj).
5c. Para disminuir el arco de cobertura, gire hacia la izquierda (en el sentido contrario al de las manecillas del reloj).
6. Cómo se quitan las boquillas.
7. La limpieza del filtro de malla:
7a. Remueva el mecanismo interno de la carcasa.
7b. Remueva el filtro de malla.
Marque : RAIN BIRD
Modèle : 3500
Catégorie : Arrosage automatique