
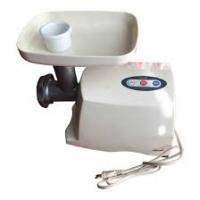
KH 3461 PROFI MEAT GRINDER - Hachoir à viande BIFINETT - Notice d'utilisation et mode d'emploi gratuit
Retrouvez gratuitement la notice de l'appareil KH 3461 PROFI MEAT GRINDER BIFINETT au format PDF.

| Type de produit | Hachoir à viande électrique |
| Marque | BIFINETT |
| Modèle | KH 3461 PROFI MEAT GRINDER |
| Alimentation | 230 V, 50 Hz |
| Puissance maximale | 550 W |
| Classe de protection | II |
| Temps de fonctionnement continu max. | 15 minutes, puis refroidissement de 30 minutes |
| Usage prévu | Domestique : hachage de viande, fabrication de saucisses, kubbe, biscuits sablés |
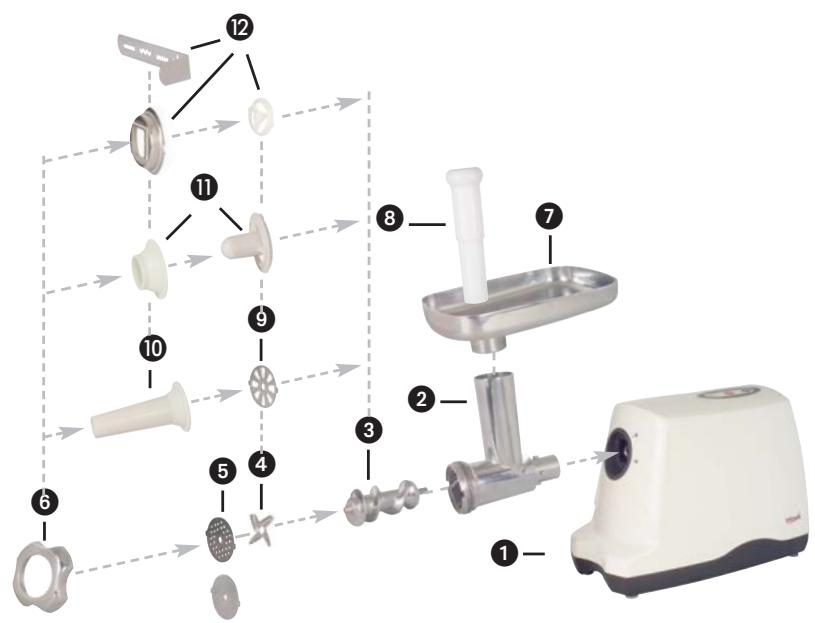
| Accessoires inclus | Vis de transport, lame croisée, 2 disques de hachage (gros et fin), plateau d'alimentation, poussoir, disque à saucisses, accessoire pour saucisses, accessoire kubbe, accessoire biscuits |
| Matériau du corps | Plastique (bloc moteur), métal (lame, disques), plastique (autres accessoires) |
| Nettoyage du bloc moteur | Chiffon humide, ne pas immerger |
| Nettoyage des accessoires | Lame et disques au lave-vaisselle ; autres accessoires à la main avec eau chaude et détergent |
| Sécurité | Fonction inverse (REV) pour déblocage, protection contre surcharge, arrêt automatique |
| Stockage | Rangement du câble sous l'appareil, disques dans compartiment supérieur |
| Garantie | Voir livret de garantie (Kompernaß GmbH) |
| Service après-vente | Kompernaß GmbH, Burgstrasse 21, 44867 Bochum, www.kompernass.com |
| Nombre de pages de la notice | 15 pages |
FOIRE AUX QUESTIONS - KH 3461 PROFI MEAT GRINDER BIFINETT
Questions des utilisateurs sur KH 3461 PROFI MEAT GRINDER BIFINETT
0 question sur cet appareil. Repondez a celles que vous connaissez ou posez la votre.
Poser une nouvelle question sur cet appareil
Téléchargez la notice de votre Hachoir à viande au format PDF gratuitement ! Retrouvez votre notice KH 3461 PROFI MEAT GRINDER - BIFINETT et reprennez votre appareil électronique en main. Sur cette page sont publiés tous les documents nécessaires à l'utilisation de votre appareil KH 3461 PROFI MEAT GRINDER de la marque BIFINETT.
MODE D'EMPLOI KH 3461 PROFI MEAT GRINDER BIFINETT
UK
KompernaB GmbH · Burgstraße 21 · D-44867 Bochum
www.kompernass.com
ID-Nr.: KH3461-10/05-V5

Mincer KH 3461
Operating Instructions
KH3461_UK 07.03.2006 15:44 Uhr Seite 3


A

B
C
D

| Mincer KH 3461 | Page |
| 1. Intended use | 4 |
| 2. Technical Data | 4 |
| 3. Delivery Contents | 4 |
| 4. Safety Instructions | 4 |
| 5. Assembly | 5 |
| a) Assembling the meat grinder | 5 |
| b) Assembling the sausage stuffer attachment | 6 |
| c) Assembling the kubbe attachment | 6 |
| d) Assembling the biscuit pastry attachments | 6 |
| 6. Operation | 7 |
| a) Operating the appliance | 7 |
| b) Processing meat | 7 |
| c) Processing sausage meat | 7 |
| d) Using the kubbe attachment | 8 |
| e) Making shortbread cookies | 8 |
| 7. Troubleshooting | 8 |
| 8. Cleaning | 9 |
| a) Cleaning the Motor block | 9 |
| b) Cleaning accessories | 9 |
| 9. Storage | 9 |
| 10. Disposal | 10 |
| 11. Warranty and service | 10 |
| 12. Recipes | 10 |
| Bologna | 10 |
| Kubbe (Middle-Eastern Appetizer) | 10 |
| Fresh roasting sausage | 11 |
| Biscuit Pastry | 11 |
Keep this manual for future reference and pass it on with the device to any future users!
bifenett KH 3461
Mincer KH 3461
1. Intended use
This appliance is meant to be used for processing foods in small quantities, enough for private households.
- Mincing fresh meat,
- Making sausages with natural or artificial sausage skin,
- Making shortbread cookies
This appliance is not meant to be used for processing frozen foods or other hard foodstuffs, e.g. bones or nuts. It is not to be used for commercial or industrial purposes.
2. Technical Data
Voltage: 230V / 50Hz
Power consumption: 550 W max.
Protection class: II
KB-time: 15 minutes
3. Delivery Contents
Motor block
Meat grinder housing
Transport screw
4 Cross blade
Cutting discs for coarse and fine grinds
Ring clamp
Feeding tray
Stodger
9 Sausage disc
Sausage stuffer attachment
1 Kubbe attachment
12 Biscuit pastry attachment
4. Safety Instructions
To avoid life-threatening electric shocks:
- Make sure that the cable is not damaged. Protect the cable from heat and make sure that it does not get stuck or clamped.
- If the cable or the electric plug is damaged, get it replaced by customer service, before you continue using the appliance.
- Use the appliance only in a dry areas, and not outdoors.
- Never immerse the motor in water or other liquids! You might suffer from a life-threatening electric shock.
Warning!
Never use the appliance for any other purposes other than those listed here. There is a major possibility of accidents if you mistakenly happen to turn off the safety device of the appliance!
To avoid the risk of accidents and injuries:
- Never put your hand into the openings of the appliance. Do not insert any objects through the openings – except for the appropriate stodger and the foodstuff to be processed. Otherwise, there are chances of a serious risk of accidents!
- Unplug the appliance, before attaching or removing the accessories.
- Do not leave the appliance unsupervised, when it is ready for use. Always unplug the appliance after use or during breaks in order to avoid it from being turned on accidentally.
- Only use original accessories, which are meant for this appliance. Other parts may probably not meet the safety requirements.
- Do not allow children and elderly people to handle the appliance without supervision, since they may not always be able to assess potential hazards.
5. Assembly
Attention: All accessories are coated with a thin oil film to protect them from corrosion. Therefore clean all the parts carefully before using the appliance for the first time, in accordance with the detailed instructions found under "8 Cleaning".
a)Assembling the meat grinder
Unfold the fold-out diagramme. There you will find the step-by-step illustrations for assembling the appliance.
- Place the transport screw ③ in the mincer casing ②.
Ensure that the metal washer as well as the insulation ring remain attached to the axle. Without the washer, the screw would wear out too fast. - Place the cross blade ④ so that the sharp side is facing the cutting disc ⑤ .
Warning: The blade is very sharp!
Attention: The appliance will be damaged if the cross blade is inserted the wrong way around!
- Choose the appropriate cutting disc – You will find a selection of discs in the small compartment on the top of the appliance (Fig. D). Push the cover upwards to open it and take out the required disc.
- Insert both lugs of the chosen disc ⑤ into the grooves in the mincer housing ②.
bifenett KH 3461
After everything has been correctly assembled, screw the ring clamp ⑥ on hand-tight.
- The assembled meat grinder is connected to the motor block ① by a bayonet joint:
- Insert the meat grinder into the motor block. (Fig. A).
- Press the meat grinder housing 2 in lightly and at the same time turn the feeding funnel on the meat grinder housing 2 into the middle position (Fig. B).
- Finally place the feed tray ⑦ on top of the feeding funnel.
- To take it out, once again press the meat grinder lightly in and turn the feeding funnel to the right (Fig. A). You can now pull out the meat grinder out.
b) Assembling the sausage stuffer attachment
When the meat grinder has been assembled as described under a):
- Screw the ring clamp ⑥ off.
- Remove the cutting disc ⑤.
- Remove the cross blade 4.
Take the sausage disc 9 from the small compartment (Fig. D) on the top of ther machine - Insert both lugs of the sausage disc ⑨ into the grooves in the mincer housing ②.
- Then place the sausage stuffer attachment in front of the sausage disc.
- Screw the ring clamp ⑥ on hand-tight.
c) Assembling the kubbe attachment When the meat grinder has been assembled as described under a):
- Screw the ring clamp ⑥ off.
- Remove the cutting disc ⑤.
- Remove the cross blade 4.
- Insert both lugs on the plastic parts of the Kubbe attachment 1 into the grooves in the mincer housing 2.
After everything has been correctly assembled, screw the ring clamp 6 on hand-tight.
d) Assembling the biscuit pastry attachments
When the meat grinder has been assembled as described under a):
- Screw the ring clamp ⑥ off.
- Remove the cutting disc ⑤ and the cross blade ④.
Pull the pattern strips from the front of the biscuit pastry attachment 12. - Place the biscuit pastry attachment 12 into the meat grinder housing 2. Insert both lugs of the biscuit pastry attachment 12 into the grooves in the mincer housing 2.
After everything has been correctly assembled, screw the ring clamp ⑥ on hand-tight. - Replace the pattern strips on the front of the biscuit pastry attachment 12.
- To dismantle it, you must first remove the pattern strips before you can screw open the ring clamp ⑥ and take the biscuit pastry attachment ⑫ out.
6. Operation
Attention: Do not use the appliance in sustained operation for longer than 15 minutes. To avoid overheating, allow the appliance to remain switched off for about 30 minutes.
a) Operating the appliance
Once the appropriate attachments have been fixed:
- Place the appliance in such a way that it is absolutely stable and cannot fall off the table or into water (due to vibrations or if it gets caught in the cable). The machine will inevitably vibrate when it is running.
Warning: Never touch a machine, which is plugged in or is operational when it happens to fall or land in water – or in the case of other emergencies! First unplug the appliance in all emergency situations! Otherwise one runs the risk of serious injury or loss of life! - Place the food, which is to be processed in the feeding tray ⑦ and place a vessel to collect the processed food in front under the opening.
- First press the OFF button, to ensure that the appliance is off.
- Then plug in. Press the ON button, to switch it on.
- Press foodstuffs into the grater funnel exclusively with the square stodger 8 - never with fingers, forks, spoon handles or similar items. This could lead to injury and also damage the appliance.
Attention: Do not ever press so hard that the motor gets audibly slower. This could put the machine under pressure and damage it.
b) Processing meat
- Only use meat pieces, which are not larger than 2 ~cm . Check that the meat does not have any bones and is not stringy.
Caution: Mincemeat is prone to decay. Therefore take care to maintain good hygiene when processing meat. - When you have read all the instructions on the topic "Meat", you can use the appliance as described under 6.a).
c) Processing sausage meat
- Put the meat through the meat grinder twice before using it as sausage stuffing.
To make the sausage stuffing, add some chopped onions, spices and other ingredients to the mincemeat as per your recipe, and knead the mixture. Refrigerate this for 30 minutes before processing it further. - Put the sausage skin (natural or artificial sausage skin) on the sausage stuffer attachment ⑩ and knot up the other end. For 1 ~kg of the filling, you will need approximately 1.60 ~m of sausage skin.
Tip: Soak the natural sausage skin in lukewarm water for about 3 hours before using it and then wring out. Natural sausage skin will thus get more elastic.
bifenett KH 3461
- The sausage mixture will be pressed into the sausage skin by the sausage stuffer. When it is long enough switch off the device and press together the sausage at the end and turn it around its longitudinal axis.
Tip: Sausage meat tends to expand when cooked or frozen. Therefore it is best not to overstuff the sausage to prevent it from splitting.
After you have read all the instructions about the topic "Sausage", you can use the machine as described under 6 a).
d) Using the kubbe attachment
With the kubbe attachment 1 foodstuffs can be processed to form hollow rolls of meat or vegetables, which can then be stuffed as desired.
- Put the meat through the meat grinder twice before pressing it through the kubbe attachment ⑪.
After you have read all the instructions about the topic "Kubbe attachment", you can use the machine as described under 6 a).
e) Making shortbread cookies
After you have made the shortbread dough according to your recipe, and after having fixed the shortbread cookie attachment 12:
After you have read all the instructions about the topic "shortbread cookie attachment", you can use the appliance as described under 6 a).
- Cover a small baking tray with baking paper and place it under the outlet opening at the front of the appliance.
- Press dough evenly into the feeding tube – the transport screw pushes it through the design on the pattern strip of the shortbread cookie attachment ②.
- When the pastry has attained the desired length, stop the appliance and break the dough off at the outlet opening. Lay the pastry on the baking tray.
Warning: Never open the casing of the motor block- There are no operating parts to be found there. If the casing is opened there exists the possibility of a life-threatening electric shock.
7. Troubleshooting
If the smooth running of the appliance is blocked by accumulated food:
- Press the OFF button to stop the meat grinder.
- Keep the REV key pressed. The drive motor will now run in the reverse direction. This will enable you to transport the food backwards in an attempt to release the blockage.
- Release the (REV) button if the drive motor runs freely again.
- Press the ON button to restart the appliance.
If you do not succeed in clearing the appliance this way, clean the machine as described under 8.
If the motor stops suddenly, it could be due to the internal overload warning device, which automatically turns off the machine when overloaded. This is supposed to protect the motor.
- Switch off the device and let it cool down for approximately 30 minutes before using it again.
- In case this does not work, wait for a further 15 minutes.
- If it still does not function at the end of this period, this indicates a technical problem. In this case, contact the service centre.
If the mains cable is damaged or or the accessories are visibly damaged:
- Switch off the device by pressing the OFF button!
- if this is not safely possible unplug the appliance.
- Get the parts be repaired by customer service, before reusing the appliance again.
8. Cleaning
Pull out the plug from the socket, before cleaning the appliance. In this way accidents caused by the unexpected switching on of the machine and electric shocks can be prevented.
a) Cleaning the Motor block
- Clean the external surfaces and the power cord with a slightly damp cloth. Always dry the device well before using it again.
Warning: Never immerse the motor block in water or any other liquid! Otherwise one could get a life threatening electric shock, if moisture, which has crept in, touches the electrical wiring. - Never use any cleansers, abrasive substances or solvents. These could damage the device.
b) Cleaning accessories
- The cross blade, as well as the cutting discs, are dishwasher proof. They can be cleaned in the dishwasher.
-
Wash all other accessories that can come in contact with food:
-
by hand only, the accessories are not dishwasher safe.
- with hot water and a household cleaning liquid suitable for use with foodstuffs.
Caution: The cross blade is very sharp!
- Dry all parts thoroughly before reusing the appliance.
9. Storage
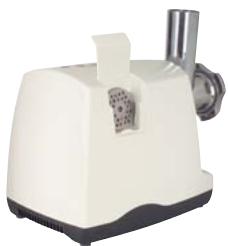
- Wind the mains cable under the bottom part of the appliance. In this way, it is protected from damage. (Fig. C)
- Store the discs in the small recess (Fig. D) on top of the machine.
- Store the appliance in a dry place.
After drying the metal attachments rub them lightly with a little cooking oil, if you are not going to use the device immediately. This will protect them from corrosion. - Keep the machine away from children and elderly people. They may not always be able to assess potential dangers of the heating elements of such devices.
bifenett KH 3461
10. Disposal
Under no circumstances should the appliance be disposed of with normal house waste.
Information on disposal possibilities for used appliances is available from your local community administration.
The packaging comprises of exclusively environmentally friendly materials. They can be disposed of in local recycling containers.
11. Warranty and service
The warranty conditions and the service address can be found in the warranty booklet.
Komperna GmbH
Burgstrasse 21
44867 Bochum
www.kompernass.com
12. Recipes
Bologna
Ingredients:
750g Beef - or veal liver
150g Streaky bacon
1 Onion
2 Bread rolls
Salt, Marjoran
ca. 150g streaky bacon in slices for laying out.
Soften the bread rolls in cold water then squeeze them dry. Grind the liver, streaky bacon, onion and the bread rolls through the meat grinder. For this use the fine or coarse cutting discs ⑤. Add the spices to taste. Lay out the bacon slices in a square box mould, fill it with the liver mixture and smooth it off. Bake the Bologna at 180^ C for ca. 45 - 55 minutes, until it has developed a brown crust. The Bologna can be eaten warm or cold.
Kubbe (Middle-Eastern Appetizer)
Ingredients for the casing
450g of lean mutton, veal or beef
150g Flour
1 Tsp Pimento (clove peppers)
1 Tsp Nutmeg
1 Pinch Chili powder
1 Pinch Pepper
ingredients for the meat filling
700g of mutton
1 1/2 Tbsp Olive oil
1 1/2 Tbsp finely diced onion
1/2 Tsp Pimento (clove peppers)
1/2 Tsp Salt
1 1/2 Tbsp Flour
Grind the meats for the casing in the meat grinder twice (first with the coarse and then with the fine cutting discs 5), then mix in the other ingredients. This mixture is then to be passed through the meat grinder twice. Exchange the cutting disc 5 for the Kubbe attachment 11 (see 5.c above). Shape the Kubbe casings with the Kubbe attachment, then freeze them.
Filling:
Grind the meat in the meat grinder twice (first with the coarse and then with the fine cutting discs 5). Fry the onions, then mix them well with the meat and other ingredients. Fill the Kubbe casings and pan-fry them
Alternative Fillings:
250g steamed Broccoli
or 250g steamed Zucchini
or 250g boiled Rice
Fresh roasting sausage
Ingredients:
300g lean beef
500g lean pork
200g shoulder bacon
20g Salt
1/2 Tbsp. white, ground Pepper
1 Tsp. caraway
1/2 Tsp. nutmeg
Pass beef, pork and bacon through grinder twice. Add the mixed spices and salt and knead for 5 minutes. Place the sausage filling in a refrigerator for ca, 30 minutes. Fill the sausage skins with sausage meat mixture (see 6.c above) and make sausages of ca. 10 inches in length. Consume the well roasted sausages on the same day.
Biscuit Pastry
Ingredients:
125g Butter
125g Sugar
1 Packet Vanilla sugar
1 Pinch Salt
1 Egg
1 Egg white
250g Plain Flour
1 Tsp Baking powder
Grated rind of half a lemon
Beat the butter until foamy. Add the sugar, vanilla sugar, lemon rind and the egg. Mix the flour, baking powder and salt, then blend it into the mixture with a mixing spoon. Allow the mixture to stand for 10 minutes. Pass the pastry through the meat grinder with the biscuit pastry attachment ② . Lay the biscuits on a baking tray covered with baking paper. Bake the biscuits in a pre-heated oven at 180^ for ca. 10 - 15 minutes, until golden-brown.
bifinett KH 3461
- Mincer KH 3461
- Intended use
- Technical Data
- Delivery Contents
- Safety Instructions
- To avoid life-threatening electric shocks:
- Warning!
- To avoid the risk of accidents and injuries:
- Assembly
- a)Assembling the meat grinder
- bifenett KH 3461
- b) Assembling the sausage stuffer attachment
- d) Assembling the biscuit pastry attachments
- Operation
- a) Operating the appliance
- b) Processing meat
- c) Processing sausage meat
- d) Using the kubbe attachment
- e) Making shortbread cookies
- Troubleshooting
- Cleaning
- a) Cleaning the Motor block
- b) Cleaning accessories
- Storage
- Disposal
- Warranty and service
- Recipes
- Bologna
- Kubbe (Middle-Eastern Appetizer)
- Fresh roasting sausage
- Biscuit Pastry
Marque : BIFINETT
Modèle : KH 3461 PROFI MEAT GRINDER
Catégorie : Hachoir à viande