
COPY PROTECTION UTILITY - Utilitaire KONICA MINOLTA - Notice d'utilisation et mode d'emploi gratuit
Retrouvez gratuitement la notice de l'appareil COPY PROTECTION UTILITY KONICA MINOLTA au format PDF.


| Type de produit | Utilitaire de protection contre la copie |
| Systèmes d'exploitation pris en charge | Windows 2000 Professional SP4, Windows XP Professional/x64 SP1, Windows Vista Business/Enterprise/x64 |
| Processeur requis | Pentium 300 MHz ou supérieur |
| Mémoire RAM minimale | 128 Mo |
| Espace disque requis | 20 Mo |
| Bibliothèque nécessaire | Microsoft .NET Framework 2.0 |
| Réseau | TCP/IP configuré correctement |
| Fonctions principales | Spécifier et modifier les paramètres de protection contre la copie et de tampon, importer/exporter des fichiers palette (*.cpf, *.xml), copie par lots |
| Formats d'image pris en charge pour les tampons | BMP, JPG |
| Paramètres de police et taille | Police modifiable, taille de 1 à 300 pt |
| Angle de rotation du texte | -180° à 180° par pas de 1° |
| Agrandissement de l'image de tampon | 10% à 500% par pas de 1% |
| Nombre de motifs de protection | Jusqu'à 8 motifs par appareil |
| Nombre de motifs de tampon | Jusqu'à 8 motifs par appareil |
| Importation de motifs sélectionnés | Oui, depuis un fichier palette |
| Exportation/Importation de données programmées | Fichiers palette (*.xml) |
| Copie par lots de paramètres | Oui, pour plusieurs appareils |
| Configuration requise de l'appareil | bizhub OpenAPI activé, mot de passe administrateur, nom d'utilisateur et mot de passe OpenAPI |
| Langues disponibles | Anglais (notice), autres langues sur demande |
FOIRE AUX QUESTIONS - COPY PROTECTION UTILITY KONICA MINOLTA
Questions des utilisateurs sur COPY PROTECTION UTILITY KONICA MINOLTA
0 question sur cet appareil. Repondez a celles que vous connaissez ou posez la votre.
Poser une nouvelle question sur cet appareil
Téléchargez la notice de votre Utilitaire au format PDF gratuitement ! Retrouvez votre notice COPY PROTECTION UTILITY - KONICA MINOLTA et reprennez votre appareil électronique en main. Sur cette page sont publiés tous les documents nécessaires à l'utilisation de votre appareil COPY PROTECTION UTILITY de la marque KONICA MINOLTA.
MODE D'EMPLOI COPY PROTECTION UTILITY KONICA MINOLTA
Copy Protection Utility
User's Guide
Contents
1 Introduction
1.1 System requirements 1-1
1.2 Main features 1-2
1.3 Specifying copy protection/stamp settings 1-3
Advance preparations 1-3
Specifying basic Copy Protection Utility settings 1-3
Copy protection/stamp pattern settings 1-3
2 Advance preparations
2.1 bizhub OpenAPI settings 2-1
Installation procedure 2-1
2.2 Installing the Copy Protection Utility 2-1
Installation procedure 2-1
2.3 Uninstalling 2-2
3 Specifying basic Copy Protection Utility settings
procedure 3-1
3.1 Device Registration 3-2
4 Copy protection pattern settings
4.1 Specifying copy protection patterns 4-1
Installation procedure 4-1
4.2 Description of the Copy Protect Settings dialog box 4-6
4.2.1 Changing the font and character size of copy protection text ..... 4-7
4.2.2 Specifying the rotation angle of copy protection text 4-8
5 Stamp pattern settings
5.1 Specifying stamp patterns 5-1
Installation procedure 5-1
5.2 Description of the Pattern Stamp Settings dialog box 5-5
5.2.1 Specifying the image data 5-6
Specifying by using the Open dialog box 5-6
Specifying by dragging the image file 5-7
5.2.2 Specifying the Enlargement for the stamp pattern 5-8
5.3 Batch copy Copy Protects and Stamps 5-9
Procedure 5-9
6 Other Functions
6.1 Importing/exporting programmed data 6-1
Saving a backup of data (exporting) 6-1
Reading backed up data (importing) 6-4
6.2 Importing a selected pattern 6-7
Installation procedure 6-7
6.3 The copy of the pattern setting 6-12
To copy the pattern setting 6-12
About this Product
The Copy Protection Utility is, as plug-in of Device Set-Up, used to program multifunctional products with copy protection and stamp information.
Copy protection is the printing of invisible characters when copying or printing with a multifunctional product.
When a document containing these characters is copied, these characters appear, indicating that it is a copy.
This feature is convenient, for example, when limiting secondary copies of highly confidential documents.
Trademarks and registered trademarks
Trademark acknowledgements
KONICA MINOLTA and the KONICA MINOLTA logo are either registered trademarks or trademarks of KONICA MINOLTA HOLDINGS, INC.
Microsoft ^® and Windows ^® are either registered trademarks or trademarks of Microsoft Corporation in the United States and/or other countries.
All other company and product names are either trademarks or registered trademarks of their respective companies.
Dialog boxes
The dialog boxes shown in this manual are those that appear in Windows XP.

Note
The dialog boxes that appear in this document may differ from those that appear on your computer, depending on the installed devices and specified settings.

Note
Unauthorized reproduction, translation or duplication of this document, whether in its entirety or in part, is strictly prohibited.
The content of this document is subject to change without notice.
Copyright © 2005 KONICA MINOLTA BUSINESS TECHNOLOGIES, INC. All rights reserved.
1 Introduction
1.1 System requirements
The operating environment for the Copy Protection Utility is described below.
- Operating system Windows 2000 Professional (Service Pack 4 or later), Windows XP Professional/Professional x64 Edition (Service Pack 1 or later) or Windows Vista Business/Enterprise/Business x64 Edition/Enterprise x64 Edition
- Computer PC/AT compatible machine installed with a Pentium 300 MHz or faster processor
- Memory 128 MB or more
- Network Computer with TCP/IP protocol settings correctly specified
- Hard disk 20 MB or more of available space
- Library Microsoft. NET Framework 2.0
1.2 Main features
The main features for the Copy Protection Utility are listed below.
Specifying and editing copy protection settings
Copy protection patterns used by a device (multifunctional product) can be specified and changed.
Specified data can be imported as palette files (*.cpf, *.xml).
Specified data can be exported as palette files (*.xml).
Character settings files (*.ctf) created with Copy Protection Utility version 1 can also be imported.
Specifying and editing stamp settings
Stamp patterns used by a device (multifunctional product) can be specified and changed.
Specified data can be imported as palette files (*.cpf, *.xml).
Specified data can be exported as palette files (*.xml).
1.3 Specifying copy protection/stamp settings
Perform the operations described below to program devices with copy protection and stamp patterns.
Advance preparations
1 From the device, specify the bizhub OpenAPI settings.
2 Install the Copy Protection Utility onto the computer.
- “Installing the Copy Protection Utility” on page 2-1
Specifying basic Copy Protection Utility settings
1 Start the Copy Protection Utility, and then specify the automatic protection settings and register the devices to be programmed with copy protection/stamp patterns.
- Refer to "Device Set-Up User's Guide" for more information about auto protect function and searching/register of device.
Copy protection/stamp pattern settings
The following information is required before copy protection/stamp patterns can be specified.
Be sure to obtain this information first.
√ Administrator password for the device
√ bizhub OpenAPI Login Name and password for the device
1 Specify and edit the copy protection/stamp patterns for each device.
- “Copy protection pattern settings” on page 4-1
- “Stamp pattern settings” on page 5-1
2 Program the device with the copy protection/stamp information.
2 Advance preparations
2.1 bizhub OpenAPI settings
Installation procedure
Before installing the Copy Protection Utility, specify the bizhub OpenAPI settings on the device.
→ Specify the bizhub OpenAPI Login Name and password from the control panel of the device as necessary.
- For details on the procedure for specifying the bizhub OpenAPI settings from the control panel of the device, refer to the device's User's Guide.

Note
Follow the instructions in the User's Guide for the device to specify the settings for SSL transmission.
2.2 Installing the Copy Protection Utility
Install the Copy Protection Utility onto your computer.

Note
Before installing the utility, be sure to log in with Administrator privileges. Quit all applications (including virus detection programs) that are running.
When the Device Set-up is not installed, the Device Set-up installer is activated. Be sure, first of all, to install the Device Set-up.
Installation procedure
1 Start the installer (Setup.exe).
2 Follow the instructions that appear to complete the installation.
2.3 Uninstalling
The Copy Protection Utility can be uninstalled using either of the following two methods.
- Using “Add/Remove Programs” in “Control Panel”
- With Windows 2000, click [Control Panel], then [Add/Remove Programs].
- Using Setup.exe again

...
Note
Before uninstalling, quit the Copy Protection Utility and the Device Set-Up.
Please note that the use of the Copy Protection Utility becomes unavailable if the Device Set-Up is uninstalled with the Copy Protection Utility installed. On an occasion like this, reinstall it with the installer of the Copy Protection Utility to install the Device Set-Up.
3 Specifying basic Copy Protection Utility settings
The following procedure describes how to specify the necessary settings when the Copy Protection Utility is first started.
procedure
1 From the Windows Start menu, start the Copy Protection Utility.
- Click the Windows [Start] , point to [All Programs] ([Programs] in Windows 2000), then [KONICA MINOLTA], then [Copy Protection Utility], and then click [Copy Protection Utility].
- When a shortcut has been created while in the installation of the Copy Protection Utility, double-click the shortcut on the desk top.
Main window appears.
![KONICA MINOLTA PageScope Data Administrator - [TOP] File Function Tool Window Help Basic Settings | Settings for multiple devices Device list: Number of Displayed Devices: 4 Status Status Display Registered name Group name Model name Device address Online 150_16_154_46 Default Group KONICA MINOL... 150.16.154.46 Online 150_16_154_42 Default Group KONICA MINOL... 150.16.154.42 Off-line 150_16_154_30 Default Group Generic 50C-1 150.16.154.30 Online 150_16_154_32 Default Group KONICA MINOL... 150.16.154.32 Function Selection Edit Copy Protect/Stamp Device Selection Filter Display All](/content/2025/01/139657/images/7b056d1d40531b38d564c6150d1be2109f2706c10ab438b47c2e5c26b53736d9.jpg)

Detail
When activated for the first time, the Application protect settings window is displayed. For details of the method for setting the application protect, refer to “Device Set-up user’s guide.”
Refer to "Device Set-Up User's Guide" for more information about main window.
3.1 Device Registration
When using the Copy Protection Utility, it is necessary to make a search for a supported device on the network for registration.
As a method for the search/registration of a supported device, the following are available.
- Method for searching a supported device on the network
- Method for searching a supported device with the IP address specified.
- Method for registering a supported device from the Function access restriction file

Detail
For details of the method for search/registration of the supported device, refer to the user's guide of the Device Set-up.
4 Copy protection pattern settings
4.1 Specifying copy protection patterns
The following procedure describes how to specify settings for copy protection patterns.
The following information is required before copy protection patterns can be specified. Be sure to obtain this information first.
- Administrator password for the device
- bizhub OpenAPI Login Name and password for the device

Note
The control panel of the device being set is locked while the copy protection settings are being specified.
Installation procedure
1 From the Windows Start menu, start the Copy Protection Utility.
- Click the Windows [Start], point to [All Programs] ([Programs] in Windows 2000), then [KONICA MINOLTA], then [Copy Protection Utility], and then click [Copy Protection Utility].
- If automatic protection settings have been specified, the Stop Protection dialog box appears. Type in the access password, and then click the [OK].
The main window appears.
2 Select the device to set the copy protection pattern from the list and click [Edit Copy Protect/Stamp].
![KONICA MINOLTA PageScope Data Administrator - [TOP] File Function Tool Window Help Basic Settings | Settings for multiple devices Device list: Number of Displayed Devices:4 Status Status Display Registered name Group name Model name Device address Online 150_16_154_46 Default Group KONICA MINOL... 150.16.154.46 Online 150_16_154_42 Default Group KONICA MINOL... 150.16.154.42 Off-line 150_16_154_30 Default Group Generic 50C-1 150.16.154.30 Online 150_16_154_32 Default Group KONICA MINOL... 150.16.154.32 Function Selection Edit Copy Protect/Stamp Device Selection Filter Display All](/content/2025/01/139657/images/d84a53dc39a36b8819f499faf1baaa81c1c775c5c7d7d0ded9efa7982691bea8.jpg)
3 Specify [Function to import], [Import to], and click [Import].
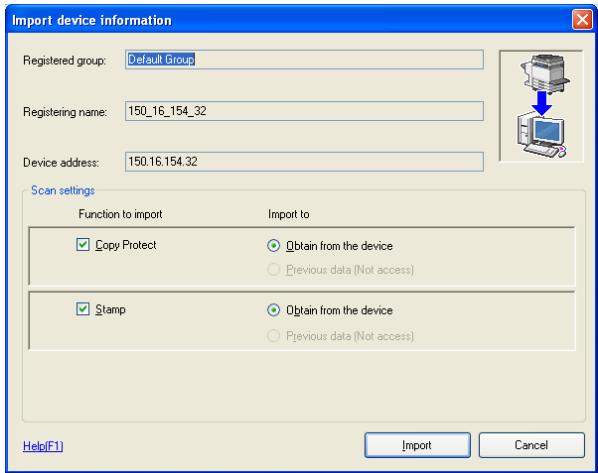
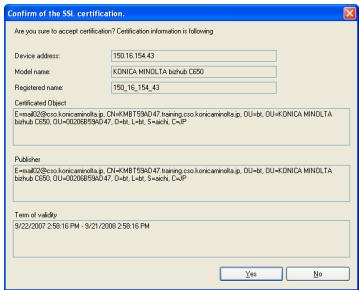
- The following screen is displayed according to the settings of the SSL communication. In order to continue the operation, click [Yes] in either case.
When the SSL communication is not yet set.
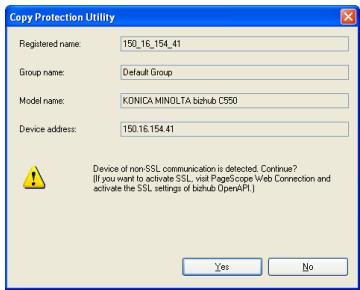
When the SSL communication is already set.
4 When the administrator password screen is displayed, enter the administrator password of the device and then click [OK].
- When the bizhub OpenAPI authentication is set to ON for the device, the Communication settings window is displayed. Enter the bizhub OpenAPI Login Name and the bizhub OpenAPI Password when the Communication settings window is displayed.
5 Select the Copy Protect on the left side of the screen, and then click [Settings] of the pattern you want to set or edit.
![KONICA MINOLTA PageScope Data Administrator Ver.1.0.0.9161 [Device Information (150_16_154_32 150.16.154.32)] File Edit Tool Window Help TOP Registration of Device Network Initial Setting Copy Protect Stamp Copy Protect 1 pro-text Settings(1) Settings(2) Settings(3) Settings(4) Unregistered Settings(5) Settings(6) Settings(7) Settings(8) Unregistered Settings(8) Settings(9) Unregistered Settings(10) Settings(11) Settings(12) Settings(13) Settings(14) Settings(15) Settings(16) Settings(17) Settings(18) Settings(19) Settings(20) Settings(21) Settings(22) Settings(23) Settings(24) Settings(25) Settings(26) Settings(27) Settings(28) Settings(29) Settings(30) Settings(31) Settings(32) Settings(33) Settings(34) Settings(35) Settings(36) Settings(37) Settings(38) Settings(39) Settings(40) Settings(41) Settings(42) Settings(43) Settings(44) Settings(45) Settings(46) Settings(47) Settings(48) Settings(49) Settings(50) Settings(51) Settings(52) Settings(53) Settings(54) Settings(55) Settings(56) Settings(57) Settings(58) Settings(59) Settings(60) Settings(61) Settings(62) Settings(63) Settings(64) Settings(65) Settings(66) Settings(67) Settings(68) Settings(69) Settings(70) Settings(71) Settings(72) Settings(73) Settings(74) Settings(75) Settings(76) Settings(77) Settings(78) Settings(79) Settings(80) Settings(81) Settings(82) Settings(83) Settings(84) Settings(85) Settings(86) Settings(87) Settings(88) Settings(89) Settings(90) Settings(91) Settings(92) Settings(93) Settings(94) Settings(95) Settings(96) Settings(97) Settings(98) Settings(99) Settings(100)](/content/2025/01/139657/images/1e277450b268c10eaf606888751f8b542a767fd972000d7ab768009a6ac5f511.jpg)
- If the pattern to be edited does not appear, click [Refresh]. The most recent information registered on the device is imported again and displayed.
6 Specify the text to be used in the copy protection pattern, and then click [Export to the device].
![KONICA MINOLTA PageScope Data Administrator Ver. 1.0.0.9161 - [Device information (150_16_154_32 150.16.154.32)] File Edit Tool Window Help top TOP Registration of Device Network Initial Setting Copy Protect Pattern 1 Pattern 2 Pattern 3(Editing) Pattern 4 Pattern 5 Pattern 6 Pattern 7 Pattern 8 Stamp Display Copy Protect pattern No copy Edit Copy Protect Copy Protect Name sample Egler Copy Protect pattern No copy Font Microsoft Sans Serif Size 24 Points Font Settings... Display an example of print results. No copy No copy No copy No copy Rotation Angle -180° -90° 0° 90° 180° [-180°-180°] Load... Clear Undo Help(F1) Refresh Export to the device](/content/2025/01/139657/images/76ce21202b24b2df265f17d3a20098153133d2c7363dde9c92ad7c15b71d4c3b.jpg)
- For details on the various settings, refer to "Description of the Copy Protect Settings dialog box" on page 4-6.
- To specify or edit multiple patterns, repeat steps 5 and 6. The Device Information dialog box appears.
7 Click the [Write].
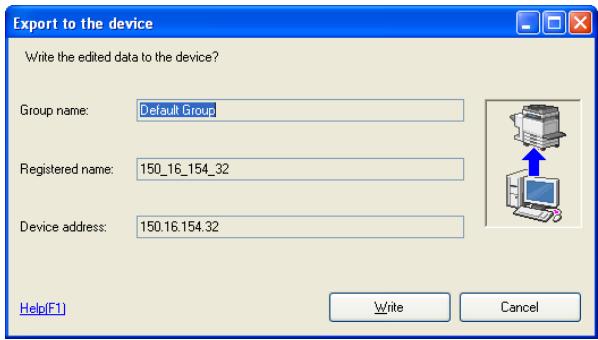
The specified pattern is written to the device.

...
Note
Click the [Export to the device] to be able to use the data specified or edited in the Copy Protect Settings dialog box.
If the [Refresh] is clicked before a pattern that was edited again is written to the device, a message appears, requesting confirmation to overwrite the pattern.
4.2 Description of the Copy Protect Settings dialog box
![KONICA MINOLTA PageScope Data Administrator Ver.1.0.0.9161 - [Device information (150_16_154_32 150.16.154.37)] File Edit Tool Window Help TDP Registration of Device Network Initial Setting Copy Protect Pattern 1 Pattern 2 Pattern 3(Editing) Pattern 4 Pattern 5 Pattern 6 Pattern 7 Pattern 8 Stamp Display Copy Protect pattern No copy Edit Copy Protect Copy Protect Name sample Enter Copy Protect pattern No copy Font Font Microsoft Sans Serif Size 24 Points Font Settings... Display an example of print results. No copy No copy No copy No copy Rotation Angle 0 Degrees -180° -90° 0° 90° 180° [-180°-180] Load... Clear Undo Help(F1) Refresh Export to the device 4 5 6 7 8 9 10 11 12](/content/2025/01/139657/images/df32eb1ad83b630f7629d0e18f926b90317c081afa303baef43f3fdad13c6e0b.jpg)
| No. | Item Name | Description |
| 1 | Sample of the copy protection text pattern | Shows the format specified for the copy protection text. |
| 2 | Sample of print image | Shows a sample of how the copy protection text will be printed on the paper. |
| 3 | Help button | Click this button to display the Help information concerning the copy protection settings. |
| 4 | Copy Protect Name | The name specified for the copy protection pattern can be edited. |
| 5 | Enter Copy Protect pattern | The text specified as the copy protection pattern can be edited.Returns can be entered in order to adjust the text layout. |
| 6 | Font | Shows the currently specified font and character size of the copy protection text.To change the font and character size of the copy protection text, click the Font Settings.“Changing the font and character size of copy protection text” on page 4-7 |
| 7 | Rotation Angle | Specify the rotation angle of the copy protection text.“Specifying the rotation angle of copy protection text” on page 4-8 |
| 8 | Clear button | Click this button to cancel the specified settings. |
| 9 | Undo button | Get it back to the initial setting. |
| 10 | Load button | Click this button to import copy protection settings from a palette file (*.cpf, *.xml). |
| 11 | Export to the device button | Write in the device the Copy protection pattern that has been set. |
| 12 | Refresh button | The latest information registered with the device is read again to be displayed. |
4.2.1 Changing the font and character size of copy protection text
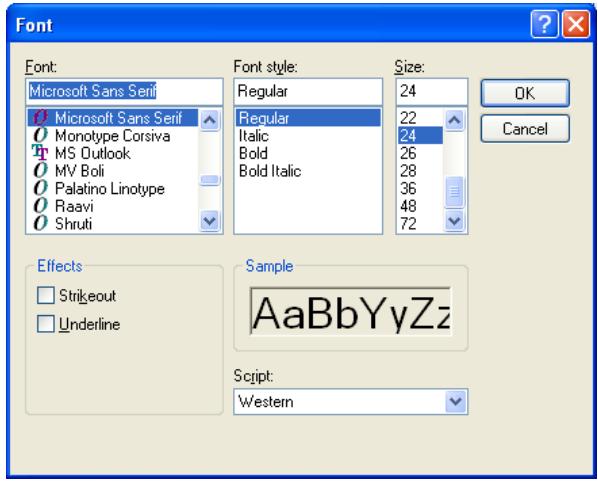
Click [Font Settings] in the Character settings dialog box to display the Font dialog box.
The font, style and character size for the copy protection text can be changed.

Note
The character size can be set between 1 and 300 pt. If the character size is set to a value outside of this range, an error occurs.
4.2.2 Specifying the rotation angle of copy protection text
To change the display angle for the copy protection text, move the slider in the Rotation Angle of the Character settings dialog box to either the left or the right.
The rotation angle can also be specified by clicking the ▲ or ▼ or by entering a value.
The rotation angle can be set between -180^ and 180^ in 1^ intervals.
![KONICA MINOL TA PagesScope Data Administrator Ver.1.0.0.9161 [Device information (150_16_154_32 150.16.154.32)] File Edit Tool Window Help top TOP Registration of Device Network Initial Setting Copy Protect Pattern 1 Pattern 2 Pattern 3 (Editing) Pattern 4 Pattern 5 Pattern 6 Pattern 7 Pattern 8 Stamp Display Copy Protect pattern No copy Edit Copy Protect Copy Protect Name Sample Epter Copy Protect pattern No copy Font Font Microsoft Sans Serif Size 24 Points Font Settings... Rejection Angle 30 Degrees -180° -50° 0° 50° 180° [-180°-180] Load Clear Undo Display an example of print results. No copy No copy No copy No copy No copy No copy Help(F1) Refresh Export to the device](/content/2025/01/139657/images/33689efe90a2ece057347f664650905813bb5174fc0b97697db98a81989bfe5a.jpg)
5 Stamp pattern settings
5.1 Specifying stamp patterns
The following procedure describes how to specify previously created image data (*.bmp, *.jpg) as a stamp pattern.
The following information is required before stamp patterns can be specified. Be sure to obtain this information first.
- Administrator password for the device
- bizhub OpenAPI Login Name and password for the device

Note
If the desired device is not equipped with a stamp function, stamp patterns cannot be specified.
If a large-size image is specified as a stamp pattern, it will automatically be adjusted to a size that can be registered.
If a color image is specified as a stamp pattern, it will automatically be converted to monochrome.
Installation procedure
1 From the Windows Start menu, start the Copy Protection Utility.
- Click the Windows [Start], point to [All Programs] ([Programs] in Windows 2000), then [KONICA MINOLTA], then [Copy Protection Utility], and then click [Copy Protection Utility].
- If automatic protection settings have been specified, the Stop Protection dialog box appears. Type in the access password, and then click the [OK].
The main window appears.
2 Select the device to set the stamp pattern from the list and click [Edit Copy Protect/Stamp].
![KONICA MINOLTA PageScope Data Administrator - [TOP] File Function Tool Window Help Basic Settings | Settings for multiple devices Device list: Number of Displayed Devices:4 Status Status Display Registered name Group name Model name Device address Online 150_16_154_46 Default Group KONICA MINOL... 150.16.154.46 Online 150_16_154_42 Default Group KONICA MINOL... 150.16.154.42 Off-line 150_16_154_30 Default Group Generic 50C-1 150.16.154.30 Online 150_16_154_32 Default Group KONICA MINOL... 150.16.154.32 Function Selection Edit Copy Protect/Stamp Device Selection Filter Display All](/content/2025/01/139657/images/566c85affed480600ce7bd6400aeffca1438999faaf91b6307d25b95ecb568c2.jpg)
3 Specify [Function to import], [Import to], and click [Import].
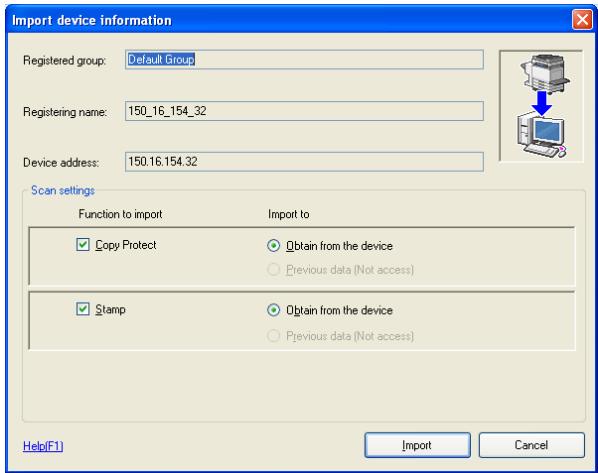
- The following screen is displayed according to the settings of the SSL communication. In order to continue the operation, click [Yes] in either case.
When the SSL communication is not yet set.
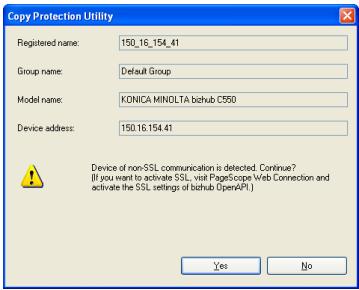
When the SSL communication is already set.
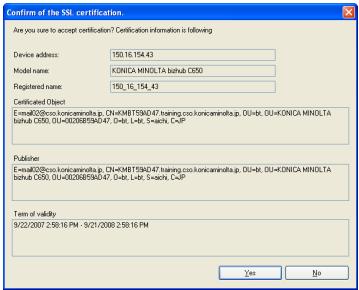
4 When the administrator password screen is displayed, enter the administrator password of the device and then click [OK].
- When the bizhub OpenAPI authentication is set to ON for the device, the Communication settings window is displayed. Enter the bizhub OpenAPI Name and the bizhub OpenAPI Password when the Communication settings window is displayed.
5 Select the Stamp on the left side of the screen, and then click [Settings] of the pattern you want to set or edit.
![KONICA MINOL TA PageScope Data Administrator Ver.1.0.0.9161 [Device information (150_16_154_46 150.16.154.46)] File Edit Tool Window Help top TOP Registration of Device Network Initial Setting Copy Protect Stamp Pattern 1 Pattern 2 Pattern 3 Pattern 4 Pattern 5 Pattern 6 Pattern 7 Pattern 8 Stamp 1: Unregistered 2: Unregistered 3: Unregistered 4: Unregistered Settings(1) Settings(2) Settings(3) Settings(4) 5: Unregistered 6: Unregistered 7: Unregistered 8: Unregistered Settings(5) Settings(6) Settings(7) Settings(8) Help(F1) Refresh Export to the device](/content/2025/01/139657/images/7894ee7e71b9ed7ca1634e4e01dc326a076508ddabc91c15b5666e1d87982c0b.jpg)
- If the pattern to be edited does not appear, click [Refresh]. The most recent information registered on the device is imported again and displayed.
6 Click [Browse] and specify the image to be used in the stamp pattern.
![KONICA MINOL TA Pagescope Data Administrator Ver.1.0.0.9161 [Device information (150_16_154_46 150.16.154.46)] File Edit Tool Window Help top TOP Registration of Device Network Initial Setting Copy Protect Stamp Pattern 1 Pattern 2 Pattern 3 Pattern 4 Pattern 5 (Editing) Pattern 6 Pattern 7 Pattern 8 Stamp image is being displayed. Edit stamp Stamp Name sample02_E Stamp image file C:\Documents and Settings\Waku\MACHINE_XPE\Desk Browse... Eqlangement 10 100 200 300 400 500 [10^500] Load... Clear Undo Help(F1) Refresh Export to the device](/content/2025/01/139657/images/e2cd7dda761cf56b189d4dba2c7073ce13fb1692e7e94a3c9fc46901d628001e.jpg)
7 Make other settings as necessary and then click [Export to the device].
- For details on the various settings, refer to "Description of the Pattern Stamp Settings dialog box" on page 5-5.
- To specify or edit multiple patterns, repeat steps 5 and 6.
The specified pattern is written to the device.

Note
Click the [Export to the device] to be able to use the data specified or edited in the Stamp Settings dialog box.
If the [Refresh] is clicked before a pattern that was edited again is written to the device, a message appears, requesting confirmation to overwrite the pattern.
5.2 Description of the Pattern Stamp Settings dialog box
![KONICA MINOLTA PageScope Data Administrator Ver.1.0.0.9161 - [Device information (150_16_154_46 150.16.154.46)] File Edit Tool Window Help Top TOP Registration of Device Network Initial Setting Copy Protect Stamp Pattern 1 Pattern 2 Pattern 3 Pattern 4 Pattern 5(Editing) Pattern 6 Pattern 7 Pattern 8 Stamp image is being displayed Edit stamp Stamp Name sample02_E Stamp image file C:\Documents and Settings\kaku.MACHINE6_XPE\Desktop Browse... Eglangement 100 % [10~500] Load... Clear Undo Help(F1) Refresh Export to the device 3 4 5 6 7 8 9 10](/content/2025/01/139657/images/a80e8dab274f72c497ef0d74e66ff6044bd1ebc1181adc160d76d179804bb582.jpg)
| No. | Item Name | Description |
| 1 | Sample of the stamp pattern | Shows an image of the specified stamp. |
| 2 | Help button | Click this button to display the Help information concerning the stamp settings. |
| 3 | Stamp Name | The name specified for the stamp pattern can be edited. |
| 4 | Stamp image file | Specify the image file specified for the stamp.The file can be specified by selecting it in the Open dialog box.→“Specifying the image data” on page 5-6 |
| 5 | Enlargement | Specify the zoom ratio for the stamp image.→“Specifying the Enlargement for the stamp pattern” on page 5-8 |
| 6 | Clear button | Click this button to cancel the specified settings. |
| 7 | Undo button | Get it back to the initial setting. |
| 8 | Load button | Click this button to import stamp settings from a palette file (*.cpf, *.xml). |
| 9 | Refresh button | The latest information registered with the device is read again to be displayed. |
| 10 | Export to the device button | Write in the device the stamp pattern that has been set. |
5.2.1 Specifying the image data
The image data (*.bmp, *.jpg) for the stamp pattern can be specified by using the Open dialog box or by directly entering the file path.
Specifying by using the Open dialog box
1 Click [Browse] in the Pattern Stamp Settings dialog box.
The Open dialog box appears.
2 Select the image file, and then click [Open].
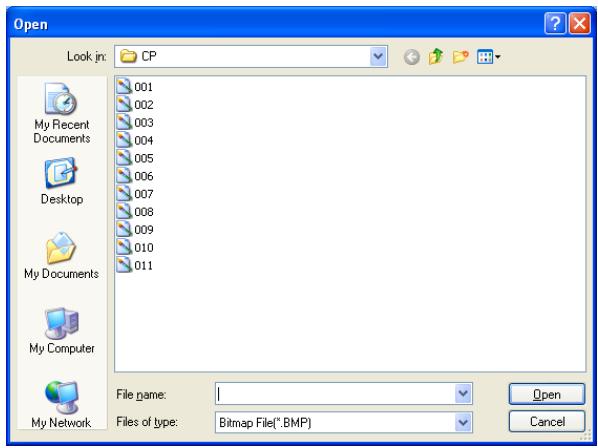
The selected image data appears as the stamp image.
Specifying by dragging the image file
1 Open the Pattern Stamp Settings dialog box.
2 Select the image you want to set it to the stamp pattern and then drag it to the stamp display area.
The selected image data appears as the stamp image.
![KONICA MINOL TA PageScope Data Administrator Ver.1.0.0.9161 [Device information (150_16_154_46 150.16.154.46)] File Edit Tool Window Help top TOP Registration of Device Network Initial Setting Copy Protect Stamp Pattern 1 Pattern 2 Pattern 3 Pattern 4 Pattern SE editing) Pattern 5 Pattern 6 Pattern 7 Pattern 8 Stamp image is being displayed. Edit stamp Stamp Name sample02_E Stamp image file C:\Documents and Settings\Uraku\MACHINE_XPE.Desk Browse... Eqlangement 200% 10 100 200 300 400 500 [10*500] Load... Clear Undo Help(F1) Refresh Export to the device](/content/2025/01/139657/images/1dd68f94e00e89cf3b35714535d9894aaf02e37992f2cfa37c83661fbfaf925b.jpg)
5.2.2 Specifying the Enlargement for the stamp pattern
To change the size of the stamp pattern, move the slider in the Enlargement of the Pattern Stamp Settings dialog box to either the left or the right.
The Enlargement can also be specified by clicking the ▲ or ▼ button or by entering a value.
The Enlargement can be set between 10% and 500% in 1% intervals.
![KONICA MINOL TA PageScope Data Administrator Ver.1.0.0.9161 [Device information (150_16_154_46 150.16.154.46)] File Edit Tool Window Help top TOP Registration of Device Network Initial Setting Copy Protect Stamp Pattern 1 Pattern 2 Pattern 3 Pattern 4 Pattern SE editing) Pattern 5 Pattern 6 Pattern 7 Pattern 8 Stamp image is being displayed. Edit stamp Stamp Name sample02_E Stamp image file C:\Documents and Settings\Uraku\MACHINE_XPE.Desk Browse... Eqlangement 200% 10 100 200 300 400 500 [10*500] Load... Clear Undo Help(F1) Refresh Export to the device](/content/2025/01/139657/images/c2e4728f4c1a6a4a15fdcfb8d042f06e52dd678a43aabfca79f0fa1bbeb378e3.jpg)
5.3 Batch copy Copy Protects and Stamps
The patterns of the copy protect/stamp can be copied collectively.
Procedure
1 Start Copy Protection Utility.
2 Select [Settings for multiple devices] tab and select [Batch copy Copy Protects and Stamps].
![KUNICA MINDI TA Pagescope Data Administrator - [TOP] File Function Tool Window Help TOP Registration of Device Network Initial Setting Basic Settings: Settings for multiple devices Batch copy Copy Protects and Stamps](/content/2025/01/139657/images/5d8a8984331ad919cd79787c4a9ab4f0f1ca0e24ff2181e188d3f2bb34e8098a.jpg)
3 Select the copy function and click [Next].
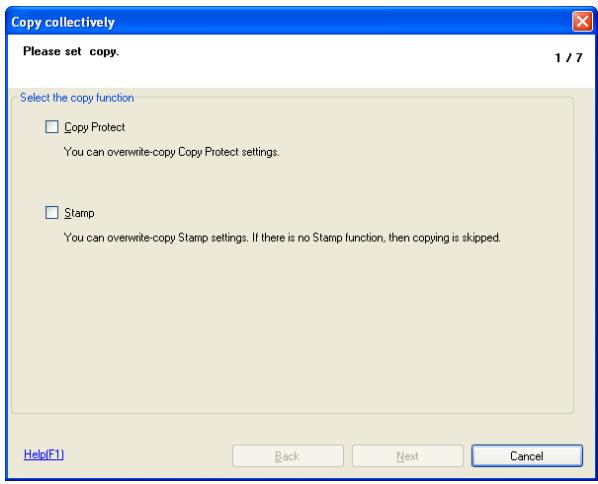
4 Select a copy source device and click [Select].
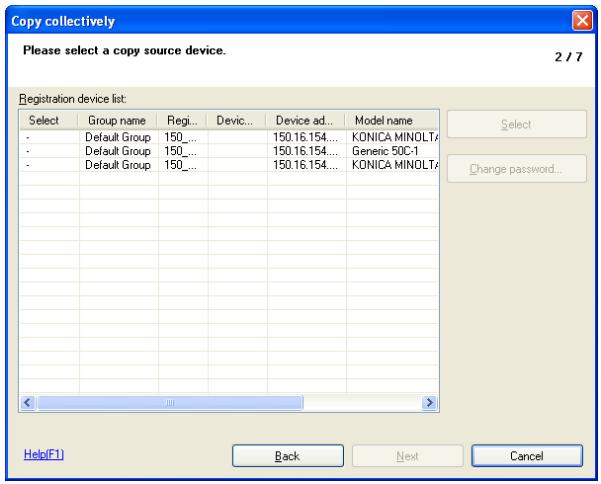
- When a change is made to the password, click [Change password].
5 When the administrator password screen is displayed, enter the administrator password of the device and then click [OK].
- When the bizhub OpenAPI authentication is set to ON for the device, click [Detail] to display the Device detail settings window and then enter the bizhub OpenAPI Login Name and the bizhub OpenAPI Password.
6 Select a target device, click [Select] and click [Next].
![Copy collectively Please select a target device. 4 / 7 Copy source device Device: 150_16_154_46 (150.16.154.46) Copy Protect: Enabled Stamp: Enabled Registration device list: S... Group name Registered n... Devic... Device ad... Model name • Default Group 150_16_154_30 150.16.154.... Generic 50C: • Default Group 150_16_154_32 150.16.154.... KONICA MIN Select Unselect Change password... Clicking [Next] button to export data to the device. Help(F1) Back Next Cancel](/content/2025/01/139657/images/c9846856d5fc3623f3634af8f0bcde2f7c55bd297ab441d38d7606d35ed69d6c.jpg)
- When a change is made to the password, click [Change password].
- Check "Clicking [Next] button to export data to the device" and click [Next]. After this, the write operation is started.
7 When the administrator password screen is displayed, enter the administrator password of the device and then click [OK].
- When the bizhub OpenAPI authentication is set to ON for the device, click [Detail] to display the Device detail settings window and then enter the bizhub OpenAPI Login Name and the bizhub OpenAPI Password.
8 Click [Start].
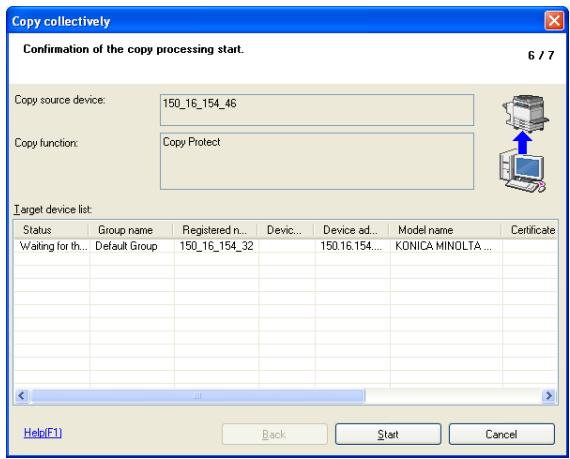
9 Click [Complete].

The batch copy operation is completed.
6 Other Functions
6.1 Importing/exporting programmed data
Copy protection/stamp pattern data specified with this utility can be imported (*.cpf, *.xml) or exported (*.xml) as palette files to each device that is registered. This is useful for copying all of the data to multiple devices or for saving the data as a backup.
Saving a backup of data (exporting)
1 From the Windows Start menu, start the Copy Protection Utility.
2 Select the device whose data is to be exported, and then click [Edit Copy Protect/Stamp].
![KONICA MINOLTA PageScope Data Administrator - [TOP] File Function Tool Window Help TOP Registration Device Network Initial Setting Basic Settings Settings for multiple devices Device list: Number of Displayed Devices:4 Status Status Display Registered name Group name Model name Device address Online 150_16_154_46 Default Group KONICA MINOL... 150.16.154.46 Online 150_16_154_42 Default Group KONICA MINOL... 150.16.154.42 Offline 150_16_154_30 Default Group Generic 50C-1 150.16.154.30 Online 150_16_154_32 Default Group KONICA MINOL... 150.16.154.32 Function Selection Edit Copy Protect/Stamp Device Selection Filter Display All](/content/2025/01/139657/images/db1937a52aaa646d862610c1cdf47573d69c76ccebbb9096021f3c9df21feadc.jpg)
3 Specify [Function to import], [Import to], and click [Import].
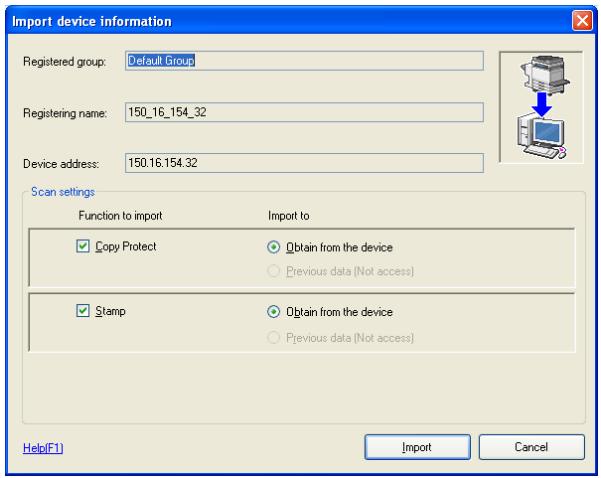
- The following screen is displayed according to the settings of the SSL communication. In order to continue the operation, click [Yes] in either case.
When the SSL communication is not yet set.
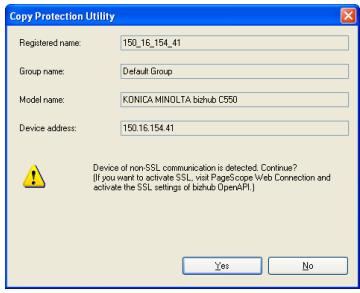
When the SSL communication is already set.
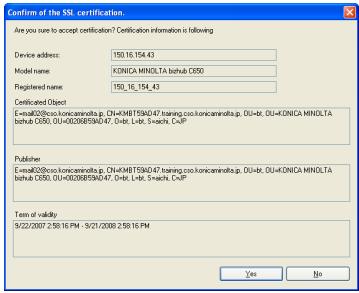
4 When the administrator password screen is displayed, enter the administrator password of the device and then click [OK].
- When the bizhub OpenAPI authentication is set to ON for the device, the Communication settings window is displayed. Enter the bizhub OpenAPI Name and the bizhub OpenAPI Password when the Communication settings window is displayed.
5 Select [Palette] - [Export] from [File] menu.
![KONICA MINOLTA PageScope Data Administrator Ver.1.0.0.9161 - [Device Information (150_16_154_32 150.16.154.32)] File Edit Tool Window Help TOP Registration of Device Network Initial Setting Copy Protect Stamp Copy Protect 1 pro-test Settings(1) Settings(2) Settings(3) Settings(4) Unregistered Unregistered Settings(5) Settings(6) Settings(7) Settings(8) Help(F1) Refresh Export to the device](/content/2025/01/139657/images/4c138bd1b5d75cb43b9cbec5724058266d53cfc52aa56858be9ecd5fb335bd21.jpg)
6 Specify the location where the exported data is to be saved and the file name that the file is saved as, and then click [Save].
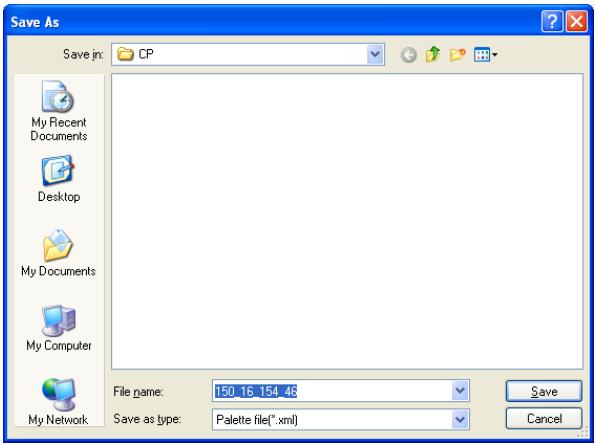
The exported data is saved as a palette file (*.xml).
Reading backed up data (importing)
1 From the Windows Start menu, start the Copy Protection Utility.
2 Select the device whose data is to be imported, and then click [Edit Copy Protect/Stamp].
![KONICA MINOLTA PageScope Data Administrator - [TOP] File Function Tool Window Help Basic Settings | Settings for multiple devices Device list: Number of Displayed Devices:4 Status Status Display Registered name Group name Model name Device address Online 150_16_154_46 Default Group KONICA MINOL... 150.16.154.46 Online 150_16_154_42 Default Group KONICA MINOL... 150.16.154.42 Offline 150_16_154_30 Default Group Generic 50C-1 150.16.154.30 Online 150_16_154_32 Default Group KONICA MINOL... 150.16.154.32 Function Selection Edit Copy Protect/Stamp Device Selection Filter Display All](/content/2025/01/139657/images/ed1d9dc9f9749b3190f2bc7c5e3df1b880c4700da78b0a0f4daebb08c620a891.jpg)
3 Specify [Function to import], [Import to], and click [Import].
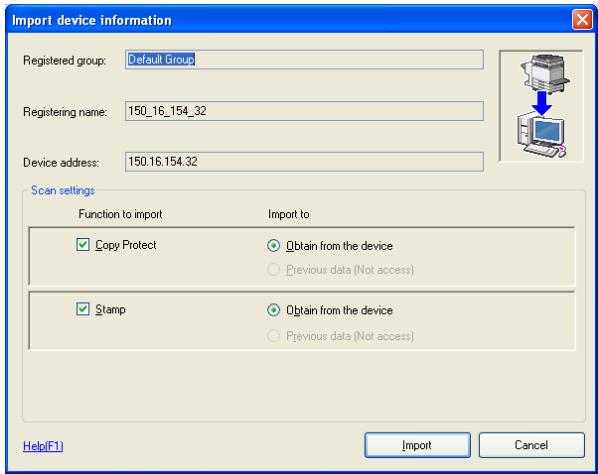
- The following screen is displayed according to the settings of the SSL communication. In order to continue the operation, click [Yes] in either case.
When the SSL communication is not yet set.
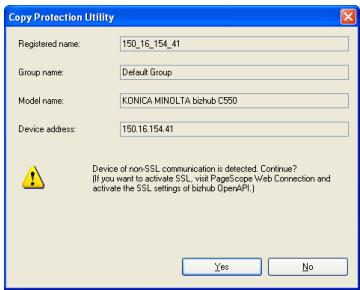
When the SSL communication is already set.
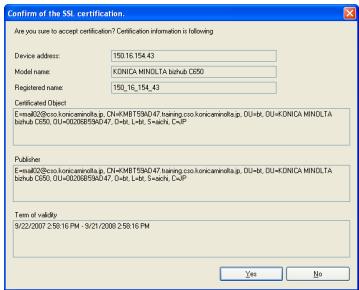
4 When the administrator password screen is displayed, enter the administrator password of the device and then click [OK].
- When the bizhub OpenAPI authentication is set to ON for the device, the Communication settings window is displayed. Enter the bizhub OpenAPI Name and the bizhub OpenAPI Password when the Communication settings window is displayed.
5 Select [Palette] - [Import] from [File] menu.
![KONICA MINOLTA PageScope Data Administrator Ver.1.0.0.9161 - [Device information (150_16_154_32 150.16.154.32)] File Edit Tool Window Help TOP Registration of Device Network Initial Setting Copy Protect Stamp Copy Protect 1 pro-test Settings(1) Settings(2) Settings(3) Settings(4) Unregistered Unregistered Unregistered Settings(5) Settings(6) Settings(7) Settings(8) Help(F1) Refresh Export to the device](/content/2025/01/139657/images/adb1090c7c1c8c4a9f8c7f8ad49724f37fd688cbe32cb844831c325ce32795d4.jpg)
6 Select the palette file to be imported, and then click [Open].
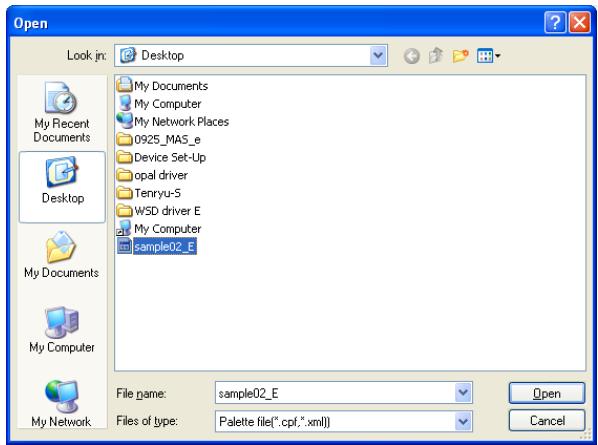
7 Select the imported pattern setting at the left of the screen and then click [Export to the device].
![KONICA MINOL TA PageScope Data Administrator Ver.1.0.0.9161 [Device information (150_16_154_46 150.16.154.46)] File Edit Tool Window Help top TOP Registration of Device Network Initial Setting Copy Protect Pattern 1 Pattern 2 Pattern 3 Pattern 4 Pattern 5 Pattern 6 Pattern 7 Pattern 8 Stamp Display Copy Protect pattern Edit Copy Protect Copy Protect Name Epter Copy Protect pattern Font Font Microsoft Sans Self Size 24 Points Font Settings... Display an example of print results. Rotation Angle -180° -50° 0° 50° 180° -180°-180° Degrees Load... Clear Undo Help(F1) Refresh Export to the device](/content/2025/01/139657/images/06e2f55fa48e8b8970c7fbf0f8d9fc4a7464b5f1580cf0ad853694a1554f939f.jpg)
- The imported data is written to the device.
- To import data to multiple devices, repeat steps 5 and 7.
6.2 Importing a selected pattern
A specific pattern from those saved in a palette file can be selected and copied to a different device.
- Up to eight each of the copy protection and stamp patterns can be saved in a single palette file.
Installation procedure
1 From the Windows Start menu, start the Copy Protection Utility.
2 Select the device to set Copy protection/Stamp, and then click [Edit Copy Protect/Stamp].
![KONICA MINOL TA PageScope Data Administrator - [TOP] File Function Tool Window Help Basic Settings | Settings for multiple devices | Device list: Number of Displayed Devices:4 Status Status Display Registered name Group name Model name Device address Online 150_16_154_46 Default Group KONICA MINOL... 150.16.154.46 Online 150_16_154_42 Default Group KONICA MINOL... 150.16.154.42 Offline 150_16_154_30 Default Group Generic 50C-1 150.16.154.30 Online 150_16_154_32 Default Group KONICA MINOL... 150.16.154.32 Function Selection Edit Copy Protect/Stamp Device Selection Filter Display All](/content/2025/01/139657/images/c6d479ff71272e745308a153bb3ed60f34ccaa5520db7bb53d5ae79ac7fd7b22.jpg)
3 Specify [Function to import], [Import to], and click [Import].
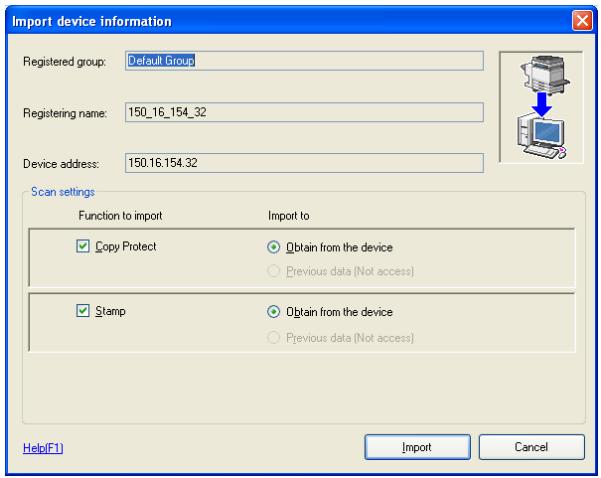
- The following screen is displayed according to the settings of the SSL communication. In order to continue the operation, click [Yes] in either case.
When the SSL communication is not yet set.
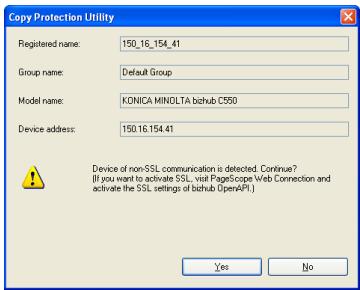
When the SSL communication is already set.
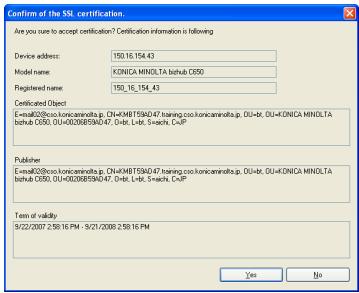
4 When the administrator password screen is displayed, enter the administrator password of the device and then click [OK].
- When the bizhub OpenAPI authentication is set to ON for the device, the Communication settings window is displayed. Enter the bizhub OpenAPI Name and the bizhub OpenAPI Password when the Communication settings window is displayed.
5 Click the [Settings] for the pattern whose settings are to be specified.
![KONICA MINOLTA PageScope Data Administrator Ver.1.0.0.9161 - [Device Information (150_16_154_32 150.16.154.32)] File Edit Tool Window Help TOP Registration of Device Network Initial Setting Copy Protect Stamp Copy Protect 1 pro-test Settings(1) Settings(2) Settings(3) Settings(4) Unregistered Unregistered Settings(5) Settings(6) Settings(7) Settings(8) Help(F1) Refresh Export to the device](/content/2025/01/139657/images/bd573f36360669965bebf20faab023bd0a81b2f5f3a7210207cabb7a1b8b6a0b.jpg)
6 Click [Load].
![KONICA MINDL TA PagesScope Data Administrator Yes: 1.0.0.9161 [Device information (150_16_154_46 150.16.154.16)] File Edit Tools Window Help TOP Registration of Device Network Initial Setting Copy Protect Pattern 1 Pattern 2 Pattern 3 Pattern 4 Pattern 5 Pattern 6 Pattern 7 Pattern 8 Stamp Display Copy Protect pattern Edit Copy Protect Copy Protect Name Epler Copy Protect pattern Font Font Microsoft Sans Self Size 24 Points Font Settings... Display an example of print results. Rotation Angle -180° -90° 0° 50° 180° [-180°-180] Degrees Load... Clear Undo Help(F1) Refresh Export to the device](/content/2025/01/139657/images/e0c52aa71b995b6cfdae74c6258a968764250fada54075f5d3406ad324ae33f3.jpg)
7 Select the palette file that contains the desired pattern, and then click [Open].
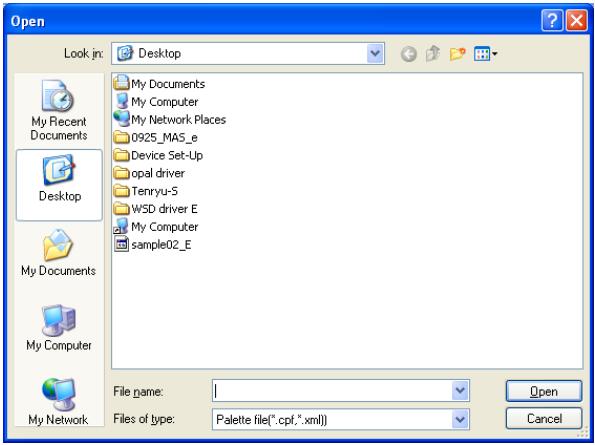
8 Click [Select] for the pattern to be copied.
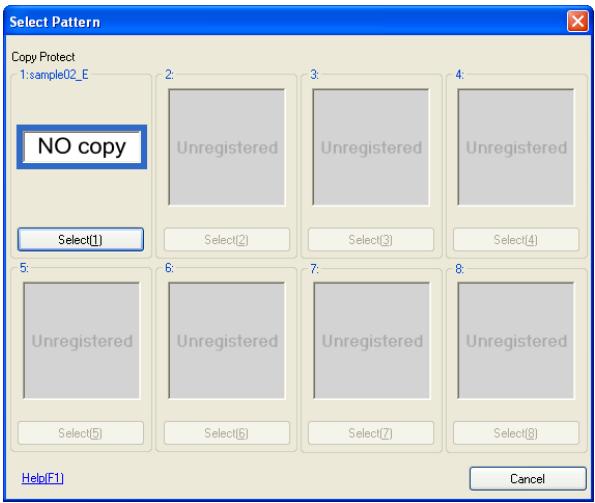
9 Click [Export to the device].
![KONICA MINOL TA PageScope Data Administrator Ver.1.0.0.9161 [Device information (150_16_154_46 150.16.154.46)] File Edit Tool Window Help top TOP Registration of Device Network Initial Setting Copy Protect Pattern 1 Pattern 2(Editing) Pattern 3 Pattern 4 Pattern 5 Pattern 6 Pattern 7 Pattern 8 Stamp Display Copy Protect pattern NO copy Edit Copy Protect Copy Protect Name sample02_E Epter Copy Protect pattern NO copy Font Font Microsoft Sans Serif Size 24 Points Font Settings... Display an example of print results. Rotation Angle 0 Degrees -180° -50° 0° 50° 180° [-180°-180] Load... Clear Undo Help(F1) Refresh Export to the device](/content/2025/01/139657/images/4a885a7940b334ee31db4fc836d6df00fc8037e4cbd3f9bf69f14280a2b3a92f.jpg)
The copied pattern data is written to the device.
6.3 The copy of the pattern setting
In the pattern setting screen, it is possible to make a copy of the pattern setting by using the methods as described below.
To copy the pattern setting
1 Open the pattern settings window.
![KONICA MINOLTA PageScope Data Administrator Ver.1.0.0.9161 - [Device Information (150_16_154_32 150.16.154.32)] File Edit Tool Window Help TOP Registration of Device Network Initial Setting Copy Protect 1 pro-test Settings(1) Settings(2) Settings(3) Settings(4) Unregistered Unregistered Settings(5) Settings(6) Settings(7) Settings(8) Help(F1) Refresh Export to the device](/content/2025/01/139657/images/5b0f048a39a34fb54d2adc05beb79b59abdde603fcc9242b6751e12a8c78a300.jpg)
2 Make a copy of the pattern setting by using the methods as described below.
- Copy&Paste in the drag and drop
- Click the right mouse button to select [Copy] and then [Paste].
- Select from the [Edit] menu [Copy] and then [Paste].

natural_image
Blue circular emblem with horizontal blue stripes (no text or symbols)KONICA MINOLTA
http://konicaminolta.com
- Copy Protection Utility
- Contents
- Introduction
- Advance preparations
- Specifying basic Copy Protection Utility settings
- Copy protection pattern settings
- Stamp pattern settings
- Other Functions
- About this Product
- Trademarks and registered trademarks
- Trademark acknowledgements
- Dialog boxes
- Note
- System requirements
- Main features
- Specifying and editing copy protection settings
- Specifying and editing stamp settings
- Specifying copy protection/stamp settings
- Advance preparations
- Specifying basic Copy Protection Utility settings
- Copy protection/stamp pattern settings
- bizhub OpenAPI settings
- Installation procedure
- Installing the Copy Protection Utility
- Uninstalling
- procedure
- Detail
- Device Registration
- Specifying copy protection patterns
- Description of the Copy Protect Settings dialog box
- Changing the font and character size of copy protection text
- Specifying the rotation angle of copy protection text
- Specifying stamp patterns
- Description of the Pattern Stamp Settings dialog box
- Specifying the image data
- Specifying by using the Open dialog box
- Specifying by dragging the image file
- Specifying the Enlargement for the stamp pattern
- Batch copy Copy Protects and Stamps
- Select a copy source device and click [Select].
- Importing/exporting programmed data
- Saving a backup of data (exporting)
- Specify [Function to import], [Import to], and click [Import].
- Select [Palette] - [Export] from [File] menu.
- Specify the location where the exported data is to be saved and the file name that the file is saved as, and then click [Save].
- Reading backed up data (importing)
- Importing a selected pattern
- Click [Export to the device].
- The copy of the pattern setting
- To copy the pattern setting
- Open the pattern settings window.
- Make a copy of the pattern setting by using the methods as described below.
- KONICA MINOLTA
Marque : KONICA MINOLTA
Modèle : COPY PROTECTION UTILITY
Catégorie : Utilitaire