
PS7000 - Imprimante KONICA MINOLTA - Notice d'utilisation et mode d'emploi gratuit
Retrouvez gratuitement la notice de l'appareil PS7000 KONICA MINOLTA au format PDF.

| Intitulé | Valeur / Description |
|---|---|
| Type de produit | Imprimante numérique couleur |
| Résolution d'impression | 1200 x 1200 dpi |
| Vitesse d'impression | Jusqu'à 70 pages par minute |
| Alimentation électrique | 220-240 V, 50/60 Hz |
| Dimensions approximatives | 1 200 x 1 200 x 1 200 mm |
| Poids | Environ 200 kg |
| Compatibilités | Windows, macOS, Linux |
| Type de batterie | Non applicable |
| Tension | 220-240 V |
| Puissance | 1 500 W (en fonctionnement) |
| Fonctions principales | Impression, copie, numérisation, fax |
| Entretien et nettoyage | Nettoyage régulier des rouleaux et des surfaces internes recommandé |
| Pièces détachées et réparabilité | Disponibilité de pièces détachées via le service après-vente Konica Minolta |
| Sécurité | Conforme aux normes de sécurité électrique et environnementale |
| Informations générales | Idéale pour les bureaux avec un volume d'impression élevé |
FOIRE AUX QUESTIONS - PS7000 KONICA MINOLTA
Questions des utilisateurs sur PS7000 KONICA MINOLTA
0 question sur cet appareil. Repondez a celles que vous connaissez ou posez la votre.
Poser une nouvelle question sur cet appareil
Téléchargez la notice de votre Imprimante au format PDF gratuitement ! Retrouvez votre notice PS7000 - KONICA MINOLTA et reprennez votre appareil électronique en main. Sur cette page sont publiés tous les documents nécessaires à l'utilisation de votre appareil PS7000 de la marque KONICA MINOLTA.
MODE D'EMPLOI PS7000 KONICA MINOLTA
www.minoltaeurope.com
The essentials of imaging
Contents
1 General Information 1-1
1.1 Introduction 1-1
1.2 How Does a Scanner Work? 1-2
Copyright Law 1-2
1.3 Safety Precautions 1-3
Halogen Lamp 1-4
1.4 Features 1-5
Technical Features 1-5
Functions 1-5
Additional Functions 1-5
2 Installation 2-1
2.1 Unpacking the Scanner 2-1
2.2 Location 2-2
2.3 Scanner Components 2-3
2.4 Control Panel, Displays and Keys 2-5
Display 2-6
2.5 Connecting the Power Cable and Interface Cable 2-7
Connecting the Power Cable 2-7
Connecting the Scanner to Your PC 2-7
Connecting the Interface Cable 2-7
Connection to Printer/ Copier 2-7
Plugging in the Connector Cable 2-7
2.6 Installing the Twain Driver (Software) 2-8
System Requirements 2-8
Installing the Driver 2-9
Setting up the Image Software for Twain 2-9
Setting Up the Driver 2-10
2.7 Installing the ISIS Driver (Software) 2-12
System Requirements 2-12
Installing the Driver 2-12
Setting up the Image Editing Software for ISIS 2-13
Setting Up the Driver 2-14
Deleting the Driver 2-15
Turning on the Scanner 2-16
Turning off the Scanner 2-16
3 Making Scanner Settings 3-1
3.1 Scanner Settings 3-1
Calling up the Settings Mode 3-1
Check Current Settings (Control Panel) 3-2
Setting the Timer (Tmr) 3-3
Exposure Lamp Timer 3-3
Warning Signal (Buzzer) 3-4
Warning Signal On/Off (Buzzer) 3-5
Defining the Standard Output Device (Connection) 3-6
Defining the SCSI ID (SCSI) 3-7
Factory Settings (Init) 3-8
Default Settings 3-8
4 Scanning 4-1
4.1 Notes on Original Documents 4-1
High-Gloss Documents 4-1
Bookmarks 4-1
Books with Special Binding 4-2
4.2 Installing the Book Support (optional) 4-3
4.3 Scanning Modes 4-4
Book Mode (Bk/SSt) 4-4
Autofocus 4-5
Single-Sheet Mode 4-5
Switching Off Automatic Settings in Single-Sheet Mode 4-6
Single Page Scan 4-6
Double Page Scan 4-6
Two Page Scan 4-6
Text / Image Mode 4-6
4.4 Positioning Documents on the Scanner 4-7
4.5 Scan Settings 4-8
Switching to User Mode 4-8
Setting the Focus for Single-Sheet Mode (Bk/SSt) 4-8
Defining the Output Device (OUT) 4-9
Saving Settings (Sav Dat) 4-10
Calling up Saved Settings 4-10
4.6 Image Processing 4-11
Deleting the Inside Margin (Cent Eras) 4-11
Setting the Width of Inside Margin Masking 4-12
Frame Masking (Mask) 4-13
Finger Masking (Fing Mask) 4-14
Centreing (Cent) 4-15
Setting Automatic Exposure (Expo) 4-16
Setting Exposure Manually (Expo) 4-17
Setting the Resolution (Res) 4-18
Setting Document Size (Size) 4-19
Setting the Original Type (PC) 4-20
Setting the Output Quality to the PC 4-21
Contrast Settings 4-22
Checking the Current Settings 4-22
4.7 Output to the Printer 4-23
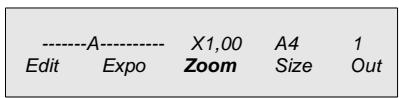
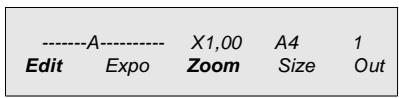
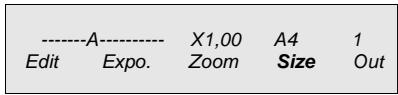
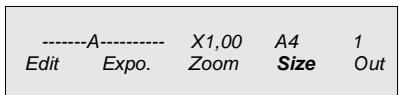
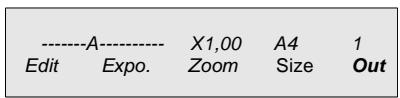
Setting the Size of the Output Automatically (Zoom) 4-23
Setting the Paper Format (Size) 4-25
Setting the Original Type (Printer) 4-26
Setting the Quality of the Output (Out) 4-27
Setting the Number of Copies (No.) 4-28
4.8 Output to the Copier 4-29
Set Paper Format (Size) 4-29
Setting the Paper Format for Single-Sheet Feeding 4-30
Setting the Original type (Copier) 4-32
Setting Duplex Copies 4-33
Duplex Copies: Scanning Books in Page Order 4-34
Duplex Copies: Scanning 2 Independent Pages 4-35
Setting 2 In 1 Copies 4-36
2 in 1 Copies: Scanning Two Independent Pages 4-37
Setting Output Quality (Out) 4-38
Setting the Number of Printouts 4-39
Setting the Copier as the Standard Output Device (Connection).4-40
5 Maintenance and Troubleshooting 5-1
Cleaning the Scanner 5-1
General Error Messages 5-2
Other Error Messages 5-3
Error Messages in connection with Printer Operation 5-4
Error Messages in Connection with Copier Operation 5-5
6 PS 7000 Printer (optional) 6-1
6.1 Safety Precautions 6-2
Laser Safety 6-3
Internal Laser Radiation 6-3
Ozone Release Warning 6-3
Model Type 6-3
6.2 Location 6-4
6.3 Machine Layout 6-5
Front View 6-5
Side View 6-6
Back View 6-7
6.4 Loading Paper into the Paper Tray 6-8
6.5 Loading Paper into the Multi-purpose tray 6-10
6.6 Installing the Imaging Cartridge 6-11
Operating the Printer 6-12
6.7 Maintenance and Troubleshooting 6-13
Cleaning the Printer 6-13
Cleaning the Casing 6-13
6.8 Clearing Jammed Paper 6-14
Paper Jam in the Manual Paper Feeder 6-14
Jammed Paper in the Paper Tray 6-16
Jammed Paper inside the Printer 6-18
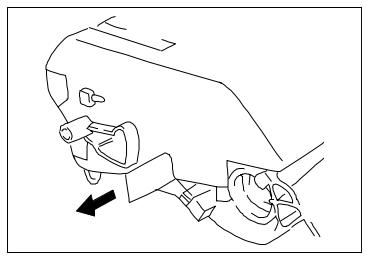
6.9 Replacing the Imaging Cartridge 6-20
6.10 Poor Printing Quality 6-22
Poor Contrast 6-22
Grey Background 6-22
Black Splotches 6-23
Blank Spaces 6-23
7 Technical Specifications 7-1
8 7-3
CE Marking (Declaration of Conformity)
End User License Agreement
1 General Information
1.1 Introduction
Thank you for choosing this PS 7000 and showing confidence in our product. This machine has a modern design and fulfils today's requirements of a scanner. It combines advanced technology with a contemporary appearance.
The PS 7000 was manufactured to the same high quality standards as is common for all other precision instruments made by Minolta.
This manual will assist you in becoming familiar with the machine. It contains all the necessary information for the start-up, its functions and the replacement of the consumables.
Please, always keep this manual on hand when using the machine.
1.2 How Does a Scanner Work?
The way a scanner works is really quite simple. First of all, the documents are scanned in by means of a reading device. This involves brightly illuminating the document, similar to the procedure for photos. The scanner reads the image dot by dot - after all, your document may be a piece of writing, a drawing or a photo. The scanner transcribes this information into a digital format (or, to put it more simply, in black and white points), compresses this data and then transmits it to the output unit, either a PC or Printer.
Now, enjoy your new scanner!
Copyright Law

Note
The use of your scanner is subject to the applicable copyrights for the documents you are processing. Any violation of these rights may lead to criminal prosecution.
1.3 Safety Precautions
- Connect the machine only to a 200 - 240 V/ 50 Hz earthed power point.
- Always pull at the plug, never at the wire, when you want disconnect the machine from the power supply. If possible, connect the machine directly to a wall outlet.
- If you need to use an extension cord, make sure it can handle the required power.
- Do not unscrew any parts, if not specifically requested in this manual. If necessary contact your technical service.
Take care not to let humidity into the machine. - Make sure no objects fall into the machine.
- If any problem occurs that can not be solved by the procedures described in this manual make sure you contact the technical service.
- Follow the recommended maintenance procedures regularly.
- The book table is movable but is locked in place during scanning. Be careful not to pinch your fingers or other things in the gaps.
- If you want to move the unit, make sure to pull all the plugs from the scanner beforehand.
- Don't place anything on top of the scanner.
- Never turn the scanner off while it is scanning.
- Never look directly into the lamp of the scanner as this may damage your eyes permanently.
- Protect your eyes from excess fatigue by taking a break for at least 5 minutes per hour.
- Always make sure that the air vents of the scanner are not blocked by any objects.
Halogen Lamp
This scanner is equipped with a halogen lamp for illuminating the documents. The lamp has been installed in such a way that it poses no threat to your health when these instructions are followed.

WARNING
Never look directly into the lamp! Doing so may lead to permanent damage to your eyes!
1.4 Features
Your new scanner is a state-of-the-art device designed to make your work easier and speed up the scanning of lengthy documents. Thanks to the high-performance functions it offers, the PS 7000 adapts ideally to the lighting conditions of your original documents and therefore, always produces good results without having to rescan the documents.
Technical Features
Desktop model
- Resolution of up to 600 dpi
265 level grey scale
- Size range of original documents: A6 to A2
- Start button integrated in book table
Functions
- Adjustable book table
Automatic exposure - Finger-shadow masking
- Inside margin masking
Automatic centering - Individual scanning of book pages
- Autofocus
- Edge-shadow deletion
- Energy-saving mode
- Image correction
- Shading correction
Additional Functions
- Connection to Minolta PS7000 printer or Minolta copier Di350 by video interface
- SCSI connection
2 Installation
2.1 Unpacking the Scanner
Check whether the contents are complete.
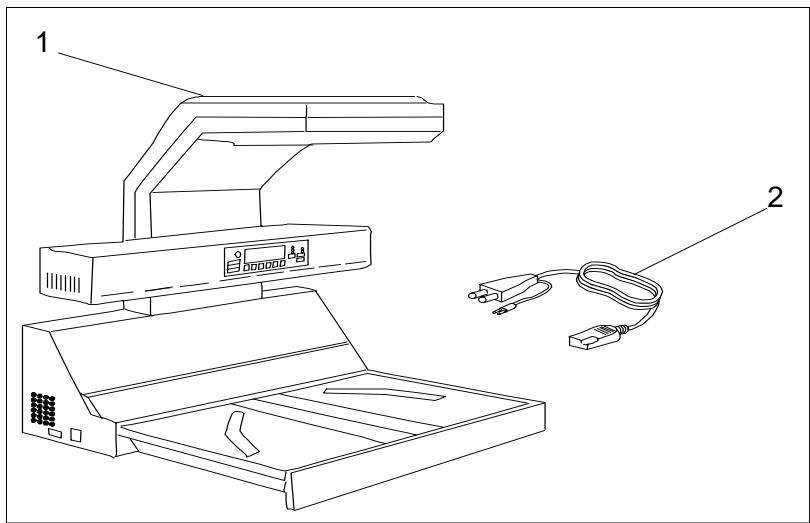
1 Scanner
2 Power Cord
2.2 Location
- Avoid direct exposure to sunlight and place the machine away from heaters.
- Avoid humid or dusty locations.
- Place the machine on an even, non-vibrating surface.
- Keep the machine away from magnetic fields (TV sets, radio).
- Avoid locations close to ventilation openings, air conditioners and heaters.
- The machines should be easily accessible from all sides.
- Make sure no liquids can enter the machine.
- To prevent moisture from condensing in the scanner, avoid extreme temperature fluctuations. This may impair scanning and printing.
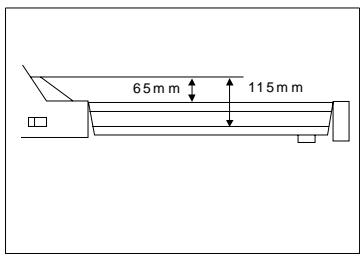
- The dimensions of the scanner are shown in the figure below. Make sure there is enough room around the scanner (approx. 40~cm on every side of the scanner) to ensure reliable functioning and easy access.
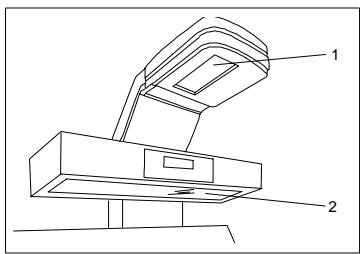
2.3 Scanner Components

1 Scanner unit
2 Lamp unit
3 Control panel
4 Shading panel
5 Steel mirror
6 Book table
7 Book table centre section
8 Start button
9 Power switch
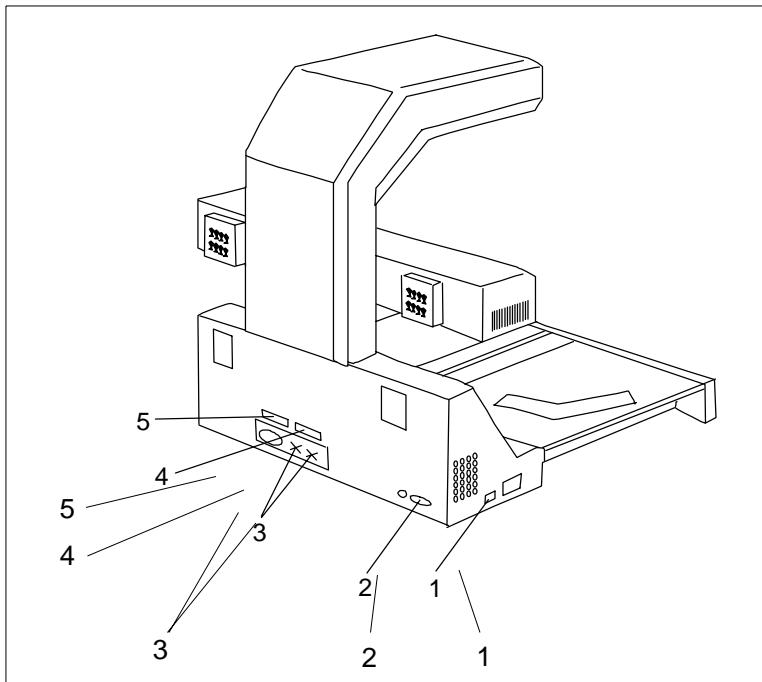
1 Counter
2 Power socket
3 Terminal for foot switch
4 SCSI port
5 Connection for external output devices (PS7000 printer, Di350)
2.4 Control Panel, Displays and Keys
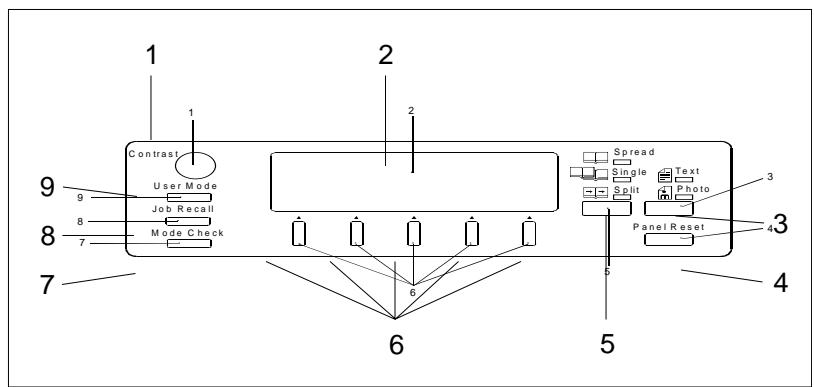
| No. | Displays/Keys | Function |
| 1 | LCD contrast | Turn this knob to adjust the display contrast to the lighting conditions. |
| 2 | LCD display | The display is context-sensitive (cf. section on “Display”). |
| 3 | Page selection | Press this key to set the scan mode you want. You can choose between 3 settings: “Text”, “Photo”, and “Text/Photo”. |
| 4 | Image key | Press this key to return to the main menu. |
| 5 | Panel reset | Press this key to restore the original settings. |
| 6 | Selection keys | Press these keys to select the function displayed above. |
| 7 | Mode check | Press this key to check the current settings (overview). |
| 8 | Job recall | Press this key to call up stored settings. |
| 9 | User mode | Press this key to program settings. |
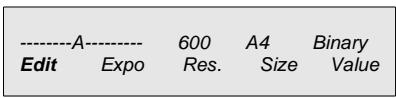
Display
The display is context-sensitive and indicates the respective functions of the selection keys. The display is divided into a message area (above) and a key area (below).
Welcome to PS 7000
Sav Dat
Bk/Sst
Outp.
Prev.
Press the selection key below the desired function. The current function is highlighted in grey in the display.
2.5 Connecting the Power Cable and Interface Cable
Connecting the Power Cable
First plug the cable into the power socket in the back of the scanner on the right hand side and then plug the cable into a socket. Follow the safety instructions in Chapter 1.
Connecting the Scanner to Your PC
First, switch off both devices.
Connecting the Interface Cable
Plug the SCSI Interface cable into the SCSI port in the back of the scanner and connect the other end of the cable to the SCSI port on your PC.
Connection to Printer/ Copier
The Minolta PS7000 printer and the Minolta copier Di350 can directly be connected with the scanner. Optional accessories are required.
First, turn off both devices.
Plugging in the Connector Cable
Plug the connector cable into the port for external output devices at the back of the scanner and connect the other end of the cable with the input port on the printer or copier.
2.6 Installing the Twain Driver (Software)
In order to edit the scanned images on your PC, you need to install the corresponding software and a driver for the scanner (PS 7000 Twain driver or ISIS driver).
System Requirements
The PC must meet the following minimum requirements:
- Operating System Windows95, Windows98, Windows NT 4.0 or OS
- SCSI board adapter (AHA 2940U, 2940AU, 2930U)
64 MB RAM - For gray scale scans: 68 MB available hard drive space, for binary scans: 10 MB available hard drive space
VGA video board, 256 colour monitor - Twain-compatible software (e.g. Adobe Photoshop)

Note
Before installing the Twain Driver, you might want to install the optional Adaptec Aspi 4.6 or higher. The ASP132.EXEL file is available, together with an update for Windows95/98/NT, as the 4.0 mini-port driver ASP1 from the Adaptecs homepage.
Installing the Driver
(For Windows95; proceed accordingly for Windows NT 4.0. and Windows98)
1 Check the cable connection between the scanner and PC.
2 Turn on the scanner.
3 Turn on your PC.
While Windows is loading, it will detect the new hardware and asks for a driver.
4 Click on MANUFACTURER DRIVER.
5 Put the driver CD into the CD-ROM Drive D: and click on OK, if Windows asks you to confirm.
6 Click on RUN... in the START menu. Enter D:\SETUP.EXE in the field OPEN and click on OK.
7 Follow the further instructions on the screen until the installation is finished.
Setting up the Image Software for Twain
After installing the driver, you must mark it in your image editing software, e.g. Adobe Photoshop, as the import source. Refer to your software manual for information on how to proceed here.
Setting Up the Driver
When you mark the driver as the import source, the following window appears where you can make settings for scanning.
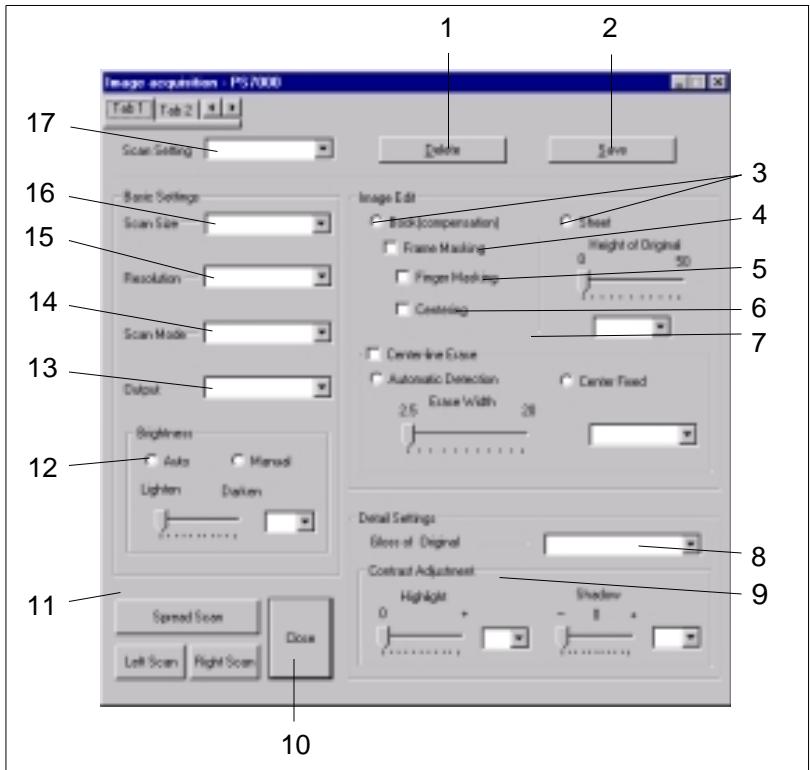
| No. | Name | Description |
| 1 | Delete | Click here to delete unnecessary settings. |
| 2 | Save | Click here to save current settings. |
| 3 | Book / Single sheet | Enter here whether you want to scan a book or a sheet of paper. |
| 4 | Frame Masking | Click here to activate frame masking. |
| 5 | Finger-Masking | Click here to activate finger masking. |
| 6 | Centre | Click here to activate automatic centring. |
| 7 | Delete inside margin | Click here to activate inside margin masking. Use the slide bar to set the masking with. |
| 8 | Glossy | Indicate whether the original to be scanned is glossy. |
| 9 | Contrast | This slide bar regulates the brightness and contrast of the image. |
| 10 | Close | Click here to exit the menu. |
| 11 | Scan buttons | These buttons are the equivalents of the start buttons on the scanner. You directly can start the scanning process in the selected mode. |
| 12 | Exposure | Set whether exposure should be automatic. |
| 13 | Output | Indicate whether the original contains text or images. |
| 14 | Scan Mode | Select the desired scan mode here. |
| 15 | Resolution | Enter the desired resolution. |
| 16 | Scan size | Enter the size of the scanned original. |
| 17 | Settings | Enter the file name of the settings to be saved in this field. |
For further information on individual function, refer to the corresponding sections in the following chapter. You can make any of these settings directly on the scanner or with the software.
2.7 Installing the ISIS Driver (Software)
To be able to process the scanned images on your PC, you have to install suitable software and a driver (TWAIN or ISIS).
System Requirements
The PC must meet the following minimum requirements:
- Operating System: Windows95, Windows98, Windows NT 4.0 or OS
- Adaptec SCSI board (AHA 2940Ultra)
32 MB RAM (64 MB recommended)
15 MB available memory on hard disk
VGA video board, 256 colour monitor - ISIS-compatible software (e.g. Pix View 3.0).
Installing the Driver
(For Windows95; proceed accordingly for Windows NT 4.0. and Windows98)
1 Check the cable connection between the scanner and PC.
2 Turn on the scanner.
3 Turn on your PC.
While Windows is loading, it will detect the new hardware and asks about a driver.
4 Click on MANUFACTURER DRIVER.
5 Put the driver CD into the CD-ROM Drive D: and click on OK, if Windows asks you to confirm.
6 Click on RUN... in the START menu. Enter D:\SETUP.EXE in the field OPEN and click on OK.
7 Follow the further instructions on the screen until the installation is finished.
Setting up the Image Editing Software for ISIS
After installing the driver, you must mark it in your image editing software, e.g. Pix View 3.0, as the import source. Refer to your software manual for information on how to proceed here.

Note
The CD contains a demo version of Pix View 3.0. Pix View software and support are not part of the Minolta product.
Setting Up the Driver
When you mark the driver as the import source, the following window appears where you can make the setting for scanning
| No. | Name | Description |
| 1 | Scan mode | Select the desired scan mode here. |
| 2 | Type of document | Indicate here whether your document is text or pictures. |
| 3 | Book/single-sheet | Enter here whether you want to scan a book or a sheet of paper. |
| 4 | Cancel | Click here to exit the menu. |
| 5 | Ok | Click here to save the selected settings. |
| 6 | Scan | Click here to operate the scanner via the PC or the control panel on the scanner. |
| 7 | Exposure | Set whether exposure should be automatic. |
| 8 | Delete inside margin | Click here to activate inside margin masking. Use the slide bar to set the masking width. |
| 9 | Centre | Click here to activate automatic centering. |
| 10 | Finger-masking | Click here to activate finger-masking. |
| 11 | Frame masking | Click here to activate masking of the frame around the scanned page. |
For further information on individual functions, refer to the corresponding sections in the following chapter. You can make any of these settings directly on the scanner or with the software.
Deleting the Driver
1 In the Windows control panel, call up the function INSTALL SOFTWARE / DELETE.
2 Select the PS 7000 driver and click on the button ADD / DELETE.
3 Follow the further instructions on the screen.
Turning on the Scanner
Operation with a PC
Always turn on the scanner first and then the PC. Turn off the PC first and then the scanner.
Operation with a Printer
Always turn on the printer first and then the scanner. Turn off the scanner first and then the printer.
Operation with a Copier
Always turn on the copier first and then the scanner. Turn off the scanner first and then the copier.
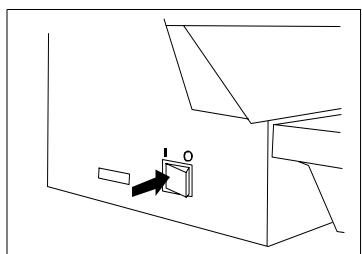
1 Turn on the scanner using the power switch. The ON/OFF switch is located on the left side of the scanner above the power socket. Press the switch over to the right to ON to turn on the scanner, or press the switch over to the left to OFF to turn it off.
2 When the scanner is in Standby mode, the display reads as shown to the left. This indicates the scanner is ready for operation.


Note
Make sure the scanner is turned on for at least three seconds before turning it off again. Turning it on and off any faster may damage the device.
Turning off the Scanner
Make sure to turn off the PC first, then the scanner and then the printer on the copier (if you have one).
3 Making Scanner Settings
3.1 Scanner Settings
Calling up the Settings Mode
1 Press USER MODE and JOB RE-CALL at the same time to call up the Settings mode. Hold down both keys for about 2 seconds.

Note
You can cancel your entries at any time with PANEL RESET.
Check Current Settings (Control Panel)
To check the current settings on the scanner, proceed as follows:
1 Switch to the Settings mode as described above and press INIT.
2 Press PNL SET (panel set).

3 Press Check to check the current settings. Press CONTINUE (next menu) and OK to make further settings.
4 Press OK to save the current settings.
5 Make other settings or press MENU to return to the original menu.
Setting the Timer (Tmr)
Use this function to set the amount of time before all the settings are reset to the original settings, the exposure lamp is shut off and the scanner goes into energy saving mode.
1 Switch to the Settings mode as described above and press TMR. (Timer).
2 Select the function you want.
3 Select the time period you want and confirm your selection with OK. If you enter NO in the menu SAVE AUTOM. TIMER DELETE, then the function is deactivated and the settings you've entered will remain in effect.
4 Make further settings or press MENU to return to the original menu.

Exposure Lamp Timer
When the scanner is turned on and a key is pressed, the exposure lamp will shine at half intensity for the time set in the timer as long as no other keys are pressed. Then, the lamp will be shut off and the ventilator will keep running for 1 more minute. During scanning, the lamp shines at full intensity.
Warning Signal (Buzzer)
Use this function to mark the malfunctions for which the scanner should send a warning signal.
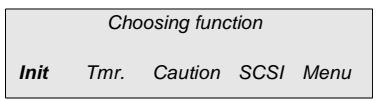
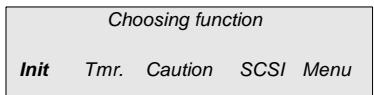
1 Switch to the Settings mode as described above and press CAUTION.
Choosing function
Init Tmr. Caution SCSI Menu
2 Press VAR. (variety) to select the malfunctions for which the scanner should produce a warning signal.
Setting ON/OFF
Var. Buzzer Prev.
3 Press the desired key to turn the function on or off. Press OK to save the setting.
Activating warnings
Hight Size AE Lamp OK
4 Make further settings or press MENU to return to the original menu.
Choosing function
Init Tmr. Caution SCSI Menu
- If you activate HIGHT, the scanner will send a warning signal if it does not recognize the hight of the document in Book mode.
- If you activate SIZE, the scanner will send a warning signal if it does not recognize the size of the document.
- If you activate AE, the scanner will send a warning signal if the document is not illuminated properly.
- If you activate LAMP, the scanner will send a warning signal if the lamp is dirty.
Warning Signal On/Off (Buzzer)
You can also set a key signal and define whether the scanner should produce a warning signal if an error message appears in the display or you attempt to perform an unallowed operation.
1 Switch to the Settings mode as described above and press CAUTION.
2 Press BUZZER.

3 Press the desired key to turn the function on or off.
You can deactivate the Buzzer with NO.
4 Press OK to save the setting.
5 Make further settings or press MENU to return to the original menu.
Defining the Standard Output Device (Connection)
Once the device is connected to a PC and a printer, you can define a Standard Output Device.
1 Switch to the Settings mode as described above and press INIT.
2 Press CONNECTION.
3 Select the output device you want.
4 Press OK to save the setting.

5 Make further settings or press MENU to return to the original menu.

Defining the SCSI ID (SCSI)
1 Switch to the Settings mode as described above and press SCSI.
2 Press UP or DOWN to set the desired ID.

3 Press OK to save the setting.

4 Make further settings or press MENU to return to the original menu.
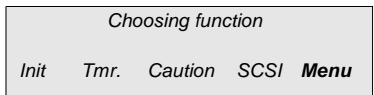
Factory Settings (Init)
You can display the factory settings to restore the original settings on the scanner.
1 Switch to the Settings mode as described above and press INIT.
| Choosing function | |||
| Init | Tmr. | Caution | SCSI |
2 Press RESET.
| Rebuild base setting? | |
| Prev. | OK |
3 Press OK to activate the factory settings and return to Standby mode.
Default Settings
The factory settings for the PS 7000 are as follows:
| Function | Setting |
| Delete inside margin | off |
| Frame masking | on |
| Finger masking | off |
| Centering | off |
| Exposure | automatic |
| Resolution | 600 dpi |
| Scale | 2 (binary) |
| Scan mode | double-page |
| Type of document | text |
| Kind of document | book |
| Port | PC |
| Contrast | ● (0), ○ (0) |
The following standard settings also apply for output to the printer.
| Function | Setting |
| Enlargement | x 1 |
| Paper format | same as for printer |
| Output | Resolution: 600dpi Original type: Automatic Output value: Image quality Printouts: 1 |
The following standard settings also apply for output to the copier.
| Function | Setting |
| Paper format | same as 1st paper cache of copier |
| Copy settings | Simplex |
| Output | Resolution: 600dpi Original type: Automatic Output value: Image quality Printouts: 1 |
4 Scanning
4.1 Notes on Original Documents
The scanner can handle documents in formats A6 - A2. Depending on whether the document is text or pictures, you can scan in Picture mode or Text mode. In Text mode, the scanner smoothes the letters so that they are portrayed more clearly.

Note
Remove all paper clips and staples from the documents before scanning. Make sure that no such objects can get into the gaps of the book table.
High-Gloss Documents
Due to the mirror effect which arises when high-gloss documents are illuminated, you may experience errors in automatic exposure. In this case, set the exposure manually. Try to avoid any bulges in the document. Set the original document type to "Glossy".
Bookmarks
If there are any bookmarks or other markings in a 30mm wide strip from the top to the bottom edge of the document, the scanner may have problems with detection. Remove as many of the markings as possible.
Oversized Documents
Documents which are larger than the book table cover up the START button. In this case, use the optional foot switch or start the scan job via your PC software.
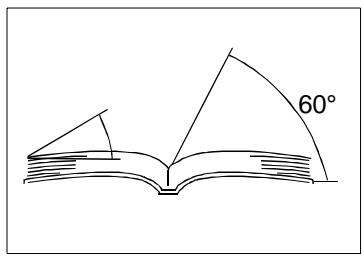
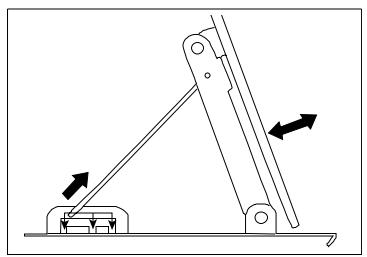
Books with Special Binding
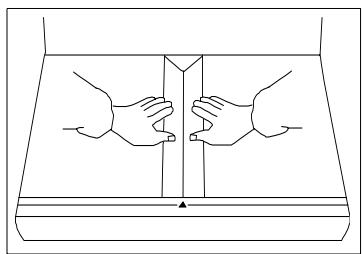
1 You can lower the middle of the book table so you don't have to open the books too far for scanning.
2 Press the centre of the book table down and lay the book in the depression to scan. You can adjust the depression to two different depths.
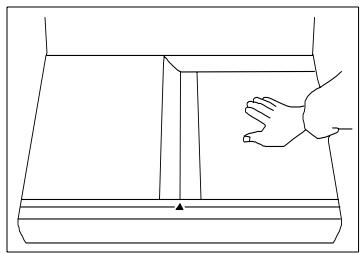
3 To scan the first and last sections of thick books without straining the binding, you can lower just one side of the book table. To do so, just press the desired key and place the book in the depression.

Note
The book table is locked in place during scanning. Be careful not to pinch your fingers or other things in the gaps.
4 When the angle of inclination in the centre of the book exceeds 60^ , the scanner may have problems with detection. The same applies to the external angle: up to A4 30^ angle of inclination, A2 10^ angle of inclination. Make sure to stay within the specified range.
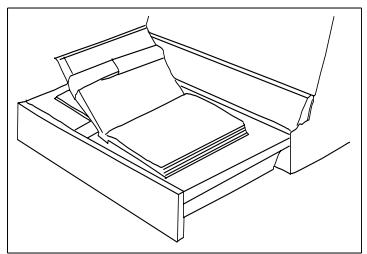
4.2 Installing the Book Support (optional)
1 Fold open the book support and hook in the braces.
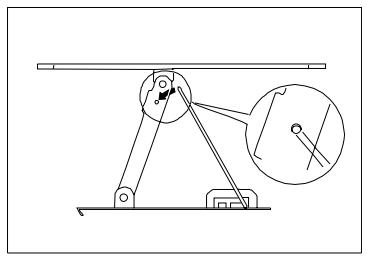
2 Hook the base plate of the book support into the guide slot in the book table.

3 Slide the brace to adjust the position of the book support.
4 Put the book on the support and secure in place with the strap.
4.3 Scanning Modes
Book Mode (Bk/SSt)
Use this mode to scan books.
1 Press USER MODE and BOOK / SHEET (book / single-sheet) to call up this mode.

2 Select the desired mode.

The following functions are automatically activated in Book mode:
Distortion Correction
The scanner automatically compensates for the curve of lines of text in the middle of the book near the inside margin. The lines of text appear straight in the scanned image.
Rectification
Due to the curve in the area of the inside margin, the text characters appear skewed. This function corrects the distortion. The text characters appear with uniform spacing in the entire line.

Note
If the text is less than 5mm away from the binding or if the curve exceeds 60^ , the scanner will have problems performing this function (Cf. Information on Scanning Documents).
Autofocus
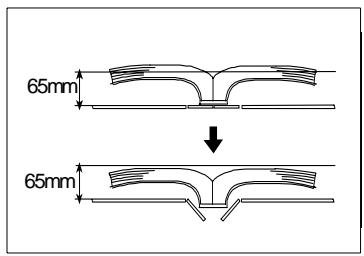
The focus is automatically set to the surface of the book in Book modes as long as it is no more than 60mm above the book table.
If the book is thicker than 60~mm , press the corresponding page down so that the surface is back in the area of focus.
Single-Sheet Mode
If you're scanning individual sheets of paper or other flat objects, use the Single-Sheet mode. The standard mode for the scanner in Single-Sheet mode is Text mode.

Note
You can also use the Single-Sheet mode if the scanner sends error messages in Book mode or produces unsatisfactory results in Book mode.
Keep pressing PAGE SELECT until the desired mode is activated.
Switching Off Automatic Settings in Single-Sheet Mode
In Single-Sheet mode, scanning time can be shortened by switching of pre-scanning for automatic settings. Set the functions as follows:
| Function | Setting |
| Exposure | Manual |
| Zoom | fixed magnification |
| Delete inside margin | Off |
| Frame masking | Off |
| Finger masking | Off |
| Centre | Off |
| Original document type | Normal or glossy |
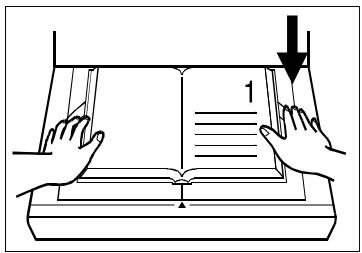
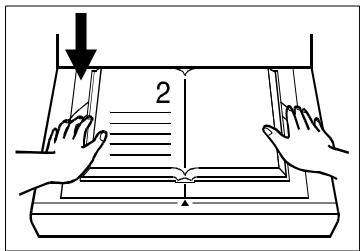
Single Page Scan
Only one page is scanned in this mode.
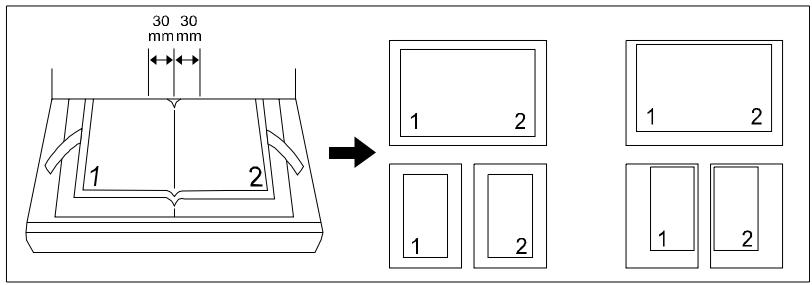
Double Page Scan
The entire face of the book on the table is scanned as one page in this mode.
Two Page Scan
The left and right page of the book on the book table are scanned individually one after the other in this mode.
Text / Image Mode
You can scan your document as text or an image in Text / Image mode.
1 Press IMAGE to switch between photo and text scanning.
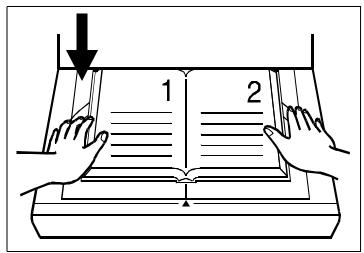
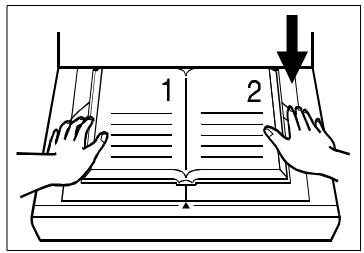
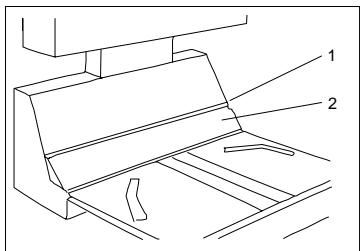
4.4 Positioning Documents on the Scanner
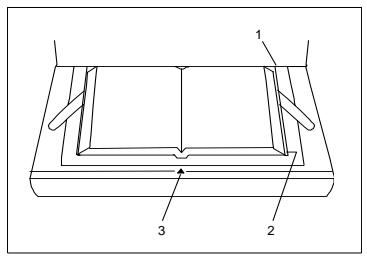
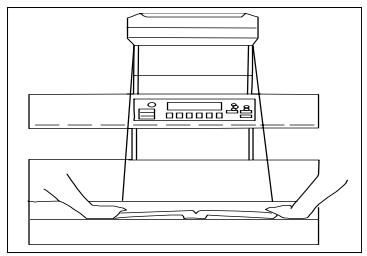
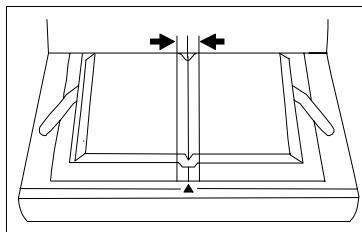
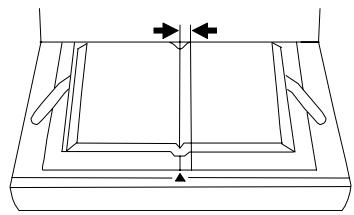
1 Place the documents in the centre of the book table so that the upper edge is aligned with the shading plate. Use the format. Lines on the book table as a guide for correct positioning.
- Shading plate
- Format line
- Centre mark
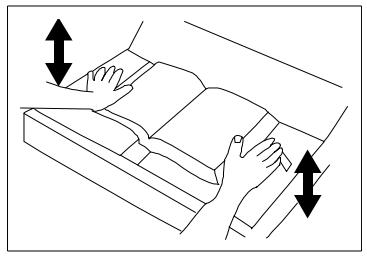
2 Adjust the book surface by pressing it down. When you press down one side the other side comes up automatically.
3 Press START to the left or right. During scanning the keys are red. When they turn green again you can start the next scanning job.
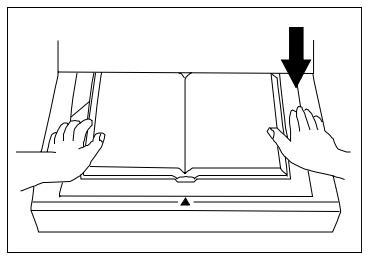
4 Make sure that the documents to be scanned are not covered up.

Note Make sure not to shift the documents during scanning.
4.5 Scan Settings
You can make the following settings for a new job or you can save up to 3 scanning programs and star them later. Likewise, you can make these settings via your PC. To do so, open the window with the scan settings and make the settings you want. To make the settings on the scanner directly, proceed as follows:

Note
Make the settings first and then save them.
Switching to User Mode
1 Press USER MODE and select the function you want.
Sav Dat Bk/SSt Cent Eras Out Prev.
Setting the Focus for Single-Sheet Mode (Bk/SSt)
1 Switch to Entry mode as described and press Bk/SSt. (Book / Single-sheet).
Sav Dat Bk/SSt Cent Eras Out Prev.
2 Press SINGLE-SHEET.
Book Sheet -10mm +10mm OK
3 Set the focus in 10mm increments and confirm your entry with OK.
Book Sheet -10mm +10mm OK

Note
In Single-Sheet mode, the default setting for the function "Delete inside margin" switches from AUTO to CENTER.
Defining the Output Device (OUT)
If you're operating the scanner with a PC and printer, you can set the output device for the scanner. (This setting only applies to specific scan jobs and not as the standard for output. Cf. Defining the Standard Output Device (CONN) in Chapter 2).
1 Switch to Entry mode as described and press OUT.

2 Select the device you want and press OK.

3 Make the next setting or press PREV. (previous) to exit Entry mode.

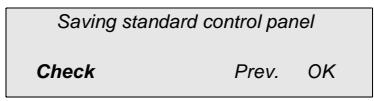
Saving Settings (Sav Dat)
To save the current settings, proceed as follows:
1 Press USER MODE and Sav Dat.

2 Select the desired memory location and press OK.

3 Press CHK. (check) and CONT. to check the current settings or PREV. to return to the original menu.

4 Press OK to save the setting.

Calling up Saved Settings
1 Press JOB RECALL and select the desired program.

2 Press PREV. to return to standby mode.

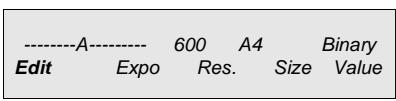
4.6 Image Processing
Deleting the Inside Margin (Cent Eras)
A shadow appears on the image during scanning on the inside margin where the book is bound. This function automatically deletes the shadow. You can set the width of the area to be deleted.
(See: Setting the Width of Inside Margin Masking)
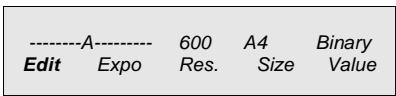
1 Press EDIT.
2 Press CENT ERAS (center erase), to activate the function.

3 Press OK to return to the main menu.
Setting the Width of Inside Margin Masking
(See also Deleting the Inside Margin (Cent Eras))
1 Switch to Entry mode as described and press CENTERAS (center erase).

2 Press AUTO to automatically set the masking position (only in Book mode).
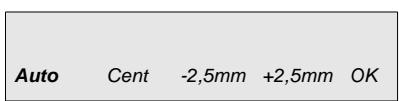
3 Press CENT (centre) to define the centre of the book table as the centre of masking.
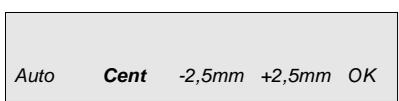
4 Enter the masking width in 2.5 mm increments and confirm your entry with OK.
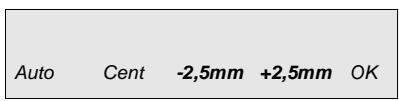

Note
The maximum width you can enter is 20 mm . If a "0" is entered in the window with the scan settings in the software, then this function is deactivated.
5 Make the next setting or press PREV. (previous) to exit the Entry mode.
Sav Dat Bk/SSt Cent Eras Out Prev.
Frame Masking (Mask)
You can use this function to delete the dark edge produced around the scanned document. This function is only available in Book mode.
1 Press EDIT.
2 Press MASK (masking) to activate edge-shadow detection.

3 Press OK to return to the main menu.

Note
This function is only possible if the distance between the image and the frame is at least 2mm .
Finger Masking (Fing Mask)
You can use this function to delete the shadow created by your fingers holding the document in place. This function is only available in Book mode with frame masking activated.
1 Press EDIT.
2 Press FING MASK to activate finger masking.

3 Press OK to return to the main menu.

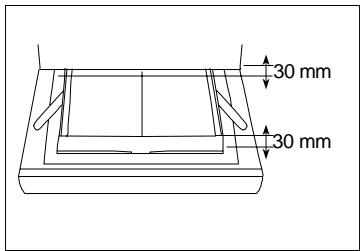
Note
The scanner detects fingers in a 10 cm wide strip on the side edges of the document. This strip begins 30 mm below the upper edge of the document. Any fingers beyond the range of this strip will not be deleted.
This function is automatically deactivated once frame masking is deactivated.
Centreing (Cent)
You can use this function to centre both pages of a double-page document individually. This function is only available when frame masking detection is activated in book mode.
1 Press EDIT.
2 Press CENT (centring) to activate this function.

3 Press OK to return to the main menu.

Note
The centre of the scanned pages must not be any further than 30~mm from the centre of the book table.
This function is automatically deactivated once frame masking is deactivated.
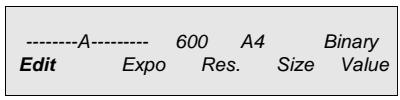
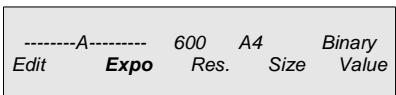
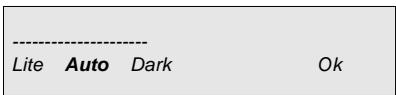
Setting Automatic Exposure (Expo)
To set exposure, proceed as follows:
1 Press EXPO.
2 Press AUTO to activate automatic exposure. If the function is activated, an A appears on the scale.
3 Once automatic exposure is activated, you can make fine adjustments manually. To do so, press on LITE or DARK.

4 Press OK to return to the main menu.

Note
Automatic exposure is not available in Single-Sheet mode or Photo mode.
Setting Exposure Manually (Expo)
To set exposure manually, proceed as follows:
1 Press EXPO.
2 Press AUTO to deactivate automatic exposure. Once the function is deactivated, the A on the scale disappears.
3 Press LITE or DARK to set the exposure.

4 Press OK, to return to the main menu.
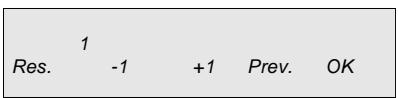
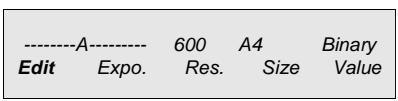
Setting the Resolution (Res)
To set the scanning resolution, proceed as follows:
1 Press RES. (resolution).
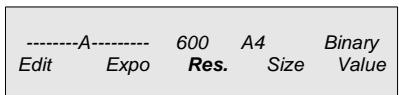
2 Select the resolution you want.
3 Press OK to return to the main menu.

Note
600 dpi is not available if the VALUE is set to (2 binary) and the original document is in the formats A2/B3 landscape or A3/B4 portrait. In addition, you can also have 240 dpi settings. To do this, please contact the Technical Support Service. The 240 dpi setting would then be activated by the 200 dpi key.
Setting Document Size (Size)
To set the size of the document, proceed as follows:
1 Press SIZE

2 Select the format you want.

3 Select the size you want.
4 Press OK to return to the main menu.

Note
With A3, A2, B3 and B4 formats, the scanner automatically switches to Double-Page mode.
With A6 and B6 formats, the scanner automatically switches to Single-Page mode.
Setting the Original Type (PC)
To set the original type in PC-mode, proceed as follows:
1 Press QUAL.
2 Press ORG.TYPE.

3 Select the original type you want.

4 Press OK to return to the main menu.

Note
It is recommended to select the AUTO setting. If you have problems scanning an original clearly, select the settings NORMAL or GLOSS.
Setting the Output Quality to the PC
To set the output quality to the PC, proceed as follows:
1 Press QUAL.
2 Press ZOOM.

3 Select the setting you want.

4 Press OK to return to the main menu.

Note
The BINARY setting is suited for originals consisting only of text, while GRAY is recommended for photos and images. The GRAY setting is only displayed if the optional gray scale card has been installed.
Contrast Settings
To set contrast, proceed as follows:
1 Press QUAL.

2 Press CONTRAST.

3 Set the contrast you want.
4 Press OK to return to the main menu.
Select the part of the picture that needs to be adapted by pressing
(○: brighter, ●: darker). + and - adjust the intensity (○: 0 to 15,
-7to+7).
| Function | Setting |
| Brighten background | ○: +9 ●: +2 Exposure: Auto |
| Darken text | ○: 0 ●: +7 Exposure: Dark |
| Brighten background and darken text | ○: +7 ●: +7 Exposure: Dark |
Checking the Current Settings
1 Press MODE CHECK to show the current settings on the display. Press PREV. to return to the original menu.
4.7 Output to the Printer
If you output the scanned images directly to the PS7000 printer, you can make a few additional settings.

Note
To make these settings, the printer must be connected, ready for operation and selected as the output device.
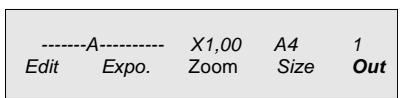
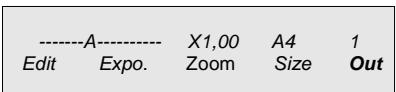
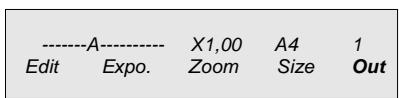
Setting the Size of the Output Automatically (Zoom)
You can use this function to automatically convert the sides of the scanned image to the format of the paper in the printer. This function is only available in Book mode.
1 Press ZOOM.
2 Select AUTO to activate the function.

3 Press OK to return to the main menu.
Setting Enlargement / Reduction Manually (Zoom)
1 Press ZOOM.
2 Select ENLARGE or REDUCE to activate the function you want.

3 Select the desired degree of enlargement or reduction or press ZOOM to enter the scale in increments.

If you press FULL, the scanned image will be printed out in a 1:1 ratio.
4 Press OK to return to the main menu.
Setting the Paper Format (Size)
1 Press SIZE (size).
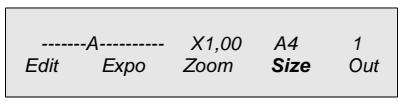
2 Select one of the available sizes for the printer.
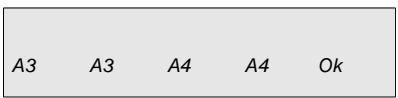
3 Press OK to return to the main menu.
Setting the Original Type (Printer)
To set the original type in printer-mode, proceed as follows:
1 Press OUT (output).

2 Press ORG.TYPE.

3 Select the original type you want.

4 Press OK to return to the main menu.

Note
It is recommended to use the AUTO setting. If an original presents scanning problems, you can select the settings NORMAL or GLOSS.
Setting the Quality of the Output (Out)
You can choose either high or low resolution for your output. High resolution printouts will take more time to print than a low resolution printout.
1 Press OUT (output).

2 Press OUT (output).

3 Select HIGH for high resolution (600 dpi) or SPEED for a fast printout (400 dpi).

4 Press OK to return to the main menu.


Note
The resolution will be automatically set to 400 dpi in the following cases:
- When the set scanning format is A3.
- When AUTO is set for enlargement.
- When the enlargement ratio is more than 1.41.
Setting the Number of Copies (No.)
1 Press OUT (output).
2 Press NO. (number).

3 Enter the number of copies you want to print out (up to 9 copies per scan job).

4 Press OK to return to the main menu.
4.8 Output to the Copier
If the scanned images are sent directly to the Minolta Copier Di350, there are some additional settings you can choose.

Note
Before you can activate these settings, the copier must be connected, switched on, and selected as an output device.
Set Paper Format (Size)
This function sets the paper size and format (portrait or landscape format) for the copier.
1 Press SIZE.
2 Use the arrow keys to select the paper size and the symbol keys to select the format you want.

3 Press OK to return to the main menu.

Setting the Paper Format for Single-Sheet Feeding
This function sets the paper size and format (portrait or landscape) for single-sheet feeding.
1 Press SIZE.
2 Press the arrow key down until the setting SINGLE appears in the display.

3 Press SINGLE.

4 Use the arrow keys to select the paper size and the symbol keys to select the format you want.

5 Insert the original and press START.

6 Open the single-Sheet feeder
7 Insert paper in the single-sheet feeder and adjust the paper guides.
Setting the Original type (Copier)
To set the original type in copy-mode, proceed as follows:
1 Press OUT (output).

2 Press ORG.TYPE.
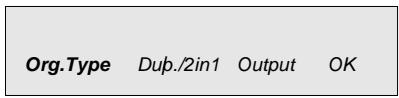
3 Select the original type you want.

4 Press OK to return to the main menu.


Note
It is recommended to use the AUTO setting. If an original presents scanning problems, you can select the settings NORMAL or GLOSS.
Setting Duplex Copies
If your Di350 is equipped with optional duplex feeding, you can also use the duplex function. Proceed as follows:
1 Press OUT (output).
2 Press DUPL/2IN1.

3 Press DUPLEX.
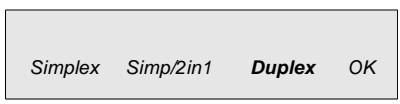

Note
If the first paper cache is set to OHP foil or cardboard, the duplex function is automatically disabled for that paper cache. In that case, select another cache or put regular paper into the first cache.
Duplex Copies: Scanning Books in Page Order
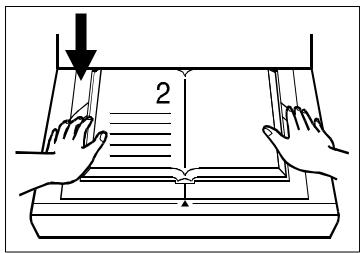
This function lets you scan two continuous pages from a book and print them on the front and back side of a page. Proceed as follows:
1 Select SINGLE with PAGE SELECTION in the panel set.
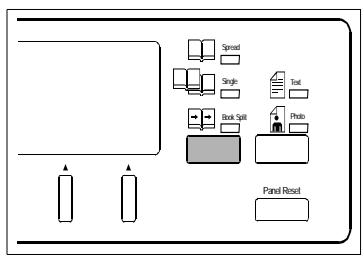
2 Insert the original and press START on the left.
3 Once the message "Ready for 2nd Scan" appears on the display, press START on the right.
Duplex Copies: Scanning 2 Independent Pages
This function lets you scan two independent pages from a book and print them on the front and back side of a page. Proceed as follows:
1 Select SINGLE with PAGE SELECTION on the panel set.

2 Insert the original and press START on the page of the book you want to scan.
3 Once the message "Ready for 2nd Scan" appears on the display, open the book on the next page you want to scan and press START on that side of the original.
Setting 2 In 1 Copies
This function lets you print two scanned pages on one sheet of paper. Proceed as follows:
1 Press OUT (output).
2 Press DUPL/2IN1.

3 Press SIMP/2IN1.

2 in 1 Copies: Scanning Two Independent Pages
This function lets you scan two independent pages from a book and print them on one sheet of paper. Proceed as follows:
1 Select SINGLE with PAGE SELECTION on the panel set.
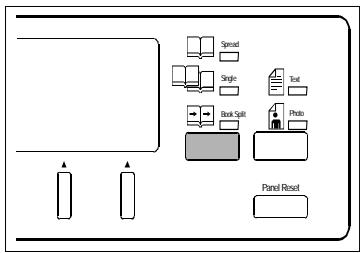
2 Insert the original and press START on the page of the book you want to scan.

3 Once the message "Ready for 2nd Scan" appears on the display, open the book on the next page you want to scan and press START on that side of the original.

Note
The page that was scanned first is always copied to the left side of the sheet, and the following page, on the right side.
Setting Output Quality (Out)
By selecting high or low resolution settings for copy output, you can influence output speed.
1 Press OUT (output).
2 Press OUT (output).

3 Select HIGH for high resolution (600 dpi) or FAST for an accelerated printing process (400 dpi).

4 Press OK to return to the main menu.


Note
In the following cases, the resolution is set to 400 dpi by default:
A3 landscape is set as the scan format.
- Zoom is set to Auto.
The zoom factor is larger than 1.41.
Setting the Number of Printouts
1 Press OUT (output).
2 Press PRINT.

3 Enter the number of copies you want. (Up to 9 copies in one scanning run.)
4 Press OK to return to the main menu.
Setting the Copier as the Standard Output Device (Connection)
If you use the scanner with both a PC and a copier, you can select one device as the standard output device.
1 Call up the Settings-Mode as described and press INIT.
Select Function
Init
Timer
SCSI
Menu
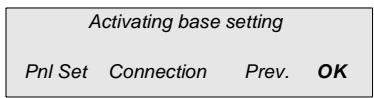
2 Press CONNECT.
Activate Basic Settings
Panel set
Connect.
Prev.
OK
3 Select the output device you want.
Activate Basic Settings
PC
Copier
Prev.
OK
4 Press OK to save settings.
Restore Basic Settings?
Prev.
OK
5 Either select other settings or press MENU to return to the main menu.
Select Function
Init
Tmr. S
SCSI
Menu
5 Maintenance and Troubleshooting
Cleaning the Scanner
Clean your scanner as needed with a dry, soft cloth to ensure the best scanning results at all times.

WARNING
Never use alcohol or thinners!
→ Always pull the plug from the power socket before cleaning!
1 Clean the glass of the lamp and the glass of the scanner unit.
1 Scanner unit
2 Lamp cover glass
2 Clean the steel mirror and the shading panel.
1 Cover screen
2 Steel mirror
General Error Messages
If an error occurs during scanning, a message is shown in the display. Press any key to erase the message. Refer to the following table for a description of the messages and the necessary action to take.
| Display | Problem | Solution |
| Bind Size is Too HighPress Down Book | The surface of the book is more than 60 mm above the book table.The steel mirror is dirty. | Press the book down so that the surface is no more than 60 mm above the book table.Switch to Single-Sheet mode Clean the steel mirror.Follow the instructions for scanning documents. |
| Bind Size is not DetectedReset Book or Change Sheet | There is a bookmark or some other marking in the book impairing recognition.There is an index or some other mark on the upper edge of the book.The steel mirror is dirty. | Remove the book-marks.Switch to Single-Sheet mode.Clean the steel mirror.Follow the instructions for scanning documents. |
| Book Exp. Level is Too HighSet AE to Off | The surface is too dark.The document is not positioned properly.There is no document on the scanner bed. | Change the setting for automatic exposure.Switch to Single-Sheet mode.Follow the instructions for scanning documents.Position the document correctly. |
| Book Size is not DetectedReset Book or Change Sheet | There is a bookmark or some other marking in the book impairing recognition.The document is not positioned properly.There is an index or some other mark on the upper edge of the book.There is no document on the scanner bed. | Remove the book-marks.Switch to Single-Sheet mode and disable the Auto-function.Follow the instructions for scanning documents.Position the document correctly. |
| Right (Left) Size is not DetectedReset Book or Change Sheet | “Double Page Scan” is activated, but there is no document on the right or left side. | Switch to Single/Page mode.Centre the document.Switch to Single-Sheet mode and disable the Auto-function.Follow the instructions for scanning documents. |
| Exp. Level not Detected Clean Top of Steel Mirror | ·The screen plate is dirty. ·The scanning surface was covered by a foreign object. ·The lamp is covered. | ·Clean the screen plate. ·Make sure not to cover the scanning surface. ·Be careful not to block the light from the lamp. |
| Open application/driver. | ·The PC is not switched on. ·The driver has not been opened. | ·Switch on your PC. ·Open the driver software. |
Other Error Messages
Please contact one of our representatives at Technical Service if the message "Service" or "Contact technicians" and an error code starting with "C" appear in the display.
Error Messages in connection with Printer Operation
| Message | Problem | Solution |
| Paper jam Remove Paper on (in Take Up, in Fusing) | ·The paper is jammed in the printer. | ·Remove the jammed paper as described in the printer manual. |
| Paper Empty on Tray Supply Paper | ·There is no paper in the printer. | ·Add paper. |
| Toner Empty Exchange Imaging Ctg. | ·No toner. | ·Put in a new toner cartridge. |
| Printer Cover is Open Close printer | ·The printer is open. | ·Close the paper. |
| Irregular Paper Size Change Paper Size | ·The selected paper format does not correspond to the paper format in the printer. ·The printer can not process the format of the paper loaded in the printer. | ·Select the right paper format. ·Put the right paper format in the printer. |
| Irregular Paper Size Open and Close Cover | ·The format of the paper fed into the printer is incorrect. ·The printer drew in more than one sheet of paper. | ·Check the paper format. Open and close the printer to delete the message. |
| Printer is off Turn Printer on | ·The printer is not switched on. | ·Switch on the printer. |
Error Messages in Connection with Copier Operation
| Message | Problem | Solution |
| Copier error | ·An error has occurred in the copier. | ·Address the cause of error in the copier. |
| Copier OFF | ·Copier is not switched on or not connected to scanner. | ·Switch copier on or check scanner-copier connection. |
| Switch copier on |
6 PS 7000 Printer (optional)
This printer has been specially developed and designed to print out scanned documents and can therefore only be connected to this scanner.
Due to its design, the PS 7000 has a high transmission rate, thereby ensuring fast printouts. The data are transmitted to the printer via a special video interface.
The printer is very easy to set up and operate. Follow the instructions in this manual for quick and easy set-up and operation. This manual also contains information on how to correct problems which may occur. If a problem does occur, make sure to follow the detailed instructions described in this manual. If a problem occurs that is not mentioned in this manual, please contact the Technical Service.
6.1 Safety Precautions
- Connect the machine only to a 200 - 240 V/ 50 Hz earthed power point.
- Make sure the power is not turned off over night.
- Always pull at the plug, never at the wire, when you want disconnect the machine from the power supply. If possible, connect the machine directly to a wall outlet.
- Do not unscrew any parts, if not specifically requested in this manual. If necessary contact your technical service.
- Never open the machine while it is transmitting or printing.
Take care not to let humidity into the machine. - Make sure no objects fall into the machine.
- If any problem occurs that can not be solved by the procedures described in this manual make sure you contact the technical service.
- Follow the recommended maintenance procedures regularly.
Used cartridges may be taken back by the technical service station as a part of the maintenance procedures.
Laser Safety
This fax machine contains a page printer which operates by means of a laser. This machine does not impose any danger as long as it is used according to the procedures described in this manual. The laser is limited to the interior of the machine. The environment is protected from the laser emission by the covers of the machine.
Internal Laser Radiation
Maximum radiation: 8.8 × 10^-4 (W) Wave length: 770-810 (nm)
The machine works with an invisible class IIlb laser. The printer head unit is not field service item.
Ozone Release Warning
During printer operation, a small quantity of ozone is released. This amount is not large enough to harm anyone. However, be sure the room where the fax machine is being used has adequate ventilation, especially if you are printing a high volume of material or if the printer is being used continuously over a long period.
Model Type
- Desktop printer for A4, B4 and A3 formats
- Manual paper feed up to 150 sheets of DIN A4
- Paper tray for up to 250 sheets of DIN A4, B4 or A3
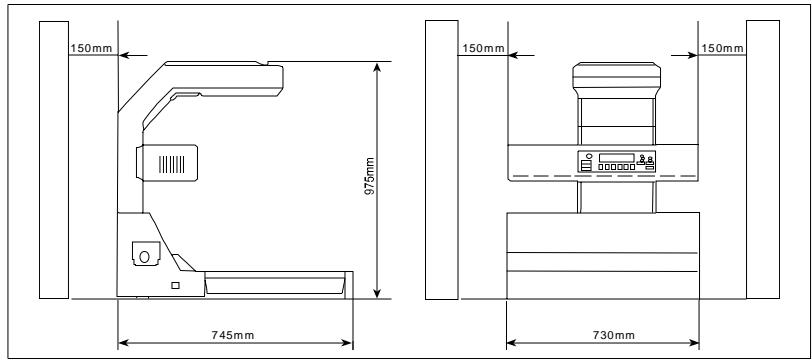
6.2 Location
- Don't put the printer in direct sunlight.
- Don't put the printer in a moist or dusty place.
- Place the printer on an even, vibration-free surface.
- Keep the printer away magnetic fields (television, radio).
- Don't put the printer directly next to air conditioners or heaters.
- The printer should be easily accessible from all sides.
- Make sure that no water or other fluids can get into the printer.
- To prevent moisture from condensing in the printer, avoid extreme temperature fluctuations. This may impair printing.
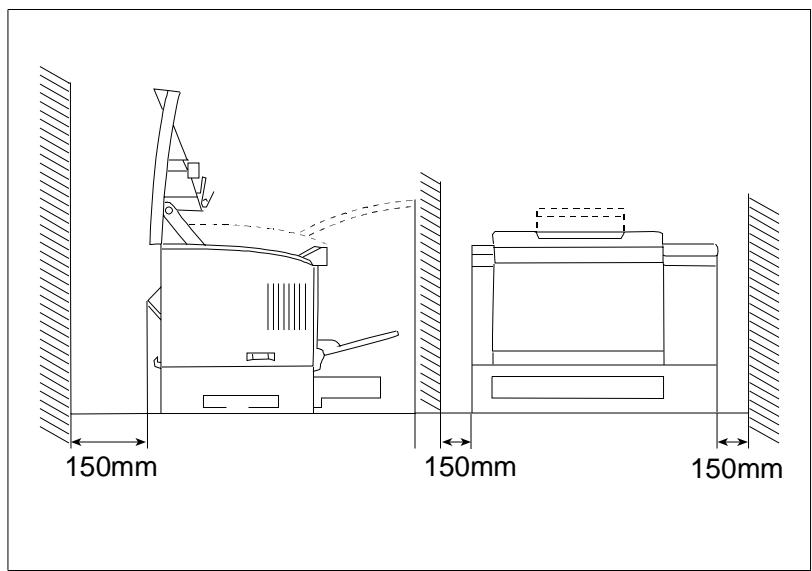
- The dimensions of the printer are shown in the figure below. Make sure there is enough room around the printer (approx. 40cm on every side of the printer) to ensure reliable functioning and easy access.
6.3 Machine Layout

Front View
1 Release lever for top cover
2 Status display
3 Multi-purpose tray
4 Paper tray
5 Switch
Side View
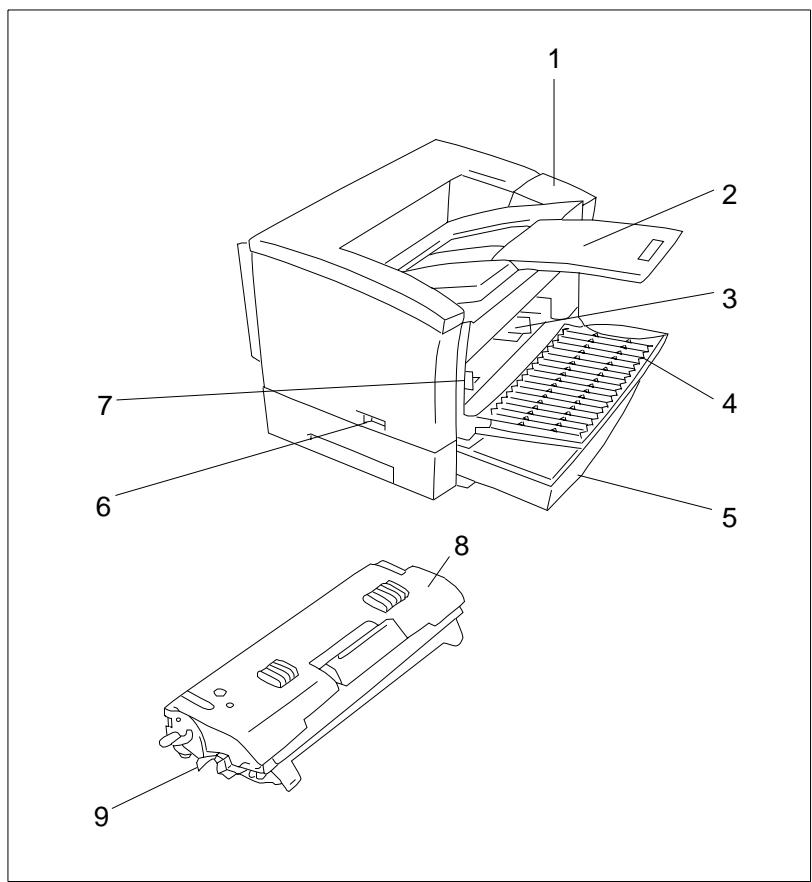
1 Status display
2 Paper output tray
3 Paper guides
4 Multi-purpose tray
5 Paper tray
6 Switch
7 Power socket
8 Imaging cartridge
9 Toner cover strip (seal)
Back View

1 Top cover
2 Power socket
3 Ports
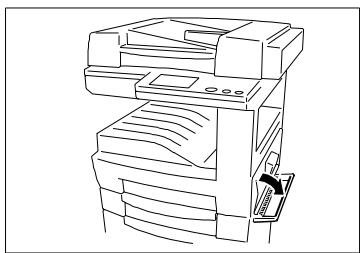
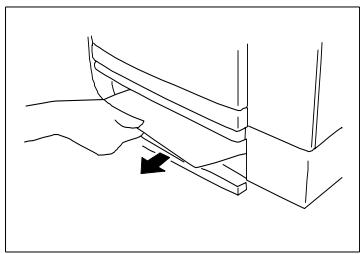
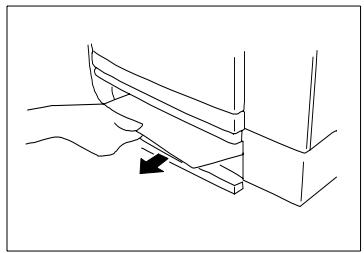
6.4 Loading Paper into the Paper Tray
The PS 7000 printer can print on normal paper from 60 - 90g / m^2
You can load up to 250 sheets of DIN A4, B4 and A3 paper into the paper tray and up to 150 sheets DIN A4 (standard format) paper into the manual paper feed.
1 Remove the paper tray from the printer and open the cover.
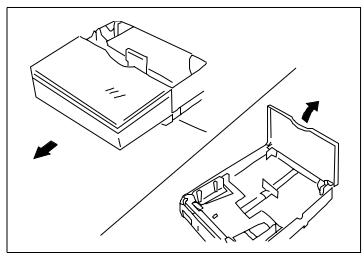
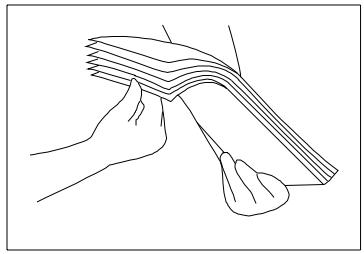
2 Press the paper plate down until you hear it lock in place. Fan through the stack of paper thoroughly, straighten the stack of paper back up and load it into the tray.
3 Lock the paper guides into position and align them with the edges of the stack of paper.

Note
Make sure the stack of paper is not higher than the marks for the maximum paper level. Do not add any paper to the paper tray until it is completely empty and all sheets have been feed through.
4 Close the cover and slide the tray into the printer.
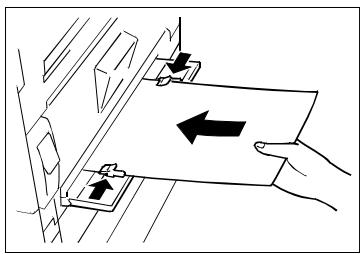
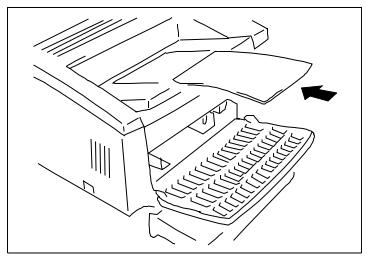
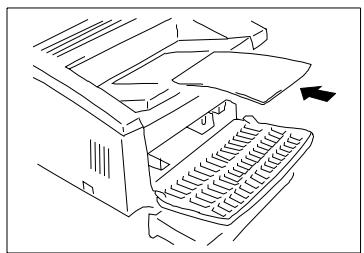
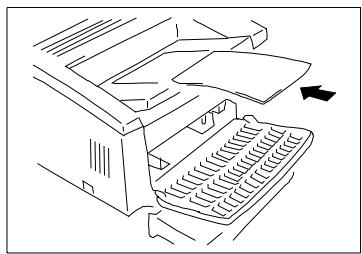
6.5 Loading Paper into the Multi-purpose tray
1 Press the paper feeder down.
2 Fan through the stack of paper thoroughly and straighten the stack of paper back up.
3 Load the stack of paper into the paper feeder and adjust the paper guides.
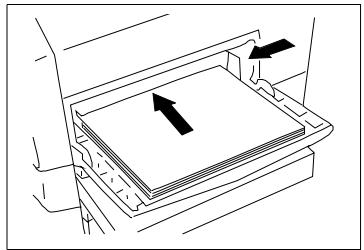
4 Close the paper feeder.
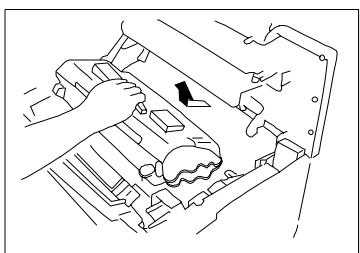
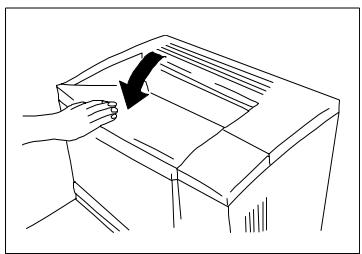
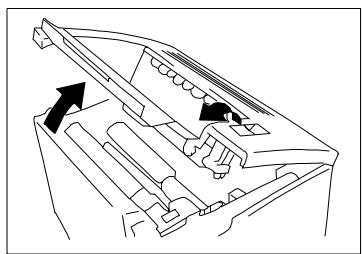
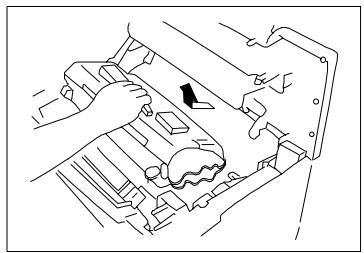
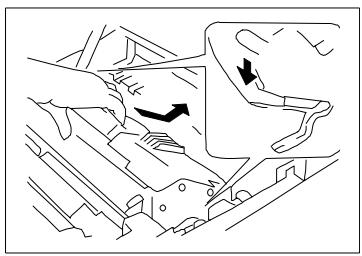
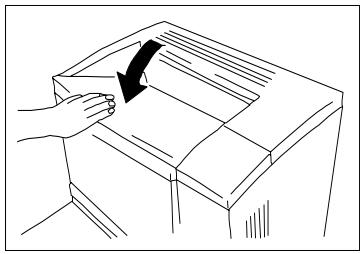
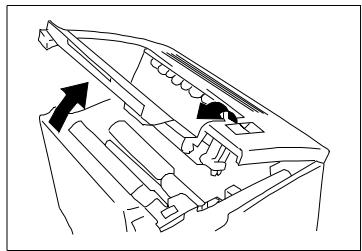
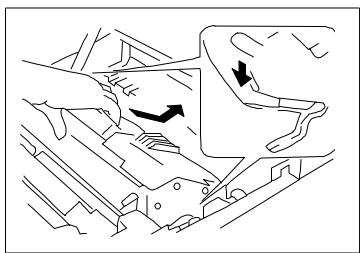
6.6 Installing the Imaging Cartridge
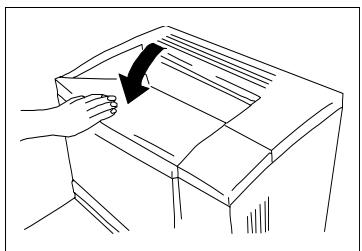
1 Slide the paper holder into the appropriate slot before opening the cover.
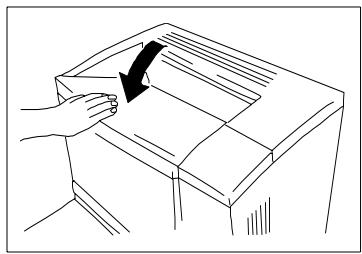
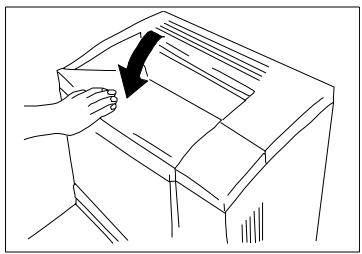
2 Open the top cover by pulling the release lever forward.
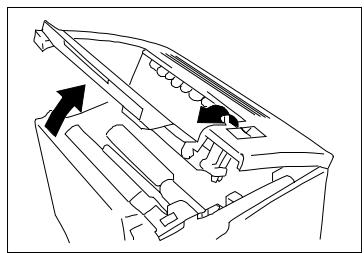
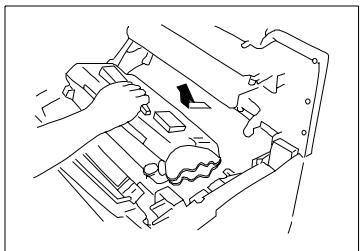
3 Take a new imaging cartridge out of the package.
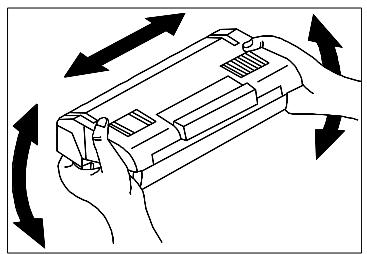
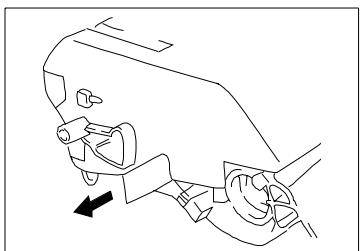
4 Hold the imaging cartridge firmly in one hand and pull the toner cover strip (seal) out with the other.
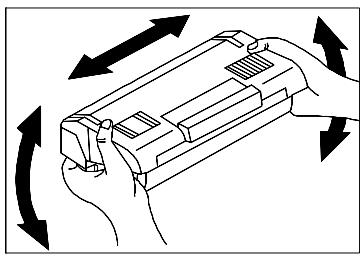
5 Shake the imaging cartridge four or five times in the direction of the arrows on the unit to distribute the contents of the toner inside evenly.
6 Insert the protrusions on the sides of the cartridge into the slots provided and slide the development unit back into the printer carefully.
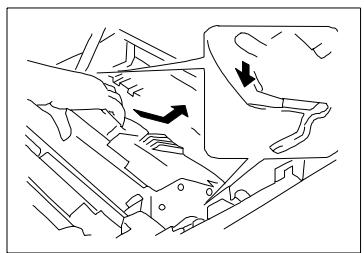
7 Close the cover.
Operating the Printer
Please refer to Chapters 2 and 4 for instructions on how to operate the printer.
6.7 Maintenance and Troubleshooting
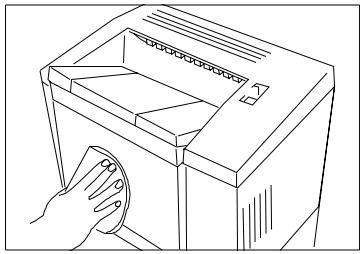
Cleaning the Printer
Clean the printer on a regular basis. Before cleaning, switch off the printer and pull the plug from the power socket. Use a soft cloth for the best results.

WARNING
Never use alcohol or thinners!
→ Always pull the plug from the power socket before cleaning!
Cleaning the Casing
Clean the casing with a soft cloth and a small quantity of mild household cleaner.
6.8 Clearing Jammed Paper
- If the printer indicates a paper jam with P0; then a paper format other than A4 is loaded in the multi-purpose tray. Load the correct paper format in the feeder and open and close the top cover once.
- If the printer indicates a paper jam with P1, P2 or P3; then the paper is jammed somewhere inside the printer.

CAUTION!
The Fusing Unit inside the printer can get very hot during operation. Be careful not to touch it.
Paper Jam in the Manual Paper Feeder
1 Slide the paper tray into the slot provided before opening the top cover.

2 Open the top cover by pulling the release catch forward. Remove the development unit from the printer.

Note
To prevent light from damaging the imaging cartridge, cover it with a cloth immediately after removing from the printer.
3 Remove the jammed paper from the paper feeder.
4 Make sure there's no more paper in the printer and reinstall the imaging cartridge.
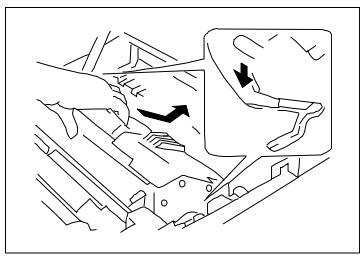
5 Close the top cover.
Jammed Paper in the Paper Tray
1 Slide the paper tray into the slot provided before opening the top cover.

2 Open the top cover by pulling the release lever forward.
3 Remove the imaging cartridge from the printer.

Note
To prevent light from damaging the imaging cartridge, cover it with a cloth immediately after removing from the printer.
4 Remove the jammed paper from the paper tray.
5 Make sure there's no more paper in the printer and reinstall the imaging cartridge.
6 Close the top cover.
Jammed Paper inside the Printer
1 Slide the paper tray into the slot provided before opening the top cover.
2 Open the top cover by pulling the release lever forward.
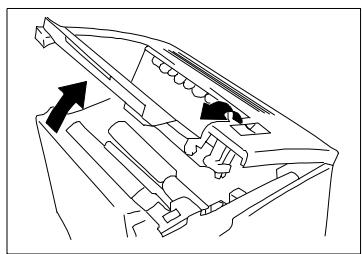
3 Remove the imaging cartridge from the printer.

Note
To prevent light from damaging the imaging cartridge, cover it with a cloth immediately after removing from the printer.
The fusing may not complete. Be careful not to get your hands and clothes dirty when removing the paper.
Never pull the jammed paper against the direction of the fusing unit.
4 If the paper is jammed in front of the fusing unit, pull it up slightly.
5 If the paper is jammed behind the fusing unit, hold it firmly in both hands and pull it out at an angle.

6 Reinstall the imaging cartridge and close the top cover.
6.9 Replacing the Imaging Cartridge
1 Slide the paper tray into the slot provided before opening the top cover.
2 Open the top cover by pulling the release catch forward.
3 Remove the old imaging cartridge from the printer.
4 Take a new imaging cartridge out of the package.
5 Hold the imaging cartridge firmly in one hand and pull the toner cover strip (seal) out with the other.
6 Shake the imaging cartridge four or five times in the direction of the arrows on the unit to distribute the contents of the toner inside evenly.
7 Insert the locking catches on the sides of the imaging cartridge into the slots provided and slide the development unit back into the printer carefully.
8 Close the cover.
6.10 Poor Printing Quality
Poor Contrast
ABCDE
ABCDE
ABCDE
ABCDE
| Possible Cause | Solution |
| Poor development | Shake the imaging cartridge. Replace the imaging cartridge. |
| Paper | Check paper for its suitability and moisture level. Switch paper. |
Grey Background
ABCDE
ABCDE
ABCDE
ABCDE
| Possible Cause | Solution |
| Poor development | Shake the imaging cartridge. |
| Insufficient cleaning | Replace the imaging cartridge. |
Black Splotches
ABCDE
ABCDE
ABCDE
ABCDE
Possible Cause
Solution
Poor development
Check the toner level in the imaging cartridge.
Blank Spaces
ABCDE
ABCD
ABCE
AbcDE
| Possible Cause | Solution |
| Poor transmission | Check toner level, shake the imaging cartridge. |
| Paper | Check paper for its suitability and moisture level. Switch paper. |
7 Technical Specifications
| Model | Desktop printer, book rest for print image above |
| Scanner type | Rotation mirror |
| Scan mode | 265 grey levels |
| Document size | min. A6 (148 mm x 105 mm) for single-page scanning max. A2 (594 mm x 420 mm) for double-page scanning |
| Document height | A3 max. 100 mm (effective scanning area 300 mm length) A2 max 50 mm (effective scanning area 432 mm length) |
| Resolution | 200 / 300 / 400 / 600 dpi |
| Scanning speed | 4,5 sec. / page (for A4, only right page scanned, 400 dpi resolution, auto illumination, finger-shadow detection, edge-shadow detection, scale 100%) |
| Image sensor | CCD (7500 pixels) |
| Light sensor | Cylindrical halogen lamp (620 W) |
| Illumination / Contrast settings | Automatic / manual (9 levels) |
| Autofocus | Automatically measured via the data on the document height |
| Delete shadow | Dynamic recognition deletes shadows on the inside margin |
| Image correction | Zoom adjustment to compensate curved lines around the inside margin, spacing compensation for letters in the line |
| Text / photo | External line intensification and edge smoothing |
| Finger-shadow detection | yes |
| Edge-shadow detection | yes |
| Centring | yes |
| Dimensions | 730 mm (W) x 745 mm (D) x 975 mm (H) |
| Weight | 64 kg |
| Power supply | 120 V, 60 Hz / 220-240 V, 50-60 Hz |
| Power consumption | max. 1000 W |
| Noise level | max. 30 dB (on standby) max. 62 dB (during operation) (Workspace related noise emission LpA ≤ 70 dB(A)) |
| Interfaces | Video I/F (Printer, copier), SCSI-2 (PC) |
| Output mode | Binary |
| Copy speed (only if connected to Di350) | 8.5 sec. / page A4, right side only, 400 dpi resolution, automatic exposure, Finger masking, frame masking, scale 100%) |
| Warm-up time for copier | max. 70 seconds |
| Optional Accessories | Laser printer PS7000 Printer, copier Di350, Foot switch, PC interface accessories, printer interface accessories, gray scale card, book holder |
Europe only
CE Marking (Declaration of Conformity)
We declare under our sole responsibility that the scanner and options to which this declaration relates is in conformity with the below specifications.
This declaration is valid for the areas of European Community (EC) only.
| Product Type | Book Scanner |
| Product Name | PS7000 |
| Options | Laser printer PS7000 printer, copier Di350, Foot switch,PC interface accessories, printer interface accessories, Gray scale card |
| Standards | Safety: EN 60 950/1992 A1, A2, A3, A4(Safetyofinformationtechnologyequipment,includingelectricalbusiness equipment)EMC: EN 55 022 (Class B) / 1998(Testing and measuring techniques for radio-frequency disturbances for communication technology)EN61000-3-2 A13Electromagnetic compatibility (EMC)- Part 3: Limits - Section 2: Limits for harmonic current emissions (equipment input current up to and including 16 A per phase)EN61000-3-2 / 1995Electromagnetic compatibility (EMC)- Part 3: Limits -Sections 2: Voltage dips and voltage variations immunity test for low voltage netowrks with devices with an input current of ≤16 AEN 50 024 / 1998(Testing and measuring techniques for immunity testing in communication technology)EN 50 082-1 / 1997(Electromagnetic compatibility - Generic immunity standard Part1: Residential, commercial and light industry)EN61000-4-2(Electromagnetic compatibility (EMC)Part 4: Testing and measuring techniquesSection 2: Electrostatic discharge immunity test)EN61000-4-3(Section 3: Radiated, radio-frequency electromagnetic field immunity test)EN61000-4-4(Electrical fast transient / burst immunity test)EN 61 000-4-5(Section 5: Surge immunity test)EN 61 000-4-6(Section 6: (Conducted disturbances induced by radio-frequency fields immunity test)EN 61 000-4-8(Section 8: Power-frequency magnetic field immunity test)EN 61 000-4-11(Section 11: Voltage dips, short interruptions and voltage variations immunity test)Note: This product was designed for operation in a typical office environment. |
| EC Directives | Safety :73 / 23 / EECEMC :89 / 336 / EEC and 93 / 68 / EEC |