
PAGESCOPE CABINET PRO - Gestion de documents KONICA MINOLTA - Notice d'utilisation et mode d'emploi gratuit
Retrouvez gratuitement la notice de l'appareil PAGESCOPE CABINET PRO KONICA MINOLTA au format PDF.

| Type de produit | Logiciel de gestion de documents |
| Systèmes d'exploitation compatibles | Windows 98 (SP1), Windows 98 SE, Windows Me, Windows NT 4.0 Workstation (SP6a), Windows 2000 Professional (SP2), Windows XP Home Edition, Windows XP Professional |
| Mémoire vive recommandée | Windows 98/Me/NT/2000 : 192 Mo ; Windows XP : 256 Mo |
| Processeur recommandé | Pentium III 1 GHz ou supérieur |
| Espace disque dur requis | 800 Mo |
| Résolution d'écran minimale | 800 x 600 pixels, High Color (16 bits) |
| Navigateur Web requis | Internet Explorer 5.0 ou ultérieur |
| Fonctions principales | Gestion et visualisation de documents, création de vignettes, annotation d'images, groupement de fichiers, fusion en PDF ou TIFF multipage, importation depuis périphériques TWAIN, envoi par e-mail, transfert FTP, surveillance de dossiers, OCR, recherche par contenu, correction d'image |
| Formats de fichiers pris en charge | DOC, XLS, PPT, PDF, HTM, HTML, TXT, JTD, DXF, DWG, DWF, JPG, JPEG, TIF, BMP, PSD, PCT, PIC, J2K, PNG |
| Langues de reconnaissance OCR | Japonais, Anglais, Langue du système d'exploitation |
| Entretien et nettoyage | Mises à jour logicielles disponibles via le fichier Readme ; désinstallation propre via Panneau de configuration |
| Sécurité | Protection par mot de passe pour le serveur FTP intégré ; gestion des attributs de fichiers en lecture seule |
| Informations générales | Logiciel développé par Minolta Co., Ltd. ; nécessite une base de données MSDE2000 ; licence utilisateur unique ; manuel d'utilisation fourni |
FOIRE AUX QUESTIONS - PAGESCOPE CABINET PRO KONICA MINOLTA
Questions des utilisateurs sur PAGESCOPE CABINET PRO KONICA MINOLTA
0 question sur cet appareil. Repondez a celles que vous connaissez ou posez la votre.
Poser une nouvelle question sur cet appareil
Téléchargez la notice de votre Gestion de documents au format PDF gratuitement ! Retrouvez votre notice PAGESCOPE CABINET PRO - KONICA MINOLTA et reprennez votre appareil électronique en main. Sur cette page sont publiés tous les documents nécessaires à l'utilisation de votre appareil PAGESCOPE CABINET PRO de la marque KONICA MINOLTA.
MODE D'EMPLOI PAGESCOPE CABINET PRO KONICA MINOLTA
The essentials of Imaging
www.minolta.com

PAGESCOPE
Cabinet Pro
Ver. 2.1
Contents
1 Introduction
1.1 Welcome 1-1
1.2 Structure of This User Manual 1-2
Content of Each Chapter. 1-2
Explanation of Manual Conventions. 1-2
2 Features of PageScope Cabinet Pro
2.1 Software Capabilities 2-1
3 Installation
3.1 System Requirements 3-1
3.2 Installing the Software 3-2
3.3 Uninstalling the Software 3-5
4 Basic Operation and Setup
4.1 Starting Up and Quitting PageScope Cabinet Pro 4-1
To start up PageScope Cabinet Pro 4-1
To quit PageScope Cabinet Pro. 4-2
4.2 Main Window 4-2
4.3 Setting the User Environment 4-3
To display the "SetUp" dialog box 4-3
"System" Tab. 4-4
"Filtering file display" Group Box 4-5
"Folder to save the PDF files generated by PageEdit"
Group Box. 4-5
"FTP" Tab. 4-6
To specify FTP server settings. 4-6
"Mail" Tab 4-8
"Launch Application" Tab 4-9
To register an application. 4-10
To register e-mail message settings 4-11
To register printer settings 4-12
To register FTP client settings 4-14
To change settings registered in the launcher 4-15
To unregister settings in the launcher 4-15
To change the icon. 4-15
"OCR"Tab 4-16
To select the recognized language 4-16
"Watch folder" Tab. 4-17
To specify the folder 4-17
To process files 4-18
To delete specified folder settings 4-19
"Stamp" Tab. 4-19
To register a stamp. 4-19
To remove a registered stamp. 4-20
4.4 Specifying and Removing Favorites 4-21
Registering a Folder in the Favorites 4-21
To open/close folders on the "ALL" and "Favorites" tabs 4-23
Removing a Folder From the Favorites 4-23
4.5 Opening Folders 4-24
Displaying as Thumbs... 4-24
Displaying as Icons 4-25
Displaying as a List. 4-26
Displaying Details 4-27
Changing the Displayed Columns 4-28
Creating a File List. 4-29
Sorting Document Files 4-29
4.6 Thumbsails 4-30
Creating Thumbs... 4-30
Updating Thumbsails 4-31
Changing the Display Size of Thumbsnails 4-31
Rotating Thumbs... 4-32
5 Managing Document Files
5.1 Editing Document Files 5-1
Adding New Folders With PageScope Cabinet Pro 5-1
Changing the Name of a File or Folder 5-2
Copying Folders or Document Files 5-3
Copying Folders or Document Files ([Copy to folder]) 5-3
Moving Folders or Document Files ([Move to folder]) 5-3
Deleting Folders or Document Files 5-4
Displaying Document Files in the "Viewer" Window 5-5
Displaying an Image File in the "Viewer Light" Window 5-7
Displaying the document file with the application linked to it. 5-8
Opening a Document File Using a Registered Application 5-8
5.2 Displaying the "Property" Dialog Box for Folders and Document Files 5-9 To display the "Property" dialog box of a folder .5-9 To display the "Property" dialog box of a document file..5-10 To display the "Property" dialog box of a group file..5-14
5.3 Grouping 5-16
Grouping Files Using a Drag-and-Drop Operation 5-16
Grouping Files Using Menu Commands 5-17
Changing the Page/File Displayed for a Group File 5-17
Changing the File Order of a Group File 5-18
Changing the Name of a Group File 5-19
Removing a Document File From a Group File 5-19
Removing All Document Files From a Group File 5-19
Slide Shows 5-20
To start a slide show 5-20
Slide Show Operations 5-21
5.4 Merging Files 5-22 Converting a Group File Into a PDF File, a Multi-Page TIFF File or a Compact PDF File 5-22
5.5 Document File Formats 5-23 Converting File Formats 5-23 Converting a File to a Different Format 5-25
5.6 Working With Annotations 5-27
- Specifying Annotations 5-27
- To add a tag 5-28
- To enter text 5-29
- To draw a line 5-30
- To draw a shape 5-31
- To add a stamp 5-32
- To select an annotation 5-34
- To copy annotations 5-34
- To move annotations 5-35
- To delete annotations 5-35
- To change the order of annotations 5-35
- To copy part of the image onto the Clipboard 5-36
- To paste the image copied onto the Clipboard into the "Viewer" window 5-36
- Searching for Annotations 5-37
5.7 Image Enhancement Functions 5-39
To specify skew adjustment 5-39
To specify background removal 5-39
To specify halftone removal 5-40
To specify bleed-through correction 5-40
To specify automatic document enhancement 5-41
To specify image enhancement. 5-42
To adjust the sharpness 5-43
To change the number of colors. 5-44
To change the resolution 5-44
To change the image size 5-45
To specify negative/positive inverting. 5-45
To specify mirror imaging (left/right flipping) 5-45
To specify embossing 5-45
To specify trimming 5-46
To specify automatic photo image enhancement 5-46
To specify a defined photo image enhancement. 5-47
To rotate the image 5-48
5.8 Page-Editing Functions 5-49
Opening the "Page Edit" Window 5-49
Closing the "Page Edit" Window 5-50
"Page Edit" Window 5-50
Page-Editing Toolbar 5-51
Scanning Through the Pages of a Document. 5-53
Adding Files to the "Page Edit" Window 5-54
Setting the User Environment of the "Page Edit" Window 5-56
Selecting a Document 5-58
Selecting All Documents. 5-58
Saving a Document 5-58
Printing a Document 5-58
Duplicating a Document 5-59
Duplicating a Page 5-59
Deleting a Document 5-59
Deleting All Documents 5-59
Changing the Name of a Document 5-60
Arranging the Documents 5-60
Previewing a Document. 5-60
Changing the Size of Thumbsnails 5-61
Merging Documents 5-61
Separating a Document Into Its Individual Pages. 5-62
Rotating a Document 5-62
Rotating a Page 5-62
Changing the Order of Pages 5-63
Removing a Page 5-64
Automatically Inserting a Blank Page 5-65
Inserting a Blank Page of the Specified Size. 5-65
5.9 Working With Keywords 5-67
Specifying Keywords 5-67
To create a keyword. 5-67
To change a keyword. 5-69
To delete a keyword. 5-70
Assigning Keywords to Document Files 5-71
5.10 Working With Comments 5-73
Specifying Comments for Document Files 5-73
Deleting the Comments for a Document File 5-74
5.11 Extracting Text for a File Content Search.. 5-75
5.12 Extracting Text From an Image File 5-76
5.13 Managing File Versions 5-77
6 Searching for Document Files
6.1 Displaying the "Search files and folders" window 6-1
6.2 Specifying the Search Conditions 6-2
Searching by File Name 6-2
Searching by File Content 6-3
Searching by Date. 6-3
Searching by Keyword 6-4
Searching Using Search Options 6-5
Compound Searching 6-6
6.3 Performing a Refined Search 6-6
7 Printing
7.1 Specifying the Printer 7-1
7.2 Printing Document Files.. 7-1
Printing the Thumbnail List. 7-1
Printing Document Files 7-2
To print using menu commands. 7-2
To print using a button on the toolbar 7-2
To print using a drag-and-drop operation. 7-3
7.3 Image Options 7-4
"Image option" Dialog Box. 7-4
8 Importing
8.1 Importing an Image From a TWAIN Device 8-1
Specifying the TWAIN Device 8-1
Importing an Image From a TWAIN Device 8-2
8.2 FTP Server Function 8-4
Displaying the IP Address 8-4
8.3 Importing From a Mail Server 8-4
8.4 Importing From a Monitored Folder 8-5
9 Distributing Document Files
9.1 Attaching Document Files to E-Mail Messages 9-1
9.2 Sending Document Files to an FTP Server 9-2
10 Appendix
10.1 Glossary 10-1
10.2 Index 10-3
1 Introduction
1.1 Welcome
Thank you for purchasing the Minolta PageScope Cabinet Pro software.
Before using this software for the first time, be sure to read this User Manual carefully.
Unauthorized reproduction, translation or duplication of this document, whether in its entirety or in part, is strictly prohibited.
The content of this document is subject to change without notice.
Copyright © 2000-2003 Minolta Co., Ltd. All rights reserved.
Trademark Acknowledgements
Microsoft, Windows and Windows NT are either registered trademarks or trademarks of Microsoft Corporation in the United States and other countries.
Adobe Acrobat and Acrobat Reader are trademarks of Adobe Systems Incorporated.
ABBYY FineReader, ABBYY, and FINERADER are trademarks of ABBYY Software Ltd.
All other product names are trademarks or registered trademarks of their respective companies.
Copyright 1998-2003 SUMITOMO ELECTRIC FIELD SYSTEMS CO.,LTD.
ABBYY™ FineReader™ 6.0 Engine © ABBYY Software Ltd. 2002.
ABBYY FineReader - the keenest eye in OCR
Outside In© Viewer Technology © 1992-2002 Stellent Chicago, Inc. All rights reserved.
This software is based in part on the work of the Independent JPEG Group.

1.2 Structure of This User Manual
Content of Each Chapter
This User Manual has the following structure and contains the information listed below. Refer to this table to retrieve information from this manual. In addition, when searching for specific information or the answer to certain questions, use the index at the back of this User Manual.
| Chapter No. | Chapter Title | Chapter Content |
| 1 | Introduction | This chapter provides information on how to use this User Manual. |
| 2 | Features of PageScope Cabinet Pro | This chapter contains general information on the software functions. |
| 3 | Installation | This chapter describes the installation and uninstallation of the software. |
| 4 | Basic Operation and Setup | This chapter provides explanations on how to begin using the software, on the various areas of the main window, and on how to specify basic program settings. |
| 5 | Managing Document Files | This chapter provides descriptions of the various functions for efficiently managing documents. |
| 6 | Searching for Document Files | This chapter provides information on how to search for files by file name, modification date, keyword, annotation, etc. |
| 7 | Printing | This chapter provides descriptions on printing document files and thumbnails. |
| 8 | Importing | This chapter provides explanations on importing document files into PageScope Cabinet Pro. |
| 9 | Distributing Document Files | This chapter contains descriptions on specifying settings in order to send document files by e-mail or transfer them to an FTP server. |
| 10 | Appendix | This chapter contains the following additional information. • Glossary • Index |

Note
For the most up-to-date information on the software, refer to the Readme file.
Explanation of Manual Conventions
The various marks and text formats used in this User Manual to indicate various circumstances are explained below.

CAUTION
This is a warning.
A warning alerts you to a problem (such as, data loss) that may occur while the software is being used.
The arrow indicates hints on preventing a situation that you did not intend.
[Menu]
The name of a key on the computer keyboard, a button in a software dialog box, an icon or a menu is written as shown.
→
Text formatted as shown here indicates a single action that is to be performed. (It is not followed by additional steps.)
1 Text formatted as shown here indicates the first step of a sequence of actions.
2 Text formatted as shown here indicates the second step of the sequence of actions. (Subsequent steps are also formatted as shown here.)
Here you can see a corresponding screenshot.
? Text formatted in this style provides additional assistance for the step.
Text formatted in this style describes the action that will ensure the desired results are achieved.
![KONICA MINOLTA PAGESCOPE CABINET PRO - [Menu] - 1](/content/2025/01/139504/images/34a7e615d9b380bcd747a5b031d026c4f0bfa58e01e4f7f1adacfa15f176a39a.jpg)
This is a helpful tip.
Text highlighted in this manner contains useful information and handy tips for easy operation of the software.
2 Features of PageScope Cabinet Pro
This chapter provides information on the various features of PageScope Cabinet Pro.
2.1 Software Capabilities
PageScope Cabinet Pro allows you to do the following:
- Efficiently use document files of various formats
- Create thumbnails of each document file in order to facilitate identifying documents
- Specify keywords and tags to facilitate document searches as well as specify annotation for searching image files
- Group multiple files so they can be used as if they are a single file
- Merge multiple image files into a single PDF file or a multi-page TIFF file
- Group single pages cut from multiple document and image files
- Import images from TWAIN devices, then manage the files
- Create e-mail messages with document files attached
- Periodically check for incoming e-mail messages and import text from the e-mail message or attached document
- Obtain FTP server functionality (The FTP server function of PageScope Cabinet Pro only allows files to be received from Minolta multifunctional products using limited FTP commands.)
- Send document files to an FTP server.
- Automatically transfer files from a specific folder to a different folder as well as specify that certain processes (such as, image correction) be performed during the transfer
- Perform various image corrections or image processing from the viewer
- Convert image files to the compact PDF file format, which has a smaller file size
- Search the contents of application files and image files
- Text can be extracted from an image file and saved as an RTF (rich text format) file
3 Installation
This chapter provides procedures on the installation and uninstallation of the software.
3.1 System Requirements
The following operating environment is required in order to use PageScope Cabinet Pro.
| Operating System | Windows® 98 First Edition (SP1), Windows 98 Second Edition, Windows Me, Windows NT® 4.0 Workstation (SP6a), Windows 2000 Professional (SP2), Windows XP Home Edition, and Windows XP Professional |
| Memory | Windows 98/Windows 98 SE/Windows Me/Windows NT 4.0 Workstation/Windows 2000 Professional: 128MB (192MB or higher is recommended) Windows XP Home Edition/Windows XP Professional: 192MB (256MB or higher is recommended) |
| CPU | Pentium@III 1GHz or higher is recommended |
| Web Browser | Internet Explorer 5.0 or later |
| Hard Disk Free Space | 800 MB |
| Monitor Resolution | 800 × 600 pixels or higher, High Color (16 bit) |
| Network | TCP/IP protocol |
| Compatible Applications | Microsoft® Office 97 (SR2), Office 2000 (SP2), Office XP (SP1), Adobe® Acrobat® 4.0/5.0, and Acrobat Reader 4.0/5.0 |
| • Acrobat 4.05/5.05 or Acrobat Reader 4.05c/5.05 must be installed on the computer. | |

Note
If the operating system and network settings are not completely specified, PageScope Cabinet Pro cannot be installed or it will not work correctly.
The full length of the path name for document files must not exceed 200 characters.
Example:
= 60 letters
| C:\Program Files\Minolta\PageScope Cabinet\Default\abcde.bmp | |||||
| 1 | 10 | 20 | 30 | 40 | 50 |
3.2 Installing the Software

CAUTION
Be careful of data loss!
Unexpected data loss can be prevented.
Before running the PageScope Cabinet Pro installer, close all open files and exit all applications.

Note
If PageScope Cabinet Ver. 1.0, 1.5 or 1.6 is installed on the computer, it must be uninstalled before the new version of PageScope Cabinet Pro is installed. When upgrading from PageScope Cabinet Pro Ver. 2.0 to Ver. 2.1, be sure to use the Updater. When uninstalling PageScope Cabinet Pro ver. 2.1 to reinstall it, uninstall the Xelo PDF Driver and Microsoft SQL Server Desktop Engine (MPSC_DB), and delete all related files before performing the installation.
All keywords, tags and markers (except for , , , marks) used with PageScope Cabinet Ver. 1.0, 1.5 or 1.6 can also be used with the newer version of PageScope Cabinet Pro. In order to use the new version of PageScope Cabinet Pro, the database files from PageScope Cabinet Ver. 1.0, 1.5 or 1.6 must be converted. For details on converting the database files, refer to steps 11 through 14 of the following installation procedure.
1 Insert the CD-ROM into the CD-ROM drive.
2 Double-click the [My Computer] icon on the desktop, and then double-click the icon of the CD-ROM drive containing the CD-ROM.
3 Double-click the [Setup.exe] icon on the CD-ROM.
The InstallShield Wizard starts up and prepares the files necessary for installation. Follow the instructions in the dialog box to continue the installation.
4 When the End User License Agreement appears, read it carefully.
- Click the [Yes] button to accept the terms and conditions of the license agreement.
5 Follow the instructions in the dialog box to continue the installation.
6 When the dialog box for entering the user information appears, type the necessary information into the User Name, Company Name and Serial Number/Key Code boxes.
The serial number can be found on a label affixed to the back of the CD case.
7 Click the [Next] button, and then follow the instructions in the dialog box to continue the installation.
8 To change the driver or folder where the software is to be installed, click the [Browse] button in the "Select Destination Folder" dialog box, and then select the destination folder.
To leave the destination folder unchanged, click the [Next] button.
9 Select the Programs folder where the application will be added. (The Programs folders are the items displayed when [Programs] on the [Start] menu is pointed to.)
10 Follow the instructions in the dialog box to complete the installation.
Once the installation is completed, restart the computer. PageScope Cabinet Pro will not be installed correctly until the computer is restarted.
This completes the installation of PageScope Cabinet Pro. If PageScope Cabinet Ver.1.0, 1.5 or 1.6 is being upgraded to a newer version, continue with the following steps.
11 Click the [Start] button, point to [Programs], then [Minolta], then [PageScope Cabinet Pro 2.1], and then click [DB Converter].
The "DB Converter" dialog box appears.
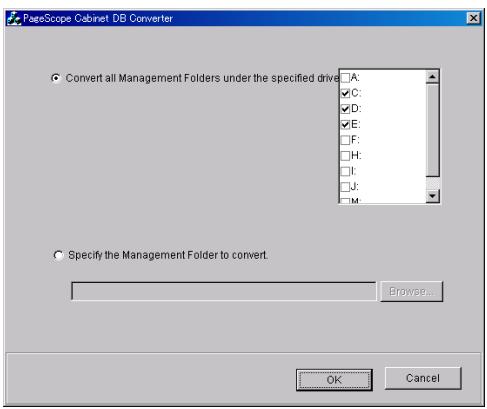
12 Select either Convert all Management Folders under the specified drive or Specify the Management Folder to convert.
Convert all Management Folders under the specified drive check box: Select this check box, and then specify a drive to convert all database files on the specified drive.
Specify the Management Folder to convert check box: Click the [Browse] button, and then specify a folder to convert only the database files in the specified folder.
13 Click the [OK] button.
A dialog box appears, requesting confirmation to begin the conversion.
14 Click the [OK] button.
The database files from the older version is converted to files for the newer version.

Note
Installation may fail if the installation of PageScope Cabinet Pro is interrupted, then restarted before the InstallShield Wizard is completely exited.
With PageScope Cabinet Pro, Microsoft SQL Server Desktop Engine (MSDE2000) is used as the database engine.
While PageScope Cabinet Pro is being used, do not uninstall MSDE2000 from the computer, otherwise all keyword and annotation information used with PageScope Cabinet Pro will be lost.
3.3 Uninstalling the Software
1 Click the [Start] button in the taskbar, point to [Settings], and then click [Control Panel].
2 In the Control Panel window, double-click the [Add/Remove Programs] icon.
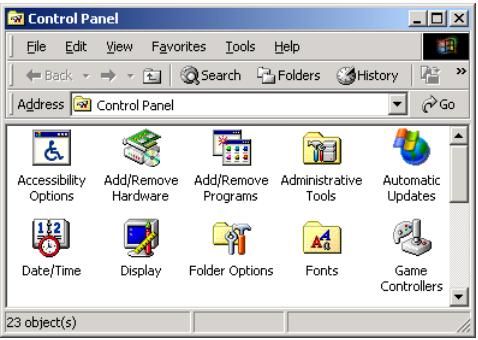
3 Select "PageScope Cabinet Pro" from the list.
4 Click the [Change/Remove] button.
5 When the message appears, requesting confirmation for deleting the file, click the [OK] button.
6 Follow the instructions in the dialog box to complete the uninstallation.

Note
During uninstallation, folders created during the installation of PageScope Cabinet Pro are not deleted. Delete these folders manually if necessary.
4 Basic Operation and Setup
This chapter provides explanations on the various areas of the main window and on how to specify basic program settings.
4.1 Starting Up and Quitting PageScope Cabinet Pro
To start up PageScope Cabinet Pro
Click the [Start] button, point to [Programs], then [Minolta], then [PageScope Cabinet Pro 2.1], and then click [PageScope Cabinet Pro].
or Double-click the [PageScope Cabinet Pro 2.1] icon on the desktop. The main window of PageScope Cabinet Pro appears.
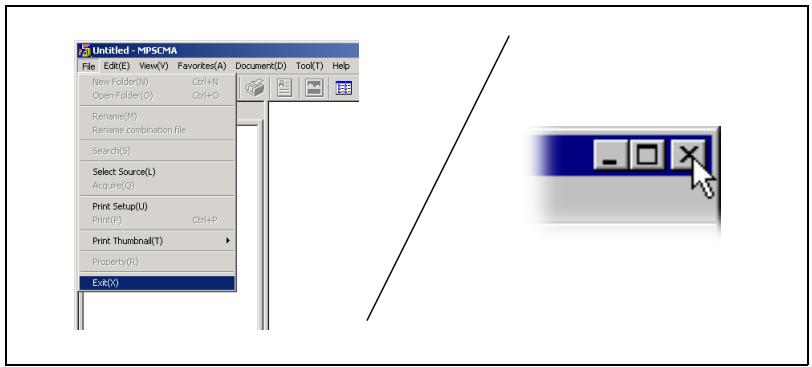
To quit PageScope Cabinet Pro
Either click [Exit] on the [File] menu or click [x] in the title bar of the main window.
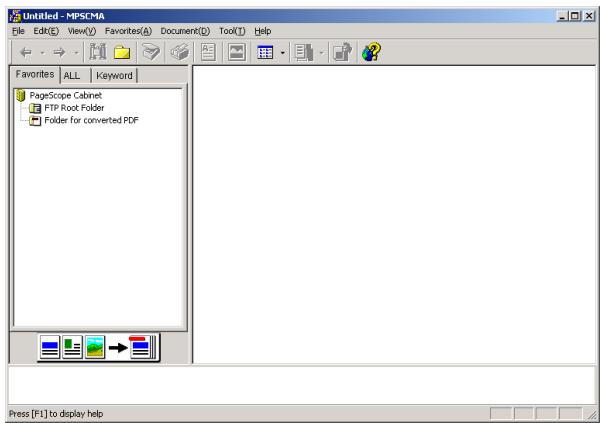
4.2 Main Window
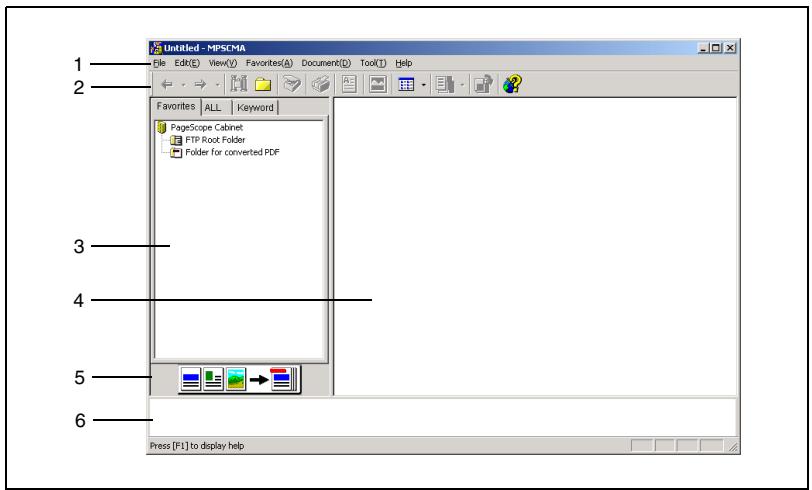
| No. | Element Name |
| 1 | menu bar |
| 2 | toolbar |
| 3 | pane A |
| 4 | pane B |
| 5 | “Page Edit” window icon |
| 6 | launcher |
4.3 Setting the User Environment
Various user settings for PageScope Cabinet Pro can be specified from the "SetUp" dialog box.
To display the "SetUp" dialog box
On the [Tool] menu, click [Setup].
The "SetUp" dialog box appears.
The "SetUp" dialog box contains the following tabs.
- "System" tab: Contains settings for displaying files and for specifying the folder where created PDF files are saved.
- "FTP" tab: Contains FTP server settings.
- "Mail" tab: Contains settings for the e-mail address that is periodically checked for incoming messages.
- "Launch Application" tab: Allows applications, printers, etc. to be registered for automatic startup.
-
"OCR" tab: Contains settings for specifying the character recognition language
-
"Watch folder" tab:
Contains settings for automatically transferring files from a specific folder to a different folder.
- "Stamp" tab:
Allows stamps to be registered.
When any setting is changed, the [Apply] button becomes available.
Clicking the [Apply] button saves the changes made to the settings.
Clicking the [OK] button saves the changes made to the settings and closes the "SetUp" dialog box. Clicking the [Cancel] button cancels the changes made to the settings and closes the "SetUp" dialog box.
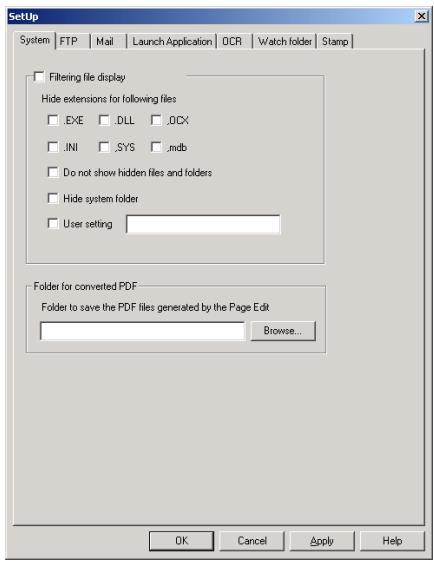
"System" Tab
With the System tab, the settings for displaying files and the folder for saving created PDF files can be specified.
"Filtering file display" Group Box
Select the Filtering file display check box, and then specify the files and folders that are not to be displayed in PageScope Cabinet Pro by selecting the appropriate check boxes of the file and folder attributes.
- File extension check boxes (.EXE, .DLL, .OCX, .INI, .SYS or .mdb) Select the check boxes for the extensions of files that are not to be displayed in PageScope Cabinet Pro.
- Do not show hidden files and folders check box
- Select this check box to specify that files and folders designated as hidden are not displayed in PageScope Cabinet Pro.
- Hide system folder check box
- Select this check box to specify that operating system folders are not displayed in PageScope Cabinet Pro.
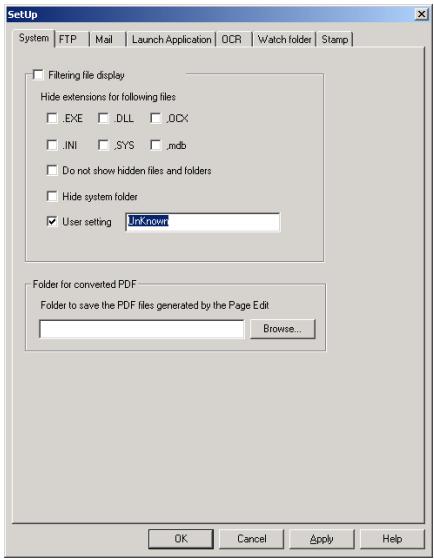
- User setting check box
- Select this check box, and then type into the box the extension of files that are not to be displayed in PageScope Cabinet Pro (for example, ".log").

Note
In the User setting box, type an extension that includes a period (.). To specify multiple extensions, type in a comma (. to separate the extensions.
"Folder to save the PDF files generated by PageEdit" Group Box
Select the folder where PDF files created from the "Page Edit" Window window are saved.
Either type in the box the path to the folder, or click the [Browse...] button and specify the folder in the "Browse for Folder" dialog box that appeared.
The specified folder is now set as the "Folder for converted PDF" on the "Favorites" tab.
"FTP" Tab
PageScope Cabinet Pro can function as an FTP server. Therefore, it can import data from Minolta multifunctional products.

To specify FTP server settings
Follow the procedure described below to set up PageScope Cabinet Pro as an FTP server.
1 Select the Launch FTP check box.
When PageScope Cabinet Pro is started up, the FTP server will also start up automatically.
2 If the TCP port is specified by the device, change the value in the TCP port box.
The default TCP port setting is "21".
3 If the FTP data transfer port is specified by the device, change the value in the FTP data transfer port box.
4 In the FTP user box, type the user login name.
To log in as anonymous, select the anonymous check box.
Login will only be possible with the user name specified here.
5 In the FTP password box, type the user login password.
6 In the FTP Root Folder box, specify the login folder.
This setting will take effect from the next time the FTP server is logged into. The specified folder is now set as the "FTP Root Folder" on the "Favorsites" tab.
7 Click the [OK] button.
The settings are registered. When the FTP server is started up, its icon appears at the right end of the taskbar.

"Mail" Tab
PageScope Cabinet Pro can periodically check for incoming e-mail messages and import the e-mail message text or the attached file. With this tab, various settings, such as those for the e-mail account, can be specified.
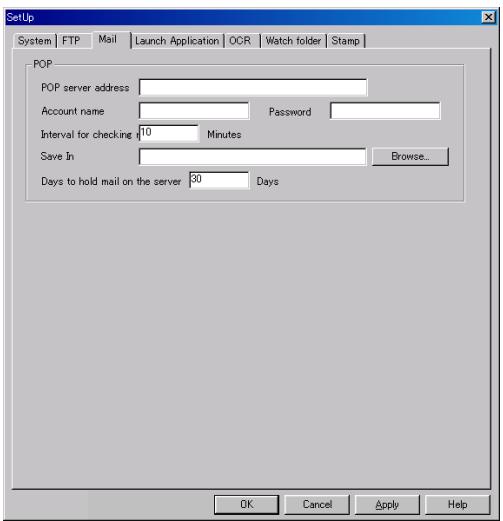
1 In the POP server address box, type the IP address of the POP server.
2 In the Account name box, type the account name for the POP server.
3 In the Password box, type the password for logging into the POP server.
4 In the Interval for checking mail box, type the interval (in minutes) that the e-mail account is checked for incoming messages.
5 Either type in the Save In box the path and the name of the folder where e-mail text and attached files are saved, or click the [Browse...] button and specify the folder.
6 In the Days to hold mail on the server box, type the time period (in days) that received e-mail is left on the mail server.
To leave no e-mail on the mail server after checking for incoming messages, leave the box blank or type "0".

Tip
The text of a received e-mail message is saved as a text file with the attached file grouped with it. A error message will appear if no folder has been specified in the Save In box when a different tab is clicked or the [OK] button is clicked to finish specifying the user environment settings. With e-mail sent in the HTML format, the text is blank.
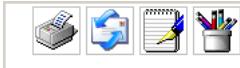
"Launch Application" Tab
With PageScope Cabinet Pro, various applications, e-mail message settings, printer settings and FTP client settings can be registered in the launcher. The icons of registered applications appear in the launcher.

Tip
This tab can also be displayed by right-clicking in the launcher of the main window.
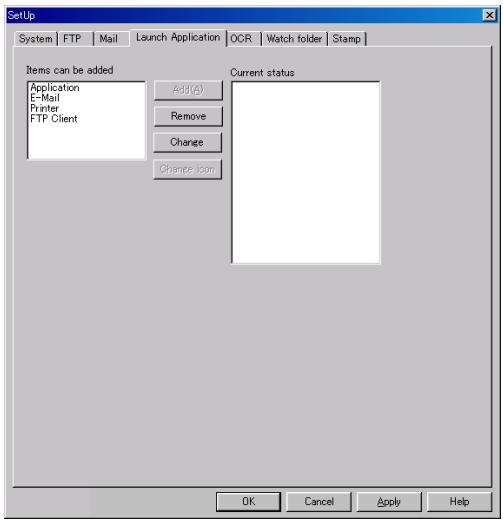
To register an application
1 Select Application from the Items can be added list box, and then click the [Add] button.
A dialog box appears, allowing you to select a file.
2 Select the application to be registered, and then click the [Open] button.
The selected application appears in the Current status list box.
3 Click the [OK] button.
The icon of the registered application appears in the launcher.
To register e-mail message settings
1 Select E-Mail from the Items can be added list box, and then click the [Add] button.
The "E-mail setting" dialog box appears.
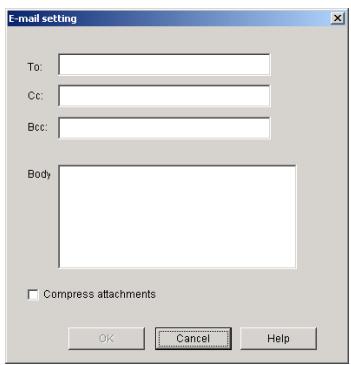
2 Specify the e-mail message settings that you wish to register.
Type in the desired recipient (To:), carbon copy recipient (Cc:), blind carbon copy recipient (Bcc:) and text (no more than 500 characters) of the e-mail message.
To compress the attached file to a file in the EXE format, select the Compress attachments check box.
The name of the recipient for the specified e-mail message transmission settings appears in the Current status list box.
3 Click the [OK] button.
An icon for the registered e-mail message settings appears in the launcher.

#
Tip
If a file is dragged and dropped onto the icon for the e-mail message settings in the main window, the application set as the computer's default e-mail application starts up. In addition, if the specified e-mail application is MAPI-compatible, a new e-mail message is created using the information (recipient, text, etc.) specified in the e-mail message settings and with the dropped file as an attachment.
To register printer settings
1 Select Printer from the Items can be added list box, and then click the [Add] button.
The "Print" dialog box appears.
2 From the Name: drop-down list in the "Printer" group box, select the printer to be used.
3 If necessary, click the [Properties] button, and then specify the detailed settings for the selected printer.
The Properties settings are valid only for printing image files.
When printing files other than image files, the file is printed with the standard settings for the selected printer.
4 If necessary, select the paper size, paper tray and paper orientation.
The paper size, paper tray and paper orientation are valid only for printing image files.
When printing files other than image files, the file is printed with the standard settings for the selected printer.
5 To specify image options for printing, click the [Image options] button.
A dialog box appears, allowing you to specify the image options.
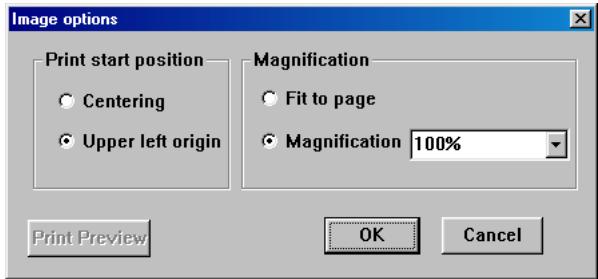
6 After specifying the image options settings, click the [OK] button. The "Print" dialog box appears again.
7 After the necessary print settings are specified, click the [OK] button. The specified printer appears in the Current status list box.
8 Click the [OK] button. An icon for the registered print settings appears in the launcher.
To register FTP client settings
1 Select FTP Client from the Items can be added list box, and then click the [Add] button.
The "FTP setting" dialog box appears.
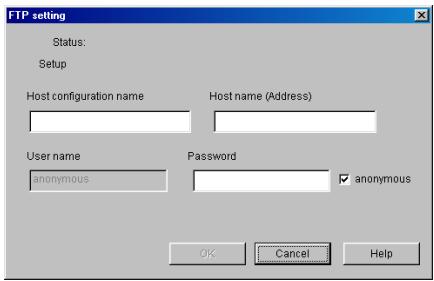
2 Specify the settings for the FTP client that you wish to register.
In the Host configuration name box, type the name of the FTP server (optional name).
In the Host name (Address) box, type the IP address of the FTP server.
In the User name box, type the user name for logging into the FTP server.
In the Password box, type the password for logging into the FTP server.
To log in as anonymous, select the anonymous check box.
3 Click the [OK] button.
The name of the specified host settings appears in the Current status list box.
4 Click the [OK] button.
An icon for the registered FTP client settings appears in the launcher.
To change settings registered in the launcher
Follow the procedure described below to change any settings for an application, e-mail message, printer or FTP client currently registered in the launcher.
1 In the Current status list box, select the item whose settings are to be changed, and then click the [Change] button.
2 Change the settings as necessary. For details on changing the settings, refer to the procedure describing the registration of that particular item.
To register an application
To register e-mail message settings
To register printer settings
To register FTP client settings
3 Click the [Apply] button.
To unregister settings in the launcher
Follow the procedure described below to unregister the settings for an application, e-mail message, printer or FTP client currently registered in the launcher.
1 In the Current status list box, select the item whose settings are to be unregistered, and then click the [Remove] button.
2 Click the [Apply] button.
To change the icon
The printer icon displayed in the launcher can be changed.
1 In the Current status list box, select the item whose icon is to be changed, and then click the [Change icon] button.
2 In the "Change icon" dialog box that appears, select the desired icon, and then click the [OK] button.
3 Click the [Apply] button.
"OCR" Tab
With PageScope Cabinet Pro, text can be extracted from image files using the OCR conversion function.
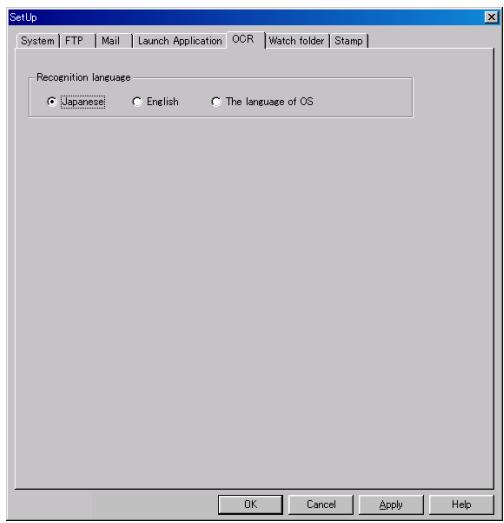
To select the recognized language
Select Japanese, English or The language of OS, and then click the [Apply] button.
"Watch folder" Tab
With PageScope Cabinet Pro, files from a specific folder can be automatically transferred to a different folder. In addition, a certain process (such as, image correction) can be specified to be performed during the transfer.
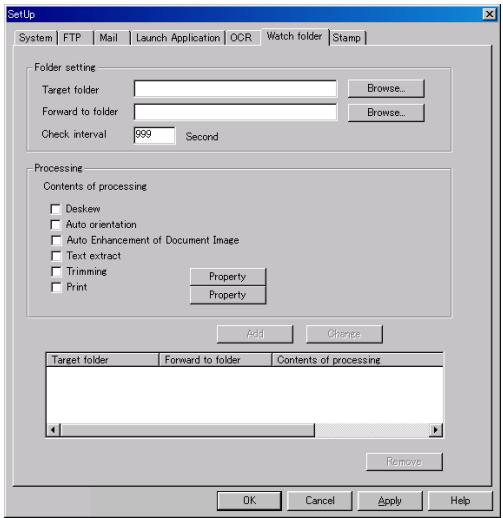
To specify the folder
1 Click the [Browse...] button beside the Target folder box, and then specify the folder to be monitored.
2 Click the [Browse...] button beside the Forward to folder box, and then specify the folder where the files will be transferred.

Note
A maximum of five transfer settings can be specified.
A folder specified as a folder to be monitored cannot be specified as a folder where files are transferred to.
To process files
A process can be specified to be automatically performed before the file is transferred.
1 In the Processing group box, select the process that should be performed.
- Select the Deskew check box to automatically adjust the skewing of image files.
- Select the Auto orientation check box to automatically orient the image files.
- Select the Auto Enhancement of Document Image check box to automatically correct image files.
- Select the Text extract check box to extract the text for a file content search.
- Select the Trimming check box to trim the files as specified. Click the [Property] button to display a dialog box that allows you to specify the trimming properties. Specify the desired settings in the Size and Resolution boxes, and then click the [OK] button.
- Select the Print check box to print the file after it is transferred. Click the [Property] button to display a dialog box that allows you to specify the print settings. Specify the desired settings, and then click the [OK] button.
2 Click the [Add] button.
The specified folder settings appear in the list box at the bottom of the dialog box.
3 Click the [Apply] button.

Note
If the Trimming check box is selected, trimming cannot be performed if the resolution of the image file cannot be obtained.
If a file with the same name already exists in the destination folder when a file is transferred to it from the monitored folder, the new file is saved with a different name so that the old file is not overwritten. For example, if a file titled "MyPic.jpg" already exists in the destination folder when a new file titled "MyPic.jpg" is transferred to it, the new file is saved as "MyPic.1.jpg".
If multiple processes are to be performed, they are performed in the order that they appear in the list.
With the Deskew, Auto orientation, Auto Enhancement of Document Image, and Trimming processes, the image after processing replaces the original image and the file is moved to the destination folder.
To delete specified folder settings
From the list box at the bottom of the dialog box, select the settings that you wish to delete, and then click the [Remove] button.
"Stamp" Tab
From this tab, stamps that can be used in the "Viewer" window can be registered. The list of stamps that are already registered appear in the Stamp list box.
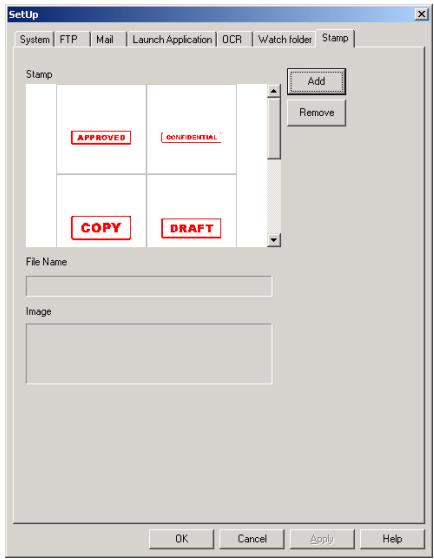
To register a stamp
1 Click the [Add] button.
A dialog box appears, allowing you to select a file.
2 Select the bitmap (BMP) file to be registered as a stamp, and then click the [Open] button.
An image of the contents of the bitmap file appears in the Image box.
3 Click the [Apply] button.
To remove a registered stamp
1 From the Stamp list box, select the stamp that you wish to unregister.
2 Click the [Remove] button.
3 Click the [Apply] button.
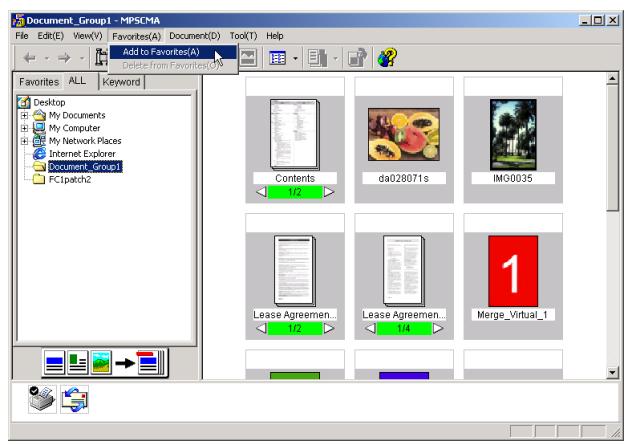
4.4 Specifying and Removing Favorites
With PageScope Cabinet Pro, certain folders can be registered in the Favorites.
If a folder that is often used is registered in the Favorites of PageScope Cabinet Pro, it will appear on the "Favorites" tab of the PageScope Cabinet Pro main window, allowing it to easily be opened. In addition, the color of folders registered in the Favorites can be changed.

Note
When the software is first started up, the "FTP Root Folder", the "Folder for converted PDF" and the "Sample folder" are registered in the Favorites. The "FTP Root Folder" and the "Folder for converted PDF" cannot be deleted.
Registering a Folder in the Favorites
Follow the procedure described below to register a folder in the Favorites.
1 Click the "ALL" tab in pane A to display the "ALL" tab.
2 On the "ALL" tab, select the folder that you wish to register in the Favorites.
3 On the [Favorites] menu, click [Add to Favorites].
The selected folder is registered in the Favorites. When the " Favorites" tab in pane A is clicked to display the Favorites, the registered folder appears in a tree structure below "PageScope Cabinet".

CAUTION
The management information cannot be changed for folders with the read-only attribute applied.
The attribute of all files in a folder is read-only if a folder that has been saved on a CD-R is copied to the hard disk drive or the attribute for the folder is set to read-only. In this case, the management information cannot be changed (keywords cannot be added and thumbnails cannot be created) and an error will occur.
Use Windows Explorer to open the "Properties" dialog box for the document file, and then clear the Read-only check box.
To open/close folders on the "ALL" and " Favorites" tabs
Perform the operations described below to open and close folders on the "ALL" and " Favorites" tabs.
-
On the "ALL" or "Favorites" tab, click a folder that contains subFolders to expand that folder and display its subFolders.
-
On the "ALL" or "Favorites" tab, click a folder to display all files in the folder as thumbnails or a list in pane B. (Click "PageScope Cabinet" at the top of the tree structure to expand and collapse the entire tree.)
-
Click [+] beside the name of a folder to expand the folder, or click [-] beside the name of a folder to collapse the folder.
Removing a Folder From the Favorites
Follow the procedure described below to remove a folder from the Favorites.
1 On the "Favorites" tab, select the folder that you wish to remove from the Favorites.
2 On the [Favorites] menu or on the menu that appears after right-clicking the selected folder, click [Delete From Favorites].
The selected folder no longer appears on the "Favorites" tab.

Note
The folder is no longer registered in the Favorites; the folder itself is not deleted. For details on deleting the folder, refer to "Deleting Folders or Document Files".
4.5 Opening Folders
Click a folder on the "ALL" or "Favorites" tab to display in pane B all files contained in the folder. In addition, if a folder in pane B is double-clicked, all files contained in the folder are displayed in pane B.
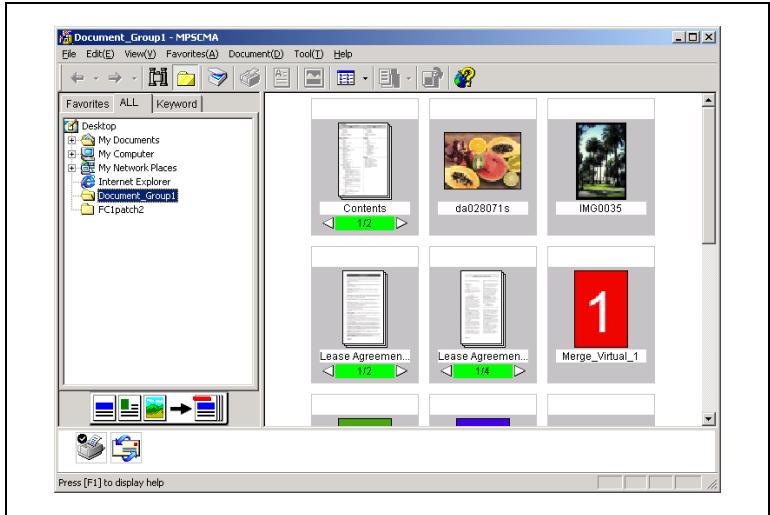
Displaying as Thumbs nails
With the thumbnail view, the contents of the document files in the folders are displayed as small images.
1 On the "ALL" or "Favorites" tab, select a folder.
2 Thumbs nails of all document files in the selected folder are displayed in pane B.
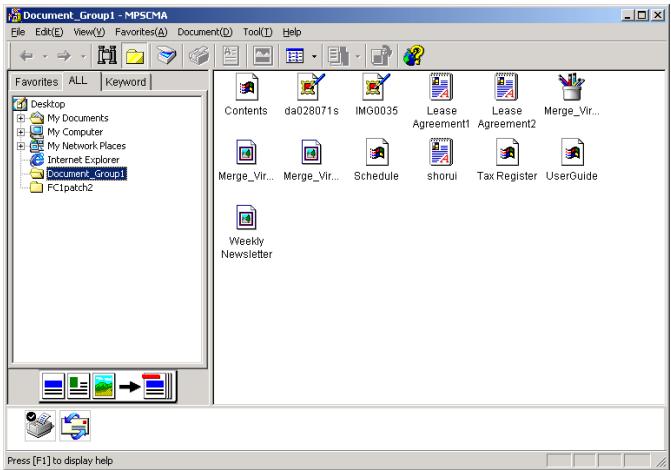
Displaying as Icons
With the icon view, the sub folders and document files in the folder are displayed as icons.
1 On the "ALL" or "Favorites" tab, select a folder.
2 On the [View] menu or from the menu of the corresponding icon on the toolbar, click [Icons].
The sub folders and document files in the folder are displayed as a icons.
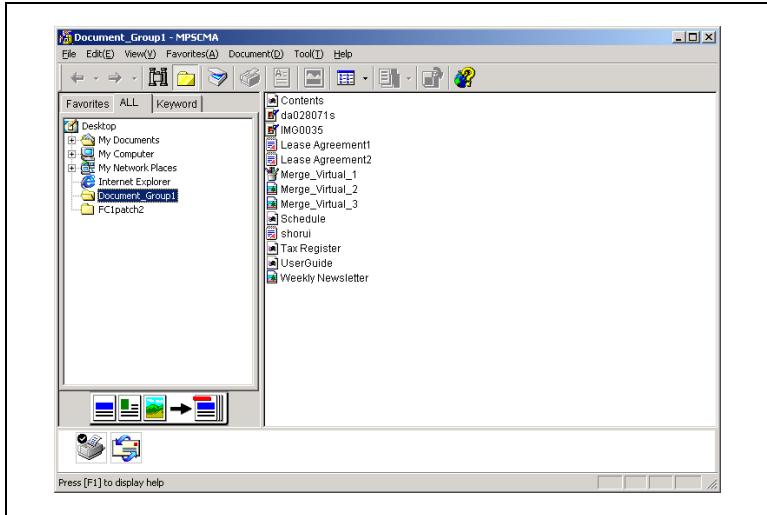
Displaying as a List
With the list view, the sub folders and document files in the folder are displayed as a list.
1 On the "ALL" or "Favorites" tab, select a folder.
2 On the [View] menu or from the menu of the corresponding icon on the toolbar, click [List].
The sub folders and document files in the folder are displayed as a list.
Displaying Details
With the details view, the list of sub folders and document files in the folder are displayed with their detailed information.
1 On the "ALL" or "Favorites" tab, select a folder.
2 On the [View] menu or from the menu of the corresponding icon on the toolbar, click [Details].
The list of sub folders and document files in the folder are displayed with their detailed information.
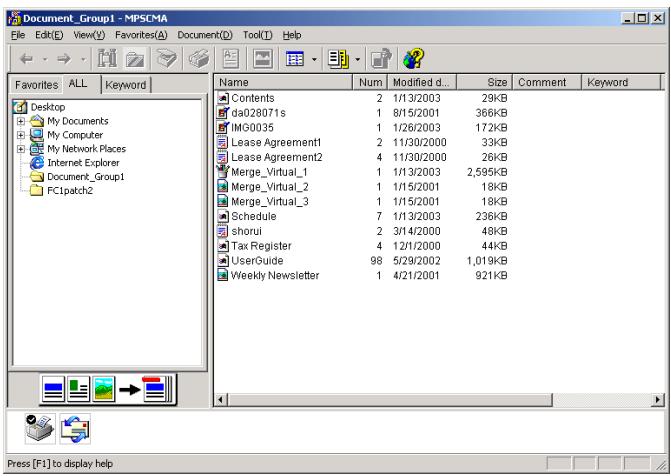
With the details view, the following information is displayed for the document files.
| Item | Description |
| Name | The name of the document file and icon are indicated. (With group files, the name of the group file is indicated.) |
| Num | The number of pages in the document file is indicated. With group files, the total number of pages in the group file is indicated. |
| Modified date | The date when the file was last modified is indicated. (With group files, the date indicated is the date when the document shown in the thumbnail was last modified.) |
| Size | The data size (KB) of the document file is indicated. (With group files, the total size (KB) of the group file is indicated.) |
| Comment | The comment specified for the document file is indicated. |
| Keyword | The keyword specified for the document file is indicated. If multiple keywords have been specified, they are separated with a comma(,) . |
| Annotation | Whether or not annotations have been specified in the document file or merged file is indicated. If annotations have been specified, “O” is displayed. If no annotations have been specified, “-” is displayed. |
Changing the Displayed Columns
If pane B is displayed in the details view, the document file information that is displayed can be changed.
On the [View] menu, click [Choose Columns].
The "Choose Columns" dialog box appears.
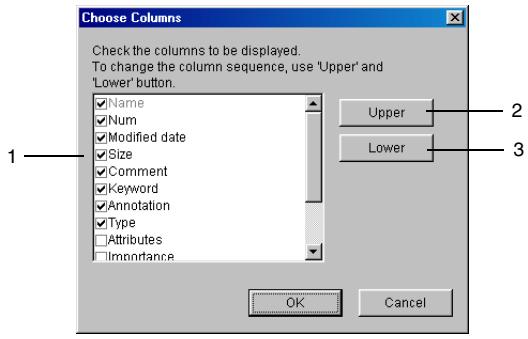
| No. | Item | Description |
| 1 | list of column items | The column items that can be displayed in the details view are listed. Select the check box of the items to be displayed in the details view. |
| 2 | [Upper] button | Click this button to move the selected item up one position in the list. After the [OK] button is clicked, the corresponding column is moved one position to the left in the details view. |
| 3 | [Lower] button | Click this button to move the selected item down one position in the list. After the [OK] button is clicked, the corresponding column is moved one position to the right in the details view. |
Creating a File List
With PageScope Cabinet Pro, the information displayed in the details view can be saved as a file in the CSV format.
1 On the [Tool] menu, click [Create file list].
The "Choose Columns" dialog box appears.
2 Select the check boxes for the items to be included.
3 Click the [Upper] and [Lower] buttons to adjust the order that the columns are displayed in.
4 Click the [OK] button.
The "Save As" dialog box appears.
5 Specify the location where the file is saved and the file name that the file is saved as, and then click the [Save] button.
The file list is saved in the CSV file format.

Tip
The path to the applicable folder is automatically added as the last line of the saved file.
Sorting Document Files
The files and folders displayed in pane B can be sorted.
The files and folders can be sorted by name, date or size in ascending or descending order.
Perform the operation described below to sort the files and folders in the desired order.
Click [Sort] on the [View] menu, and then select how the files and folders are to be sorted.
The files and folders are sorted in the specified order.
4.6 Thumbs nails
The contents of all document files in the folder selected on the "ALL" or " Favorites" tab can be displayed as small images in PageScope Cabinet Pro. (For more details, refer to "Displaying as Thumbsnails".)
Creating Thumbsails
Thumbs nails are automatically created when the contents of a folder selected on the "ALL" or "Favorites" tab are displayed in pane B.
Thumbs nails can only be created for files with the following extensions: DOC, XLS, PPT, PDF, HTM, HTML, TXT, JTD, DXF, DWG, DWF, JPG, JPEG, TIF, BMP, PSD, PCT, PIC, J2K and PNG

Tip
The resolution of the thumbnails can be adjusted in the "Property" dialog box for the folder. Select a folder in pane A or pane B, and then on the [File] menu or on the menu that appears after right-clicking the selected folder, click [Property]. In the "Property" dialog box for the folder, type the desired resolution (in pixels) into the Thumbnail box, and then click the [OK] button.

Note
Depending on the contents of the file, some thumbnails may not be displayed correctly. If the file is protected with a password, the thumbnail is not created.
Updating Thumbs nails
PageScope Cabinet Pro automatically updates the thumbnail when it detects that the file has been changed. However, depending on the order in which thumbnails are created, it may take some time until the thumbnail of the desired file is updated.
Follow the procedure described below to update a thumbnail.
1 Select the thumbnail that you wish to update.
To display a specific document in a group file, click the arrows. (For more details, refer to "Changing the Page/File Displayed for a Group File".)
2 On the [Document] menu, click [Create Thumbnail].
The thumbnail is updated.
Changing the Display Size of Thumbs nails
The thumbnails can be displayed in one of three sizes.
Follow the procedure described below to change the display size of the thumbnail.
1 Select pane B, where the thumbnails whose size you wish change are displayed.
2 On the [View] menu or on the menu that appears after right-clicking the pane, click [Thamburger Size].
3 Select the desired thumbnail size ([Large], [Medium] or [Small]).
Rotating Thumbsils
The [Rotate] command is only available if the thumbnail of an image file is selected. When the thumbnail is rotated, the actual contents of the image file are also rotated. If the file is in a lossy compression format, such as JPEG, rotating the thumbnail may increase the file size. This occurs because the file is expanded, rotated, then saved, resulting in a reduction of data loss.
Follow the procedure described below to rotate a thumbnail.
1 Select the thumbnail(s) of the file(s) that you wish to rotate.
To display a specific document in a group file, click the arrows. (For more details, refer to "Changing the Page/File Displayed for a Group File".)
2 On the [Document] menu or on the menu that appears after right-clicking the selected file(s), click [Rotate].
The rotation angle can be set to [90 right], [90 Left] or [180].
The thumbnail can also be rotated if the Rotate,Thumbsail button on the toolbar is clicked. In this case, the rotation angle is 90^ (clockwise).
The selected thumbnails are rotated. If the selected file is a multi-page image, all pages are rotated.
If a file containing annotations is rotated, a warning appears.
To delete the annotation information and rotate the image, click the [Yes] button.
To cancel the rotation operation, click the [No] button.

Note
If multiple files were selected, all files that can be rotated are rotated. If the [No] button is clicked in the message "Are you sure to delete annotation?", the next file is rotated. If none of the selected files can be rotated, the rotation operation is not performed.
5 Managing Document Files
This chapter provides descriptions of the various software functions available for efficiently managing documents and descriptions on the file formats that can be managed by PageScope Cabinet Pro.
5.1 Editing Document Files
PageScope Cabinet Pro can be used to change file names and copy, move or delete files in the same way as Windows Explorer. In addition, as with Windows Explorer, PageScope Cabinet Pro can be used to create new folders, change folder names, and copy, move or delete folders.
Adding New Folders With PageScope Cabinet Pro
1 In pane A or pane B, select the folder that you wish to add a new folder to.
2 On the [File] menu or on the menu that appears after right-clicking in the pane, click [New Folder].
A new folder with the name "NewFolder" is added to the selected folder. For details on changing the folder name, refer to "Changing the Name of a File or Folder".
Changing the Name of a File or Folder

CAUTION
If the name of a document file is changed using an application other than PageScope Cabinet Pro, the keyword, tag and annotation information are lost.
When changing the name of a document file, be sure to use PageScope Cabinet Pro.

Note
The name of a folder containing a file that is open cannot be changed.
1 Select the folder or document file whose name you wish to change.
- With a group file, click the arrows until the desired document is displayed.
- If the files and folders are displayed in the icon view, list view or details view, the name of group files is changed.
2 On the [File] menu or on the menu that appears after right-clicking the selected file or folder, click [Rename].
The name of the folder or document file can now be changed.
3 Type in the new name for the folder or document file.
4 Press the [Enter] key.

Note
To cancel the renaming of the file before the [Enter] key is pressed, press the [Esc] key.
It is not possible to change the name of a file to the name of a document file already in the folder.
Copying Folders or Document Files
1 In pane A or pane B, select the folder or document file that you wish to copy.
2 On the [Edit] menu or on the menu that appears after right-clicking the selected folder or file, click [Copy].
3 Open the folder where you wish to copy the file or folder to.
4 On the [Edit] menu or on the menu that appears after right-clicking the selected folder or file, click [Paste].
The selected folder or document file is copied.
Copying Folders or Document Files ([Copy to folder])
1 In pane A or pane B, select the folder or document file that you wish to copy.
2 On the [Edit] menu, click [Copy to folder].
A dialog box appears, allowing you to select the folder where the file or folder is to be copied to.
3 Select the folder where you wish to copy the file or folder to, and then click the [OK] button.
The selected folder or document file is copied.
Moving Folders or Document Files ([Move to folder])
1 In pane A or pane B, select the folder or document file that you wish to move.
2 On the [Edit] menu, click [Move to folder].
A dialog box appears, allowing you to select the folder where the file or folder is to be moved to.
3 Select the folder where you wish to move the file or folder to, and then click the [OK] button.
The selected folder or document file is moved.
Deleting Folders or Document Files

CAUTION
Deleted folders and document files are moved to the Recycle Bin. When the file is deleted, grouping and added annotation or keyword information are also erased and cannot be recovered.
Be careful about which files and folders you delete using this operation.

Note
A folder containing a file that is open cannot be deleted. Close the file, and then perform the operation again.
1 Select the file or folder that you wish to delete.
2 On the [Edit] menu or on the menu that appears after right-clicking the selected file or folder, click [Delete].
A message appears, requesting confirmation to delete the file or folder.
3 Click the [Yes] button.
The selected folder or document file is deleted.
Displaying Document Files in the "Viewer" Window
The contents of document files can be viewed in the PageScope Cabinet Pro "Viewer" window. From the "Viewer" window, annotations can be added and images can be adjusted. (For more details, refer to "Working With Annotations" and "Image Enhancement Functions".)
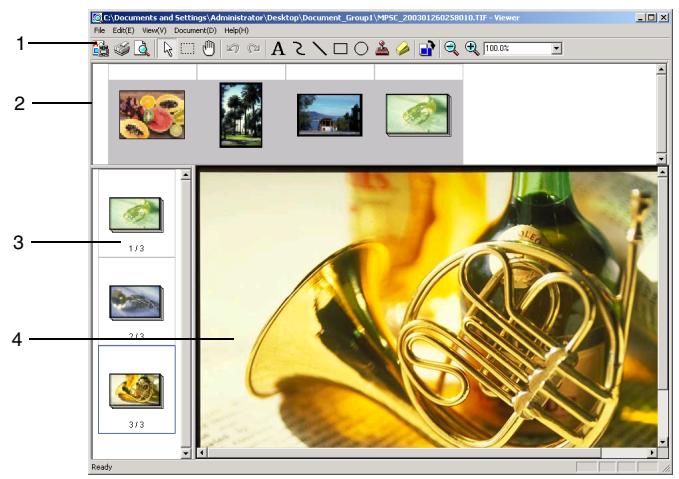
| No. | Element Name | Description |
| 1 | toolbar | Enables functions, such as zooming in/out, printing and adding annotations, to be performed. |
| 2 | file selection pane | Displays a thumbnail of the first page for all files in a group file. Click a thumbnail to select the file. *As a default, this pane is not displayed. To display this pane, click [Display group files] on the [View] menu. |
| 3 | thumbnail display pane | Displays a thumbnail of each page. With group files, thumbnails for the file selected in the file selection pane are displayed. *As a default, this pane is not displayed. To display this pane, click [Thumbnail Area] on the [View] menu. |
| 4 | display pane | Displays the contents of the selected page. Annotations can be added or corrections can be made to the image shown in the display pane. (For more details, refer to "Working With Annotations" and "Image Enhancement Functions"). |
With image files, the size of the displayed area can be changed.
1 On the [View] menu, select how the image is to be displayed.
- [Fit width]: Displays the image so that its width is the same as the width of the display pane.
- [Fit in window]: Displays the image enlarged or reduced so that the entire image is displayed.
[Actual Size]: Displays the image at its actual size.
[Enlarge]: Changes the shape of the pointer and selects the zoom in function. Click within the display pane until the image is displayed at the desired size.
[Shrink]: Changes the shape of the pointer and selects the zoom out function. Click within the display pane until the image is displayed at the desired size.

Tip
The display size can also be changed using the buttons and commands on the toolbar. Change the display size by clicking the Zoom In or Zoom Out button, then clicking within the display pane until the image is displayed at the desired size, by typing a zoom ratio (\%) into the Zoom box, or by selecting a zoom ratio from the Zoom dropdown list.
With group files, the images of one file at a time are displayed in the display pane. Perform the operations described below to select different images.
1 On the [View] menu, select the image that is to be displayed.
[Next File]: Displays the file after the currently displayed file.
[Previous File]: Displays the file before the currently displayed file.
[Top File]: Displays the first file in a group file.
[Last File]: Displays the last file in a group file.
Multiple images are included in multi-page TIFF files. Perform the operations described below to select different images.
1 On the [View] menu, select the image that is to be displayed.
[Next Page]: Displays the page after the currently displayed page.
[Previous Page]: Displays the page before the currently displayed page.
[Top Page]: Displays the first page of a multi-page TIFF file.
[End Page]: Displays the last page of a multi-page TIFF file.
For files other than image files, only .doc, .xls, .ppt or .pdf files can be opened with the "Viewer" window.

Note
In order for a file other an image file to be opened with the "Viewer" window, a compatible application must be installed.
Displaying an Image File in the "Viewer Light" Window
Images can be simply displayed in the "Viewer Light" window.
1 In pane B, select the image file that you wish to display in the "Viewer Light" window.
2 On the [Document] menu, click [Open with Viewer Light]. The "Viewer Light" window appears.
- With group files or multi-page TIFF files, the displayed page or file can be changed by using the arrows at the top of the "Viewer Light" window.


Note
Only image files can be viewed in the "Viewer Light" window.

Tip
If an image displayed in pane B is selected while the "Viewer Light" window displayed, the selected image is appears in the "Viewer Light" window.
Displaying the document file with the application linked to it
Document files other than image files cannot be opened in the "Viewer" window or the "Viewer Light" window; however, with Windows, the file is displayed with the application linked to it. For details on linking file extensions and file types in Windows, refer to the instruction manual for Windows.
Follow the procedure described below to display the document file with the application linked to it.
1 In pane B, select the document file that you wish to display.
2 On the [Document] menu or on the menu that appears after right-clicking the selected file, click [Open with Application].
The application linked to the file is started up and the document file is displayed.
Opening a Document File Using a Registered Application
Drag the document file and drop it onto the icon for the application registered in the launcher.
Dragging a document file and dropping it onto the icon for an application registered in the launcher has the same result as dragging the actual file and dropping it into the actual application.

Tip Double-click the icon of an application registered in the launcher to start up the application.
5.2 Displaying the "Property" Dialog Box for Folders and Document Files
To display the "Property" dialog box of a folder
Follow the procedure described below to display the "Property" dialog box of a folder.
1 In pane A or pane B, select the folder for the "Property" dialog box that you wish to display.
2 On the [File] menu or on the menu that appears after right-clicking the selected folder, click [Property].
The "Property" dialog box for the folder appears.

| No. | Item | Description |
| 1 | icon | The folder icon is displayed. |
| 2 | folder name | The name of the folder is indicated. The folder name can be changed here. |
| 3 | Type | The folder type is indicated. |
| 4 | Location | The path for the folder is indicated. |
| 5 | Size | The total size of the folder contents is indicated. |
| 6 | Contents | The number of files and the number of folders that the folder contains are indicated. |
| 7 | Created | The date and time when the folder was created are indicated. |
| 8 | Attributes | “Read only” is indicated if the folder has the read-only attribute applied. |
| 9 | Thumbsail Resolution | The resolution used to display the thumbnailsails of the document files in the folder is indicated. The resolution can be changed here. A resolution between 64 and 240 can be set. If a resolution outside of the specified range is set, an error message appears after the [OK] or [Apply] button is clicked. |
| 10 | Color | The color of the folder can be changed here. The default color setting is yellow. |
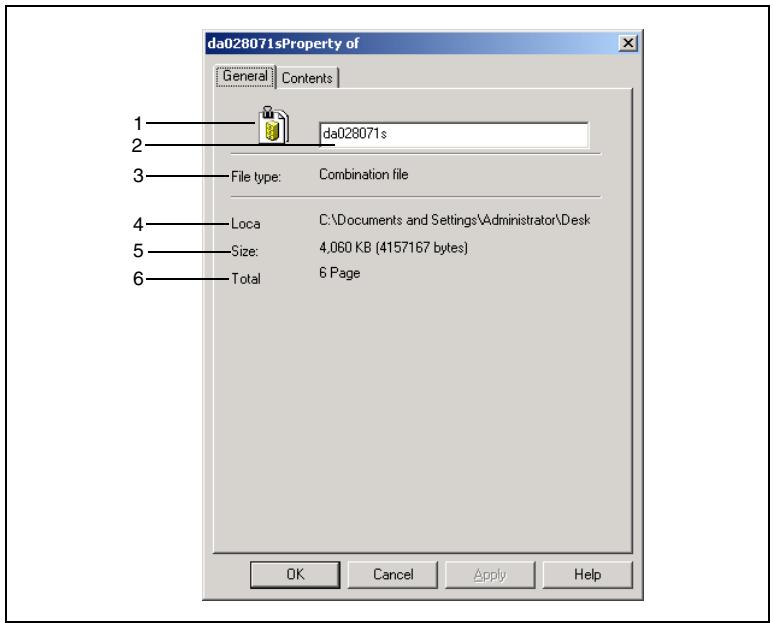
To display the "Property" dialog box of a document file
Follow the procedure described below to display the "Property" dialog box of a document file.
1 In pane B, select the document file for the "Property" dialog box that you wish to display.
2 On the [File] menu or on the menu that appears after right-clicking the selected file, click [Property].
The "Property" dialog box for the document file appears. Information about the selected document file is displayed in this dialog box.

Tip
The "Property" dialog box for the document file can also be displayed by clicking [File Property] on the [Document] menu in the "Viewer" window.
"General" tab
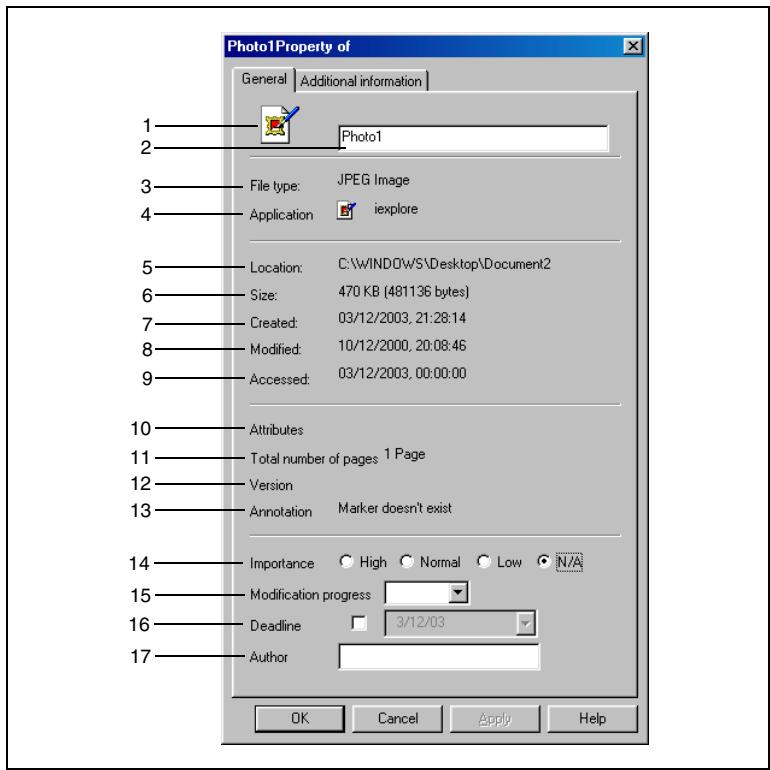
| No. | Item | Description |
| 1 | icon | The icon for the application related to the file is displayed. |
| 2 | file name | The name of the file is indicated. The file name can be changed here. |
| 3 | File Type | The file type is indicated. |
| 4 | Application | The name of the related application is indicated. |
| 5 | Location | The path to the file is indicated. |
| 6 | Size | The size of the file is indicated. |
| 7 | Created | The date when the file was created is indicated. |
| 8 | Modified | The date when the file was updated is indicated. |
| 9 | Accessed | The date when the file was last accessed is indicated. |
| 10 | Attributes | “Read only” is indicated if the file has the read-only attribute applied. |
| 11 | Total number of pages | The number of pages in the file is indicated. |
| 12 | Version | The version number is indicated if versions of the file are being managed. |
| 13 | Annotation | Whether or not annotations have been specified is indicated. |
| 14 | Importance | The priority of the file (“High”, “Normal”, “Low” or “N/A”) can be specified.The default priority setting is “N/A”. |
| 15 | Modification progress | The amount of the file that is completed (“0%”, “10%”, “20%”, “30%”, “40%”, “50%”, “60%”, “70%”, “80%”, “90%” or “100%”) can be specified.As a default, no setting is selected. |
| 16 | Deadline | Select the check box in order to specify a submission date. As a default, a submission date cannot be specified.If the check box is selected, a date can be specified.The default date setting is the date currently set on the operating system. |
| 17 | Author | The name of the author can be specified.As a default, no author is specified. |

Note
If thumbnails for all pages have not been created, the number of pages is not displayed.
"Additional Information" tab
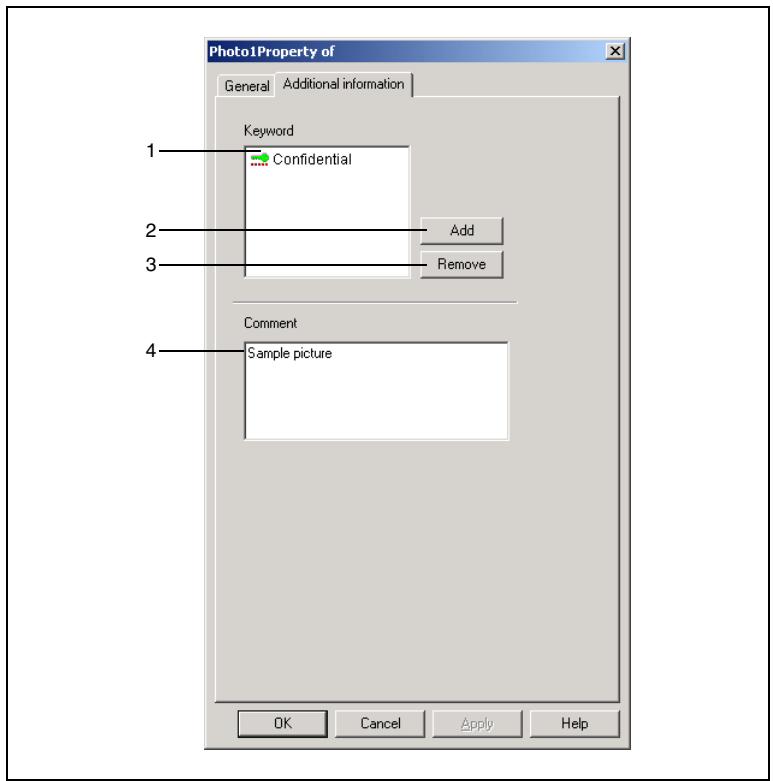
| No. | Item | Description |
| 1 | keyword list | The keywords added to the file are listed. |
| 2 | [Add] button | Click this button to display a dialog that allows you to specify keywords. Select the keyword that you wish to assign to the file, and then click the [OK] button. |
| 3 | [Remove] button | The keyword selected in the keyword list is removed from the file. |
| 4 | Comment | Comments for the file can be typed in. |
To display the "Property" dialog box of a group file
Follow the procedure described below to display the "Property" dialog box of a group file.
1 In pane B, select the group file for the "Property" dialog box that you wish to display.
2 On the [File] menu or on the menu that appears after right-clicking the selected file, click [Property].
The "Property" dialog box for the group file appears.
"General" tab
| No. | Item | Description |
| 1 | icon | The icon for the group file is displayed. |
| 2 | name of the group files | The name of the group file is indicated. The name of the group file can be changed here. |
| 3 | File Type | The file type ("Group file") is indicated. |
| 4 | Location | The path to the group file is indicated. |
| 5 | Size | The total size of the group file is indicated. |
| 6 | Total pages | The total number of pages in the group file is indicated. |
"Contents" tab

| No. | Item | Description |
| 1 | file list | The files included in the group file are listed. • Name: The name of the file is displayed. • Pages: The number of pages in the file is indicated. • Size: The size of the file is indicated. |
| 2 | [Top] button | Click this button to move the selected file up one position in the list. |
| 3 | [Under] button | Click this button to move the selected file down one position in the list. |
| 4 | [Details] button | Click this button to display the “Property” dialog box for the file selected in the list. |

#
Note
With group files that contain files created with applications such as Word and Excel, the values for "Total pages" and "Num" are displayed only when thumbnails for all pages are being created.
5.3 Grouping
With PageScope Cabinet Pro, multiple documents can be grouped into a single file. Grouping related document files will facilitate further handling of the files.
Grouping Files Using a Drag-and-Drop Operation
Drag the document file that you wish to merge and drop it onto the other document file that you wish to merge or onto a group file.
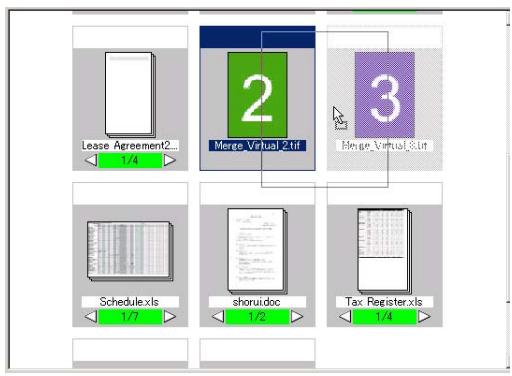
The document file that was dragged and dropped is merged together with the other document file to create a group file.

Note
When group files are created by dragging and dropping, the dragged and dropped document file is inserted before the document file dropped on.
Grouping Files Using Menu Commands
1 In pane B, select all document files that you wish to merge.
2 On the [Document] menu or on the menu that appears after right-clicking the selected files, point to [Group files], and then click [Stack Documents].
A group file is created from the selected files, starting with the file displayed in the upper-leftmost corner.
? How can multiple file be selected?
To select all of the files in a range, click the first file in the range, and then hold down the [Shift] key and click the last file in the range.
To select all of the files in an area, hold down the left mouse button and drag the mouse to select the area.
To select multiple files that are not adjacent to each other, hold down the [Ctrl] key while clicking each file.
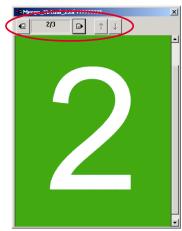
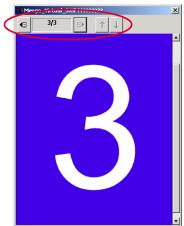
Changing the Page/File Displayed for a Group File
Numbers and arrows appear at the bottom of the thumbnail for a group file.
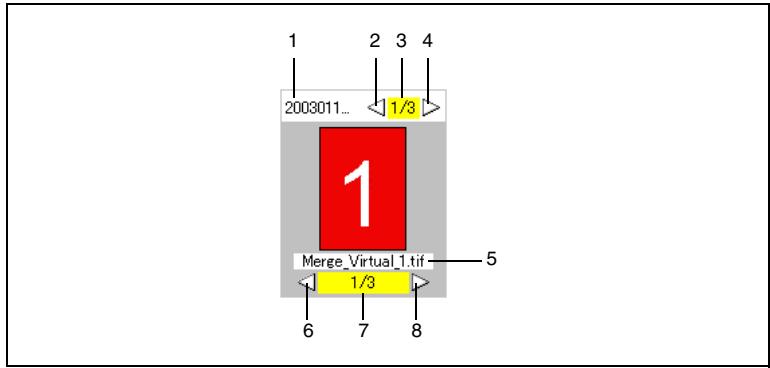
| No. | Item | Description |
| 1 | name of group file | The name of the group file is indicated. For details on changing the name of the group file, refer to “Changing the Name of a Group File”. |
| 2 | previous file arrow | Click this arrow to display the file before the currently displayed file. If the first file is displayed when this arrow is clicked, the last file is displayed. |
| 3 | number of group file | The position of the currently displayed file / the total number of files is indicated. |
| 4 | next file arrow | Click this arrow to display the file after the currently displayed file. If the last file is displayed when this arrow is clicked, the first file is displayed. |
| 5 | name of displayed file | The name of the currently displayed file is indicated. For details on changing the name of the file, refer to “Changing the Name of a File or Folder”. |
| 6 | previous page arrow | Click this arrow to display the page before the currently displayed page. If the first page is displayed when this arrow is clicked, the last page is displayed. |
| 7 | number of page | The number of the currently displayed page / the total number of pages is indicated. |
| 8 | next page arrow | Click this arrow to display the page after the currently displayed page. If the last page is displayed when this arrow is clicked, the first page is displayed. |
Changing the File Order of a Group File
Follow the procedure described below to change the order of files contained in a group file.
1 In pane B, select the group file whose file order you wish to change.
2 On the [File] menu or on the menu that appears after right-clicking the selected file, click [Property].
The "Property" dialog box for the group file appears. (For more details, refer to "To display the "Property" dialog box of a group file".)
3 Click the "Contents" tab.
4 From the Member of group files list, select the file that you wish to move, and then click the [Top] or [Under] button until the file is moved to the desired position.
5 Click the [OK] button to close the "Property" dialog box.
Changing the Name of a Group File
Follow the procedure described below to change the name of a group file.
1 In pane B, select the group file whose file name you wish to change.
2 On the [File] menu or on the menu that appears after right-clicking the selected file, click [Property].
The "Property" dialog box for the group file appears. (For more details, refer to "To display the "Property" dialog box of a group file".)
3 Click the "General" tab.
4 In the file name box, type the new name of the group file.
5 Click the [OK] button to close the "Property" dialog box.
Removing a Document File From a Group File
1 In pane B, select the group file that you wish to remove a document file from.
- Click the arrows until the document that you wish to remove from the group file is displayed.
2 On the [Document] menu or on the menu that appears after right-clicking the selected file, point to [Group files], and then click [Unstack Current Document].
The displayed file is removed from the group file and displayed in pane B.
Removing All Document Files From a Group File
1 In pane B, select the group file that you wish to remove all document files from.
2 On the [Document] menu or on the menu that appears after right-clicking the selected file, point to [Group files], and then click [Unstack All Document].
All files are removed from the group file and displayed in pane B.
Slide Shows
The procedure for starting a slide show is described below.
All document files in a group file can be displayed in order as a slide show.
To start a slide show
Follow the procedure described below to start the slide show.
1 In pane B, select the group file that you wish to display as a slide show.
2 On the [Tool] menu, click [Slide Show].
The "Slide Show" window appears, and all files in the group file are displayed in order.

Slide Show Operations
Use the buttons in the "PageScope Cabinet Pro Slide Show" window to perform various operations.
Click the appropriate button to perform the desired operation.

| No. | Button/Control Name | Description |
| 1 | close | Click this button to close the “Slide Show” window. |
| 2 | first image | Click this button to display the first image. |
| 3 | previous image | Click this button to display the previous image. |
| 4 | stop | Click this button to stop the slide show. |
| 5 | start | Click this button to start the slide show. |
| 6 | next image | Click this button to display the next image. |
| 7 | last image | Click this button to display the last image. |
| 8 | display time | Specify the amount of time that each image is displayed. |
| 9 | image counter | The image order is indicated. |
As a default, all images are automatically displayed in the slide show. Follow the procedure described below to manually display an image.
1 If the slide show starts automatically, click the "stop" button.
2 Click the appropriate buttons to move forward and backward through the images in the slide show. (For details on the functions of the buttons, refer to the above table.)

Note
Only the first page of files are shown in the slide show.
5.4 Merging Files
PageScope Cabinet Pro can convert a group file into a single PDF file, a multi-page TIFF file or a compact PDF file.
Only image files can be merged.

Note
Keyword, annotation and tag information are not transferred.
Converting a Group File Into a PDF File, a Multi-Page TIFF File or a Compact PDF File
1 In pane B, select the group file that you wish to convert.
2 On the [Document] menu or on the menu that appears after right-clicking the selected file, point to [Group files], and then click [Save as Actual].
The "Actual Combination" dialog box appears.
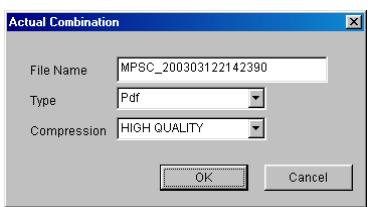
3 In the File Name box, type the new name of the merged file.
4 From the File Type drop-down list, select "Pdf", "Multipage Tiff" or "Compact PDF".
- If "Pdf" was selected, select the level of compression from the Compression drop-down list.
5 Click the [OK] button.
The new file is saved in the specified format and displayed in pane B.

Note
The group file that was converted remains as it was.
5.5 Document File Formats
Converting File Formats
PageScope Cabinet Pro can convert image files into a file of a different format. The following table shows the file formats whose bit depth and compression method can be specified.
| Conversion Format | Bit Depth | Compression Method | ||||
| 1-bit color | 8-bit color | 24-bit color | High quality | Standard | High compression | |
| ✓ | ✓ | ✓ | ||||
| JPEG | ✓ | ✓ | ✓ | ✓ | ✓ | |
| JPEG2000 | ✓ | ✓ | ✓ | |||
| BMP | ✓ | ✓ | ✓ | |||
| TIFF | ✓ | ✓ | ✓ | |||
| PNG | ✓ | ✓ | ✓ | |||
" indicates that the setting can be specified.
The following table shows which file formats can be converted to which other file formats.
| Convert To | ||||||||||||||||||
| PDF*1 | Text | JPEG | JPEG2000 | BMP | EPS | PSD | PICT | TIFF | HTML | PNG | DOC | RTF | XLS | PPT | Compact PDF *2 | CAD file | ||
| Convert From | ||||||||||||||||||
| Text | ✓ | |||||||||||||||||
| JPEG | ✓ | ✓ | ✓ | ✓ | ✓ | ✓ | ✓ | ✓ | ✓ | |||||||||
| JPEG2000 | ✓ | ✓ | ✓ | ✓ | ✓ | ✓ | ✓ | ✓ | ✓ | |||||||||
| BMP | ✓ | ✓ | ✓ | ✓ | ✓ | ✓ | ✓ | ✓ | ✓ | |||||||||
| EPS | ✓ | ✓ | ✓ | ✓ | ✓ | ✓ | ✓ | ✓ | ||||||||||
| PSD | ✓ | ✓ | ✓ | ✓ | ✓ | ✓ | ✓ | ✓ | ✓ | |||||||||
| PICT | ✓ | ✓ | ✓ | ✓ | ✓ | ✓ | ✓ | ✓ | ✓ | |||||||||
| TIFF | ✓ | ✓ | ✓ | ✓ | ✓ | ✓ | ✓ | ✓ | ✓ | |||||||||
| HTML | ✓ | |||||||||||||||||
| PNG | ✓ | ✓ | ✓ | ✓ | ✓ | ✓ | ✓ | ✓ | ✓ | |||||||||
| DOC | ✓ | |||||||||||||||||
| RTF | ✓ | |||||||||||||||||
| XLS | ✓ | |||||||||||||||||
| PPT | ✓ | |||||||||||||||||
| Compact PDF | ||||||||||||||||||
| CAD file | ✓ | ✓ | ✓ | ✓ | ✓ | ✓ | ✓ | |||||||||||
" indicates that conversion is possible.
1: Text, HTML, DOC, XLS and PPT files can be converted to files in the PDF format if they are registered in the "Page Edit" window.
2: The conversion to the compact PDF format is limited to files that meet the following requirements.
Color: Monochrome binary, Grayscale (8 bit) or Full Color Resolution: 200 to 600 dpi
Converting a File to a Different Format

Note
Only image files can be converted to a different file format. If a group file is selected to be converted, only the images files in the group file are converted.
Follow the procedure described below to convert a document file to a different file format.
1 In pane B, select the document file whose format you wish to convert.
2 On the [Document] menu, click [Change format].
The "Change format" dialog box appears.
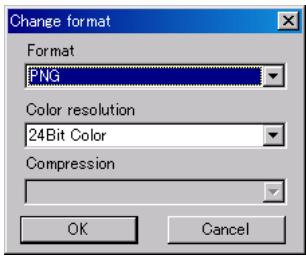
3 Specify the format that the file will be converted to, the bit depth and the compression method.
4 Click the [OK] button.
The file is converted to the specified format and saved as a new file. The file in the new format is given the same name as the file in the old format with the appropriate file extension.

Note
The file format conversion continues as a background process after it is started. When the process is finished, a message appears, indicating that the process is finished. In addition, if the process failed, a message appears, showing the name of that file.
If a file with the name for the new format already exists in the folder, the new file is saved with a different name so that the existing file is not overwritten. For example, if a file titled "MyPic.tif" is to be converted and saved as "MyPic.jpg", which already exists, the file is instead saved as "MyPic.1.jpg".
Keyword, annotation and note information are not transferred to the file in the new format.
5.6 Working With Annotations
Annotations can be specified when an image file is opened in the "Viewer" window. For details on the "Viewer" window, refer to "Displaying Document Files in the "Viewer" Window".
Specifying Annotations
Before specifying annotations, make sure that [Show Annotation] on the [View] menu of the "Viewer" window is selected so that the annotations are displayed.
Common operations
The following operations are available in the display pane of the "Viewer" window.
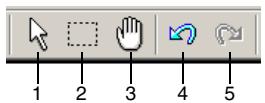
| No. | Button Name | Description |
| 1 | Pointer Mode | The pointer changes to an arrow, and annotations that have been added can be selected. Clicking this button is the same as clicking [Pointer Mode] on the [View] menu. |
| 2 | Draw Mode | The pointer changes to a selection pointer, and the area of the image that is selected is copied to the Clipboard. Clicking this button is the same as clicking [Draw Mode] on the [View] menu. |
| 3 | Cursor Mode | The pointer changes to a hand, and the image can be freely moved within the display pane. Clicking this button is the same as clicking [Cursor Mode] on the [View] menu. |
| 4 | Undo | Click this button to undo the last annotation operation that was performed. Clicking this button is the same as clicking [Undo] on the [Edit] menu. |
| 5 | Redo | Click this button to redo the operation that was undone. Clicking this button is the same as clicking [Redo] on the [Edit] menu. |
To add a tag
1 On the [Document] menu, point to [Annotation], and then click [Note]. or Click the "Note" button on the toolbar.

2 Click the image at the location where you wish to add the note, and then type in the text.
3 On the [Document] menu, click [Annotation Property].
The "Note property" dialog box appears.
4 Specify the desired settings in the Font, Style, Size, Character decoration and Note color boxes, and then click the [OK] button.
5 Use the Pointer Mode pointer to adjust the position of the note.

To enter text

1 On the [Document] menu, point to [Annotation], and then click [Text]. or Click the "Text" button on the toolbar.
2 Click the image at the location where you wish to add the text, and then type in the text.
3 On the [Document] menu, click [Annotation Property]. The "Text property" dialog box appears.
4 Specify the desired settings in the Font, Style, Size and Character decoration boxes, and then click the [OK] button.
5 Use the Pointer Mode pointer to adjust the position of the text.

To draw a line
1 On the [Document] menu, point to [Annotation], and then click [Line]. or Click the "Line" button on the toolbar.

2 Move the pointer into the display pane.
3 At the starting point of the line, hold down the mouse button, and then drag the pointer to the ending point of the line and release the mouse button.
A line is drawn in the image.
4 On the [Document] menu, click [Annotation Property].
The "Line property" dialog box appears.
5 Specify the desired settings in the Color, Solid line/dotted line and Style boxes, and then click the [OK] button.
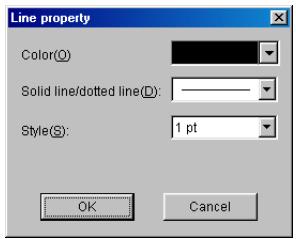
6 Use the Pointer Mode pointer to adjust the position and angle of the line.
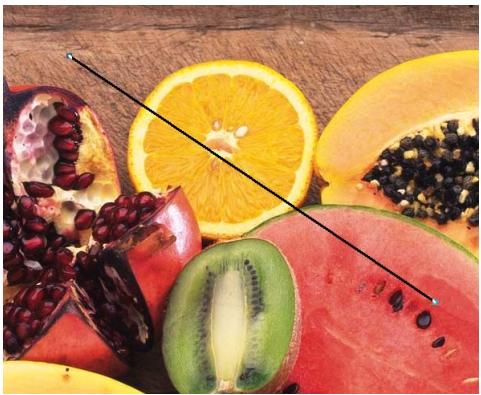
To draw a shape
1 On the [Document] menu, point to [Annotation], then [Shapes], and then click [Circle], [Rectangle] or [Freedraw].
or
Click the "Circle", "Rectangle" or "Freedraw" button on the toolbar.

2 Move the pointer into the display pane.
3 At the starting point of the shape, hold down the mouse button, and then drag the pointer to the ending point of the shape and release the mouse button.
A shape is drawn in the image.
4 On the [Document] menu, click [Annotation Property].
The "Shape property" dialog box appears.
5 Specify the desired settings in the Fill with color, Color and Style boxes, and then click the [OK] button.
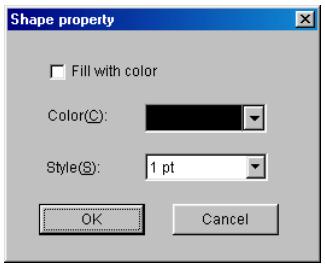
6 Use the Pointer Mode pointer to adjust the position and size of the shape.
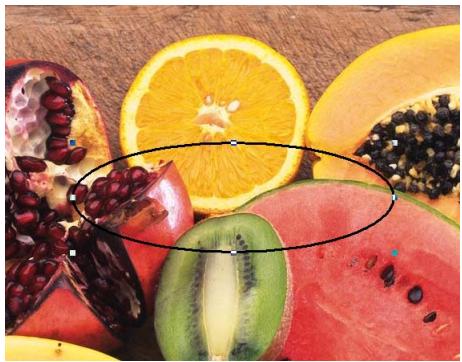
To add a stamp
1 On the [Document] menu, point to [Annotation], and then click [Stamp].
or
Click the "Stamp" button on the toolbar.

The "Stamp property" dialog box appears.
2 Select the stamp to be added, and then click the [OK] button.
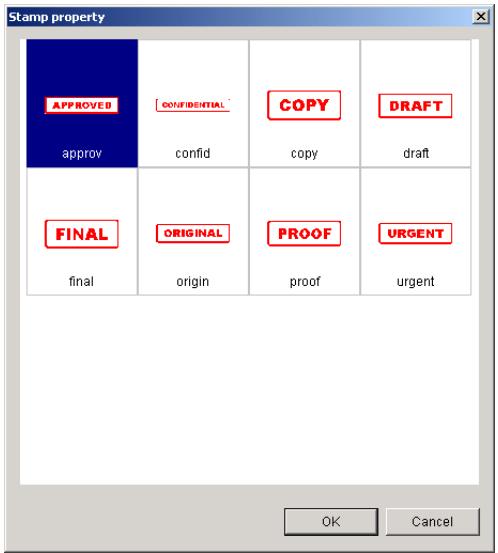
3 At the starting point of the stamp, hold down the mouse button, and then drag the pointer to the ending point of the stamp and release the mouse button.
A stamp is added to the image.
4 Use the Pointer Mode pointer to adjust the position and size of the stamp.

To select an annotation
Before a annotation can be changed, it must first be selected. Follow the procedure described below to select a annotation.
1 Click the [Pointer Mode] button on the toolbar of the "Viewer" window.
2 Click the annotation.
To select multiple annotations, hold down the [Ctrl] while clicking each of the other annotations.
The annotation is selected.
To copy annotations
Using menu commands:
1 Select the annotation that you wish to copy.
2 On the [Edit] menu or on the menu that appears after right-clicking the selected annotation, click [Copy].
3 On the [Edit] menu or on the menu that appears after right-clicking in the image, click [Paste].
A duplicate of the selected annotation is created.
Using a drag-and-drop operation:
1 Select the annotation that you wish to copy.
2 While holding down the [Ctrl] key, drag the annotation to the desired location.
3 At the desired location, release the mouse button.
A duplicate of the selected annotation is created.
To move annotations
1 Select the annotation that you wish to move.
2 Drag the annotation to the desired location.
3 At the desired location, release the mouse button.
The selected annotation is moved.
To delete annotations
1 Select the annotation that you wish to delete.
2 On the [Edit] menu or on the menu that appears after right-clicking the selected annotation, click [Delete].
The selected annotation is deleted.
To change the order of annotations
Annotations are displayed in a specific order. Annotations may be hidden behind another annotation, depending on the order of the annotations. If this occurs, a hidden annotation can be brought to the foreground by changing its order.
1 Select the annotation whose order you wish to change.
2 On the [Edit] menu or on the menu that appears after right-clicking the selected annotation, click [To Top].
The selected annotation is moved in front of the annotation that was not selected.
or
On the [Edit] menu or on the menu that appears after right-clicking the selected annotation, click [To Bottom].
The selected annotation is moved in back of the annotation that was not selected.
To copy part of the image onto the Clipboard
Part of the image can be copied onto the Clipboard and pasted into a different application. Follow the procedure described below to copy part of the image to the Clipboard.
1 Click the [Draw Mode] button on the toolbar of the "Viewer" window.
2 Move the pointer over the image in the display pane.
3 At the starting point of the area to be copied, hold down the mouse button.
While keeping the mouse button held down, select the area to be copied.
4 On the [Edit] menu or on the menu that appears after right-clicking the selected area, click [Copy].
The selected area of the image is copied onto the Clipboard.

Note
If the selected area of the image contains a annotation, the annotation is not copied onto the Clipboard.
To paste the image copied onto the Clipboard into the "Viewer" window
The image copied onto the Clipboard can be pasted into the image in the "Viewer" window.
Follow the procedure described below to paste the image on the Clipboard into the "Viewer" window.
With an image copied onto the Clipboard, click [Paste] on the [Edit] menu or on the menu that appears after right-clicking in the display pane.
The image from the Clipboard is pasted into the display pane of the "Viewer" window as an annotation.

Tip
The pasted image can be moved or resized, like a stamp.
Searching for Annotations
An annotation specified in an image file can be searched for by type. Follow the procedure described below to search for an annotation.
1 On the [File] menu, click [Annotation search].
2 The "Annotation search" dialog box appears.

3 Select the check box for the type of annotation that you wish to search for.
4 Click the [Start Search] button.
The pages with annotations of the types corresponding to the selected check boxes are displayed.
5 Click the [End Search] button to close the "Annotation search" dialog box.

Tip
Press the [F3] key on the computer keyboard to start the search without displaying the "Annotation search" dialog box. If this is done, the search is performed with the previously specified search conditions.

Note
When files contain multiple pages, the search begins with the page that is currently displayed and continues to the last page. When the search reaches the last page, it continues with the first page and stops when it reaches the first page that was searched.
With group files, the search is performed, in order, starting with the first page of the next file. If the image that is displayed is in the last file, the search returns to the first file.
If the image file was edited, including undoing an operation, the message "Overwrite" appears when the [Start Search] button is clicked. Click the [Yes] button to begin the search. If the [No] button is clicked, the message "Annotation search suspended." appears and the search will be stopped.
5.7 Image Enhancement Functions
Various image enhancement, adjustment and editing processes can be applied to the image file from the "Viewer" window of PageScope Cabinet Pro. For details on the "Viewer" window, refer to "Displaying Document Files in the "Viewer" Window".

Note
If a process is selected for an image file whose format is not supported by PageScope Cabinet Pro, an error message appears. Some functions may have limitations on the image file formats that are supported, causing an error message to appear. For details on the limitations, refer to the description for the function.
To specify skew adjustment
Perform the operation described below to adjust the slant of an image.
On the [Document] menu, point to [Image enhancement], and then click [Deskew].
The slant of the image in the display pane is corrected.

Note
In order for this process to be performed, the image must meet the following requirements.
Color: Monochrome binary, Grayscale (8 bit) or Full Color
Resolution: 100 to 600 dpi
Document skew: Within ± 10^
To specify background removal
Perform the operation described below to remove the background color from the image.
On the [Document] menu, point to [Image enhancement], then [Eliminate Background], and then click [Low], [Standard] or [High].
The specified background is removed from the image in the display pane.

Note
In order for this process to be performed, the image must meet the following requirements.
Color: Full Color
Resolution: 100 to 600 dpi
To specify halftone removal
Perform the operation described below to remove the halftone from the image.
On the [Document] menu, point to [Image enhancement], then [Remove Halftone], and then click [Low], [Standard] or [High].
The shading is removed from the image in the display pane.

Note
In order for this process to be performed, the image must meet the following requirements.
Color: Grayscale (8 bit) or Full Color
Resolution: 200 to 600 dpi
To specify bleed-through correction
Perform the operation described below to remove the image from the back of the scanned page.
On the [Document] menu, point to [Image enhancement], then [Remove Background bleep through], and then click [Low], [Standard] or [High].
The image from the back of the scanned page is removed from the image in the display pane.

Note
In order for this process to be performed, the image must meet the following requirements.
Color: Full Color
Resolution: 100 to 600 dpi
To specify automatic document enhancement
Perform the operation described below to automatically perform the necessary image enhancement processes on the image.
On the [Document] menu, point to [Image enhancement], and then click [Auto Enhancement of Document Image].
The automatic enhancement process is performed on the image in the display pane.

Note
In order for this process to be performed, the image must meet the following requirements.
Color: Full Color
Resolution: 200 to 600 dpi
To specify image enhancement
Follow the procedure described below to adjust the brightness, contrast and color balance for the image.
1 On the [Document] menu, point to [Image enhancement], and then click [Enhancement].
The "Enhancement" dialog box appears.
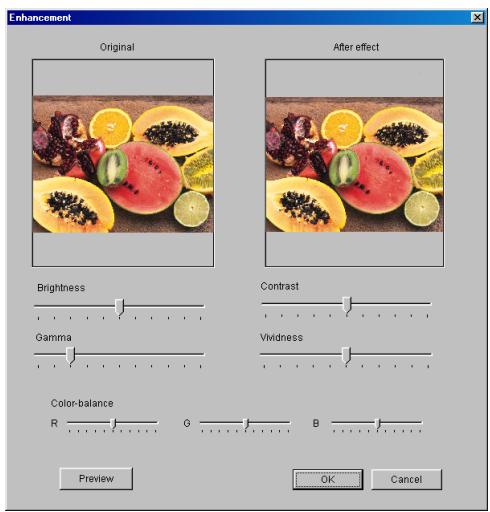
2 Move the sliders to adjust each setting.
- Brightness: The brightness of the image can be set to one of 11 levels.
Contrast: The contrast (difference between highlights and shadows) of the image can be set to one of 11 levels.
Gamma: The gamma level of the image can be set to one of 11 levels.
Vividness: The color purity of the image can be set to one of 11 levels.
Color-balance: The balance in each density of red (R), green (G) and blue (B) can be set to one of 11 levels.
3 Click the [Preview] button.
The image is shown in the After effect area as it would appear after the adjustments are applied.
4 After the settings are specified, click the [OK] button.
The color adjustments are applied to the image in the display pane.
To adjust the sharpness
Follow the procedure described below to adjust the amount of contours in the image.
1 On the [Document] menu, point to [Image enhancement], and then click [Sharpness].
The "Sharpness" dialog box appears.
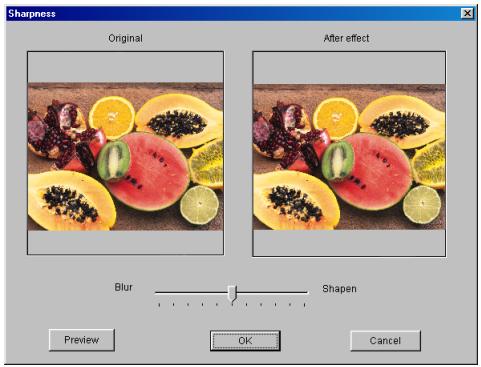
2 Move the slider to adjust the setting.
The sharpness can be set to one of 11 levels between Blur and Shapen.
3 Click the [Preview] button.
The image is shown in the After effect area as it would appear after the adjustments are applied.
4 After the settings are specified, click the [OK] button.
The sharpness is adjusted for the image in the display pane.
To change the number of colors
Perform the operation described below to change the number of colors in the image.
On the [Document] menu, point to [Image enhancement], then [Color], and then click [Monochrome (1 bit)], [Grayscale (8 bit)], [256 Color] or [Full Color].
The number of colors is changed for the image in the display pane.
To change the resolution
Follow the procedure described below to change the resolution of the image.
1 On the [Document] menu, point to [Image enhancement], and then click [Change Resolution].
The "Change Resolution" dialog box appears.
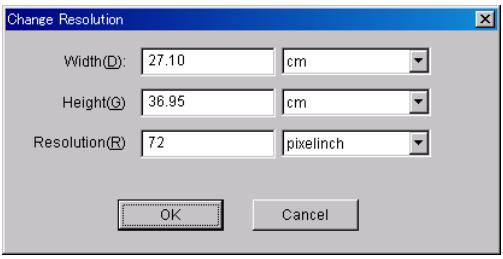
2 Type the desired settings into the Width, Height and Resolution boxes.
- Width: Changes the resolution based on the entered image width. From the drop-down list, select "cm" or "inch" as the units.
- Height: Changes the resolution based on the entered image height. From the drop-down list, select "cm" or "inch" as the units.
Resolution: Changes the resolution to the entered value. From the drop-down list, select "pixel/cm" or "pixel/inch" as the units.
3 After the settings are specified, click the [OK] button.
The resolution for the image in the display pane is changed.
To change the image size
Follow the procedure described below to change the size of the image.
1 On the [Document] menu, point to [Image enhancement], and then click [Change Size].
The "Change Size" dialog box appears.

2 Type the desired settings (in pixels) into the Width and Height boxes.
3 After the settings are specified, click the [OK] button.
The size of the image in the display pane is changed.
To specify negative/positive inverting
Perform the operation described below to invert the shading and colors of the image.
On the [Document] menu, point to [Image enhancement], and then click [Invert Image].
The shading and colors for the image in the display pane are inverted.
To specify mirror imaging (left/right flipping)
Perform the operation described below to flip the image horizontally so that it appears as if it is seen in a mirror.
On the [Document] menu, point to [Image enhancement], and then click [Mirror Image].
The image in the display pane is flipped horizontally.
To specify embossing
Perform the operation described below to apply embossing to the image.
On the [Document] menu, point to [Image enhancement], and then click [Emboss].
The embossing process is performed on the image in the display pane.
To specify trimming
Follow the procedure described below to trim the image.
1 On the [Document] menu, point to [Image enhancement], and then click [Trimming].
The "Trimming" dialog box appears.
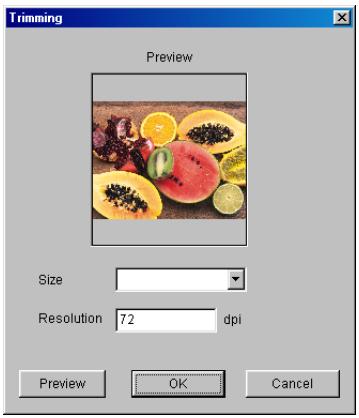
2 From the Size drop-down list, select the size of the paper that the image should be trimmed to.
The resolution of the image is displayed in the Resolution box.
3 Click the [Preview] button.
The image is shown in the Preview area as it would appear after the adjustments are applied.
4 After the settings are specified, click the [OK] button.
The image in the display pane is centered in the print area for the paper that was specified and trimmed to the size of paper.
To specify automatic photo image enhancement
Perform the operation described below to automatically perform the necessary image enhancement processes on the photo image.
On the [Document] menu, point to [Image enhancement], and then click [Auto Enhancement of Photo Image].
The automatic enhancement process is performed on the photo image in the display pane.

Note
In order for this process to be performed, the image must meet the following requirements.
Color: Full Color
Resolution: Within 8.5 megapixels
To specify a defined photo image enhancement
Follow the procedure described below to perform the image enhancement process appropriate for the photo image.
1 On the [Document] menu, point to [Image enhancement], and then click [Preset Enhancement of Photo Image].
The "Preset Enhancement of Photo Image" dialog box appears.
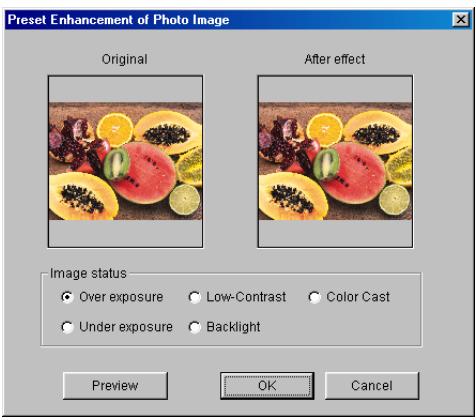
2 From the Picture status group box, select a condition of the photo image.
Over exposure
Under exposure
Low-Contrast
Backlight
Color Cast
3 Click the [Preview] button.
The image is shown in the After effect area as it would appear after the adjustments are applied.
4 After the settings are specified, click the [OK] button.
The automatic enhancement process is performed on the photo image in the display pane.

Note
In order for this process to be performed, the image must meet the following requirements.
Color: Full Color
Resolution: Within 8.5 megapixels
To rotate the image
Perform the operation described below to rotate the image.
On the [Document] menu, point to [Image enhancement], then [Rotate], and then click [90 (Right)], [90 (Left)] or [180].
The image in the display pane is rotated.
5.8 Page-Editing Functions
In the "Page Edit" window of PageScope Cabinet Pro, various page-editing operations can be performed, such as merging multiple documents, changing the page order, inserting blank pages and rotating pages.
- File operations: Add a document, delete a document, duplicate a document, rename a document, print a document, and save a document
- Document editing: Merge documents, separate documents, insert a document and arrange documents
- Page editing: Rotate page, scan pages, remove pages, change page order and insert blank pages
Opening the "Page Edit" Window
Follow the procedure described below to open the "Page Edit" window by using menu commands.
1 In pane B, select the document that you wish to open.
2 On the [Document] menu or on the menu that appears after right-clicking the selected page, click [Add to Page Edit Window].
The "Page Edit" window is opened and the selected document is added to it.
Follow the procedure described below to open the "Page Edit" window by using a drag-and-drop operation.
1 In pane B, select the document that you wish to open.
2 Drag the document and drop it onto the "Page Edit" window icon. The "Page Edit" window is opened and the selected document is added to it.
Follow the procedure described below to open the "Page Edit" window by double-clicking it.
In pane A, double-click the "Page Edit" window icon.
The "Page Edit" window is opened.
Closing the "Page Edit" Window
Perform the operation described below to close the "Page Edit" window.
On the [File] menu, click [Exit].
As a default, the window is saved as it is when it is closed.
"Page Edit" Window
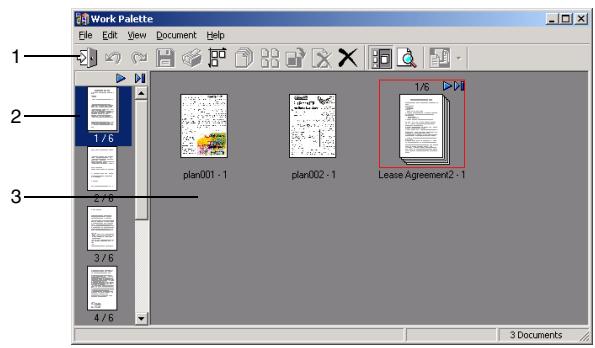
| No. | Element Name | Description |
| 1 | toolbar | Enables functions, such as saving, printing, merging and deleting documents, to be performed. |
| 2 | page list pane | Displays a thumbnail for each page in the selected document, in the corresponding page order.From here, pages can be cut out or the page order can be changed. |
| 3 | page-editing pane | Displays thumbnails of the documents added to the “Page Edit” window.From here, documents can be added and merged. |
Page-Editing Toolbar

| No. | Button Name | Description |
| 1 | Exit | Click this button to close the “Page Edit” window. Clicking this button is the same as clicking [Exit] on the [File] menu. |
| 2 | Undo | Click this button to undo the last page-editing operation that was performed. Clicking this button is the same as clicking [Undo] on the [Edit] menu. |
| 3 | Redo | Click this button to redo the operation that was undone. |
| 4 | Save | Click this button to save the selected document as a PDF file. Clicking this button is the same as clicking [Save Document] on the [File] menu. |
| 5 | Click this button to print the selected document. Clicking this button is the same as clicking [Print...] on the [File] menu. | |
| 6 | Line up Documents | Click this button to arrange the documents in the page-editing pane. Clicking this button is the same as clicking [Alignment] on the [View] menu. |
| 7 | Merge | Click this button to merge the selected documents into a single document. Clicking this button is the same as clicking [Merge] on the [Document] menu. |
| 8 | Divide | Click this button to separate the multi-page document into its individual pages. Clicking this button is the same as clicking [Disjoint] on the [Document] menu. |
| 9 | 90 degrees CW | Click this button to rotate the selected document 90° to the right. Clicking this button is the same as clicking [Clockwise 90 degrees (Page)] after pointing to [Rotate] on the [Document] menu. |
| 10 | Delete | Click this button to delete the selected document. Clicking this button is the same as clicking [Delete Documents] on the [Edit] menu. |
| 11 | Delete All | Click this button to delete all documents in the “Page Edit” window. Clicking this button is the same as clicking [Delete All] on the [Edit] menu. |
| 12 | Page List | Click this button to show or hide the page list pane. Clicking this button is the same as clicking [Page List] on the [View] menu. |
| 13 | Preview | Click this button to display a preview of the selected document. Clicking this button is the same as clicking [Preview] on the [View] menu. |
| 14 | Insert Blank Page Automatically | Click this button to insert a blank page of the same size as the displayed page if the paper size of the currently displayed page can be obtained. If it cannot be obtained, the “Insert Blank Page” dialog box appears. [Insert a Blank Page...] can also be selected from the drop-down list that appears when the arrow to the right of the button is clicked. Clicking this button is the same as clicking [Insert Blank Page Automatically] on the [Document] menu. |
Scanning Through the Pages of a Document
Perform the operations described below to scan through the pages of a multi-page document and display the desired page.
| No. | Button Name | Description |
| 1 | First Page | Click this button to display the first page of the document. Clicking this button is the same as clicking [First Page] on the [View] menu. |
| 2 | Previous Page | Click this button to display the page before the one currently displayed. Clicking this button is the same as clicking [Previous Page] on the [View] menu. |
| 3 | Next Page | Click this button to display the page after the one currently displayed. Clicking this button is the same as clicking [Next Page] on the [View] menu. |
| 4 | Last Page | Click this button to display the last page of the document. Clicking this button is the same as clicking [Last Page] on the [View] menu. |
Adding Files to the "Page Edit" Window
Follow the procedure described below to add a file to the "Page Edit" window by using menu commands.
1 In pane B, select the document that you wish to open.
2 On the [Document] menu or on the menu that appears after right-clicking the selected page, click [Add to Page Edit Window].
The "Page Edit" window is opened and the selected document is added to it.
Follow the procedure described below to add a file to the "Page Edit" window by using a drag-and-drop operation.
1 In pane B, select the document that you wish to open.
2 Drag the document and drop it onto the "Page Edit" window icon. The "Page Edit" window is opened and the selected document is added to it.
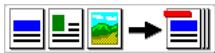

Tip
If the "Page Edit" window is already open, a document can be added by dragging and dropping it directly into the page-editing pane.

Note
The following types of files can be added to the "Page Edit" window. Image files: JPEG, TIFF, and BMP
Application files*: DOC, XLS, PPT, and PDF
*With DOC, XLS and PPT files, the application that created the file must be installed.
PDF files with security added, such as a password, cannot be added to the "Page Edit" window. Cancel the security setting in order to add the file to the window. For details on cancelling the security setting, refer to the manual for Adobe Acrobat.
When an application file created using fonts other than the standard operating system fonts is added to the "Page Edit" window, the file may not be correctly converted to a PDF file.
Setting the User Environment of the "Page Edit" Window
Follow the procedure described below to specify the user settings for the "Page Edit" window.
1 On the [File] menu, click [Preferences...].
The "Preferences" dialog box appears.
2 Specify the necessary settings on the "General" tab and the "Setting of PDF conversion" tab.
3 After the settings are specified, click the [OK] button.
"General" tab
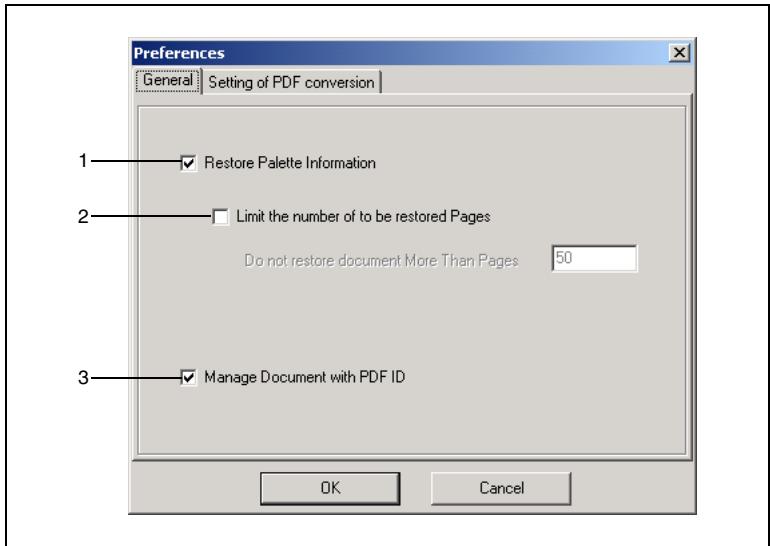
| No. | Item | Description |
| 1 | Restore Palette Information | Select this check box to open the “Page Edit” window with the documents that were added before the previous session ended. |
| 2 | Limit the number of pages to be restored | Select this check box to limit the number of pages that are restored if the Restore Palette Information check box is selected. In the box below this check box, type the maximum number of pages that are restored. |
| 3 | Manage Document with PDF ID | To keep different versions of the same PDF file in the “Page Edit” window, information from all base file can be maintained, instead of creating temporary files for editing. If this option is not selected, a temporary file for editing is created for the documents registered in the “Page Edit” window. |
"Setting of PDF conversion" tab
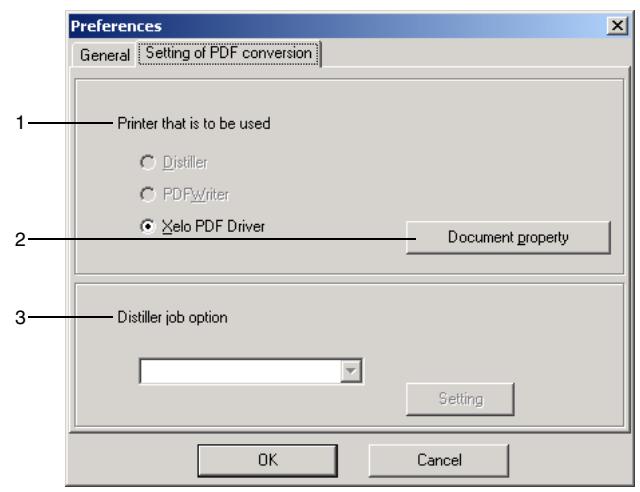
| No. | Item | Description |
| 1 | Printer that is to be used | Select the printer that is used with PDF conversion in the “Page Edit” window. Select Distiller, PDFWriter or Xelo PDF Driver. *Xelo PDF Driver is installed as a standard with PageScope Cabinet Pro. |
| 2 | Document property | Click this button to specify detailed settings for PDF conversion. The settings that are available differ depending on the selected printer. |
| 3 | Distiller job options | If Distiller was selected under Printer that is to be used, the job options for the Distiller appear in the drop-down list. The specific settings can be changed by clicking the [Setting] button. For details, refer to the instruction manual for Adobe Acrobat. |
Selecting a Document
In the page-editing pane, click the thumbnail for the document that you wish to select.
Frames appear around the thumbnail of the document in the page-editing pane and the thumbnail in the page list pane for the currently displayed page.
To select multiple documents, perform either of the operations described below, both of which are also used to select multiple files and folders in Windows Explorer.
- Hold down the [Shift] key or the [Ctrl] key while clicking the thumbnails.
- Drag the pointer in the page-editing pane to select the thumbnails of the desired documents.
Selecting All Documents
To select all documents in the page-editing pane, click [Select All] on the [Edit] menu.
A frame appears around all thumbnails in the page-editing pane.
Saving a Document
1 In the page-editing pane, select the document that you wish to save, and then click [Save Document] on the [File] menu.
The "Save Document" dialog box appears.
2 Type the necessary settings into the Save place and Saved file name boxes, and then click the [Save] button.
The document is saved in the PDF format.

Note
If the Favorite Folder is selected as the destination folder, the file is saved in the folder title "Folder for converted PDF", which appears in the Favorites.
Printing a Document
1 In the page-editing pane, select the document that you wish to print, and then click [Print...] on the [File] menu.
The "Print" dialog box appears.
2 Specify the necessary settings, and then click the [OK] button.
Duplicating a Document
In the page-editing pane, select the document that you wish to duplicate. On the [Edit] menu, point to [Duplicate], and then click [Duplicate Documents].
or
On the menu that appears after right-clicking the selected documents, click [Duplicate Documents].
Duplicating a Page
1 In the page-editing pane, select the page that you wish to duplicate.
2 On the [Edit] menu, point to [Duplicate], and then click [Duplicate Page].
Deleting a Document
In the page-editing pane, select the document that you wish to delete, and then click [Delete Documents] on the [Edit] menu or on the menu that appears after right-clicking the selected document.
The selected document is deleted.

Tip
To restore a deleted document, click [Undo] on the [Edit] menu, or click the "Undo" button on the toolbar. (If a different operation is performed after a document is deleted, the deleted document cannot be restored.)
Deleting All Documents
1 On the [Edit] menu, click [Delete All].
2 When the message "Clear All Documents" appears, click the [OK] button.
All documents are deleted from the "Page Edit" window.

Tip
To restore the deleted documents, click [Undo] on the [Edit] menu, or click the [Undo] button on the toolbar. (If a different operation is performed after all documents are deleted, the deleted documents cannot be restored.)
Changing the Name of a Document
1 In the page-editing pane, select the document whose name you wish to change, and then click [Rename] on the [Edit] menu or on the menu that appears after right-clicking the selected document.
The "Rename Document" dialog box appears.
2 Type in the new name for the document, and then click the [OK] button.
Arranging the Documents
On the [View] menu, click [Alignment].
The documents in the page-editing pane are arranged.
Previewing a Document
1 In the page-editing pane, select the document that you wish to preview, and then click [Preview] on the [View] menu. The selected document appears in the "Preview" window.
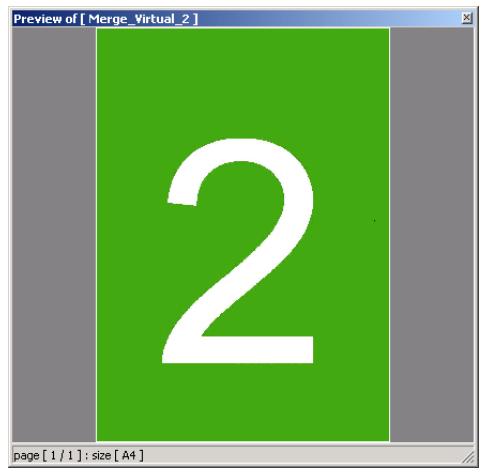
In the status bar at the bottom of the window, the number of the page currently being viewed, the page size, and the rotation angle of the page are listed.
If the document has multiple pages, right-click the image to display the next page or click the left mouse button to display the previous page.
2 Click [x] in the upper-right corner of the "Preview" window to close it.

Tip
A document can be displayed in the "Preview" window by double-clicking the document in the page-editing pane or the page list pane. For a multi-page document, display the desired page, and then double-click the document. The size of the "Preview" window can be adjusted.
Changing the Size of Thumbs nails
On the [View] menu, point to [Thumbnail Size], and then click [Big], [Medium] or [Small].
The thumbnails in the page-editing pane and the page list pane are changed to the specified size.
Merging Documents
Multiple documents can be merged using two different methods.
- Select the documents, and then merge them using menu commands.
- Merge the documents by dragging one document and dropping it on top of another document.
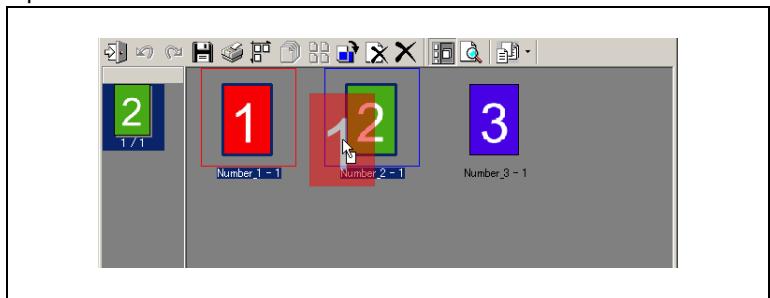
The procedure for selecting the multiple documents, then merging them using menu commands is described below.
1 In the page-editing pane, select the documents that you wish to merge.
2 On the [Document] menu or on the menu that appears after right-clicking the selected documents, click [Merge].
The selected documents are merged.

Note
An original copy of a merged document does not remain. To keep a copy of a document before it is merged, duplicate the document before merging it.

Tip
The order of the documents after they are merged is from the left to the right and from the top to the bottom of the page-editing pane. In addition, the order from the left to the right has priority over the order from the top to the bottom.
Separating a Document Into Its Individual Pages
In the page-editing pane, select the document that you wish to separate into its individual pages, and then click [Disjoint] on the [Document] menu or on the menu that appears after right-clicking the selected document.
The selected document is separated into different documents that each contain a page.
Rotating a Document
In the page-editing pane, select the document that you wish to rotate, point to [Rotate] on the [Document] menu or on the menu that appears after right-clicking the selected document, and then click [Clockwise 90 degrees (Document)], [Counterclockwise 90 degrees (Document)] or [180 degrees (Document)].
All pages in the selected document are rotated the specified angle.
Rotating a Page
1 In the page-editing pane, select the document, and then display the page that you wish to rotate.
2 On the [Document] menu or on the menu that appears after right-clicking the selected document, point to [Rotate], and then click [Clockwise 90 degrees (Page)], [Counterclockwise 90 degrees (Page)] or [180 degrees (Page)].
The selected page is rotated the specified angle.
Changing the Order of Pages
1 In the page-editing pane, select the document.
2 In the page list pane, select the page that you wish to move, and then drag and drop it between the pages where you wish to move it to.
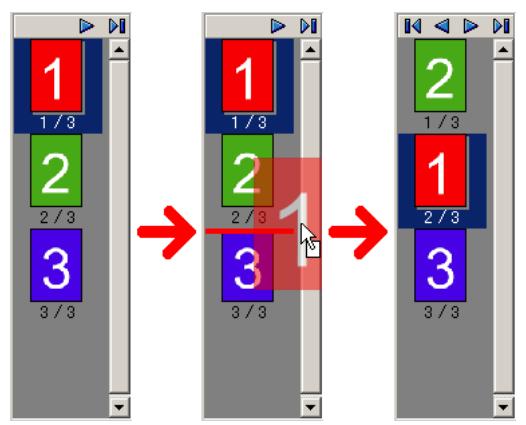
Removing a Page
A page can be removed from a document containing multiple pages using two different methods.
- Select the page that you wish to remove from the document, and then remove it using menu commands.
- Remove the page from the document by dragging it from the page list pane and dropping it into the page-editing pane.
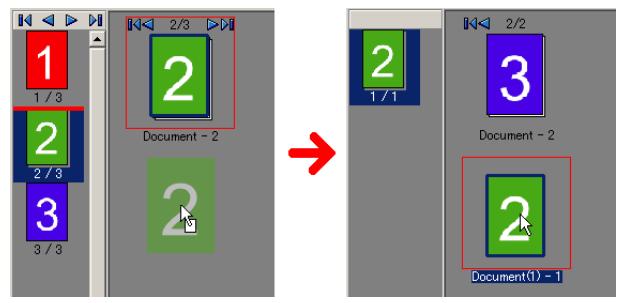
The procedure for removing a page from a document using menu commands is described below.
1 In the page-editing pane, select the document that you wish to remove a page from.
2 In the page-editing pane or the page list pane, select the page that you wish to remove.
3 On the [Document] menu or on the menu that appears after right-clicking the selected page, click [Extraction Page].
The selected page is removed.

Note
Once a page is removed, the document cannot be restored to its original condition.
Automatically Inserting a Blank Page
A blank page of the same size will be inserted after the page whose thumbnail is currently displayed in the selected document.
1 In the page-editing pane, select the document.
2 In the page-editing pane or the page list pane, select the page in front of the location where you wish to insert the blank page.
3 On the [Document] menu or on the menu that appears after right-clicking the selected page, click [Insert Blank Page Automatically].
A blank page of the same size as the currently displayed page in inserted after the displayed page.
If the paper size of the currently displayed page cannot be obtained, the "Insert Blank Page" dialog box appears.
Inserting a Blank Page of the Specified Size
A blank page of the specified size will be inserted either before or after the page whose thumbnail is currently displayed in the selected document.
1 In the page-editing pane, select the document.
2 In the page-editing pane or the page list pane, select the page either in front of or behind the location where you wish to insert a blank page.
3 On the [Document] menu or on the menu that appears after right-clicking the selected page, click [Insert Blank Page.] The "Insert Blank Page" dialog box appears.
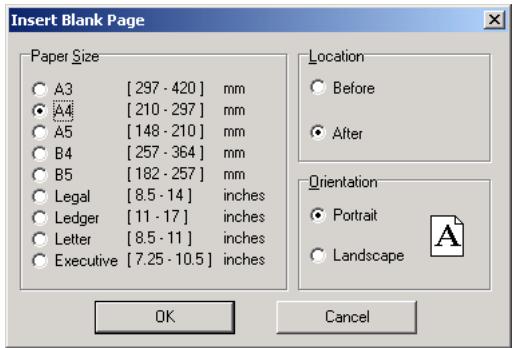
4 Select the desired settings in the Paper Size, Location and Orientation group boxes, and then click the [OK] button.
A blank page in the specified size and orientation is inserted at the specified location.
5.9 Working With Keywords
Keywords, which are used for searching, can be assigned to the document files. The procedures for creating, changing and deleting keywords are described below.
Specifying Keywords
The keywords must first be defined.
PageScope Cabinet Pro does not differentiate between uppercase and lowercase. For example, "AAA" and "aaa" are treated as the same keyword.
To create a keyword
1 Click the "Keyword" tab in pane A.
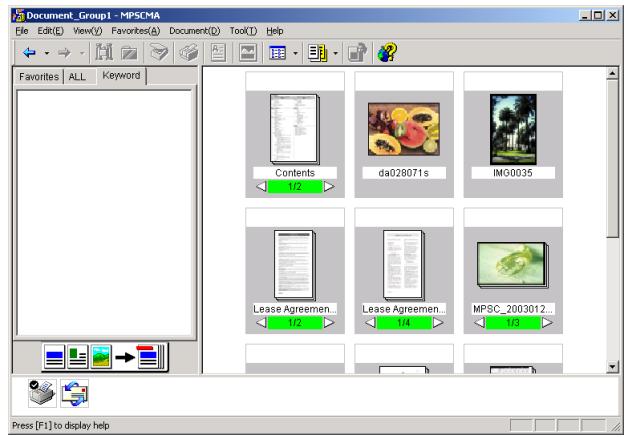
2 On the [Edit] menu, point to [Keyword], and then click [Add]. or
On the menu that appears after right-clicking the "Keyword" tab in pane A, click [Add].
A new keyword titled "New Keyword" is created on the "Keyword" tab in pane A.
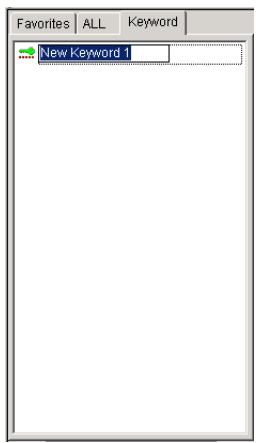
3 Type a meaningful name for the keyword.
4 Press the [Enter] key.
The new keyword is specified.
To change a keyword
1 On the "Keyword" tab in pane A, select the keyword that you wish to change.
2 On the [Edit] menu, point to [Keyword], and then click [Rename]. The keyword can now be changed.
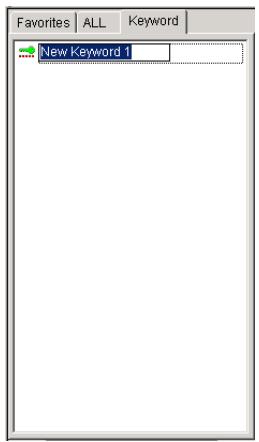
3 Type in the keyword.
4 Press the [Enter] key.

Tip
To cancel the changing of the keyword before the [Enter] key is pressed, press the [Esc] key.

Note
If the same keyword has already been specified, a warning appears. If the [Yes] button is clicked, the two keywords will be unified. If the [No] button is clicked, the operation is not performed.
To delete a keyword
1 On the "Keyword" tab in pane A, select the keyword that you wish to delete.
2 On the [Edit] menu, point to [Keyword], and then click [Delete]. or
On the menu that appears after right-clicking the selected keyword, click [Delete].
A confirmation message appears, asking whether or not to delete the keyword.
3 Click the [Yes] button.
The selected keyword is deleted.
Assigning Keywords to Document Files
Keywords can be assigned to document file to facilitate document searches. The keywords can be assigned using a variety of different methods.
Using menu commands:
1 On the "Keyword" tab in pane A, select the keyword that you wish to assign.
2 On the [Edit] menu or on the menu that appears after right-clicking the selected keyword, click [Copy].
3 In pane B, select the document file that you wish to assign the keyword to.
If a group file is selected, the keyword is assigned to all documents in the group file.
4 On the [Edit] menu or on the menu that appears after right-clicking the selected file, click [Paste].
The keyword is assigned to the document file.

Tip
To assign the same keyword to multiple document files, select all of the files before pasting the keyword.
Using a drag-and-drop operation:
1 On the "Keyword" tab in pane A, select the keyword that you wish to assign.
2 Drag the keyword and drop it onto the document file in pane B that you wish to assign it to.
The keyword is assigned to the document file.
Using the "Property" dialog box for the document file:
1 Display the "Property" dialog box for the document file. (For more details, refer to "To display the "Property" dialog box of a document file".)
2 Click the "Additional information" tab of the "Property" dialog box, and then click the [Add] button.
The "Keyword" dialog box appears.
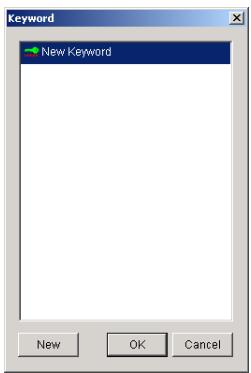
3 To specify a new keyword, click the [New] button in the "Keyword" dialog box.
O Type in the keyword.
4 Select the keyword that you wish to assign to the document.
5 Click the [OK] button.
The keyword is assigned to the document file.

Tip
To cancel the operation, click the [Cancel] button.

Tip
If multiple keyword are selected and the [OK] button is clicked, all selected keywords are assigned to the document.
5.10 Working With Comments
With PageScope Cabinet Pro, comments can be specified to facilitate document searches. The procedure for specifying comments is described below.
**Specifying Comments for Document Files**
1 Display the "Property" dialog box for the document file. (For more details, refer to "To display the "Property" dialog box of a document file".)
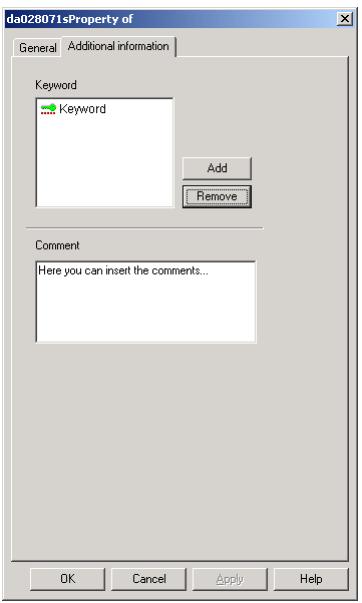
2 In the Comment box of the "Property" dialog box, type and edit the comments.
3 Click the [Apply] button, and then click the [OK] button to close the dialog box.
The comments are specified.
Deleting the Comments for a Document File
1 Display the "Property" dialog box for the document file. (For more details, refer to "To display the "Property" dialog box of a document file".)
2 In the Comment box of the "Property" dialog box, delete the comments.
3 Click the [Apply] button, and then click the [OK] button to close the dialog box.
The comments are deleted.
5.11 Extracting Text for a File Content Search
PageScope Cabinet Pro can search for a document file containing a certain string of text without actually opening the file. In order to do this, the text must be extracted for a file content search. The procedure to do this is described below.
1 In pane B, select the file whose text is to be extracted for a file content search.
2 On the [Document] menu or on the menu that appears after right-clicking the selected file, click [Extract Text Data].
or Click the "extract text data" button on the toolbar.

The text is extracted for a file content search.

Tip
A text file for a file content search can be extracted when an image is imported with a TWAIN device. For details, refer to "Importing an Image From a TWAIN Device". Using OCR, text can be extracted from image files. In order to perform a search, text can be extracted from application files with the following extensions:
DOC, XLS, PPT, PDF, TXT, RTF, HTML, HTM, JAW, JBW and JTD
5.12 Extracting Text From an Image File
Text can be extracted from an image file and saved as an RTF or a text file.
1 Select the image file that you wish to extract text from, and then drag and drop it onto the application icon in the launcher.
? What applications are compatible with the OCR conversion function for image files?
Word (An RTF file is created.)
Word Pad (An RTF file is created.)
Notepad (A text file is created.)
2 The OCR conversion is started.
3 A file is created in the same folder as the selected image file.
5.13 Managing File Versions
PageScope Cabinet Pro can save a history of different versions of a file and manage the versions.
1 In pane B, select the file whose versions are to be managed.
2 On the [Document] menu, click [Save as Old Version].
The "Version management" dialog box appears.
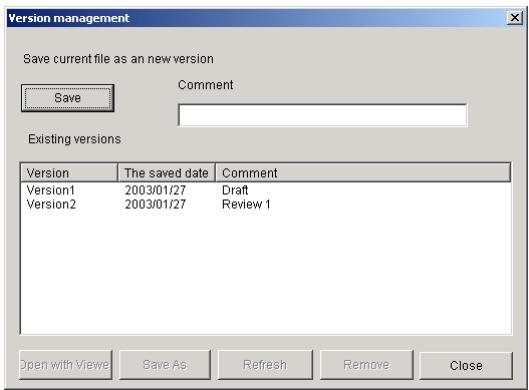
3 To save a version of the current file, click the [Save] button.
To specify a comment, type the comment into the Comment box before clicking the [Save] button. A maximum of 30 bytes can be entered for the comment.
4 The current version of the file is saved in the version management history and the information for the Version, The saved date and Comment are added to the Existing versions list.
To open the version selected in the list, click the [Open with Viewer] button.
To save the version selected in the list with a different name in the specified folder, click the [Save As] button.
To make any version the newest version, click the [Refresh] button. If this is done, the file currently selected in pane B is deleted and replaced with the selected version. If an older version of a group file is being restored and a file with the same name as the file being restored already exists in the folder, the file is restored with a number, such as "(1)" or "(2)", added at the end of the name of the file being restored.
To delete any version from the Existing versions list, click the [Remove] button.

Note
A maximum of 5 versions of a file can be saved in the management history. If you try to save a new version when 5 versions have already been saved, the oldest version is deleted from the Existing versions list so the new version can be saved. If a file whose versions are being managed is deleted from PageScope Cabinet Pro, the message "Older versions will be deleted. Are you sure you want to delete?" appears. To delete all files including the older versions, click the [Yes] button. To cancel the delete operation, click the [No] button. If the file is deleted from Windows Explorer, no message is displayed.
6 Searching for Document Files
The procedures for searching for files based on information such as the file name or modification date are described below.
6.1 Displaying the "Search files and folders" window
1 In pane A, select the folder that you wish to search.
2 On the [File] menu or on the menu that appears after right-clicking the selected folder, click [Search].
or
Click the toolbar button indicated in the illustration.

The "Search files and folders" window appears.

6.2 Specifying the Search Conditions
Searching by File Name
1 In the Name of file or folder box, type the name of the document file to be searched for.
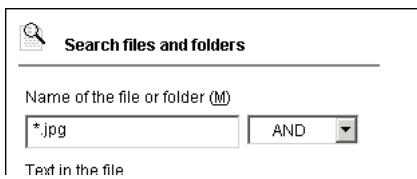
To search for multiple file names, separate the file names with semicolons (·) , and then select [AND] or [OR]. If [AND] is selected, files with all of the file names will be searched for. If [OR] is selected, files with any of the file names will be searched for.
The wildcard character (^) can also be used.
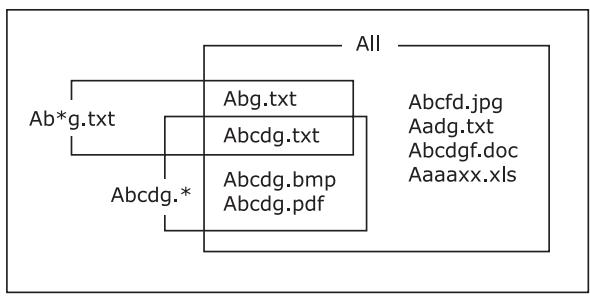
2 Click the [Start Search] button.
The search is started.
The search results appear in pane B.
Searching by File Content
1 In the Text in the file box, type the string of text to be searched for.
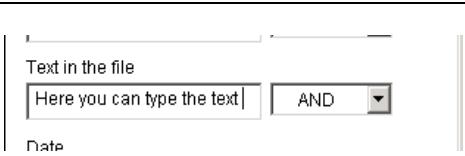
To search for multiple strings of text, separate the text strings with spaces, and then select [AND] or [OR].
2 Click the [Start Search] button.
3 The search is started.
The search results appear in pane B.
The search by file content is based on the text extracted for a file content search.
Searching by Date
1 From the Date drop-down list, select the type of date ([Not specific] or [Specific]) to be searched for.
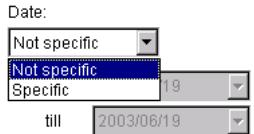
Keywords
2 Specify the start date for the search range.
3 Specify the end date for the search range.
4 Click the [Start Search] button.
The search is started.
The search results appear in pane B.
Searching by Keyword
1 From the Keyword drop-down list, select the keyword to be searched for.
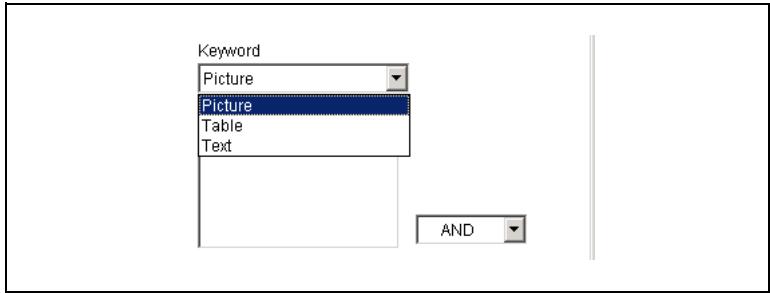
2 Click the [Add] button.
The keyword is added to the list. Only the keywords in the list are searched for.
To search for multiple keywords, select [AND] or [OR].
If [AND] is selected, files with all of the keywords will be searched for.
If [OR] is selected, files with any of the keywords will be searched for.
? How can keywords be removed from the list?
From the list, select the keyword to be deleted, and then click the [Remove] button to remove the keyword from the list.
3 Click the [Start Search] button.
The search is started.
The search results appear in pane B.
Searching Using Search Options
With the search conditions in the Search Options group box, searches can be performed by Type, Size or Page number of the file, by Importance or Comment specified in the "Property" dialog box, or by Annotation specified in the "Viewer" window.
1 Click the [Search Options] button.
The Search Options group box appears.
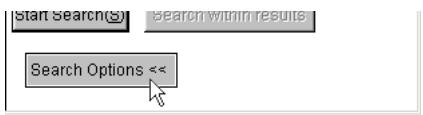
2 Select the check box for a search option, and then select the search value from the drop-down list for the option or type in a value.
To search for multiple comments, separate the comments with spaces, and then select [AND] or [OR].
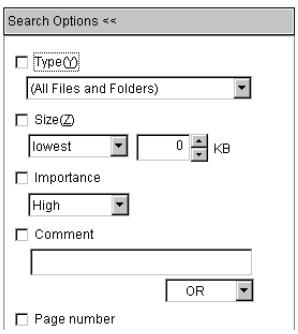
3 Click the [Start Search] button.
The search is started.
The search results appear in pane B.

Note
If the check box for a search condition in the Search Options group box is not selected, it will not be recognized as a search condition.
Compound Searching
1 In the "Search files and folders" window, select all conditions to be used in the search.
2 Click the [Start Search] button.
The search is started.
The search results appear in pane B.
With a compound search, only files that meet all search conditions will be displayed.

Tip
To cancel the search that is being performed, click the [Cancel] button.
6.3 Performing a Refined Search
Additional search conditions can be specified and a search can be performed on search results.
1 Specify the search conditions in the "Search files and folders" window.
2 Click the [Search within result] button.
- The [Search within result] button is only available if a search has already been performed and search results appear in pane B.

The restricted search is started. The final search results appear in pane B.
7 Printing
The procedures for using PageScope Cabinet Pro to print thumbnails and document files are described below.
With files other than image files, the application that originally created the file is used to print the document. In addition, image files can also be printed with their annotations.
7.1 Specifying the Printer
1 On the [File] menu, click [Print Setup].
The "Print Setup" dialog box appears.
2 Select the desired printer, and then specify the print settings.
3 Click the [OK] button.
PageScope Cabinet Pro can now be used to print documents.
7.2 Printing Document Files
Printing the Thumbnail List
Follow the procedure described below to print a thumbnail list.
1 Set pane B to the thumbnail view.
2 On the [File] menu, point to [Print Thumbnail], and then click [Print]. The thumbnail list is printed.

Tip
The thumbnails are printed in the order that they appear in pane B.
Printing Document Files
To print using menu commands
Follow the procedure described below to print a document file by using menu commands.
1 In pane B, select the document file that you wish to print.
Search results can be displayed in pane B for this step.
2 On the [File] menu or on the menu that appears after right-clicking the selected file, click [Print].
3 The document file is printed.

Note
If the document file cannot be printed, install an application that can handle a file with the indicated file name extension. Image files can be printed from the "Viewer" window; however, other types of files are printed using the application linked with the file.
To print using a button on the toolbar
Follow the procedure described below to print a document file by using a button on the toolbar.
1 In pane B, select the document file that you wish to print.
Search results can be displayed in pane B for this step.
2 Click the toolbar button indicated in the illustration.

3 The document file is printed.
To print using a drag-and-drop operation
Follow the procedure described below to print a document file using a drag-and-drop operation.
Drag the document file and drop it onto the printer icon in the launcher. The document file is printed.

Tip
To print the annotations, click [Show Annotation] on the [View] menu.
7.3 Image Options
With the options on the "Image option" dialog box, the printing position can be changed or the image can be printed enlarged or reduced to fit the size of the paper.
"Image option" Dialog Box
Before starting to print, click the [Image option] button in the lower-left corner of the "Print" dialog box to display the "Image option" dialog box.

| No. | Item | Description |
| 1 | Print start position | If the image is smaller than the size of the paper, one of the following settings can be selected. Centering: Select this option to print with the image and the paper aligned at the center in the horizontal direction. For the vertical direction, the image is aligned with the top of the paper. Upper left corner: Select this option to print the image aligned in the upper-left corner of the paper for the horizontal direction. |
| 2 | Magnification | Fit to page: Select this option to print the image enlarged or reduced to fit the size of the paper. Magnification: Select this option, and then specify the magnification (10%, 20%, 30%, 40%, 50%, 60%, 70%, 80%, 90% or 100%) for printing the image. |
8 Importing
8.1 Importing an Image From a TWAIN Device
This chapter provides explanations on importing an image using a TWAIN device. The imported image can also be saved in various formats.
In order to use this function, a TWAIN device (such as a scanner or digital camera) must be connected to the computer and the appropriate device driver must be installed on the computer.
Specifying the TWAIN Device
Before an image can be imported into PageScope Cabinet Pro, the TWAIN device being used must be selected.
Follow the procedure described below to select the TWAIN device.
1 On the [File] menu, click [Select Source]. The "Select Source" dialog box appears.
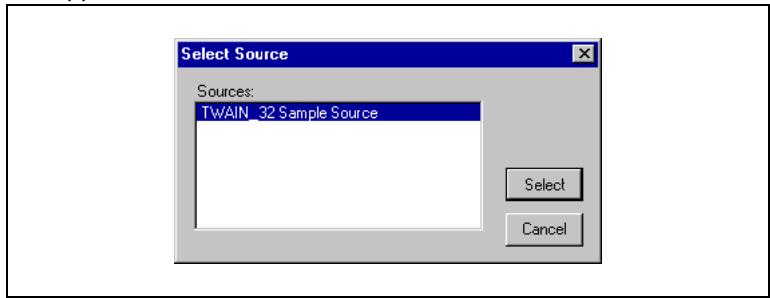
2 In the Sources list, click the TWAIN device to be used.
3 Click the [Select] button.
The TWAIN device that will be used is selected.
Importing an Image From a TWAIN Device
Follow the procedure described below to import an image from the TWAIN device.
1 In pane A, select the folder where the image file will be saved.
2 On the [File] menu, click [Acquire].
The driver of the selected TWAIN device starts up.
3 Follow the instructions for the operation of the TWAIN device driver and import the image.
For details on the operation of the TWAIN device driver, refer to the instruction manual for the TWAIN device.
When the TWAIN driver is closed, the imported image appears in the "TWAIN" dialog box.
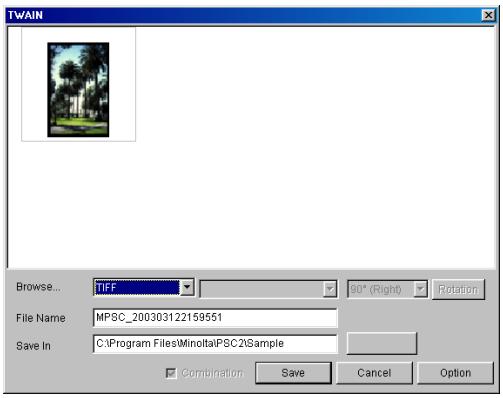
4 In the File Name box, type the name that the image file will be save with.
5 Specify the file format of the image.
If [JPEG] or [JPEG2000] was selected as the file format, the compression method of the image can be selected.
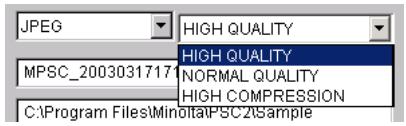
If [HIGH QUALITY] is selected, a low compression ratio is used, and if [HIGH COMPRESSION] is selected, a low image quality will result.
6 If desired, change the orientation of the image.
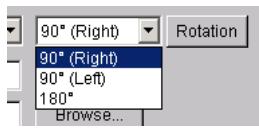
Select the image.
Specify the rotation angle.
Click the [Rotation] button.
7 Click the [Option] button to specify a process to be performed while the image is being saved.
Extracting text data for full-text search
Using the OCR function, text data for a file content search is extracted while the image is being saved.
O Deskew
Determines the slant in the imported image and applies the necessary corrections.
Auto Enhancement of Image
Corrections in the contrast, color balance, etc. are automatically applied while the imported image is being saved.
Click the [OK] button to close the dialog box.
8 Click the [Save] button.
The imported image is saved in the specified folder and the "TWAIN" dialog box is closed.
The image file can be managed with PageScope Cabinet Pro.

Note
PageScope Cabinet Pro can continue importing several image files if the TWAIN device driver supports continuous importing of several image files. All of the imported images are displayed in the "TWAIN" dialog box. If [Mulipage], [PDF] or [COMPACT PDF] is selected as the file format, all images can be saved as a single file. To save the image files as a group file, select the [Group files] check box.
8.2 FTP Server Function
PageScope Cabinet Pro can function as an FTP server. Therefore, it can receive document files directly from devices connected through the network and data from Minolta multifunctional products.
The PageScope Cabinet Pro FTP server function cannot be used if a different FTP server is installed on the computer, for example, if the Internet Information Server program package for Windows 2000 includes an FTP server.
Displaying the IP Address
Follow the procedure described below to view the IP address of your computer.
On the [Tool] menu, click [Show IP Address].
The "IP Address" dialog box appears.
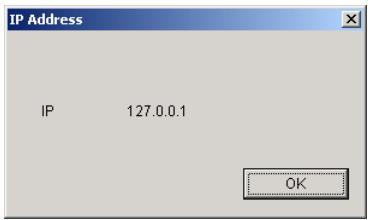
8.3 Importing From a Mail Server
PageScope Cabinet Pro can be set to periodically check for incoming e-mail messages. If the e-mail messages are on a mail server, the e-mail message text or the attached file can be imported into a specified folder.
In addition, the text from the e-mail message can be saved as a text file, and the message text followed by the attached file can be saved as a group file.
The settings for importing from the mail server can be specified from the "Mail" tab of the "SetUp" dialog box. For more details, refer to the procedure for specifying settings on the "Mail" tab of the "SetUp" dialog box.
8.4 Importing From a Monitored Folder
PageScope Cabinet Pro can be set to periodically monitor a specified folder. When files are added to the specified folder, the specified process can be performed on the data, and then the file is transferred to the specified folder.
The settings for importing files from a monitored folder can be specified from the "Watch folder" tab of the "SetUp" dialog box. For more details, refer to the procedure for specifying settings on the "Watch folder" tab of the "SetUp" dialog box.

Note
Importing files from a monitored folder is only available when PageScope Cabinet Pro is started up.
9 Distributing Document Files
This chapter provides information on attaching document files to e-mail messages and on setting up the FTP server function of PageScope Cabinet Pro.
9.1 Attaching Document Files to E-Mail Messages
With PageScope Cabinet Pro, document files can be attached to e-mail messages.
Follow the procedure described below to attach a document file to an e-mail message.
Drag the document file or group file and drop it onto the icon in the launcher for the registered e-mail message settings.
The dialog box for sending an e-mail message with your e-mail application appears.

Note
The icon for the e-mail application differs depending on the e-mail application that is installed. If no e-mail application is installed on the computer, no icon for an e-mail application is displayed.
When a document file is dragged and dropped onto the icon for the e-mail application, the e-mail application specified as the default starts up, and a new e-mail message is created with the specified recipients and text and with the dropped file attached.
If a group file or multiple files are dragged and dropped onto the icon, all of the relevant files are attached to the e-mail message.
9.2 Sending Document Files to an FTP Server
With PageScope Cabinet Pro, document files can be sent to an FTP server.
Follow the procedure described below to send a document file to an FTP server.
Drag the document file or group file and drop it onto the icon in the launcher for the registered FTP client settings.
When the dialog box appears, click the [Sending] button to begins sending to the the specified FTP server.

Tip
The dialog box is displayed during transmission. The transmission status appears on the [Status:] dialog box.
10 Appendix
This chapter contains the glossary and the index.
10.1 Glossary
The following terms often appear in descriptions of PageScope Cabinet Pro in this User Manual.
Annotation
Used in the "Viewer" window of PageScope Cabinet Pro to add information in the form of tags, text, lines, shapes and stamps to image files. The added information is called an "annotation".
group
Files consisting of multiple documents virtually grouped so they can be handled as a single file. The original document files are left unchanged. This is similar to binding paper documents with paper clips so that document files can be removed and new document files can be added.
document file
File formats, such as image formats, PDF, Microsoft Excel and Microsoft Word, that can be used with PageScope Cabinet Pro.
folder
Directories in the Windows file system, which are constructed in a hierarchy.
keyword
A string of characters (words) registered for each document file in order to enable searching. Keywords must be registered. Examples of keywords include "fun", "park", "company" and "sea".
launcher
The area at the bottom of the main window of PageScope Cabinet Pro that contains various applications, printer settings, e-mail message settings and FTP client settings registered in the "SetUp" dialog box.
merge
An operation where image files in a group file are merged together into a single file.
multi-page file
A single file containing multiple pages.
OCR
A function for converting image files to editable text data.
"Page Edit" window icon
The icon for starting up the "Page Edit" window in pane A. Double-click this icon to display the "Page Edit" window. In addition, dragging and dropping files onto this icon displays the "Page Edit" window and registers the dropped file.
pane A
The left side of the main window for PageScope Cabinet Pro, which contains the "Favorites" tab, the "ALL" tab, the "Keyword" tab, the "Search files and folders" window in addition to the icon for the "Page Edit" window.
pane B
The side of the main window that contains the files and folders in the folder selected in pane A and the search results.
thumbnail
A reduced image of the contents of the document file.
10.2 Index
A
annotations
copying 5-34
deleting 5-35
moving 5-35
order 5-35
searching 5-37,6-5
selecting 5-34
specifying 5-27
applications
compatible applications 3-1
linking 5-8
registering in launcher 4-10
C
cancelling
grouping 5-19
changing
launcher settings 4-15
Clipboard 5-36
comments
deleting 5-74
managing file versions 5-77
searching 6-5
specifying 5-73
converting
document file formats 5-23
merging 5-22
OCR 5-76
Setting of PDF conversion tab 5-57
D
deleting
annotations 5-35
comments 5-74
document files 5-4
documents from Page Edit window 5-59
fj 5-4
from Favorites 4-23
keywords 5-70
registered stamps 4-20
software 3-5
Watch folder settings 4-19
details view 4-27
document files
attaching to e-mail messages 9-1
converting formats 5-25
copying 5-3
deleting 5-4
distributing 9-1
extracting text 5-75
file formats 5-23
file list 4-29
grouping 5-16, 5-17
moving 5-3
opening 5-8
printing 7-2
Property dialog box 5-10
removing grouping 5-19
re-naming 5-2
searching 6-1
sorting 4-29
Viewer Light window 5-7
Viewer window 5-5
E
e-mails 9-1
Mail tab 4-8
registering settings 4-11
F
filtering
file display 4-5
folders
copying 5-3
deleting 5-4
moving 5-3
Property dialog box 5-9
re-naming 5-2
searching 6-2
FTP
importing 4-6,8-4
sending 9-2
G
glossary 10-1
group files
changing the order 5-18
e-mails 4-9, 9-1
grouping 5-16, 5-17
managing versions 5-78
merging 5-22
Property dialog box 5-14
removing grouping 5-19
re-naming 5-19
scrolling 5-17
slide shows 5-20
icon view 4-25
image correction functions 5-39
Auto Enhancement of Photo Image 5-46
Change Resolution 5-44
Change Size 5-45
Color 5-44
Deskew 5-39
Eliminate Background 5-39
Emboss 5-45
Enhancement 5-42
Mirror Image 5-45
Preset Enhancement of Photo Image 5-47
Remove Background Bleed-Through 5-40
Remove Halftone 5-40
Rotate 5-48
Sharpness 5-43
Trimming 5-46
importing
e-mails 8-4
FTP 8-4
monitored folder 8-5
installing 3-2
K
keywords
changing 5-69
creating 5-67
deleting 5-70
searching 6-4
specifying for document files 5-71
L
list view 4-26
M
merging 5-22
P
Page Edit window 5-50
adding files 5-54
changing page order 5-63
deleting 5-59
duplicating pages 5-59
inserting blank pages 5-65
merging 5-61
opening 5-49
reviewing 5-60
printing 5-58
quitting 5-50
removing pages 5-64
re-naming 5-60
rotating 5-62
saving 5-58
selecting 5-58
thumbsnails 5-61
toolbar 5-51
user environment 5-56
Folder for converted PDF 4-5
Setting of PDF conversion tab 5-57
printers
registering settings 4-12
specifying 7-1
printing
document files 7-2
thumbsnails 7-1
Property dialog box 5-9
Q
quitting
Page Edit window 5-50
PageScope Cabinet Pro 4-2
slide shows 5-21
R
registering
applications 4-10
e-mail message settings 4-11
Favorites 4-21
FTP client settings 4-14
launcher 4-9
prinertier settings 4-12
stamps 4-19
S
searching
"Search files and folders" window 6-1
annotations 5-37
compound search 6-6
date 6-3
file or folder name 6-2
keywords 6-4
refined search 6-6
search options 6-5
text contained in file 6-3
sending
e-mail 9-1
FTP 9-2
SetUp dialog box
displaying 4-3, 5-56
FTP tab 4-6
General tab 5-56
Launch Application tab 4-9
Mail tab 4-8
OCR tab 4-16
Page Edit window 5-56
PageScope Cabinet Pro 4-3
Setting of PDF conversion tab 5-57
Stamp tab 4-19
System tab 4-4
Watch folder tab 4-17
slide shows 5-20
operating 5-21
starting 5-20
sorting 4-29
stamps
deleting 4-20
register 4-19
specifying 5-32
starting
Page Edit window 5-49
slide shows 5-20
starting up
applications registered in launcher 5-8
e-mail application 4-11
FTP 4-6
PageScope Cabinet Pro 4-1
symbols 1-2
system
hiding system folders 4-5
installation conditions 3-1
System tab 4-4
user environment 4-3
T
thumbnails
creating 4-30
displaying 4-24, 5-5
group files 5-17
printing 7-1
re-sizing 4-31, 5-61
resolution 5-10
rotating 4-32
updating 4-31
transferring
selected part of image 5-36
Watch folder tab 4-17
TWAIN devices
importing images 8-2
specifying 8-1
U
uninstalling 3-5
unregistering
launcher settings 4-15
V
version management 5-77
W
Watch folder tab
deleting settings 4-19
Processing 4-18
specifying 4-17
tabs 4-17

MINOLTA
Copyright
2003 MINOLTA CO., LTD.
The information contained in this manual is subject to change without notice to incorporate improvements made on the product or products the manual covers.
- Cabinet Pro
- Contents
- Introduction
- Features of PageScope Cabinet Pro
- Installation
- Basic Operation and Setup
- Specifying and Removing Favorites 4-21
- Opening Folders 4-24
- Thumbsails 4-30
- Managing Document Files
- Editing Document Files 5-1
- Page-Editing Functions 5-49
- Searching for Document Files
- Printing
- Importing
- Distributing Document Files
- Appendix
- Welcome
- Trademark Acknowledgements
- Structure of This User Manual
- Content of Each Chapter
- Note
- Explanation of Manual Conventions
- CAUTION
- This is a warning.
- [Menu]
- This is a helpful tip.
- Software Capabilities
- System Requirements
- Installing the Software
- Be careful of data loss!
- Uninstalling the Software
- Starting Up and Quitting PageScope Cabinet Pro
- To start up PageScope Cabinet Pro
- To quit PageScope Cabinet Pro
- Main Window
- Setting the User Environment
- To display the "SetUp" dialog box
- "System" Tab
- "Filtering file display" Group Box
- "Folder to save the PDF files generated by PageEdit" Group Box
- "FTP" Tab
- To specify FTP server settings
- "Mail" Tab
- Tip
- "Launch Application" Tab
- To register an application
- To register e-mail message settings
- #
- To register printer settings
- To register FTP client settings
- To change settings registered in the launcher
- To unregister settings in the launcher
- To change the icon
- "OCR" Tab
- To select the recognized language
- "Watch folder" Tab
- To specify the folder
- To process files
- To delete specified folder settings
- "Stamp" Tab
- To register a stamp
- To remove a registered stamp
- Specifying and Removing Favorites
- Registering a Folder in the Favorites
- The management information cannot be changed for folders with the read-only attribute applied.
- To open/close folders on the "ALL" and " Favorites" tabs
- Removing a Folder From the Favorites
- Opening Folders
- Displaying as Thumbs nails
- Displaying as Icons
- Displaying as a List
- Displaying Details
- Changing the Displayed Columns
- Creating a File List
- Sorting Document Files
- Thumbs nails
- Creating Thumbsails
- Updating Thumbs nails
- Changing the Display Size of Thumbs nails
- Rotating Thumbsils
- Editing Document Files
- Adding New Folders With PageScope Cabinet Pro
- Changing the Name of a File or Folder
- Copying Folders or Document Files
- Copying Folders or Document Files ([Copy to folder])
- Moving Folders or Document Files ([Move to folder])
- Deleting Folders or Document Files
- Displaying Document Files in the "Viewer" Window
- Displaying an Image File in the "Viewer Light" Window
- Displaying the document file with the application linked to it
- Opening a Document File Using a Registered Application
- Displaying the "Property" Dialog Box for Folders and Document Files
- To display the "Property" dialog box of a document file
- "General" tab
- "Additional Information" tab
- To display the "Property" dialog box of a group file
- "Contents" tab
- Grouping
- Grouping Files Using a Drag-and-Drop Operation
- Grouping Files Using Menu Commands
- Changing the Page/File Displayed for a Group File
- Changing the File Order of a Group File
- Changing the Name of a Group File
- Removing a Document File From a Group File
- Removing All Document Files From a Group File
- Slide Shows
- To start a slide show
- Slide Show Operations
- Merging Files
- Converting a Group File Into a PDF File, a Multi-Page TIFF File or a Compact PDF File
- Document File Formats
- Converting File Formats
- Converting a File to a Different Format
- Working With Annotations
- Specifying Annotations
- Common operations
- To add a tag
- To enter text
- To draw a line
- To draw a shape
- To add a stamp
- To select an annotation
- To copy annotations
- To move annotations
- To delete annotations
- To change the order of annotations
- or
- To copy part of the image onto the Clipboard
- To paste the image copied onto the Clipboard into the "Viewer" window
- Searching for Annotations
- Image Enhancement Functions
- To specify skew adjustment
- To specify background removal
- To specify halftone removal
- To specify bleed-through correction
- To specify automatic document enhancement
- To specify image enhancement
- To adjust the sharpness
- To change the number of colors
- To change the resolution
- To change the image size
- To specify negative/positive inverting
- To specify mirror imaging (left/right flipping)
- To specify embossing
- To specify trimming
- To specify automatic photo image enhancement
- To specify a defined photo image enhancement
- To rotate the image
- Page-Editing Functions
- Opening the "Page Edit" Window
- Closing the "Page Edit" Window
- "Page Edit" Window
- Page-Editing Toolbar
- Scanning Through the Pages of a Document
- Adding Files to the "Page Edit" Window
- Setting the User Environment of the "Page Edit" Window
- "Setting of PDF conversion" tab
- Selecting a Document
- Selecting All Documents
- Saving a Document
- Printing a Document
- Duplicating a Document
- Duplicating a Page
- Deleting a Document
- Deleting All Documents
- Changing the Name of a Document
- Arranging the Documents
- Previewing a Document
- Changing the Size of Thumbs nails
- Merging Documents
- Separating a Document Into Its Individual Pages
- Rotating a Document
- Rotating a Page
- Changing the Order of Pages
- Removing a Page
- Automatically Inserting a Blank Page
- Inserting a Blank Page of the Specified Size
- Working With Keywords
- Specifying Keywords
- To create a keyword
- To change a keyword
- To delete a keyword
- Assigning Keywords to Document Files
- Working With Comments
- **Specifying Comments for Document Files**
- Deleting the Comments for a Document File
- Extracting Text for a File Content Search
- Extracting Text From an Image File
- Managing File Versions
- Displaying the "Search files and folders" window
- Specifying the Search Conditions
- Searching by File Name
- Searching by File Content
- Searching by Date
- Searching by Keyword
- Searching Using Search Options
- Compound Searching
- Performing a Refined Search
- Specifying the Printer
- Printing Document Files
- Printing the Thumbnail List
- Printing Document Files
- To print using menu commands
- To print using a button on the toolbar
- To print using a drag-and-drop operation
- Image Options
- "Image option" Dialog Box
- Importing an Image From a TWAIN Device
- Specifying the TWAIN Device
- Importing an Image From a TWAIN Device
- FTP Server Function
- Displaying the IP Address
- Importing From a Mail Server
- Importing From a Monitored Folder
- Attaching Document Files to E-Mail Messages
- Sending Document Files to an FTP Server
- Glossary
- Annotation
- group
- document file
- folder
- keyword
- launcher
- merge
- multi-page file
- OCR
- "Page Edit" window icon
- pane A
- pane B
- thumbnail
- Index
- A
- annotations
- applications
- C
- cancelling
- changing
- comments
- converting
- D
- deleting
- document files
- E
- F
- filtering
- folders
- FTP
- G
- K
- keywords
- L
- M
- P
- printers
- printing
- Q
- quitting
- R
- registering
- S
- searching
- sending
- SetUp dialog box
- T
- TWAIN devices
- U
- V
- W
- Watch folder tab
- MINOLTA
Marque : KONICA MINOLTA
Modèle : PAGESCOPE CABINET PRO
Catégorie : Gestion de documents