MDS-Compact - Support pour batterie électronique ROLAND - Notice d'utilisation et mode d'emploi gratuit
Retrouvez gratuitement la notice de l'appareil MDS-Compact ROLAND au format PDF.


| Type de produit | Support de batterie électronique |
| Marque | Roland |
| Modèle | MDS-Compact |
| Dimensions (déplié) | 120 x 100 x 80 cm |
| Poids | 8 kg |
| Matériau | Acier tubulaire |
| Capacité de charge maximale | 30 kg |
| Nombre de membres | 4 |
| Compatibilité | Modules et pads Roland et autres marques |
| Hauteur réglable | Oui, de 60 à 90 cm |
| Réglage d'angle | Oui, pour les pads |
| Pieds antidérapants | Oui |
| Montage | Sans outils, assemblage simple |
| Entretien et nettoyage | Nettoyer avec un chiffon doux et sec |
| Sécurité | Vérifier régulièrement le serrage des vis |
| Pièces détachées et réparabilité | Disponibles auprès du service après-vente Roland |
| Garantie | 2 ans |
| Accessoires inclus | Clé Allen, manuel d'utilisation |
| Utilisation prévue | Batterie électronique, pads de percussion |
| Plage de hauteur | 60 – 90 cm |
FOIRE AUX QUESTIONS - MDS-Compact ROLAND
Questions des utilisateurs sur MDS-Compact ROLAND
0 question sur cet appareil. Repondez a celles que vous connaissez ou posez la votre.
Poser une nouvelle question sur cet appareil
Téléchargez la notice de votre Support pour batterie électronique au format PDF gratuitement ! Retrouvez votre notice MDS-Compact - ROLAND et reprennez votre appareil électronique en main. Sur cette page sont publiés tous les documents nécessaires à l'utilisation de votre appareil MDS-Compact de la marque ROLAND.
MODE D'EMPLOI MDS-Compact ROLAND
NOTE
- When setting-up or adjusting the stand, take care not to pinch your fingers between movable parts and the main unit. If using this in a location where children are present, be sure to provide adult supervision or guidance.
- Prepare an area in which you can perform the assembly safely.
- Do not use a power tool (e.g., an electric screwdriver) to assemble the stand. You risk damaging or stripping the screws.
* If you will be using this drum stand for an extended period of time in the same location, we recommend that you use a drum mat (TDM series) made by Roland to prevent the rubber feet from soiling the surface on which they are placed.
1. Check the parts
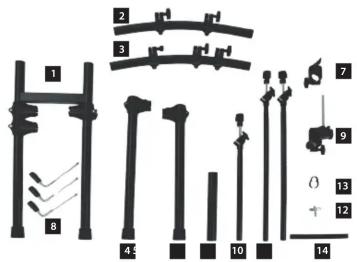
| No. | Name Quantity | |
| 1 | Stand 1 | |
| 2 | Curved pipe L 1 | |
| 3 | Curved pipe R 1 | |
| 4 | Straight pipe L (Long) | 1 |
| 5 | Straight pipe R (Short) | 1 |
| 6 | Snarc pipe | 1 |
| 7 | Mount holder 3 | |
| 8 | Pad mount | 3 |
| 9 | Pad mount (ball type) | 1 |
| 10 | Cymbal mount (Short) | 1 |
| 11 | Cymbal mount (Long) | 2 |
| 12 | Drum key | 1 |
| 13 | Cable clip | 4 |
| 14 | Cable tie | 2 |
2. Assembling the Left and Right Arm Sections
Lay the left and right arm sections on the floor while assembling them.
2-1. Using a drum key, loosen the bolt on the holder of straight pipe "L," then insert curved pipe "L."
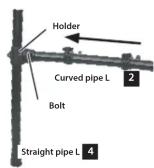
2-2. Attach mount holder to straight pipe "L." Then, after pulling down straight pipe "L" until it can move no further, tighten the bolt.

2-3. Using a drum key, loosen the bolt on the holder of straight pipe "R," then insert curved pipe "R."

2-4. Position straight pipe "R" so that its tip protrudes by about 7cm , and then tighten the holder.
3. Attach the Left and Right Arm Sections to the Main Unit
3-1. Use a drum key to loosen bolt of the holder "A" (attached to the left-side pipe (with two holders) of the stand), and insert curved pipe "L" (of the assembly you created in step 2-1-2-2) into holder "A" of the stand.

As a general rule, insert curved pipe "L" until the guide hole on the pipe can be seen through the gap in the holder.
After firmly inserting it all the way, use the drum key to firmly tighten bolt.

3-2. Lower holder "B" (attached to the right-side pipe of the stand) to the same position as holder "C" (attached to the left-side pipe of the stand).
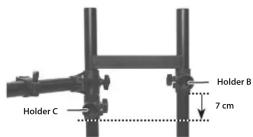


3-3. Use the drum key to loosen bolt of the holder "B," and insert curved pipe "R" (of the assembly you created in step 2-3-2-4) into holder "B" of the stand.

As a general rule, insert curved pipe "R" until the guide hole on the pipe can be seen through the gap in the holder.
After firmly inserting it all the way, use the drum key to firmly tighten bolt.

4. Attaching the snare pipe
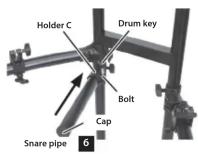
4-1. Use the drum key to loosen bolt of the holder "C," and insert the snare pipe into holder "C" of the stand. After firmly inserting it all the way, use the drum key to firmly tighten bolt.
Insert the end of the snare pipe that doesn't have a cap on it into holder "C."
5. Attaching the pad mounts
The tips of the mounts are sharp. Handle them with care.
5-1. Place the stand upright, then loosen the hand knobs of holders "A" and "B" (two places). Next, spread open the pipes at left and right.
5-2. Verify that the four vertical pipes are truly vertical. If the stand wobbles, loosen the bolts on the holders of curved pipes "L" and "R," and adjust the height. After adjusting the height, tighten the bolts on the holders.

5-3. Attach mount holders to the top of the stand and tighten the respective hand knobs.

5-4. Attach the pad mounts to mount holder, and firmly tighten the respective hand knobs.
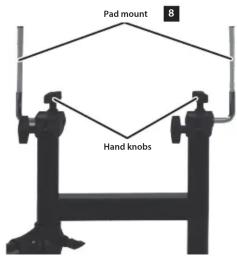
5-5. Attach pad mount (ball type) to the snare pipe, and tighten the hand knob.

6. Attaching the cymbal mounts
As appropriate for the drum kit that you're using, attach the cymbal mounts (short) to the locations for hi-hat and ride cymbal.
6-1. Insert the two cymbal mounts and the hi-hat mount into the holders of the curved pipes, and adjust all the holders as shown in the illustration to complete setup.
"A" type (for hi-hat)

"B" type (for ride cymbal)

Notes
- When setting up or storing the stand, be careful not to pinch the fingers you use to handle the stand.
- Regarding the way of mounting a sound module, pads, or cymbals, please refer to the owner's manual supplied with them.
WARNING: Caution during setup
When setting-up, you must observe the following cautions.
If you fail to observe these cautions, the stand might overturn or fall, causing injury.
Check for stability when setting-up the stand, and take appropriate care.
Do not spread the stand wider than 1.2 meters (48 inches).

Adjust the rod height so that no part of any cymbal is higher than 1.2 meters (48 inches) above the floor.

Attach the cymbals in such a way that the center of the cymbal does not extend beyond the rear pipes of the stand.
Center of cymbal must not extend beyond rear of stand

5. Attaching the pad mounts
Notes

Marque : ROLAND
Modèle : MDS-Compact
Catégorie : Support pour batterie électronique