
MDS-12 - Support pour batterie électronique ROLAND - Notice d'utilisation et mode d'emploi gratuit
Retrouvez gratuitement la notice de l'appareil MDS-12 ROLAND au format PDF.


| Marque | Roland |
| Modèle | MDS-12 |
| Type de produit | Tabouret de batterie (drum throne) |
| Matériau de l'assise | Cuir synthétique rembourré |
| Diamètre de l'assise | 30 cm |
| Hauteur réglable | Oui, de 45 à 60 cm |
| Type de réglage | Vis de blocage avec molette |
| Structure | Base trépied en acier |
| Poids | 8 kg |
| Capacité de charge maximale | 120 kg |
| Pieds antidérapants | Oui, embouts en caoutchouc |
| Garantie | 2 ans |
| Pays d'origine | Chine |
| Utilisation recommandée | Batterie acoustique et électronique |
| Entretien | Nettoyer avec un chiffon doux et humide, éviter les solvants |
| Sécurité | Vérifier régulièrement le serrage de la vis de blocage |
| Pièces détachées disponibles | Oui (embouts caoutchouc, vis de blocage, assise de rechange) |
| Réparabilité | Réparable par un technicien agréé Roland |
FOIRE AUX QUESTIONS - MDS-12 ROLAND
Questions des utilisateurs sur MDS-12 ROLAND
0 question sur cet appareil. Repondez a celles que vous connaissez ou posez la votre.
Poser une nouvelle question sur cet appareil
Téléchargez la notice de votre Support pour batterie électronique au format PDF gratuitement ! Retrouvez votre notice MDS-12 - ROLAND et reprennez votre appareil électronique en main. Sur cette page sont publiés tous les documents nécessaires à l'utilisation de votre appareil MDS-12 de la marque ROLAND.
MODE D'EMPLOI MDS-12 ROLAND
この機器を正しくお使いいただくために、ご使用の前に別紙「安全上のご注意」と「使用上のご注意」をよくお読みください。また、この機器の優れた機能を十分ご理解いただくためにも、取扱説明書をよくお読みください。取扱説明書は必要なときにすぐに見ることができるよう、手元に置いてください。
主な特長
・金属製クランプを使用した、安定性の高いドラム・スタンドです。
- ボール・クランプを採用し、パッドやシンバルの角度を自由に調整可能です。
- 接続ケーブルを内蔵。短時間でのセッティングが可能です。
内容物

| A | 音源取り付けパイプ(音源マウンティング・プレート付き) | ||
| B | カーブ・パイプ L 600mm、センター・パイプ 550mm(接続ケーブル内蔵) | ||
| C | カーブ・パイプ R | ||
| D | スネア・パイプ 300mm | ||
| E | ストレート・パイプ 625mm | ||
| F | ストレート・パイプ 650mm L | ||
| G | ストレート・パイプ 650mm R | ||
| H | ストレート・パイプ 520mm | ||
| I | シンパル・アーム× 3 | ||
| J | パッド・アーム× 2 | ||
| K | ホルダー× 2 | ||
| L | パッド・マウント× 2、メモリー・ロック(パッド・マウント用)× 2 | ||
| □ドラム・キー □ケーブル・クリップ □取扱説明書(本書) | |||
© 2009 ローランド株式会社 本書の一部、もしくは全部を無断で複写、転載することを禁じます。 Roland および V-Drums は、日本国およびその他の国における ローランド株式会社の登録商標または商標です。

完成図

当ドラム・スタンドを長期間同じ場所で使用される場合は、ゴム足の設置面への汚れ付着等の影響を※防ぐために、当社製品のドラム・マット(TDM シリーズ)を使用されることをお勧めします。
主な仕様
- 必要占有面積 1,200(幅)× 700(奥行き)× 1,100(高さ)mm(スタンドのみ) 1,500(幅)× 1,200(奥行き)× 1,250(高さ)mm(音源、キック・パッド、シンパル、椅子を含む)
- パイプ径 スタンド本体:38.1mm パッド・アーム/シンバル・アーム:22.2mm
- 質量 16.8kg(パッド・マウント、シンパル・マウントなどを含む) 製品の仕様および外観は、改良のため予告なく変更することがあります。※
組み立てかた
組み立てる際の注意
スタンドを組み立てる際は、本体や床を傷つけないようにマットなどを敷いてください。※
転倒防止のため、組み立てはスタンドを床に寝かせた状態から始めてください。また、組み立てが不※完全な状態でスタンドを起こさないようにしてください。
スタンドを使用するときには、ハンド・ノブやネジを確実に締めてください。特に演奏前には確実に※取り付けられているかどうか確認してください。確実に取りつけられていないとパッドや機器が落下してけがをする恐れがあります。
スタンドをセッティング及び収納する際は、スタンドを持っている指をはさまないように注意してく※ださい。
故障の原因になりますので、ハンド・ノブ、パイプ、マウントなどに過度の力を加えないでください。※
スタンドを、120度以上外側には開かないでください。※また、両端のパイプの距離を1.3 m以上離さないでください。スタンド内部のケーブルを損傷したり、スタンド自体が倒れたりする恐れがあります。
接続ケーブルを無理に引っ張らないでください。※
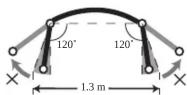
音源とケーブルを接続するときは、ケーブル両端のマーキング・ラベルを参照してください。接続に※ついては、お使いの音源の取扱説明書をご覧ください。
マーキング・ラベルのラベル名は、トリガー・インプットのジャック名と以下のように対応しています。
| ラベル | KIK | SNR | T1 | T2 | T3 | HH | HHC |
| ジャック | KICK | SNARE | TOM 1 | TOM 2 | TOM 3 | HI-HAT | HH CTRL |
| ラベル | CR1 | CR2 | RD | RDE | AX1 | AX2 | |
| ジャック | CRASH1 | CRASH2 | RIDE | EDGE | AUX 1 | AUX 2 |
組み立て
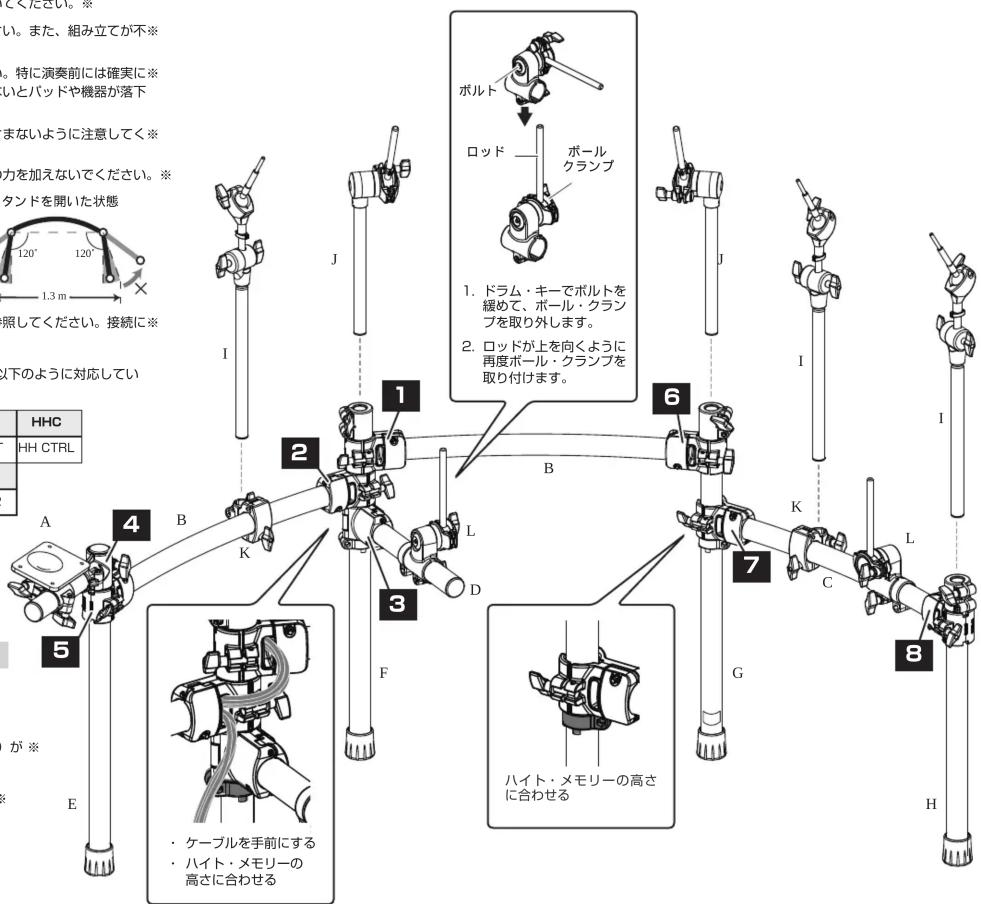
右の図の番号(1~8)順に、カーブ・パイプをストレート・パイプに取り付けてください。
B は、長い方(600mm)がカーブ・パイプ L、短い方(550mm)が※センター・パイプです。
C(カーブ・パイプ R)には、ケーブルを通さずにお使いください。※
Before using this unit, carefully read the sections entitled: "USING THE UNIT SAFELY" and "IMPORTANT NOTES" (separate sheet). These sections provide important information concerning the proper operation of the unit. Additionally, in order to feel assured that you have gained a good grasp of every feature provided by your new unit, Owner's manual should be read in its entirety. The manual should be saved and kept on hand as a convenient reference.
Main Features
- A very solid and stable stand featuring ball clamps that allow precise adjustments for all pads and cymbals.
- Cables are inside the pipes, providing a clean look and quick breakdown or setup.
Components
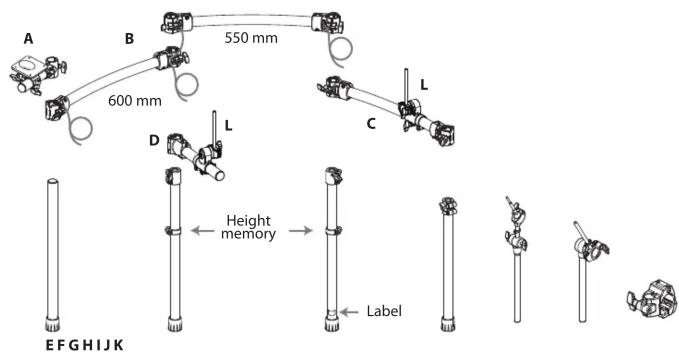
| A | Sound module mounting pipe (including the mounting plate) |
| B | Curved pipe L 600mm, Center pipe 550 mm (connection cables are inside) |
| C | Curved pipe R |
| D | Snare pipe 300 mm |
| E | Straight pipe 625 mm |
| F | Straight pipe 650 mm L |
| G | Straight pipe 650 mm R |
| H | Straight pipe 520 mm |
| I | Cymbal arm x 3 |
| J | Pad arm x 2 |
| K | Holder x 2 |
| L | Pad mount x 2, Memory lock (for pad mount) x 2 |
   | |
Copyright © 2009 ROLAND CORPORATION
All rights reserved. No part of this publication may be reproduced in any form without the written permission of ROLAND CORPORATION. Roland and V-Drums are either registered trademarks or trademarks of Roland Corporation in the United States and/or other countries.

Fully Assembled View
• View of Stand When Spread Open

* We recommend using an optional Roland drum mat (TDM series) to prevent scarring or discoloration of flooring by the rubber feet of the stand.
Specifications
- Required Space for Set-up
1,200 (W) x 700 (D) x 1,100 (H) mm / 47-1/4 (W) x 27-9/16 (D) x 43-5/16 (H) inches (Drum Stand only) 1,500 (W) x 1,200 (D) x 1,250 (H) mm / 59-1/16 (W) x 47-1/4 (D) x 49-1/4 (H) inches (including Sound Module, Kick Pad, Cymbals and Stool)
- Tube Diameter
Stand: 38.1 mm / 1-1/2 inches Pad Arm/Cymbal Arm: 22.2 mm / 7/8 inches
- Weight
16.8 kg / 37 lbs 1 oz (including Pad Mounts and Cymbal Mounts)
* In the interest of product improvement, the specifications and/or appearance of this unit are subject to change without prior notice.
Setting Up The Stand
Important in Setting Up the Stand
* When assembling the stand, you should cover the floor with a mat, blanket, etc., so as to prevent damage to the floor as well as to the stand.
* To prevent toppling, begin the assembly with the stand placed horizontally on the floor. Do not raise the stand into the upright position until it has been sufficiently assembled.
* Make sure to firmly tighten all hand knobs and bolts after you have assembled the stand and attached any components. You should probably also try to make a habit of checking and retightening them if necessary before every performance. You risk injury if you have loose screws or clamps, since a pad or component can fall unexpectedly.
* When setting up or storing the stand, be careful not to pinch your hands or fingers in the stand joints.
* Do not apply undue force to the hand knobs, pipes, mounts, etc.
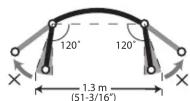
* Do not open the stand wider than 120 degrees outward. Be sure the two pipes at the ends tare no more than 1.3 meters apart. Doing so can damage the cables inside the stand or cause the stand to fall over.
* Never pull on any cables with excessive force.
* There are labels on the ends of the cables allowing easy connection to your sound module. For about connections, refer to the owners manual that came with your sound module.
The names on the labels correspond to trigger input jack names as follows. (input names shown here are for the TD-12 modules)
| Label | KIK | SNR | T1 | T2 | T3 | HH | HHC |
| Jack | KICK | SNARE | TOM 1 | TOM 2 | TOM 3 | HI-HAT | HH CTRL |
| Label | CR1 | CR2 | RD | RDE | AX1 | AX2 | A |
| Jack | CRASH1 | CRASH2 | RIDE | EDGE | AUX 1 | AUX 2 |
Setting Up
Working in order, following numbers 1 - 8 in the illustration, attach the curved pipes to the straight pipes.
* Of pipes "B," the long one (600 mm) is Curved Pipe L, and the short one (550 mm) is the Center Pipe.
* Do not pass any cables through pipe "C" (Curved Pipe R).
View of Stand When Spread Open

Marque : ROLAND
Modèle : MDS-12
Catégorie : Support pour batterie électronique