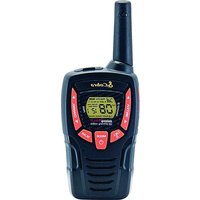
ACXT390 - Talkie-walkie COBRA - Notice d'utilisation et mode d'emploi gratuit
Retrouvez gratuitement la notice de l'appareil ACXT390 COBRA au format PDF.


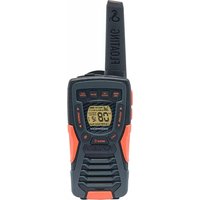
| Type de produit | Talkie-walkie |
| Marque | Cobra |
| Modèle | ACXT390 |
| Dimensions | Environ 5,5 x 2,5 x 1,5 cm |
| Poids | Environ 100 g (avec piles) |
| Alimentation | 3 piles AAA (non incluses) |
| Portée maximale | Jusqu'à 10 km en terrain dégagé |
| Nombre de canaux | 22 canaux (8 GMRS, 14 FRS) |
| Fonction VOX | Activation vocale mains libres |
| Fonction balayage | Scan des canaux pour trouver une conversation |
| Fonction appel | Bip d'appel intégré |
| Verrouillage clavier | Oui, pour éviter les changements accidentels |
| Écran | Écran LCD avec rétroéclairage |
| Indicateur de batterie faible | Oui |
| Autonomie des piles | Environ 20 heures en utilisation normale |
| Résistance aux intempéries | Conception résistante aux éclaboussures |
| Fréquence | UHF 462-467 MHz |
| Code de confidentialité | 121 codes d'accès (38 CTCSS / 83 DCS) |
| Utilisation | Extérieur, randonnée, chantier, sécurité |
| Entretien et nettoyage | Nettoyer avec un chiffon doux et sec. Ne pas utiliser de produits chimiques. |
| Sécurité | Respecter les réglementations locales d'utilisation des fréquences. |
| Pièces détachées et réparabilité | Piles, antenne (non détachable). Pour réparation, contacter le service client Cobra. |
| Informations générales | Talkie-walkie compact pour usage familial et professionnel. |
FOIRE AUX QUESTIONS - ACXT390 COBRA
Questions des utilisateurs sur ACXT390 COBRA
0 question sur cet appareil. Repondez a celles que vous connaissez ou posez la votre.
Poser une nouvelle question sur cet appareil
Téléchargez la notice de votre Talkie-walkie au format PDF gratuitement ! Retrouvez votre notice ACXT390 - COBRA et reprennez votre appareil électronique en main. Sur cette page sont publiés tous les documents nécessaires à l'utilisation de votre appareil ACXT390 de la marque COBRA.
MODE D'EMPLOI ACXT390 COBRA




































Introduction
Making Life Easier and Safer
Staying in touch with your family and friends is convenient and easy when using your microTALK® radio. Some of the many uses you will discover include:
Some of the many uses you will discover include:
Communicating with others while hiking, biking, and working; keeping
track of family and friends at a crowded public event; checking with
travel companions in another car; talking with neighbors; arranging
meeting spots with others while shopping at the mall.

Secure your microTALK® radio while on

the go

•

Carrying your microTALK® radio with you is easy

when using the belt clip or optional wrist strap.

The following table is provided in the image.

The belt

backpac

•

[Non-Text]

广力云智慧零售收银系统

omer

simler
Product Service & Support
In this user's guide, you should find all the information you need to operate your microTALK® radio. If you require further assistance after reading this guide, Cobra offers the following customer assistance services:
For Assistance In The U.S.A.
For any questions about operating or installing this new Cobra product, PLEASE
FOR ANY QUESTIONS ABOUT OPERATING OF INSTALLING THIS NEW CEBDA PRODUCT, PLEASE CONTACT CORRA FIRST. DO NOT RETURN THIS PRODUCT TO THE RETAIL STORE. THE
CONTACT CODRA FIRST... DO NOT RETAIN THIS PRODUCT TO THE RETAIL STORE. THE contact information for Cohra will vary depending on the country in which you
contact information for Cobra will vary depending on the country in which you
purchased and uses the product. For the latest contact information, please go
to www.cobra.com/support or call 1-800-543-1608.
If your product should require factory service, please go to
www.cobra.com/support and follow the instructions
©2022 Cobra Electronics Corporation
www.cobra.com
[Non-Text]
A-1 A-2 A-3
[Non-Text]
Battery Low

When battery power is low, the final bar in the

Battery Low icon will blink and an audible tone will

sound twice before the radio shuts off. Your battery

sound twice before the radio shots off. To

should be replaced or


The radio will display flashing battery icon


Auto Battery Save

15.01

If there are no transmissions within 10 seconds, the

radio will automatically switch to Power Save mode

and the Power Saver icon will flash in the display

This will not affect the radio's ability to receive

This will not affect the

incoming transmissions.
Communicati

g with Another Person

3. The manufacturer: P.O.

1. Press and hold the Talk button.

2. With the microphone about two inches (5 cm) from

2. With the microphone about two miles your mouth, speak in a normal voice

your mouth, speak in a normal voice.

3. Release the Talk button when you are

finished talking and listen for a response.

You cannot receive incon

pressing the Talk button


Both radios must be tuned to the

(1) Both radios must be tailed to the same channel to communicate.

same channel to communicate.
To Select a Channel

With the radio on, select any of the 32 channels by

with the radio off, select any of the 22 channels by

pressing the Channel Up or Channel Down button.

Both radios must be tuned to the

Both radios must be tuned to the same channel to communicate.

same channel to

(1)

(二)

See page 13 for frequency allocations

See page 15 for frequency allocations.

Introduction
Product Features

- Antenna
- External Speaker/
Microphone/Charge - Mode/Power Button
- Weather/Lock Button
- Channel Un/Down B
- Backlit LCD Display
- Speaker/Microphone
- Volume Up/Down Buttons
- Light/Max Range Button
- Talk Button
- Call Button
- Wrist Strap
- Belt Clip
- Battery Con
- Battery Door Latch
Backlit LCD Display
Features
• 22 Channel

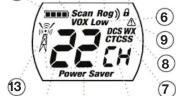

1. Battery Level Indicator
2. VOX Icon
3. Scan Icon
4. Roger Beep Icon
5. Lock Icon
6. Lock tooth
8. Low Power loop
6. LOW POWER ICON
7. DCS/CTCSS logo
- DCS/C1CSS icons
- Weather Icon
- Weather Alert Icon
- DCS/CTCSS Privacy Code Numbers
- Power Saver Icon
- Channel Numbers
- Receive/Transmit Icon

Maximum range may vary and is based on unobstructed line-of-sight communication under ideal conditions.
Caring for Your microTALK® Radio
Your microTALK® radio will give you years of trouble-free service
Your MICROTAER Table will give you years of trouble free service if you feel forward. But it's the direction, if you are doing so far
If cared for properly. Handle the radio gently. Keep the radio away from
dust. Never put the radio in water or in a damp place. Avoid exposure to
extreme temperatures.
Installing Batteries

To install or replace batteries:
1. Remove belt clip by releasing belt clip
latch and sliding clip up.
- Pull up on the battery does latch to remove the
- Pull up on the battery door battery compartment cover

- Insert the supplied three AA rechargeable
batteries or non-rechargeable alkaline batteries.
Position batteries according to polarity markings - Replace battery compartment cover and
- Hoplasso belt clip
• Do not attempt to charge alkaline batteries
- Do not mix old and new batteries.
- Do not mix alkaline, standard (carbon pipes), or
- DO NOT MIX alkaline, standard (carbon-zinc), rechargerable (Ni Cd, Ni ML, etc.) batteries

To charge batteries in radio:
1. Check to see that the batteries have been
inserted properly.
2. Insert the cable into the charge in each location at
2. Insert the cable into the top of the radio
the top of the radio.
3. Plug the cable into USB-compatible power port
Use only the supplied rechargeable batteries and charger for recharging your Cobra microTALK® radio.
Cobra recommends your radio is turned off while being charged.
Non-rechargeable alkaline batteries can also be used in your radio.
Non reorganizing all-time batteries can also be good in your table.


Operation
Mode Functions
Scrolling Through the Mode Function
Propelling through the Mode function you will be able to
By scrolling through the Mode function, you will be able to select a type an preferred feature of version TALK® vs. We
select or turn on preferred features of your microTALK radio. When scrolling through the Mode function, your radio features
scrolling through the mode function, your radio fan will be displayed in the same predetermined order.

Set CTCSS Privacy Code
Set DCS Privacy Codes
- Set Vox On/Off
• Set Vox Sensitivity
: Set Channel Scan
• Set CTCSS Privacy Code Scan
• Set DCS Privacy Code Scan
Set Call Tones
Set Roger Beep On/Off
Privacy Codes
Vermilion TUK ®
Your microTALK- radio incorporates two advanced coded squelch systems that can help to reduce interference from other years.
systems that can help to reduce interference from other users
on any given channel. CTCSS (Continuous Tone Coded Squelch System) provides 3D privacy codes and PGS (Digitally Coded Squelch)
System) provides 38 privacy codes and DCS (Digitally Coded Squelch)
provides 83 privacy codes. This provides a total of 121 Privacy
Codes. Either system can be used on all channels, but both systems cannot be used on the same channel at the same time.
cannot be used on the same channel at the same

To successfully communicate using a privacy code, both
the transmitting and receiving radios must be tuned to the same
channel and to the same privacy code system (CTCSS or DCS)
and privacy code number. Each channel will rem
last privacy code system and number you select

[Non-Text]

Operation
Mode Functions (continued)
Set CTCSS Privacy Codes

To select a CTCSS privacy code:
- After selecting a channel, press the Mode/Power button until the CTCSS icon appears and the small numbers next to the channel number flash on the display.

If DCS is turned on at the channel selected, the display will flash the CTCSS icon and "OFF." To switch from DCS to CTCSS, press the Channel Up or Channel Down button while the display is flashing "OFF." The display will then show the small numbers flashing and you will then be able to proceed to step 2.
- Press using the Channel Up or Channel Down button to select a
privacy code. You can hold the Up or Down button for fast advance. 3. When your desired CTCSS privacy code is displayed, choose one of the following:
a. Press the Mode/Power button to enter the new setting and proceed to other functions
b. Press the Lock button to return to Standby mode.
c. Do not press any buttons for 15 seconds to return to Standby mode
Set DCS Privacy Codes

To select a DCS privacy code:
- After selecting a channel, press the Mode/Power button until the DCS icon appears and the small numbers flash on the display (00 through 83).

If CTCSS is turned on at the channel selected, the display will flash the DCS icon and "OFF." To switch from CTCSS to DCS, press the Channel Up or Channel Down button while the display is flashing "OFF." The display will then show the small numbers flashing and you will then be able to proceed to step 2.

channel Up or Channel Down button to select a DCS

can hold the Up or Down button for fast advance.

y code is displayed, choose one of the following:

e/Power button to enter the new setting and

er functions.

ny buttons for 15 seconds to enter the new settings
b. Press the Lock button to return to Standby mode. c. Do not press any buttons for 15 seconds to enter the new settings
Voice Activated Transmit (VOX)
In VOX mode, your microTALK ® radio can be used “hands-free,” automatically transmitting when you speak. You can set the VOX sensitivity level to fit the volume of your voice and avoid transmissions triggered by background noise.

To turn VOX mode on or off:

- Press the Mode/Power button until the VOX

icon flashes on the display. The current off or off setting is displayed

- Press the Channel Up or Channel Down

button to turn VOX On or Off.

a. Press the Mode/Power button to enter the

new setting and proceed to other functions.

b. Press the Lock button to return to Standby mode.
891011

To set VOX sensitivity:
- Press the Mode/Power button until the VOX icon

flashes and the current sensitivity level is displayed.

The current VOX sensitivity level is displayed with letters "L" and a Number 1 through 5, with Number 5 being the most sensitive level and Number 1 being the least sensitive level.

displayed with letters "L" and a Number 1 through 5, with Number 5 being the most sensitive level and Number 1 being the least sensitive level.

- Press the Channel Up or Channel Down

button to change the setting

- Choose one of the following:

a. Press the Mode/Power button to enter the

selected setting and proceed to other functions.

b. Press the Lock button to return to Standby mo
Channel Scan
Your microTALK® radio can automatically scan channels.

- Press the Mode/Power button until the

Scan icon and the channel numbers appear

on the display.

- Press the channel up of channel down button to begin scanning channels.

• The following described

The radio ignores specific privacy codes while scanning channels.

The Scan icon will continue to be displayed when

scan is on. Your radio will continue to scan all

channels and stop if an incoming transmission is detected. Your radio will remain on that channel for

5 seconds after the last incoming transmission
During scanning (while receiving an incoming transmission),
you can choose from the following:
a. Press and hold the Talk button to communicate on that channel. Your radio will remain on that channel and return to Standby mode
Your Radio will remain off that channel and return to Standup.
b. Press the Channel scanning channels.
c. Press the Lock butt
c. Press the Lock button to return to Standby
Privacy Code Scan
Your microTALK ® radio can automatically scan the Privacy Codes (either
CTCSS 01 through 38 or DCS 01 through 83) within one channel. Only one act of privacy orders (CTCSS or DCS) can be agreed at a time
one set of privacy codes (CICSS
Select Channel To scan privacy codes:
- While in Standby mode, press the Channel Up or
Channel Down button to choose the code which you wish to sign privacy codes
Which you wish to scan privacy codes


- Press the Channel Up or Channel Down button


During scanning (while receiving an incoming transmission),
you can choose from the following:
a. Press and hold the Talk button to communicate on that channel/
privacy code. Your radio will remain on that channel/privacy code
and return to Standby mode.
b. Press the Channel Up or Channel Down button to
resume scanning privacy codes. If you do not press any button within 5 seconds after the last incoming transmission, your radio will
5 seconds after the last incoming transmission, your radio will automatically resume scanning.
automatically resume scanning.
c. Press the Lock button to return to Standby.
Five Call Tone Settings
You can choose between five different Call Tone Settings to transmit
a call alert.


- See the Mealy OWJ button until the letter "C" and the current call tone numbe
(01 through 05) is displayed. The current
Call Tone Setting call tone will sound for one second.

to hear the other call tone settings.
Power Saver 3. Choose one of the following:
Channel Button a. Press the Mode/Power button to
enter the new setting and proceed
to other functions.
b. Press the Lock button to return to Standby
[Non-Text]
Roger Beep Confirmation Tone
Your listener will hear an audible tone when you release the Talk button.
This alerts the other party that you have finished talking and it is OK for
them to speak.
Mode/Power To turn roger beep on or off:

Roger Beep icon flashes. The current
on or off setting is displayed.
Roger Beep Off 2. Press the Channel Up or Channel Down button
to select roger beep on or off.
- Choose one of the following:
a. Press the Mode/Power
Channel Button return to Standby mode
b. Press the Lock button to return to Standby
22 CM (J)
[Non-Text]
NOAA* All Hazards Radio Channels
You can use your microTALK ® radio to listen to NOAA All Hazards Radio channels transmitting in your area.


*National Oceanographic and Atmospheric Administration
Weather (WX) Alert Mode
Turning On the Weather Alert function will allow your radio to
automatically receive NOAA Hazard Alert radio signals and warnings from
designated NOAA broadcast stations. If the radio is turned ON, it will alert to Weather and other emergency alerts broadcast by NOAA.
to weather and other emergency alerts broadcast by NOAA.




eral Specifications
Frequency Allocation
A = Channel No. for 22 Char
B = Frequency in MHz
C = Power Output



- INTRODUCTION
- MAKING LIFE EASIER AND SAFER
- PRODUCT SERVICE & SUPPORT
- PRODUCT FEATURES
- OPERATION
- MODE FUNCTIONS (CONTINUED)
- SET DCS PRIVACY CODES
- VOICE ACTIVATED TRANSMIT (VOX)
- CHANNEL SCAN
- PRIVACY CODE SCAN
- FIVE CALL TONE SETTINGS
- ROGER BEEP CONFIRMATION TONE
- NOAA* ALL HAZARDS RADIO CHANNELS
- WEATHER (WX) ALERT MODE
- ERAL SPECIFICATIONS
- FREQUENCY ALLOCATION
Marque : COBRA
Modèle : ACXT390
Catégorie : Talkie-walkie