
KP-700 - Système d'alarme Chuango - Notice d'utilisation et mode d'emploi gratuit
Retrouvez gratuitement la notice de l'appareil KP-700 Chuango au format PDF.


| Type de produit | Système d'alarme sans fil |
| Marque | Chuango |
| Modèle | KP-700 |
| Dimensions (L x l x H) | 150 x 100 x 30 mm |
| Poids | 200 g |
| Alimentation | Adaptateur secteur 12V/1A, piles de secours (non incluses) |
| Type de piles de secours | 4 x AAA (non incluses) |
| Consommation électrique | Max 5W |
| Fréquence de communication | 433 MHz |
| Portée de communication | Jusqu'à 100 m en champ libre |
| Fonctions principales | Détection de mouvement, sirène intégrée (110 dB), télécommande, notifications par téléphone, mode nuit |
| Capteurs inclus | 1 détecteur de mouvement, 1 télécommande, 1 sirène |
| Entretien et nettoyage | Nettoyer avec un chiffon doux et sec. Ne pas utiliser de produits chimiques. |
| Sécurité | Cryptage des signaux, protection antisabotage, alarme en cas de tentative d'ouverture |
| Pièces détachées et réparabilité | Capteurs supplémentaires disponibles (détecteurs d'ouverture, de fumée). Réparation par un professionnel agréé. |
| Garantie | 2 ans |
| Certifications | CE, RoHS |
FOIRE AUX QUESTIONS - KP-700 Chuango
Questions des utilisateurs sur KP-700 Chuango
0 question sur cet appareil. Repondez a celles que vous connaissez ou posez la votre.
Poser une nouvelle question sur cet appareil
Téléchargez la notice de votre Système d'alarme au format PDF gratuitement ! Retrouvez votre notice KP-700 - Chuango et reprennez votre appareil électronique en main. Sur cette page sont publiés tous les documents nécessaires à l'utilisation de votre appareil KP-700 de la marque Chuango.
MODE D'EMPLOI KP-700 Chuango

KP-700
Wireless Keypad
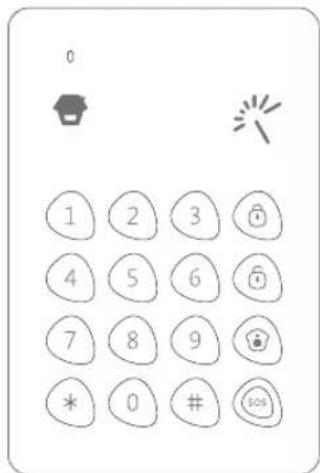
Operation Manual
Please read this manual carefully before using.
Please keep it properly for further reference.
Table of Contents
Introduction
Foreword 1
Package List 2
Product Overview 3-4
Preparation before Use
Power on 5
Connect Keypad to Control Panel 6
Connect RFID Tag to Keypad 6-7
Connect Electronic Door Lock 8
Installation 8
Settings
Enter Setup State 9
Exit Delay 10
Setting for SOS Key 11
Keyboard Tone 12
RFID Reader Setting 13-14
Direct Disarm by RFID Tag 15-16
Change User Code 17
Change Admin Code 18
Reset 19
Usage
Arm 20
Disarm 21
Stay Mode 22
Emergency Call 23
Mute Mode 23
Notices and Maintenance
Usage Notices 24
Maintenance 24
FAQ
FAQ 25
Instructions of Wired Cables Interface
Instructions of Wired Cable Interface 26
Specifications
Specifications 27
Foreword
Thank you for purchasing this wireless keypad. It is recommended to install outside the entry door and users can achieve operations such as arm, disarm, stay mode after inputting passcode. Moreover, the keypad can connect with an electronic door lock to work as an access control system for homes and offices. When users are leaving rooms, just close the door, the electronic lock will be locked automatically. Before entering house, just input the passcode and then press [Disarm ☐] key or put RFID tag purchased separately close to the RFID reader to disarm the system. By this way, the door will be opened easily, which is very convenient.
Package List

Keypad x 1

AAA 1.5V Battery x 3

Manual x 1

Screws x 4

Wired Cable x 1
Product Overview

① RFID tag / card (125KHz) can be purchased separately. Max. 50 pcs are supported.
RFID Tag


① The keypad beeps twice every two seconds and the LED indicator flashes once in case of low battery.
Preparation before Use
Power on
Remove the insulating strip for the first time.
- Keypad uses 3pcs of AAA batteries.
① Loose the screw, open the case
② Put batteries in according to the positive and negative signs
③ Close the rear cover and screw on

natural_image
Line drawing of a handheld electronic device with a blue scroll wheel (no text or symbols)
natural_image
Simple line drawing of a rectangular device with mounting holes and a numbered label (3) in the center, no text or symbols present.
Note: Open the rear cover of keypad will trigger tamper switch, please dismiss the alarm by following the disarm instruction in page 21.
- When connected with electronic door lock as an access control, keypad is suggested to use the specific power supply for access control.
To know connection steps, please refer to the instruction manual of electronic door lock. The electronic door lock and specific power supply for access control should be purchased respectively.
Connect Keypad to Control Panel
Make sure the control panel is in connecting state, input user code ① or admin code ② on keypad, and then press any key of [Arm] [Disarm] [Stay Mode]. The connection succeeds after one beep.
User can remotely control the panel via the keypad after connection.
(For detailed connection steps, please refer to the user manuals of panels.)
Note: If the control panel beeps twice when connecting, it means the keypad has already connected with the panel.
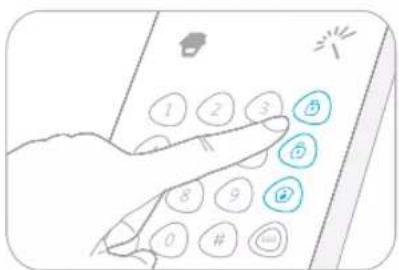
① The default user code is 1234.
⑦ The default admin code is 123456.
Connect Keypad with RFID Tag
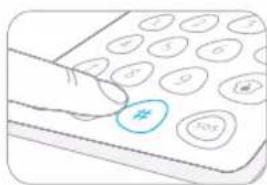
- Input [admin code + #] to wake up keypad.
Three beeps mean wrong input.
Wrong input for 6 times continuously, the keypad will be locked for 20 seconds.
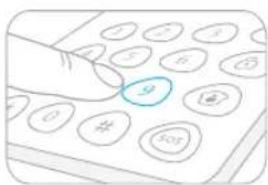
- Press [9], one beep is heard and the LED indicator is on. Keypad enters learning state.
- Put RFID tag close to the RFID reader, the connection succeeds after one beep and the LED indicator goes out.
If two beeps are heard, it indicates the RFID tag has been connected before.

To clear the connection of RFID tags, input [admin code + #] to wake up the keypad and then press down [9] for six seconds. RFID tags are all cleared after one beep.
Connect Electronic Door Lock
To know connection steps, please refer to the instruction manual of electronic door lock.
Installation
Fix the keypad on the door frame or the wall before use.
① Loose the screw, open the case
② Fix the rear cover on the door frame or the wall by screws
③ Fasten the front cover of keypad on the rear cover. Secure two covers into place and then screw on

natural_image
Line drawing of a handheld calculator with a blue mouse pointer (no text or symbols)
natural_image
Diagram of a device panel with a cursor pointing to a button (no text or symbols)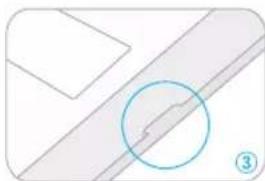
natural_image
Simple line drawing of a diagonal stripe with a circled area, no text or symbols presentNote: Opening the rear cover of keypad will trigger tamper switch, please disarm the alarm by following the disarm instruction in page 21.
Settings
The keypad should enter setup state before all settings.
Enter Setup State
Input [admin code + #] to wake up keypad.

Press [3] to enter setup state, the LED indicator is on.
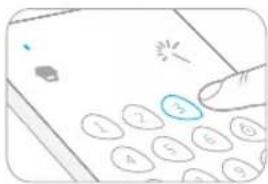
Under setup state, if there is no operation within 10 seconds, the keypad will exit setup state automatically. You can also press [#] to exit.
Exit Delay
The exit delay allows time to leave after arming the system. After the delay time, if you are sill at home, you may trigger an alarm.
This setting does not apply to Stay Mode.
If the delay time of both control panel and keypad are set delay time respectively, the actual delay time is the total of both times.
Exit Delay
Enter setup state, input:
*2* delay time *

When one beep is heard and the LED indicator keeps on for 10 seconds, the setup is successful.
Once the delay time is set, when you arm the keypad, it will beep once every two seconds to remind you to leave. The reminding rhythm will speed up in the last 15 seconds. After the delay time, the control panel enters arm state.
Note: User can input digital 0-250 which refers to 0-250 seconds. Default setting: 0, no delay.
Setting for SOS Key
You can choose to input code before pressing [SOS] key or not. This function is to prevent false operation or trick.
Not Input Code for SOS

When one beep is heard and the LED indicator keeps on for 10 seconds, the setup is successful.
Enable Code SOS

When one beep is heard and the LED indicator keeps on for 10 seconds, the setup is successful.
Note: Default setting: 0, Code SOS is disabled.
Keyboard Tone
Keyboard tone can be turned on or off. If it is off, the successful setup tone will be closed too.
Turn off Keyboard Tone
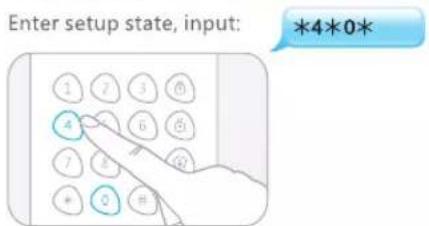
When one beep is heard and the LED indicator keeps on for 10 seconds, the setup is successful.
Turn on Keyboard Tone

When one beep is heard and the LED indicator keeps on for 10 seconds, the setup is successful.
Note: Default setting: 1, turn on the keyboard tone.
RFID Reader Setting
Disable RFID Reader
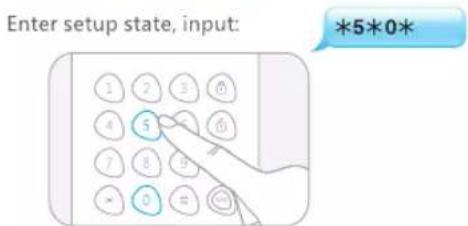
When one beep is heard and the LED indicator keeps on for 10 seconds, the setup is successful.
Enable RFID Reader
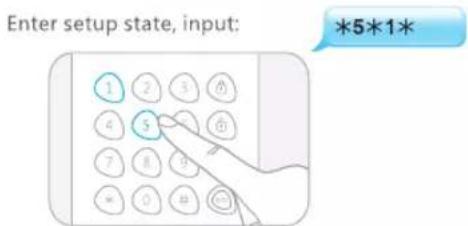
When one beep is heard and the LED indicator keeps on for 10 seconds, the setup is successful.
Press [*] on the keypad and then disaram the system by RFID tag after this function was enabled.
Disarming Silently by RFID Tag
The control panel and siren will hoot twice when disarming by RFID tag. If set disarming silently by RFID tag, the control panel and siren will keep silent to finish disarming without disturbing neighborhood.
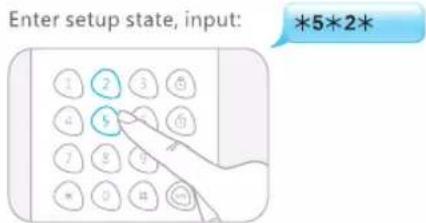
When one beep is heard and the LED indicator keeps on for 10 seconds, the setup is successful.
Note: Default setting: 1, turn on disarm by RFID tag and the siren will hoot when disarming.
Direct Disarm by RFID Tag
When direct disarm by RFID tag is enabled, users can directly present RFID tags to disarm the system and unlock the electrical door locks. However, the function consumes power greatly. It is recommended to disable the function, that is, the keypad is in sleeping state. Users need to press the [*] key before presenting RFID tags.
Disable Direct Disarm by RFID Tag

When one beep is heard and the LED indicator keeps on for 10 seconds, the setup is successful.
Enable Direct Disarm by RFID Tag
If the keypad is powered by DC 12V power, enable this function. User can disarm the system by RFID tag directly, which is more convenient.
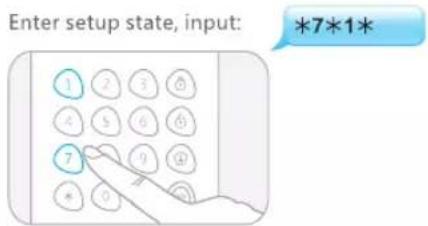
When one beep is heard and the LED indicator keeps on for 10 seconds, the setup is successful.
Note: Default setting: 0, disable the function of direct disarm by RFID tag.
Change User Code
Using user code can wake up keypad, open electronic door lock, or send Arm, Disarm, Stay Mode commands to the control panel.
To avoid passcode reveal, please change user code when first time use.
Change User Code
Enter setup state, input:
*8* new user code*

When one beep is heard and the LED indicator keeps on for 10 seconds, the setup is successful.
Note: User code is 4 digits; default code is "1234".
Change Admin Code
Using admin code can wake up keypad, send Arm, Disarm, Stay Mode commands to the control panel, and also change any settings of the keypad.
To avoid passcode reveal, please change admin code for first time.
Change Admin Code
Enter setup state, input:
*9* new admin code *

When one beep is heard and the LED indicator keeps on for 10 seconds, the setup is successful.
Note: Admin code is 6 digits; default code is "123456".
Reset
After reset, the user code, admin code, and other settings will restore to default except that the connected RFID tags can still disarm and open electronic door lock.

When one beep is heard and the LED indicator keeps on for 10 seconds, the setup is successful.
Usage
Working with an alarm control panel, the keypad is more secure than the remote control. User code or admin code should be input before the operation of Arm, Disarm, Stay Mode, and Mute Mode.
Arm
Input user code or admin code, and press [Arm] key, the LED indicator flashes once and the keypad beeps once and sends [Arm] command to the control panel.
When the alarm panel receives the signal, the siren will beep once and the [Arm] indicator will light on. The alarm system enters armed state.

If there is an intrusion, the alarm system will be triggered, the siren will hoot and the control panel will send SMS and auto dial to pre-stored phone numbers to notify users. (SMS notification is applicable only for GSM alarm systems.)
Disarm
Users can disarm alarm system by using keypad or by using RFID tags.
Using Keypad to Disarm
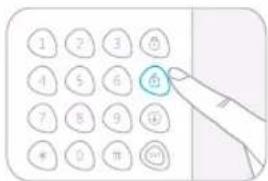
Input user code or admin code, and press [Disarm] key, the LED indicator flashes once and the keypad beeps once and sends [Disarm] command to the control panel.
When the alarm panel receives the signal, the siren will beep twice and the Disarm indicator will light on, the alarm system enters disarmed state. In this state, the sensors being triggered will not cause an alarm.
Using RFID Tag to Disarm
If direct disarm by RFID tag is disabled, user needs to press [*] to wake up the keypad and then put RFID tag close to the reader to disarm and unlock the door.
If direct disarm by RFID tag is enable, user can put RFID tag close to the reader to disarm and unlock the door directly.
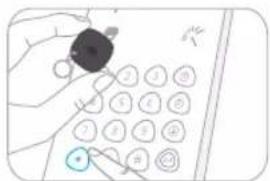
Stay Mode
Input user code or admin code, and press [Stay Mode] key, the LED indicator flashes once and the keypad beeps once and sends [Stay Mode] command to the control panel.
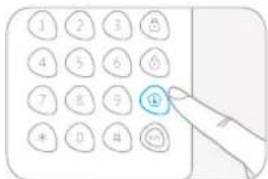
When the alarm panel receives the signal, the siren will beep once and the [Stay Mode] indicator will light on, the alarm system enters stay mode state.
All the sensors in other zones are armed to prevent the intruder except that the motion detector in Home Mode Zone is disarmed, so that people can move freely at home.
Emergency Call
If not inputting code for SOS is set, user just holds the [SOS] key for 3 seconds, the LED indicator flashes once, the keypad beeps once, and the control panel alarms immediately.

If inputting code for SOS is set, user needs to input user code or admin code before holding the [SOS] key for 3 seconds to send an alarm.
Mute Mode
Mute mode means that the LED indicators of control panel flash, but the siren does not beep, to avoid disturbing the neighborhood.
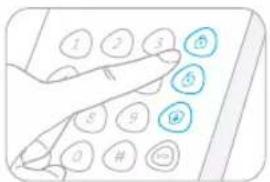
Input user code or admin code, and hold any key of [Arm] [Disarm] [Stay Mode] for 2 seconds, the LED indicator flashes once, the keypad beeps once and sends corresponding command to the control panel.
When the alarm panel receives the signal, the LED indicator lights on or off, but the siren does not beep.
Notices and Maintenance
In order to avoid any harm to the users or others during usage and prolong the usage life, please abide by the following notices.
Usage Notices
| General instruction |
| The keypad should be connected to control panel before use. |
| The power supply of keypad will probably impact on the transmitting distance of wireless signal. |
| The keypad can be powered by 3 pcs of AAA batteries, or wired by DC 12V. |
| The keypad is compatible for any our alarm system. |
| Please remove the battery insulating strip before use. |
| Do not press SOS key if there's no emergency to avoid disturbing the neighborhood. |
| Check the keypad regularly to ensure the system works properly in case of emergency. |
| The keypad is neither waterproof nor moisture-proof, please install it in a shady, cool and dry place. |
| The case of keypad is made of ABS. Please keep it away from strong light to ensure the lifetime. |
| Forbiddance |
| The keypad is non explosion-proof. Please keep it away from fire, flame sources. |
| Install the keypad away from objects such as heater, air conditioner, microwave oven etc. that produces heat or electric-magnetic. |
| Forbiddance of decomposition |
| Take the keypad for disposal of recycling according to the local regulation. |
| Do not take apart the product if you are not a professional technician. |
Maintenance
You can get most dust or fingerprint off with a dry, soft cloth or tissue. If there is dirt on the keypad, please wipe the surface by a soft cloth with a little dilute alkaline detergent and then wipe again with a dry cloth.
FAQ
| Problem | Cause | Solution |
| No response from keypad | Low battery | Please change the battery |
| The positive and negative terminals are reversed | Follow the right terminal direction and insert the battery again | |
| Keypad is locked by inputting wrong passcode continually more than 6 times | Keypad will be unlocked after non-operation for 20 seconds | |
| Keypad cannot connect to control panel | No response from alarm panel | Make sure the alarm panel is powered on |
| Make sure the alarm panel enters learning state | ||
| Alarm panel beeps twice | Keypad has been learned | |
| No response from the control panel by operating on keypad | Keypad is not learned to control panel | Please connect the keypad to the control panel by following the manual instruction |
| Distance between keypad and control panel is too far | Please move the keypad in a proper distance where control panel can receive the signal of keypad | |
| It's recommended to buy signal repeater to extend the distance | ||
| Cannot disarm by RFID Tags | The RFID tags are not learned to keypad | Please connect the RFID tag to control panel by following the manual instruction |
| Disarm by RFID tag function is deactivated. | Enter setup state and activate the function of disarm by RFID tag | |
| Direct disarm by RFID tag is disabled. | Disarm after pressing [*] key | |
| Keypad cannot be programmed | Keypad is not waked up | Please input [admin code+#] to wake up the keypad |
| Keypad doesn't enter setup state | Please input [admin code+#], and press [3] to enter setup state | |
| Keypad cannot be armed, disarmed and in stay mode | Haven't input user code or admin code before operation | Please input the user code or admin code before operation |
Instructions of Wired Cables Interface (from Left to Right)
+12V (RED WIRE):
Positive of power
GND (BLACK WIRE):
Negative of power
PUSH (YELLOW WIRE):
Signal output for electronic lock
GND (WHITE WIRE):
Negative of power
OPEN (GREEN WIRE):
Signal input for exit switch
Specifications
Product Name:
Keypad
Model No.:
KP-700
Power Supply:
3 pcs of AAA batteries or DC 12V
Static Current:
< 20uA (powered by batteries)
Transmitting Current:
< 24mA
RFID Tags Supported:
50pcs
Transmitting Distance:
< 80m ( in open area)
Radio Frequency:
315MHz or 433.92MHz
*Only 433.92 MHz is available for Europe
ERP (dBm).MAX:
-13.55
Housing Material:
ABS plastic
Operating Condition:
Temperature: 0°C to 50°C
Relative Humidity: < 90% (non-condensing)
Dimensions:
135×90×15mm
Net Weight:
90g

CE Declaration of Conformity
Hereby, Chuango AloT GmbH declares that the radio equipment type KP-700 Wireless Keypad is in compliance with Directive 2014/53/EU. The full text of the EU declaration of conformity is available at the following internet address: https://www.chuango.com/english/compliance_KP-700

INFORMATION FOR THE USERS
At the end of its life, the device has to be separated from the other waste. Consign the device and all its components together to a center of electronic and electrotechnical waste recycling center, designated by your local authorities.

2006/66/EC and its amendment 2013/56/EU (battery directive). This product contains a battery that cannot be disposed of as unsorted municipal waste in the European Union. See the product documentation for specific battery information. The battery is marked with this symbol, which may include lettering to indicate cadmium (Cd), lead (Pb), or mercury (Hg). For proper recycling, return the battery to your supplier or to a designated collection point. For more information see: www.recyclethis.info.




- KP-700
- Wireless Keypad
- Operation Manual
- Table of Contents
- Introduction
- Preparation before Use
- Settings
- Usage
- Notices and Maintenance
- FAQ
- Instructions of Wired Cables Interface
- Specifications
- Foreword
- Package List
- Product Overview
- Power on
- Connect Keypad to Control Panel
- Connect Keypad with RFID Tag
- Connect Electronic Door Lock
- Installation
- Enter Setup State
- Exit Delay
- Setting for SOS Key
- Keyboard Tone
- RFID Reader Setting
- Disable RFID Reader
- Enable RFID Reader
- Disarming Silently by RFID Tag
- Direct Disarm by RFID Tag
- Enable Direct Disarm by RFID Tag
- Change User Code
- Change Admin Code
- #
- Reset
- Arm
- Disarm
- Using Keypad to Disarm
- Using RFID Tag to Disarm
- Stay Mode
- Emergency Call
- Mute Mode
- Maintenance
- Instructions of Wired Cables Interface (from Left to Right)
- CE Declaration of Conformity
- INFORMATION FOR THE USERS
Marque : Chuango
Modèle : KP-700
Catégorie : Système d'alarme