Apollo MS-RA670 - Radio VHF marine Fusion - Notice d'utilisation et mode d'emploi gratuit
Retrouvez gratuitement la notice de l'appareil Apollo MS-RA670 Fusion au format PDF.


| Marque | Fusion |
| Modèle | Apollo MS-RA670 |
| Type de produit | Radio VHF marine fixe |
| Dimensions (L x H x P) | 188 x 66 x 127 mm |
| Poids | 1,0 kg |
| Alimentation | 12 V CC |
| Classe de protection | IPX7 (étanche à 1 mètre pendant 30 minutes) |
| Puissance d'émission | 25 W (réglable sur 1 W) |
| Canaux | VHF maritime (USA, International, Canada) |
| Fonctions principales | DSC (Appel sélectif numérique), réception météo NOAA, balayage des canaux, double veille, verrouillage des touches |
| Affichage | Écran LCD avec rétroéclairage réglable |
| Connectivité | Antenne (SO-239), haut-parleur externe, microphone, entrée NMEA 0183 |
| Entretien et nettoyage | Nettoyer avec un chiffon doux et humide. Ne pas utiliser de solvants. Rincer à l'eau douce après usage en milieu salin. |
| Sécurité | Respecter les réglementations maritimes. Ne pas transmettre sans licence appropriée. Utiliser le canal 16 pour les appels de détresse. |
| Pièces détachées et réparabilité | Antenne, micro, câble d'alimentation disponibles. Réparation par centre agréé. Garantie 2 ans. |
| Informations générales | Radio VHF marine à usage nautique. Conforme aux normes RTCM et FCC. Température de fonctionnement : -20°C à 60°C. |
FOIRE AUX QUESTIONS - Apollo MS-RA670 Fusion
Questions des utilisateurs sur Apollo MS-RA670 Fusion
0 question sur cet appareil. Repondez a celles que vous connaissez ou posez la votre.
Poser une nouvelle question sur cet appareil
Téléchargez la notice de votre Radio VHF marine au format PDF gratuitement ! Retrouvez votre notice Apollo MS-RA670 - Fusion et reprennez votre appareil électronique en main. Sur cette page sont publiés tous les documents nécessaires à l'utilisation de votre appareil Apollo MS-RA670 de la marque Fusion.
MODE D'EMPLOI Apollo MS-RA670 Fusion
FUSON®
Apollo™ RA670 Retrofit Kit Installation Instructions
Important Safety Information
WARNING
Failure to follow these warnings and cautions could result in personal injury, damage to the vessel, or poor product performance.
See the Important Safety and Product Information guide in the stereo box for product warnings and other important information.
This device must be installed according to these instructions.
Disconnect the vessel's power supply before beginning to install this product.
CAUTION
Always wear safety goggles, ear protection, and a dust mask when drilling, cutting, or sanding.
NOTICE
When drilling or cutting, always check what is on the opposite side of the surface.
You must read all installation instructions before beginning the installation. If you experience difficulty during the installation, contact FUSION® Product Support.
What's In the Box
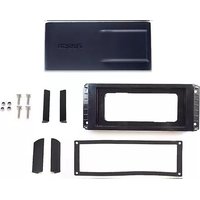
- Adapter plate
- Adapter plate mounting gasket
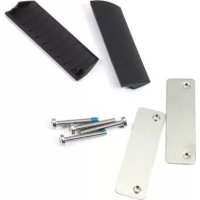
• Eight 8-gauge, self-tapping screws - Two pairs of screw covers
- Dust cover
- Template
Tools Needed
- Rotary cutting tool, utility knife, or file
- Phillips screwdriver
- Silicone-based marine sealant (optional)
Mounting Considerations
You can use this kit to install a FUSION Apollo RA670 stereo in a single-DIN opening or to replace a previous FUSION stereo, such as a MS-UD/AV650/755 stereo.
To allow for clearance of the screws from the stereo to the mounting plates, you may need to remove some existing material from the dashboard by following these installation instructions.
NOTE: You must use the dust cover included with this retrofit kit when installing the Apollo RA670 stereo with this kit.
Installing the Stereo Using the Retrofit Mounting Kit
1 If necessary, remove the existing stereo from the dashboard, and clean the surface of any existing gaskets or marine sealant.
2 Place the included template over the opening and observe the location of the mounting holes in relation to the existing opening on the dashboard.
3 If necessary, mark and drill the pilot holes.
4 Place the adapter plate cover the opening to verify the cutout clearance and the pilot hole locations.

5 If necessary, use a file to refine the shape or size of the cutout, and mark and drill new pilot holes.
6 Follow the installation instructions included with the stereo to make the necessary wiring connections through the dashboard.
7 Select an option:
- If you are installing the stereo in a dry location, place the adapter plate gasket (included in the retrofit kit) on the back of the adapter plate.
- If you are installing the stereo in a location that is exposed to water, apply silicone-based marine sealant on the mounting surface around the cutout.
NOTICE
Do not install the gasket if you applied sealant to the mounting surface. Using sealant and the mounting gasket may reduce water resistance.
8 Secure the adapter plate to the dashboard using the included screws ③
9 Select an option:
- If you are installing the stereo in a dry location, place the stereo gasket (included in the stereo box) on the back of the stereo plate.
- If you are installing the stereo in a location that is exposed to water, apply silicone-based marine sealant on the adapter plate.
NOTICE
Do not install the gasket if you applied sealant to the mounting surface. Using sealant and the mounting gasket may reduce water resistance.
10 Secure the stereo to the adapter plate using the included screws ⑤
11 Snap the screw covers into place on the sides of the adapter plate.
12 Snap the screw covers into place on the sides of the stereo.
NOTE: If you are replacing a previous stereo, you must use the included screw covers when installing the stereo using this kit. The screw covers included with the stereo are smaller, and do not visually cover the screw holes from the previous stereo installation.
© 2019 Garmin Ltd. or its subsidiaries
Garmin ® , FUSION ® , and the Fusion logo are trademarks of Garmin Ltd. or its subsidiaries, registered in the USA and other countries. Apollo ™ is a trademark of Garmin Ltd. or its subsidiaries. These trademarks may not be used without the express permission of Garmin.

Marque : Fusion
Modèle : Apollo MS-RA670
Catégorie : Radio VHF marine