
Prima Bit DMI - Autoradio AUDISON - Notice d'utilisation et mode d'emploi gratuit
Retrouvez gratuitement la notice de l'appareil Prima Bit DMI AUDISON au format PDF.


| Type de produit | Interface audio numérique pour autoradio (processeur DSP) |
| Marque | Audison |
| Modèle | Prima Bit DMI |
| Dimensions (L × l × H) | Environ 118 × 72 × 30 mm |
| Poids | Environ 150 g |
| Alimentation | 11-15 V DC, consommation maximale 1 A |
| Entrées audio | 1 entrée optique Toslink, 1 entrée coaxiale S/PDIF |
| Sorties audio | 2 sorties RCA stéréo (avant/arrière) |
| Résolution audio | Jusqu'à 24 bits / 96 kHz |
| Fonctions principales | Conversion numérique-analogique, filtrage passe-bas, réglage de niveau, décodeur Dolby Digital 5.1 (en option) |
| Compatibilité | Autoradios avec sortie numérique (optique ou coaxiale) |
| Installation | Montage dissimulé, connecteurs fournis |
| Entretien et nettoyage | Nettoyer avec un chiffon doux et sec, éviter les solvants |
| Sécurité | Protection contre les inversions de polarité et les courts-circuits |
| Pièces détachées et réparabilité | Indice de réparabilité estimé : 7/10 (connecteurs standards, pas de soudure nécessitant un expert) |
| Température de fonctionnement | -20 °C à +60 °C |
FOIRE AUX QUESTIONS - Prima Bit DMI AUDISON
Questions des utilisateurs sur Prima Bit DMI AUDISON
0 question sur cet appareil. Repondez a celles que vous connaissez ou posez la votre.
Poser une nouvelle question sur cet appareil
Téléchargez la notice de votre Autoradio au format PDF gratuitement ! Retrouvez votre notice Prima Bit DMI - AUDISON et reprennez votre appareil électronique en main. Sur cette page sont publiés tous les documents nécessaires à l'utilisation de votre appareil Prima Bit DMI de la marque AUDISON.
MODE D'EMPLOI Prima Bit DMI AUDISON
audison
Quick Start Guide bit DMI
Italiano / Italian English / English
Prima di procedere all'installazione leggete con attenzione tutte le indicazioni riportate di seguito. E' opportuno prestare attenzione alle indicazioni riportate. La mancata osservanza di tali istruzioni potrebbe causare lesioni involontarie o danni all'apparecchio.
AVVERTENZE GENERALI
- Verificare la compatibilità del bit DMI con la propria autovettura consultando la sezione Browse Vehicle Compatibility digitando "http://www.audison.eu/bitdmi".
- Scaricare dalla sezione PC Software digitando "http://www.audison.eu/bitdmi", il software necessario per la configurazione del bit DMI e installarlo nel proprio PC.
- Scaricare dalla sezione Firmware upgrade digitando "http://www.audison.eu/bitdmi" il file necessario per l'aggiornamento del bit DMI, tramite PC Software
- Verificate che l'impianto elettrico del veicolo abbia una tensione di alimentazione di 12VDC con negativo a massa.
- Non realizzate alcun tipo di installazione all'interno del vano motore ed in posizioni esposte ad acqua, umidità eccessiva, polvere e sporco o che interferisca con dispositivi meccanici o elettrici della vettura.
- Installate il bit DMI in zone del veicolo ove la temperatura non scenda sotto gli 0°C (32°F) e non ecceda i 55°C (131°F).
- Assicurarsi che i cavi siano adeguatamente fissati per tutta la lunghezza e che la guaina protettiva, utilizzata per proteggere i contatti, sia di tipo autoestinguente alla fiamma. Bloccare i cavi in prossimità dei terminali
- Posizionare l'interruttore "BY-PASS" in una zona della vettura facilmente raggiungibile durante le operazioni di manutenzione dell'autovettura.
COME COLLEGARE il bit DMI
- Prima di procedere con l'installazione del bit DMI, assicurarsi che la sorgente e tutti gli apparati elettronici del sistema audio della vettura siano spenti, per evitare qualsiasi possibile danno.
- Fate passare un cavo di alimentazione specifico e del diametro adeguato (16 AWG, ∅ 1.5mm/0.059") dalla batteria al bit DMI.
- Applicare un porta fusibile isolato a non più di 20 cm dal morsetto positivo della batteria e collegare su di esso il cavo di alimentazione proveniente dal bit DMI. Utilizzare un fusibile da 3A.
- Collegare i terminali di alimentazione facendo attenzione alla polarità di connessione. Collegare prima il terminale (-) al telaio dell'autovettura, poi il terminale (+) al cavo proveniente dalla batteria.
- INPUT MOST: Collegare il cavo fibra ottica "MOST" fornito nella confezione, come indicato nella sezione "DIAGRAM CONNECTIONS".
- OPTICAL OUT: Collegare tramite cavo ottico con terminazione Toslink a dispositivi Audison dotati di ingresso digitale ottico S/PDIF (bit One, bit Ten D, AP bit Prima, Audison TH Thesis). Tale ingresso sarà selezionabile tramite DRC o tramite terminale di Enable dove presente (bit Ten D, AP bit Prima).
ATTENZIONE: Codifiche audio surround multicanale DOLBY DIGITAL (AC3), DTS o altre tecnologie proprietarie, provenienti da sorgenti A/V (come ad esempio l'audio di un film in DVD), non possono essere decodificate. Il formato audio di uscita di tali sorgenti dovrà quindi essere configurato in modalità STEREO, dove disponibile attraverso il menu impostazioni audio del sistema di multimediale, per essere riprodotto.
-
ACCENSIONE: Il bit DMI si accende automaticamente all'accensione dell'autovettura. All'accensione fornirà un segnale in uscita (REM OUT) per l'accensione di dispositivi collegati al sistema (bit One, bit Ten D, AP bit Prima, TH Thesis), opportunamente settati in funzione del sistema audio.
-
PC SOFTWARE: Collegare il PC al bit DMI utilizzando il cavo USB fornito in dotazione, per intervenire nel settaggio del dispositivo in funzione della vettura utilizzata. Accendere il quadro della vettura e lanciare il PC Software"Audison bit DMI Updater" precedentemente installato nel desktop del proprio PC. Seguire la procedura di setup riportata nella sezione"PC CONFIGURATION". Al termine della procedura di setup chiudere tutte le portiere della vettura e di seguito le chiussure di sicurezza. Attendere 20 minuti prima di zianpire la vettura ed accendere il sistema audio.
-
BY PASS: Il bit DMI può essere reso "invisibile" al sistema MOST di serie attraverso una semplice operazione che lo pone in modalità "BY-PASS". La modalità BY-PASS è consigliata quando il veicolo deve subire un intervento di assistenza presso un'officina autorizzata per evitare che la diagnostica dell'auto rilevi il bit DMI come "intruso" e generi un errore durante l'intervento. Dettivono la modalità "BY-PASS" non con le spesa
Per attivare la modalità "BY-PASS" procedere come segue:
a. Per bit DMI con HW precedente la rev. R03 a sistema acceso e funzionante agire sull'interruttore "BY-PASS" portandolo velocemente in posizione 1 ed 0 per 5 volte consecutivamente.
L'audio si interromperà, questa è l'indicazione dell'attivazione della modalità "BY-PASS".
Per disattivare la funzione "BY-PASS" ripetere gli stessi passi della procedura di attivazione, l'audio ricomparirà subito dopo la disabilitazione della funzione.
b. Per bit DMI con HW uguale o superiore la rev. R03 la funzione BY-PASS può essere attivata/disattiva tramite software (vedi PC Configuration).
ATTENZIONE: la funzione BY-PASS viene tenuta in memoria anche se si spegne e riaccende il veicolo o il sistema audio infinite volte, quindi la sua attivazione è permanente fino alla disattivazione.

SAFE SOUND
UTILIZZATE EQUILIBRIO E BUON SENSO NELL'ASCOLTO; RICORDATE CHE PROLUNGATE ESPOSIZIONI AD UN LIVELLO ECCESSIVO DI PRESSIONE ACUSTICA POSSONO PRODURRE DANNI AL VOSTRO UDITO. LA SICUREZZA DURANTE LA GUIDA DEVE RESTARE SEMPRE AL PRIMO POSTO.

Informazioni per lo smaltimento di apparecchiature elettroniche ed elettriche (per i paesi europei che dispongono di sistemi di raccolta separata). I prodotti contrassegnati con il simbolo del contenitore per rifiuti su ruote barrato da una X non possono essere smaltiti insieme ai normali rifiuti domestici. Questi prodotti elettrici ed elettronici devono essere riciclati presso una struttura adeguata, in grado di trattare i prodotti stessi e i loro componenti. Per conoscere dove e come recapitare tali prodotti nel centro più vicino, contattare l'apposito ufficio comunale. Il riciclaggio e lo smaltimento corretto contribuise a tutelare l'ambiente e ad evitare effetti dannosi alla salute.
audison
Quick Start Guide bit DMI
Before installing the components, please carefully read all of the following instructions.
It is advisable to carefully follow the highlighted instructions. Failure to respect these instructions may cause unintentional harm or damage to the device.
SAFETY CONSIDERATIONS
- Verify compatibility of the bit DMI with your vehicle referring to the Browse Vehicle Compatibility section and typing
"http://www.audison.eu/bitdmi". - Download the software required to configure the bit DMI from the PC Software section by typing "http://www.audison.eu/bitdmi".
- Download the software and install it on your PC.
- Download the file required to upgrade the bit DMI via the PC Software from the Firmware upgrade section by typing "http://www.audison.eu/bitdmi"
- Make sure your car has 12 VDC voltage negative ground electric system
- Do not carry out any installation inside the engine compartment or in areas exposed to water, excessive humidity, dust or dirt or if it interferes
- Install the bit DMI in parts of the vehicle where the temperature does not drop below 0°C (32°F) and does not exceed 55°C (131°F).
- Make sure all the cables are properly secured all along their length. Also, make sure their outer protective jacket is flame resistant and self
extinguishing. Secure the connected cables close to the terminal blocks with wire ties or clamps. - Set the "BY-PASS" switch in a part of the vehicle where it can be easily reached while performing maintenance on the vehicle.
HOW TO CONNECT THE bit DMI
- Before installing the bit DMI, turn off the source and all other electronic devices in the audio system to prevent possible damage.
- Run a specifically designed power wire with proper diameter ( 0.15m ± 0.050° , 16AWG) from the battery location to the bit DMI.
- Run a specifically designed power wire with proper diameter ( φ 1.5mmx0.059 - 16AWG) from the battery location to the bit DMI.
- Apply an isolated fuse holder not more than 20 cm away from the battery positive terminal and connect the power cable from the bit DMI to it.
Use a 3A fuse. - Connect the power supply terminals paying attention to the connection polarity. First connect the (-) terminal to the chassis of the vehicle and then the (+) terminal to the ball for which it is
then the (+) terminal to the cable from the battery. - INPUT MOST Connect the "MOST" optical fibre gel
- INPUT MOST: Connect the "MOST" optical fibre cable supplied in the package as described in the DIAGRAM CONNECTIONS section.
- OPTICAL OUT: Use an optical cable with a Toslink end to connect to Audicon devices fitted with an S/PDIE optical digital input.
- OP TICAL OUT. Use an optical cable with a Toshink end to connect to Audison devices fitted with an S/P DIP optical digital input (bit One, bit Ten D, Prima AP bit, Audison Thesis TH). This input can be selected via DRC or via an Enable terminal, if any (bit Ten D, Prima AP bit).
WARNING: DOLBY DIGITAL (AC3), DTS or other proprietary multichannel sound-surround codecs, coming from A/V sources (such as the audio of a movie in DVD), cannot be decoded. The output audio format of these sources must be set in STEREO mode, where available through the infotainment's audio settings menu, to be reproduced.
- TURN-ON: The bit DMI automatically turns on when the vehicle is started. When it is turned on, it will provide an output signal (REM OUT) to turn on the drive button to the system (bit 2, bit 1, 2, 3, 4, 5, 6, 7, 8, 9, 10, 11, 12, 13, 14, 15, 16, 17).
turn on the devices connected to the system (bit One, bit Ten D, Prima AP bit, Thesis TH) and properly set according to the audio system. 8. PC SOFTWARE: Connect the PC to the bit DMI using the USB cable supplied to set the device according to the vehicle used. Switch the vehicle
panel on and launch the "Audison bit DMI Updater" PC Software previously installed on your PC desktop. Follow the set-up procedure described in the "PC CONFIGURATION" section. Once the set-up is complete, close all the doors of the vehicle and then the safety locks. Wait 20 minutes before opening the vehicle again and switching the audio system on. - BY PASS: bit DMI can be made "invisible" to the OEM MOST system through a simple operation making it work in "BY-PASS" mode. The BY-PASS mode is recommended when a vehicle needs to be serviced at an authorized car service centre, to avoid the car diagnostic detects the bit DMI as "intruder", so generating an error during the operation.
To activate the "BY-PASS" mode, you should proceed as follows:
a. For bit DMI with HW version prior to rev. R03 with the system turned on and working, operate on the "BY-PASS" switch by moving it foot from position 1 to 9 and back for 5 times in a row.
The audio will interrupt, thus indicating that the "BY-PASS" mode activated.
To disable the "BY-PASS" function, repeat the same steps as described in the activation procedure; the audio will come back as soon as
b. For bit DMI with HW versione qual to or greater than rev. B03 the BY-PASS function can be enabled/disabled using the software (see PC Configuration).
WARNING: the BY-PASS function is stored in the memory even if the vehicle or the audio system is turned off and on endless times, so it will stay permanently activated until it is disabled.

SAFE SOUND
USE COMMON SENSE AND PRACTICE SAFE SOUND. PLEASE REMEMBER THAT LONG EXPOSURE TO EXCESSIVELY HIGH SOUND PRESSURE LEVELS MAY DAMAGE YOUR HEARING. SAFETY MUST BE AT THE FOREFRONT WHILE DRIVING.

Information on electrical and electronic equipment waste (for those European countries which organise separate collection of waste) Products which are marked with a wheeled bin with an X through it can not be disposed of as ordinary domestic waste. These electrical and electronic products must be recycled in proper facilities, capable of managing the disposal of these products and their components. To find out where and how to deliver these products to your nearest recycling/disposal site, please contact your local council office. Recycling and disposing of waste in a proper way contributes to the protection of the environment and prevents harmful effects to health.

DIAGRAMS CONNECTIONS
![graph TD A["OTHER DEVICES (if any)"] --> B["OEM DVD/CD CHANGER (if any)"] B --> C["OEM HEADUNIT"] C --> D["OME AMPLIFIER (if any)"] D --> E["OEM DVD/CD CHANGER (if any)"] E --> F["OEM HEADUNIT"] F --> G["Other DEVICES (if any)"] G --> H["OEM AMPLIFIER (if any)"] H --> I["OEM DVD/CD CHANGER (if any)"…](/content/2026/06/1368102/images/be9c58def2f8b3452324865f00008ffda14571a9f1d5d611458e3184bedaa944.jpg)
QUICK
START
GUIDE
bit DMI
audison
Power Supply
| Voltage | 8 ÷ 18 VDC |
| Idling current | 150 mA |
| Switched off | < 5 mA |
| Remote IN | Automatic turn On/Off via MOST |
| Remote OUT | 12 VDC (200 mA) |
Input Stage
| MOST optical input | MOST IN/OUT socket connector |
Output Stage
| TOSLINK optical output | S/PDIF max 48 kHz/16 bit PCM STEREO |
Control Connection
| From / to personal computer | 1 x USB Mini B to A (2.0) |
General Requirements
| PC connection | USB-A socket (1.1/2.0/3.0) |
| Software / PC requirements | Microsoft Windows (32/64 bit):XP, Vista, Windows 7 / 8 / 10 |
| Graphic card min. resolution: | 800 x 600 |
| Ambient temperature range Operating: | -40 °C to 85 °C(-40°F to 185°F) |
Size
| W x H x D (mm / in.) | 141,5 x 36,5 x 86,5 / 5.57 x 1.43 x 3.40 |
| Weight (kg / lb.) | 0,26 / 0.573 |
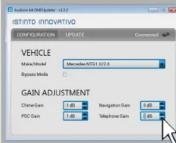
Set your car's infotainment volume levels, then close the software.
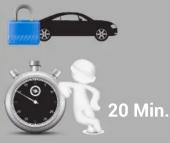
Close all the doors of the vehicle and then the safety locks. Wait 20 minutes before opening the vehicle again and switching the audio system on.

Flag "Bypass mode" only in the event of interventions in a garage, to exclude the audio system and any diagnostic errors.
bit Drive and Update

Select the items available from the bit Drive portal or "Check for Updates" to check for any updates available.

Select "Update FW" to update the bit DMI FW, previously downloaded.
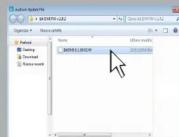
Select from the PC the FW file previously saved.

Wait for the update to end, then repeat the operations for the system configuration.

Marque : AUDISON
Modèle : Prima Bit DMI
Catégorie : Autoradio