Octagon 98 - Tente COLEMAN - Notice d'utilisation et mode d'emploi gratuit
Retrouvez gratuitement la notice de l'appareil Octagon 98 COLEMAN au format PDF.


| Type de produit | Tente de camping familiale |
| Forme | Octogonale |
| Capacité | 4 à 6 personnes |
| Dimensions au sol | 300 x 300 cm environ |
| Hauteur intérieure | 200 cm |
| Poids | 10 kg environ |
| Matériau du double-toit | Polyester enduit de polyuréthane |
| Indice d'imperméabilité | 3000 mm |
| Matériau de l'arceau | Fibre de verre |
| Type d'ouverture | Fermeture éclair sur les deux côtés |
| Ventilation | Ouvertures en haut des parois |
| Entretien et nettoyage | Nettoyer à l'eau tiède, sécher complètement avant rangement |
| Sécurité | Ne pas utiliser de flammes nues à l'intérieur |
| Pièces détachées et réparabilité | Arceaux, piquets et housse disponibles |
| Garantie | 2 ans |
FOIRE AUX QUESTIONS - Octagon 98 COLEMAN
Questions des utilisateurs sur Octagon 98 COLEMAN
0 question sur cet appareil. Repondez a celles que vous connaissez ou posez la votre.
Poser une nouvelle question sur cet appareil
Téléchargez la notice de votre Tente au format PDF gratuitement ! Retrouvez votre notice Octagon 98 - COLEMAN et reprennez votre appareil électronique en main. Sur cette page sont publiés tous les documents nécessaires à l'utilisation de votre appareil Octagon 98 de la marque COLEMAN.
MODE D'EMPLOI Octagon 98 COLEMAN
DO NOT PRINT THIS PAGE
Printing Notes:
Material: White washable and tear resistant non-woven fabric, such as Tyvek.
Ink: Black
Resolution: 150 DPI or above
Printing method: Offset Printing
Size: 8.27 x 11.29(A4) in (W x H)
| This drawing contains proprietary information and trade secrets of The Coleman Company, Inc. Unauthorized use or copying is prohibited. | |||||||||
| METRIC [INCH] | |||||||||
| CRITICAL DIMENSION CHECKING IS COMPULSORY | |||||||||
| VOLUME | cm3 | 01 | 27-SEP-13 | NEW | Abby K | 20031793 | |||
| MASS | grams | REV | DATE | MODIFICATIONS | NAVE | SON NO. | |||
| DENSITY | g/cm3 | MATERIAL SEE NOTES | The Coleman Company, Inc.Wichita, Kansas USA 67219 | ||||||
| GENERAL TOLERANCES EXCEPT AS NOTED | FISH SPEC: SEE NOTES | COMPOSITE- NO | SHEET 1 OF 1 | ||||||
| 0 TO 6mm = ±0.1>6 TO 30mm = ±0.2>30 TO 80mm = ±0.3>80 TO 180mm = ±0.4>180mm = ±0.5ANGULAR = ±3° | SCALE: DATE DRAWN BY APPROVED BY REVISION1:1 27-SEP-13 Abby K ID | 01 | |||||||
| NAME: Instruction for Octagon 98 - Half Rainfly | INITNO.: 4010024931 | ||||||||
TENT SETUP INSTRUCTIONS
Tent Octagon 98 - Half Rainfly
(The product may look different from yours. It is for illustration purpose only.)
Before you begin
- Read all instructions before set up.
- Select a level site clear of rocks, branches, and other hard or sharp objects, to install your tent.
⚠ WARNING: Keep clear of overhead power lines.
- Do not set up your tent under trees because of potential lightning strikes or falling tree limbs in inclement weather.
- Secure with all stakes and guylines provided to prevent property damage or personal injury.
- For best results in windy conditions, position narrow end of tent into the wind.
- Enlist the help of at least one other person to assist you when it is time to assemble the tent.
Pole Descriptions
| No. | Description | Qty. | Pole Repair Kit | Pole Replacement Kit |
| 1 | Awning Pole, fiberglass, black, thick | 2 | 5010000569 | 5010000568 |
| 2 | Steel Roof Pole, steel, gray | 8 | N/A | N/A |
| 3 | Steel Leg Pole, steel, gray | 8 | N/A | N/A |
1 Layout & Positioning of Tent and Poles
- Layout and position the tent with both doors facing desired directions. (Fig. 1)
- Stake down tent corners by driving the stakes into the loops attached at the bottom of the tent. (Fig. 2)
- Keep the floor taut.
- Assemble all poles by unfolding and interlocking the shock-corded pole sections.
- Insert one end of roof pole to the 8-in-1 pole hub at the center, and the other end will be inserted into to the pole connector at tent corner at step 2. (Fig. 3)

Connect Poles to Tent
- Insert roof poles and leg poles into pole connectors. (the color marking on the leg poles should match the mark on pole connectors)
- Insert one pin into the end of the leg pole. (Fig. 5 and 6)
- Repeat for all leg poles.
- The tent will raise as the leg poles are all connected with the tent.
NOTE: The tent door should between the adjacent leg poles with awning pole connector.

flowchart
graph TD
    A["Pole Connector"] --> B["Roof Pole"]
    B --> C["Leg Pole"]
    C --> D["Awning Pole Connector"]
    D --> E["Clip"]
    E --> F["Pole"]
    F --> G["Pin"]
    G --> H["Leg Pole"]
    H --> I["Clip"]
    I --> J["Fig. 6"]
    J --> K["Fig. 7"]
3 Attach Tent to Leg Poles Using Clips
- Attach clips along the edges of tent to leg poles. (Fig. 7)
• Make any adjustments to the tent stakes, if needed.
4
Attach Rainfly
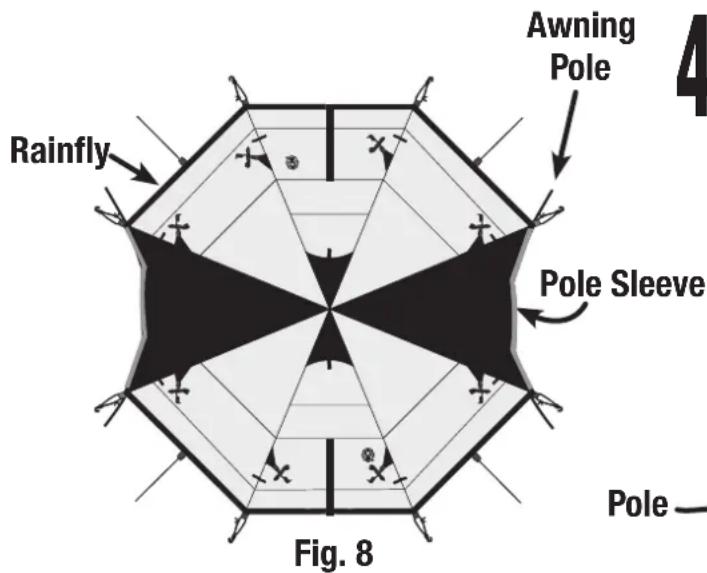
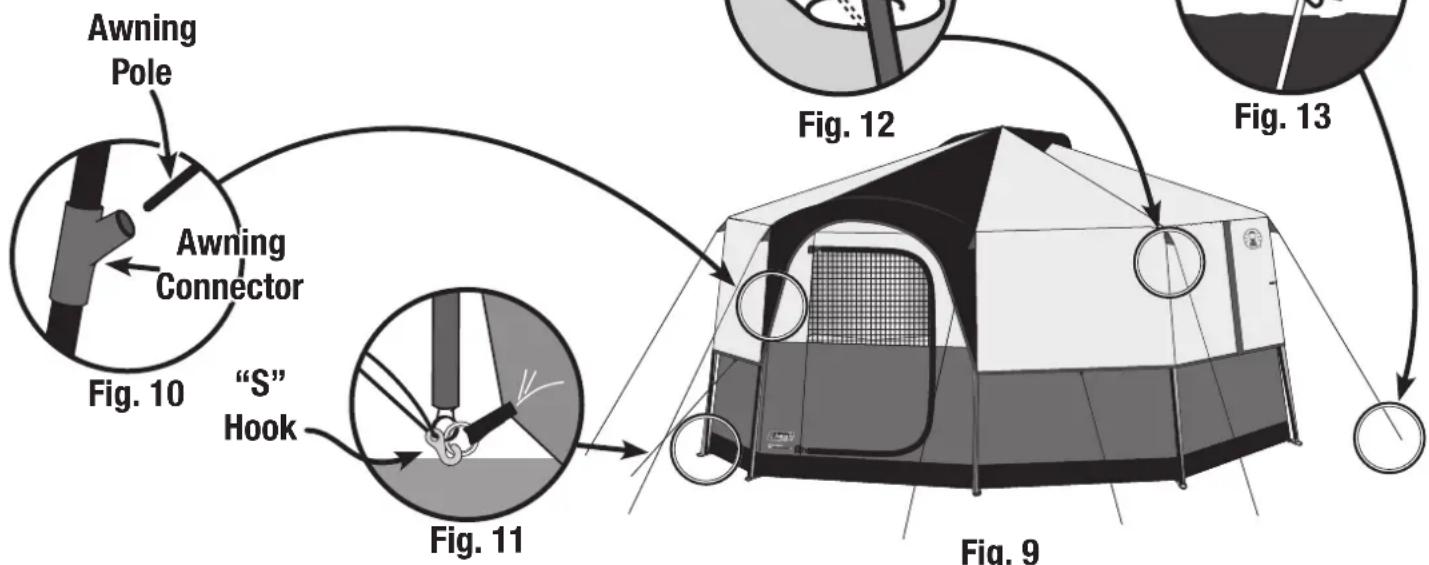
- Insert awning pole into pole sleeves located on underside of rainfly. (Fig. 8)
• Drape rainfly over tent. (Fig. 9) - Connect the elastic loops with "S" hooks, (found at the rainfly corners) to the rings found at the tent corners. (Fig. 10)
- Insert the tips of the awning pole into the grommets. (Fig. 11)
- Secure rainfly with straps located on the underside of rainfall. (Fig. 12)
- Attach and stake out guylines. (Fig. 13)
HINT: During setup, keep door zipped to keep proper tension on fabric.
flowchart
graph TD
    A["Awning Pole"] --> B["Awning Connector"]
    B --> C[""S" Hook"]
    C --> D["Fig. 10"]
    D --> E["Fig. 11"]
    E --> F["Fig. 12"]
    F --> G["Fig. 9"]
    G --> H["Fig. 13"]
    H --> I["End"]
To Store
- All poles and stakes must be placed in the storage bag to prevent damage to the fabric items placed in the carry case.
- Make sure tent is clean and dry before placing in carry case.
- Remove rainfly, spread out on floor of tent, then unzip door & vents before taking tent down for storage.
- Neatly fold tent to width of pole storage bag, place on tent, roll tightly, and place in carry case.
- Store in a clean, dry area.
Things You Should Know:
- Under certain conditions (cold weather, high humidity, etc.) condensation will form on the inside of your tent. Condensation is caused by water vapor from your breath, perspiration, or any wet clothing inside the tent. It is NOT LEAKAGE through the tent fabric. It can be minimized by removing wet clothing from your tent and by providing good ventilation through the tent.
- Tree limbs, tree sap, bird droppings, or moisture steadily dripping off tree limbs can cause damage to the tent fabric and its coating resulting in leaks or loss of flame-resistant properties.
- Never store tent, even for a short period of time, without drying it thoroughly and brushing off caked dirt. Do not pack stakes or poles inside your tent. Use a separate storage bag.
- Stakes should be removed by pulling on the stake itself. NEVER PULL ON THE TENT TO REMOVE STAKES AS THIS COULD RESULT
IN PROPERTY DAMAGE OR PERSONAL INJURY.
- Tent poles should not be left telescoped together during storage.
- Do not leave your tent set-up for weeks at a time. Be aware that exposure to ultraviolet rays from the sun can seriously damage material and/or cause it to become discolored.
WARNING: KEEP ALL FLAME AND HEAT SOURCES AWAY FROM THIS TENT FABRIC.
This tent meets the flammability requirements of CPAI-84. The fabric may burn if left in continuous contact with any flame source. The application of any foreign substance to the tent fabric may render the flame-resistant properties ineffective.
Coleman
The Coleman Company, Inc. • 3600 North Hydraulic • Wichita, Kansas 67219 U.S.A. 1-800-835-3278 in the United States • www.coleman.com
MADE IN BANGLADESH
© 2013 The Coleman Company, Inc. All rights reserved.
Coleman®, Colaretic are registered trademarks of The Coleman Company, Inc.
4010024774 (ECN20031793-01)
INSTRUCCIONES PARA ARMAR LA CARPA
Tienda de campaña octogonal 98 - Medio sobretecho
(Su producto puede tener un aspecto distinto. La muestra es solo para fines ilustrativos.)
Antes de comenzar
• Lea todas las instrucciones antes de armar la carpa.
- Elija un lugar plano, sin piedras, ramas u otros objetos duros o filosos para instalar la carpa.
ADVERTENCIA: Manténgase lejos de líneas de alimentación aéreas.
- No arme la carpa debajo de árboles ya que podría sufrir el impacto de rayos o la caída de ramas de árboles cuando hay mal tiempo.
- Utilice todas las estacas y los vientos provistos para evitar daños materiales o lesiones físicas.
- Para obtener resultados óptimos cuando hay viento, oriente el extremo estrecho de la carpa en dirección al viento.
- Solicite la ayuda de al menos otra persona cuando llegue el momento de armar la carpa.
Descripción de las varillas
| N.° | Descripción Cant. Materiales de reparación | Materiales de repuesto | |
| 1 | Poste del alero, fibra de vidrio, negro, grueso 2 | 5010000569 | 5010000568 |
| 2 | Poste del techo de acero, acero, gris 8 | N/A | N/A |
| 3 | Poste de la pata de acero 8 | N/A | N/A |
1 Diagrama y posicionamiento de la carpa y las varillas
- Presente y coloque la carpa con la entrada orientada en la dirección deseada. (Fig. 1)
- Coloque estacas en las esquinas de la tienda de campaña introduciéndolas por las presillas en la base de la tienda. (Fig. 2)
• Mantenga el piso tirante. - Despliegue e inmovilice todas las secciones de las varillas acopladas en su interior con una cuerda elástica.
- Introduzca un extremo del poste del techo en el concentrador de postes 8 en 1 de la parte central y el otro extremo, en el conector del poste en la esquina de la tienda de campaña en el paso 2. (Fig. 3)

Colocação das varetas na barraca
- Introduzca los postes del techo y de las patas en los conectores. (Las marcas de color en las patas deben coincidir con la marca en los conectores.)
- Introduzca un pasador en el extremo del poste de la pata. (Fig. 5 y 6)
• Repita para todos los postes de las patas. - La tienda de campaña se elevará a medida que se conecten todas las patas con la tienda.
NOTA: El acceso a la tienda de campaña debería encontrarse entre los postes de las patas adyacentes al conector del poste del alero.

flowchart
graph TD
    A["Conector del poste"] --> B["Poste de la pata"]
    B --> C["Conector del poste del alero"]
    C --> D["Gancho"]
    D --> E["Varilla"]
    E --> F["Conector"]
    F --> G["Conector del poste"]
    style A fill:#f9f,stroke:#333
    style B fill:#ccf,stroke:#333
    style C fill:#cfc,stroke:#333
    style D fill:#fcc,stroke:#333
    style E fill:#cff,stroke:#333
    style F fill:#ffc,stroke:#333
    style G fill:#cfc,stroke:#333
3 Use clips para fijar la tienda de campaña a los postes de las patas
- Coloque clips a lo largo de los bordes de la tienda de campaña para sujetarlos a los postes de las patas (Fig. 7)
• Realice todos los ajustes necesarios en las estacas.
4 Colocación del sobretecho • Introduzca la varilla del toldo en la manga de la par
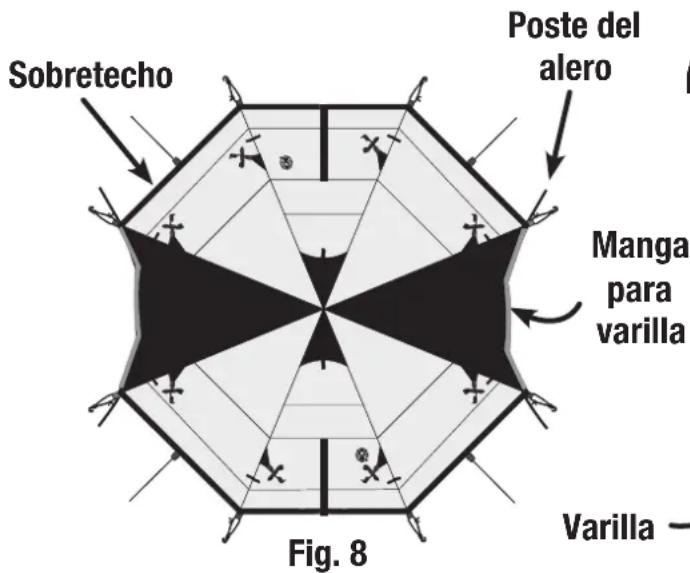
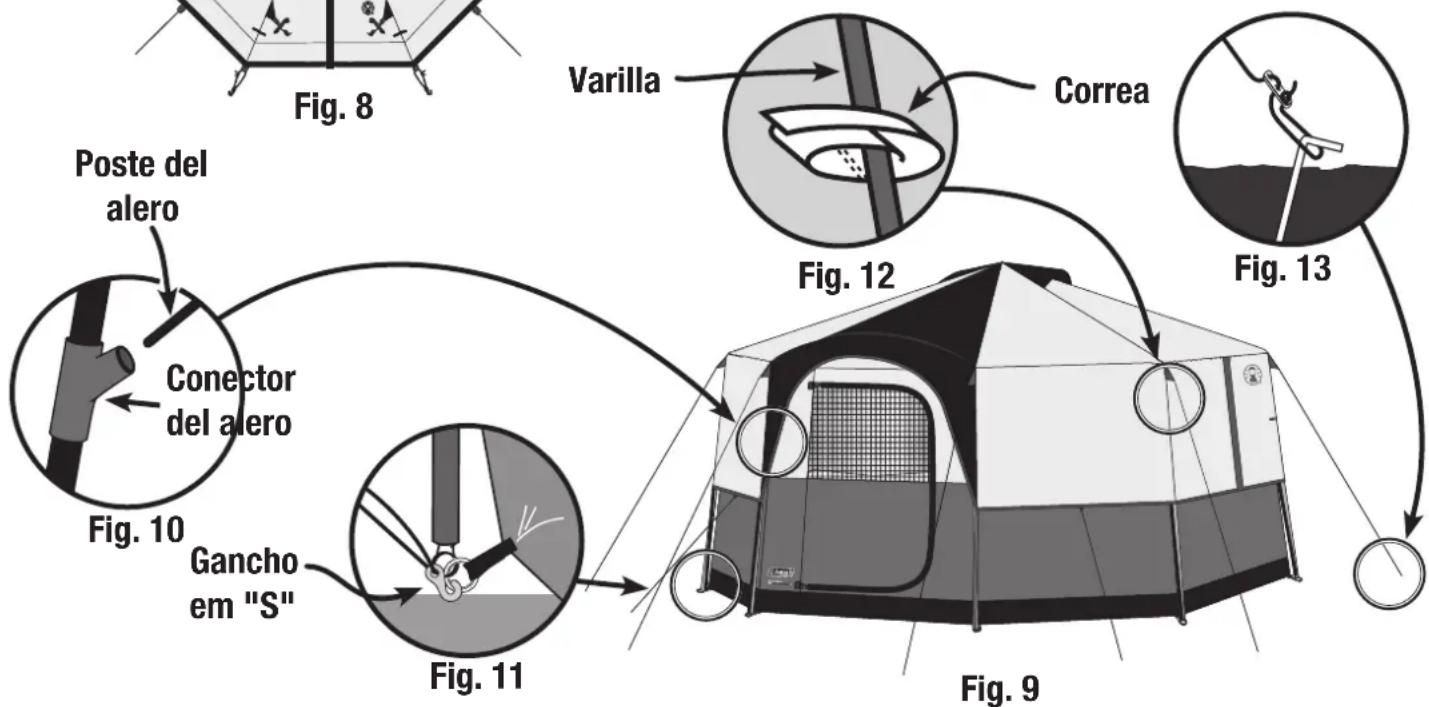
- Introduzca la varilla del toldo en la manga de la parte inferior del sobretecho. (Fig. 8)
• Coloque el sobretecho sobre la carpa. (Fig. 9) - Fije las presillas elásticas con ganchos "S", (en los vértices del sobretecho) a los anillos en los vértices de la carpa. (Fig. 10)
- Introduzca las puntas de la varilla del toldo en las arandelas. (Fig. 11)
- Utilice las correas en la parte inferior del sobretecho para inmovilizarlo. (Fig. 12)
• Coloque y clave las estacas de los vientos. (Fig. 13)
SUGERENCIA: Durante el armado de la carpa, deje cerrada la entrada para mantener la tensión correcta de la tela.
flowchart
graph TD
    A["Poster"] --> B["Poste del alero"]
    B --> C["Conector del alero"]
    C --> D["Gancho em "S""]
    D --> E["Fig. 10"]
    E --> F["Fig. 11"]
    F --> G["Fig. 12"]
    G --> H["Correa"]
    H --> I["Fig. 13"]
    I --> J["Fig. 9"]
    J --> K["Final tent diagram"]
    style A fill:#f9f,stroke:#333
    style K fill:#bbf,stroke:#333
Almacenamiento
- Todas las varillas y estacas deben colocarse en la funda para no dañar los artículos de tela guardados en la bolsa.
- Asegúrese de que la carpa esté limpia y seca antes de colocarla en la bolsa.
- Retire el sobretecho, extiéndalo en el piso de la carpa y luego abra las cremalleras de la entrada y los respiraderos antes de desarmar la carpa para guardarla.
- Pliegue la carpa prolijamente según el ancho de la funda para las varillas, coloque la funda sobre la carpa, enróllela ceñidamente y guarde todo en la bolsa.
- Conserve la carpa en un lugar limpio y seco.
Lo que usted debe saber:
- En determinadas situaciones (clima frío, mucha humedad, etc.) se formará condensación en el interior de la carpa. La causa de la condensación es el vapor de agua de la respiración, transpiración o ropa húmeda en el interior de la carpa. NO ES FILTRACIÓN por la tela de la carpa. Para minimizarla, quite de la carpa la ropa húmeda y mantenga la carpa bien ventilada.
- Las ramas de los árboles, la savia, los excrementos de pájaros o la humedad que gotea constantemente de las ramas de los árboles pueden dañar la tela de la carpa y su recubrimiento. Esto resultará en filtraciones o pérdida de las propiedades ignífugas del material.
- Nunca guarde la carpa, ni siquiera durante un período breve, sin secarla bien y quitarle con un cepillo toda la suciedad endurecida. No guarde estacas o varillas dentro de la carpa. Utilice una funda
separada.
- Las estacas deben extraerse del suelo jalando de las estacas mismas. NUNCA AYÚDESE CON LA CARPA PARA EXTRAER LAS ESTACAS YA QUE ESTO PODRÍA RESULTAR EN DAÑOS MATERIALES O LESIONES FÍSICAS.
- Las varillas de la carpa deben plegarse para guardarlas.
- No deje la carpa armada durante un período de varias semanas. La exposición a los rayos ultravioletas del sol puede dañar severamente el material o decolorarlo.
ADVERTENCIA: MANTENGA LA TELA DE ESTA CARPA ALEJADA DE TODAS LAS FUENTES ÍGNEAS Y DE CALOR.
Esta carpa cumple los requisitos para productos inflamables de CPAI-84. La tela puede quemarse si se deja en contacto continuo con llamas expuestas. La aplicación de sustancias ajenas a la tela de la carpa podría anular las propiedades ignífugas del material.
Coleman
The Coleman Company, Inc. • 3600 North Hydraulic • Wichita, Kansas 67219 EE.UU.
1-800-835-3278 • www.coleman.com
HECHO EN BANGLADESH
© 2013 The Coleman Company, Inc. Todos los derechos reservados.
Coleman®, Colrmm son marcas comerciales registradas de
The Coleman Company, Inc.

- DO NOT PRINT THIS PAGE
- Printing Notes:
- TENT SETUP INSTRUCTIONS
- Tent Octagon 98 - Half Rainfly
- Before you begin
- Layout & Positioning of Tent and Poles
- Connect Poles to Tent
- Attach Tent to Leg Poles Using Clips
- Attach Rainfly
- To Store
- Things You Should Know:
- WARNING: KEEP ALL FLAME AND HEAT SOURCES AWAY FROM THIS TENT FABRIC.
- Coleman
- MADE IN BANGLADESH
- INSTRUCCIONES PARA ARMAR LA CARPA
- Tienda de campaña octogonal 98 - Medio sobretecho
- Antes de comenzar
- ADVERTENCIA: Manténgase lejos de líneas de alimentación aéreas.
- Diagrama y posicionamiento de la carpa y las varillas
- Colocação das varetas na barraca
- Use clips para fijar la tienda de campaña a los postes de las patas
- Colocación del sobretecho • Introduzca la varilla del toldo en la manga de la par
- Almacenamiento
- Lo que usted debe saber:
- ADVERTENCIA: MANTENGA LA TELA DE ESTA CARPA ALEJADA DE TODAS LAS FUENTES ÍGNEAS Y DE CALOR.
- HECHO EN BANGLADESH
Marque : COLEMAN
Modèle : Octagon 98
Catégorie : Tente