
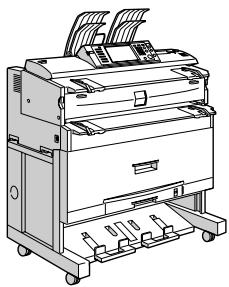
AFICIO MP W3600 - Imprimante multifonction RICOH - Notice d'utilisation et mode d'emploi gratuit
Retrouvez gratuitement la notice de l'appareil AFICIO MP W3600 RICOH au format PDF.

| Type de produit | Imprimante multifonction grand format (copieur, serveur de documents) |
| Marque et modèle | RICOH AFICIO MP W3600 (Type 2) |
| Dimensions (approx.) | Environ 1 200 mm (largeur) x 700 mm (profondeur) x 1 000 mm (hauteur) |
| Poids (approx.) | Environ 200 kg (sans options) |
| Alimentation électrique | 220–240 V CA, 50/60 Hz, 10 A |
| Formats de papier supportés | Rouleaux : largeur 210–914 mm, longueur jusqu'à 15 m ; Bac feuilles : A0 à A4, formats personnalisés |
| Fonctions principales | Copie, numérisation, serveur de documents, impression (avec option), télécopie (avec option) |
| Fonctions de copie avancées | Assemblage, rotation, réduction/agrandissement (25–400 %), zoom, combine, répétition d'image, double exemplaire, négatif, miroir, filigrane, numérotation, estampille, date |
| Capacité d'originaux | Table d'exposition pour originaux plans, rouleaux, ou via feuille porte-document |
| Sortie des copies | Sortie supérieure (jusqu'à A1, 50 feuilles) ; sortie inférieure (jusqu'à A0, 40 feuilles) ; sortie arrière en option |
| Options disponibles | Chargeurs de rouleaux (2), bac à feuilles, table, finisseur plieur FD6500A, unité de pliage, support arrière |
| Consommables | Toner, papier rouleau (différentes largeurs), feuilles coupées, agrafes (pour option) |
| Entretien et nettoyage | Nettoyer la vitre d'exposition et les rouleaux régulièrement ; vider les bacs de sortie ; remplacer le toner ; consulter le guide de dépannage |
| Sécurité | Authentification utilisateur (code, Windows, LDAP, serveur) ; protection des données ; arrêt d'urgence |
| Réparabilité et pièces détachées | Pièces disponibles via revendeur agréé RICOH ; nombreux guides de dépannage intégrés |
| Informations générales | Notice en français disponible (190 pages) ; manuels électroniques (PDF) ; impression sur papier ordinaire, translucide, film |
FOIRE AUX QUESTIONS - AFICIO MP W3600 RICOH
Questions des utilisateurs sur AFICIO MP W3600 RICOH
0 question sur cet appareil. Repondez a celles que vous connaissez ou posez la votre.
Poser une nouvelle question sur cet appareil
Téléchargez la notice de votre Imprimante multifonction au format PDF gratuitement ! Retrouvez votre notice AFICIO MP W3600 - RICOH et reprennez votre appareil électronique en main. Sur cette page sont publiés tous les documents nécessaires à l'utilisation de votre appareil AFICIO MP W3600 de la marque RICOH.
MODE D'EMPLOI AFICIO MP W3600 RICOH
Operating Instructions
Copy/Document Server Reference
1 Placing Originals
2 Copying
3 Document Server
4 Appendix
Introduction
This manual contains detailed instructions and notes on the operation and use of this machine. For your safety and benefit, read this manual carefully before using the machine. Keep this manual in a handy place for quick reference.
Important
Contents of this manual are subject to change without prior notice. In no event will the company be liable for direct, indirect, special, incidental, or consequential damages as a result of handling or operating the machine.
Do not copy or print any item for which reproduction is prohibited by law.
Copying or printing the following items is generally prohibited by local law:
bank notes, revenue stamps, bonds, stock certificates, bank drafts, checks, passports, driver's licenses.
The preceding list is meant as a guide only and is not inclusive. We assume no responsibility for its completeness or accuracy. If you have any questions concerning the legality of copying or printing certain items, consult with your legal advisor.
Notes:
Some illustrations in this manual might be slightly different from the machine.
Certain options might not be available in some countries. For details, please contact your local dealer.
Depending on which country you are in, certain units may be optional. For details, please contact your local dealer.
Notes:
The model names of the machines do not appear in the following pages. Check the type of your machine before reading this manual. (For details, see "Machine Types", About This Machine.)
Type 1: 2404WD/GWD2004/LW324/Aficio MP W2400
Type 2: 2406WD/GWD2006/LW326/Aficio MP W3600
Certain types might not be available in some countries. For details, please contact your local dealer.
Two kinds of size notation are employed in this manual. With this machine refer to the inch version.
Manuals for This Machine
Refer to the manuals that are relevant to what you want to do with the machine.
Important
Media differ according to manual.
The printed and electronic versions of a manual have the same contents.
Adobe Acrobat Reader/Adobe Reader must be installed in order to view the manuals as PDF files.
Depending on which country you are in, there may also be html manuals. To view these manuals, a Web browser must be installed.
For details about the functions of RW-3600, refer to the manuals for this option.
About This Machine
Be sure to read the Safety Information in this manual before using the machine. This manual provides an introduction to the functions of the machine. It also explains the control panel, preparation procedures for using the machine, how to enter text, and how to install the CD-ROMs provided.
General Settings Guide
Explains User Tools settings, and Address Book procedures such as registering e-mail addresses, and user codes. Also refer to this manual for explanations on how to connect the machine.
Troubleshooting
Provides a guide to solving common problems, and explains how to replace paper, toner, and other consumables.
Security Reference
This manual is for administrators of the machine. It explains security functions that the administrators can use to protect data from being tampered with, or prevent the machine from unauthorized use.
Also refer to this manual for the procedures for registering administrators, as well as setting user and administrator authentication.
Copy/ Document Server Reference
Explains Copier and Document Server functions and operations. Also refer to this manual for explanations on how to place originals.
Printer Reference
Explains Printer functions and operations.
Scanner Reference
Explains Scanner functions and operations.
Network Guide
Explains how to configure and operate the machine in a network environment, and use the software provided.
Other manuals
PostScript3 Supplement
- UNIX Supplement
- Manuals for Desktop Binder Lite
- DeskTopBinder Lite Setup Guide
- DeskTopBinder Introduction Guide
- Auto Document Link Guide
Note
□ Manuals provided are specific to machine types.
For "UNIX Supplement", please visit our Web site or consult an authorized dealer.
- "PostScript3 Supplement" and "UNIX Supplement" include descriptions of functions and settings that might not be available on this machine.
What You Can Do with This Machine
Functions differ depending on machine type and options.

Reference
See p.3 "Functions Requiring Optional Configurations".
Assembling Copies as Sets in Sequential Order
Sort
Copies are assembled as sets in sequential order.
See p.118 "Sort".

Rotate Sort
Every other copy set is rotated by 90 degrees and delivered to the copy tray. See p.118 "Sort".

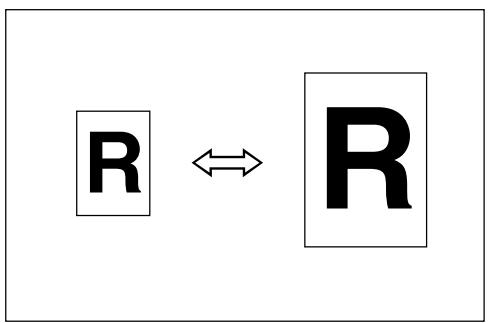
Preset Reduce/Enlarge
You can select a preset reproduction ratio for copying. See p.60 "Preset Reduce/Enlarge".
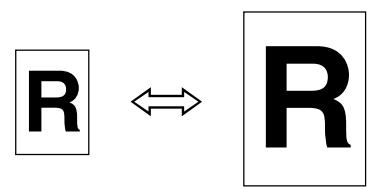
Zoom
You can change the reproduction ratio in increments of 0.1% . See p.61 "Zoom".

Auto Reduce/Enlarge
The machine selects an appropriate reproduction ratio based on the paper and original sizes you select. See p.64 "Auto Reduce/Enlarge".
User Auto Reduce/Enlarge
Copies to a selected size for each original size. See p.66 "User Auto Reduce/Enlarge".
Size Magnification
Calculates a reproduction ratio based on the lengths of original and copy. See p.68 "Size Magnification".
Directional Magnification (%)
You can specify the horizontal and vertical reproduction ratios, individually. See p.69 "Directional Magnification (\%)".

Directional Magnification (inch)
You can specify the horizontal and vertical lengths of the original and copy image.
See p.72 "Directional Magnification (inch)".

Fine Magnification
Calculates the correction ratios to produce copies that are close to the actual image size.
See p.74 "Fine Magnification".
Types of Adjustment/Erase
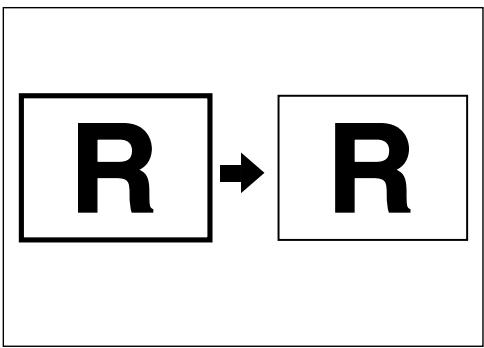
Erase Border
Erases the edge margin of the original image.
See p.78 "Erase Border (Same Width)" and p.79 "Erase Border (Different Width)".
ZEDX080J
Erase Inside
Copies the original while erasing a specified area.
See p.81 "Erase Inside".
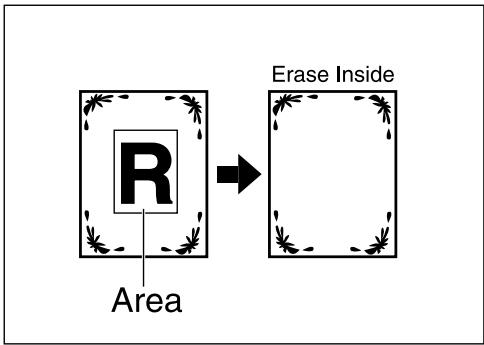
ABB524S
Erase Outside
Copies the original while erasing outside a specified area.
See p.83 "Erase Outside".
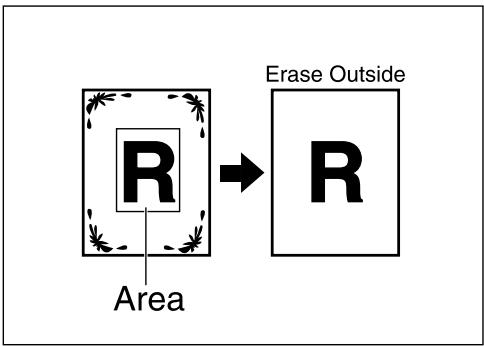
ABB526S
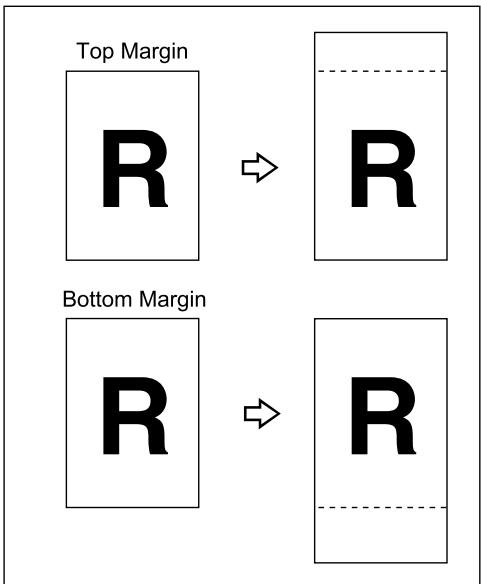
Margin Adjustment
When Synchro Cut is selected, you can create a margin on the copy's leading and trailing edge.
See p.84 "Margin Adjustment".
ATY052S
Adjust Print Position
Moves (shifts) the copy image up, down, left, or right to create a margin. See p.116 "Adjust Print Position".

ZEDG110E
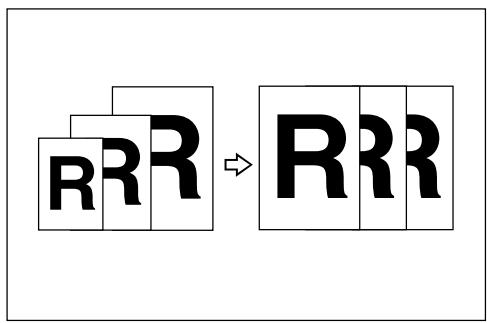
Types of Combine
Combines several pages onto one side of a sheet. See p.76 "Combine".
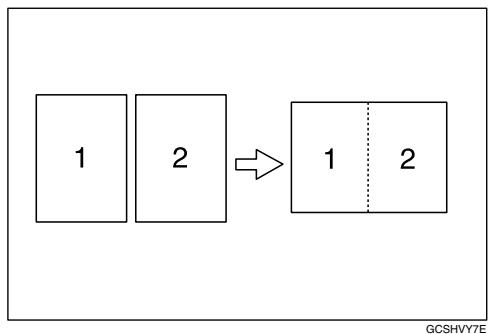
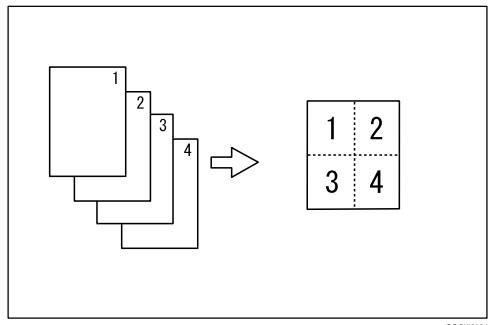
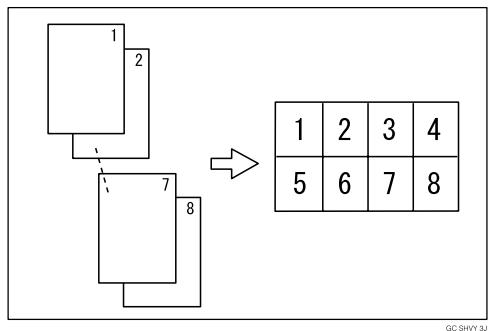
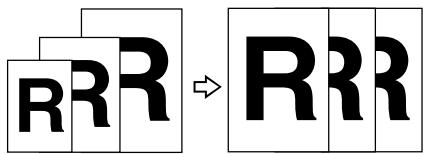
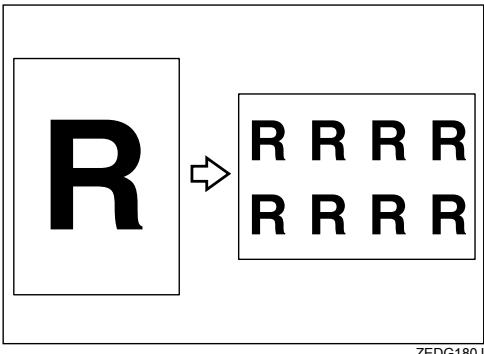
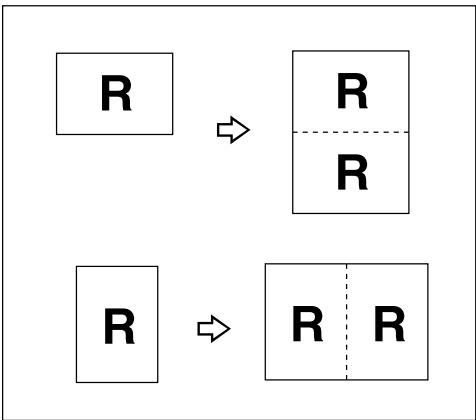
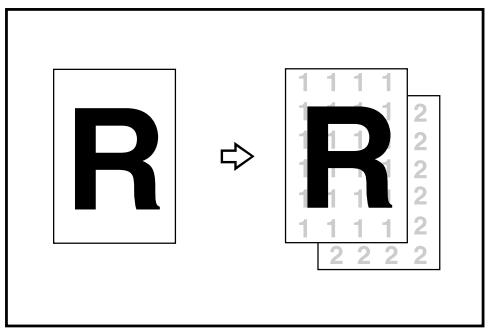
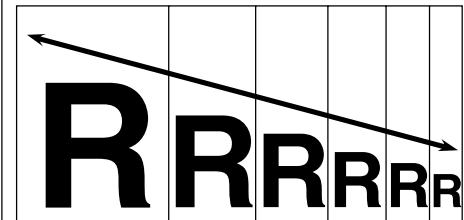
Image Repeat
Repeatedly copies the entire image.
See p.105 "Image Repeat".
ZEDG180J
Double Copies
One original image is copied twice on one sheet. See p.106 "Double Copies".
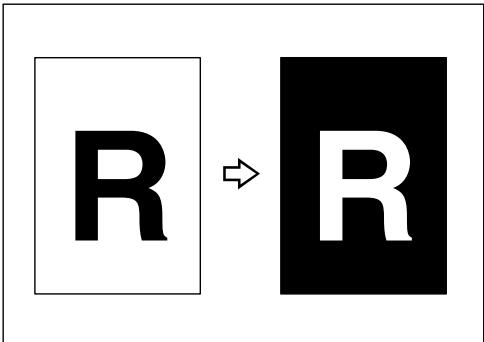
Positive/Negative
Copies an image inverted.
See p.107 "Positive/Negative".
ZEDG150J
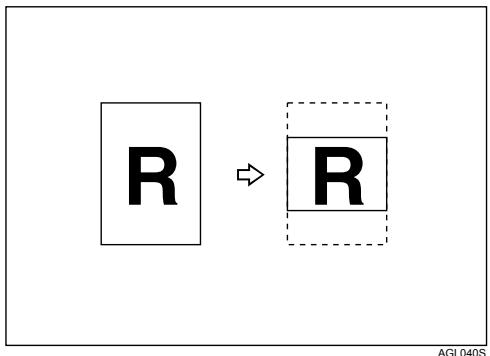
Partial Copy
Copies only a specified portion of the original. See p.108 "Partial Copy".
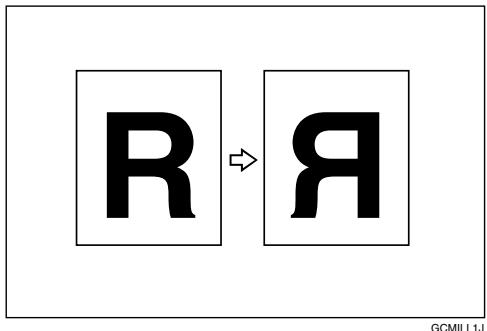
Mirror Image
Copies by reversing the image from left to right, as reflected in a mirror. See p.110 "Mirror Image".
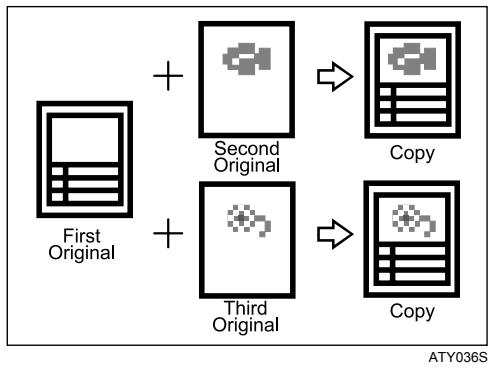
Format Overlay
Combines two images onto one copy. See p.111 "Format Overlay".
Background Numbering
Prints numbers on the background of copies. See p.86 "Background Numbering".
GCSTMP2J
Preset Stamp
Preset messages are stamped on copies. See p.87 "Preset Stamp".
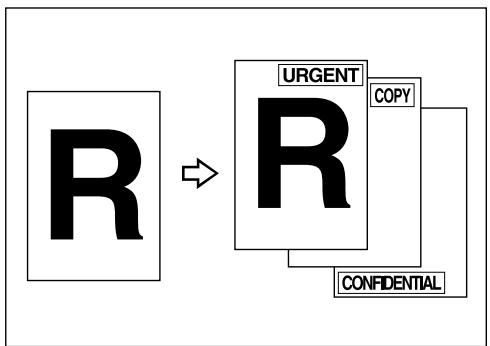
GCSTMP1E
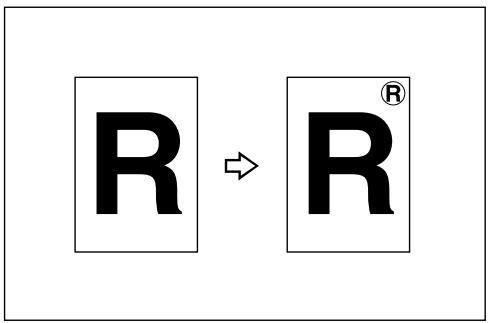
User Stamp
Copies a scanned image as a stamp. See p.90 "User Stamp".
GCSTMP0E
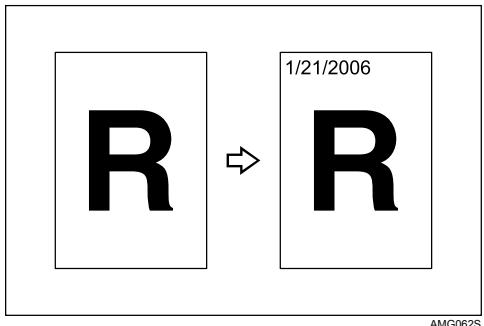
Date Stamp
Prints dates on copies. See p.96 "Date Stamp"
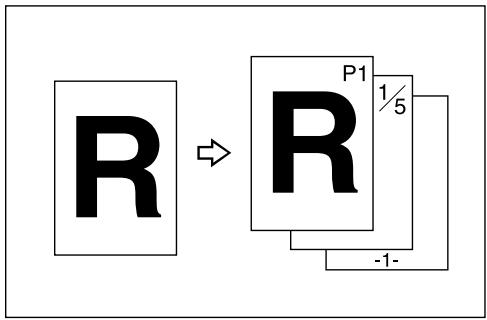
Page Numbering
Prints page numbers on copies. See p.99 "Page Numbering".
CP2G0100
TABLE OF CONTENTS
Manuals for This Machine
What You Can Do with This Machine. iii
Assembling Copies as Sets in Sequential Order iii
Types of Magnification iv
Types of Adjustment/Erase vi
Types of Combine ix
Types of Edit
Types of Stamp xii
How to Read This Manual 1
Symbols 1
Names of Major Options 2
Terms 2
Functions Requiring Optional Configurations 3
Display 4
Simplified Display 5
User Tools Menu (Copier / Document Server Features) 6
1. Placing Originals
Original and Copy Output Locations 9
Original Output Locations. 9
Copy Output Locations 12
Originals 16
Sizes and Weights of Recommended Originals 16
Missing Image Area 19
Placing Originals 20
Placing Originals on the Original Table 20
Original Orientation 23
Placing Custom Size Originals 25
Wide Scan 26
Setting the Carrier Sheet. 28
Setting Folded Originals (the Original Switching Lever). 29
SettingRolled Originals 29
Setting the Original Hangers 31
2. Copying
Basic Procedure 33
Check Modes 35
Original Counter/Reset. 36
Auto Start 36
Interrupt Copy 37
Job Preset 38
Job List. 38
Copying from the Bypass Tray 43
When Copying onto Regular Size Paper 45
When Copying onto Custom Size Paper 46
When Copying onto Special Paper 48
Copier Functions 49
Selecting the Original Type Setting 49
Adjusting Copy Image Density 51
Selecting Copy Paper 53
Setting the Length of Copy Paper Cut 56
Preset Reduce/Enlarge 60
Zoom 61
Auto Reduce/Enlarge 64
User Auto Reduce/Enlarge 66
Size Magnification 68
Directional Magnification (%) 69
Directional Magnification (inch) 72
Fine Magnification 74
Combine 76
Erase Border (Same Width) 78
Erase Border (Different Width) 79
Erase Inside 81
Erase Outside 83
Margin Adjustment 84
Background Numbering 86
Preset Stamp 87
User Stamp 90
Date Stamp 96
Page Numbering 99
Image Repeat. 105
Double Copies 106
Positive/Negative 107
Partial Copy 108
Mirror Image 110
Format Overlay 111
Adjust Print Position 116
Sort 118
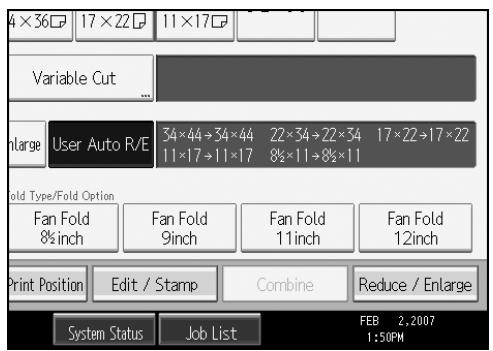
Fan Fold 121
Storing Data in the Document Server 123
Programs 125
Storing a Program 125
Changing a Stored Program 126
Deleting a Program 127
Recalling a Program 128
Registering Defaults in Initial Display 129
3. Document Server
Relationship between Document Server and Other Functions 131
Document Server Display 132
Simplified Display 133
Preview Display. 134
Using the Document Server 136
Storing Data 136
Changing User Name, File Name or Password of a Stored Document 142
Checking the Details of a Stored Document 143
Searching for a Stored Document 144
Printing a Stored Document 146
Deleting a Stored Document 152
Displaying a Stored Document with Web Image Monitor 153
Downloading a Stored Document 154
4. Appendix
Function Compatibility 155
Supplementary Information 156
Scan Size Limitations, by Function 162
Settings Record Sheet. 163
Magnification Ratio Chart 166
Measure Chart 167
INDEX. 168
How to Read This Manual

Note
For proper use of this product, be sure to read About This Machine first.
Supplementary information about the copier mode is described in "Supplementary Information".

Reference
p.156 "Supplementary Information"
About This Machine
Symbols
This manual uses the following symbols:

WARNING:
Indicates important safety notes.
Ignoring these notes could result in serious injury or death. Be sure to read these notes.
They can be found in the "Safety Information" section of About This Machine.

CAUTION:
Indicates important safety notes.
Ignoring these notes could result in moderate or minor injury, or damage to the machine or to property. Be sure to read these notes. They can be found in the "Safety Information" section of About This Machine.

Important
Indicates points to pay attention to when using the machine, and explanations of likely causes of paper misfeeds, damage to originals, or loss of data. Be sure to read these explanations.

Note
Indicates supplementary explanations of the machine's functions, and instructions on resolving user errors.

Reference
This symbol is located at the end of sections. It indicates where you can find further relevant information.
[]
Indicates the names of keys that appear on the machine's display panel.
【】
Indicates the names of keys on the machine's control panel.
Names of Major Options
Major options for this machine are referred to as follows:
- Roll Feeder Type 240A Paper roll tray 1
- Roll Feeder Type 240B Paper roll tray 2
- Paper Cassette Type 240 Cut paper tray
Table Type 240 Table - Folder FD6500A Folding finisher
Terms
- Long length original/paper Original/paper length longer than 1189mm (46.8").
Functions Requiring Optional Configurations
Certain functions require special machine configuration and extra options as follows:
Auto Paper Select: Paper roll tray 1, Paper roll tray 2, Cut paper tray
User Auto Reduce/Enlarge: Paper roll tray 1, Paper roll tray 2, Cut paper tray
Lower Copy Output: Paper roll tray 1, Paper roll tray 2, Table
Rotate Sort: Paper roll tray 1, Paper roll tray 2, Cut paper tray
Synchro Cut: Paper roll tray 1, Paper roll tray 2
Preset Cut: Paper roll tray 1, Paper roll tray 2, Cut paper tray
Variable Cut: Paper roll tray 1, Paper roll tray 2
Fan Fold: Folding finisher

Note
- Paper roll tray 1 or 2 is required to install the cut paper tray.
Depending on the model you are using, some options may be provided as standard. For more information, see "Options", About This Machine.

Reference
p.12 "Copy Output Locations"
p.54 "Auto Paper Select"
p.56 "Setting the Length of Copy Paper Cut"
p.66 "User Auto Reduce/Enlarge"
p.118 "Sort"
p.121 "Fan Fold"
"Options", About This Machine
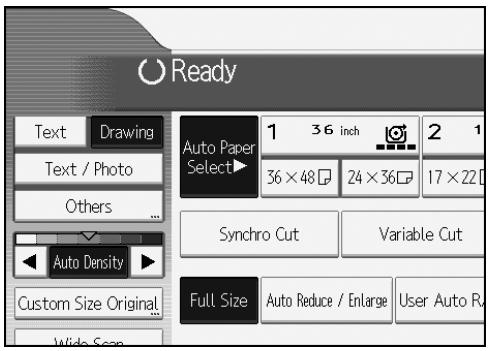
Display
The function items displayed serve as selector keys. You can select or specify an item by lightly pressing them.
When you select or specify an item on the display panel, it is highlighted like Auto Reduce / Enlarge. Keys appearing as Auto Reduce / Enlarge cannot be used.
Initial copy display
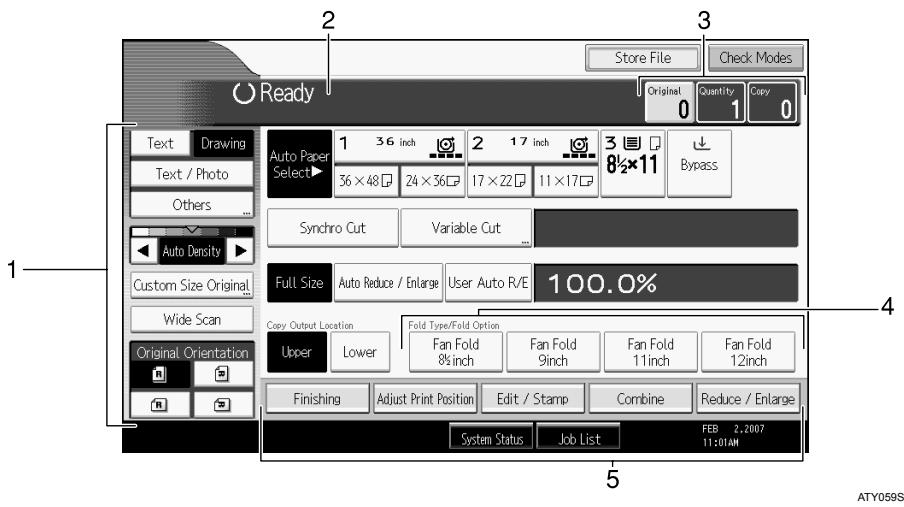
- Use this area to specify the original type, original orientation, image density level, and other settings.
- Displays operational status and messages.
-
Displays the numbers of originals scanned, copies set, and copies made.
-
Use this area to select the fold function and related options.
- Displays available functions. Press a function to display its menu.
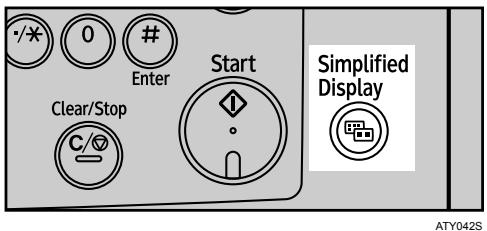
Simplified Display
This section explains how to switch to the simplified display.
When you press the [Simplified Display] key, the screen changes from the initial display to the simplified display.
Letters and keys are displayed at a larger size, making operations easier.
Example of a simplified display
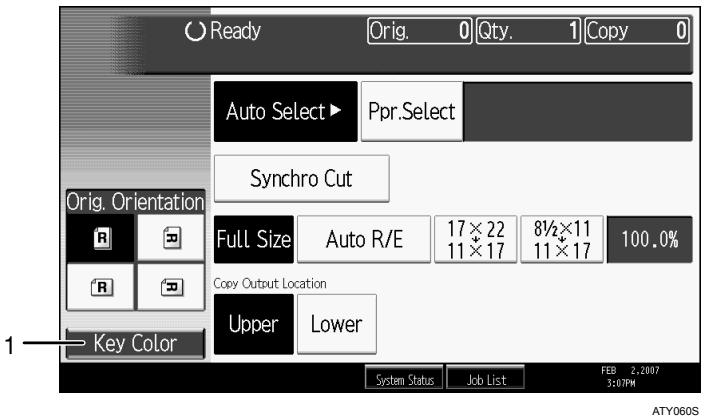
1. [Key Color]
Press to increase screen contrast.
This is available only for the simplified display.
![RICOH AFICIO MP W3600 - [Key Color] - 1](/content/2025/01/136380/images/b30d6ce8bfd02950f5eca42b833682b6ab33ded208eb0c9dc021515a9184d718.jpg)
Note
To return to the initial display, press the 【Simplified Display】key again.
Certain keys do not appear on the simplified display.
User Tools Menu (Copier / Document Server Features)
This section describes items that can be specified on the Copier / Document Server Features screen. The Copier / Document Server Features screen can be displayed by pressing the [User Tools/Counter] key. For details about how to set up these items, see General Settings Guide.
General Features
| Item | Description |
| Auto Image Density Priority | You can set whether Auto Image Density is “On” or “Off” when the machine is turned on, reset, or modes are cleared. |
| Copy Quality | Adjust the finish for each original type (Text, Drawing, Text/Photo, Photo, Background Lines, Patched Original). |
| Image Density | Specify the copy image density for each original type (Text, Drawing, Text/Photo, Photo, Background Lines, Patched Original, Generation Copy). |
| Max. Copy Quantity | The maximum copy quantity can be set between 1 and 99 . |
| Auto Tray Switching | If you load paper of the same size in two or more trays, the machine automatically shifts to the other when the first tray runs out of paper (when Auto Paper Select is selected.) This function is called “Auto Tray Switching”. This setting specifies whether to use Auto Tray Switching or not. |
| Job End Call | You can choose whether or not the beeper sounds when copying is complete. |
Reproduction Ratio
| Item | Description |
| User Reduce/Enlarge Ratio | You can register up to three frequently used Reduce/Enlarge ratios other than the fixed Reduce/Enlarge ratio and have them shown on the initial display. You can also change registered Reduce/ Enlarge ratios. |
| Reproduction Ratio | Specify the enlargement and reduction ratios that appear if [Reduce / Enlarge] is pressed on the copier screen. |
| Reduce/Enlarge Ratio Priority | You can set the ratio that has priority when [Reduce / Enlarge] is pressed on the copier screen. |
| Magnification Key Display | Specify which scale's reproduction ratios shown on the initial display. |
| User Auto Reduce / Enlarge: | Define a user auto reduce/enlarge ratio for each document size when copying with the User Auto Reduce / Enlarge feature. |
| Adjust Position | Specify the default setting for Print Position Adjustment. |
| Erase Border Width | Specify the width of the border to be erased. |
| Erase Original Shadow in Combine | In Combine Copy mode, you can specify whether to erase a 3 mm, 0.1" bounding margin around all four edges of each original. |
| Image Repeat Separation Line | You can select a separation line using the Image Repeat function from: None, Solid, Broken A, Broken B, or Crop Marks. |
| Double Copies Separation Line | You can select a separation line using the Double Copies function from: None, Solid, Broken A, Broken B, or Crop Marks. |
| Separation Line in Combine | You can select a separation line using the Combine function from: None, Solid, Broken A, Broken B, or Crop Marks. |
| Copy Order in Combine | You can set the copy order in Combine mode to Left to Right or Top to Bottom. |
| Program / Delete Format | Store a format (background) image for use with Format Overlay. You can store up to four formats. |
| Margin Adjustment Priority | Specify the default setting for the margin size. |
| Partial Copy Size | Specify the default settings of the start position (Y1) and the copy size (Y2). |
Stamp
| Item | Description |
| Background Numbering | |
| Size | You can set the size of the numbers. |
| Density | You can set the density of the numbers. |
| Preset Stamp | |
| Stamp Language | You can select the language of the message printed in Stamp mode. |
| Stamp Priority | You can select the stamp type given priority when [Preset Stamp] is pressed. |
| Stamp Format | Specify how each of stamp is printed. |
| User Stamp | |
| Program / Delete Stamp | You can register, change, or delete user stamps. |
| Stamp Format: 1-4 | Specify how each of registered User Stamps 1 to 4 is printed. |
| Date Stamp | |
| Format | You can select the date format for Date Stamp mode. |
| Font | You can select the Date Stamp font. |
| Size | You can set the Date Stamp size. |
| Superimpose | You can have the Date Stamp printed in white when it overlaps black parts of the image. |
| Stamp Setting | Specify how Date Stamp is printed. |
| Page Numbering | |
| Stamp Format | You can select the page number format given priority when [Page Numbering] is pressed. |
| Font | You can select the font of the page number. |
| Size | You can set the size of the stamp printed in Page Numbering mode. |
| Page Numbering in Combine | You can set page numbering when using the Combine function and Page Numbering function together. |
| Stamp Position:P1,P2... | Specify how each of stamp is printed. |
| Stamp Position:1/5,2/5... | Specify how each of stamp is printed. |
| Stamp Position:-1,-2... | Specify how each of stamp is printed. |
| Stamp Position:P.1,P.2... | Specify how each of stamp is printed. |
| Stamp Position:1,2... | Specify how each of stamp is printed. |
| Stamp Position:1-1,1-2... | Specify how each of stamp is printed. |
| Superimpose | You can have page numbers printed in white when they overlap black parts of the image. |
| Page Numbering Initial Letter | You can select the page numbering initial letter between “P1,P2.../ P.1,P.2...” and “S1,S2.../ S.1,S.2...”. |
Input/Output
| Item | Description |
| Rotate Sort: Auto Paper Continue | Specify to continue copying when paper of the required orientation has run out during rotate sort. |
| Customize Function: Fold Type/Fold Option | Specify which “Fold Type/Fold Option” has priority to be shown on the initial display. |
Administrator Tools
| Item | Description |
| Menu Protect | You can prevent unauthenticated users from changing the user tools. |
This chapter describes original and copy output locations, the types of originals you can set, and how to place originals.
Original and Copy Output Locations
Specify original and copy output locations before copying.
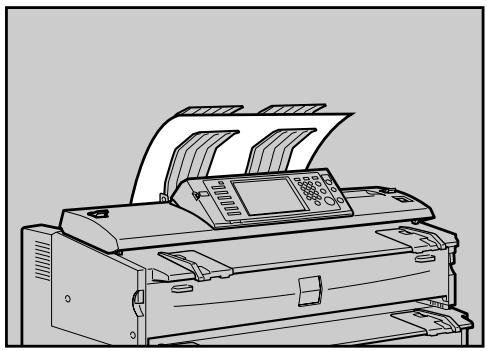
Original Output Locations
Two types of original output locations are available.
Original Upper Output
This is the basic original output location.
Originals are ejected onto the original stacker.
Original Rear Output
Originals are ejected onto the original output guides. When copying thick or hard originals, select this output location.
Original upper output
Originals are ejected onto the original stacker.
Check the upper output stackers are correctly installed on the top of the machine.

ATZ078S
Originals are ejected onto the original stacker.
ATZ021S
The original stacker can hold one original at a time. Remove each original after it is ejected by holding its leading edge.
Note
If the original is larger than A1 (D), select original rear output.
If the original is heavier than 157g / m^2 (41.8 lb.), select original rear output.
If the original is plain paper not heavier than 52.3g / m^2 (13.9 lb.) or translucent paper not heavier than 80g / m^2 (21.3 lb.), select original rear output.
- When copying a rolled original, prevent it curling up on the stacker by holding its leading edge as it is ejected.
Original rear output
Originals are ejected onto the original output guides.
1 Remove the upper output stackers.
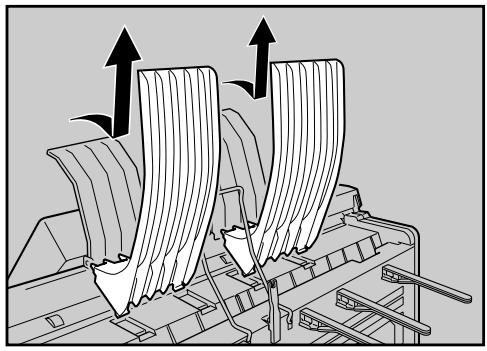
ATZ022S
2 Lower the upper output guide and the original exit switching lever at the machine's rear.

AAJ503S
Extend the original output guides.
Originals are ejected onto the original output guides.
Copy Output Locations
Two types of copy output locations are available.
Upper Copy Output
Copies come out between the upper output stacker and upper output guide on the machine's top. When copying sizes up to A1 (D) , we recommend selecting upper copy output.
Lower Copy Output
Copies come out to the lower output stacker through the lower output exit and lower output tray at the machine's rear. When copying A1 (D) or A0 (E) select lower copy output.
The table below shows you how many sheets can be stacked.
| Copy output location | Plain paper | Translucent paper |
| Upper copy output (A1 (D) □ or smaller) | 50 sheets | 10 sheets |
| Lower copy output (A1 (D) □ or A0 (E) □) | 40 sheets | 1 sheet |
| Rear copy output* (A1 (D) □ or A0 (E) □) | 10 sheets | 1 sheet |
- The optional rear stacker is required.

Note
□ If copies exceed the upper limit, paper jams may occur. Remove the copies from the stacker.
- When copying onto film, hold the leading edge of the copied film, remove it from the stacker, and then place it on a level surface.

Reference
p.3 "Functions Requiring Optional Configurations"
Upper copy output
Copies come out between the upper output stacker and upper output guide.
Make sure [Upper] is selected under Copy Output Location.
Copies come out between the upper output stacker and upper output guide.
Lower copy output
Copies come out to the lower output stacker.
1 Select [Lower] under Copy Output Location.
![RICOH AFICIO MP W3600 - Select [Lower] under Copy Output Location. - 1](/content/2025/01/136380/images/823d35f6cea12d454d3e3d7c9aa8559b001d646877b6181019c6a045a8577aeb.jpg)
Note
If you copy a rolled original using the lower output auxiliary guide, and lower copy output is selected for the copy output location, the original in the lower output auxiliary guide may interfere with copy output. This may damage originals or cause paper jams. In such case, select Synchro Cut.
- Copies are ejected from the lower output exit onto the lower output tray, and then sent to the lower output stacker at the machine's front. Remove the copies from the stacker.
- When lower copy output is specified for A1 (D) or A0 (E) size paper, attach the lower output guides to the machine.
- You cannot stack A1 (D) and A0 (E) size paper on the lower output stacker at the same time. Remove stacked paper from the lower output stacker before you change the paper size.
- When using thick paper, the last sheet to be ejected may remain in the output exit. If this happens, remove it.
- Do not pull out the lower output auxiliary guide when lower copy output is selected. Otherwise, copies may not be stacked properly. When it is hard to remove the copies from the lower output stacker, pull out the guide.
- If the optional rear stacker is installed instead of the lower output tray and if you select lower copy output, copies come out to the rear stacker at the back of the machine (Rear copy output).
Reference
p.29 "Setting Rolled Originals"
p.56 "Synchro Cut"
Originals
This section describes the types of originals that can be placed, and missing image area.
Sizes and Weights of Recommended Originals
The following describes recommended paper sizes and non-compatible originals for this machine:
Metric version
| Where original is placed | Original size | Original weight |
| Original table | Standard sizes: A0□, A1□□, A2□□, A3□□, A4□□, B1 JIS□, B2 JIS□, B3 JIS□, B4 JIS□□ Custom sizes: Length: 210 - 15000 mm Width: 210 - 914 mm (including B1 ISO□, 625 mm×880 mm□, 440 mm×625 mm□) (Maximum width 960 mm) | 20.9 - 157 g/m² (18 - 135 kg) and 0.03 - 1 mm thick originals |
JIS: Japanese Industrial Standard
ISO: International Organization for Standardization
Inch version
| Where original is placed | Original size | Original weight |
| Original table | Standard sizes: · Engineering E (34"×44") □, D (22"×34") □, C (17"×22") □, B (11"×17") □, A (81/2"×11") □ · Architecture E (36"×48") □, 30"×42") □, D (24"×36") □, C (18"×24") □, B (12"×18") □, A (9"×12") □ · Other 81/2"×12") □, 81/2"×13") □, 81/2"×14") □, 11"×14") □, 11"×15") □, 12"×141/2") □, 30"×21") □ Custom sizes: Length: 8.3" - 590.5" Width: 8.3" - 36.0" (Maximum width: 37.8") | 20.9 - 157 g/m² (5.6 - 41.8 lb.) and 1.1 Mil - 40 Mil thick originals |
Originals that should be scanned using the carrier sheet
The following types of originals should be mounted on the carrier sheet. You should also use the carrier sheet for important originals and for originals you will copy repeatedly.
- Cut and pasted originals
- Originals with fold lines
- Wrinkled or torn originals
Waved originals - Punched originals
- Originals with sticky tape or adhesive
- Pasted originals
- Originals with a damaged leading edge
- Originals with surfaces that attach to glass easily such as photographs
- Originals drawn in pencil
Reference
p.28 "Setting the Carrier Sheet"
Non-compatible originals
The following types of originals can cause jams, or may itself be damaged.
- Originals other than those specified in "Sizes and Weights of Recommended Originals"
- Stapled or clipped originals
- Perforated or torn originals
- Bent, folded, or creased originals
- Pasted originals
- Originals with any kind of coating, such as thermal fax paper, art paper, aluminum foil, carbon paper, or conductive paper
- Originals with indexes, tags, or other projecting parts
- Thin and soft originals such as translucent paper
- Bound originals such as books
Damp originals - Badly curled originals
- Originals that vary in thickness
- Originals with sticky tape or adhesive
- Originals with thick leading edges
- Originals with wet ink or correction fluid
- Carbon-backed originals
- Originals not made of paper (such as glass, metal)
- Originals with a roll diameter smaller than 35 ~mm ( 1.4^ )
- Originals with a roll diameter larger than 110mm ( 4.3'' )
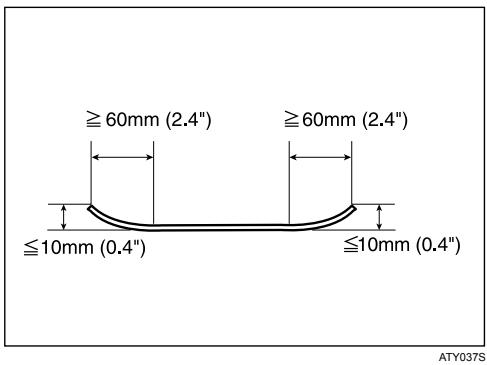
Flatten curled originals so they fit within the range shown below.
- Front and back curl; R 60 mm (2.4") or more, height 10 mm (0.4") or less
Originals that use more than 20% of the image area, may be faint.
Missing Image Area
Part of the original may not be copied as shown below (full-size copying on paper roll).
*1: Left and right, less than 5 mm (0.2")
Placing Originals
This section describes the procedure for placing originals on the original table.
Important
Set one original at a time on the original table.
Once an original start to feed in, do not push or pull it. This may damage the original.
□ If the original's rear edge is badly curled, smooth it out with both hands before scanning. If the original is inserted as is, it may be damaged.
□ When inserting an original, push it lightly against the rollers. Pushing it with force may cause an original jam.
- When inserting an original, be careful not to put the trailing edge into the entrance of the bypass tray. This will cause an original jam.
Note
Place originals after any correction fluid or ink has completely dried. Not taking this precaution will result in a dirtied exposure glass and blemished copies.
Dust and residue from originals drawn with a pencil can result in a dirtied exposure glass and blemished copies. We recommend using the carrier sheet for this type of original.
Placing Originals on the Original Table
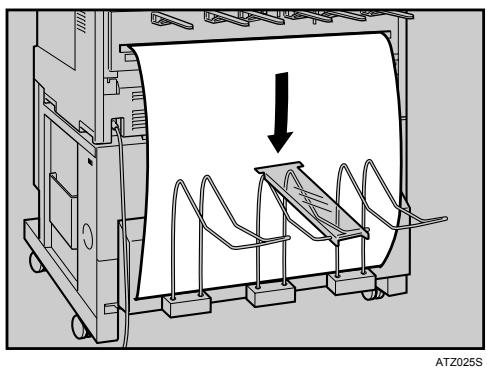
Place originals on the original table.
Make sure "Ready" appears on the screen.
2 Adjust the original guides to the size and orientation of the original.
Make sure the original guides are flush against the original. Do not push the original guide side fence with force.
ATY068S
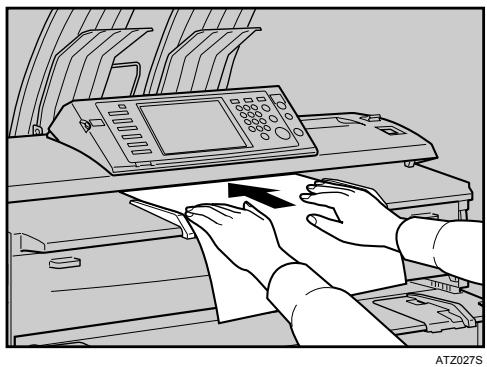
Using both hands, carefully insert the original between the original guides, copy side down.
Place the original centrally, so that the space on either side of its edges is even. Then push it carefully in, so that it makes light contact with the feed rollers. Support the original with your hands until it feeds in.
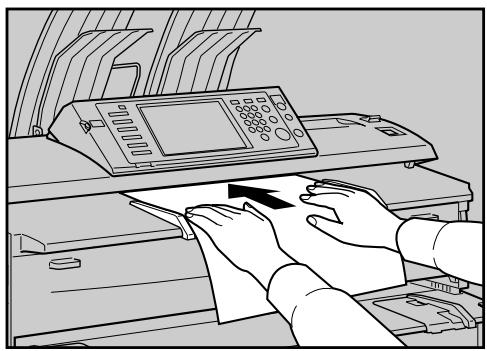
ATZ027S
Note
□ After inserting an original, do not try to handle it. Support it, if necessary, so as not to interrupt feeding.
- When copying rolled originals, use the lower output auxiliary guide.
□ You can change the original feed delay setting if originals are repeatedly feeding in slanted, or if you need to adjust the delay for the type of originals you are using. See "Original Feed Delay 1", General Settings Guide.
Reference
p.9 "Original Output Locations"
p.16 "Originals"
p.28 "Setting the Carrier Sheet"
p.29 "Setting Rolled Originals"
"General Features (System Settings)", General Settings Guide
To stop originals feeding in
If the originals are feeding in slanted, or jamming, etc., press the [Scanner Stop] key to stop them feeding in.
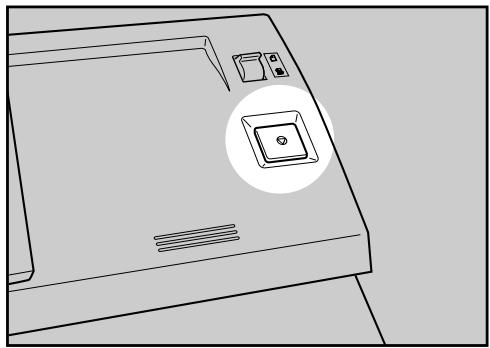
AAJ505S

Note
□ When you press the [Scanner Stop] key, the original stops immediately, which can cause it to jam. When this happens, see "Clearing Misfeeds", Troubleshooting.
- When you have set original rear output as the original output location, the rear edge of the originals is held at the output exit. To cancel this, press the [Scanner Stop] key.

Reference
p.9 "Original Output Locations"
"Clearing Misfeeds", Troubleshooting.
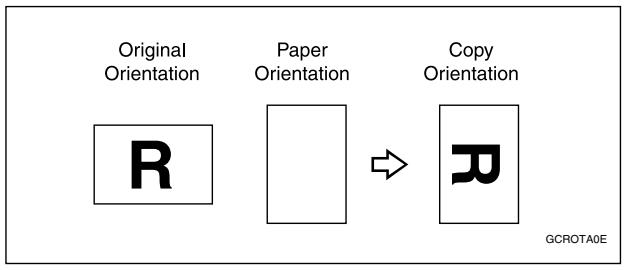
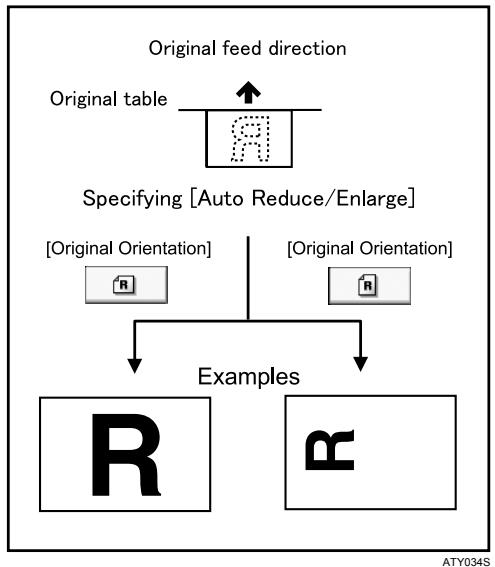
Original Orientation
Place the original face down on the original table so that the top of the original feeds in first.
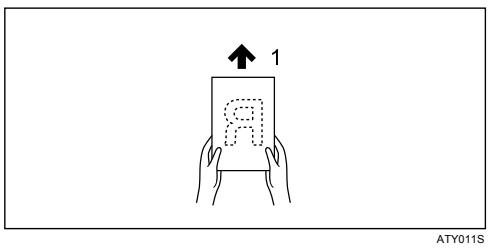
1. Original feed direction
When you cannot place the original as the above, you may not make copies as you want with particular functions.
If this happens, change the orientation by selecting or
The relationship between Original Orientation and the actual orientation of originals is as follows:
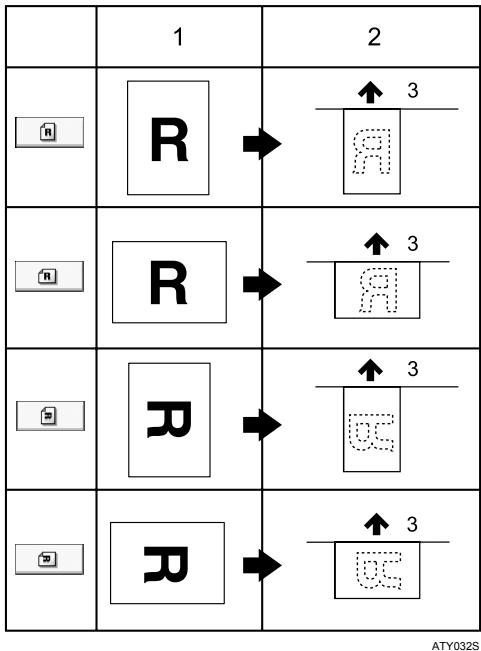
- Original
- Original on the original table
- Original feed direction
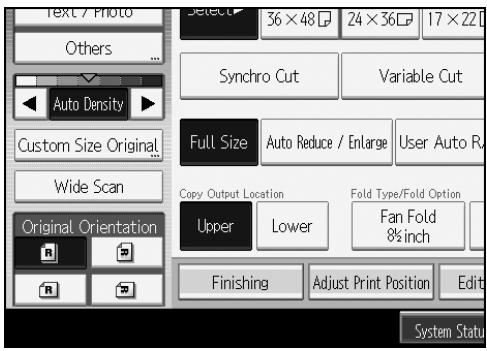
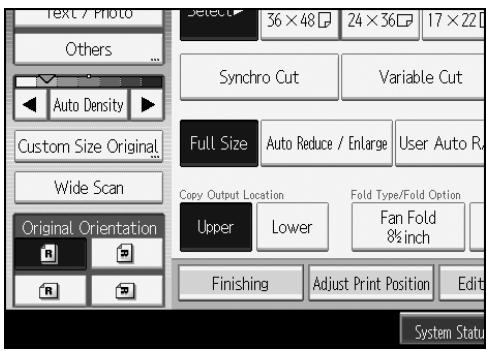
Under [Original Orientation], select an original orientation that is suitable for your original.
![RICOH AFICIO MP W3600 - Under [Original Orientation], select an original orientation that is suitable for your original. - 1](/content/2025/01/136380/images/b3948bdea745edb4b9b1710bf70c7d1f8c5baef28e37b87d22f6e57ee3fa2daa.jpg)
Note
It is recommended that you use this function together with Auto Paper Select or Preset Reduce/Enlarge.
Placing Custom Size Originals
When placing custom size originals, specify the size of the originals.
Press [Custom Size Original].
![RICOH AFICIO MP W3600 - Press [Custom Size Original]. - 1](/content/2025/01/136380/images/f0022c6cef9abc13b303b0a49225a48a96ebbad2f5f75916804eaaeee4c6d137.jpg)
2 Enter the horizontal size of the original with the number keys, and then press [#].
![RICOH AFICIO MP W3600 - Enter the horizontal size of the original with the number keys, and then press [#]. - 1](/content/2025/01/136380/images/9cea78e072edfcbbf3804246c01a6944a761303c1291d080a03184d1452c0eb0.jpg)
3 Enter the vertical size of the original with the number keys, and then press [#].
Press [OK].
Note
- Paper with a vertical size of 210-15000 mm (8.3" - 590.5") and a horizontal size of 210-914 mm (8.3" - 36.0") can be specified with this function.
If you do not specify the size, parts of the image may not be copied.
If you make a mistake, press [Clear], and then enter the value again.
Wide Scan
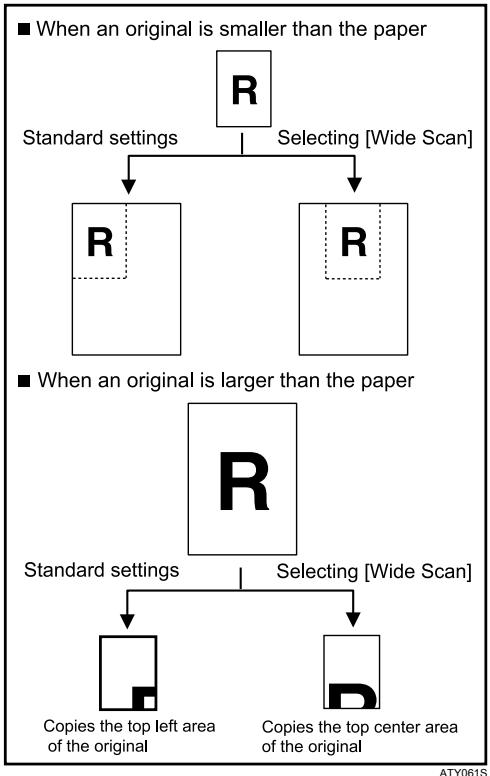
When Wide Scan is selected, the machine scans using a predetermined width, regardless of the actual width of the original.
You can copy a custom size original without specifying its horizontal and vertical sizes.
If the paper size you want to copy onto is larger than that of the original, this function sifts the image to the upper center of the paper.
If the paper size you want to copy onto is smaller than that of the original, this function copies the top center part of the image.
Press [Wide Scan].
![RICOH AFICIO MP W3600 - Press [Wide Scan]. - 1](/content/2025/01/136380/images/327c3fa78f8fe9b003d825f8d7a6f2ca79fadd65365d62da4b7576604734c2a1.jpg)
![RICOH AFICIO MP W3600 - Press [Wide Scan]. - 2](/content/2025/01/136380/images/fd7779b4c1c0ead91d6bc1b9b70bee9964a8efde15e57ea7c078f074d29827a1.jpg)
Note
If you select Wide Scan, the scan width is determined by the sum of the selected paper size and a specified reduction/enlargement ratio. The maximum width of Wide Scan is 914mm (36").
- When originals are scanned and stored in Document Server using this function, the stored original size is the paper size of the selected paper tray.
Depending on the paper cut method you are using, some functions cannot be used with this function. For more details, refer to "Function Compatibility".

Reference
p.155 "Function Compatibility"
Setting the Carrier Sheet
Use the carrier sheet when copying originals listed in "Originals that should be scanned using the carrier sheet", such as originals drawn in pencil, and pasted originals.
Important
- When using the optional carrier sheet, set the original output location to original rear output. If the original output location is set to original upper output, the original may be damaged.
Open the carrier sheet with the transparent sheet face up, and then insert the original also face up.
Align the original with the fold of the carrier sheet.
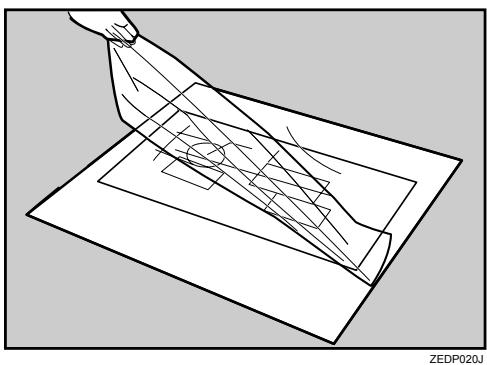
Using both hands, hold the carrier sheet face down, and carefully insert the folded edge of the carrier sheet into the insertion area.
Note
- When using the carrier sheet with Synchro Cut, the paper is cut to the size of the carrier sheet.
Reference
p.17 "Originals that should be scanned using the carrier sheet"
Setting Folded Originals (the Original Switching Lever)
When setting folded originals such as drawings, you can make copies with the fold lines erased.
1 Move the original switching levers at both sides of the machine to the front.
ATZ028S

Note
Originals of 157g / m^2 (41.8 lb.) or heavier cannot be used.
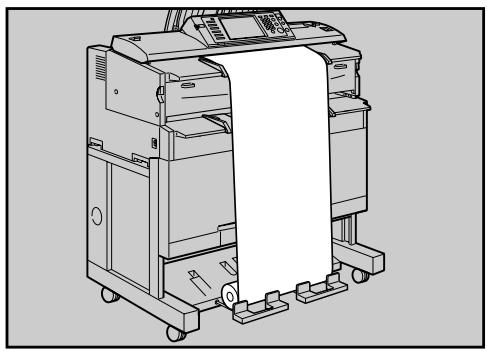
Setting Rolled Originals
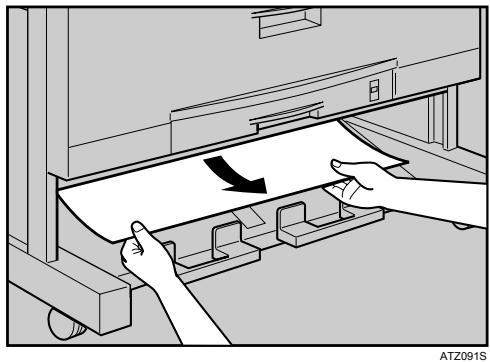
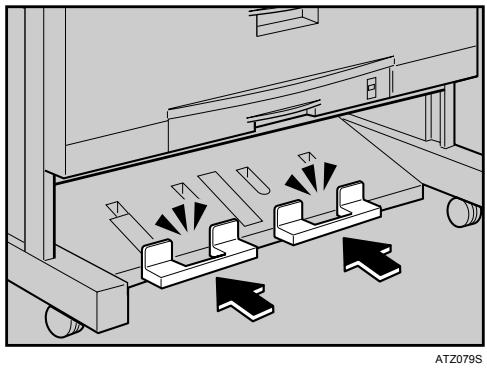
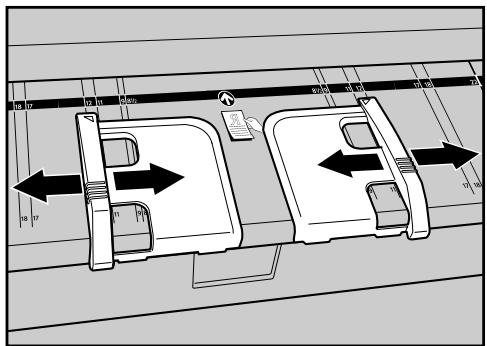
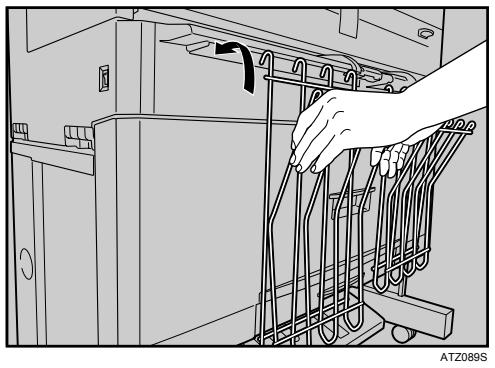
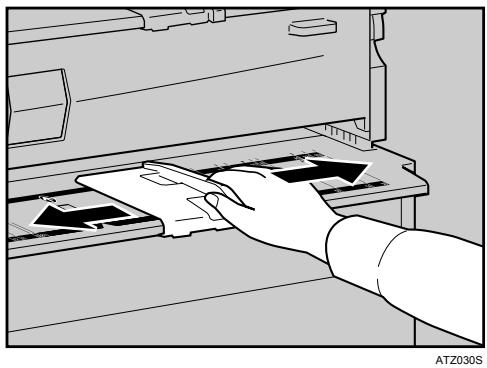
When setting rolled originals, you can make copies using the lower output auxiliary guide.
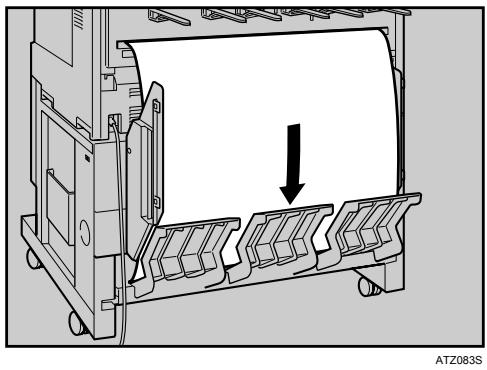
Pull the lower output auxiliary guide out.
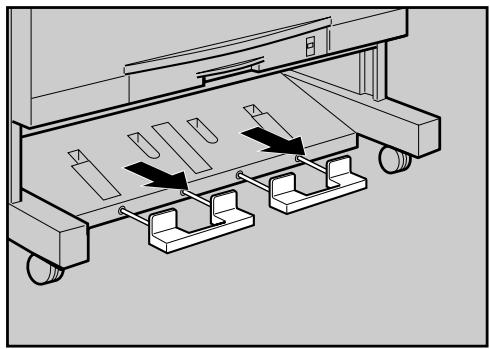
ATZ087S
Place the rolled original on the lower output auxiliary guide.
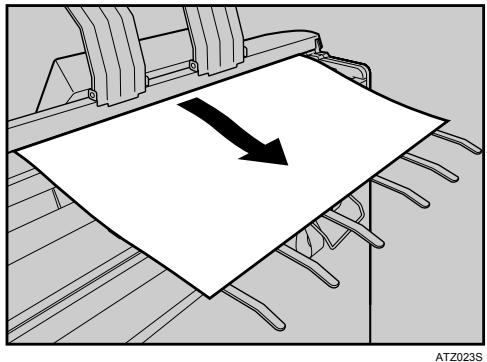
Pull the leading edge of the original up to the original table, and then adjust the original guides to the paper width.
4 Using both hands, carefully insert the original between the original guides, copy side down.
ATZ029S
Note
Do not apply excessive force to the lower output auxiliary guide.
- Close the lower output auxiliary guide after each use.
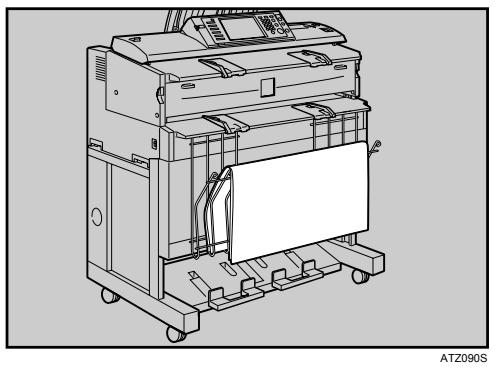
Setting the Original Hangers
The original hangers (optional) are useful when scanning two or more originals at a time.
Up to A0 (D) size originals can be placed on the hangers.
Attach each of the original hangers to the front of the machine.
When placing originals, space the hangers according to the size of your originals. Drape large originals, such as A0 (E) or A1 (D) sizes, over the tips of the hangers.
1
This chapter describes the procedure for making copies in various modes.
Basic Procedure
This section describes the basic procedure for making copies.
Important
□ When User Code Authentication is set, enter your user code (up to eight digits) with the number keys so that the machine accepts copy jobs. See "Administrator Tools", General Settings Guide.
□ When Basic Authentication, Windows Authentication, LDAP Authentication, or Integration Server Authentication is set, enter your login user name and password so that the machine accepts copy jobs. Ask the administrator for the login user name and password. For details, see "When the Authentication Screen is Displayed", About This Machine.
Make sure "Ready" appears on the screen.
If any other function is displayed, press the [Copy] key on the left side of the control panel.
Initial copy screen
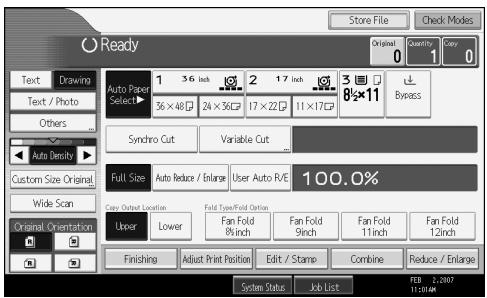
2 Make sure no previous settings remain.
When there are previous settings remaining, press the【Clear Modes】key.
Set the output locations for originals and copies, and then prepare to use them.
4 Select an [Original Orientation] that matches the orientation of your originals.
Make the necessary settings.
6 Enter the number of copies with the number keys.
The maximum copy quantity that can be set is 99.
7 Adjust the original guides to the width of the original, and then place the original face down.
The original feeds into the machine automatically, and copying starts.
If [Press Start Key] is selected for [Feed Start Method], copying starts after you press the [Start] key. See "Feed Start Method", General Settings Guide.
Note
- Always log off when you have finished using the machine to prevent unauthorized users from using the machine.
To stop the machine during a multi-copy run, press the [Clear/Stop] key after the original has fed in. The machine stops when the current copy finishes. Press [Yes] to cancel the copy job; press [No] to resume the interrupted copy job.
To cancel all copy jobs and return the machine to the default condition, press the [Clear Modes] key.
To clear entered values, press [Cancel] on the screen.
To confirm settings, press [Check Modes].
To stop the original feeding in, press the 【Scanner Stop】key.
□ If you register the settings using the program function, you can easily recall them by pressing the 【Program】key.
The number of scanned originals is displayed in the top right corner of the screen.
Reference
p.9 "Original and Copy Output Locations"
p.20 "Placing Originals"
p.22 "To stop originals feeding in"
p.23 "Original Orientation"
p.125 "Programs"
"When the Authentication Screen is Displayed", About This Machine "General Features (System Settings)", General Settings Guide
Check Modes
You can confirm the current settings on the screen.
Press [Check Modes].
![RICOH AFICIO MP W3600 - Press [Check Modes]. - 1](/content/2025/01/136380/images/529d00fc95b235b936da3735bfd9dd21a3acf3c1901af33d1907d7f6fac68b3c.jpg)
The Check Modes screen appears.
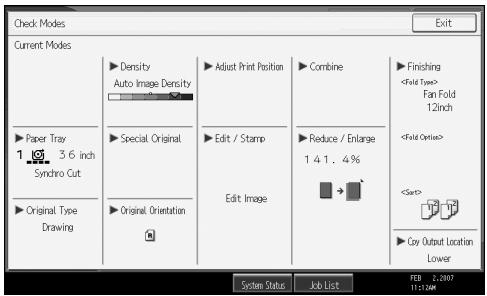
Original Counter/Reset
The number of scanned originals is displayed in the top right corner of the screen.
This allows you to check the number of originals in a job, or if any sheets have been fed together, and the number of copies that will be stored in the copy output tray.
Resetting the original counter
Reset the number of scanned originals displayed on the screen.
Press [Original] in the top right corner of the screen. The number is reset to 0.
Auto Start
If you make settings and scan the originals while the messages "Scanning originals can be started." and "Select copy mode and Place original." are displayed alternately, your copies will be made once the machine is ready.
Interrupt Copy
Use this function if you want to interrupt a long copy job to make urgently needed copies.
Press the [Interrupt] key.
![RICOH AFICIO MP W3600 - Press the [Interrupt] key. - 1](/content/2025/01/136380/images/5f3c60014ac241c27abd717fb063ea9967ab3ddabae9286fc2bac17de15984f0.jpg)
The interrupt key indicator lights.
The current copy is ejected, and the machine stops making copies.
2 Make the settings for a interrupt copy job.
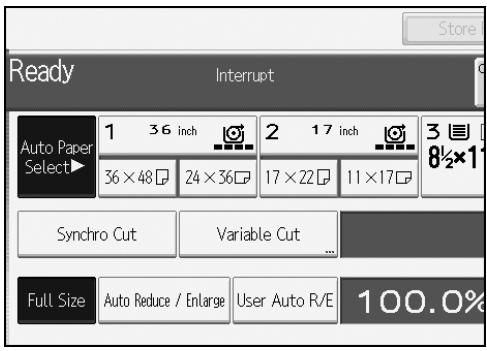
Place the original you want to copy face down.
The original feeds into the machine, and copying starts automatically.
When copying is complete, remove the originals and copies.
Press the [Interrupt] key again.
The interrupt key indicator goes off.
Replace the originals that you were copying.
The original feeds into the machine, and copying resumes automatically. To cancel copying, press the [Clear Modes] key.
Note
□ You cannot set Job Preset for Interrupt Copy.
The number of originals is counted from "1" when you use Interrupt Copy.
Job Preset
You can set up the next copy job during copying. If a long copy job is in progress and you do not want to wait for it to finish, you can use this function to set up the next copy job in advance. When the current copy job is finished, the next job will start automatically.
Press [New Job] when "copying..." appears.
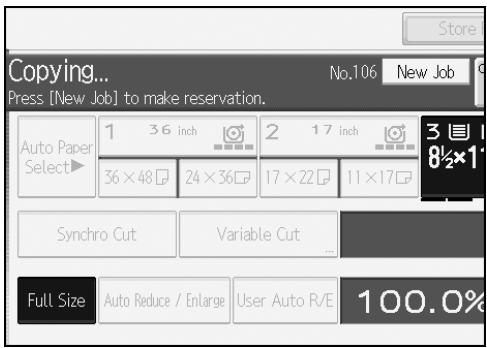
2 Be sure message "Ready" appears, and then set up the next copy job.
3 Place the original.
The original feeds automatically into the machine and is then scanned.
When the job preset is complete, a confirmation dialog box appears.
4 Press [Exit].
You return to the copy screen.
After the current copy job, the next copy job starts automatically.
Note
- You can switch the display to the current copy job by pressing [To Copying Screen].
- You can switch the display to the preset job by pressing [To Reserv. Screen].
- Preset copy jobs are registered under job numbers in the Reserv. Screen.
Reference
p.156 "Supplementary Information"
Job List
Jobs printed with Copier, Document Server, or Printer are temporarily stored in the machine, and then executed in order. The Job List function allows you to manage these jobs. For example, you can cancel incorrect job settings, or print an urgent document.
Note
□ You cannot use the Job List function when Interrupt Copy is active.
Documents printed with Scanner are not displayed in the job list.
Job List screen
This section explains displays and icons that appear in the Job List screen.
The Job List screen varies depending on whether [Job Order] is selected with Print Priority for the System Settings. For details about the setting procedure, see "Print Priority", General Settings Guide.
When [Job Order] is not selected:
The job list is displayed for each of the functions.
![RICOH AFICIO MP W3600 - When [Job Order] is not selected: - 1](/content/2025/01/136380/images/a8d32bbba0d326f83637477dce65daf621097937f0875d1a02ffe201a6069b1d.jpg)
When [Job Order] is selected:
The job list is displayed for all functions in the order of print jobs.
![RICOH AFICIO MP W3600 - When [Job Order] is selected: - 1](/content/2025/01/136380/images/c873ef1f1a4207e9d7424a6f8b80527b4a3df4809cba6fa83a6f53cfd1b1d5b2.jpg)
① Switches between job lists for each function.
② Switches between [Current / Waiting Job List] and [Job History].
③ Displays reserved job numbers.
④ Displays the function used to print jobs.
: Job printed with Copier
Job printed with Printer
: Job printed with Document Server
: Job printed with TopBinder
: Job printed with Web Image Monitor
Reference
"General Features (System Settings)", General Settings Guide
Checking jobs in the job list
You can check the contents of jobs in the job list.
Press [Job List].
2 Select a job whose contents you want to check.
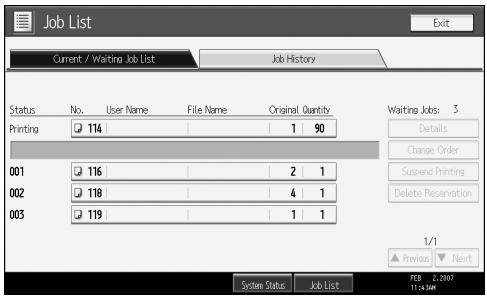
Press [Details], and then check the contents.
4 Press [Exit].
Changing the order of jobs
You can change the order of jobs in the job list.
Press [Job List].
2 Select a job whose order you want to change.
Press [Change Order].
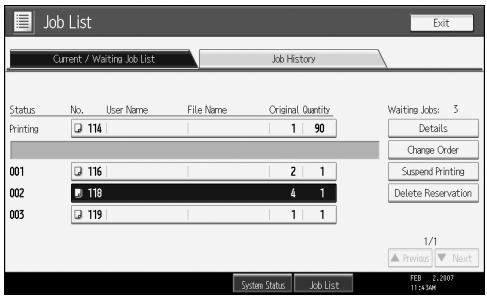
4 Change the order using [Top], [Previous], or [Next].
Press [OK].
Holding print jobs
You can hold jobs that are queued or currently printing.
Press [Job List].
2 Select a job you want to hold.
Press [Suspend Printing].

The selected job and the jobs that follow it are suspended. "Suspending" is displayed at the left of the jobs in the job list that are suspended.
Note
To resume the suspended jobs, press [Resume Printing].
This function is available only if [Job Order] is specified.
Deleting jobs
You can delete a job that is queued or currently printing.
Press [Job List].
2 Select a job you want to delete.
Press [Delete Reservation].

4 Press [OK].
Note
To delete multiple print jobs, select them in step 2.
Checking job history
You can view the history and contents of completed print jobs.
Press [Job List].
Press [Job History].
A list of completed print jobs appears.
3 Select a job whose contents you want to check.
Press [Details], and then check the contents.
Press [Exit].
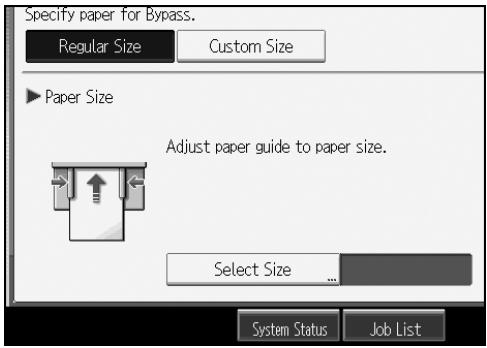
Copying from the Bypass Tray
Use the bypass tray to copy onto paper sizes that cannot be loaded on the paper roll trays, or cut paper tray.
Important
- Paper that has a vertical length of 210 - 914.4 mm (8.27" - 36.00") and a horizontal length of 257 - 2000 mm (10.12" - 78.74") can be copied from the bypass tray.
- Insert the paper in the bypass tray lengthwise or sideways to fit it onto the feeding orientation.
Insert the paper in the bypass tray lengthwise when you use A0 (E) size paper.
Press [Bypass], and then press the [#] key.
2 Select the size and type of the paper.
Press [OK].
4 Enter the number of copies with the number keys.
Place your original, and let it be scanned.
6 Adjust the bypass tray's paper guides to the size of the paper.
7 Insert the paper copy side up into the bypass tray.
The paper feeds into the machine automatically and copying starts.
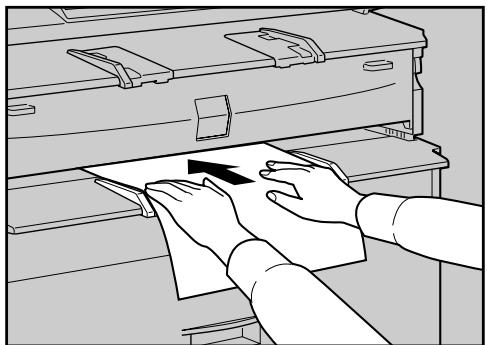
ATZ031S
Note
Insert the paper until you hear the beep.
Place the original centrally, so that the space on either side of its edges is even. Then push it carefully in, so that it makes light contact with the feed rollers. Support the paper with your hands until it feeds in.
Do not copy on both sides of the paper.
Do not use paper already copied or printed on.
To make multiple copies, insert an additional sheet after each feeds in.
For details about paper type and orientation that can be loaded in the bypass tray, see "Copy Paper", About This Machine.
To set a rolled original, pull out the lower output auxiliary guide to the front, and then place the rolled original on it.
Reference
p.20 "Placing Originals"
p.29 "Setting Rolled Originals"
p.156 "Supplementary Information"
"Copy Paper", About This Machine
When Copying onto Regular Size Paper
Makes copies onto regular size paper from the bypass tray.
Press [Bypass], and then press the # key.
2 Make sure that [Regular Size] is selected.
Press [Select Size].

4 Select the paper size.
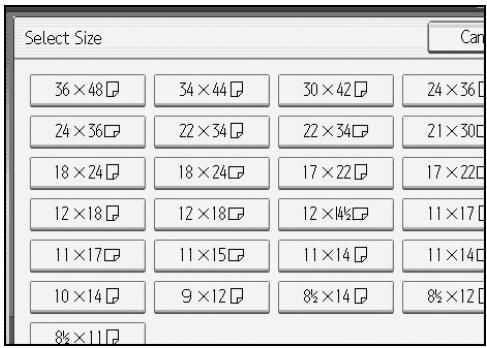
Press [OK] twice.
6 Place your original, and let it be scanned.
7 Adjust the bypass tray's paper guides to the size of the paper.
Insert the paper copy side up into the bypass tray. The paper feeds into the machine automatically and copying starts.
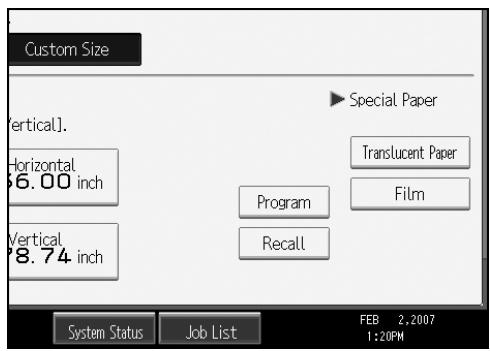
When Copying onto Custom Size Paper
Makes copies onto custom size paper from the bypass tray.
Press [Bypass], and then press the [#] key.
Press [Custom Size].
3 Enter the horizontal size of the paper with the number keys, and then press [#].

4 Enter the vertical size of the paper with the number keys, and then press [#].
Press [OK].
6 Place your original, and let it be scanned.
7 Adjust the bypass tray's paper guides to the size of the paper.
Insert the paper copy side up into the bypass tray. The paper feeds into the machine automatically and copying starts.
Note
□ If you make a mistake in step 3 or 4, press [Clear], and then enter the value again.
Registering a custom size
Register a custom paper size.
Press [Bypass], and then press the # key.
Press [Custom Size].
3 Enter the horizontal size of the paper with the number keys, and then press [#].
4 Enter the vertical size of the paper with the number keys, and then press [#].
Press [Program].
The confirmation screen appears.
6 Press [Exit].
Recalling the registered custom size
Recalls the registered paper size.
Press [Bypass], and then press the # key.
Press [Custom Size].
Press [Recall].

The registered size is displayed.
Press [OK].
When Copying onto Special Paper
When copying onto special paper such as translucent paper or films, select the type and size of paper.
Important
Remove a copied special paper every time it is ejected.
Press [Bypass], and then press the # key.
2 Select a paper type ([Translucent Paper] or [Film]) in the special paper settings.
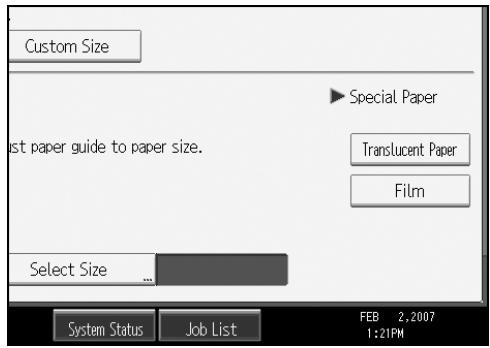
Set the paper size.
Press [OK].
Place your original, and let it be scanned.
6 Adjust the bypass tray's paper guides to the size of the paper.
Insert the paper copy side up into the bypass tray.
The paper feeds into the machine automatically and copying starts.
Note
□ Printing on special paper may be slower than printing on plain paper.
Copier Functions
This section describes the copy functions.
Selecting the Original Type Setting
Select one of the following seven types to match your originals:
Text
For originals that contain mainly text or printed characters.
Drawing
For drawings that contain fine lines. Faint lines are clearly reproduced.
Text/Photo
For originals that contain both text and photographs or pictures.
Photo
For photographs or pictures.
Background Lines
For images drawn on section paper (green sectioned graph paper) without copying the lines on the paper. Blue lines on originals cannot be eliminated.
Patched Original
For originals made up of several pieces of smaller originals which differ in background density. Selecting this mode tones down the dark background of originals.
Generation Copy
For originals that are copied. The copy image can be reproduced sharply and clearly.
1 Select the original type.
Note
To select [Photo], [Background Lines], [Patched Original], or [Generation Copy], select [Others] first.
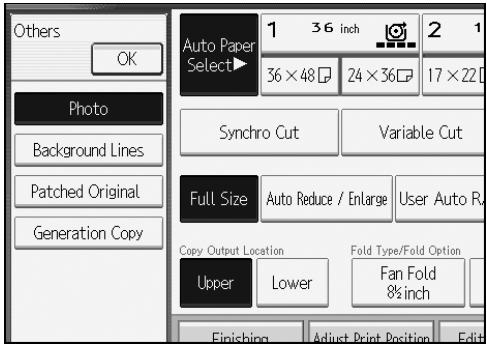
- When you select [Photo], Auto Image Density is automatically canceled.
- When you select [Patched Original], thick lines, text, or solid images in the original are recognized as dark background that may not be copied.
Adjusting Copy Image Density
There are three types of adjustment available.
Auto image density
The machine automatically adjusts the image density by scanning the densities of originals. Dark texture originals (such as newspaper or recycled paper) will be copied so that background will not be reproduced.
Manual image density
You can adjust the density of the overall original in seven steps.
Combined auto and manual image density
Adjusts the density of an image only for dark texture originals.
Auto image density
The machine automatically adjusts the image density by scanning the densities of originals. Dark texture originals (such as newspaper or recycled paper) will be copied so that background will not be reproduced.
1 Make sure that [Auto Density] is selected.
When [Auto Density] is not selected, press [Auto Density].
![RICOH AFICIO MP W3600 - Make sure that [Auto Density] is selected. - 1](/content/2025/01/136380/images/921ad1eb7a4d7fc029b48e5526ef88c57f96d0ff6501a62de450828e272d3b4f.jpg)
Manual image density
You can adjust the density of the overall original in seven steps.
When [Auto Density] is selected, press [Auto Density] to cancel it.
Press [<] or [▶] to adjust the image density. The density indicator "∇" moves.
Combined auto and manual image density
Adjusts the density of an image only for dark texture originals.
Make sure [Auto Density] is selected.
When [Auto Density] is not selected, press [Auto Density].
Press [ or [] to adjust the image density. The density indicator " " moves.
Note
□ If dark backgrounds still appear on copies, adjust the density using [4].
Reference
"General Features (Copier / Document Server Features)", General Settings Guide
Selecting Copy Paper
There are two ways to select copy paper:
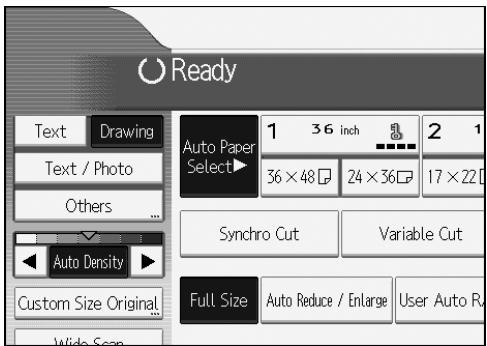
Auto Paper Select
The machine selects a suitable size of copy paper automatically based on original size and reproduction ratio.
Manual Paper Select
Choose the tray containing the paper you want to copy onto: paper roll tray, cut paper tray, or bypass tray.
See the following lists for paper sizes and orientations that can be used with Auto Paper Select (when copying at a ratio of 100% ):
Metric version
A0□, A1□□, A2□□, A3□□, A4□, B1 JIS□, B2 JIS□□, B3 JIS□□, B4 JIS□
Inch version
- Engineering E (34'' × 44'') , D (22'' × 34'') , C (17'' × 22'') , B (11'' × 17'') , A (8^1 / 2'' × 11'') , 8^1 / 2'' × 14''
- Architecture
E (36'' × 48'') , D (24'' × 36'') , C (18'' × 24'') , B (12'' × 18'') , A (9'' × 12'')
Others 8^1 / 2^ × 13^ ,30^ × 21^ ,30^ × 42^
Note
- Only the paper trays set to [No Display] or [Recycled Paper] in Paper Type in Tray Paper Setting in System Settings and also set to [Yes] in Apply Auto Paper Select can be selected in Auto Paper Select mode.
Reference
p.3 "Functions Requiring Optional Configurations"
p.43 "Copying from the Bypass Tray"
p.156 "Supplementary Information"
"Tray Paper Settings", General Settings Guide
Auto Paper Select
The machine selects a suitable size of copy paper automatically based on the original size and the reproduction ratio.
Make sure that Auto Paper Select is selected.
Trays with a key mark (B) will not be automatically selected.
Note
□ If no paper suitable for the size and magnification you have specified is loaded in the paper trays, load paper of the required size in a paper tray. Alternatively, you can select a suitable magnification ratio for the paper currently loaded in the paper trays. After doing one of the above, set your original again.
Special size paper cannot be used with Auto Paper Select.
Reference
"Tray Paper Settings", General Settings Guide
Manual Paper Select
Choose the tray containing the paper you want to copy onto: paper roll tray, cut paper tray, or bypass tray.
0 Select the paper roll tray, cut paper tray, or bypass tray.
The indicator corresponding to the selected paper tray is highlighted.
Rotate Copy
If the original's width is different to that of the paper set in the paper roll tray, or the original's orientation is different to that of the paper set in the cut paper tray, the machine rotates the original image by 90 degrees to fit it onto the copy paper.
Note
This function works when [Auto Paper Select] or [Auto Reduce / Enlarge] is selected. See "Auto Paper Select" and "Auto Reduce/Enlarge".
The default setting for Auto Tray Switching is [With Image Rotation]. You cannot use Rotate Copy if this setting is changed to [Without Image Rotation] or [Off]. See "Auto Tray Switching", General Settings Guide.
□ You cannot use Rotate Copy when copying onto A0 (E), A4 (A), or B4 JIS size paper. In this case, place your original in the orientation.
Reference
p.43 "Copying from the Bypass Tray"
p.54 "Auto Paper Select"
p.64 "Auto Reduce/Enlarge"
"General Features (Copier / Document Server Features)", General Settings Guide
Setting the Length of Copy Paper Cut
Specify the length to cut the paper loaded in the paper roll tray.
The following paper cut methods are available:
Synchro Cut
Cuts the paper at the same length as the original. If the copy is enlarged or reduced, the machine calculates the appropriate length for the magnification ratio and cuts the paper.
Preset Cut
Cuts the paper at a preset size, regardless of the size of the original. You can use this to copy different sized originals to the same size.
Variable Cut
Cuts the paper to the size entered.
Note
The minimum cut length is 280 mm (11"), and the maximum length is 15000 mm (590.5") for plain paper of 841 mm (34" or 36") or more in width. For other paper, the maximum length is 3600 mm (141.8"). If you specify a length greater than the maximum, paper will be fed in at a slant, resulting in poor copy quality and wrinkled paper.
□ You cannot cut the paper in the bypass tray.
Reference
p.3 "Functions Requiring Optional Configurations"
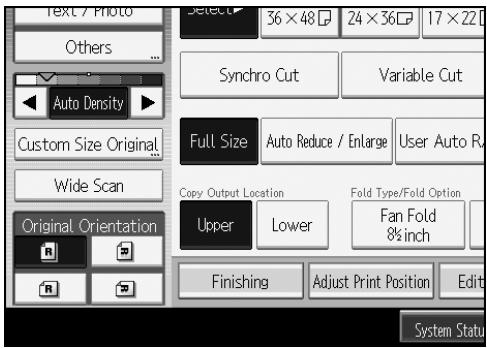
Synchro Cut
Cuts the paper at the same length as the original. If the copy is enlarged or reduced, the machine calculates the appropriate length for the magnification ratio and cuts the paper.
1 Select [Synchro Cut].
![RICOH AFICIO MP W3600 - Select [Synchro Cut]. - 1](/content/2025/01/136380/images/a0b6237baf709d5fb515d4f57e5df5f49b3caaccc6aca3c8f1105b75a146ffca.jpg)
2 Select a paper roll tray.
Note
Depending on the original length and paper type, copy paper length may be different from the original.
Preset Cut
Cuts the paper at a preset size, regardless of the size of the original. You can use this to copy different sized originals to the same size.
1 Select a preset cut size of the paper roll tray 1 or 2.


Note
The preset cut size differs depending on the paper roll width. It is cut in the following sizes or standard lengths.

Metric version
| Paper roll width | Preset □ | Preset □ |
| 841 mm | A0□ | A1□ |
| 594 mm | A1□ | A2□ |
| 420 mm | A2□ | A3□ |
| 297 mm | A3□ | - |
| 210 mm | A4□ | - |
| 728 mm | B1 JIS□ | B2 JIS□ |
| 515 mm | B2 JIS□ | B3 JIS□ |
| 364 mm | B3 JIS□ | - |
| 257 mm | B4 JIS□ | - |
| 880 mm | 1189 mm | 594 mm |
| 800 mm | 1189 mm | 594 mm |
| 707 mm | 1000 mm | 500 mm |
| 660 mm | 841 mm | 420 mm |
| 625 mm | 880 mm | 440 mm |
Inch version (Engineering)
| Paper roll width | Preset □ | Preset □ |
| 34 inch | 34 × 44□ | 22 × 34□ |
| 22 inch | 22 × 34□ | 17 × 22□ |
| 17 inch | 17 × 22□ | 11 × 17□ |
| 11 inch | 11 × 17□ | - |
| 8 1/2inch | 8 1/2 × 11□ | 8 1/2 × 14□ |
Inch version (Architecture)
| Paper roll width | Preset □ | Preset □ |
| 36 inch / 914 mm | 36 × 48□ | 24 × 36□ |
| 30 inch | 30 × 42□ | 21 × 30□ |
| 24 inch | 24 × 36□ | 18 × 24□ |
| 18 inch | 18 × 24□ | 12 × 18□ |
| 12 inch | 12 × 18□ | - |
| 9 inch | 9 × 12□ | - |
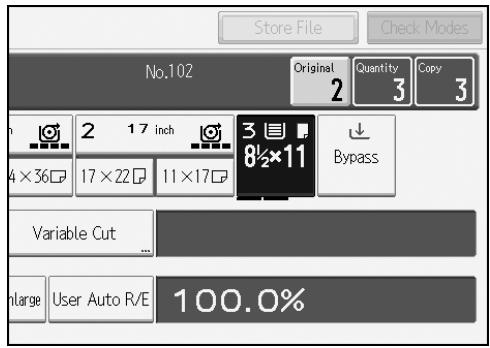
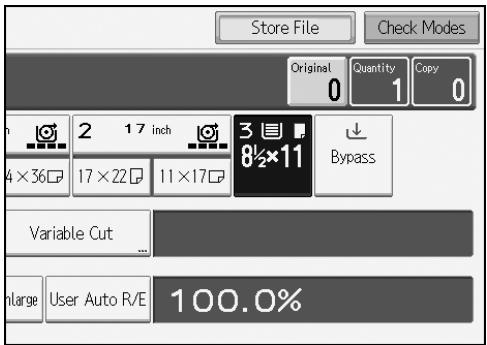
Variable Cut
Cuts the paper to the size entered.
1 Select [Variable Cut].
![RICOH AFICIO MP W3600 - Select [Variable Cut]. - 1](/content/2025/01/136380/images/487f5d983572b970fabf10f8338e5580ca87070b2fc40ba61bb7c7ce390dd5ca.jpg)
2 Enter the length with the number keys, and then press [#].
![RICOH AFICIO MP W3600 - Enter the length with the number keys, and then press [#]. - 1](/content/2025/01/136380/images/acfb3a7b7413c82a15dd9e6412ab94faffa2b7c9968a93128a0722dd95819b93.jpg)
Press [OK].
The entered length is displayed on the screen.
4 Select a paper roll tray.
Note
If you make a mistake, press [Clear] to set a new value.
To cancel Variable Cut, press [Cancel].
Preset Reduce/Enlarge
You can select a preset ratio for copying.
Metric version
Enlargement ratios: 141.4% , 200.0% , 282.8% , 400.0%
Reduction ratios: 25.0% , 35.4% , 50.0% , 70.7%
Inch version
Engineering
Enlargement ratios: 129.4% , 200.0% , 258.8% , 400.0%
Reduction ratios: 25.0% , 32.4% , 50.0% , 64.7%
Architecture
Enlargement ratios: 133.3% , 200.0% , 266.7% , 400.0%
Reduction ratios: 25.0% , 33.3% , 50.0% , 66.7%
Press [Reduce / Enlarge].
![RICOH AFICIO MP W3600 - Press [Reduce / Enlarge]. - 1](/content/2025/01/136380/images/4cb12dd4b7b597a3b3dd19b4ac18bf55e111d325066650e18bca429c03e23f05.jpg)
2 Select a ratio, and then press [OK].
![RICOH AFICIO MP W3600 - Select a ratio, and then press [OK]. - 1](/content/2025/01/136380/images/25d3350830940df57b0deac02035c5fd14bc0377704b230af65ff6945c68824c.jpg)
The selected ratio appears on the display.
Note
- Select one of the preset ratios based on the original size and paper size.
□ You can store up to three ratios of your own for frequently used ratio, but are not preset. The ratios can be set in 0.1% increments. See "Reproduction Ratio", General Settings Guide.
For details about the relationship between the original and paper sizes for preset ratios, see "Magnification Ratio Chart".
Reference
p.156 "Supplementary Information"
p.166 "Magnification Ratio Chart"
"Reproduction Ratio", General Settings Guide
Zoom
You can change the reproduction ratio in increments of 0.1% .
You can set the ratio in the following ways.
- Specifying the ratio with [-] and [+]
- Entering the ratio with the number keys
Reference
p.156 "Supplementary Information"
Specifying the ratio with [一] and [十]
Select a ratio close to the one you want to set from Preset Reduce/ Enlarge, and then press [-] or [+] to adjust the ratio.
Press [Reduce / Enlarge].
![RICOH AFICIO MP W3600 - Press [Reduce / Enlarge]. - 1](/content/2025/01/136380/images/910ecf056c64974953faf55a2698e26c29d95ce6ecbb83effc86a36bdd83cb2d.jpg)
2 Select a preset ratio which is close to the desired ratio.
Adjust the ratio with [-] or [+] .
![RICOH AFICIO MP W3600 - Press [Reduce / Enlarge]. - 2](/content/2025/01/136380/images/fc9ed63fe015bb0a96e0d3b3765050875d9756ae4a0e20656a0cc87cac8800b6.jpg)
Press [OK].
Note
□ If you make a mistake in step 3, readjust it with ([-]) or ([+]
Entering the ratio with the number keys
Specifying a ratio with the number keys.
Press [Reduce / Enlarge].
![RICOH AFICIO MP W3600 - Press [Reduce / Enlarge]. - 1](/content/2025/01/136380/images/76d0d947d92cb3edde6a00ea41fbe333cb8b97afe3c6c868353f80dc121dc9e8.jpg)
Press [Number keys].
![RICOH AFICIO MP W3600 - Press [Number keys]. - 1](/content/2025/01/136380/images/4d3841b629e0e4eb31c29860355eb4aa92f9a2417f8430d4594c6e255fead9d6.jpg)
3 Enter the desired ratio with the number keys, and then press [#].
Press [OK] twice.
Note
Use the [.)] key to enter a decimal point.
To change the value, press [Clear], and then enter a new value.
Auto Reduce/Enlarge
The machine selects an appropriate reproduction ratio based on the paper and original sizes you select.
This is useful to copy different size originals to the same size paper.
To ensure the print result you require is produced, specify Original Orientation before using Auto Reduce/Enlarge.
Important
□ You cannot use the bypass tray with this function.
See the following lists for paper sizes and orientations you can use:
Metric version
A0□, A1□□, A2□□, A3□□, A4□, B1 JIS□, B2 JIS□□, B3 JIS□□, B4 JIS□
Inch version
Engineering
E (34''× 44'') ,D(22''× 34'') ,C(17''× 22'') ,B(11''× 17'') ,
A (8^1 / 2^ × 11^ ) ,8^1 / 2^ × 14^
Architecture
E (36''× 48'') D, D (24''× 36'') D, C (18''× 24'') D, B (12''× 18'') D,
A (9^ × 12^ )
- Others
8^1 / 2^ × 13^ ,30^ × 21^ ,30^ × 42^
Press [Auto Reduce / Enlarge].
![RICOH AFICIO MP W3600 - Press [Auto Reduce / Enlarge]. - 1](/content/2025/01/136380/images/963d2fd117a10d9f48512ceee80b8d2bf553cab02fa97bcfdae0f497afcca6a8.jpg)
2 Select the paper size.
Note
The machine selects one of the following ratios:
Metric version 400.0% ,282.8% ,200.0% ,141.4% ,100.0% ,70.7% ,50.0% ,35.4% ,25.0%
- Inch version (Engineering)
400.0%, 258.8%, 200.0%, 129.4%, 100.0%, 64.7%, 50.0%, 32.4%, 25.0%
- Inch version (Architecture)
400.0%, 266.7%, 200.0%, 133.3%, 100.0%, 66.7%, 50.0%, 33.3%, 25.0%
- Make sure the Original Orientation setting matches the actual orientation of your original.
Reference
p.23 "Original Orientation"
User Auto Reduce/Enlarge
Use this function to copy to a selected size for each original size.
When the original is set, the machine automatically enlarges or reduces the image to fit the size of the copy paper.
You can select the following combinations:
Metric version
| Original size | Copy size |
| A0 | A0, A1, A2, A3, A4, B1 JIS, B2 JIS, B3 JIS, B4 JIS |
| A1 | |
| A2 | |
| A3 | |
| A4 | |
| B1 JIS | |
| B2 JIS | |
| B3 JIS | |
| B4 JIS |
Inch version
| Original size | Copy size | |
| Engineering | E (34"×44") | E (34"×44"), D (22"×34"), C (17"×22"), B (11"×17"), A (81/2"×11") |
| D (22"×34") | ||
| C (17"×22") | ||
| B (11"×17") | ||
| A (81/2"×11") | ||
| Architecture | E (36"×48") | E (36"×48"), D (26"×36"), C (18"×24"), B (12"×18"), A (9"×12") |
| D (26"×36") | ||
| C (18"×24") | ||
| B (12"×18") | ||
| A (9"×12") |
Press [User Auto R/E].
Check that the combination selected for User Auto Reduce/Enlarge is the one you want.
Note
The default setting is to copy at the same size (full size). You can change the combination with Copier/Document Server Features in User Tools.
- Make sure the Original Orientation setting matches the actual orientation of your original.
Reference
p.3 "Functions Requiring Optional Configurations"
p.23 "Original Orientation"
"Reproduction Ratio", General Settings Guide
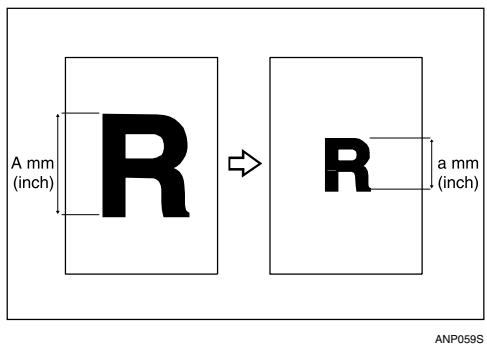
Size Magnification
This function calculates an enlargement or reduction ratio based on the lengths of the original and copy.
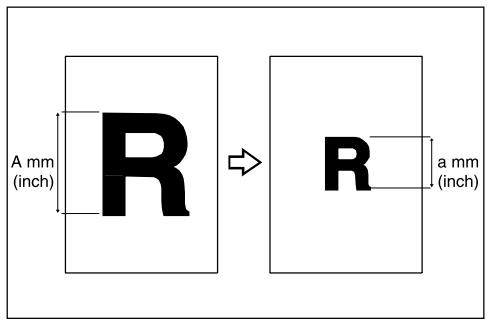
ANP059S
Measure and specify the lengths of the original and copy by comparing “A” with “a”.
Press [Reduce / Enlarge].
![RICOH AFICIO MP W3600 - Press [Reduce / Enlarge]. - 1](/content/2025/01/136380/images/6b7185655a0578d6cd0c8f17f4987d96786e68a208e31452563bce3bcf5a9212.jpg)
Press [Size Magnification].
3 Enter the length of the original with the number keys, and then press [#].
![RICOH AFICIO MP W3600 - Press [Size Magnification]. - 1](/content/2025/01/136380/images/f29b0d799ba250adc0116275b459464b8cad692086a602db8a133980220ef2b4.jpg)
4 Enter the length of the copy with the number keys, and then press [#].
Press [OK] twice.
![RICOH AFICIO MP W3600 - Press [Size Magnification]. - 2](/content/2025/01/136380/images/fc0e8050e3043efd8b12c1bd32cc7bd0f4855e3274cb67136aded9c1056cce57.jpg)
Note
To change the length after pressing [#] in step 4, select [Original] or [Copy], and then enter the desired length.
- You can enter sizes between 1 to 9999 ~mm (0.1" to 99.9") in 1 ~mm (0.1") steps.

Reference
p.156 "Supplementary Information"
Directional Magnification (%)
Specify the horizontal and vertical reproduction ratios, individually. Copies can be reduced or enlarged at different reproduction ratios horizontally and vertically.

ATY050S
a: Horizontal ratio
b: Vertical ratio

Reference
p.156 "Supplementary Information"
Entering the ratio with the number keys
Specify a ratio with the number keys.
Press [Reduce / Enlarge].
![RICOH AFICIO MP W3600 - Press [Reduce / Enlarge]. - 1](/content/2025/01/136380/images/b666cae76969a5f924e504546095068efffd000eeeb3fff7028772e064e246be.jpg)
Press [Direct. Mag. %].
Press [Horizontal].
![RICOH AFICIO MP W3600 - Press [Horizontal]. - 1](/content/2025/01/136380/images/ead3c3fcbd70415046d636b8bd46bda6a3900e47f90ebd57ac2a0e7c5c3c6ad0.jpg)
Enter the desired ratio with the number keys, and then press [#].
Press [Vertical].
6 Enter the desired ratio with the number keys, and then press [#].
Press [OK] twice.
Specifying the ratio with [一] and [十]
Specify a ratio using [一] or [十].
Press [Reduce / Enlarge].
![RICOH AFICIO MP W3600 - Specifying the ratio with [一] and [十] - 1](/content/2025/01/136380/images/db13d620417a109f474f9f5028aacee263851d010a9c8da0b7570f2f8ee8ea99.jpg)
Press [Direct. Mag. %].
Press [++] [—] keys].
Press [Horizontal].
Adjust the ratio using ([+] or ([-]).
![RICOH AFICIO MP W3600 - Specifying the ratio with [一] and [十] - 2](/content/2025/01/136380/images/5e55c177058262333d1690d663ab5625be6d52d9c608d36cf43939eea0ccafe2.jpg)
Pressing [+ ] or [-] changes the ratio in increments of 0.1% . Pressing and holding down [+] or [-] changes it in increments of 1% .
6 Press [Vertical].
Adjust the ratio with [+ or [-] .
Press [OK] twice.
Note
□ If you make a mistake in step 5 or 7, readjust the ratio with [+ ] or [-] .
Directional Magnification (inch)
Specify the horizontal and vertical lengths of the original and copy image. Copies can be reduced or enlarged at different reproduction ratios horizontally and vertically.

① Horizontal original size: A mm (inch)
② Vertical original size: B mm (inch)
③ Horizontal copy size: a mm (inch)
④ Verticalcopysize:bmm(inch)
Measure and specify the lengths of the original and copy by comparing "A" with "a", and "B" with "b".
Press [Reduce / Enlarge].
![RICOH AFICIO MP W3600 - Press [Reduce / Enlarge]. - 1](/content/2025/01/136380/images/2881904639bc707427e8b41d963fbbd61dcc86cf9ff3acea06a6a50999dceb39.jpg)
Press [Dir. Size Mag. inch].
3 Enter the horizontal size of the original with the number keys, and then press [#].
![RICOH AFICIO MP W3600 - Press [Dir. Size Mag. inch]. - 1](/content/2025/01/136380/images/3e4d9711cdb82d5eaa800783ac336c194cb786b20ac8625958664a597f7b3e07.jpg)
4 Enter the horizontal size of the copy with the number keys, and then press [#].
5 Enter the vertical size of the original with the number keys, and then press [#].
6 Enter the vertical size of the copy with the number keys, and then press [#].
Press [OK] twice.
Note
To change a length in steps 3 to 6, press the key you want to change and enter the new value.
□ You can enter sizes between 1 to 9999 ~mm (0.1" to 99.9") in 1 ~mm (0.1") steps.
Reference
p.156 "Supplementary Information"
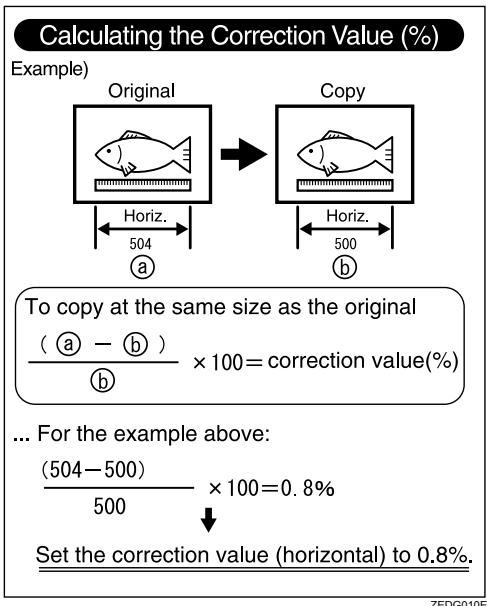
Fine Magnification
The machine calculates the correction ratios to produce copies that are close to the actual image size.
For environmental reasons such as humid conditions, paper may expand or shrink. This can result in a mismatch between the size of the original and copy. This function uses the measurements of the original and the copy to calculate a ratio to produce copies that are close to the actual size.
Measure the length and width of the original and the copy, and then calculate the correction ratio as follows:
Press [Reduce / Enlarge].
![RICOH AFICIO MP W3600 - Press [Reduce / Enlarge]. - 1](/content/2025/01/136380/images/6a956c6e3bd9f4f3302ed7751ef459fa13c58ecfc0b87a581932b5183e303746.jpg)
Press [Fine Magnification].
3 Adjust the horizontal ratio using \([-]\) and \([+\]
![RICOH AFICIO MP W3600 - Adjust the horizontal ratio using \([-]\) and \([+\] - 1](/content/2025/01/136380/images/a47ddb78dbdcc7c8839b2542d7110aa8312beda937ca21d231fac77daf3fc285.jpg)
4 Adjust the vertical ratio using \([-]\) and \([+\]
Press [OK] twice.
Note
- Fine Magnification is used for originals that have already been scanned. If you want to apply fine magnification corrections to paper that has stretched due to the paper type or exposure to humid conditions, see "Fine Ratio Adjustment: Copier", General Settings Guide.
□ You can also make these settings in "Fine Ratio Adjustment: Copier" under System Settings. If you specified the ratio in both System Settings and this function, the resulting settings will be the sum of the set value.
□ When the bypass tray is selected, you can set Fine Magnification after scanning the original.
Reference
p.156 "Supplementary Information"
"General Features (System Settings)", General Settings Guide
Combine
Combines several pages onto one side of a sheet.
Important
□ You cannot use the bypass tray with this function.
There are three types of Combine available.
1 Sided 2 Pages Combine 1 Side
Copies 2 one-sided originals to one side of a sheet.
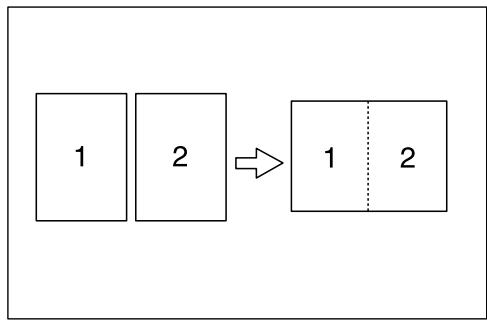
GCSHVY7E
1 Sided 4 Pages Combine 1 Side
Copies 4 one-sided originals to one side of a sheet.
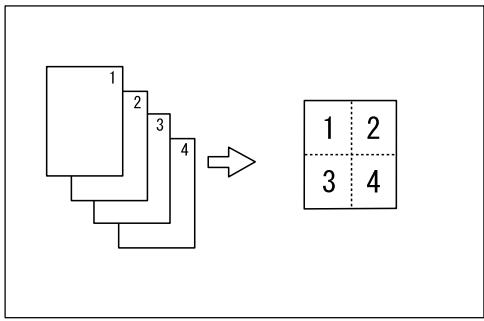
1 Sided 8 Pages Combine 1 Side
Copies 8 one-sided originals to one side of a sheet.
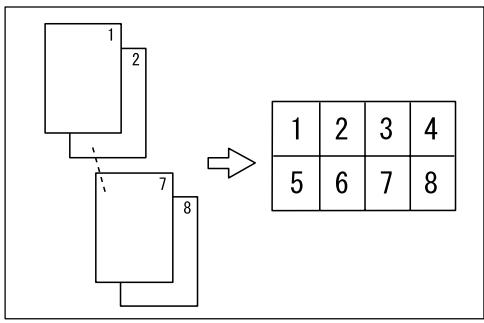
Orientation of the original and image position of Combine Portrait ( ) originals

Landscape (□) originals
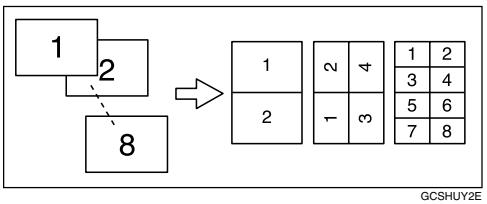
Press [Combine].
![RICOH AFICIO MP W3600 - Press [Combine]. - 1](/content/2025/01/136380/images/0175ad275972603f86f1b4d4b44ed91cb6afd7f96d17cdd3968d587afbc488fc.jpg)
2 Select the number of originals to combine.
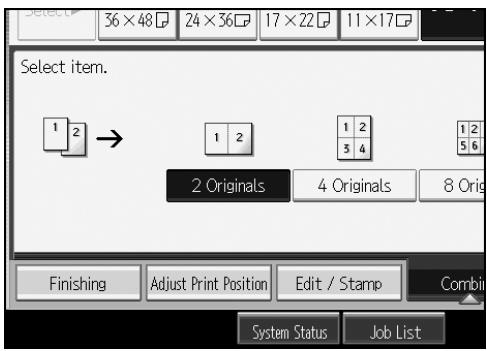
3 Select the paper size.
Press [OK].
Reference
p.156 "Supplementary Information"
"Edit", General Settings Guide
Erase Border (Same Width)
Erases the edge margin of the original image.

The default erase border setting is 10mm (0.4").

Important
□ You cannot use the bypass tray with this function.

Press [Edit / Stamp].
![RICOH AFICIO MP W3600 - Press [Edit / Stamp]. - 1](/content/2025/01/136380/images/a50e883c0e4faa4a4c0b71531439c9c8d8f0dd9a58c400b4bad26d4b2f83b3d3.jpg)
Press [Erase].
Press [Erase Border].
Press [Same Width].
Set an erase border width with [+ or [-] .
Pressing ([+] or ([-]) changes the width in increments of (1\mathrm{mm}) (0.1"). Pressing and holding down the relevant key changes the width in increments of (10\mathrm{mm}) (1").
![RICOH AFICIO MP W3600 - Set an erase border width with [+ or [-] . - 1](/content/2025/01/136380/images/ae72e5127583dfb39b7e9b471005aeeba304c6e906747cc2a2a9b4ef6d648ef6.jpg)
6 Press [OK] twice.
Note
To change the value entered in step 5, press [+ ] and [-] to set a new value.
For details about the scan size limitations when using Erase Border together with the other functions, see "Scan Size Limitations, by Function".
Reference
p.156 "Supplementary Information"
p.162 "Scan Size Limitations, by Function"
"Edit", General Settings Guide
Erase Border (Different Width)
Erases the edge margin of the original image.
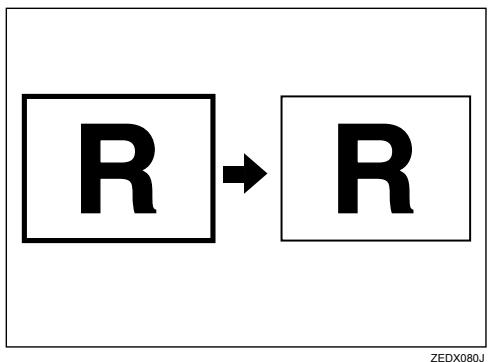
The default erase border setting is 10mm (0.4^ )
Important
□ You cannot use the bypass tray with this function.
Press [Edit / Stamp].
![RICOH AFICIO MP W3600 - Press [Edit / Stamp]. - 1](/content/2025/01/136380/images/752d482f10628adfc9dbaee718ec888c0a9037f4a97b8871b38ce5613f935dd5.jpg)
Press [Erase].
Press [Erase Border].
Press [Different Width].
Press the key for the border you want to change and set an erase width with [+ ] and [-] .
Pressing ([+] or ([-]) changes the width in increments of (1\mathrm{mm}) (0.1"). Pressing and holding down the relevant key changes the width in increments of (10\mathrm{mm}) (1").
![RICOH AFICIO MP W3600 - Press the key for the border you want to change and set an erase width with [+ ] and [-] . - 1](/content/2025/01/136380/images/c26e82be856d5c65a1097fb778d291edbbe1eddfff03b1cac6495a8a39840193.jpg)
Press [OK] twice.
Note
To change the value entered in step 3, press [+ ] and [-] to set a new value.
For details about the scan size limitations when using Erase Border together with the other functions, see "Scan Size Limitations, by Function".
Reference
p.156 "Supplementary Information"
p.162 "Scan Size Limitations, by Function"
"Edit", General Settings Guide
Erase Inside
Use this function to copy the original while erasing a specified area.

ABB524S
Important
□ You cannot use the bypass tray with this function.
To specify the area you want to erase, you have to define the value of X1, Y1, X2, and Y2 on the original. Measure the area you want to specify before entering the area settings.
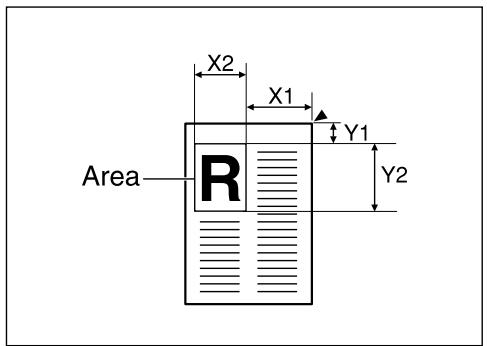
ATY035S
Press [Edit / Stamp].
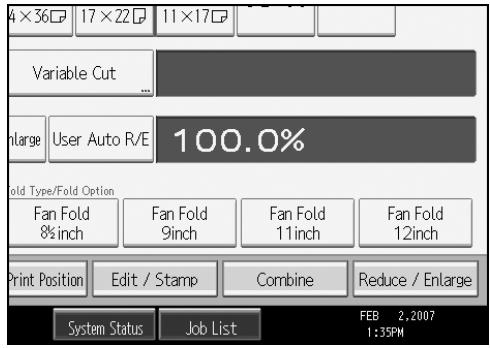
Press [Erase].
3 Select one of the areas from [Erase Inside 1] to [Erase Inside 5].
4 Enter the length of [X1] with the number keys, and then press [#].
![RICOH AFICIO MP W3600 - Enter the length of [X1] with the number keys, and then press [#]. - 1](/content/2025/01/136380/images/f17c1429312022bb79d58af30f8f670f00916591197c6aca3599941819c794b6.jpg)
Enter the lengths of [X2], [Y1], and [Y2] in the same way, and then press [OK].
To specify multiple areas, specify areas 1 to 5, and then repeat steps 4 to 5.
Press [OK].
Note
- When using this function with magnification, the actual size will be the specified value multiplied by the reproduction ratio.
□ You can specify up to five areas.
Reference
p.156 "Supplementary Information"
p.162 "Scan Size Limitations, by Function"
Erase Outside
Use this function to copy the original while erasing outside a specified area.
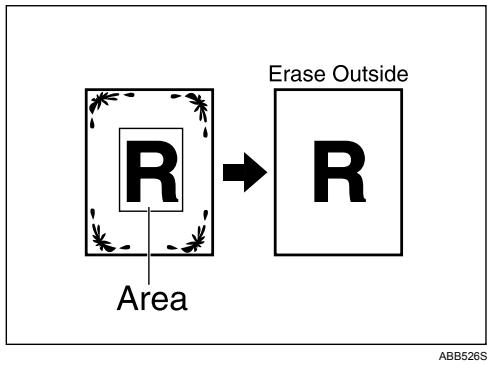
Important
□ You cannot use the bypass tray with this function.
To specify the area you want to erase, you have to define the value of X1, Y1, X2, and Y2 on the original. Measure the area you want to specify before entering the area settings.
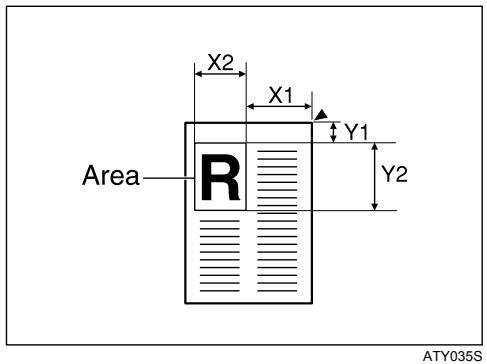
Press [Edit / Stamp].
Press [Erase].
3 Select [Erase Outside].
4 Enter the length of [X1] with the number keys, and then press [#].
![RICOH AFICIO MP W3600 - Enter the length of [X1] with the number keys, and then press [#]. - 1](/content/2025/01/136380/images/be52ba79ebdbd363cc5e256302df7ac933ab7a2dc8048c61213b4ab1f1fa53ec.jpg)
5 Enter the lengths of [X2], [Y1], and [Y2] in the same way, and then press [OK].
6 Press [OK].
Note
- When using this function with magnification, the actual size will be the specified value multiplied by the reproduction ratio.
Reference
p.162 "Scan Size Limitations, by Function"
Margin Adjustment
When Synchro Cut is selected, you can create a margin on the copy's leading and trailing edge.

ATY052S
Important
□ You cannot use the bypass tray with this function.
You can select the following types of margin for this function:
- Top Margin: margin at the leading edge of the original (top of copy).
- Bottom Margin: margin at the trailing edge of the original (bottom of copy).
Press [Edit / Stamp].
![RICOH AFICIO MP W3600 - Press [Edit / Stamp]. - 1](/content/2025/01/136380/images/f58472e50a1bbc3c6a97fa8142647da098884ee9eb53066e769c013d4993a07b.jpg)
Press [Margin Adj.].
Press [Top Margin] or [Bottom Margin].
![RICOH AFICIO MP W3600 - Press [Top Margin] or [Bottom Margin]. - 1](/content/2025/01/136380/images/9a9467571a440c0447d32807aaa5812c2b8681df2a000abafe5075a773f23438.jpg)
Use [-] or [+] to specify the margin, and then press [OK].
[Synchro Cut] is automatically selected.
Note
- You can specify the margin from 0 to 200 ~mm (7.9") in 1 ~mm (0.1") increments. The default margin is 20 ~mm (0.8").
□ You can specify both the top and the bottom margins at a time.
The copy length is the length automatically specified by Synchro Cut plus the margin specified.
Reference
p.56 "Synchro Cut"
p.156 "Supplementary Information"
p.162 "Scan Size Limitations, by Function"
"Edit", General Settings Guide
Background Numbering
Use this function to have numbers printed on the background of copies. If this function is used in conjunction with Sort, the same numbers are printed on each set of copies, helping you keep track of confidential documents.
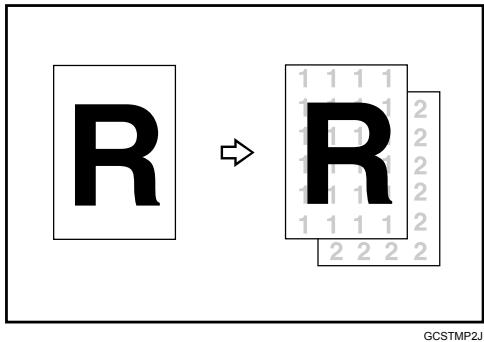
Important
□ You cannot use the bypass tray with this function.
Press [Edit / Stamp].
Press [Stamp].
Press [Background Numbering].
4 Enter the number to start counting from with the number keys, and then press [#].
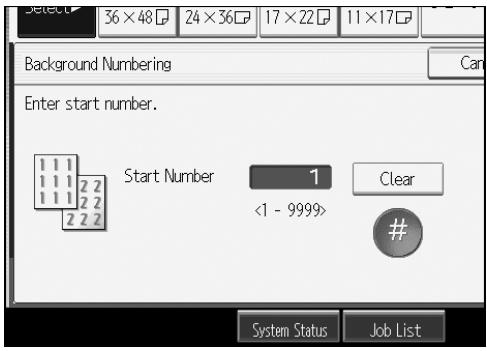
You can set the number from 1 to 9999.
Press [OK] twice.
![RICOH AFICIO MP W3600 - Press [OK] twice. - 1](/content/2025/01/136380/images/a65cfaf9d6880fed252155ab90e7cfd34705a5f316ab3e7b3235dd1717514ee7.jpg)
Note
To change the value entered in step 4, press [Clear] to set a new value.
□ You can combine this function with up to four other stamp functions.

Reference
p.156 "Supplementary Information"
p.162 "Scan Size Limitations, by Function"
"Stamp", General Settings Guide
Preset Stamp
Preset messages are stamped on copies.
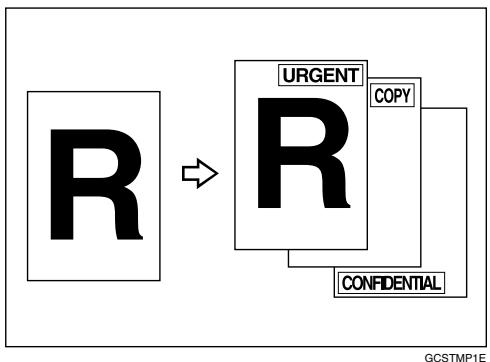
The following eight messages are available for Preset Stamp:
"COPY", "URGENT", "PRIORITY", "For Your Info.", "PRELIMINARY", "For Internal Use Only", "CONFIDENTIAL", "DRAFT"

Important
□ You cannot use the bypass tray with this function.
Only one message can be stamped at a time.
Stamp position and original orientation
The stamp positions differ according to the orientation in which you place your originals.

ATY019S
Press [Edit / Stamp].
![RICOH AFICIO MP W3600 - Press [Edit / Stamp]. - 1](/content/2025/01/136380/images/8bd455538f4a496aa4d0a8f173c7f999f9f972556a782af3338bb0454a0e7e2e.jpg)
Press [Stamp].
Press [Preset Stamp].
4 Select the desired message.
You can change the position, size, and density of the stamp.
Press [All Pages] or [1st Page Only] to select the print page.
![RICOH AFICIO MP W3600 - Press [All Pages] or [1st Page Only] to select the print page. - 1](/content/2025/01/136380/images/fbd1ff78c4957fc3d9d608857eee285d0277bf7dbb585a059c40c5e7d818d932.jpg)
6 After making all settings, press [OK].
Press [OK].
Note
□ You can combine this function with up to four other stamp functions.
□ You can change the priority of the selected stamp.
Reference
p.156 "Supplementary Information"
p.162 "Scan Size Limitations, by Function"
"Stamp", General Settings Guide
Changing the stamp position, size and density
Changes the stamp position, size and density.
Press [Edit / Stamp].
Press [Stamp].
Press [Preset Stamp].
Press [Change] under Position / Size / Density.
Select the position, size, and density of the stamp, and then press [OK].
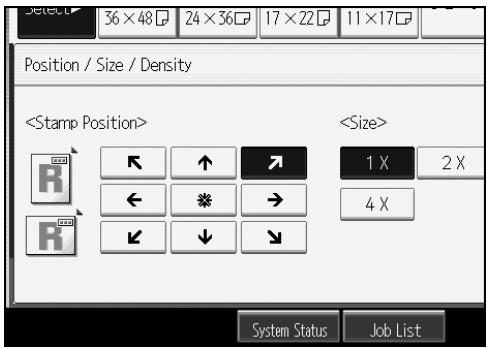
User Stamp
Prints a scanned image on copies as a stamp. Letters or images you use frequently can be registered.
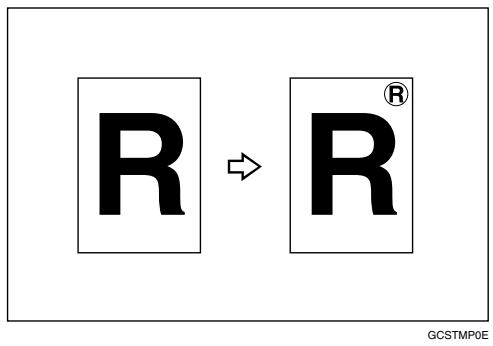
Important
□ You have to register a user stamp before using this function.
□ You cannot use the bypass tray with this function.
Only one message can be stamped each time.
Stamp position and original orientation
The user stamp positions differ according to the orientation in which you place your originals.
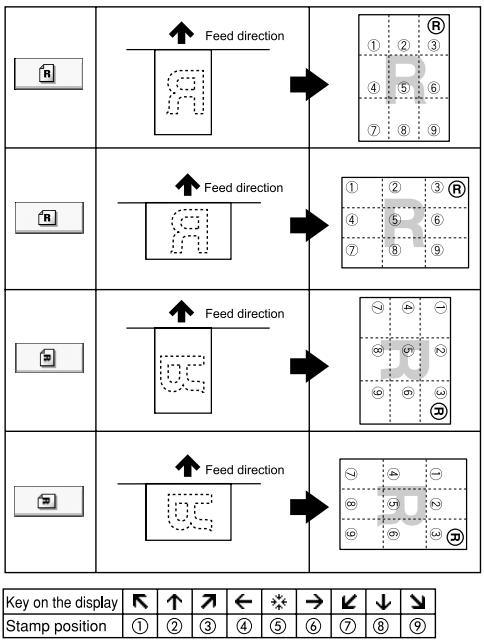
ATY020S
Press [Edit / Stamp].
![RICOH AFICIO MP W3600 - Press [Edit / Stamp]. - 1](/content/2025/01/136380/images/8f5c4684a5eee73c2a25342b75fbfdf20ba66507c6ff390ec7ae6400f9fd5554.jpg)
Press [Stamp].
Press [User Stamp].
4 Select the desired message.
You can change the stamp position.
Press [All Pages] or [1st Page Only] to select the print page.
![RICOH AFICIO MP W3600 - Press [All Pages] or [1st Page Only] to select the print page. - 1](/content/2025/01/136380/images/a279da71416a8c2586b2836973bbdc264852dc3393c5e519cfa6aa29712dd70d.jpg)
6 After making all settings, press [OK].
Press [OK].
Note
□ You can combine this function with up to four other stamp functions.
Up to four user stamps can be registered.
□ When User Stamp is selected, it may take longer to print the first copy.
To delete a stored user stamp, see "Deleting a user stamp".
Reference
p.93 "Registering a user stamp"
p.95 "Deleting a user stamp"
p.156 "Supplementary Information"
p.162 "Scan Size Limitations, by Function"
"Stamp", General Settings Guide
Changing the stamp position
Changes the stamp position.
Press [Edit / Stamp].
Press [Stamp].
Press [User Stamp].
Press [Change] under Stamp Position.
5 Select the desired position, and then press [OK].
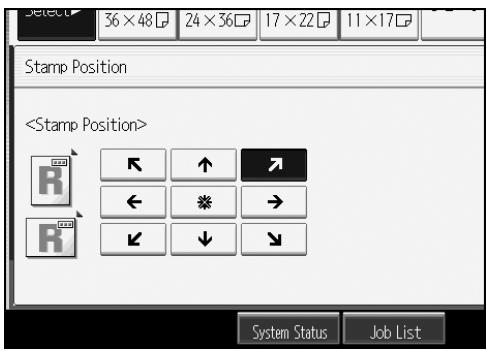
Registering a user stamp
Scans an image that is used as a user stamp.
The range of stamp images for readability is 10-297 mm (0.4"-11.7") wide and 10-432 mm (0.4"-17.0") high. However, if the value exceeds the maximum value of the area (5,000 mm², 7.75 inch²), it is corrected within the range of the area automatically.
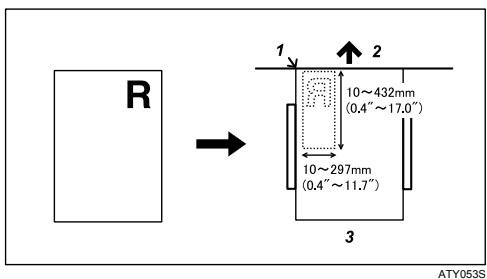
- Base point
- Original feed direction
- Original table
Press the [User Tools / Counter] key.
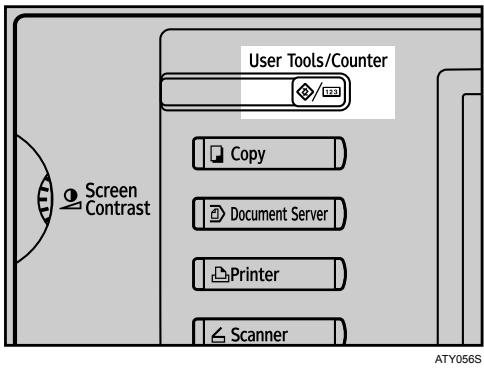
Press [Copier / Document Server Features].
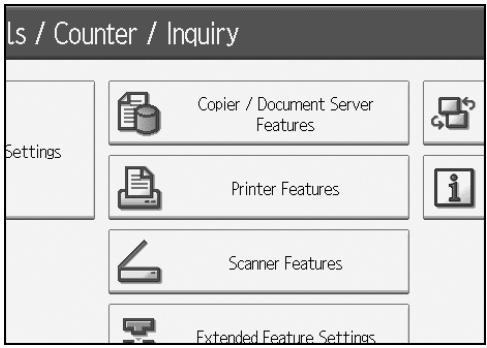
Press [Stamp].
Press [User Stamp].
Press [Program / Delete Stamp].
Press [Program], and then press the stamp number you want to program.
7 Enter the user stamp name (up to ten characters) with the letter keys, and then press [OK].
3 Enter the horizontal size of the stamp with the number keys, and then press [#].
9 Enter the vertical size of the stamp with the number keys, and then press [#].
Adjust the original guides to A3 (11"×17") or A4 (8½"×11") and then place the original for user stamp on the original table.
Press [Start Scanning].
The original will be scanned, and the stamp will be registered.
Press [Exit].
Press [Exit].
The display returns to the User Tools/Counter/Inquiry screen.
14 Press [Exit].
Exits settings and gets ready to copy.
Note
Stamp numbers with already have settings in them.
□ If the stamp number is already being used, the machine will ask you if you want to overwrite it. Press [Yes] or [Stop].
Up to four user stamps can be registered.
If the stamp is red or bright red, it may not be scanned clearly. To store a user stamp clearly, use a black ink stamp, or make a copy and use that as the original.
Deleting a user stamp
Deletes an image registered as a user stamp.
You cannot restore a deleted stamp.
Press the [User Tools / Counter] key.

Press [Copier / Document Server Features].

Press [Stamp].
Press [User Stamp].
Press [Program / Delete Stamp].
Press [Delete], and then press the stamp number you want to delete.
Select [Yes], and then press [Exit].
Press [Exit]. The display returns to the User Tools/Counter/Inquiry screen.
Press [Exit]. Exits settings and gets ready to copy.
Date Stamp
Use this function to print dates on your copies.
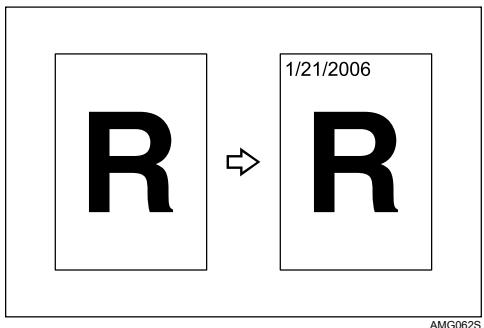

Important
□ You cannot use the bypass tray with this function.
You can select from the following formats:
- MM/DD/YYYY
- MM.DD.YYYY
- DD/MM/YYYY
- DD.MM.YYYY
- YYYY.MM.DD
Stamp position and original orientation
The date stamp positions differ according to the orientation in which you place your originals.
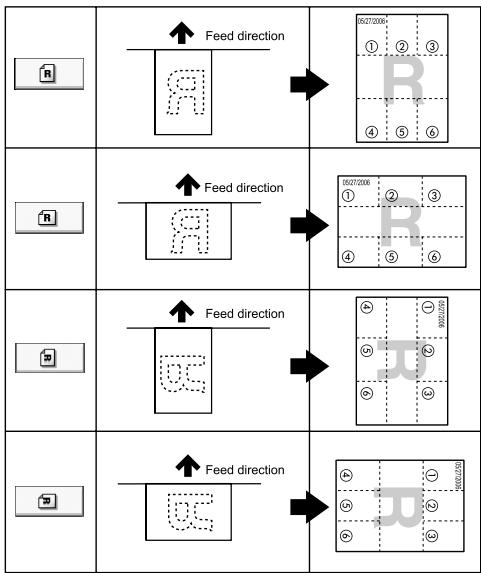
| Key on the display | R | ↑ | ↓ | |||
| Stamp position | ① | ② | ③ | ④ | ⑤ | ⑥ |
ATY021S
Press [Edit / Stamp].
![RICOH AFICIO MP W3600 - Press [Edit / Stamp]. - 1](/content/2025/01/136380/images/607b337dfe90d0a4bb1430acaf0efecf7e42fece01250038f2126be7f4fe2a74.jpg)
Press [Stamp].
Press [Date Stamp].
4 Select the stamp format.
You can change the format and position of the date to be stamped.
Press [All Pages] or [1st Page Only] to select the print page.
![RICOH AFICIO MP W3600 - Press [All Pages] or [1st Page Only] to select the print page. - 1](/content/2025/01/136380/images/8e08fa408312cfb322a9f37914be8183614fb8f8a8d4150a8d363f250bac558b.jpg)
6 After making all settings, press [OK].
Press [OK].
Note
□ You can combine this function with up to four other stamp functions.
Reference
p.156 "Supplementary Information"
p.162 "Scan Size Limitations, by Function"
"Stamp", General Settings Guide
Changing the format of date
Changes the format of date to be stamped.
Press [Edit / Stamp].
Press [Stamp].
Press [Date Stamp].
Press [Change Format] under Current Date.
5 Select the date format, and then press [OK].
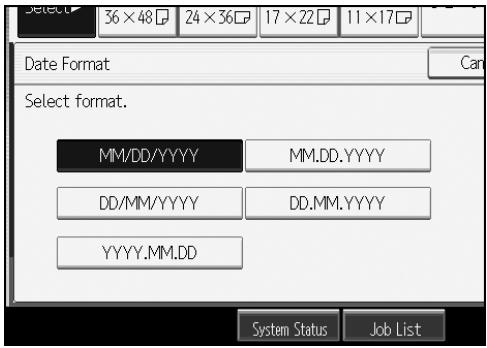
Changing the stamp position
Changes the stamp position.
Press [Edit / Stamp].
Press [Stamp].
Press [Date Stamp].
Press [Change] under Stamp Position.
5 Select the desired date stamp position, and then press [OK].
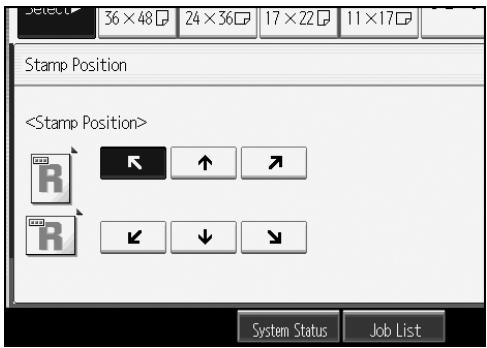
Page Numbering
Use this function to print page numbers on your copies.
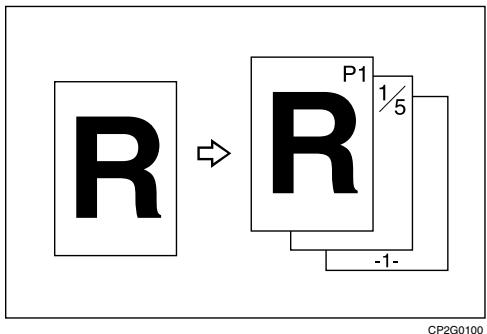
Important
□ You cannot use the bypass tray with this function.
There are six types of page numbering available.
P1,P2,...
1/5,2/5,...
-1-,2-,...
P.1,P.2,...
1,2,...
1-1,1-2,...
Stamp position and original orientation
The page stamp positions differ according to the orientation in which you place your originals.
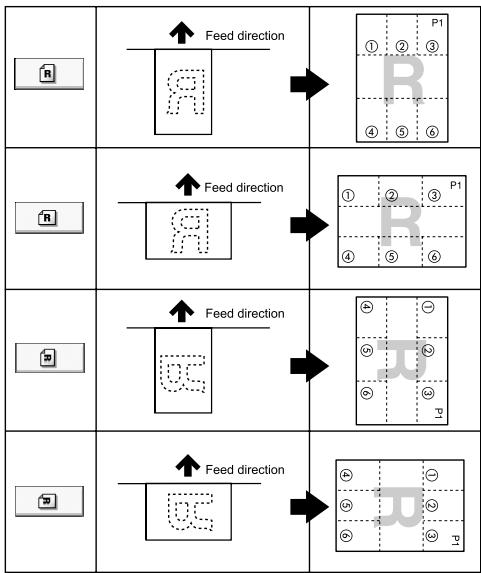

ATY022S
Press [Edit / Stamp].
![RICOH AFICIO MP W3600 - Press [Edit / Stamp]. - 1](/content/2025/01/136380/images/a2a5a70c1a9ccc565e6e200f00293d3633599e529df7d330b5839c1ffc878f9c.jpg)
Press [Stamp].
Press [Page Numbering].
4 Select the format.
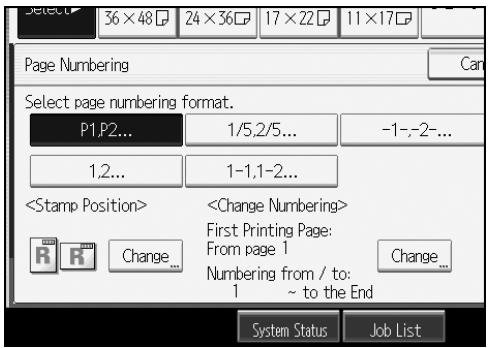
You can specify the position and pages to be stamped, and numbering.
5 After making all settings, press [OK].
Press [OK].
Note
□ You can combine this function with up to four other stamp functions.
Reference
p.156 "Supplementary Information"
p.162 "Scan Size Limitations, by Function"
"Stamp", General Settings Guide
Changing the stamp position
Changes the stamp position.
Press [Edit / Stamp].
Press [Stamp].
Press [Page Numbering].
Press [Change] under Stamp Position.
5 Select the desired position, and then press [OK].
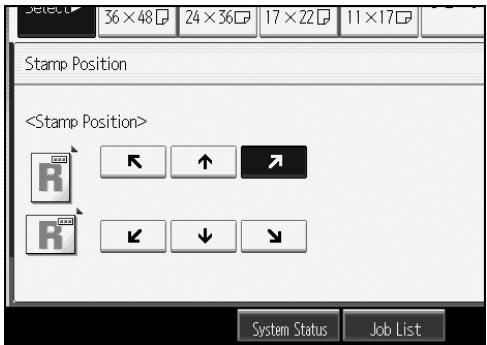
Specifying the first printing page and start number ("P1,P2...", "-1-, -2-...", "P.1,P.2...", "1,2..."*)
Explains the example when "P1, P2 ..." is selected. The steps are the same for other cases.
Press [Edit / Stamp].
Press [Stamp].
Press [Page Numbering].
Press [Change] under Change Numbering.
Press [First Printing Page], enter the original sheet number from which to start printing with the number keys, and then press [#].
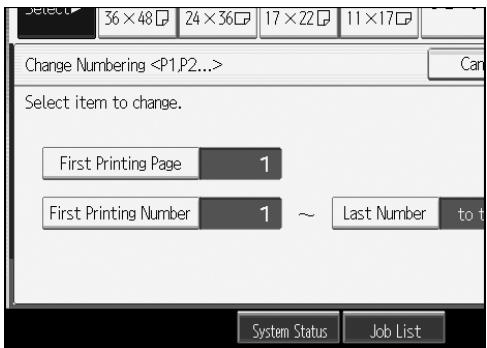
Press [First Printing Number], enter the number of page from which to start numbering with the number keys, and then press [#].
The example below shows when the first printing page is "2" and the start number is "3".
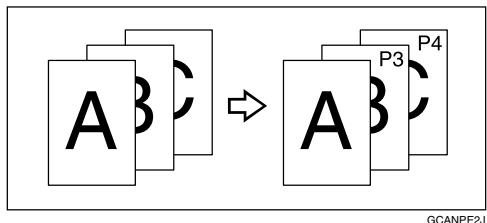
7 Press [Last Number], enter the number of the page at which to stop numbering with the number keys, and then press [#].
If you want to number all pages to the end, press [to the End].
8 When page designation is complete, press [OK].
Press [OK] twice.
Note
To change the numbers entered in steps 5-7, press [Clear], and then enter a new number.
□ You can set a value from 1 to 9999 for [First Printing Page], [First Printing Number], and [Last Number].
Specifying the first printing page and start number ("1/5,2/5..."
Explains the procedures when "1/5,2/5..." is selected.
Press [Edit / Stamp].
Press [Stamp].
Press [Page Numbering].
Press [Change] under Change Numbering.
Press [First Printing Page], enter the original sheet number from which to start printing with the number keys, and then press [#].

Press [First Printing Number], enter the number of page from which to start numbering with the number keys, and then press [#].
Press [Last Number], enter the number of page at which to stop numbering with the number keys, and then press [#].
Proceed to step 8 when not changing.
If you want to number all pages to the end, press [to the End].
The last number is the last page number to print. For example, if Total Pages is ten, if you want to print up to seven pages and do not want to print from page 8 on, enter "7" for Last Number. Normally, you do not need to enter the number.
Press [Total Pages], enter the total number of original pages with the number keys, and then press [#].
9 When page designation is complete, press [OK].
Press [OK] twice.
Note
To change the numbers entered in steps 5-8, press [Clear], and then enter a new number.
To change the settings (the first printing page, the number of pages from which to start numbering, or total number of pages) after pressing [OK] in step ①, press [Change], and then enter the numbers again.
□ You can set a value from 1 to 9999 for [First Printing Page], [First Printing Number], [Last Number], and [Total Pages].
Specifying the first printing page and start number ("1-1,1-2..."
Explains the procedures when "1-1,1-2..." is selected.
Press [Edit / Stamp].
Press [Stamp].
Press [Page Numbering].
Press [Change] under Change Numbering.
Press [First Printing Page], enter the original sheet number from which to start printing with the number keys, and then press [#].
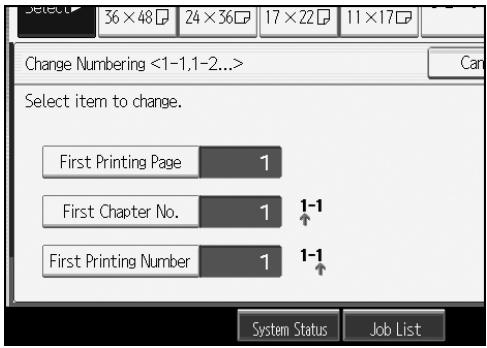
Press [First Chapter No.], enter the chapter number from which to start numbering with the number keys, and then press [#].
Press [First Printing Number], enter the page number from which to start printing with the number keys, and then press [#].
8 When page designation is complete, press [OK].
Press [OK] twice.
Note
To change the numbers entered in steps 5-7, press [Clear], and then enter a new number.
□ You can set a value from 1 to 9999 for [First Printing Page], [First Chapter No.], and [First Printing Number].
Image Repeat
Repeatedly copies the entire image.
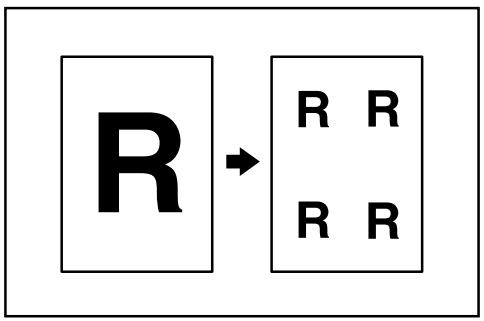
Important
□ You cannot use the bypass tray with this function.
The number of repeated images depends on the original size, copy paper size, and reproduction ratio. For example, you can copy eight A4 (A) images to one sheet of A1 (D) size paper.
Press [Edit / Stamp].

Press [Edit Image].
Press [Image Repeat].
4 Press [OK].
5 Select the paper tray.
Note
- You can insert separation lines (solid, broken, crop marks) between repeated images.
- When using Image Repeat with Adjust Print Position, the composite image is shifted.

Reference
p.156 "Supplementary Information"
p.162 "Scan Size Limitations, by Function"
"Edit", General Settings Guide
Double Copies
One original image is copied twice on one copy as shown.
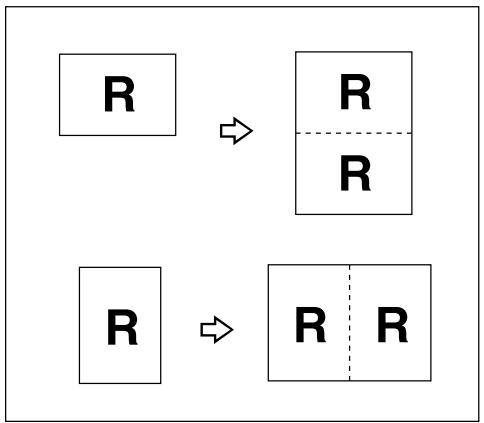

Important
□ You cannot use the bypass tray with this function.

Press [Edit / Stamp].
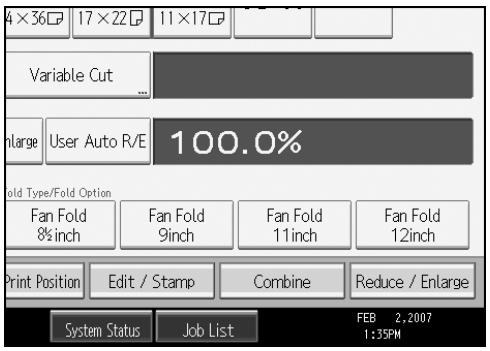

Press [Edit Image].

Press [Double Copies].

Press [OK].

Select the paper tray.

Note
- You can insert separation lines (solid, broken, crop marks) between two images.
- When using Double Copies, the copy paper must be twice as large as the original. When using Reduce/Enlarge, consider the magnification ratio when selecting the paper size.

Reference
p.156 "Supplementary Information"
p.162 "Scan Size Limitations, by Function"
"Edit", General Settings Guide
Positive/Negative
Copies an image inverted.
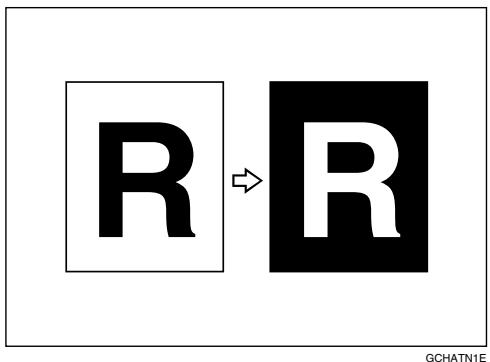

Press [Edit / Stamp].
![RICOH AFICIO MP W3600 - Press [Edit / Stamp]. - 1](/content/2025/01/136380/images/8321c04554095908a22d19cb1f82630a922092f93822dd11fa1cf5a8c14139bd.jpg)
![RICOH AFICIO MP W3600 - Press [Edit / Stamp]. - 2](/content/2025/01/136380/images/49c25f6adf0fcf14ea3a2f278b0ef5d26ee6fee62250a1fe80be5d52ce9ed566.jpg)
Press [Edit Image].
![RICOH AFICIO MP W3600 - Press [Edit Image]. - 1](/content/2025/01/136380/images/2119466c3498eef77bef28905977d6e2550ffb0cf74924114e63ee6ccaf69a3f.jpg)
Press [Positive / Negative].
![RICOH AFICIO MP W3600 - Press [Positive / Negative]. - 1](/content/2025/01/136380/images/3b1aefc911771a74acb9caf84ed4e590a5cb7e231c8d0840fd2be20a8e352a18.jpg)
Press [OK].
![RICOH AFICIO MP W3600 - Press [OK]. - 1](/content/2025/01/136380/images/c968a91b0907889136f8e93ef3c675d66f01a2dbe4d52b4307cb02bace059e29.jpg)
Select the paper tray.

Note
- When making continuous copies, image density may deteriorate.

Reference
p.162 "Scan Size Limitations, by Function"
Partial Copy
Use this function to copy only a specified portion of the original.
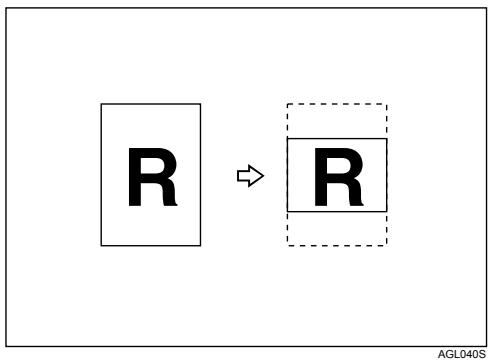

Press [Edit / Stamp].
![RICOH AFICIO MP W3600 - Press [Edit / Stamp]. - 1](/content/2025/01/136380/images/e6a24c2f9983001f6a0cb7dbbc38061afa4494a4bc0607427d9e1826a351e87d.jpg)
![RICOH AFICIO MP W3600 - Press [Edit / Stamp]. - 2](/content/2025/01/136380/images/4bdd51c6c836b2d7a2ec688b95afb019c15e878ca99d7f0082292f369bae6901.jpg)
Press [Edit Image].
![RICOH AFICIO MP W3600 - Press [Edit Image]. - 1](/content/2025/01/136380/images/f392ba89478e344a7d818cacfcfadd7ff85adf273340c9531f3d5da617cccfff.jpg)
Press [Partial Copy].
Press [Y1], and then enter the scan start position (the length from the leading edge of the original) with the number keys.
![RICOH AFICIO MP W3600 - Press [Partial Copy]. - 1](/content/2025/01/136380/images/61576d31b5370bf9770e3c0c426b49156333930994247ab7b283d38a38c7b17d.jpg)
Press [#].
Press [Y2], and then enter the copy size with the number keys.
Press [#].
Press [OK] twice.
Note
To change the value, press [Clear], and then enter a new value.
The copy size (Y2) should be at least 210mm (8.3").
The maximum length of copy sizes (Y1+Y2) is 15000 mm (590.6").
□ If Y1 + Y2 is greater than 15000mm (590.6"), the machine shortens Y2 to make Y1 + Y2 less than the maximum.
If Y1 + Y2 is less than 279mm(11^ ) , the length of the copy paper is 279mm (11").
Reference
"Edit", General Settings Guide
Mirror Image
Copies by reversing the image from left to right, as reflected in a mirror.
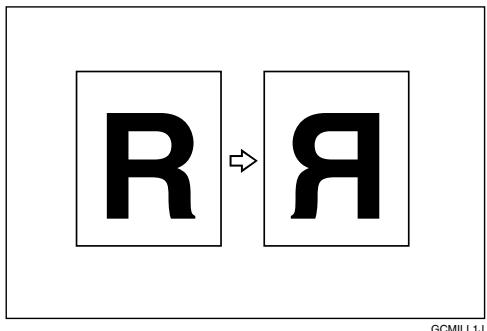
Press [Edit / Stamp].
![RICOH AFICIO MP W3600 - Press [Edit / Stamp]. - 1](/content/2025/01/136380/images/4dac5124f4958681015f8786eaa60eed41c22dcf5630e95b98ca19910bc5d949.jpg)
Press [Edit Image].
Press [Mirror Image].
Press [OK].
Reference
p.162 "Scan Size Limitations, by Function"
Format Overlay
Combines two images onto one copy.
You can also store frequently used format original in the machine memory and recall it for future use.
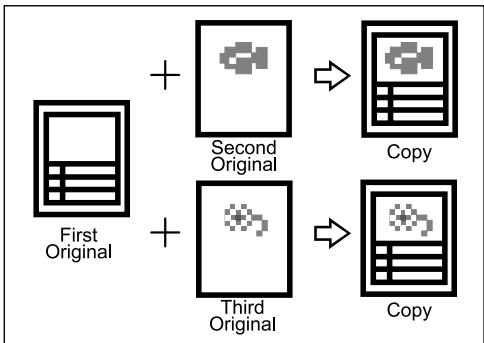
ATY036S
Important
□ You cannot use the bypass tray with this function.
There are two types of Format Overlay available.
Format Overlay
Combines two images onto one copy using the first original as the background.
Programmed Format Overlay
Uses a stored image as the background and combines it with a scanned image.
Reference
p.156 "Supplementary Information"
p.162 "Scan Size Limitations, by Function"
Format Overlay
Combines two images onto one copy using the first original as the background.
Press [Edit / Stamp].
![RICOH AFICIO MP W3600 - Press [Edit / Stamp]. - 1](/content/2025/01/136380/images/679188a2f584326c4de169f23ede5ef5883a5d0354259be0955638818d82631a.jpg)
Press [Edit Image].
Press [Format Overlay].
Press [Format Overlay].
![RICOH AFICIO MP W3600 - Press [Edit / Stamp]. - 2](/content/2025/01/136380/images/aefb5bf4bc5a38e0d3b88b477380d2eff9da82066920499fce57ce3cf820d189.jpg)
Make the necessary settings.
Place the first original, and let it be scanned.
7 Place the second original, and let it be scanned.
The machine makes a composite copy of the first and second originals.
Place the third original, and let it be scanned.
The machine makes a composite copy of the first and third originals.
9 Place any further originals, as required.
Programmed Format Overlay
Uses a stored image as the background and combines it with a scanned image. To use this function, you need to register the overlay format in advance.
Press [Edit / Stamp].
![RICOH AFICIO MP W3600 - Press [Edit / Stamp]. - 1](/content/2025/01/136380/images/90918431be4c65247d17db768b8f753daf9d4ebedcc1aa3fcabebe5ede3ed370.jpg)
Press [Edit Image].
Press [Format Overlay].
Press [Programmed Format Overlay].
5 Select a stored format number.
![RICOH AFICIO MP W3600 - Press [Edit / Stamp]. - 2](/content/2025/01/136380/images/13d6aa63c92147b0c6d4153a611f1a10e94abd46ca0261db6232cdd644d1e734.jpg)
Make the necessary settings.
7 Place your original, and let it be scanned.
The machine makes a copy overlaying the scanned original onto the stored format.
Place any further originals, as required.
The machine makes a copy overlaying the new original onto the stored format.
Reference
p.114 "Storing a format"
p.115 "Overwriting a stored format"
p.115 "Deleting a stored format"
"Program / Delete Overlay Format", General Settings Guide
Storing a format
Stores a format for Programmed Format Overlay.
The maximum size of original to be stored is A0 (E). You cannot store long length originals.
Make sure the machine is ready to copy.
Press the [User Tools / Counter] key.
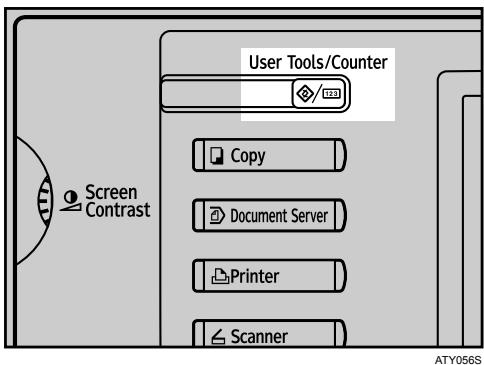
Press [Copier / Document Server Features].
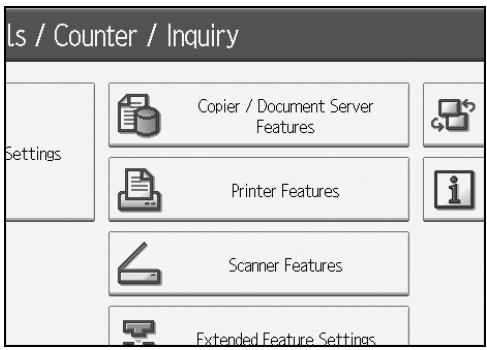
Press [Edit], and then press [Program / Delete Format].
Select a format number (1 to 4).
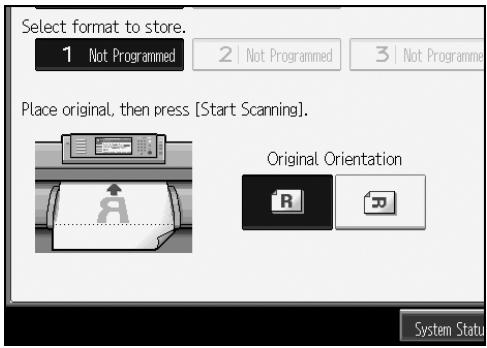
Format numbers with against them have already been stored.
6 Select the original orientation.
7 Place the original, and then press [Start Scanning]. The original is scanned and stored.
Press [Exit] twice. Returns to the initial User Tools / Counter / Inquiry display.
Overwriting a stored format
Overwrites a format stored in memory.
Important
□ You cannot restore a format that has been overwritten.
Make sure the machine is ready to copy.
Press the [User Tools / Counter] key.
Press [Copier / Document Server Features].
Press [Edit], and then press [Program / Delete Format].
5 Select a format number you want to overwrite.
Press [Yes]. Press [Stop] if you do not want to overwrite the existing format.
Select the original orientation.
Place the original, and then press [Start Scanning]. The original is scanned and stored.
Press [Exit] twice. Returns to the initial User Tools / Counter / Inquiry display.
Deleting a stored format
Deletes a format stored in memory.
Important
□ You cannot restore a format that has been deleted.
Make sure the machine is ready to copy.
Press the [User Tools / Counter] key.
Press [Copier / Document Server Features].
Press [Edit], and then press [Program / Delete Format].
Press [Delete], and then select the format number to be deleted.
6 Press [Yes].
Press [No] if you do not want to delete the existing format.
Press [Exit] twice.
Returns to the initial User Tools / Counter / Inquiry display.
Adjust Print Position
Use this function to move (shift) the copy image up, down, left, or right to create a margin. You can also shift in a combination of up/down and left/right.
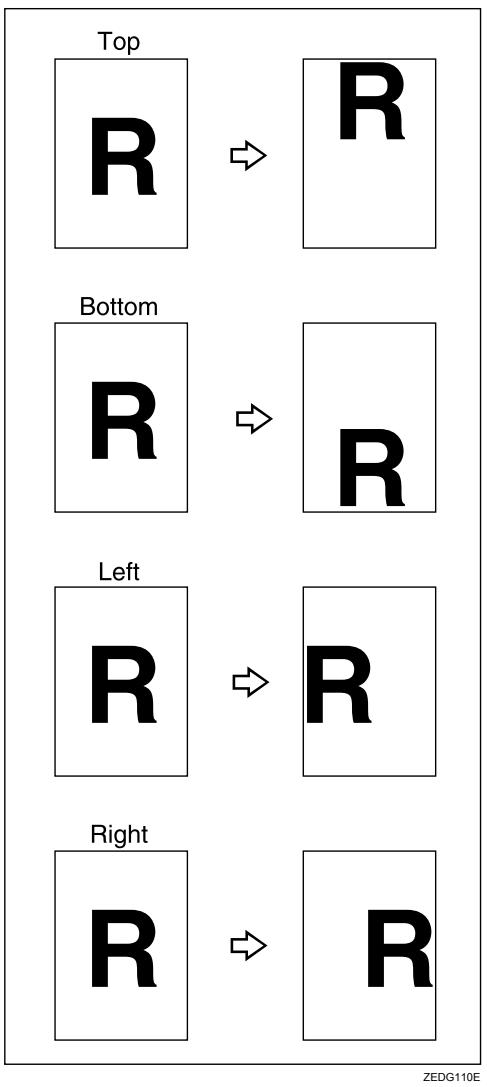
You can select the following types of margin for this function:
- [↑] (Top): shifts towards the leading edge of the original.
- [↓] (Bottom): shifts towards the trailing edge of the original.
- [ ] (Left): shifts towards the left of the original.
- [] (Right): shifts towards the right of the original.
Press [Adjust Print Position].
![RICOH AFICIO MP W3600 - Press [Adjust Print Position]. - 1](/content/2025/01/136380/images/c6c5fd0abdcc16e36744fd62aa81e91f5116890bbb432cb5334d089074aac4c5.jpg)
Use [ ] or [ ] to specify the horizontal position.
![RICOH AFICIO MP W3600 - Use [ ] or [ ] to specify the horizontal position. - 1](/content/2025/01/136380/images/5c7c4f713dea0bceefbdbabbb611cbe5f11201e09763de8b5d77acfb7ec3c20b.jpg)
Use [ ] or [ ] to specify the vertical position.
Press [OK].
Note
The default setting is Bottom 20mm (0.8") and Right 20mm (0.8").
Reference
p.156 "Supplementary Information"
p.162 "Scan Size Limitations, by Function"
Sort
The machine assembles copies as sets in sequential order.
Important
To use Rotate Sort, two paper trays loaded with same size and type paper, but in different orientation (□□), are required.
□ You cannot use the bypass tray with Rotate Sort.
Sort
Copies are assembled as sets in sequential order.
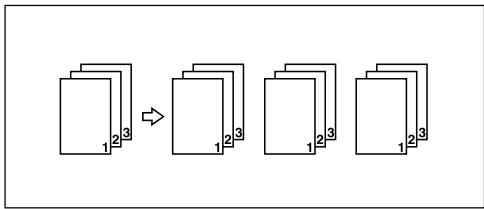
Rotate Sort
Every other copy set is rotated by 90 degrees (□□) and delivered to the copy tray.

Make necessary settings.
Press [Finishing].
![RICOH AFICIO MP W3600 - Press [Finishing]. - 1](/content/2025/01/136380/images/22035b647806b84a9d926cce63715e71595eb7629bc76dd40c546358b3ab40db.jpg)
Press [Sort].
4 Select [Sort] or [Rotate Sort].
![RICOH AFICIO MP W3600 - Select [Sort] or [Rotate Sort]. - 1](/content/2025/01/136380/images/7c1d97d66b10a21803500529732b8a7f79f706960b8594e40a0b9634948ce3ff.jpg)
Press [OK].
6 Enter the number of copy sets with the number keys.
7 Place your original, and let it be scanned.
Press the [#] key after all the originals have been scanned. The machine starts copying.
Note
To use Sample Copy, select [Press Start Key] under [Feed Start Method] in System Settings. You cannot make sample copy when [Auto] is selected.
To confirm the type of finishing, press the [Sample Copy] key in step 7.
To cancel Sort or Rotate Sort, press [Clear].
Special size paper cannot be used with Rotate Sort.
Reference
p.3 "Functions Requiring Optional Configurations"
p.156 "Supplementary Information"
p.162 "Scan Size Limitations, by Function"
"General Features (System Settings)", General Settings Guide
Sample Copy
Use this function to check the copy settings before making a long copy run.
Important
This function can be used only when the Sort function is selected.
To use Sample Copy, select [Press Start Key] under [Feed Start Method] in System Settings. You cannot make sample copy when [Auto] is selected.
1 Select Sort or Rotate Sort and any other necessary functions, and then place the originals.
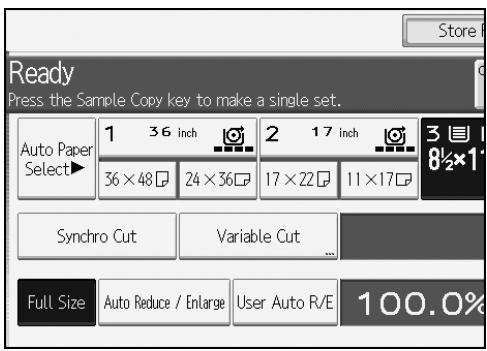
Press the [Sample Copy] key.
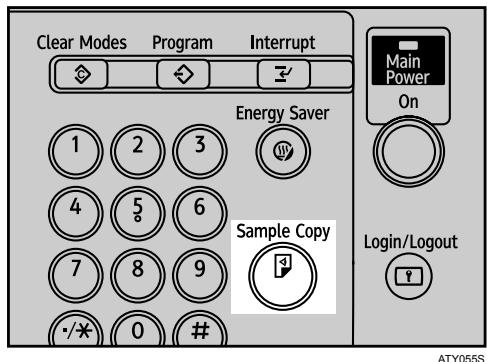
One copy set is delivered as a sample.
3 If the sample is acceptable, press [Continue].
The number of copies made is the number specified minus one for the proof copy.
Note
If you press [Suspend] after checking the results, return to step 1 to adjust the copy settings as necessary. Depending on the combination of functions, you may not be able to change some settings.
Reference
p.155 "Function Compatibility"
Changing the number of sets
You can change the number of copy sets during copying.
Important
This function can be used only when the Sort function is selected.
While "Copying..." is displayed, press the [Clear/Stop] key.
Press [Change Quantity].
Enter the number of copy sets with the number keys, and then press the [#] key.

Press [Continue].
Copying starts again.
Note
The number of sets you can enter in step 3 differs depending on when the [Clear/Stop] key is pressed.
Fan Fold
Automatically folds copies.
The sheet is folded several times parallel to its leading edge, enabling it be opened like a fan.
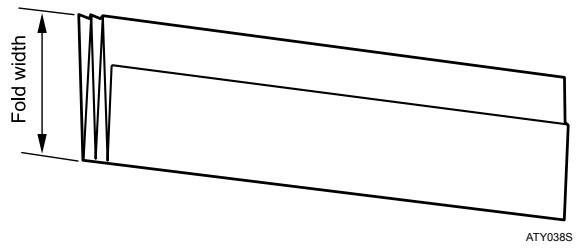
Important
If you select Fan Fold, you must select the lower copy output as the copy output location.
You can select one of the following widths for the fold: 140, 170, 210, or 297mm ( 8^1/2 , 9 , 11 , and 12 ).
When [8^1 / 2] inch(Margin Fold)] is selected, paper is folded so as to have a binding margin.
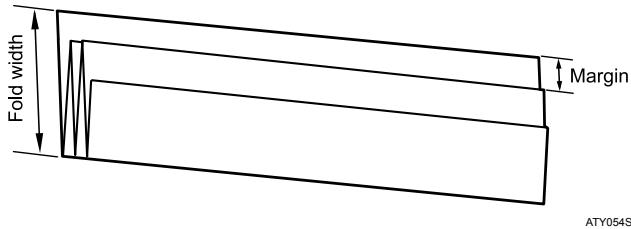
For details about the Fold function, see the manuals for your folding finisher.
Press [Finishing].
![RICOH AFICIO MP W3600 - Press [Finishing]. - 1](/content/2025/01/136380/images/1779b47e45a1ac16f4657af46111f56817a1fdb46ec3536cf7344f997a42f1de.jpg)
Press [Fold Type].
3 Select a fold width for Fan Fold.
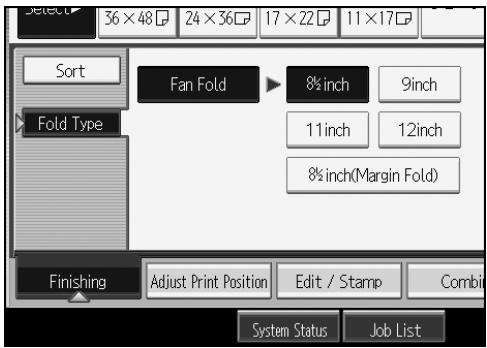
4 Press [OK].
Reference
p.3 "Functions Requiring Optional Configurations"
p.14 "Lower copy output"
Storing Data in the Document Server
The Document Server enables you to store documents in the memory and print them as you want.
Important
Data stored in the machine might be lost if some kind of failure occurs. The manufacturer shall not be responsible for any damage that might result from the loss of data.
Press [Store File].
![RICOH AFICIO MP W3600 - Press [Store File]. - 1](/content/2025/01/136380/images/b17ba5c81f43c0e52774baa9dc06a58cc38f16975153cc38d420c65f6bd0fcac.jpg)
2 Enter a file name, user name, or password if necessary.
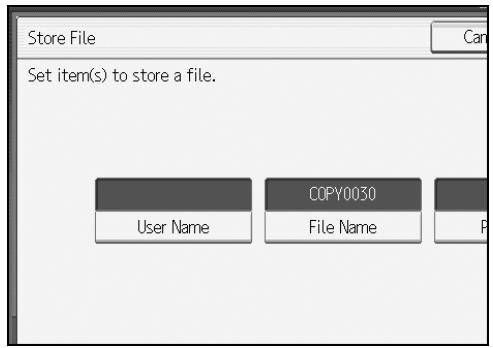
Press [OK].
Make the scanning settings for the original.
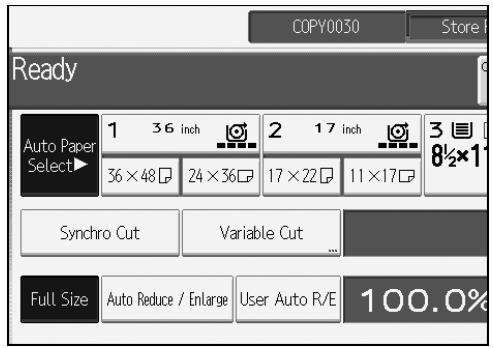
Adjust the original guides to the width of the original, and then place the original face down.
The original feeds into the machine automatically, and copying starts. The scanned data is also stored in the memory.
Note
To stop scanning, press the [Clear/Stop] key. To resume a paused scanning job, press [Continue] in the confirmation display. To delete scanned images and cancel the job, press [Stop].
Press the [#] key after all the originals have been scanned.
- Data stored in the Document Server is set to be deleted after three days by the factory default. You can specify the period after which the stored data is deleted automatically. For details about changing settings, see "Administrator Tools", General Settings Guide.
To check if the document has been stored, press the [Document Server] key.
If you want to store another document, do so after copying is complete.
For details about the Document Server, see "Using the Document Server".
For details about printing stored documents, see "Printing a Stored Document".
For details about setting user name, file name, and password, see "Storing Data".
Depending on the security setting, [Access Privileges] may appear instead of [UserID]. For details about specifying [Access Privileges], consult the administrator.
Reference
p.136 "Using the Document Server"
p.136 "Storing Data"
p.146 "Printing a Stored Document"
"Administrator Tools", General Settings Guide
Programs
You can store frequently used copy job settings in the machine memory and recall them for future use.
You can store up to 10 programs.

Note
- When a specified program is registered as the default, its values become the default settings, which are displayed without pressing the [Program] key, when modes are cleared or reset, and after the operation switch is turned on. See "Registering Defaults in Initial Display".
- Paper settings are stored based on paper size. So if you place more than one paper tray of the same size, the paper tray prioritized with User Tools (System Settings) will be selected first. See "Tray Paper Settings", General Settings Guide.
□ Programs are not deleted by turning the power off or by pressing the [Clear Modes] key.

Reference
p.129 "Registering Defaults in Initial Display"
"Tray Paper Settings", General Settings Guide
Storing a Program
Stores a program.
Edit the copy settings so all functions you want to store in this program are selected.
Press the【Program】key.
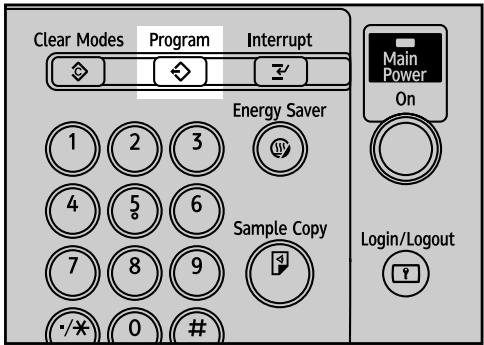
ATY057S
Press [Program].
![RICOH AFICIO MP W3600 - Press [Program]. - 1](/content/2025/01/136380/images/4510839321f9b0873f3f8824b8a3c3018c4c878efcf2088e2b1aea35300aaabe.jpg)
Press a program number you want to store.
5 Enter a program name with the letter keys.
You can enter up to 34 characters.
![RICOH AFICIO MP W3600 - Press [Program]. - 2](/content/2025/01/136380/images/df170a60154f669d28860a71086e8e86fb09610912a06e81f1ff06ba8c1b6d68.jpg)
6 Press [OK].
The screen returns to the program screen, showing the program number followed by the program name. The screen returns to the initial copy display after a short time.
Note
□ Program numbers with against them already have settings made for them.
Changing a Stored Program
Changes program settings.
Check the program settings.
2 Set the contents of a program.
Press the【Program】key.
Press [Program].
Press a program number you want to change.
6 Press [Yes].
Enter a program name.
You can enter up to 34 characters.
Press [OK].
The screen returns to the program screen, showing the program number followed by the program name. The screen returns to the initial copy display after a short time.
Note
□ When you want to check the contents of a program, recall the program.
□ When it is overwritten, the previous program is deleted.
Reference
p.128 "Recalling a Program"
Deleting a Program
Erases the contents of a program.
Press the [Program] key.
Press [Delete].
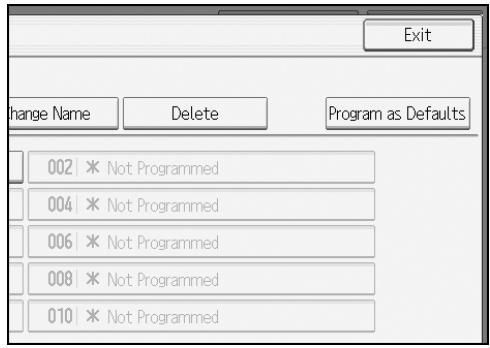
Press a program number you want to delete.
4 Press [Yes].
The program is deleted, and the display returns to the initial copy display.
Recalling a Program
Recalls a stored program to make copies using the stored settings.
Press the【Program】key.
Press [Recall].
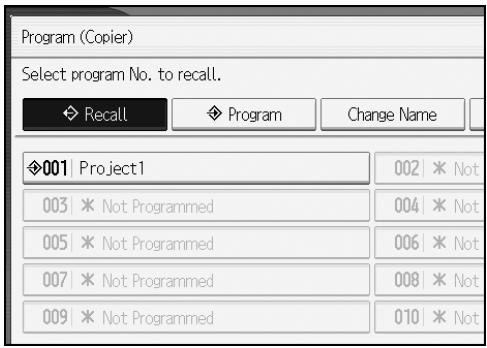
Press a program number you want to recall.
The stored settings are displayed.
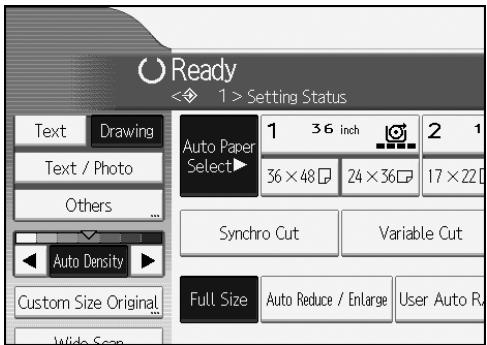
Note
Only programs with against them contain a program in step 3.
Registering Defaults in Initial Display
This section describes how to program defaults for the initial display when modes are cleared or reset, or immediately after the operation switch is turned on.
The default settings you can program are Paper Tray, Original Type, Density, Special Original, Original Orientation, Edit / Stamp, Combine, Reduce / Enlarge, Finishing, Adjust Print Position, Copy Output Location, Fold Type, paper cut method, and the number of copies.
1 Specify scan settings and any other settings you require in the initial display.
Press the【Program】key.
Press [Program as Defaults].
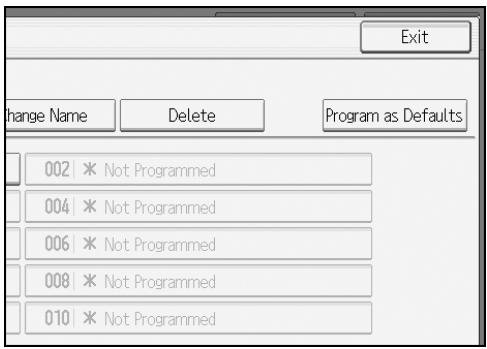
Press [Program].
When a confirmation dialog appears, press [Yes].
The current settings are programmed as defaults. The screen returns to the initial display.
Note
To restore the factory default settings on the initial display, press [Restore Factory Defaults].
The default settings can be programmed separately for the normal screen and simplified display screens.
2
3. Document Server
The Document Server enables you to store documents on the hard disk of this machine. Thus you can print them later applying necessary conditions.
Relationship between Document Server and Other Functions
State of the Document Server varies depending on the function used.
Copier Functions
- Storing method: Copy/Document Server
- List display: Available
- Printing: Available
Transmission: Unavailable
Printer Functions
- Storing method: Personal computer
- List display: Available
- Printing: Available
Transmission: Unavailable
Scanner Functions
- Storing method: Scanner
- List display: Unavailable
When documents are stored with the scanner feature, you can confirm them from the scanner feature screen.
- Printing: Unavailable
Transmission: Available
Transmission is done by the stored document transmission of the scanner feature.
Reference
p.123 "Storing Data in the Document Server"
"Displaying the List of Stored Files", Scanner Reference
"Sending a Stored File", Scanner Reference
"Saving and Printing Using the Document Server", Printer Reference
Document Server Display
Following explains the screens and icons displayed in the Document Server function.
Document Server initial display
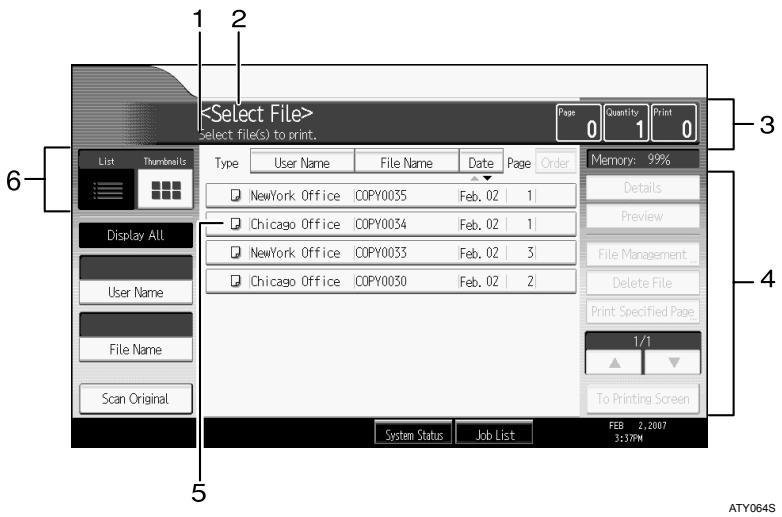
- Displays operational status and messages.
- Displays the title of the current screen.
- Displays the numbers of originals stored into the memory, copies set, and copies made.
- Displays keys for the operation.
-
Displays an icon that indicates the function used to store the document.
-
Displays keys for switching the display between list and thumbnails. In thumbnail view, miniature images of the stored documents are displayed. This is useful for checking a document's content.
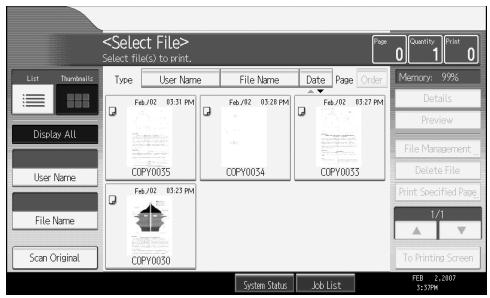
The following icons appear in the list of the Document Server to indicate the function used to store a document.
| Function | Copier | Printer |
| Icons |

Note
- All the stored documents may not be displayed depending on the security function specified.
Simplified Display
This section explains how to switch to the simplified display.
When you press the [Simplified Display] key, the screen changes from the initial display to the simplified display.
Letters and keys are displayed at a larger size, making operations easier.
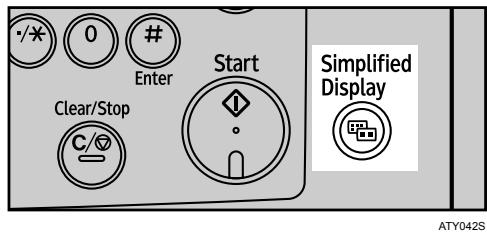
Example of a simplified display
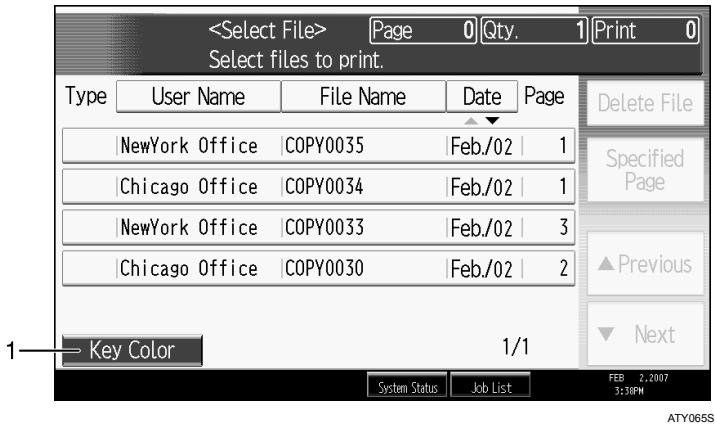
1. [Key Color]
Press to increase screen contrast.
This is available only for the simplified display.
![RICOH AFICIO MP W3600 - [Key Color] - 1](/content/2025/01/136380/images/92e70021f1b994c096c494df9a3246501e3047d47f3911d25cfc5436f2f9a063.jpg)
Note
To return to the initial display, press the【Simplified Display】key again.
Certain keys do not appear on the simplified display.
Preview Display
This section explains the items that appear on the preview display and how to preview stored documents.
To preview stored documents, select the documents you want to preview on the Document Server initial display, and then press [Preview]. For details, see "Displaying the List of Stored Files", Scanner Reference.
The preview display denotes the screen that allows confirming contents of the scanned documents.
Preview display
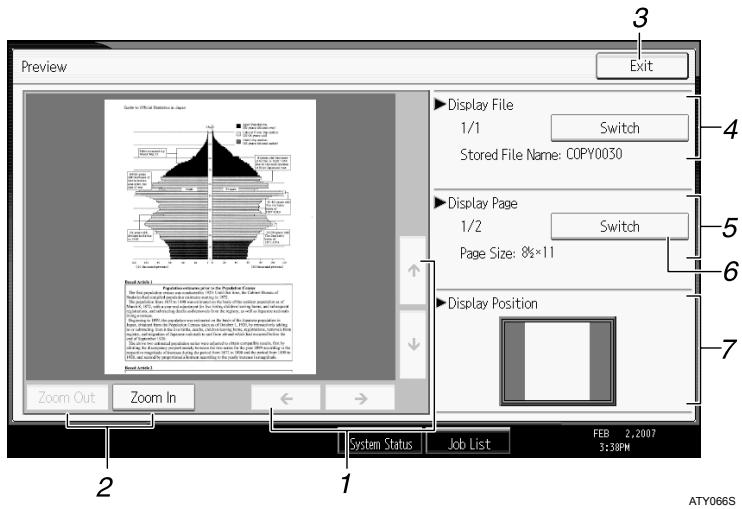
1. [ ][ ][ ][ ]
Moves the display area in the direction indicated by the arrow.
2. [Zoom Out], [Zoom In]
Scales the displayed page down or up.
3. [Exit]
Closes the preview display.
4. Display File
Displays the file name.
If you have selected two or more files for preview, press [Switch] to switch between them.
5. Display Page
Displays the number of the currently displayed page, total number of pages, and page size.
6. [Switch]
Flips the page of the selected file.
7. Display Position
Indicates the location of the displayed preview image when the image is enlarged.

Note
- When the preview is already selected from another function, the preview display function may become unusable.
The preview display is also not available when the paper size is larger than A2 (C).

Reference
"Displaying the List of Stored Files", Scanner Reference
Using the Document Server
Following describes how to use the Document Server.
Storing Data
Following describes the procedure for storing documents on the Document Server.
Important
-
Data stored in the machine might be lost if some kind of failure occurs. The manufacturer shall not be responsible for any damage resulting from loss of data.
-
When entering your password or recording it to your notebook or like, be sure to protect it from being seen by others. Care must also be exercised for safe keeping of its recording paper.
Enter the password in the range of four and eight digits.
It is advisable not to use the same number such as "0000" or continuous numbers such as "1234" for your password. These numbers are imagine fully and they do not provide sufficient security.
-
When you have selected a stored document using a correct password, it remains being selected after the operation is finished. As is, therefore, the document is left operable to those who don't know the password. After the operation, be sure to press the [Clear Modes] key to cancel the selected state of the document.
-
User names registered to the stored documents of the Document Server are used for identifying the documents' authors and the nature of the documents. They don't function as a protective means of confidential documents.
-
When scanning documents by the scanner, make sure that all other operations are ended.
File Name
A file name such as "COPY0001" and "COPY0002" is automatically attached to the scanned document. You can change the file name.
User Name
You can specify the user name so that the person or department that has stored the document can be identified. Two approaches are available in specifying the user name. One is specifying the name being registered from the Address Book Management and the other is entering another name.
Password
You can specify a password for a document to be stored. When a password is set for a document, you are to enter that password for printing the document. Above arrangement prevents unauthorized printing of the document. A key mark will be attached to the document for which a password has been set.
Press the [Document Server] key.
![RICOH AFICIO MP W3600 - Press the [Document Server] key. - 1](/content/2025/01/136380/images/aed8908fc94df197a9df27f7b1a1a9288d0a3e2b7470dd9ab9f2e928ae6c19b9.jpg)
Press [Scan Original].
![RICOH AFICIO MP W3600 - Press [Scan Original]. - 1](/content/2025/01/136380/images/3eec04ed3328c6adeb23ce734901dc835ee7c01382fa023095992d65e157a39f.jpg)
3 Enter a user name, file name, and password, as required.
When not changing a file name, the name will be automatically set.
4 Specify the original scanning conditions.
5 Place the original.
The original feeds into the machine automatically.
If [Press Start Key] is selected for [Feed Start Method], scanning starts when you press the [Start] key.
Press [Scanning Complete] after all documents are scanned.
![RICOH AFICIO MP W3600 - Press [Scanning Complete] after all documents are scanned. - 1](/content/2025/01/136380/images/94b6ce38215bb11d840788e93192c84f8bca91493559c6430e261ae87bcefbc2.jpg)
The scanned documents are stored in the Document Server.
![RICOH AFICIO MP W3600 - Press [Scanning Complete] after all documents are scanned. - 2](/content/2025/01/136380/images/396d4187a9bf9cffa4321c52b4e6314dc5e6d87478a93dd7241d29c4afe85c05.jpg)
Note
To interrupt the scan, press the [Clear/Stop] key. Pressing [Continue] from the confirmation screen resumes the scan. Pressing [Stop] deletes the scanned images.
As a password is set, the key mark will be displayed on the left side of the document.
□ According to the factory default, the documents stored on the Document Server are deleted three days (72 hours) after the storing date. You can cancel the automatic document deletion or select other period than three days for the automatic deletion. See "Administrator Tools", General Settings Guide.
- When storing a document, which is not to be automatically deleted in the Document Server, specify [Off] for "Auto Delete File in Document Server" before storing the document. If you specify [On] for "Auto Delete File in Document Server" after that, Auto Delete File in Document Server will be enabled for the documents being stored after the setting.
- When storing a document in the Document Server after storing it from the copy feature, be sure that its copy is completed.
Depending on the security setting, [Access Privileges] may appear instead of [UserID]. For details about specifying [Access Privileges], consult the administrator.
- You can enter up to 20 characters for a user name and file name. In the list, however, up to 16 characters are displayed as the user name or file name. If above limits are exceeded, the list will display up to 15 characters for the name.

Reference
"Administrator Tools", General Settings Guide
"General Features (System Settings)", General Settings Guide
Registering or changing a user name (When using a user name registered to the Address Book)
Following describes the procedure for registering or changing a user name to be attached to a stored document.
Press [Scan Original].
Press [UserID].
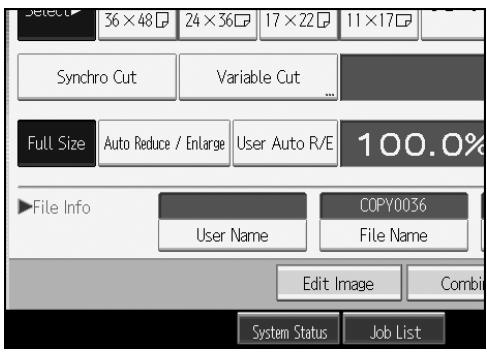
The user name input screen will appear.
3 Select the user name, and then press [OK].
Registering or changing a user name (When using a user name not registered to the Address Book)
Following describes the procedure for registering or changing a user name to be attached to a stored document.
Press [Scan Original].
Press [UserID].
3 Select the user name, and then press [Manual Entry].
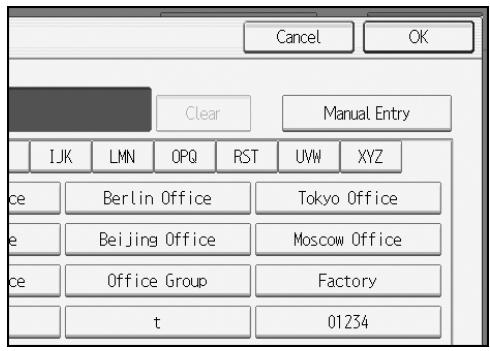
The user name change screen will appear.
Enter the user name, and then press [OK] twice.
Registering or changing a user name (When no name is registered to the Address Book)
Following describes the procedure for registering or changing a user name to be attached to a stored document.
Press [Scan Original].
Press [UserID].
3 Enter the user name, and then press [OK].
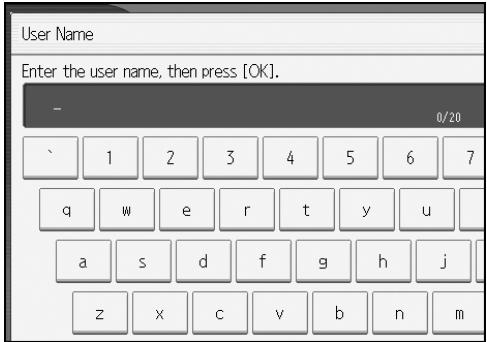
Changing a file name
Following describes the procedure for changing a name to be attached to a stored document.
Press [Scan Original].
Press [File Name].
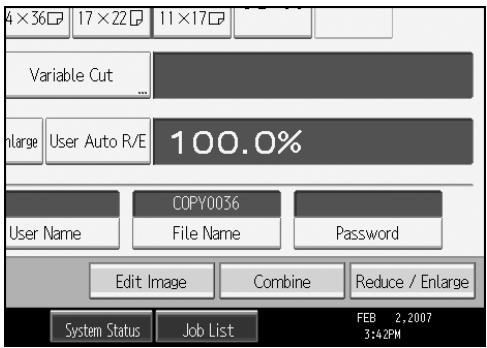
The file name change screen will appear.
Press [Delete All] to delete the file name to be automatically set.
4 Enter a file name, and then press [OK].
Note
In Step 3, pressing [Backspace] allows you to delete up to any desired location.
Registering or changing a password
Following describes the procedure for setting or changing a password to be attached to a stored document.
Press [Scan Original].
Press [Password].
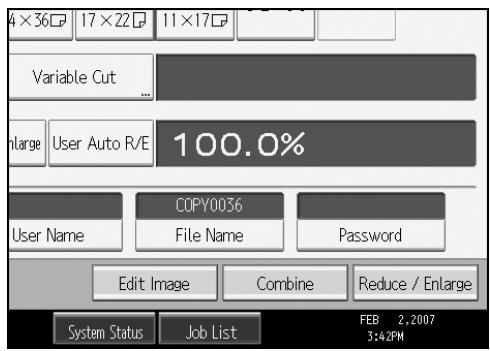
3 Enter the password with the number keys, and then press [OK]. You can use four to eight digits for specifying the password.
4 For double-check, enter the password again, and then press [OK].
Changing User Name, File Name or Password of a Stored Document
Following describes the procedure for changing a user name, file name or password.
Press the [Document Server] key.
2 Select the document whose user name, file name or password is to be changed.
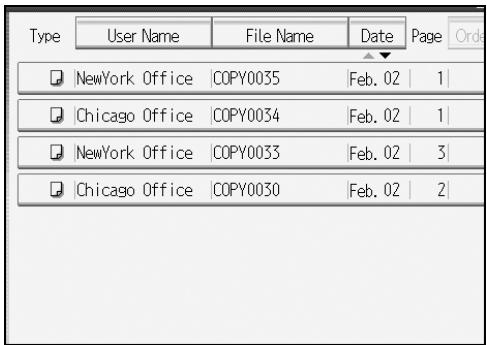
When a password is set, enter it, and then press [OK].
Press [File Management].
Press [ChangeUserName], [ChangeFileName] or [ChangePassword].
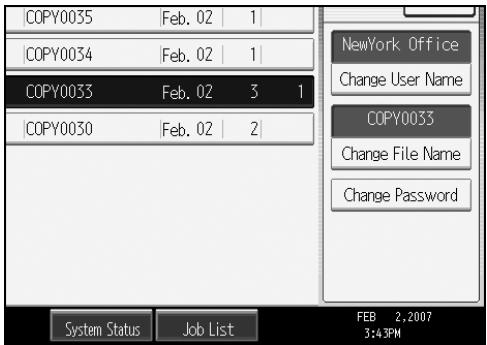
From the respective change screens, enter a new user name, file name or password, and then press [OK].
6 Press [OK].
Note
Depending on the security setting, [Access Privileges] may appear instead of [UserID]. For details about specifying [Access Privileges], consult the administrator.
Checking the Details of a Stored Document
Following describes the procedure for displaying details of a stored document.
Press the [Document Server] key.
2 Select the document whose details are to be displayed.

When a password is set, enter it, and then press [OK].
Press [Details].
Details of the document will be displayed.
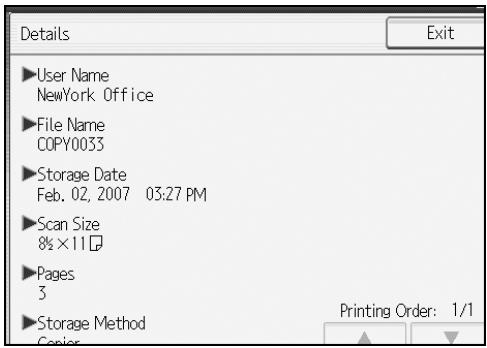
Note
If you have selected multiple documents, press [▲] or [▼] to view their information.
- Pressing [Exit] restores the Select File screen.
Searching for a Stored Document
Following describes the procedure for searching a stored document from user name or file name.
You can rearrange the currently chronologically ordered documents in any desired order.
Searching by file name
Searches for stored documents by file name.
Searching by user name
Searches for stored documents by user name.
Note
- Installing DesktopBinder Lite enables to search and reorder stored documents from computers.
For details about DesktopBinder Lite, see Instruction Manual and Help of DesktopBinder Lite.
Reference
Instruction Manual and Help of DesktopBinder Lite
Searching by file name
Following describes the procedure for searching a stored document by the file name.
Press the [Document Server] key.
Press [File Name].

3 Enter the file name to be searched, and then press [OK].
A file name that matches completely from the starting character will be searched and displayed on the screen.
Note
□ Pressing [Display All] displays ever stored document.
Searching by user name
Following describes the procedure for searching a stored document by the user name.
Press the [Document Server] key.
Press [UserID].
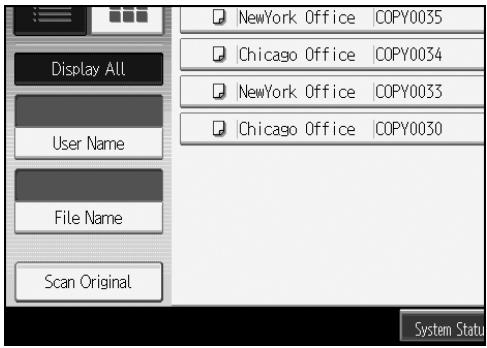
3 When specifying a registered user name, select the user name. When using a not-registered user name, proceed to the next step
When the user name is not registered, press [Manual Entry], and then enter the user name from the input screen to be displayed. Then press [OK].

Press [OK].
A file name that matches completely from the starting character will be searched and displayed on the screen.
Note
□ Pressing [Display All] displays ever stored document.
Printing a Stored Document
Following describes the procedure for printing a stored document.
Press the [Document Server] key.
2 Select the document to be printed.
When a password is set, enter it, and then press [OK].
3 When printing two or more documents at a time, repeat the operation in step 2.
Up to 30 documents can be selected.
4 When specifying printing conditions, press [To Printing Screen].
The printing condition screen will appear. User name of the document, file name and the order of printing of this document will be displayed.
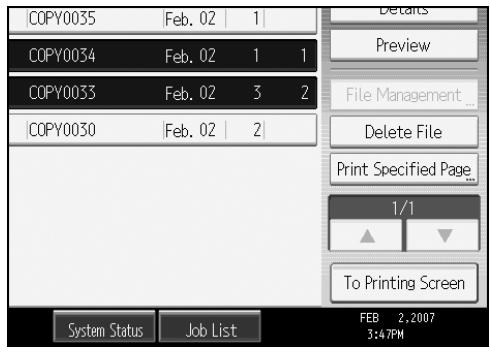
5 Enter the number of print copies with the number keys.
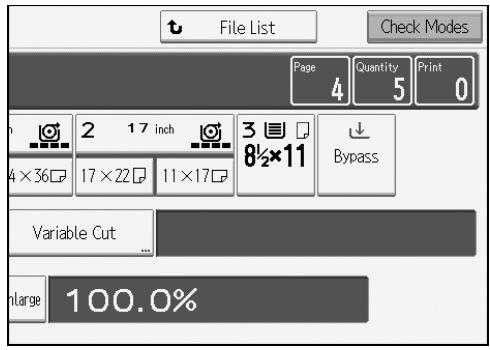
Up to 99 copies are specifiable.
6 Press the [Start] key.
Printing will be started.
Note
□ You can search the target document using, in step 2, [UserID] or [FileName] situated in the left side of the screen.
In the display order field of step 2, you can sort the documents by [Name], [File Name], or [Date]. Press the item to be used for the sorting.
To cancel the selection in step 2, press the highlighted document again.
Some of the selected documents may not be printed due to the difference in the size or resolution.
To change the printing order, cancel the highlight, and then specify the order correctly.
□ Pressing the【Clear Modes】key cancels every selection.
□ Pressing [Order] displays the selected documents in the printing order.
The copy and printer features hold the specified printing conditions after the operation is over and apply them at the next printing.
- When two or more documents are specified, the printing conditions are stored on the first document but not on the succeeding documents.
Following settings are available for the printing conditions. For respective printing results, see "Copier Functions".
- Reduce/Enlarge (Zoom, Fine Magnification, Auto Reduce/Enlarge)
- Stamp (Background Numbering, Preset Stamp, User Stamp, Date Stamp, Page Numbering)
- Adjust Print Position
- Print Output Location
- Image Density
-
Finishing (Sort, Rotate Sort, Fan Fold)
Variable Cut -
When printing two or more copies while selecting the sort function, you can confirm the finish by printing only one copy.
□ When printing two or more documents at a time, you can print them as a single continuous document by specifying the order of their printing. - When printing two or more documents at a time, the printing conditions set for the first document are applied to all the remaining documents.
- When two or more documents are selected, pressing [▲] or [▼] allows you to confirm the user name, file name and printing order of the document selected in step ②.
□ Pressing [File List] restores the Select File screen.
Web Image Monitor allows you to print a document stored in the Document Server from your computer. For the Web Image Monitor starting procedure, "Displaying a Stored Document with Web Image Monitor".

Reference
p.49 "Copier Functions"
p.144 "Searching for a Stored Document"
p.153 "Displaying a Stored Document with Web Image Monitor"
Interrupting a print job
Following describes the procedure for interrupting a print job.

Press the【Clear/Stop】key.

Press [Stop].
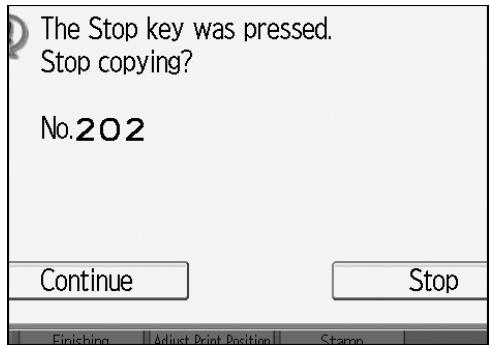
Changing the number of print copies while printing is in progress
Following describes the procedure for changing the number of print copies after printing is started.

Important
This feature is enabled when the sort function is selected in the printing conditions.

Press the【Clear/Stop】key.

Press [Change Quantity].

Enter the number of print copies anew with the number keys.
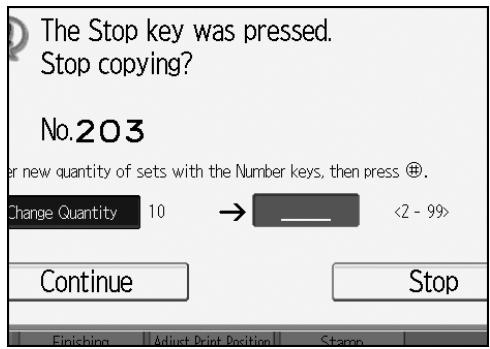

Press the [#] key.
Press [Continue].
Printing will be resumed.
Note
The range of print copies enterable in step 3 depends on the timing of your pressing the [Clear/Stop] key.
Sample Print
When print copies are massive, you can print a single copy in advance to check the printing order of the selected documents and the printing conditions.
Important
This feature is enabled when the sort function is selected in the printing conditions.
1 Select the document to be printed.

When a password is set, enter it, and then press [OK].
Press the [Sample Copy] key.
Only one copy will be printed.
Press [Continue].
Printing will be resumed.
Note
- When canceling the printing, press [Suspend]. The print screen will appear, enabling to set another item.
Printing the first page
In order to confirm the print results, you can print the first page alone of the document selected on the Select File screen.
When two or more documents are selected, the first page of the respective documents is printed.
1 Select the document to be printed (confirmed).
When a password is set, enter it, and then press [OK].
Press [Print Specified Page].
Press [1st Page].
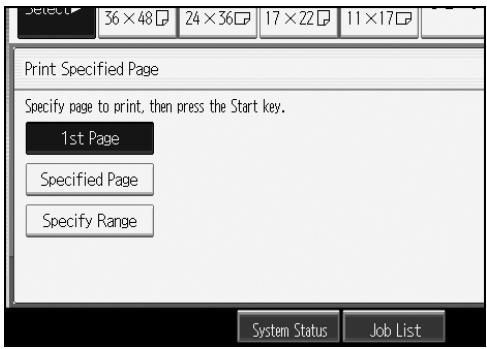
Press the [Start] key.
Printing a specified page
You can print a specified page alone of the document selected on the Select File screen.
0 Select the document to be printed.
When a password is set, enter it, and then press [OK].
Press [Print Specified Page].
Press [Specified Page].
4 Specify the page to be printed with the number keys, and then press [#].
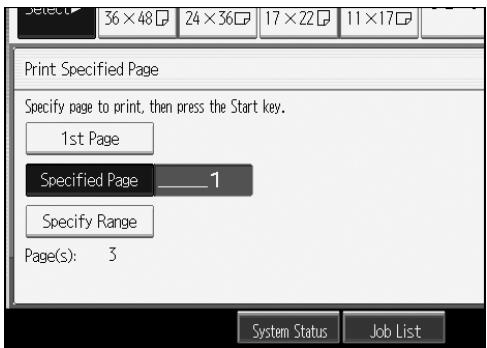
Press the [Start] key.
Printing a specified range
You can print the pages in the specified range alone of the document selected on the Select File screen.
0 Select the document to be printed.
When a password is set, enter it, and then press [OK].
Press [Print Specified Page].
Press [Specify Range].
4 Specify the printing start page with the number keys, and then press [#].
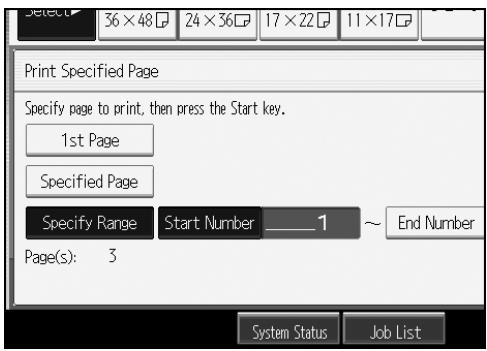
5 Specify the printing end page with the number keys, and then press [#].
6 Press the [Start] key.
Deleting a Stored Document
Following describes the procedure for deleting a stored document.
Important
The Document Server can store up to 3000 documents. As the number of stored documents reaches 3000, storing of a new document becomes unavailable. Thus, you should delete unnecessary documents as much as practicable.
Press the [Document Server] key.
2 Select the document to be deleted.
When a password is set, enter it, and then press [OK].
Press [Delete File].

Press [Yes].
Note
□ You can delete the all stored documents at a time. See "Administrator Tools", General Settings Guide.
It is also possible to select two or more documents and delete them.
- You can search the target document using [File Name] or [UserID] situated in the left side of the screen.
In the display order field, you can sort the documents by [UserID], [FileName], or [Date]. Press the item to be used for the sorting.
- When you could not identify the target document from the file name, print the first page alone of the document in order to confirm the print results.
- When canceling your selection, press the highlighted document again.
Web Image Monitor allows you to print a document stored in the Document Server from your computer. For the Web Image Monitor starting procedure, "Displaying a Stored Document with Web Image Monitor".
Reference
p.153 "Displaying a Stored Document with Web Image Monitor" "Administrator Tools", General Settings Guide
Displaying a Stored Document with Web Image Monitor
Following describes the procedure for confirming contents of a stored document on a computer with Web Image Monitor.
0 Start a Web browser.
Enter "http:// (IPv4 address of this machine) /" to the address.
The top page of Web Image Monitor will be displayed.
3 Click [Document Server].
The list of documents in the Document Server will be displayed.
4 Click of the document you want to confirm.
Information of the document will be displayed.
5 Confirm contents of the document.
Note
□ You can change the format of the document list in step 3. Click the (Thumbsnails), (Icons), or (Details).
□ When you want to enlarge the preview display in step 3, click [Enlarge Image].
Downloading a Stored Document
Following describes the procedure for downloading a stored document to a computer with Web Image Monitor.
Important
- When downloading a document stored with the copy feature, you must prepare File Format Converter.
1 Start a Web browser.
Enter "http://(IPv4 address of this machine)/" to the address.
The top page of Web Image Monitor will be displayed.
3 Click [Document Server].
The list of documents in the Document Server will be displayed.
Click of the document you want to download.
5 Select [PDF] or [TIFF] for the file format.
The data will be downloaded.
Click [OK].
Note
□ You can change the format of the document list in step 3. Click the (Thumbsails), (Icons), or (Details).
This chapter describes the copy machine's specifications and the function compatibility.
Function Compatibility
The combination chart given below shows which functions can be used together. Blank space: These functions can be used together.
× : These functions cannot be used together. The function selected first will be the mode you are working in.
- These functions cannot be used together. The function selected second will be the mode you are working in.
| Function selected first | Function selected second | ||||||||||||||||||||||||||||||||||||||||||||||||||||||||||||||||||||||||||||||||||||||||||||||||||||||||||||||||||||||||||||
| Custom Size Original | Wide Scan | Original Orientation (Unreadable) | Auto Image Density | Manual Image Density | Auto Paper Select | Manual Paper Select: Paper Roll Tray | Manual Paper Select: Cut Paper Tray | Bypass Tray | Synchro Cut | Variable Cut | Preset Cut | Auto Reduce/Extend | Zoom/ Directional Magnification (%)/ Directional Magnification (inch) | User Auto Reduce/Extend | Combine | Double Copies | Image Repeat | Adjust Print Position | Positive/Negative | Erase Border | Erase Inside | Mirror Outside | Format Overlay/ Programmed Format Overlay | Margin Adjustment | Partial Copy | Background Numbering | Preset Stamp | User Stamp | Date Stamp | Page Numbering | Sort | Rotate Sort | Fan Fold | Store File (Document Server) | |||||||||||||||||||||||||||||||||||||||||||||||||||||||||||||||||||||||||||||||||||||||||||
| Custom Size Original | ● | × | × | × | |||||||||||||||||||||||||||||||||||||||||||||||||||||||||||||||||||||||||||||||||||||||||||||||||||||||||||||||||||||||||
| Wide Scan | ● | × | × | × | |||||||||||||||||||||||||||||||||||||||||||||||||||||||||||||||||||||||||||||||||||||||||||||||||||||||||||||||||||||||||
| Original Orientation (Unreadable) | |||||||||||||||||||||||||||||||||||||||||||||||||||||||||||||||||||||||||||||||||||||||||||||||||||||||||||||||||||||||||||||
| Auto Image Density | |||||||||||||||||||||||||||||||||||||||||||||||||||||||||||||||||||||||||||||||||||||||||||||||||||||||||||||||||||||||||||||
| Manual Image Density | |||||||||||||||||||||||||||||||||||||||||||||||||||||||||||||||||||||||||||||||||||||||||||||||||||||||||||||||||||||||||||||
| Auto Paper Select | ● | ● | |||||||||||||||||||||||||||||||||||||||||||||||||||||||||||||||||||||||||||||||||||||||||||||||||||||||||||||||||||||||||||
| Manual Paper Select: Paper Roll Tray | |||||||||||||||||||||||||||||||||||||||||||||||||||||||||||||||||||||||||||||||||||||||||||||||||||||||||||||||||||||||||||||
| Manual Paper Select: Cut Paper Tray | |||||||||||||||||||||||||||||||||||||||||||||||||||||||||||||||||||||||||||||||||||||||||||||||||||||||||||||||||||||||||||||
| Bypass Tray | × | ||||||||||||||||||||||||||||||||||||||||||||||||||||||||||||||||||||||||||||||||||||||||||||||||||||||||||||||||||||||||||||
| Synchro Cut | × | ||||||||||||||||||||||||||||||||||||||||||||||||||||||||||||||||||||||||||||||||||||||||||||||||||||||||||||||||||||||||||||
| Variable Cut | |||||||||||||||||||||||||||||||||||||||||||||||||||||||||||||||||||||||||||||||||||||||||||||||||||||||||||||||||||||||||||||
| Preset Cut | |||||||||||||||||||||||||||||||||||||||||||||||||||||||||||||||||||||||||||||||||||||||||||||||||||||||||||||||||||||||||||||
| Auto Reduce/Extend | × | ||||||||||||||||||||||||||||||||||||||||||||||||||||||||||||||||||||||||||||||||||||||||||||||||||||||||||||||||||||||||||||
| Zoom/ Directional Magnification (%)/ Directional Magnification (inch) | +2 | ● | ● | ● | ● | × | × | × | × | × | × | × | × | × | × | × | × | × | × | × | × | × | × | × | × | × | × | × | × | × | × | × | × | × | × | × | × | × | × | × | × | × | × | × | × | × | × | × | × | × | × | × | × | × | × | ||||||||||||||||||||||||||||||||||||||||||||||||||||||||||||||||||||||
| User Auto Reduce/Extend | × | × | ● | ● | ● | ● | ● | ● | ● | ● | ● | ● | ● | ● | × | × | × | × | × | × | × | × | × | × | × | × | × | × | × | × | × | × | × | × | × | × | × | × | × | × | × | × | × | × | × | × | × | × | × | × | × | × | × | × | × | × | × | × | × | ||||||||||||||||||||||||||||||||||||||||||||||||||||||||||||||||||
| Combine | × | × | × | × | × | × | × | × | × | × | × | × | × | × | × | × | × | × | × | × | ● | ● | ● | ● | ● | ● | ● | ● | ● | ● | ● | ● | ● | ● | ● | ● | ● | ● | ● | ● | ● | ● | ● | ● | ● | ● | ● | ● | ● | ● | ● | ● | ● | ● | ● | ● | ● | ● | ● | ● | ● | ● | ● | ● | ● | ● | ● | ● | ● | ● | |||||||||||||||||||||||||||||||||||||||||||||||||||||||
| Double Copies | × | × | × | × | × | × | × | × | × | × | × | × | × | × | × | × | × | × | × | ● | ● | ● | ● | ● | ● | ● | ● | ● | ● | ● | ● | ● | ● | ● | ● | ● | ● | ● | ● | ● | ● | ● | ● | ● | ● | ● | ● | ● | ● | ● | ● | ● | ▲ 0.5mm 0.7mm 0.9mm 1.1mm 1.3mm 1.5mm 1.7mm 2.0mm 2.2mm 2.4mm 2.6mm 2.8mm 3.0mm 3.2mm 3.4mm 3.6mm 3.8mm 4.0mm 4.2mm 4.4mm 4.6mm 4.8mm 5.0mm 5.2mm 5.4mm 5.6mm 5.8mm 6.0mm 6.2mm 6.4mm 6.6mm 6.8mm 7.0mm 7.2mm 7.4mm 7.6mm 7.8mm 8.0mm 8.2mm 8.4mm 8.6mm 8.8mm 9.0mm 9.2mm 9.4mm 9.6mm 9.8mm 10.0mm 10.2mm 10.4mm 10.6mm 10.8mm 11.0mm 11.2mm 11.4mm 11.6mm 11.8mm 12.0mm 12.2mm 12.4mm 12.6mm 12.8mm 13.0mm 13.2mm 13.4mm 13.6mm 13.8mm 14.0mm 14.2mm 14.4mm 14.6mm 14.8mm 15.0mm 15.2mm 15.4mm 15.6mm 15.8mm 16.0mm 16.2mm 16.4mm 16.6mm 16.8mm 17.0mm 17.2mm 17.4mm 17.6mm 17.8mm 18.0mm 18.2mm 18.4mm 18.6mm 18.8mm 19.0mm 19.2mm 19.4mm 19.6mm 19.8mm 20.0mm 20.2mm 20.4mm 20.6mm 20.8mm 21.0mm 21.2mm 21.4mm 21.6mm 21.8mm 22.0mm 22.2mm 22.4mm 22.6mm 22.8mm 23.0mm 23.2mm 23.4mm 23.6mm 23.8mm 24.0mm 24.2mm 24.4mm 24.6mm 24.8mm 25.0mm 25.2mm 25.4mm 25.6mm 25.8mm 26.0mm 26.2mm 26.4mm 26.6mm 26.8mm 27.0mm 27.2mm 27.4mm 27.6mm 27.8mm 28.0mm 28.2mm 28.4mm 28.6mm 28.8mm 29.0mm 29.2mm 29.4mm 29.6mm 29.8mm 30.0mm 30.2mm 30.4mm 30.6mm 30.8mm 31.0mm 31.2mm 31.4mm 31.6mm 31.8mm 32.0mm 32.2mm 32.4mm 32.6mm 32.8mm 33.0mm 33.2mm 33.4mm 33.6mm 33.8mm 34.0mm 34.2mm 34.4mm 34.6mm 34.8mm 35.0mm 35.2mm 35.4mm 35.6mm 35.8mm 36.0mm 36.2mm 36.4mm 36.6mm 36.8mm 37.0mm 37.2mm 37.4mm 37.6mm 37.8mm 38.0mm 38.2mm 38.4mm 38.6mm 38.8mm 39.0mm 39.2mm 39.4mm 39.6mm 39.8mm 40.0mm 40.2mm 40.4mm 40.6mm 40.8mm 41.0mm 41.2mm 41.4mm 41.6mm 41.8mm 42.0mm 42.2mm 42.4mm 42.6mm 42.8mm 43.0mm 43.2mm 43.4mm 43.6mm 43.8mm 44.0mm 44.2mm 44.4mm 44.6mm 44.8mm 45.0mm 45.2mm 45.4mm 45.6mm 45.8mm 46.0mm 46.2mm 46.4mm 46.6mm 46.8mm 47.0mm 47.2mm 47.4mm 47.6mm 47.8mm 48.0mm 48.2mm 48.4mm 48.6mm 48.8mm 49.0mm 49.2mm 49.4mm 49.6mm 49.8mm 50.0mm 50.2mm 50.4mm 50.6mm 50.8mm 51.0mm 51.2mm 51.4mm 51.6mm 51.8mm 52.0mm 52.2mm 52.4mm 52.6mm 52.8mm 53.0mm 53.2mm 53.4mm 53.6mm 53.8mm 54.0mm 54.2mm 54.4mm 54.6mm 54.8mm 55.0mm 55.2mm 55.4mm 55.6mm 55.8mm 56.0mm 56.2mm 56.4mm 56.6mm 56.8mm 57.0mm 57.2mm 57.4mm 57.6mm 57.8mm 58.0mm 58.2mm 58.4mm 58.6mm 59.0mm 59.2mm 59.4mm 59.6mm 59.8mm 60.0mm 60.2mm 60.4mm 60.6mm 60.8mm 61.0mm 61.2mm 61.4mm 61.6mm 61.8mm 62.0mm 62.2mm 62.4mm 62.6mm 62.8mm 63.0mm 63.2mm 63.4mm 63.6mm 63.8mm 64.0mm 64.2mm 64.4mm 64.6mm 64.8mm 65.0mm 65.2mm 65.4mm 65.6mm 65.8mm 66.0mm 66.2mm 66.4mm 66.6mm 67.0mm 67.2mm 67.4mm 67.6mm 67.8mm 68.0mm 68.2mm 68.4mm 68.6mm 69.0mm 69.2mm 69.4mm 69.6mm 69.8mm 70.0mm 70.2mm 70.4mm 70.6mm 70.8mm 71.0mm 71.2mm 71.4mm 71.6mm 71.8mm 71.8mm 71.9mm 72.0mm 72.2mm 72.4mm 72.6mm 72.8mm 73.0mm 73.2mm 73.4mm 73.6mm 73.8mm 73.8mm 73.8mm 73.8mm 73.8mm 73.8mm 73.8mm 73.8mm 73.8mm 73.8mm 73.8mm 73.8mm 73.8mm 73.8mm 73.8mm 73.8mm 73.8mm 74.0mm 74.2mm 74.4mm 74.6mm 74.8mm 75.0mm 75.2mm 75.4mm 75.6mm 75.8mm 75.8mm 75.8mm 75.8mm 75.8mm 75.8mm 75.8mm 75.8mm 75.8mm 75.8mm 75.8mm 75.8mm 75.8mm 75.8mm 75.8mm 75.8mm 75.8mm 76.0mm 76.2mm 76.4mm 76.6mm 76.8mm 76.8mm 76.8mm 76.8mm 76.8mm 76.8mm 76.8mm 76.8mm 76.8mm 76.8mm 76.8mm 76.8mm 76.8mm 76.8mm 76.8mm 76.8mm 76.8mm 77.0mm 77.2mm 77.4mm 77.4mm 77.4mm 77.4mm 77.4mm 77.4mm 77.4mm 77.4mm 77.4mm 77.4mm 77.4mm 77.4mm 77.4mm 77.4mm 77.4mm 77.4mm 77.4mm 78.0mm 78.2mm 78.4mm 78.6mm 78.8mm 78.8mm 78.8mm 78.8mm 78.8mm 78.8mm 78.8mm 78.8mm 78.8mm 78.8mm 78.8mm 78.8mm 78.8mm 78.8mm 78.8mm 78.8mm 78.8mm 79.0mm 79.2mm 79.4mm 79.6mm 79.8mm 79.8mm 79.8mm 79.8mm 79.8mm 79.8mm 79.8mm 79.8mm 79.8mm 79.8mm 79.8mm 79.8mm 79.8mm 79.8mm 79.8mm 79.8mm 79.8mm 78.0mm 78.2mm 78.4mm 78.6mm 78.8mm 78.8mm 78.8mm 78.8mm 78.8mm 78.8mm 78.8mm 78.8mm 78.8mm 78.8mm 78.8mm 78.8mm 79.0mm 79.2mm 79.4mm 79.6mm 78.0mm 78.2mm 78.4mm 78.6mm 78.8mm 78.8mm 78.8mm 78.8mm 78.8mm 78.8mm 78.8mm 78.8mm 78.8mm 78.8mm 78.8mm 78.8mm 77.0mm 77.2mm 77.4mm 77.4mm 77.4mm 77.4mm 77.4mm 77.4mm 77.4mm 77.4mm 77.4mm 77.4mm 77.4mm 77.4mm 77.4mm 77.4mm | ||||||||||||||||||||||||||||||||||||||||||||||||||||||||||||||||||||||||
ATY067S
1 When there is no appropriate preset cut size paper in the selected tray, the function selected first has priority.
2 When Directional Magnification (%) or Directional Magnification (inch) is selected, the function selected first has priority.
*3 When Directional Magnification (\%) or Directional Magnification (inch) is selected, the function selected second has priority.
Supplementary Information
Following describes the detailed specifications of the respective functions.
Job Preset
- When the paper size specified in Job Preset is as the same as that of the copy job in progress, the number of sheets that can be set is as follows:
A0 (E): 100 sheets
A1 (D): 100 sheets
A2 (C): 200 sheets
A3 (B): 400 sheets
A4 (A): 400 sheets
- The maximum number of jobs that can be preset is eight.
- You might not be able to specify eight preset jobs if your originals are large.
Bypass Tray Copy
- The paper size that can be loaded in the bypass tray is 210 - 914 × 257 - 2000mm ( 8^1 / 2^- - 36^- × 10^- - 78^- ).
Selecting Copy Paper
- If you change the paper type, copying may take longer to start.
- When Auto Paper Select is selected, copying may take slightly longer since the machine selects the copy paper after scanning the original.
Preset Reduce/Enlarge
- The reproduction ratios you can specify are 25.0 - 400.0% .
- You can select one of eight preset ratios (four enlargement ratios, four reduction ratios).
- Following shows the relation between the original size and paper size at respective scaling factors.
Metric version
400.0% (Area ratio 16 times): A4→A0
282.8% (Area ratio 8 times): A3→A0, A4→A1, B4 JIS→B1 JIS
200.0% (Area ratio 4 times): A2→A0, A3→A1, A4→A2, B3 JIS→B1 JIS, B4 JIS→B2 JIS
141.4% (Area ratio 2 times): A1→A0, A2→A1, A3→A2, A4→A3,
B2 JIS B1 JIS, B3 JIS B2 JIS, B4 JIS B3 JIS
70.7% (Area ratio ^1 / _2 times): A0→A1, A1→A2, A2→A3, A3→A4,
B1 JIS→B2 JIS, B2 JIS→B3 JIS, B3 JIS→B4 JIS
50.0% (Area ratio 1/4 times): A0→A2, A1→A3, A2→A4, B1 JIS→B3 JIS, B2 JIS→B4 JIS
35.4%: A0→A3, A1→A4, B1 JIS→B4 JIS
25.0%: A0→A4
- Inch version (Engineering) 400.0% (Area ratio 16 times): A → E 258.8%: A → D, B → E 200.0% (Area ratio 4 times): A → C, B → D, C → E 129.4%: A → B, B → C, C → D, D → E 64.7%: B → A, C → B, D → C, E → D 50.0% (Area ratio ^1/_4 times): C → A, D → B, E → C 32.4%: D → A, E → B 25.0%: E → A
-
Inch version (Architecture) 400.0% (Area ratio 16 times): A → E 266.7%: A → D, B → E 200.0% (Area ratio 4 times): A → C, B → D, C → E 133.3%: A → B, B → C, C → D, D → E 66.7%: B → A, C → B, D → C, E → D 50.0% (Area ratio ^1/_4 times): C → A, D → B, E → C 33.3%: D → A, E → B 25.0%: E → A
-
You can select a ratio regardless of original or paper size, or paper roll cut method. With certain ratios, parts of the image might not be copied or margins will appear.
Zoom
- The reproduction ratios you can specify are 25.0 - 400.0% .
- You can select a ratio regardless of original or paper size, or paper roll cut method. With certain ratios, parts of the image might not be copied or margins will appear.
Size Magnification
- The reproduction ratios you can specify are 25.0 - 400.0% .
- If the calculated ratio is over the maximum or under the minimum ratio, it is automatically adjusted to within available range. However, with some ratios, parts of the image might not be copied or margins will appear on copies.
Directional Magnification (%)
- The reproduction ratios you can specify are 25.0 - 400.0% .
- You can enter a ratio regardless of original or paper size, or paper roll cut method. With certain ratios, parts of the image might not copy or margins will appear.
- You cannot use Directional Magnification (\%) if Auto Paper Select is selected.
Directional Magnification (inch)
- The reproduction ratios automatically selected by the machine are 25.0 - 400.0% .
- If the calculated ratio is over the maximum or under the minimum ratio, it is automatically adjusted within the available range. With certain ratios, parts of the image might not copy or margins will appear.
- You cannot use Directional Magnification (inch) if Auto Paper Select is selected.
Fine Magnification
- Depending on the image patterns of the originals, moiré patterns may be noticeable, or the image quality may deteriorate.
Combine
- The machine selects the reproduction ratio automatically. This reproduction ratio depends on copy paper sizes and the number of originals.
- If the calculated ratio is under the minimum ratio, it is automatically adjusted to within available range. However, with some ratios, parts of the image might not be copied.
- You cannot use custom size paper.
- If the orientation of originals is different from that of the copy paper, the machine will automatically rotate the image by 90 degrees to make copies properly.
- If the number of originals placed is less than the number specified for Combine, the last page segment is left blank as shown.
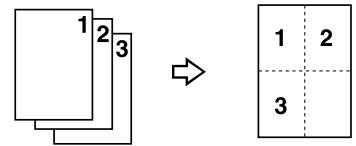
Erase Border
- You can specify the width of the erased border margins from 2 to 99mm (0.1" to 3.9") in increments of 1mm (0.1").
Erase Inside
- By combining "Erase Inside 1"- "Erase Inside 5'' , you can erase up to 5 areas at the same time.
Margin Adjustment
- You can specify margins from 0 to 200 ~mm (0 to 7.9'' ) in increments of 1 ~mm (0.1").
- If you set the margin too long for the original, parts of the image might not be copied.
Background Numbering
- A pattern-like image may appear in the area where an original's image overlaps the background number.
Preset Stamp
- You can stamp onto paper sizes up to A0 (E).
- You can change the default settings of the stamp with User Tools. Depending on settings, image density may change.
- Depending on paper size, if you change the stamp size, parts of the stamp might not be printed.
- When you set the stamp position to "Bottom Left", "Bottom Center", or "Bottom Right", and then use Rotate Sort or Rotate Copy, the stamp position may shift.
User Stamp
- You can stamp onto paper sizes up to A0 (E).
Date Stamp
- You can stamp onto paper sizes up to A0 (E).
- When using Combine mode, the date stamp is printed as follows:
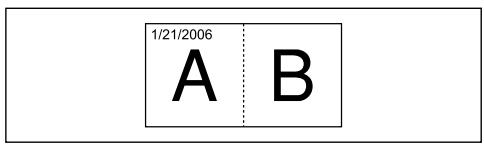
AMG067S
Page Numbering
- You can stamp onto paper sizes up to A0 (E).
- When using Combine mode, page numbers are printed as follows: [Per Original] is selected in User Tools:
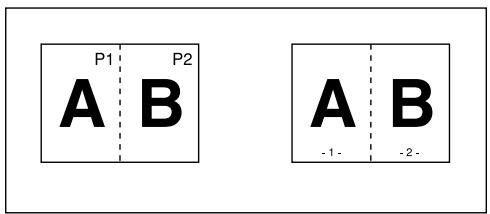
GCANPE0E
[Per Copy] is selected in User Tools:
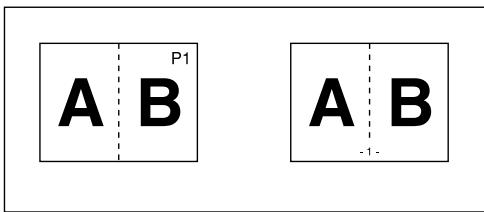
GCANPE2E
Image Repeat
- Depending on the paper size, ratio, and orientation, parts of repeated images may not be copied.
- You can use Image Repeat for paper sizes up to A0 (E).
- When using Image Repeat with Adjust Print Position together, the repeated images will be shifted as a whole.
Double Copies
- You can copy an image up to A1 (D) with Double Copies. You can use paper sizes up to A0 (E) .
Format Overlay
- When the sizes of the format (background original) and original to be overlaid on the format are different, the image is created at the size of the overlaid original.
- You can use Format Overlay for paper sizes up to A0 (E).
- When scanning a format (background original), the output image may be blurred. If this happens, copy the format, and then use it as the background original.
- When using Format Overlay, image quality may deteriorate.
- You cannot change the image density of a format (background original). To achieve a desired image density, scan an original with the image density changed beforehand.
Adjust Print Position
- You can shift the image from 0 to 200 ~mm in 1 ~mm increments (0 to 7.9'' in 0.1'' increments).
- When using Stamp and Adjust Print Position together, the stamp position does not move.
- You can use Adjust Print Position for paper sizes up to A0 (E).
- If you set the margin too long for the original, parts of the image might not be copied.
Sort, Rotate Sort
- You can use Sort for copy sizes up to A0 (E).
- You can use Rotate Sort for copy sizes up to A1 (D).
- The number of originals that can be scanned for Sort and Rotate Sort is as follows:
A0 (E): 100 sheets
A1 (D): 100 sheets
A2 (C): 200 sheets
A3 (B): 400 sheets
- You can use the following paper sizes with Rotate Sort:
Metric version
420mm× 297mm (A3)
594mm× 420mm (A2)
841mm× 594mm (A1)
515mm× 364mm (B3 JIS)
728mm× 515mm (B2 JIS)
- Inch version (Engineering)
11^ × 17^ (B)
17^ × 22^ (C)
22^ × 34^ (D)
- Inch version (Architecture)
12^ × 18^ (B)
18^ × 24^ (C)
24^ × 36^ (D)
Scan Size Limitations, by Function
The following chart shows scan size limitations for the Adjust Print Position, Margin Adjustment, Edit, and Stamp functions.
| Function | Scan size limitation | |
| Adjust Print Position | A0 (E) or smaller | |
| Margin Adjustment | 15 m or smaller | |
| Format Overlay | A0 (E) or smaller | |
| Erase | Erase Inside | A0 (E) or smaller, 5 locations |
| Erase | Erase Outside | A0 (E) or smaller |
| Erase | Erase Border | A0 (E) or smaller |
| Erase | Erase Inside, Erase Border, and Format Overlay Combinations | A0 (E) or smaller |
| Erase | Erase Outside and Format Overlay Combinations | A0 (E) or smaller |
| Positive/Negative | 15 m or smaller | |
| Mirror Image | 15 m or smaller | |
| Double Copies | A1 (D) (when A0 (E) paper is selected) | |
| Image Repeat | with no other modes | A0 (E) or smaller |
| Image Repeat | with Erase Border | A0 (E) or smaller |
| Image Repeat | with Format Overlay | A0 (E) or smaller |
| Stamp | A0 (E) or smaller | |
Settings Record Sheet
Program Record Sheet
| Program No. | Original name | Function 1 | Function 2 | Function 3 | Function 4 | Function 5 |
| 1 | ||||||
| 2 | ||||||
| 3 | ||||||
| 4 | ||||||
| 5 | ||||||
| 6 | ||||||
| 7 | ||||||
| 8 | ||||||
| 9 | ||||||
| 10 |
AHD014S
Print this sheet to keep a record of your program settings.
Stored Format Record Sheet
| Format No. | Original name | Note | Date | User |
| 1 | ||||
| 2 | ||||
| 3 | ||||
| 4 |
AHD015S
Print this sheet to keep a record of your format settings.
User Stamp Record Sheet
| Record No. | Corporation/section/project...etc | Stamp image | Date | User |
| 1 | ||||
| 2 | ||||
| 3 | ||||
| 4 |
ATY031S
Print this sheet to keep a record of your user stamps.
Magnification Ratio Chart
Metric version (A series)
| % | Copy size | |||||
| A0 | A1 | A2 | A3 | A4 | ||
| Original size | A0 | 100.0 | 70.7 | 50.0 | 35.4 | 25.0 |
| A1 | 141.4 | 100.0 | 70.7 | 50.0 | 35.4 | |
| A2 | 200.0 | 141.4 | 100.0 | 70.7 | 50.0 | |
| A3 | 282.8 | 200.0 | 141.4 | 100.0 | 70.7 | |
| A4 | 400.0 | 282.8 | 200.0 | 141.4 | 100.0 | |
Metric version (B series)
| % | Copy size | ||||
| B1 JIS | B2 JIS | B3 JIS | B4 JIS | ||
| Original size | B1 JIS | 100.0 | 70.7 | 50.0 | 35.4 |
| B2 JIS | 141.4 | 100.0 | 70.7 | 50.0 | |
| B3 JIS | 200.0 | 141.4 | 100.0 | 70.7 | |
| B4 JIS | 282.8 | 200.0 | 141.4 | 100.0 | |
Inch version (Engineering)
| % | Copy size | |||||
| E | D | C | B | A | ||
| Original size | E | 100.0 | 64.7 | 50.0 | 32.4 | 25.0 |
| D | 129.4 | 100.0 | 64.7 | 50.0 | 32.4 | |
| C | 200.0 | 129.4 | 100.0 | 64.7 | 50.0 | |
| B | 258.8 | 200.0 | 129.4 | 100.0 | 64.7 | |
| A | 400.0 | 258.8 | 200.0 | 129.4 | 100.0 | |
Inch version (Architecture)
| % | Copy size | |||||
| E | D | C | B | A | ||
| Original size | E | 100.0 | 66.7 | 50.0 | 33.3 | 25.0 |
| D | 133.3 | 100.0 | 66.7 | 50.0 | 33.3 | |
| C | 200.0 | 133.3 | 100.0 | 66.7 | 50.0 | |
| B | 266.7 | 200.0 | 133.3 | 100.0 | 66.7 | |
| A | 400.0 | 266.7 | 200.0 | 133.3 | 100.0 | |
Measure Chart
Metric version
| Width × Length (mm) | |
| A0 | 841 × 1189 |
| A1 | 594 × 841 |
| A2 | 420 × 594 |
| A3 | 297 × 420 |
| A4 | 210 × 297 |
| B1 JIS | 728 × 1030 |
| B2 JIS | 515 × 728 |
| B3 JIS | 364 × 515 |
| B4 JIS | 257 × 364 |
| B1 ISO | 707 × 1000 |
Inch version (Engineering)
| Width × Length (inches) | |
| E | 34 × 44 |
| D | 22 × 34 |
| C | 17 × 22 |
| B | 11 × 17 |
| A | 81/2 × 11 |
Inch version (Architecture)
| Width × Length (inches) | |
| E | 36 × 48 |
| D | 24 × 36 |
| C | 18 × 24 |
| B | 12 × 18 |
| A | 9 × 12 |
INDEX
1 Sided 2 Pages to Combine 1 Side, 76
1 Sided 4 Pages to Combine 1 Side, 76
1 Sided 8 Pages to Combine 1 Side, 76
A
Adjusting copy image density, 51
Adjust Print Position, vi, 116, 156
Administrator Tools, 6
Auto image density, 51
Auto Paper Select, 3, 53, 54, 55
Auto Reduce/Enlarge, iv, 55, 64
Auto start, 36
B
Background Lines, 49
Background Numbering, xii, 86, 156
Basic Procedure, 33
Bypass tray, 43, 45, 46
Bypass Tray Copy, 156
C
Carrier sheet, 17, 28
Changing a file name, 140, 142
Changing a password, 141, 142
Changing a stored program, 126
Changing a user name, 139, 140, 142
Changing the number of sets, 121, 148
Changing the order of jobs, 40
Checking job history, 42
Checking jobs in the job list, 40
Check Modes, 35
Combine, ix, 76, 156
Combined auto and
manual image density, 51, 52
Copier functions, 49, 131
Copying, 33
Copying from the bypass tray, 43
Copying onto special paper, 48
Copy output location, 9, 12
Copy paper, 53
Custom size original, 25, 26
Custom size paper, 46, 47
Cut paper tray, 2, 3
D
Date format, 98
Date Stamp, xii, 96, 156
Deleting a program, 127
Deleting a stored document, 152
Deleting a stored format, 115
Deleting a user stamp, 95
Deleting jobs, 41
Details of a stored document, 143
Directional Magnification (%) , iv, 69, 156
Directional Magnification (inch), iv, 72, 156
Display, 4, 132
Displaying a stored document with
Web Image Monitor, 153
Document Server, 123, 131
DoubleCopies,x,106,156
Downloading a stored document, 154
Drawing, 49
E
Edit, 6
Erase Border, vi, 78, 79, 156
Erase Inside, vi, 81, 156
Erase Outside, vi, 83
F
Fan Fold, 3, 121
File name, 140, 142, 144
Film, 48
FineMagnification,iv,74,156
First Printing Number, 101, 102, 104
First Printing Page, 101, 102, 104
Folded original, 29
Folding finisher, 2, 3
Format Overlay, x, 111, 112, 156
Function compatibility, 155
G
General Features, 6
Generation Copy, 49
H
Holding print jobs, 41
How to Read This Manual, 1
1
Image Repeat, x, 105, 156
Initial display, 4, 129, 132
Input/Output,6
Interrupt Copy, 37
Interrupting a print job, 148
J
JobList,38
Job List screen, 39
Job Preset, 38, 156
L
Last Number, 101, 102
Long length original, 2
Long length paper, 2
Lower copy output, 3, 12
Lower output auxiliary guide, 29
M
Magnification ratio chart, 166
Manual image density, 51, 52
Manual Paper Select, 53, 54
Manuals for This Machine, i
Margin Adjustment, vi, 84, 156
Measure chart, 167
Mirror Image, x, 110
Missing image area, 19
N
Non-compatible originals, 18
Number keys, 63, 70
0
Original counter, 36
Originalhanger,31
Original orientation, 23, 76, 87, 90, 96, 99
Original output location, 9
Original rear output, 9
Originals, 16
Original Switching lever, 29
Original table, 20
Original upper output, 9
Overwriting a stored format, 115
P
Page Numbering, xii, 99, 101, 156
Paper roll tray, 2, 3
Partial Copy, x, 108
Password, 141, 142
Patched Original, 49
Photo, 49
Placing originals, 16, 20
Positive/Negative, x, 107
Preset Cut, 3, 56, 57
Preset Reduce/Enlarge, iv, 60, 156
Preset Stamp, xii, 87, 89, 156
Preview display, 134
Printer functions, 131
Printing a stored document, 146
Printing the first page, 150
Printing the specified page, 150
Printing the specified range, 151
Program, 125, 129
Programmed Format Overlay, 111, 113
Programming a user stamp, 93
Programming defaults, 129
R
Rear copy output, 12
Recalling a program, 128
Recommended originals, 16
Registering a password, 141
Registering a user name, 139, 140
Regular size paper, 45
Reproduction Ratio, 6
Resetting the original counter, 36
Rolled original, 29
Rotate Copy, 55
Rotate Sort, iii, 3, 118, 156
s
Sample Copy, 120
Sample Print, 149
Scanner functions, 131
Scanner Stop key, 22
Scan size limitations, by function, 162
Searching by file name, 144
Searching by user name, 145
Searching for a stored document, 144
Selecting Copy Paper, 53, 156
Settings record sheet, 163
Simplified Display, 5, 133
Size Magnification, iv, 68
Sort, iii, 118, 156
Specifying the ratio, 62, 71
Stamp, 6
Stamp density, 89
Stamp position, 87, 89, 90, 92, 96, 98, 99, 101
Stamp size, 89
Storing a format, 114
Storing a program, 125
Storingdata,123,136
Supplementary information, 156
Symbols, 1
Synchro Cut, 3, 56
T
Table, 2, 3
Text, 49
Text/Photo, 49
Translucent paper, 48
U
Upper copy output, 12
User Auto Reduce/Enlarge, iv, 3, 66
UserID, 139, 140, 142, 145
User Stamp, xii, 90, 92, 93, 95, 156
V
Variable Cut, 3, 56, 59
W
Web Image Monitor, 153, 154
What You Can Do with This Machine, iii
Wide Scan, 26
Z
Zoom, iv, 61, 156
In accordance with IEC 60417, this machine uses the following symbols for the main power switch:
I means POWER ON.
means STAND BY.
In accordance with IEC 60417, this machine uses the following symbols for the anti-humidity heater switch:
I means POWER ON.
means POWER OFF.
Trademarks
Acrobat® is a registered trademark of Adobe Systems Incorporated.
Other product names used herein are for identification purposes only and might be trademarks of their respective companies. We disclaim any and all rights to those marks.
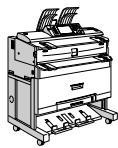
- Operating Instructions
- Copy/Document Server Reference
- Introduction
- Important
- Notes:
- Manuals for This Machine
- About This Machine
- General Settings Guide
- Troubleshooting
- Security Reference
- Copy/ Document Server Reference
- Printer Reference
- Scanner Reference
- Network Guide
- Other manuals
- Note
- What You Can Do with This Machine
- Reference
- Assembling Copies as Sets in Sequential Order
- Sort
- Rotate Sort
- Preset Reduce/Enlarge
- Zoom
- Auto Reduce/Enlarge
- User Auto Reduce/Enlarge
- Size Magnification
- Directional Magnification (\%)
- Directional Magnification (inch)
- Fine Magnification
- Types of Adjustment/Erase
- Erase Border
- Erase Inside
- Erase Outside
- Margin Adjustment
- Adjust Print Position
- Types of Combine
- Image Repeat
- Double Copies
- Positive/Negative
- Partial Copy
- Mirror Image
- Format Overlay
- Background Numbering
- Preset Stamp
- User Stamp
- Date Stamp
- Page Numbering
- TABLE OF CONTENTS
- What You Can Do with This Machine. iii
- How to Read This Manual 1
- Functions Requiring Optional Configurations 3
- Display 4
- User Tools Menu (Copier / Document Server Features) 6
- Placing Originals
- Original and Copy Output Locations 9
- Originals 16
- Placing Originals 20
- Copying
- Basic Procedure 33
- Copying from the Bypass Tray 43
- Copier Functions 49
- Storing Data in the Document Server 123
- Programs 125
- Document Server
- Relationship between Document Server and Other Functions 131
- Document Server Display 132
- Using the Document Server 136
- Appendix
- Function Compatibility 155
- Supplementary Information 156
- Settings Record Sheet. 163
- Magnification Ratio Chart 166
- Measure Chart 167
- INDEX. 168
- How to Read This Manual
- Symbols
- WARNING:
- CAUTION:
- Names of Major Options
- Terms
- Functions Requiring Optional Configurations
- Display
- Initial copy display
- Simplified Display
- Example of a simplified display
- [Key Color]
- User Tools Menu (Copier / Document Server Features)
- General Features
- Reproduction Ratio
- Input/Output
- Administrator Tools
- Original and Copy Output Locations
- Original Output Locations
- Original upper output
- Original rear output
- Extend the original output guides.
- Copy Output Locations
- Upper Copy Output
- Lower Copy Output
- Select [Lower] under Copy Output Location.
- Originals
- Sizes and Weights of Recommended Originals
- Metric version
- Originals that should be scanned using the carrier sheet
- Non-compatible originals
- Missing Image Area
- Placing Originals
- Placing Originals on the Original Table
- Using both hands, carefully insert the original between the original guides, copy side down.
- To stop originals feeding in
- Original Orientation
- Original feed direction
- Under [Original Orientation], select an original orientation that is suitable for your original.
- Placing Custom Size Originals
- Press [Custom Size Original].
- Enter the horizontal size of the original with the number keys, and then press [#].
- Enter the vertical size of the original with the number keys, and then press [#].
- Press [OK].
- Wide Scan
- Press [Wide Scan].
- Setting the Carrier Sheet
- Setting Folded Originals (the Original Switching Lever)
- Setting Rolled Originals
- Setting the Original Hangers
- Basic Procedure
- Make sure "Ready" appears on the screen.
- Initial copy screen
- Make sure no previous settings remain.
- Adjust the original guides to the width of the original, and then place the original face down.
- Check Modes
- Press [Check Modes].
- The Check Modes screen appears.
- Original Counter/Reset
- Resetting the original counter
- Auto Start
- Interrupt Copy
- Press the [Interrupt] key.
- Make the settings for a interrupt copy job.
- Place the original you want to copy face down.
- When copying is complete, remove the originals and copies.
- Press the [Interrupt] key again.
- Replace the originals that you were copying.
- Job Preset
- Job List
- Job List screen
- When [Job Order] is not selected:
- When [Job Order] is selected:
- Checking jobs in the job list
- Changing the order of jobs
- Holding print jobs
- Deleting jobs
- Press [OK].
- Checking job history
- Copying from the Bypass Tray
- Insert the paper copy side up into the bypass tray.
- When Copying onto Regular Size Paper
- When Copying onto Custom Size Paper
- Registering a custom size
- Recalling the registered custom size
- When Copying onto Special Paper
- Copier Functions
- Selecting the Original Type Setting
- Select the original type.
- Adjusting Copy Image Density
- Auto image density
- Manual image density
- Combined auto and manual image density
- Auto image density
- Make sure that [Auto Density] is selected.
- P Reference
- Selecting Copy Paper
- Auto Paper Select
- Manual Paper Select
- Inch version
- Make sure that Auto Paper Select is selected.
- Select the paper roll tray, cut paper tray, or bypass tray.
- Rotate Copy
- Setting the Length of Copy Paper Cut
- Synchro Cut
- Preset Cut
- Variable Cut
- Select [Synchro Cut].
- Select a paper roll tray.
- Inch version (Engineering)
- Inch version (Architecture)
- Select [Variable Cut].
- Enter the length with the number keys, and then press [#].
- Select a paper roll tray.
- Press [Reduce / Enlarge].
- Select a ratio, and then press [OK].
- Specifying the ratio with [一] and [十]
- Entering the ratio with the number keys
- Press [Number keys].
- Enter the desired ratio with the number keys, and then press [#].
- Press [OK] twice.
- Press [Auto Reduce / Enlarge].
- Select the paper size.
- Press [Size Magnification].
- Directional Magnification (%)
- Press [Direct. Mag. %].
- Press [Horizontal].
- Directional Magnification (inch)
- Press [Dir. Size Mag. inch].
- Press [Fine Magnification].
- Adjust the horizontal ratio using \([-]\) and \([+\]
- Adjust the vertical ratio using \([-]\) and \([+\]
- Combine
- Orientation of the original and image position of Combine Portrait ( ) originals
- Landscape (□) originals
- Press [Combine].
- Select the number of originals to combine.
- Select the paper size.
- Erase Border (Same Width)
- Press [Edit / Stamp].
- Set an erase border width with [+ or [-] .
- Press [OK] twice.
- Erase Border (Different Width)
- Press [Erase].
- Press [Erase Border].
- Press [Different Width].
- Press the key for the border you want to change and set an erase width with [+ ] and [-] .
- Enter the length of [X1] with the number keys, and then press [#].
- Enter the lengths of [X2], [Y1], and [Y2] in the same way, and then press [OK].
- Press [OK].
- Press [Margin Adj.].
- Press [Top Margin] or [Bottom Margin].
- Use [-] or [+] to specify the margin, and then press [OK].
- Preset Stamp
- Stamp position and original orientation
- Press [All Pages] or [1st Page Only] to select the print page.
- After making all settings, press [OK].
- Changing the stamp position, size and density
- Press [Stamp].
- Press [User Stamp].
- Select the desired message.
- Changing the stamp position
- Registering a user stamp
- Deleting a user stamp
- Press [Date Stamp].
- Select the stamp format.
- Changing the format of date
- Press [Page Numbering].
- Select the format.
- After making all settings, press [OK].
- Specifying the first printing page and start number ("1/5,2/5..."
- Specifying the first printing page and start number ("1-1,1-2..."
- Press [Edit Image].
- Press [Positive / Negative].
- Select the paper tray.
- Press [Partial Copy].
- Press [Mirror Image].
- Programmed Format Overlay
- Storing a format
- Overwriting a stored format
- Deleting a stored format
- Press [Yes].
- Press [Exit] twice.
- Press [Adjust Print Position].
- Use [← ] or [→ ] to specify the horizontal position.
- Use [ ] or [ ] to specify the vertical position.
- Make necessary settings.
- Press [Finishing].
- Press [Sort].
- Select [Sort] or [Rotate Sort].
- Enter the number of copy sets with the number keys.
- Place your original, and let it be scanned.
- Sample Copy
- Changing the number of sets
- Fan Fold
- Press [Fold Type].
- Select a fold width for Fan Fold.
- Storing Data in the Document Server
- Press [Store File].
- Enter a file name, user name, or password if necessary.
- Make the scanning settings for the original.
- Adjust the original guides to the width of the original, and then place the original face down.
- Programs
- Storing a Program
- Press [Program].
- Changing a Stored Program
- Deleting a Program
- Recalling a Program
- Registering Defaults in Initial Display
- Relationship between Document Server and Other Functions
- Printer Functions
- Scanner Functions
- Document Server Display
- Preview Display
- [← ][→ ][ ][ ]
- [Zoom Out], [Zoom In]
- [Exit]
- Display File
- Display Page
- [Switch]
- Display Position
- Using the Document Server
- Storing Data
- File Name
- User Name
- Password
- Press the [Document Server] key.
- Press [Scan Original].
- Enter a user name, file name, and password, as required.
- Specify the original scanning conditions.
- Place the original.
- Press [Scanning Complete] after all documents are scanned.
- Registering or changing a user name (When using a user name registered to the Address Book)
- Registering or changing a user name (When using a user name not registered to the Address Book)
- Registering or changing a user name (When no name is registered to the Address Book)
- Changing a file name
- Registering or changing a password
- Changing User Name, File Name or Password of a Stored Document
- Checking the Details of a Stored Document
- Searching for a Stored Document
- Searching by file name
- Searching by user name
- Printing a Stored Document
- Interrupting a print job
- Changing the number of print copies while printing is in progress
- Press [Continue].
- Sample Print
- Select the document to be printed.
- Press the [Sample Copy] key.
- Printing the first page
- Printing a specified page
- Press the [Start] key.
- Printing a specified range
- Deleting a Stored Document
- Displaying a Stored Document with Web Image Monitor
- Downloading a Stored Document
- Function Compatibility
- Supplementary Information
- Bypass Tray Copy
- Selecting Copy Paper
- Sort, Rotate Sort
- Scan Size Limitations, by Function
- Settings Record Sheet
- Stored Format Record Sheet
- Magnification Ratio Chart
- Metric version (A series)
- Metric version (B series)
- Inch version (Engineering)
- Measure Chart
- INDEX
- A
- B
- C
- D
- E
- F
- G
- H
- s
- T
- U
- V
- W
- Z
- Trademarks
Marque : RICOH
Modèle : AFICIO MP W3600
Catégorie : Imprimante multifonction