
Disaster Transport SR - Machine à effet EarthQuaker Devices - Notice d'utilisation et mode d'emploi gratuit
Retrouvez gratuitement la notice de l'appareil Disaster Transport SR EarthQuaker Devices au format PDF.


| Type de produit | Machine à effet (pédale de délai et réverbération) |
| Marque | EarthQuaker Devices |
| Modèle | Disaster Transport SR |
| Dimensions | Environ 12,7 x 10,2 x 5,1 cm |
| Poids | Environ 340 g |
| Alimentation | 9V DC, centre négatif, 100 mA |
| Fonctions principales | Délai analogique avec modulation, réverbération, contrôles de feedback, mix, temps, tonalité, profondeur et vitesse de modulation |
| Entretien et nettoyage | Nettoyer avec un chiffon sec et doux, éviter l'humidité |
| Sécurité | Utiliser une alimentation adaptée, ne pas ouvrir le boîtier, éviter les chocs et les températures extrêmes |
| Pièces détachées et réparabilité | Non réparable par l'utilisateur, contacter le service client pour toute réparation |
| Informations générales | Fabriqué à Akron, Ohio, États-Unis |
FOIRE AUX QUESTIONS - Disaster Transport SR EarthQuaker Devices
Questions des utilisateurs sur Disaster Transport SR EarthQuaker Devices
0 question sur cet appareil. Repondez a celles que vous connaissez ou posez la votre.
Poser une nouvelle question sur cet appareil
Téléchargez la notice de votre Machine à effet au format PDF gratuitement ! Retrouvez votre notice Disaster Transport SR - EarthQuaker Devices et reprennez votre appareil électronique en main. Sur cette page sont publiés tous les documents nécessaires à l'utilisation de votre appareil Disaster Transport SR de la marque EarthQuaker Devices.
MODE D'EMPLOI Disaster Transport SR EarthQuaker Devices
Disaster Transport SR™

OPERATION MANUAL
<< English >>>
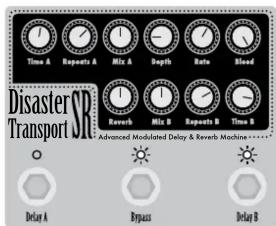
Hey buddy, welcome to your brand new advanced modulated delay and reverb machine! The Disaster Transport SR ^® was designed to create an intense wash of lo-fi swirling tape styled echo. While it may look intimidating at first glance, it's actually pretty easy to navigate. The top row of controls are for delay A and the bottom row of controls are for delay B. Delay A is a 600ms delay with modulation and delay B is a 300ms delay with reverb. Both delays can be run separately, in parallel, in series or in series/parallel. To take it one step further, there are also expression controls for the repeats on delay A as well as bleeding delay A into delay B. The switching was designed so each delay can be used individually or in tandem with both true bypass or trails. In addition to being used as a straight delay, straight reverb, rhythmic delay, modulated delay and old school tape-style echo, the Disaster Transport SR can also be used to create a wide variety of wild sounds ranging from warped records, clanging flange, smooth chorus, echoed out squalls and various other-worldly effects that will blow your mind, man.
If you are a fan of old school tape delay and crazy lo-fi sounds, you will get hours of enjoyment every time you plug into the Disaster Transport SR. If not, you may have just made a huge mistake. Hand made one at a time in sunny Akron, Ohio USA.
Expression Pedal Control
We recommend the Moog EP-2 expression pedal for use with the Disaster Transport SR.
Control Center
The controls for delay A and B are separated by row. The top row is for delay A and the bottom row is for delay B.
Delay A Controls
Time: Controls the delay time from about 30ms up to 600ms.
Repeats: Controls how many regenerations of the signal there are. This ranges from one single repeat through an endless wash into self oscillation. This can also be controlled via an expression pedal. The Moog EP-2 is recommended.
Mix: Level control for the wet signal. Unity is around center, anything above is boosted. Boosting this works great when using a distorted signal. Please keep in mind this is a gain control, a bit of hiss is normal when it's above unity.
Depth: Controls the intensity of the modulation, from no modulation to all out seasick pitch bends. Rate: Controls the rate of the modulation. The LED for delay A flashes in time with the modulation to visually show where the rate is set.
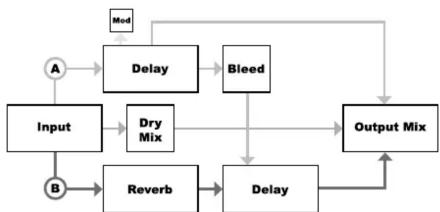
Bleed: This feeds delay A into delay B, post reverb (see block diagram for visual explanation). Use this control for series or series/parallel operation to create rhythmic repeats, extra long delay time or an all out echo wash. This can also be controlled via an expression pedal. The Moog EP-2 is recommended. When using the bleed, experiment with the repeat controls on each delay line. Try using them in different settings, both together and individually, for different timing and textures.
Delay B Controls
Reverb: Controls the amount of reverb added to the input of delay B.
Mix: Level control for the wet signal. Unity is around center, anything above is boosted. Boosting this works great when using a distorted signal. Please keep in mind this is a gain control, a bit of hiss is normal when it's above unity.
Repeats: Controls how many regenerations of the signal there are. This ranges from one single repeat through an endless wash into self oscillation.
Time: Controls the delay time from about 30ms up to 300ms.
Switching
The switches for both delays switch the inputs only. The outputs are always connected. This allows you to have trails by always leaving the bypass switch engaged or to use the bypass switch as the master on/off for true bypass. Additionally, you can feed delay A in to delay B with the bleed control without having delay B switched on for a cleaner rhythmic delay.
Jacks & Switching
A Output Jack
B 9v 2.1 mm DC Power Jack
Repeats Expression Jack
D Bleed Expression Jack
Input Jack
F Delay A Input Bypass
Master Bypass Switch
Delay B Input Bypass

Signal Flow & Notes
flowchart
graph TD
    A["A"] --> Delay1["Delay"]
    B["B"] --> Reverb["Reverb"]
    Input --> DryMix["Dry Mix"]
    DryMix --> Delay2["Delay"]
    Delay2 --> Bleed["Bleed"]
    Bleed --> OutputMix["Output Mix"]
    OutputMix --> Delay3["Delay"]
    Delay3 --> Delay4["Delay"]
    Delay4 --> OutputMix
    Mod["Mod"] --> Delay1
    Mod --> OutputMix
Signal Path Block Diagram Explanation: Delay A and B levels can be adjusted with the Mix control. Dry signal is always present at unity level. The Bleed control is used to feed the output of delay A into the input of delay B. If the Bleed control is set anywhere above zero, you will hear the output of delay B being fed by delay A, regardless if delay B is switched on or off.
Series Operation: Delay A is switched on and set to taste, Delay B is switched off and set to taste and the Bleed control set to taste.
Parallel Operation: Delay A is switched on and set to taste, Delay B is switched on and set to taste and the Bleed control is set to zero (no bleed).
Series/Parallel Operation: Delay A is switched on and set to taste, Delay B is switched on and set to taste and the Bleed control set to taste.
Delay A only: Delay A is switched on and set to taste, the Bleed is set at zero and Delay B is switched off. Delay B only: Delay A is switched off, the Bleed is set at zero and Delay B is switched on and set to taste.
Power
This device take a standard 9 volt DC power supply with a 2.1mm negative center barrel. We always recommend pedal-specific, transformer-isolated wall-wart power supplies or multiple isolated-output supplies. Pedals will make extra noise if there is ripple or unclean power. Switching-type power supplies, daisy chains and non-pedal specific power supplies do not filter dirty power as well and let through unwanted noise. DO NOT RUN AT HIGHER VOLTAGES!
Current Draw: 107mA
Switching
This device is true bypass and uses electronic relay based switching. Audio will not pass without power.
Warranty
This device has a limited lifetime warranty. If it breaks, we will fix it. Should you encounter any issues, please email info@earthquakerdevices.com.
Visit our YouTube Channel for a Visual Demonstration
http://www.youtube.com/earthquakerdevices
Example Settings

Parallel with no modulation or reverb
Series/parallel with modulation & reverb

Series with no modulation or reverb

Clanging psuedo flanger modulation
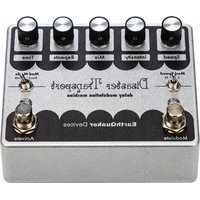


Marque : EarthQuaker Devices
Modèle : Disaster Transport SR
Catégorie : Machine à effet