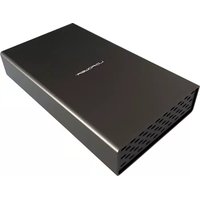
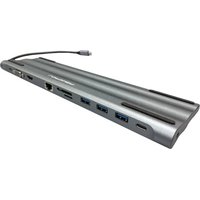
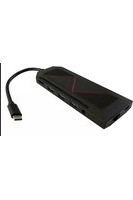
35U3-C-HUB - Hub USB LC-Power - Notice d'utilisation et mode d'emploi gratuit
Retrouvez gratuitement la notice de l'appareil 35U3-C-HUB LC-Power au format PDF.


| Type de produit | Hub USB 3.0 |
| Marque | LC-Power |
| Modèle | 35U3-C-HUB |
| Nombre de ports | 4 ports USB 3.0 |
| Dimensions (L x l x h) | 10 x 5 x 2 cm |
| Poids | 100 g |
| Alimentation | Bus USB (auto-alimenté) |
| Câble intégré | Oui, longueur 30 cm |
| Compatible avec | Windows, Mac OS, Linux |
| Débit de transfert | Jusqu'à 5 Gbit/s (SuperSpeed) |
| Fonctions principales | Extension de ports USB, transfert de données, charge de périphériques |
| Entretien et nettoyage | Essuyer avec un chiffon doux et sec |
| Sécurité | Ne pas exposer à l'humidité, ne pas ouvrir le boîtier |
| Pièces détachées et réparabilité | Non réparable par l'utilisateur, aucune pièce détachée disponible |
| Garantie | 2 ans |
FOIRE AUX QUESTIONS - 35U3-C-HUB LC-Power
Questions des utilisateurs sur 35U3-C-HUB LC-Power
0 question sur cet appareil. Repondez a celles que vous connaissez ou posez la votre.
Poser une nouvelle question sur cet appareil
Téléchargez la notice de votre Hub USB au format PDF gratuitement ! Retrouvez votre notice 35U3-C-HUB - LC-Power et reprennez votre appareil électronique en main. Sur cette page sont publiés tous les documents nécessaires à l'utilisation de votre appareil 35U3-C-HUB de la marque LC-Power.
MODE D'EMPLOI 35U3-C-HUB LC-Power
LC-POWER™
LC-35U3-C-HUB

Introduction Thank you for choosing our product. Please read the manual carefully before you use the product.
Service If you need technical support, please contact us via support@lc-power.com. If you need after sales service, please contact your retailer.
Einleitung Vielen Dank, dass Sie sich für unser Produkt entschieden haben. Bitte lesen Sie diese Anleitung vor Benutzung des Geräts sorgfältig durch.
Service Sollten Sie technische Unterstützung benötigen, kontaktieren Sie uns bitte unter support@lc-power.com. Sollte ein Service-Fall auftreten, wenden Sie sich bitte an Ihren Händler.
Installation
2. New drive / Neues Laufwerk
2.1 Go to „Computer - Manage - Disk management“. 2.1 Öffnen Sie „Computer - Verwalten - Datenträgerverwaltung“.



Specifications / Spezifikationen
LC-35U3-C-HUB - 3,5" SATA enclosure with USB 3.2 Gen 2 hub

| Item / Produkt: | LC-35U3-C-HUB |
| HDD / Festplatte: | 3,5" (8,89 cm) SATA I/II/III HDD (Festplatte) |
| Quantity / Menge: | 1 pc / Stück |
| Power / Material: | 12 V, 3 A / Aluminium + ABS |
| Interface / Scholizstelle | USB-C-> SATA / Hub: 2x USB-A, 1x USB-C |
| Speed / Geschwindig: | 10 Gb/s (SATA-C + Hub) |
| Size / Größe: | 192 x 111 x 35 mm |
| Operating system / Benelssystem: | Windows 10, Mac OS 10 |
| Package contents / Lauferrang | Enclosure, user manual. USB cable, power adapter, mounting screws Gehäuse, Atelegung. USB-Kabel, Netzell, Montageschruiken |
Silent Power Electronics GmbH, Formerweg 8, 47877 Willich, Germany, www.lc-power.com
--- ① ---
Installation
2. Partitioning / Partitionieren
2.2 Right-click "Disk 1", then click "New Simple Volume". 2.2 Rechtsklicken Sie „Disk 1“, danach „Neues einfaches Volume“.

Installation
1. Installation
- Pull out the middle frame and assemble the HDD as shown below.
- Ziehen Sie den mittleren Rahmen heraus und bauen Sie die Festplatte wie unten gezeigt ein.

- Assemble the HDD to the middle frame in a 45 degree angle.
- Fix the HDD to the frame with screws.
- Push the middle frame into the housing.
-
Fix frame and housing with screws.
-
Bauen Sie die Festplatte im 45-Grad-Winkel in den mittleren Rahmen ein.
- Befestigen Sie die Festplatte mit Schrauben am Rahmen.
- Schieben Sie den mittleren Rahmen in das Gehäuse.
- Verschrauben Sie Rahmen und Gehäuse.

--- ② ---
Installation
2. Partitioning / Partitionieren
2.3 Choose the size of the new partition and click "Next" to finish. 2.3 Wählen Sie die Größe der neuen Partition und klicken Sie zum Beenden auf „Weiter“.

Installation
1. Installation
- Connect your enclosure with your computer (USB-C), plug the power adapter and turn the enclosure on. Your drive will automatically be detected.
- Verbinden Sie das Gehäuse mit dem Computer (USB-C), schließen Sie das Netzteil an und schalten Sie das Gehäuse ein. Ihr Laufwerk wird automatisch erkannt.

natural_image
Line drawing of a keyboard with an attached USB device (no text or symbols)Note: A new drive must be initialized and formatted first (step 2).
Hinweis: Ein neues Laufwerk muss erst initialisiert und formatiert werden (Schritt 2).

Installation
2. Partitioning / Partitionieren
2.4 You can now find the new drive at „Computer“, it's ready to be used. 2.4 Sie können das neue Laufwerk nun unter „Computer“ finden und benutzen.

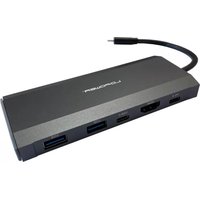


Marque : LC-Power
Modèle : 35U3-C-HUB
Catégorie : Hub USB