
VCH 8830 HANDSTAUBSAUGER, 14,4V POWE - Aspirateur à main GRUNDIG - Notice d'utilisation et mode d'emploi gratuit
Retrouvez gratuitement la notice de l'appareil VCH 8830 HANDSTAUBSAUGER, 14,4V POWE GRUNDIG au format PDF.


| Marque | GRUNDIG |
| Modèle | VCH 8830 |
| Type de produit | Aspirateur à main sans fil |
| Tension de la batterie | 14,4 V |
| Type de batterie | Nickel-Métal Hydrure (NiMH) rechargeable |
| Autonomie | Environ 12 minutes |
| Temps de charge (première utilisation) | 20 heures |
| Temps de charge maximal recommandé | 16 heures |
| Alimentation du chargeur | 230 V, 50 Hz (secteur) / 22 V DC (station de charge) |
| Filtre | Lavable avec protection hygiénique Microban® |
| Accessoires inclus | Brosse universelle, brosse motorisée, tube étroit, brosse à tissus, 3 tubes d'extension, station de charge murale, adaptateur secteur, filtre de rechange Microban® |
| Fonctions spéciales | Protection hygiénique Microban® intégrée (réduit jusqu'à 99,9% des bactéries, inhibe les odeurs) |
| Utilisation | Domestique uniquement (aspiration à sec) |
| Entretien | Réservoir et filtre lavables à l'eau savonneuse ; séchage complet obligatoire |
| Sécurité | Ne pas utiliser sur surfaces humides, ne pas aspirer cendres ou mégots, ne pas utiliser sans filtre, ne pas ouvrir l'appareil |
| Garantie | Valable uniquement pour usage domestique ; garantie annulée en cas d'usage commercial |
FOIRE AUX QUESTIONS - VCH 8830 HANDSTAUBSAUGER, 14,4V POWE GRUNDIG
Questions des utilisateurs sur VCH 8830 HANDSTAUBSAUGER, 14,4V POWE GRUNDIG
0 question sur cet appareil. Repondez a celles que vous connaissez ou posez la votre.
Poser une nouvelle question sur cet appareil
Téléchargez la notice de votre Aspirateur à main au format PDF gratuitement ! Retrouvez votre notice VCH 8830 HANDSTAUBSAUGER, 14,4V POWE - GRUNDIG et reprennez votre appareil électronique en main. Sur cette page sont publiés tous les documents nécessaires à l'utilisation de votre appareil VCH 8830 HANDSTAUBSAUGER, 14,4V POWE de la marque GRUNDIG.
MODE D'EMPLOI VCH 8830 HANDSTAUBSAUGER, 14,4V POWE GRUNDIG
HAND VACUUM CLEANER
VCH 8830


DEUTSCH 4 - 10
ENGLISH 11 - 17
FRANÇAIS 18 - 24
ITALIANO 25 - 31
PORTUGUÊS 32 - 38
ESPAÑOL 39 - 45
POLSKI 46 - 52
CESKY 53 - 59
TÜRKÇE 60 - 66
ΕΛΛΗΝΙΚΑ 67 - 73
Please note the following when starting up the appliance:
■ This appliance is intended for domestic use only. All guarantee claims expire if it is used for industrial or commercial purposes.
■ To avoid damage and risks due to improper use, please read the instructions for use and store in a safe place.
■ Do not use it to clean wet surfaces.
- Do not use the appliance in a wet environment.
■ Never hold the appliance in water or other liquids.
- Keep the appliance and accessories away from your eyes and ears while the appliance is in use.
■ The appliance is intended to be used for vacuuming dirt and dust particles. Do not use it to vacuum large objects which block the appliance and can damage it as a result.
- Do not sweep up cigarette butts, fireplace ashes or matchsticks. This could cause a fire.
■ Never use the appliance without the dust container and filter.
- Do not use the appliance if the air inlet and ventilation slits are blocked. Keep the air inlet and ventilation slits free at all times of dust, hairs and other elements which could block or prevent the air flow.
If using with the motorised brush, ensure you constantly move the brush backwards and forwards and do not allow it to rotate too long on a stain.
■ The motorised brush may only be cleaned if it is not connected to the appliance.
■ Never start up the appliance if it shows signs of visible damage. This also applies to an accidentally wetten appliance. In such cases, contact your local specialist store.
■ Use the mains adapter supplied only to charge the appliance.
- Keep the appliance out of reach of children.
■ Store the appliance in a dry and safe environment only.
The device may not be used by the following people, including children: those with limited physical, sensory or mental capabilities and also those with a lack of experience and knowledge. This does not apply to the latter if they were instructed in the use of the device or if they use it under the supervision of a person responsible for safety. Children should always be supervised to ensure that they do not play with the device.
■ Never open up the appliance. All rights to claim under the guarantee are invalidated for damage caused by improper interventions.
Controls and component parts
Fold out page 2 to clearly see the diagram at all times.
A Dust container.
B Filter (inside the dust container).
C Vacuum intake.
D Pushbutton for opening the dust container (Microban® hygiene protection container).
E Charging indicator (LED).
F Switch for switching on and off.
G Handle.
H Motor housing.
Compartment for the rechargeable battery (underside of the appliance).
Accessories
J Charging station for mounting on the wall with mains adapter (see page 14).
K Universal vacuum brush.
L Motorised brush.
M Narrow vacuum tube.

N Upholstery brush.
3 Extension tubes.
P Microban® hygiene protection replacement filter.
Dear customer,
We hope you enjoy using your new GRUNDIG handheld vacuum cleaner with its built-in Microban® hygiene protection.
Special features
- Microban® hygiene protection in dust container and filter.
What is Microban®?
Microban ® is odourless, tasteless and colourless.
Microban ® inhibits the growth of microorganisms by permeating the cell walls and destroying the micro-organisms. These cells are then no longer able to reproduce and growth is prohibited.
Grundig offers an effective way to clean floors hygienically with the impressive technology from Microban ® . The Grundig dust filter is equipped with the integrated Microban ® hygiene protection. This even inhibits the spread of tiny microscopic particles including house mites, pollen and dust.
Dangerous bacteria can hardly survive with the integrated Microban® hygiene protection in dust container and filter.
Microban® technology has been tested in independent laboratories and certified, thus making a significant contribution towards a healthier household.
Floor brush
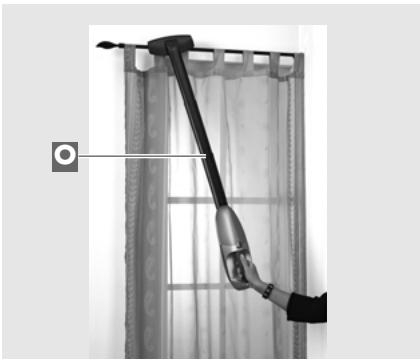
Use the universal vacuum brush K together with the three extension tubes O to clean small floor areas or curtains.
1 Switch off the appliance.
2 Firmly push an extension tube into the appliance's vacuum intake C.
3 Depending on your requirements, insert one or two extension tubes into the first extension tube.
4 Push the universal vacuum brush K onto the bottom extension tube.
Motorised brush
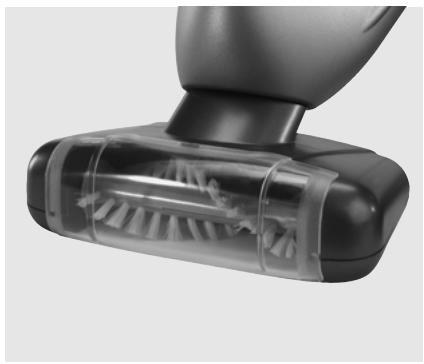
Use the motorised brush L to clean short pile carpets or carpeting. It is particularly suitable for removing animal hairs. Never use the motorised brush on long hair/deep pile carpets.
1 Switch off the appliance.
2 Firmly push the motorised brush into the appliance's vacuum intake C.
Note
■ When you install the motorised brush ensure the contacts of the brush touch the contacts in the appliance's vacuum intake.
Important
■ Do not touch the motorised brush during use. Risk of injuries.
If using with the motorised brush, ensure you constantly move the brush backwards and forwards and do not allow it to rotate too long on a stain.
Narrow vacuum tube and upholstery brush
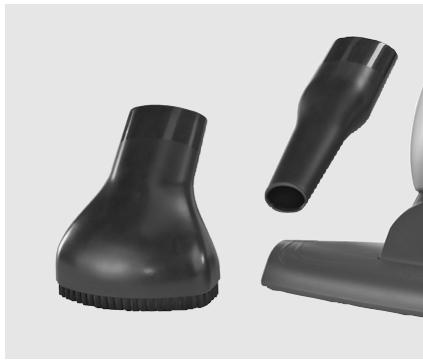
Use the narrow vacuum tube M to clean places difficult to reach, e.g. crevices and corners.
Use the upholstery brush N to clean small areas of upholstery.
1 Switch off the appliance.
2 Firmly push the narrow vacuum tube or the upholstery brush into the appliance's vacuum intake C.
Charging station for mounting on a wall
Fix the charging station J to a wall.
1 Ensure the place you have chosen to install the charger is free of concealed electric cables, water or gas pipes.
2 Choose an installation location near a wall socket (230 V, 50 Hz) for connecting the mains adapter.
Important
- Do not install the charging station anywhere where it is exposed to direct sunlight or near a heater/radiator.
Do not install the charger outdoors.
3 Choose a suitable drill bit for the screws and wall plugs supplied.
4 Drill two holes approx 30 cm above the floor, push in a wall plug and screw in the screws, then hang up the charging station.
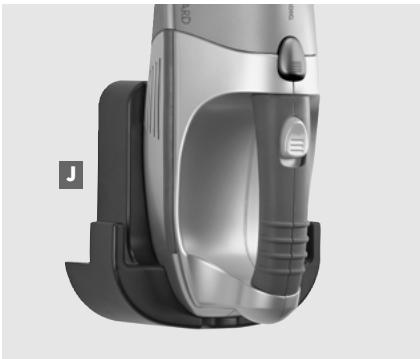
If run with the installed rechargeable nickel metal hydride batteries, use the charging station with the mains adapter as a charger.
Charging
If run with the installed rechargeable nickel metal hydride batteries, use the charging station with the mains adapter as a charger.
1 Remove the accessory used.
2 Insert the appliance in the charging station so that it precisely fits.
– The charging contacts of the appliance and the charging station touch each other.
3 Plug the mains adapter into the wall socket.
- The charging process begins, the charging indicator E lights up red.
- The charging indicator remains lit until the appliance is removed from the charging station or the mains adapter plug is disconnected.
Note
■ Fully charge the batteries before using for the first time or if the batteries have not been used for a long time (20 hours).
- Charge the appliance at room temperature. Lower or higher temperatures have a negative effect on the life of the batteries.
■ The ambient temperature should be between 5° C and 40° C.
■ When fully charged, the appliance works for around 12 minutes. It is not advisable to charge the batteries after every use, especially if you do not use the appliance for the full 12 minutes. Only charge the batteries when they are completely discharged. This increases their life. Do not charge it every day.
The device does not end the charging process automatically. Therefore, remove the device from the charging unit after 16 hours or disconnect the power supply unit from the socket. In this way, you save electricity.
Switching on and off
1 Remove the appliance from the charging station J.
2 Depending on the requirements, insert one of the accessories into the appliance's vacuum intake C.
3 Switch on the appliance by pushing forward switch F.
4 Switch off the appliance by pushing back switch F.
5 Remove the accessory used.
Empty dust container and clean
1 Hold the appliance vertically with the vacuum intake C facing downward.
2 Press pushbutton D and remove the dust container from underneath.
3 Remove the holder and filter B from the dust container.
Note
■ You can wash the filter from time to time with hot soapy water. After washing, allow the filter to completely dry.
4 Empty the dust container A, wash out and dry.
Note
- Allow the dust container to completely dry before you replace it in the appliance.
5 Hold the appliance vertically facing upwards.
6 Press button D.
7 Replace the dust container A, ensure that both plug-in contacts of the dust container are precisely inserted in the correct position.
8 Release button D. Ensure the latch clicks into place.
Cleaning and care
■ Do not clean the appliance with chemical cleaning agents. These could damage the housing
■ Clean the appliance with a soft cloth and mild soap only.
■ Brush out the filter over a dustbin.
■ The filter and the inside of the dust container can be washed with hot soapy water. Do not wash the filter in the washing machine.
■ The filter and dust container must be completely dry before they are used again.
■ Before using, ensure the motorised brush is free of hairs and fibres.
Replace the rechargeable batteries
If damaged, the appliance may only be opened by an authorised technician.
Environmental information
■ Never throw the rechargeable batteries in the domestic waste. Used batteries must be placed in the used battery collection containers in shops or handed in to public bodies responsible for waste disposal.
Environmental information
This product has been made from high-quality materials and parts, which are suitable for recycling and can be reused.
Therefore, at the end of its life, the product must not be disposed of in the normal domestic waste but must be taken to a collection point for recycling electrical and electronic appliances. This is indicated by the following symbol on the product, in the instructions for use or on the packaging.

Please contact your local authority to find out where your local collection points are.
Reusing and recycling old appliances is an important contribution to protecting our environment.
Technical specifications

This product fulfils the European Directives 2004/108/EG and 2006/95/EG.
Serial number
GMM 2100
Power supply
230 V, 50 Hz at the wall socket DC 22 V at the charging station Rechargeable batteries: Nickel metal hydride
Protection class
III

Ni-Mh
Subject to technical and visual changes!
- HAND VACUUM CLEANER
- CONTROLS AND COMPONENT PARTS
- ACCESSORIES
- SPECIAL FEATURES
- WHAT IS MICROBAN®
- FLOOR BRUSH
- MOTORISED BRUSH
- NOTE
- IMPORTANT
- NARROW VACUUM TUBE AND UPHOLSTERY BRUSH
- CHARGING STATION FOR MOUNTING ON A WALL
- CHARGING
- SWITCHING ON AND OFF
- EMPTY DUST CONTAINER AND CLEAN
- CLEANING AND CARE
- REPLACE THE RECHARGEABLE BATTERIES
- ENVIRONMENTAL INFORMATION
- TECHNICAL SPECIFICATIONS
- SERIAL NUMBER
- POWER SUPPLY
- PROTECTION CLASS
Marque : GRUNDIG
Modèle : VCH 8830 HANDSTAUBSAUGER, 14,4V POWE
Catégorie : Aspirateur à main