
WTES 5972 VINIDOR - Cave à vin LIEBHERR - Notice d'utilisation et mode d'emploi gratuit
Retrouvez gratuitement la notice de l'appareil WTES 5972 VINIDOR LIEBHERR au format PDF.


| Intitulé | Valeur / Description |
|---|---|
| Type de produit | Réfrigérateur de vin |
| Capacité | 197 litres |
| Nombre de bouteilles | Pour environ 75 bouteilles |
| Température réglable | De 5 à 20 °C |
| Zones de température | 2 zones indépendantes |
| Alimentation électrique | 220-240 V, 50 Hz |
| Consommation énergétique | 0,5 kWh/24h |
| Dimensions approximatives | H 85 cm x L 59,7 cm x P 57,5 cm |
| Poids | 70 kg |
| Fonctions principales | Contrôle électronique de la température, éclairage LED, porte en verre isolante |
| Entretien et nettoyage | Nettoyage régulier avec un chiffon humide, pas de produits abrasifs |
| Pièces détachées et réparabilité | Disponibilité des pièces détachées via le service après-vente Liebherr |
| Sécurité | Verrouillage de sécurité, protection contre les surcharges électriques |
| Garantie | 2 ans |
| Informations générales | Produit conçu pour un usage domestique, idéal pour les amateurs de vin |
FOIRE AUX QUESTIONS - WTES 5972 VINIDOR LIEBHERR
Questions des utilisateurs sur WTES 5972 VINIDOR LIEBHERR
0 question sur cet appareil. Repondez a celles que vous connaissez ou posez la votre.
Poser une nouvelle question sur cet appareil
Téléchargez la notice de votre Cave à vin au format PDF gratuitement ! Retrouvez votre notice WTES 5972 VINIDOR - LIEBHERR et reprennez votre appareil électronique en main. Sur cette page sont publiés tous les documents nécessaires à l'utilisation de votre appareil WTES 5972 VINIDOR de la marque LIEBHERR.
MODE D'EMPLOI WTES 5972 VINIDOR LIEBHERR
natural_image
Line drawing of a double-door refrigerator with open door and side panel (no text or symbols)7082 059-00
WT

text_image
LIEBHERR VinidorDisposal notes
The appliance contains reusable materials and should be disposed of properly - not simply with unsorted household refuse. Appliances which are no longer needed must be disposed of in a professional and appropriate way, in accordance with the current local regulations and laws.
When disposing of the appliance, ensure that the refrigerant circuit is not damaged to prevent uncontrolled escape of the refrigerant it contains (data on type plate) and oil.
- Disable the appliance.
- Pull out the mains plug.
- Cut through the connection cable.

WARNING
Danger of suffocation due to packing material and plastic film! Do not allow children to play with packaging material. Take the packaging material to an official collection point.
Range of appliance use
The appliance is suitable solely for storing wine in a domestic environment or similar. This includes, for example, use
- in staff kitchenettes, bed and breakfast establishments,
- by guests in cottages, hotels, motels and other forms of accommodation,
- in catering and similar services in the wholesale trade.
Use the appliance solely as is customary within a domestic environment. All other types of use are inadmissible. The appliance is not suitable for storing and cooling medicines, blood plasma, laboratory preparations or similar substances and products covered by the 2007/47/EC Medical Devices Directive. Any misuse of the appliance may result in damage to or spoilage of stored goods. Furthermore, the appliance is not suitable for operation in potentially explosive atmospheres.
Climate rating
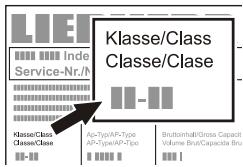
The climate rating indicates the room temperature at which the appliance may be operated in order to achieve full refrigeration performance.
The climate rating is indicated on the type plate.
text_image
LIEI Inde Service-Nr./h Klasse/Class Classe/Clase Ap-Type/AP-Type AP-Type/AP-Topo Brutoinhalt/Gross Capacit Volume Brut/Capacida BruThe position of the type plate is shown in the section entitled Description of the appliance.
| Climate rating | Room temperature |
| SN | +10°C to +32°C |
| N | +16°C to +32°C |
| ST | +16°C to +38°C |
| T | +16°C to +43°C |
| SN-ST | +10°C to +38°C |
| SN-T | +10°C to +43°C |
Do not operate the appliance outside the specified room temperature range.
Saving energy
- Always ensure good ventilation. Do not cover ventilation openings or grille.
- Always keep fan slits clear.
- Avoid positioning the appliance in direct sunlight or near cookers, radiators or similar sources of heat.
- The energy consumption depends on the installation conditions, e.g. the ambient temperature.
- Keep the time the appliance is open to a minimum.
Accumulated dust increases the energy consumption:
- Once a year, dust the refrigerating unit together with the metal grid of the heat exchanger at the back of the appliance.
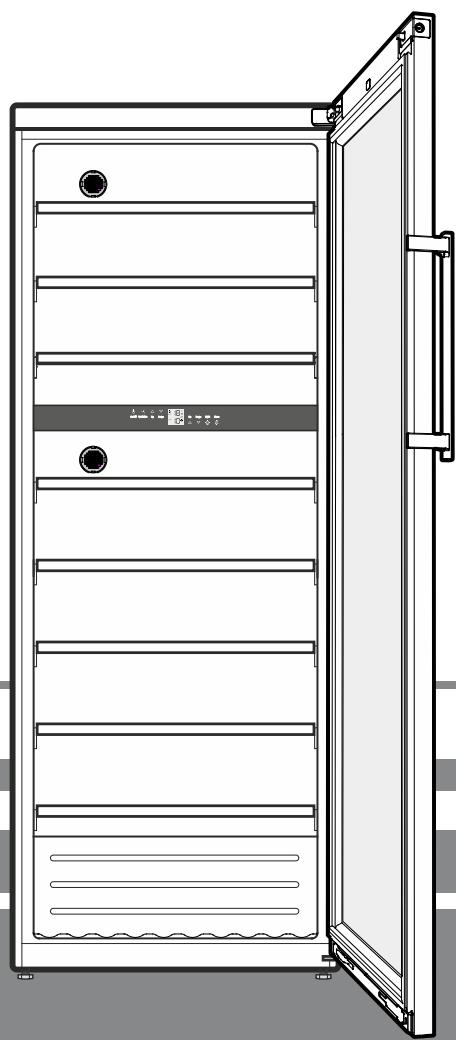
Description of the appliance
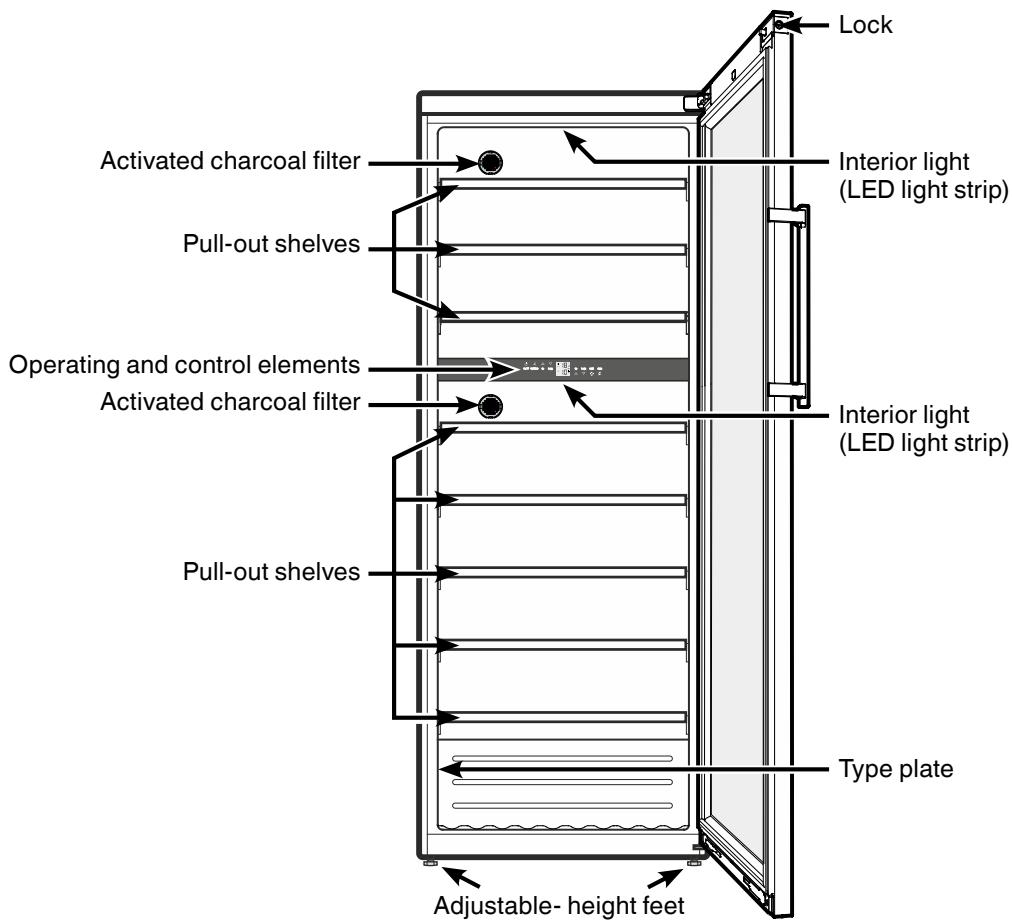
text_image
Lock Activated charcoal filter Pull-out shelves Operating and control elements Activated charcoal filter Pull-out shelves Interior light (LED light strip) Interior light (LED light strip) Type plate Adjustable- height feetSafety instructions and warnings
- To prevent injury or damage to the unit, the appliance should be unpacked and set up by two people.
- In the event that the appliance is damaged on delivery, contact the supplier immediately before connecting to the mains.
- To guarantee safe operation, ensure that the appliance is set up and connected as described in these operating instructions.
- Disconnect the appliance from the mains if any fault occurs. Pull out the plug, switch off or remove the fuse.
- When disconnecting the appliance, pull on the plug, not on the cable.
- Any repairs and work on the appliance should only be carried out by the customer service department, as unauthorised work could prove highly dangerous for the user. The same applies to changing the mains power cable.
- Do not allow naked flames or ignition sources to enter the appliance. When transporting and cleaning the appliance, ensure that the refrigerant circuit is not damaged. In the event of damage, make sure that there are no ignition sources nearby and keep the room well ventilated.
- Do not stand on the plinth, drawers or doors or use them to support anything else.
- This appliance is not intended for use by persons (including children) with reduced physical, sensory or mental capabilities or lack of experience and knowledge unless they have been given initial supervision or instruction concerning use of the appliance by a person responsible for their safety. Children should be supervised to ensure that they do not play with the appliance.
- Avoid prolonged skin contact with cold surfaces or chilled/frozen food. This could cause pain, numbness and frostbite. In the case of prolonged skin contact, protective measures should be taken, e.g. gloves should be worn.
- Do not consume food which has been stored for too long, as it could cause food poisoning.
- Do not store explosives or sprays using combustible propellants such as butane, propane, pentane etc. in the appliance. Electrical components might cause leaking gas to ignite. You may identify such sprays by the printed contents or a flame symbol.
- Do not use electrical appliances inside the appliance.
- If you have a lockable appliance, do not keep the key near the appliance or within reach of children.
- The appliance is designed for use in enclosed areas. Do not operate the appliance outdoors or in areas where it is exposed to splash water or damp conditions.
- The LED light strips illuminate the interior of the appliance. They are not suitable for lighting a room.
- When transporting or operating the appliance at an altitude of more than 1500 m above sea level, the glass pane in the door can break due to the reduction in air pressure. Broken fragments are sharp-edged and can cause serious injury.
Setting up
- Avoid positioning the appliance in direct sunlight or near cookers, radiators and similar sources of heat.
- The floor on which the appliance stands should be horizontal and level. Compensate for uneven floors with the adjustable feet.
- Always ensure that there is good ventilation and that the outward flowing air is able to escape.
- Standard EN 378 specifies that the room in which you install your appliance must have a volume of 1m^3 per 8g of R 600a refrigerant used in the appliance, so as to avoid the formation of inflammable gas/air mixtures in the room where the appliance is located in the event of a leak in the refrigerant circuit. The quantity of refrigerant used in your appliance is indicated on the type plate on the inside of the appliance.
• Always install the appliance directly against the wall.
- Place the appliance in its final position at the place of installation. Extend the adjustable foot at the bottom hinge bracket until it rests on the floor and then make a further 90° turn.
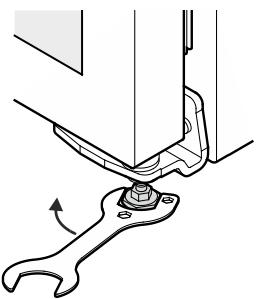
natural_image
Mechanical assembly diagram showing a wrench inserted into a workpiece with a central hub (no text or symbols)Appliance dimensions
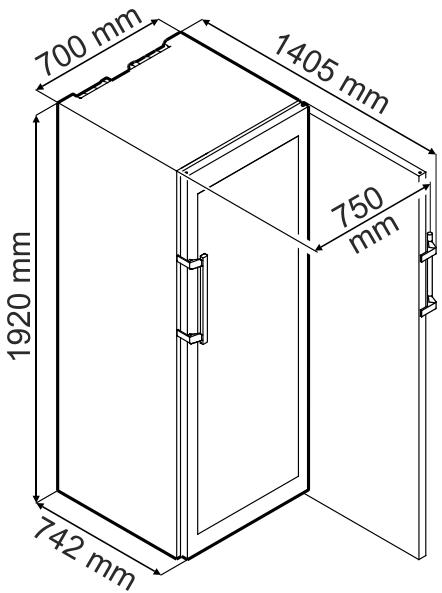
text_image
700 mm 1405 mm 750 mm 1920 mm 742 mmElectrical connection
Only operate the appliance with alternating current (AC).
The permissible voltage and frequency are indicated on the type plate. The position of the type plate is shown in the section entitled Description of the appliance.
The socket must be properly earthed and protected by a fuse. The tripping current of the fuse must be between 10 A and 16 A. The socket must not be situated behind the appliance and must be easily accessible.
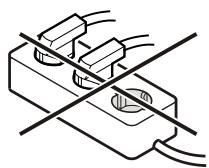
Do not connect the appliance using an extension cable or extension socket.
Do not use stand-alone inverters (conversion of direct current to alternating/three-phase current) or energy-saving plugs. Risk of damage to the electronic control system!
Operating and control elements
The electronic control panel has the new "touch capacitance technology".
Any function can be activated by touching the corresponding icon.
The exact contact point is between the symbol and its label On/Off
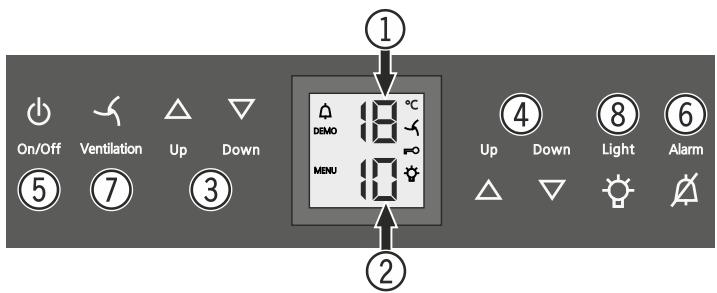
text_image
On/Off Ventilation Up Down ⑤ ⑦ ③ ① DEMO MENU ② Up Down Light Alarm ④ Light ⑥① Upper compartment temperature display
② Lower compartment temperature display
③ Upper compartment temperature setting buttons
④ Lower compartment temperature setting buttons
⑤ On/Off button (switching the appliance on and off)
⑥ Audible warning On/Off button
⑦ Fan switch
⑧ Interior light On/Off button
Symbols in the display
Alarm (symbol flashes if the temperature inside the appliance is too high or too low)
DEMO Demo mode is activated
MENU Setup mode is activated (activating the child lock and adjusting the display brightness
The interior fan runs constantly
Child lock is activated
The interior light is switched on constantly
Switching the appliance on and off
Switching the appliance on
Press the On/Off button until the temperature display lights up.

On/Off
Switching the appliance off
Keep the On/Off button pressed for approx. 3 seconds so that the temperature display goes out.
Setting the temperature
The temperature of both compartments can be set separately.
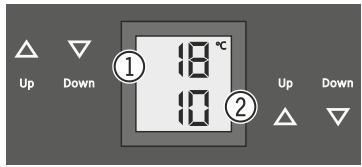
text_image
Up Down ① 18 °C 10 ② Up Down① Upper compartment
② Lower compartment
Reducing the temperature
Press the Down button.
Increasing the temperature
Press the Up button.
- When pressing one of the buttons for the first time, the display will start to flash.
- Pressing this button again enables you to change the temperature setting.
- The electronic control system will switch over automatically about 5 seconds after the last time you pressed the button, and the actual temperature will be displayed.
The temperature can be set at between +5°C and +20°C.
The following drinking temperatures are recommended for the various types of wine.
Red wines: +14°C to +20°C
Rosé wines: +10°C to +12°C
White wines: +8°C to +12°C
Sparkling wines, Prosecco: +7°C to +9°C
Champagne: +5°C to +7°C
If you are storing wine for long periods of time, it should be stored at a temperature of between +10°C and +12°C.
Door open alarm
If the door is left open for more than 60 seconds, the audible warning signal will sound.
If the door must be opened for a lengthy period to place items into the appliance, cancel the audible warning signal by pressing the Alarm button.
Alarm

The alarm switches back to standby when the door is shut.
Temperature alarm
If the temperatures in the interior are out of the permitted range, the audible warning signal will sound and the temperature display will flash.
After a lengthy power failure, the temperature in the interior may have risen to too high a level. After the power supply returns, the fall in temperature can be watched on the display.
- Cancel the audible warning signal by pressing the Alarm button.
The temperature display will stop flashing as soon as the temperature in the interior has reached the set value.
Temperature alarm after a fault in the appliance
If the appliance develops a fault, the temperature in the interior may rise too high or fall too low. The audible warning signal will sound and the temperature display will flash.
If the temperature displayed is too high (warm), first check whether the door is closed correctly.
If the temperature display continues to show a value that is too high or too low after one hour, contact the customer service department.
- Cancel the audible warning signal by pressing the Alarm button.
If F1, F2, S1, S2, S7, or S8 appears in the display, the appliance has suffered a fault. In this case, contact the customer service department.
Fan
The interior fan ensures a constant and even interior temperature and a suitable climate for wine storage.
The humidity in the appliance can be increased even further by activating the Ventilation button. This has a particularly positive effect for long-term storage.

Ventilation
The increased level of humidity prevents the corks from drying out.
Note
If the appliance is operated in a low ambient temperature, the fan may also run when the fan function is deactivated.
Additional functions
In set-up mode you can set the child lock and adjust the brightness of the display. The child lock is designed to protect the appliance from being switched off accidentally. The child lock is designed to protect the appliance from being switched off and the temperature setting from being changed accidentally.
Activating the child lock
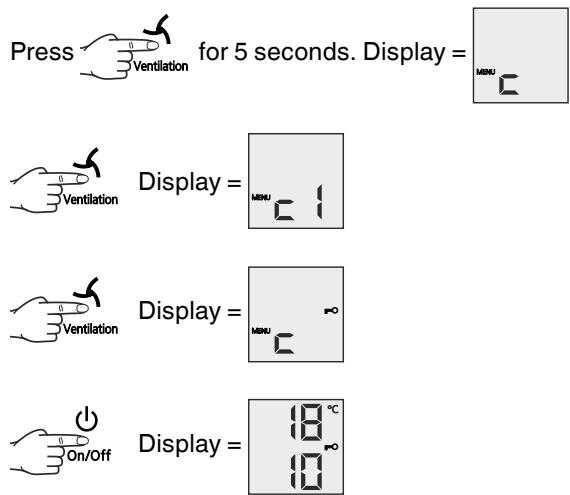
text_image
Press Ventilation for 5 seconds. Display = MENU Display = MENU Display = MENU Display = 18°C On/Off Display = 0°CDeactivating the child lock
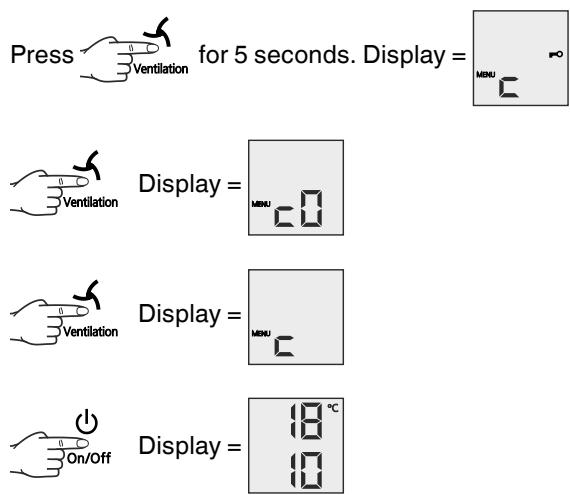
text_image
Press Ventilation for 5 seconds. Display = Display = Display = Display = Display = 18 °C 10Adjusting the display brightness

text_image
Press Ventilation for 5 seconds. Display = MENU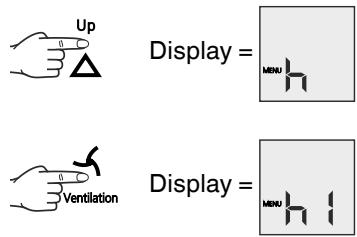
text_image
Up Display = MENU Ventilation Display = MENUUse buttons Up and Down to select the desired setting.
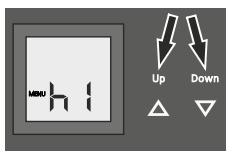
h0 = display lighting off
h1 = minimum brightness
h5 = maximum brightness
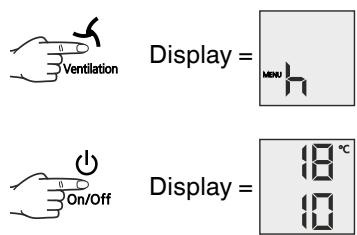
text_image
Ventilation Display = MENU On/Off Display = 18 °C 10The adjusted brightness will be activated after one minute.
Note
If a button is pressed, the display lights up for one minute at maximum brightness.
Demo mode
Demo mode can be activated for presenting the appliance at exhibitions or in salesrooms as though in normal operating mode. DEMO appears in the display.
When in this mode, the cooling circuit is switched off!
If this mode is activated by accident, it can be deactivated as detailed below.
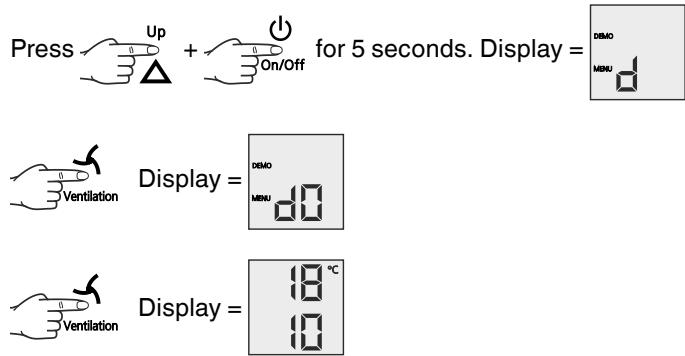
text_image
Press Up + On/Off for 5 seconds. Display = DEMO Ventilation Display = DEMO MINU d0 Ventilation Display = 18 °C 10The refrigeration unit switches on.
The temperature display flashes.
The appliance is now in normal operating mode.
Interior light
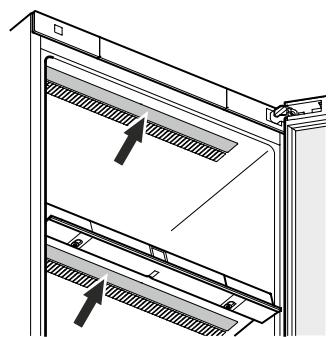
The interior of the appliance is lit by an LED light strip at the top of each compartment.
The interior light will always switch on when the appliance door is opened.
The interior light will go out approx. 5 seconds after the door is closed.
Press the Light button if you want the interior light to be on even when the door is closed.
Light

Note
This function applies to the lighting of both compartments.
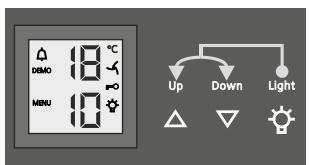
Furthermore, the brightness of the lighting can be adjusted.
- Press the Light button.
- Press and hold the Light button and at the same time press the temperature setting buttons to increase or decrease the brightness.
text_image
DINO 18°C MENU 10°C Up Down LightNote: The brightness will change in all compartments.
The light intensity of the LED light corresponds to laser class 1/1M.

Important
The light cover may only be removed by customer service staff.
If the cover is removed, do not look directly at the light through optical lenses from close distance. This can damage your eyes.
natural_image
Technical line drawing of a door frame with two shelves and a handle (no text or symbols)Air exchange with activated charcoal filter
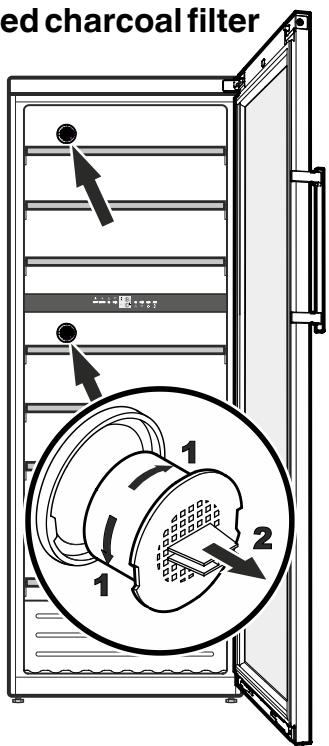
The way in which wines continue to mature depends on the ambient conditions. The quality of the air is therefore decisive for preserving the wine.
We recommend that you replace the filter once a year. Filters can be obtained from your dealer.
Changing the filter:
Take the filter by the handle. Turn it 90^ to the left or right and remove.
Inserting the filter:
Insert with the handle in a vertical position. Turn it 90^ to the left or right until it clicks into place.
text_image
ed charcoal filter 1 2 1Presentation shelf
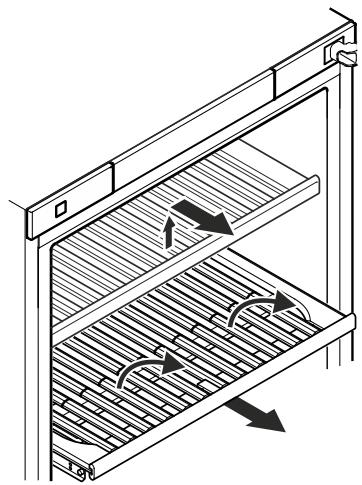
The middle pull-out shelf in the top compartment can be used for the presentation of wine bottles or to keep opened bottles at the perfect temperature. The presentation shelf can be used in all three zones.
natural_image
Isometric line drawing of a refrigerator drawer with horizontal shelves and directional arrows indicating movement (no text or symbols)The wooden shelf above it must be removed so that the presentation shelf can be used. Raise and remove the shelf.
Pull the presentation shelf forwards as far as it will go.
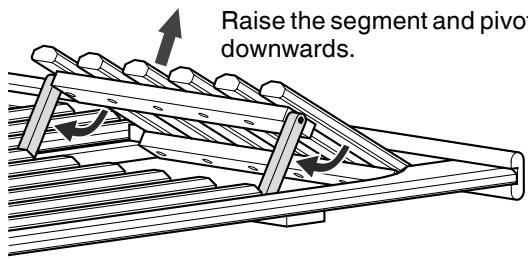
The front section of the presentation shelf consists of two segments which can be raised separately.
text_image
Raise the segment and pivot downwards.Raise the segment and pivot the two supports downwards.
natural_image
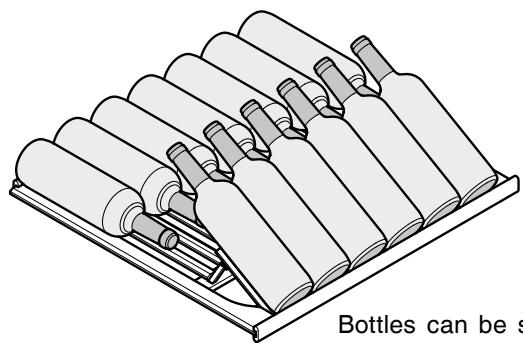
Illustration of a multi-cylinder storage tray with a tool, no text or symbols presentBottles can be stored behind the raised segment.
Inserting the wooden shelf
Fit the upper wooden shelf again for using the presentation shelf for storing bottles normally (with the segments not raised).
natural_image
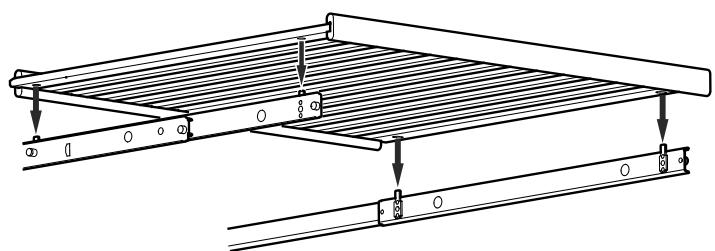
Technical line drawing of a structural support frame with mounting brackets and diagonal braces (no text or symbols)Extend the pull-out rails as far as they will go.
Place the wooden shelf with its bore holes face down on the pins on the pull-out rails.
Labels
The appliance is supplied with one label for each wooden shelf.
Use these to label the type of wine stored on each shelf.
Additional labels can be obtained from your dealer.
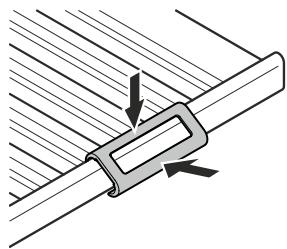
Click the label holder into place and slide the label in from the side.
natural_image
Diagram of a mechanical clamp or bracket assembly with directional arrows indicating movement (no text or symbols)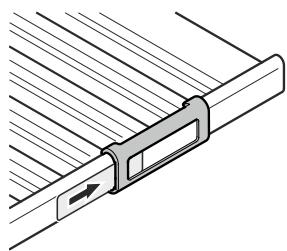
natural_image
Technical line drawing of a mechanical component with diagonal grooves and a central bracket (no text or symbols)Storage diagram
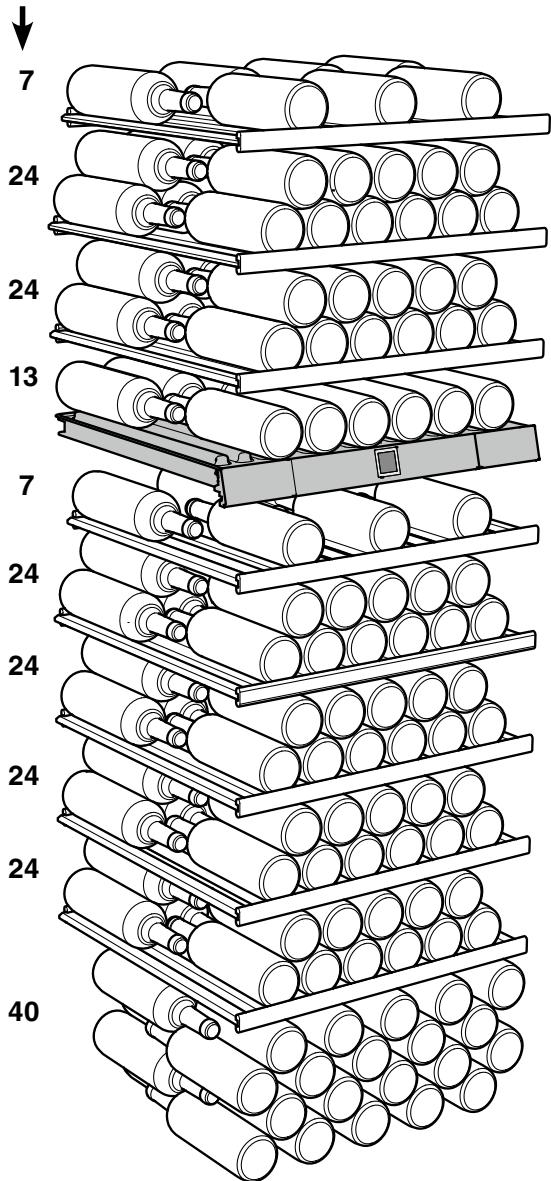
for 0.75 l Bordeaux bottles to standard NF H 35-124
Number of bottles
text_image
7 24 24 13 7 24 24 24 24 40Total 211 bottles
Defrosting
The appliance defrosts automatically.
Cleaning
Before cleaning always switch off the appliance. Pull out the mains plug or remove/unscrew the fuse.
- Clean the inside and outer walls with lukewarm water and a little detergent. Do not use abrasive or acid cleaners or chemical solvents.
- Use a glass cleaner to clean the glass surfaces and a commercially available stainless-steel cleaning agent for the stainless-steel surfaces.
Do not use steam cleaners because of the risk of injury and damage.
- Ensure that no cleaning water penetrates into the electrical components or ventilation grille.
- Do not damage or remove the type plate on the inside of the appliance. It is very important for servicing purposes.
Malfunctions
• F1, F2, S1, S2, S7, or S8 appears in the display.
- The appliance has suffered a fault. Contact the customer service department.
- F1, F2, S1, S2, S7, or S8 appears in the display. - The appliance has suffered a fault. Contact the customer service department.
You may be able to rectify the following faults by checking the possible causes yourself.
- Appliance does not function:
– Is the appliance switched on?
- Is the plug correctly fitted in the mains socket?
– Is the fuse intact?
- When inserting the mains plug, the refrigeration unit does not switch on, but a value is shown in the temperature display.
- Demo mode is activated. Deactivate demo mode as described in the section entitled Additional functions - Demo mode.
- Loud running noise:
– Is the appliance set up firmly on the floor?
- Does the appliance cause nearby items of furniture or objects to vibrate? Please note that noises caused by the refrigerant circuit cannot be avoided.
- The temperature is not low enough:
- Is the temperature setting correct (see "Setting the temperature")?
- Does the separately installed thermometer show the correct reading?
- Is the ventilation system working properly?
- Is the appliance set up too close to a heat source?
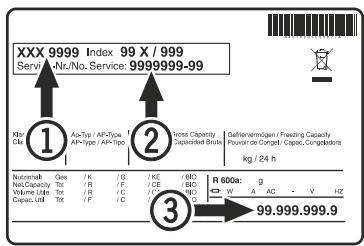
If none of the above causes apply and you cannot rectify the fault yourself, contact the nearest customer service department stating the type designation ①, service number ② and appliance number ③ as indicated on the type plate.
The position of the type plate is shown in the section entitled Description of the appliance.
text_image
XXX 9999 Index 99 X / 999 Service -Nr./No. Service: 9999999-99 Hnr. Dls. ① Asp-Top / Asp-Type Asp-Type / AsP-Top ② Inlet Capacity Capacilled Bruns Gefnervermögen / Freezing Capacity Fluxor de Corrug / Capac, Congluboren kg / 24 h R 600x: G W A AC • V HZ Nuclerkaf Gas K / G / HE / BBO NetCapacity Tot / R / F / CE / BBO Volume Unit Tot / R / F / CE / BBO Capac, Unit Tot / F / C ③ 99.999.999.9Changing over door hinges
Door hinges should only be changed by a trained expert.
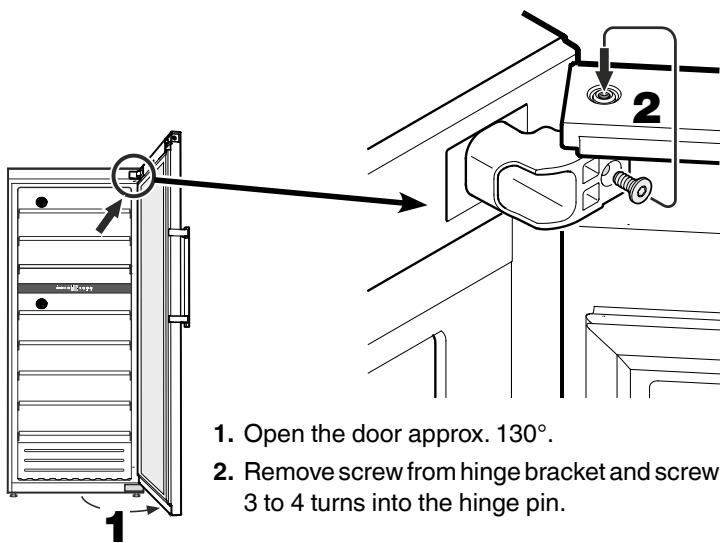
Changing the door hinges must be done by two people.
text_image
1. Open the door approx. 130°. 2. Remove screw from hinge bracket and screw 3 to 4 turns into the hinge pin.
text_image
6 6. Unscrew lock and re-fit on the opposite side.- Unscrew lock and re-fit on the opposite side.
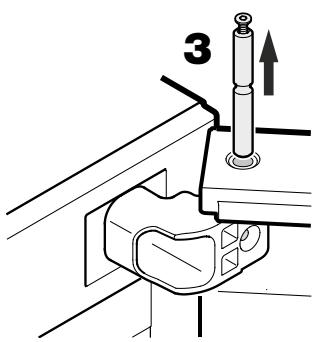
text_image
3Important
The door must now be held secure by somebody.
- Pull out hinge pin.
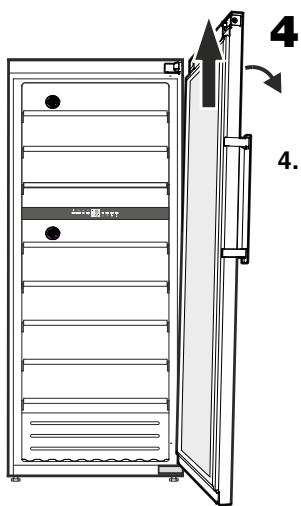
text_image
Technical diagram of a refrigerator with labeled parts and directional arrows indicating movement or assembly.- Tilt door slightly to the side and remove by lifting upwards.
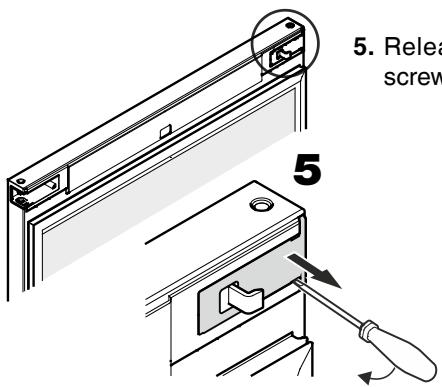
text_image
5. Release screw 5- Release cover with a small screwdriver and remove.
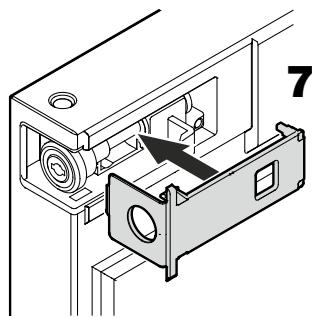
natural_image
Technical diagram of a mechanical assembly with labeled component 7 (no text or symbols present)- Click cover into place.
text_image
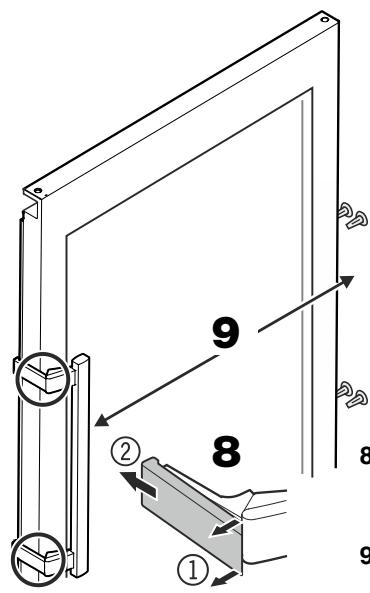
9 8 ② ① 8 9- Release pressure plates at the front ① and pull them backwards to remove ②.
- Transfer door handle and plugs to the opposite side.

text_image
10- Push on pressure plates until they engage.
text_image
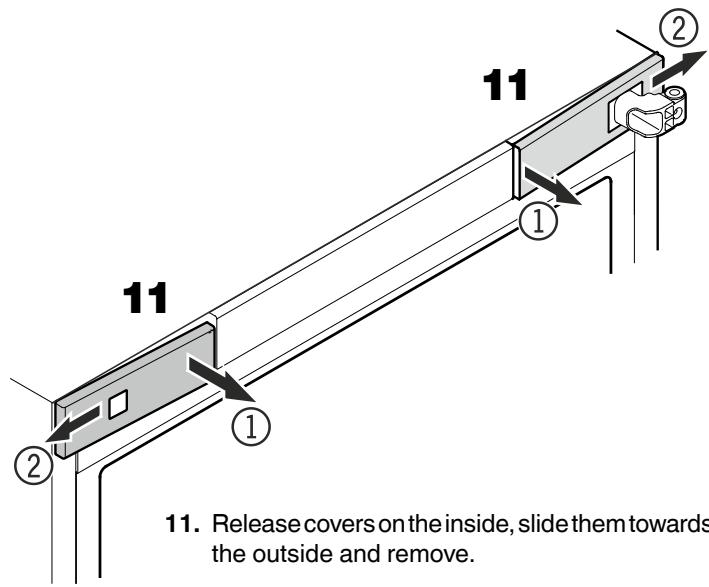
11. Release covers on the inside, slide them towards the outside and remove.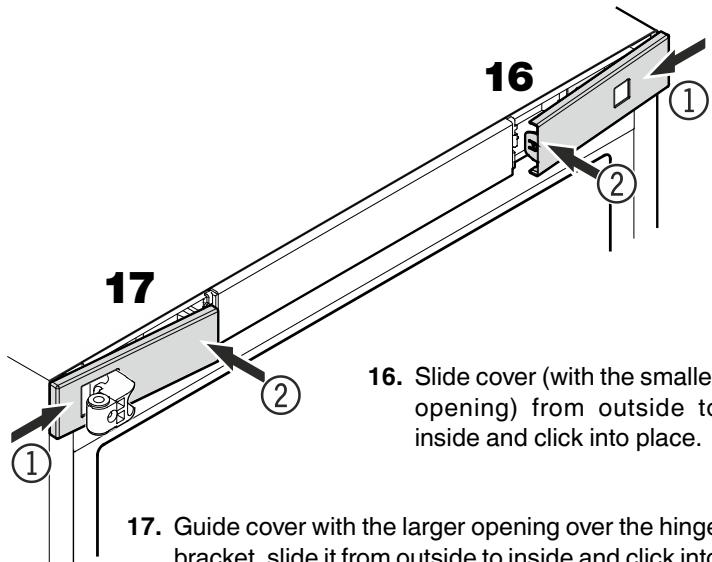
text_image
16 ① ② ① ② 17 Slide cover (with the smaller opening) from outside to inside and click into place. 17. Guide cover with the larger opening over the hinge bracket, slide it from outside to inside and click into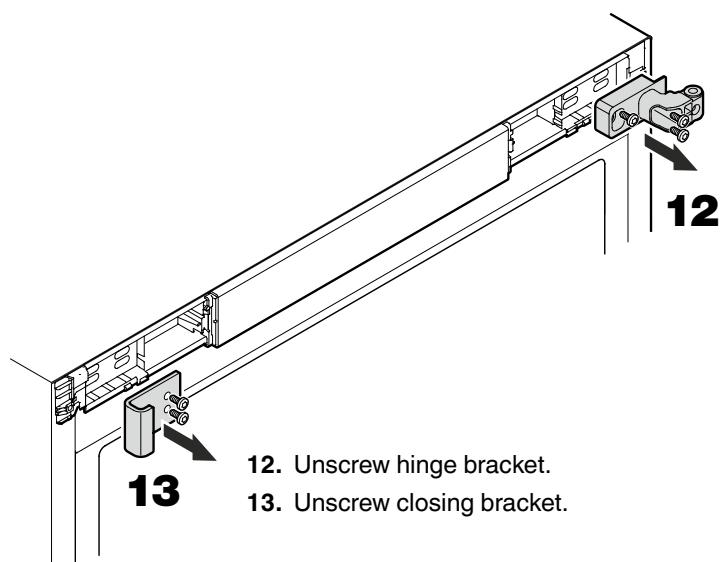
text_image
12 13 12. Unscrew hinge bracket. 13. Unscrew closing bracket.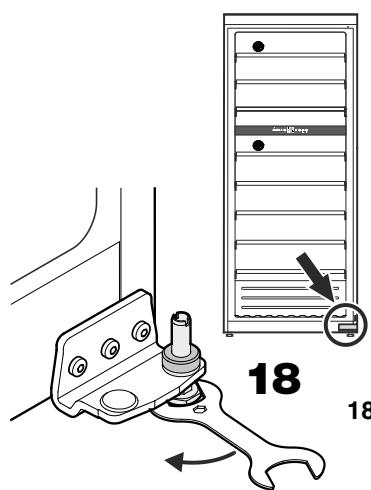
text_image
Diagram showing a mechanical device with a wrench and a server rack, labeled with numbers 18 and an arrow indicating rotation or adjustment.- Undo adjustable foot with the spanner provided.
text_image
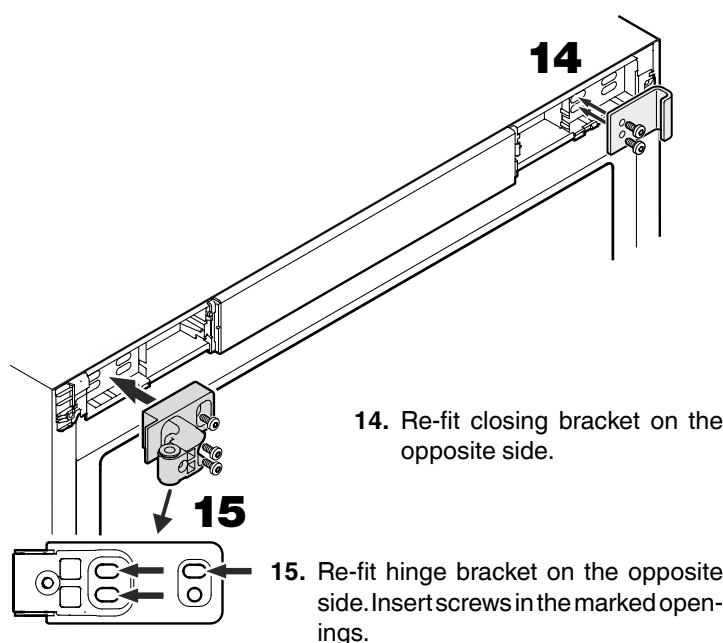
14 14. Re-fit closing bracket on the opposite side. 15 15. Re-fit hinge bracket on the opposite side. Insert screws in the marked openings.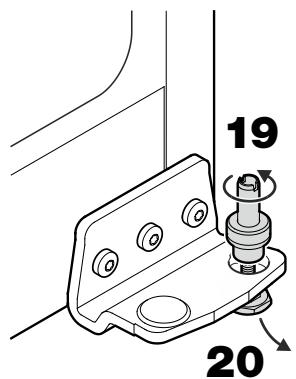
text_image
19 20- Pull hinge pin upwards and unscrew it from the adjustable foot.
- Pull adjustable foot downwards to remove.
- Re-fit hinge bracket on the opposite side. Insert screws in the marked openings.
text_image
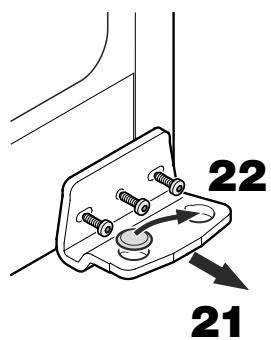
22 21- Unscrew hinge bracket.
- Transfer cover to the opposite side.
text_image
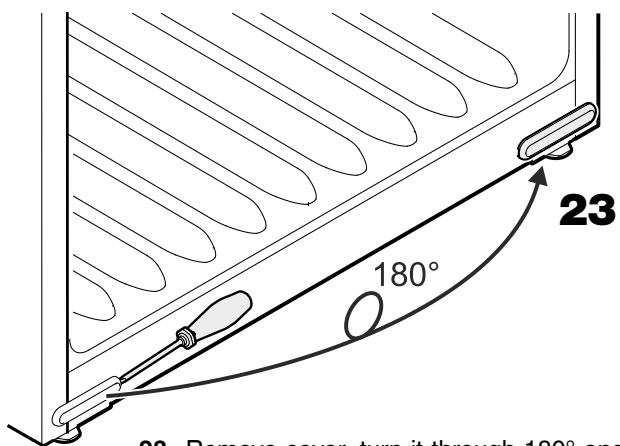
23 180° 23 Remove cover turn it through 180° and- Remove cover, turn it through 180^ and re-fit on the opposite side.
text_image
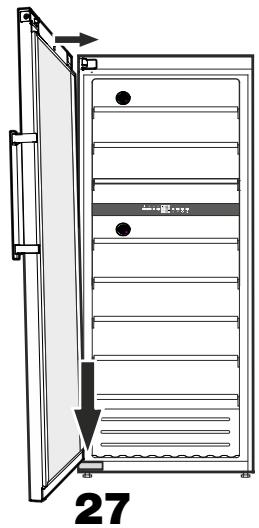
27- Place door on pin and move the top of it to the hinge bracket.
Important
The door must now be held secure by somebody.
text_image
24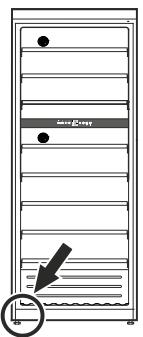
text_image
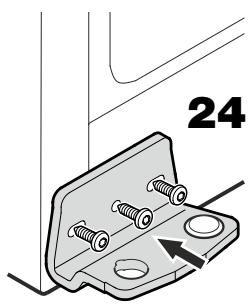
Server Rack- Screw hinge bracket into place.
text_image
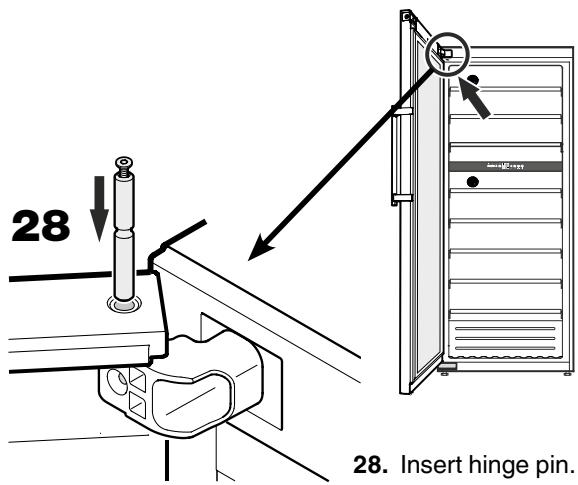
28 Insert hinge pin. 28. Insert hinge pin.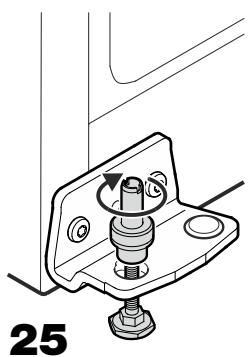
natural_image
Mechanical assembly diagram showing a bolt and nut assembly mounted on a housing (no text or symbols)- Fit adjustable foot from underneath and attach hinge pin to it.
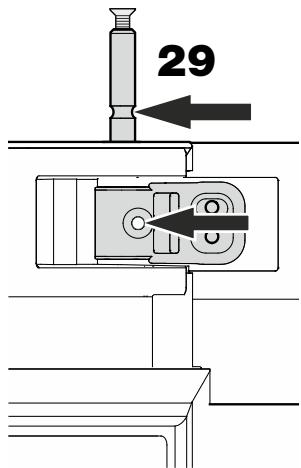
Front view of top hinge bracket
text_image
29- Push in hinge pin until groove in the pin lines up with bore hole in the hinge bracket.
natural_image
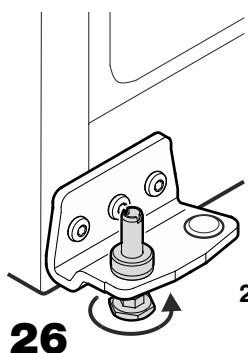
Mechanical assembly diagram showing a pin mounted on a bracket with a knob, labeled with numbers 2 and 26 (no text or symbols beyond labels)- Insert pin fully into hinge bracket and tighten adjustable foot by hand.
natural_image
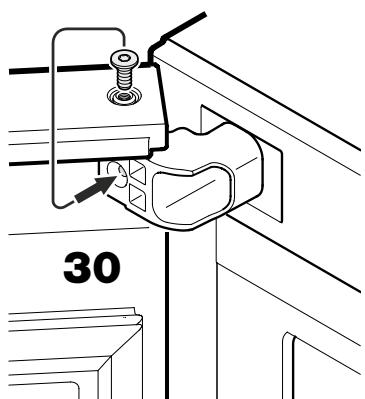
Technical line drawing of a mechanical clamp or bracket assembly (no text or symbols)- Undo screw in hinge pin and screw into bore hole in hinge bracket.
text_image
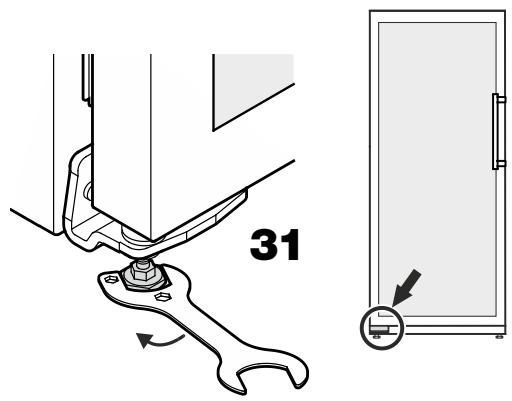
31- Place the appliance in its final position at the place of installation.
Extend the adjustable foot at the bottom hinge bracket until it rests on the floor and then make a further 90^ turn.
Adjusting the lateral tilt of the door
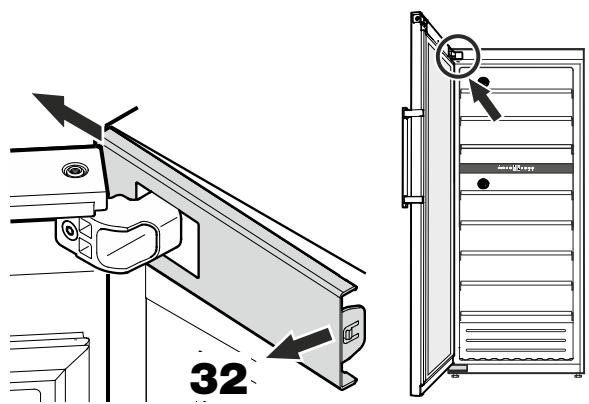
If the door is at an angle, adjust the angle.
text_image
32- Release cover on the inside and slide to the outside.
natural_image
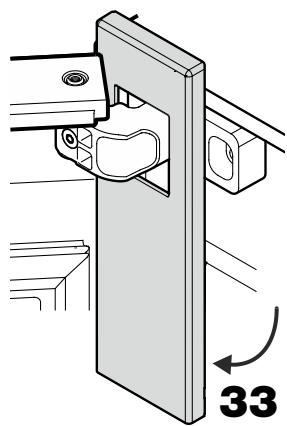
Mechanical assembly diagram showing a bracket with mounting holes and a numbered component (33), no text or symbols present.- Turn cover downwards.
Front view of top hinge bracket
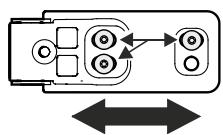
34
- Undo screws and slide hinge bracket to the right or left.
Tighten screws.
Re-fit cover following the instructions above in reverse order.
Close door and check that it is aligned with the side walls of the appliance.
Safety lock
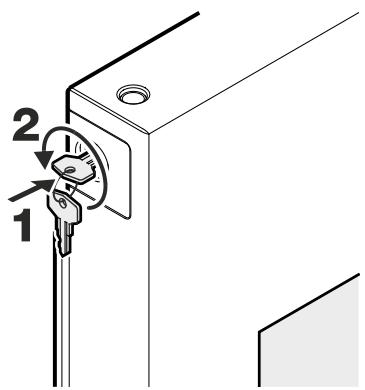
The lock in the appliance door is equipped with a safety mechanism.
Locking the appliance:
- Insert the key as shown by arrow 1.
- Turn the key 180^ .
To unlock the appliance, the same procedure must be repeated in the same order.
text_image
2 1Shutting your appliance down
If your appliance is to be shut down for any length of time, switch it off and disconnect the plug or switch off or unscrew the fuse. Clean the appliance and leave the door open in order to prevent unpleasant smells.
The appliance complies with the relevant safety regulations and EC Directives 2004/108/EC and 2006/95/EC.
GB