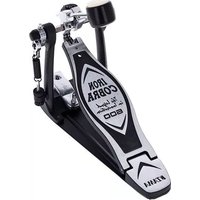
Iron Cobra HP600D - Instrument de musique TAMA - Notice d'utilisation et mode d'emploi gratuit
Retrouvez gratuitement la notice de l'appareil Iron Cobra HP600D TAMA au format PDF.


| Type de produit | Pédale de grosse caisse |
| Marque | TAMA |
| Modèle | Iron Cobra HP600D |
| Mécanisme d'entraînement | Double chaîne |
| Type de came | Power Glide (accélératrice) |
| Matériau du châssis | Acier |
| Matériau du plateau | Aluminium moulé |
| Battant inclus | Feutre et plastique |
| Poids | Environ 1,6 kg |
| Dimensions (L x l x h) | 30 x 15 x 10 cm |
| Réglage tension ressort | Oui, par molette |
| Réglage angle battant | Oui |
| Réglage hauteur battant | Oui |
| Revêtement antidérapant | Tapis caoutchouc |
| Garantie | 2 ans |
| Origine | Japon |
| Utilisation | Batterie acoustique |
| Entretien | Nettoyage avec chiffon sec, lubrification occasionnelle des axes |
| Sécurité | Utiliser sur surface stable |
| Pièces détachées | Ressorts, axes, battants disponibles |
| Réparabilité | Oui, vis standard |
FOIRE AUX QUESTIONS - Iron Cobra HP600D TAMA
Questions des utilisateurs sur Iron Cobra HP600D TAMA
0 question sur cet appareil. Repondez a celles que vous connaissez ou posez la votre.
Poser une nouvelle question sur cet appareil
Téléchargez la notice de votre Instrument de musique au format PDF gratuitement ! Retrouvez votre notice Iron Cobra HP600D - TAMA et reprennez votre appareil électronique en main. Sur cette page sont publiés tous les documents nécessaires à l'utilisation de votre appareil Iron Cobra HP600D de la marque TAMA.
MODE D'EMPLOI Iron Cobra HP600D TAMA
INSTRUCTION MANUAL
Thank you very much for purchasing the TAMA IRON COBRA drum pedal. For better understanding of its features and capabilities, please read through this manual before use. Store the manual in a convenient place for future reference.
取扱説明書
この度は、TAMAアイアンコブラ・ドラムペダルをお買い上げいただき、誠にありがとうございます。製品の特徴をご理解いただき、性能を十分に発揮するため、ご使用前に必ず本説明書をお読みください。また、本説明書は大切に保管してください。
SINGLE PEDAL HP600D

Photo 1 (写真 1)
1. Installing the Beater
Loosen the square head bolt ① of the beater holder using the drum key. Insert the beater shaft and adjust it to the desired height, and then tighten the bolt to secure it. The beater head is designed with two surfaces, one felt and one nylon, to be used at the performer's discretion.
When securing the beater, attach the pedal to the bass drum and press the footboard so that the beater surface you have chosen makes contact with the drumhead. Then, tighten the bolt to secure the beater in the correct position.
1. ビーターの取り付け
ビーターホルダーの角頭ボルト①を付属のチューニングキーで緩めます。ビーターシャフトが適当な長さになるよう調整し、角頭ボルト①を締めて固定します。付属のビーターはフェルトとナイロン樹脂の二面の使い分けが出来る設計です。ビーターを固定するときには一旦バスドラムにペダルを取り付けた後フットボードを踏み込み、好みの面をバスドラムに押し付けるようにしながらボルトを締めると正しく固定できます。
2. Attaching the Pedal Unit
The pedal unit is attached to the bass drum. Loosen the T-bolt of the hoop clamp and fasten the clamp to the hoop on the bass drum. After making sure that it is straight, tighten the bolt to secure it.
2. ペダル本体の取り付け
ペダル本体をバスドラムに取り付けます。フープクランプのTボルトを緩め、フープクランプがバスドラムのフープを挟み込むようにします。まっすぐに付いていることを確認したら、固定ボルトを再び締めて固定します。
3. Adjusting the Spring Tension
Fit the quick hook onto the bearing of the rocker cam. Adjust the spring tension using the nut on the lower end. When adjusting the spring, first loosen the locknut (Fig. 1), and then turn the adjusting nut while pressing down on the locknut as in Fig. 2. Tightening the nut makes the pedal's resistance heavier, but the beater's return time is correspondingly faster. In order to prevent the spring from loosening while playing, the adjusting nut engages the cap attached to the unit roughly every 1/3 of a turn. Once the desired tension is reached, secure it by tightening the locknut as in Fig. 3.
3. スプリングの調整
クイックフックをロッカーカムのベアリングに掛けます。スプリングテンションは下側のナットで調整できます。スプリングの調整をするときにはまずロックナットを緩めた後(Fig. 1)、Fig. 2のようにロックナットを押し下げながら下側の調整ナットで調整してください。ナットを締めるにつれて踏み心地は重くなりますがビーターの戻りは速くなります。
調整ナットは約1/3回転ごとに本体に取り付けられたキャップにかみ合い、演奏中のスプリングの緩みを防止する構造になっています。好みのテンションが決まったらロックナットを締めて固定します(Fig. 3)。

4. Adjusting the Beater Angle (Photo 2)
The angle of the beater can be adjusted along with the angle of the footboard by loosening the square head bolt ② on top of the rocker cam. You may test the increments of the angle memory cap, attached to the end of the shaft (The longer line on the angle memory cap shows the factory set-up position.), by adjusting it a bit at a time. As the angle of the beater is lowered, the footboard rises. Once the desired angle is reached, tighten the bolt ② firmly to secure it.
4. ビーター角度の調整 (写真 2)
ロッカーカムの上側の角頭ボルト②を緩めるとビーターの角度とフットボードの角度を連動して調整することができます。シャフトの端に付いているアングルメモリー・キャップの目盛を目安に少しずつ調整してみて下さい(長い目盛が出荷時の標準位置です)。ビーターの角度を倒すにつれてフットボードが上がります。好みの角度が決まったらボルト②をしっかりと締め、固定します。
5. Duo Glide
The Duo Glide system allows you to choose two different actions by changing the mounting direction of the chain wheel.
P: Power Glide (Photo 3-P / factory standard) The power glide offset cam increases power and speed as the beater reaches the end of stroke.
R: Rolling Glide (Photo 3-R)
The rolling glide, a true rounded cam, provides smooth, uniform response.
To change the mounting direction of the wheel, fi rst loosen the square-headed bolt ③ and remove it. Then, pull out the black wheel (Photo 3).
Reattach the wheel upside-down and insert the bolt ③ and tighten it.
Note:
For the twin pedals (HP600DTW), make sure to change the wheel on the left pedal so it is in the same direction as that on the right pedal.
5. デュオ・グライド
Duo Glideは、チェーンホイールの取付け方向を変える事によって、二つの異なるアクションを選べるシステムです。
P: Power Glide (出荷時標準。写真3-P)
ビーターがヘッドに当たる寸前にビータースピードが増し、パワフルなサウンドを生み出すアクションです。
R: Rolling Glide (写真 3-R)
踏み込みからヒットの瞬間まで均一でくせの無いアクションの真円ホイールです。
PとRを切り替えるにはホイール下側の角頭ボルト③を緩めて外して、黒いホイール部分を引き抜き(写真3)、上下逆さに取付けて再び角頭ボルト③を締めます。
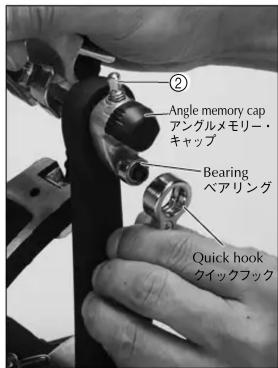
Photo 2 (写真 2)

Photo 3-P (写真 3-P)
P: Power Glide

Photo 3-R (写真 3-R)
R: Rolling Glide

Photo 3 (写真 3)
注:
ツインペダル(HP600DTW)の場合、左右両方のホイールが同じ形になるよう付け替える必要があります。
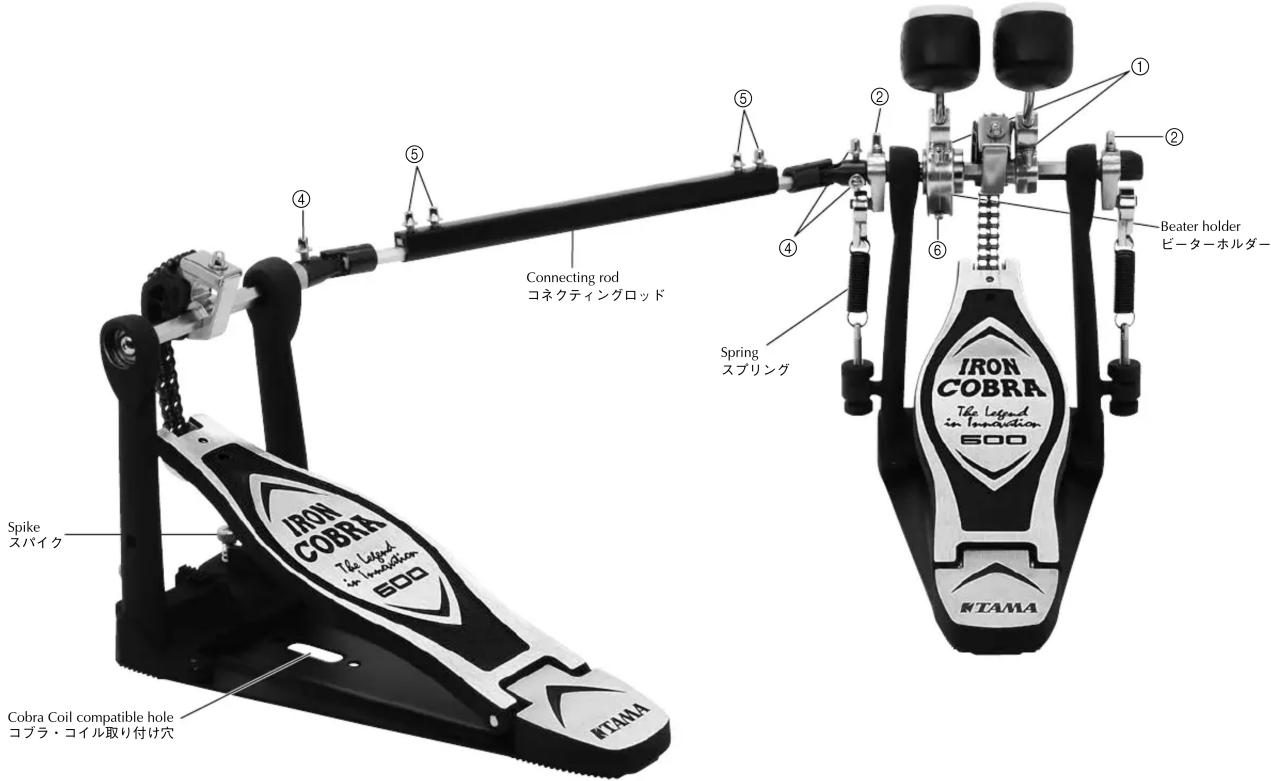
Operation and adjustment methods are the same as for the single-pedal model. Please read the information for the single-pedal model before proceeding.
各部の基本的な操作、調整方法はシングルペダルと同じです。はじめにシングルペダルの説明を必ずお読み下さい。

Photo 5L (写真 5L)
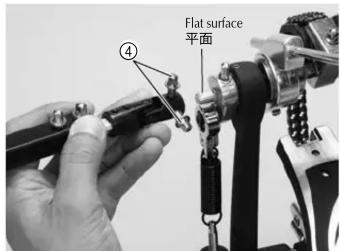
Photo 5R (写真 5R)
6. Attaching the Connecting Rod
Attach the connecting rod to the left and right pedal cam shafts. To the right pedal (as seen by the player), attach the cam shaft so that the square-headed bolts ④ at the end of the connecting rod are positioned as shown in Photo 5R, and use the drum key to tighten the bolts. In the same way, fasten the rod to the cam shaft for the left pedal (as seen by the player), while using one hand to hold the wheel with the chain wrapped around it (Photo 5L). When the assembly is done, adjust the distance between the left and right pedals. Loosen the square-headed bolt ⑤ with the drum key and adjust the connecting rod to the desired length. Once the desired position is determined, tighten the square-headed bolts ⑤ to secure it.
6. コネクティングロッド
コネクティングロッドを左右のペダルカムシャフトに取り付けます。奏者側向かって右のペダルには、コネクティングロッド端の角頭ボルト④が写真5Rのような位置関係でカムシャフトに付くよう取り付け、ボルトをドラムキーで固定してください。同様に奏者側向かって左のペダルにも、片手でチェーンがホイールに巻きつくようホイールを固定しながら(写真5L)、カムシャフトにロッドを固定してください。組立が終わったら、左右のペダルの間隔を調整します。角頭ボルト⑤をドラムキーで緩め、コネクティングロッドを好みの長さに調整して下さい。好みの位置が決まったら角頭ボルト⑤を締めて固定します。
7. Adjusting the Beater Angle (Left Side)
The left-side beater of the twin-pedal model may be adjusted in the same way as in instruction 4. When a more delicate adjustment is needed, you can adjust the beater angle independently of the footboard angle by loosening the bolt ⑥ below the beater holder. This feature is useful when you wish the footboard angles of both the hi-hat stand and the left pedal to match.
7. ビーター角度調整 (左側)
ツインペダルの左側のビーター角度も手順4と同様に調整できますが、より微妙な調整が必要な場合には左側のビーターホルダーの下側のボルト⑥を緩めることによってフットボードの角度とは無関係にビーター角度のみを調整することも出来、ハイハットスタンドと左側のペダルとのフットボードの角度を合わせたいときに便利な設計になっています。
8. Adjusting the Spikes
To prevent slippage of the left-side pedal while playing, there are two spikes in the bottom of the left frame. These spikes can be extended as needed if the screws are turned clockwise.
8. スパイクの調整
演奏中に左側のペダルが滑る事を防ぐ為、左側のフレーム下に二本のスパイクがあります。時計回りに回すと剣先が出ますので、必要に応じて調整して下さい。
Installing the Cobra Coil (sold separately)
The Cobra Coil (CC900S) is a spring that assists the return of the footboard, allowing smoother and lighter pedal action. The Cobra Coil can be installed on HP600D or HP600DTW.
コブラ・コイルの取り付け (別売)
コブラ・コイル(CC900S)はフットボードの返りをアシストし、よりスムーズで軽快なペダルアクションを可能にするスプリングです。HP600DとHP600DTWにも取り付け可能です。
Maintenance
- To maintain a smoother action for an extended period of time, wipe clean as necessary with a dry cloth. Periodically lubricate the chain (using TAMA tune-up oil TOL2) in order to prevent rust.
Note that bearings do not require lubrication due to their lubrication-free design. - The fi xing screw in the back side of the underplate or fi xing bolts of other parts may become loose due to vibration during playing or transport. Retighten them as necessary using a Phillips screwdriver.
メインテナンス
- より長く滑らかなアクションをお楽しみ頂くために、時々乾いた布でほこりや汚れを拭き取ってください。チェーンには鑄を防ぐために時々オイル(TAMAチューンナップ・オイル: TOL2)をさして下さい。
ベアリング部は給油の必要が無い設計ですので、オイルをさす必要はありません。
- アンダープレート裏側の固定ネジや、その他部品の固定ボルトは演奏中や運搬時の振動で緩む事がありますので、プラスドライバーで時々増し締めして下さい。

- INSTRUCTION MANUAL
- 取扱説明書
- INSTALLING THE BEATER
- ビーターの取り付け
- ATTACHING THE PEDAL UNIT
- ペダル本体の取り付け
- ADJUSTING THE SPRING TENSION
- スプリングの調整
- ADJUSTING THE BEATER ANGLE (PHOTO 2)
- ビーター角度の調整 (写真 2)
- DUO GLIDE
- NOTE
- デュオ・グライド
- 注
- ATTACHING THE CONNECTING ROD
- コネクティングロッド
- ADJUSTING THE BEATER ANGLE (LEFT SIDE)
- ビーター角度調整 (左側)
- ADJUSTING THE SPIKES
- スパイクの調整
- INSTALLING THE COBRA COIL (SOLD SEPARATELY)
- コブラ・コイルの取り付け (別売)
- MAINTENANCE
- メインテナンス
Marque : TAMA
Modèle : Iron Cobra HP600D
Catégorie : Instrument de musique