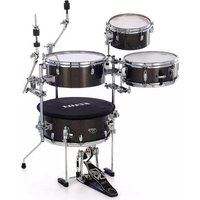
Cocktail Jam - Batterie acoustique TAMA - Notice d'utilisation et mode d'emploi gratuit
Retrouvez gratuitement la notice de l'appareil Cocktail Jam TAMA au format PDF.


| Type de produit | Batterie cocktail compacte |
| Marque | TAMA |
| Modèle | Cocktail Jam |
| Matériau du fût | Bouleau et peuplier |
| Grosse caisse | 18" x 14" |
| Tom | 10" x 7" |
| Charleston | 13" ou 14" (selon configuration) |
| Cymbale ride | 18" (incluse) |
| Pédale de grosse caisse | Incluse, simple |
| Siège | Tabouret de batterie inclus |
| Dimensions totales | Environ 90 cm de hauteur, 60 cm de largeur |
| Poids | Environ 15 kg |
| Alimentation | Aucune (instrument acoustique) |
| Fonctions principales | Jeu de batterie acoustique pour styles jazz, blues, pop |
| Entretien et nettoyage | Chiffon doux et sec, éviter l'humidité excessive |
| Sécurité | Stabilité assurée par les patins caoutchouc |
| Pièces détachées et réparabilité | Peaux, cymbales, visserie disponibles séparément |
| Informations générales | Notice d'utilisation incluse au format PDF |
FOIRE AUX QUESTIONS - Cocktail Jam TAMA
Questions des utilisateurs sur Cocktail Jam TAMA
0 question sur cet appareil. Repondez a celles que vous connaissez ou posez la votre.
Poser une nouvelle question sur cet appareil
Téléchargez la notice de votre Batterie acoustique au format PDF gratuitement ! Retrouvez votre notice Cocktail Jam - TAMA et reprennez votre appareil électronique en main. Sur cette page sont publiés tous les documents nécessaires à l'utilisation de votre appareil Cocktail Jam de la marque TAMA.
MODE D'EMPLOI Cocktail Jam TAMA
"Cocktail-JAM" Drum Kit Instruction Manual
Thank you for purchasing the TAMA Cocktail-JAM, or Cocktail-JAM drum kit. In order to ensure safe usage and to take full advantage of this product's capabilities, please read this manual before use. Keep the manual in a safe place for future reference.

Assembly
1. Bass Drum
<1-1> Insert the bass drum legs into the 4 leg brackets (a) on the bass drum, and tighten the T-bolts to fix them in place. The 2 straight legs should be on the drummer's side. The 2 curves legs should face away from the drummer.
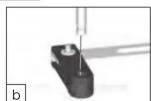
<1-2> Attach the connecting bar for the drum pedal to the 2 straight legs on the player's side. Insert the bass – drum legs into the holes (b) on the plastic parts of the connecting bar. From the player's view, the plate of connecting bar should be positioned behind the 2 legs.
<1-3> Attach the drum pedal to the connecting bar. The pedal clamp should be centered to the marked position (c) on the connecting bar, allowing the pedal beater to hit the center of the bass drum head. Also, adjust the length of bass drum legs so that the pedal chain is not in contact with the bass drum head.
2. Floor Tom
<2-1> Insert the connecting pipes into the 3 mounting brackets (d) on the bass drum, and tighten the T-nuts to fix them in place. Then, fixing the floor tom according to pipe's memory locks, you can set up the floor tom in standard height.
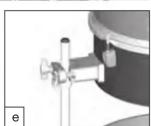
<2-2> To set up the floor tom, connect the 3 pipes fom the bass drum to the floor tom pip brackets (e). You can position the floor tom at a standard height according to the pipe's memory locks, or position at your desired height and then adjust the memory locks accordingly.
*1 The kit in this photo is the Cocktail-JAM drum kit. The Cocktail-JAM Mini only utilizes 2 pipe brackets and connecting pipes, instead of 3.

Leg Bracket



■ Sie können ein PDF dieser Sicherheitsanweisung auf Deutsch unter http://www.tama.com finden.
■ Vous pouvez trouver un PDF de ce manuel d'instructions de sécurité en français sur le site http://www.tama.com.
- È possibile trovare un PDF di questo Manuale di istruzioni per la sicurezza in italiano all'indirizzo http://www.tama.com.
Encontrará disponible este Manual de instrucciones de seguridad en formato PDF y en español en http://www.tama.com.
■ Można znaleźć PDF niniejszej instrukcji bezpieczeństwa w języku polskim na http://www.tama.com.
■ Pode encontrar um PDF deste Manual de Instruções de Segurança em português em http://www.tama.com.
■ Вы можете найти это руководство по технике безопасности в формате PDF на русском языке по адресу http://www.tama.com.
■ 点击此处查看 PDF 版的中文安全使用说明: http://www.tama.com
3. Tom Tom & Snare Drum
<3-1> Set up the tom holder to your preferred playing position on one of the 3 connecting pipes. Attach the clamp (f) to one of the pipes, and tighten the T-nut to secure it.
<3-2> Attach the bracket of tom-tom or the snare drum to the rod of the tom holder (g), and tighten the T-nut to secure it. The ball on the tom holder (h) allows you to adjust the position and angle of the tom-tom or snare drum. Simply loosen the T-nut, adjust to the desired position and angle, and then retighten to secure it in place.


Set-up Examples
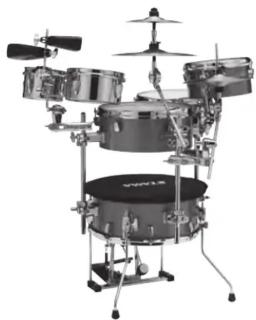
Cocktail-JAM

Cocktail-JAM Mini
You can also attach cymbals or various percussion instruments to the connecting pipes. For a tighter and more isolated bass drum sound, place Sound Focus Pad on top of the bass drum.
Storage
1. Drums
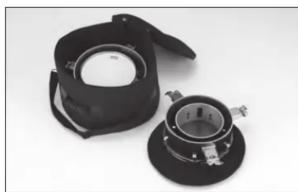
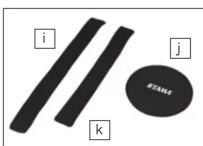
Store all 4 drums in one bag. First, put the cushion (i) around the inside of the bass drum, and nest the snare drum inside of it. After storing them in the bag, put Sound Focus Pad (j) on top of the two drums. Then, put the cushion (k) around the two drums. Then, put the cushion (k) around the inside of the floor tom, and nest the tom-tom inside of it. Finally, put them on Sound Focus Pad (j), which should be on top of the bass drum and snare drum, and zip up the bag.
2. Hardware
Store the hardware (drum pedal, bass drum legs, connecting bar for drum pedal, connecting pipes, and tom holders) in the separate hardware bag. It is easiest and most compact to pack the bass drum pedal first, and then add the rest of the hardware.


HOSHINO GAKKI CO., LTD.
http://www.tama.com
*This product contains DEHP or other phthalate chemicals known to the state of California to cause birth defects and other reproductive harm.
*These instructions were issued on May, 2017.
Specifications and improvements subject to change without notice.



Marque : TAMA
Modèle : Cocktail Jam
Catégorie : Batterie acoustique