32E5000 - Téléviseur Yasin - Notice d'utilisation et mode d'emploi gratuit
Retrouvez gratuitement la notice de l'appareil 32E5000 Yasin au format PDF.


| Type de produit | Téléviseur LED |
| Marque | Yasin |
| Modèle | 32E5000 |
| Taille de l'écran | 32 pouces (81 cm) |
| Résolution d'écran | HD Ready (1366 x 768 pixels) |
| Rapport d'aspect | 16:9 |
| Rétroéclairage | LED |
| Dimensions sans pied (L x H x P) | 73.5 x 43.5 x 8.5 cm |
| Dimensions avec pied (L x H x P) | 73.5 x 48.5 x 18.5 cm |
| Poids sans pied | 4.2 kg |
| Poids avec pied | 4.5 kg |
| Alimentation | 220-240 V ~ 50/60 Hz |
| Consommation électrique (max) | 50 W |
| Consommation en veille | Moins de 0.5 W |
| Entrées HDMI | 2 |
| Entrées USB | 1 (pour lecture multimédia) |
| Tuner TV | TNT (DVB-T) / Câble (DVB-C) |
| Haut-parleurs intégrés | 2 x 8 W |
| Fonctions principales | Télétexte, Contrôle parental, Minuterie, Enregistrement USB |
| Entretien et nettoyage | Débrancher avant nettoyage. Utiliser un chiffon doux et sec. Ne pas utiliser de produits chimiques. |
| Sécurité | Ne pas exposer à l'humidité, ne pas ouvrir le boîtier, utiliser sur une surface stable. |
| Pièces détachées et réparabilité | Contacter le service après-vente agréé. Indice de réparabilité : 6.5/10 |
FOIRE AUX QUESTIONS - 32E5000 Yasin
Questions des utilisateurs sur 32E5000 Yasin
0 question sur cet appareil. Repondez a celles que vous connaissez ou posez la votre.
Poser une nouvelle question sur cet appareil
Téléchargez la notice de votre Téléviseur au format PDF gratuitement ! Retrouvez votre notice 32E5000 - Yasin et reprennez votre appareil électronique en main. Sur cette page sont publiés tous les documents nécessaires à l'utilisation de votre appareil 32E5000 de la marque Yasin.
MODE D'EMPLOI 32E5000 Yasin
YASIN
LED TV
USER MANUAL 32E5000
Please read this User Manual carefully to ensure use of this product and keep this manual for future reference
Contents
- Introduction
- Warning
- Caution
- Main Unit Description
- Remote Control
- OSD Basic Adjustment
- USB Features
- Smart TV
- Specifications
- Troubleshooting
Introduction
Thank you very much for purchasing your LED TV. It serves as a normal colour TV and a PC monitor. To enjoy your set fully from the very beginning, read this manual carefully and keep it handy for future reference.
INSTALLATION
① Locate the receiver in the room where direct light does not strike the screen. Total darkness or a reflection on the picture screen can cause eyestrain. Soft and indirect lighting is recommended for comfortable viewing.
② Allow enough space between the receiver and the wall to permit ventilation.
③ Avoid excessively warm locations to prevent possible damage to the cabinet or premature component failure.
④ This TV can be connected to AC 100-240V\~50/60HZ.
⑤ Do not install the TV in a location near heat sources such as radiators, air ducts, direct sunlight, or in closed compartments and closed areas. Do not cover the ventilation openings when using the TV.
⑥The indicator light will last for about 30 seconds after the power has been turned off.
Wait until the indicator light goes out before repowering the TV.
Warning

CAUTION RISK OF ELECTRIC SHOCK DO NOT OPEN

CAUTION: TO AVOID THE RISK OF ELECTRIC SHOCK.
DO NOT REMOVE COVER (OR BACK).
NO USER- SERVICEABLE PARTS INSIDE.
REFER SERVICING TO QUALIFIED SERVICE PERSONNEL.

This symbol is intended to alert the user to avoid the risk of electric shock. This equipment may only be disassembled by qualified service personnel.

This symbol is intended to alert the user to the presence of important operation and maintenance instructions in the literature accompanying the equipment.

An apparatus with Class I construction shall be connected to a MAINS socket outlet with protective earthing connection.
Where the MAINS plug or an appliance coupler is used as the disconnect device, the disconnect device shall remain readily operable.
Caution

natural_image
Illustration of a computer monitor with lightning bolts and a crossed-out hand gesture (no text or symbols)
High voltages are used in the operation of this product. Do not open the product's casing. Refer servicing to qualified service personnel.

natural_image
Simple line drawing of a computer monitor with a blue X mark and a hanging sheet of clothes beside it (no text or symbols)
To prevent fire or electrical shock hazard, do not expose the main unit to moisture. do not place objects filled with liquids, such as vases, on the apparatus.

natural_image
Illustration of a computer monitor with a 'X' symbol and decorative icons above it (no text or symbols present)
Do not drop or push objects into the television cabinet slots or openings. Never spill any kind of liquid on the television receiver.
natural_image
Illustration of a computer monitor with a 'X' symbol and smoke, mounted on a stand (no text or symbols present)
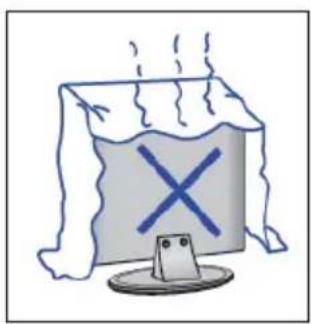
Avoid exposing the main unit to direct sunlight and other sources of heat. Do not stand the television receiver directly on other products which give off heat: e. g. video cassette players and audio amplifiers. Do not block the ventilation holes in the back cover. Ventilation is essential to prevent failure of electrical components. Do not squash power supply cord under the main unit or other heavy objects.
Caution
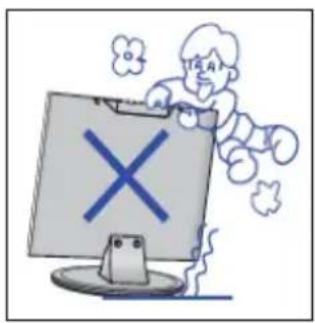

Never stand on, lean on or suddenly push the product or its stand. You should pay special attention to children.

natural_image
Illustration of a computer monitor with a blue X mark and lightning bolt, positioned at a table (no text or symbols)
Do not place the main unit on an unstable cart stand, shelf or table. Serious injury to an individual, and damage to the television, may result if it should fall.

natural_image
Illustration of a person standing next to a computer monitor and a bug symbol (no text or symbols present)
When the product is not used for an extended period of time, it is advisable to disconnect the AC power cord from the AC outlet.

natural_image
Illustration of a hammer striking a surface with radiating lines, no text or symbols present
The LED panel used in this product is made of glass and is therefore breakable. This product must not be dropped or banged. If the LED Panel breaks be careful of being injured by broken glass.
Main unit description
Control Panel Button Function
VOL+ : Volume up.
VOL- : Volume down.
CH+: TV channel up.
CH- : TV channel down.
MENU : Press to select the main menu.
SOURCE: Select the input signal.
POWER : Switch on when in standby mode or to enter the standby mode.
NOTE: Source is the same as input in function.
TV Terminal Connections


- Earphone out.
- RJ45 input terminal.
- SCART.
- HDMI1 input terminal.
- HDMI2 input terminal.
- HDMI3 input terminal.
- Coax out terminal.
- RF antenna.
- PC audio input terminal.
- VGA input terminal.
- CI input terminal.
12.MINI YPbPr input terminal.
13.MINI AV input terminal. - USB1 input terminal.
- USB2 input terminal.
Remote control

Switch the TV between on and standby mode.
Mute and restore your TV sound.
CANCEL: No Function.
AUDIO: Select audio language.(DTV mode)
Select Stereo / Dual Sound Reception. (ATV mode).
P.MODE: Select picture mode.
S.MODE: Select sound mode.
FREEZE: Press to hold the picture.
0-9: Select and switch to a channel using 0 - 9.
FAV.LIST: Display the favourite channel list. (ATV / DTV mode)
MIX: TV and TXT pictures are mixed together.(ATV / DTV mode)
RECALL: Return to the previous viewing channel. (ATV / DTV mode)
DISPLAY: Display the present channel information such as the current time and channel name.(ATV / DTV mode)
RECORD: Record the current programme.
(The U disk will be formatted when in burning, please do not store important files in the U disk)
RED, GREEN, YELLOW, BLUE: Correspond to the different colored subjects.
SLEEP: Set the sleep timer.
SOURCE: Select among the different input signal source.
ENTER: Enter the selected option or execute the selected operation.
NOTE: press this button to display "channel list" in TV source.
▼ / ▲/◀ / ▶: Allows you to navigate the OSD menus and adjust the system settings to your reference.
MENU: Press this button to enter the main menu for various optional adjustable setting.
EXIT: Exit the OSD.
CH▼/CH▲: Change the channel up and down.
VOL▼/VOL▲: Adjust the volume.
SUBTITLE: Display subtitles which are broadcast with the programme.
SIZE: To enlarge the picture on the TV in teletext.(ATV / DTV mode)


Switch to TV or SMART
▶II:Press to start playing the MEDIA, or to pause playing. (MEDIA mode)
TIMESHIFT: Press the button to pause current DTV program and start record background. (DTV mode)
◀ Press to play backward.(MEDIA mode)
INDEX: To select the page number of the Index in teletext (ATV / DTV mode)
▶:Press to play forward.(MEDIA mode)
HOLD: Freeze a multi-page passage on screen in teletext.(ATV / DTV mode)
■:Stop playing the Media. (MEDIA mode)
EPG: Enter electronic program guide. (DTV mode)
◀◀:Skip to previous chapter.(MEDIA mode)
REVEAL: To show hidden information if existing.(ATV / DTV mode)
▶▶:Skip to next chapter.(MEDIA mode)
SUBPAGE: To open a subpage if existing in teletext.(ATV / DTV mode)
TXT: Press to enter the Teletext mode. (ATV / DTV mode)
TV/RADIO : A short-cut to switch input source to TV / Digital radio channels. (DTV mode).
MOUSE: Press to turn Mouse on/off
OSD Basic Adjustment
CHANNEL
You can make the desired adjustment in the TV mode.

natural_image
Vertical stacked bar with five distinct icons: bird, photo, speaker, clock, and gear (no text or labels)
Press the "MENU" button to enter the OSD menu. Then press "▲/▼" button to select the "Channel
Setting" menu and press the "▶" button to set.
- Press “▲/▼” button to select “Auto Tuning” and press the “ENTER” button to do auto search.
- Press “▲/▼” button to select “ATV Manual Tuning” and press the “ENTER” button to do manual tuning.
- Press “▲/▼” button to select “DTV Manual Tuning” and press the “ENTER” button to do manual tuning.
- Press “▲/▼” button to select “DTV Antenna Type” and press the “ENTER” button to select DVB-T or DVB-C etc.
- Press “▲/▼” button to select “Country” and press the “ENTER” button to select the countries.
- Press “▲/▼” button to select “CI Information” and press the “ENTER” button to view the information of CI.
- Press “▲/▼” button to select “Signal Information” and press the “ENTER” button to view the information of signal.
- Press “▲/▼” button to select “Program Guide” and press the “ENTER” button to select the programs.
- Press “▲/▼” button to select “Program Edit” and press the “ENTER” button to edit the programs.
Note: Searching platform will take a long time. Please be patient!

PICTURE
You can select the type of picture, which best corresponds to your viewing.

Press the "MENU" button to enter the OSD menu. Then press "▲/▼" button to select the
"Picture Setting" menu and press the "▶" button to setting.
- Press “▲/▼” button to select “Picture mode” and press the “ENTER” button to adjust.
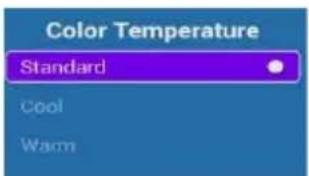
- Press “▲/▼” button to select “Color Temperature” and press the “ENTER” button to adjust.
- Press “▲/▼” button to select “Zoom Mode” and press the “ENTER” button to adjust.
- Press “▲/▼” button to select “Image Noise Reduction” and press the “ENTER” button to adjust.


SOUND
You can select the type of sound which best corresponds to your listening.

Press the "MENU" button to enter the OSD menu. Then press "▲/▼" button to select the "Sound Setting" menu and press the "►" button to setting.
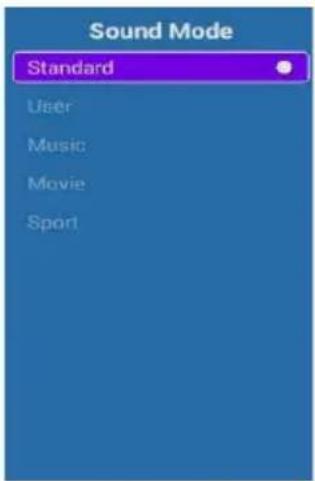
- Press “▲/▼” button to select “Sound Mode” and press the “ENTER” button to adjust.
- Press “▲/▼” button to select “Balance” and press the “ENTER” button to adjust.
- Press “▲/▼” button to select “AVC” and press the “ENTER” button to adjust.
- Press “▲/▼” button to select “Hearing Impaired” and press the “ENTER” button to adjust.
- Press “▲/▼” button to select “Surround” and press the “ENTER” button to adjust.
- Press “▲/▼” button to select “SPDIF Out” and press the “ENTER” button to adjust.
- Press “▲/▼” button to select “Alone” and press the “ENTER” button to adjust.
TIME
You can set TV MENU the desired time parameter settings.

Press the "MENU" button to Enter the OSD menu. Then press "▲/▼" button to select the "TIME" menu and press the "►" button to setting.
- Press “▲/▼” button to select “Date” and press the “ENTER” button to set.
- Press "▲/▼" button to select "Tv Time" and press the "ENTER" button to set.
- Press "▲/▼" button to select "Off Time" and press the "ENTER" button to set.
- Press “▲/▼” button to select “On Time” and press the “ENTER” button to set.
- Press "▲/▼" button to select "Auto Power Time" and press the "ENTER" button to set.
- Press “▲/▼” button to select “Sleep Time” and press the “ENTER” button to set.
SETTING
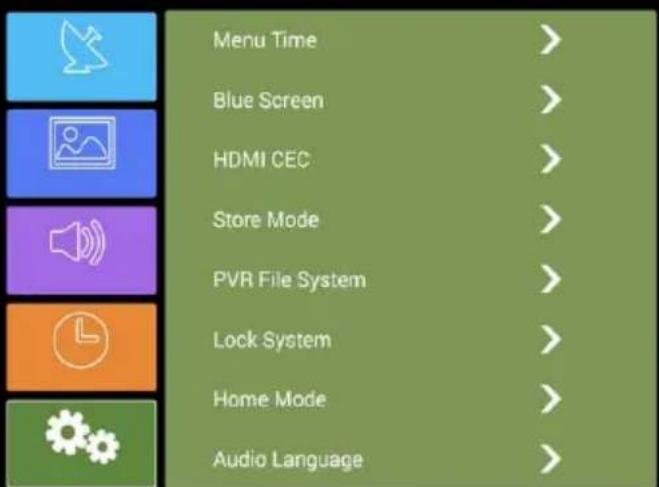
Press the "MENU" button to Enter the OSD menu. Then press "▲/▼" button to select the "SETTING" menu and press the "►" button to setting.
- Press “▲/▼” button to select “Menu Time” and press the “ENTER” button to set .
- Press "▲/▼" button to select "Blue Screen" and press the "ENTER" button to set.
- Press "▲/▼" button to select "HDMI CEC" and press the "ENTER" button to select.
- Press “▲/▼” button to select “Store Mode” and press the “ENTER” button to enter the Store Mode.
- Press “▲/▼” button to select “PVR File System” and press the “ENTER” button to set.
- Press "▲/▼" button to select "Lock System" and press the "ENTER" button to set.
- Press “▲/▼” button to select “Home Mode” and press the “ENTER” button to enter the Home Mode.
- Press “▲/▼” button to select “Audio Language” and press the “ENTER” button to select the languages.
USB Features
Press the Home button to enter the Home page and press “◀/▶” button to select the “Media Center” menu. If the remote controller can not realize the function, use the mouse (not included) and related operations.

There are three options in media center. From left to right, they are Music, Video and Picture.
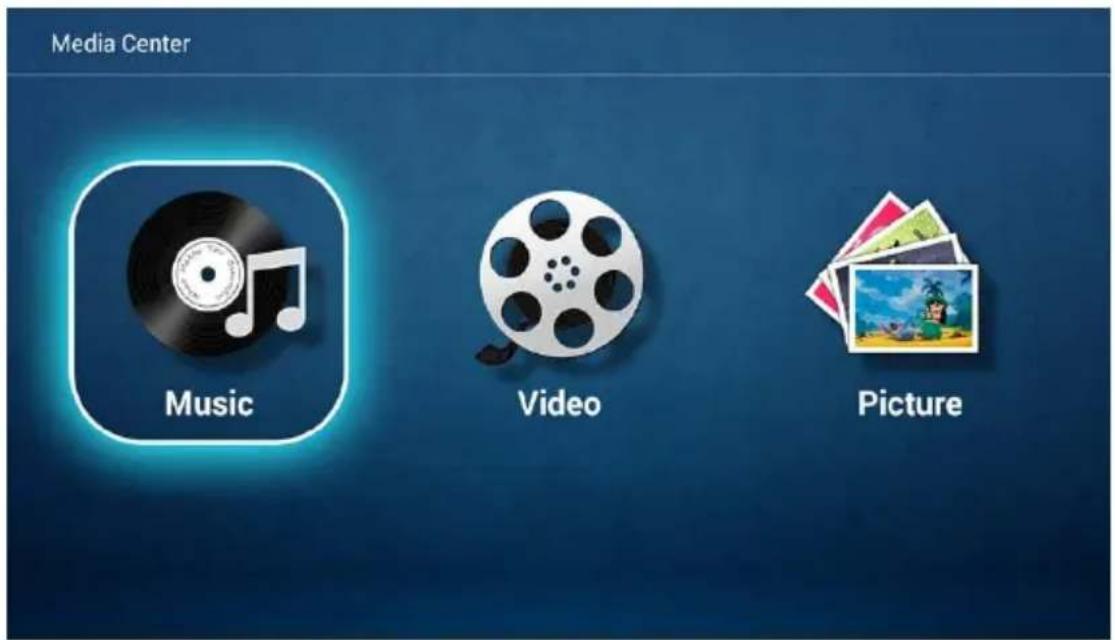
- Press the “◀/▶” button to enter the “Music” option and press the “ENTER” button to enter.

1.1 Press the “▲/▼” button to select the disc drive that you want to watch and press the “ENTER” button to enter.
1.2 Press the “◀/▶” button to select the file that you want to watch in the file selection menu, then press the “ENTER” button to display the music.
1.3 Press the "EXIT" button to select return option to go back to the previous menu.
- Press the “◀/▶” button to enter the “Video” option and press the “ENTER” button to enter.

2.1 Press the “▲/▼” button to select the disc drive that you want to watch and press the “ENTER” button to enter.
2.2 Press the “▲/▼” button to select the file that you want to watch in the file selection
menu, then press the "ENTER" button to display the video.
2.3 Press the "EXIT" button to select return option to go back to the previous menu.

natural_image
Scenic landscape with rolling green fields, wooden fence, and distant mountains under a clear sky (no text or symbols visible)- Press the “◀/▶” button to enter the “Photo” option and press the “ENTER” button to enter.
3.1 Press the “▲/▼” button to select the disc drive that you want to watch and press the “ENTER” button to enter.
3.2 Press the “▲/▼” button to select the file that you want to watch in the file selection menu, then press the “ENTER” button to display the picture.
3.3 Press the "EXIT" button to select return option to go back to the previous menu.
Note: The pictures in regard to function are provided for reference purposes only.
Smart TV
Smart TV brings you the latest in android technology.
In television, press the Home button, according to the prompt to enter the Smart TV channel.
If the remote controller can not realize the function, use the mouse (not included) and related operations.

Browser
You may want to browser the Web through a browser.
Press the "EXIT" button to return to the interface or previous page.
Press the “◀/▶,▲/▼” buttons to choose the web you need.

Application Manager

Setting
Select setting icon, then you can do some settings. From left to right, they are The internet, Language and input method, Time and Date, System, Wireless Display, System Upgrade, Restore Factory, About.

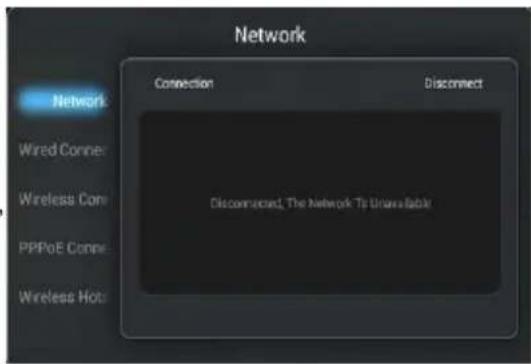
Network
You can use the type of network settings.
- Press “▲/▼” button to select “Network” menu and press the “▶” button to connect a network.
- Press “▲/▼” button to select “Wired Connection” menu and press the “ENTER” button to connect a wired network.
- Press “▲/▼” button to select “Wireless connection” menu and press the “ENTER” button to connect a wireless network.
- Press “▲/▼” button to select “PPPoE connection” menu and press the “ENTER” button to connect a PPPoE network.
- Press “▲/▼” button to select “Wireless Hotspot” menu and press the “ENTER” button to connect a wireless hotspot.
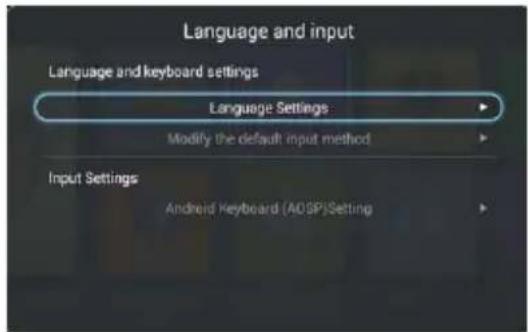
Language and Input
You can set the type of Language and input.
- Press “▲/▼” button to select “Language and keyboard settings” menu to select the languages and the input method.
- Press “▲/▼” button to select “Input Settings” menu and press the “◀/▶” button to choose the input setting which you like.
System
In this option, you can view the system information, choose the type of power desktop and view the information of network address.

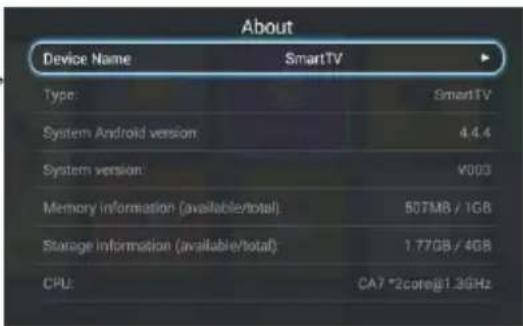
About
In this option, you can view system version information, memory information and so on.
Note: Picture only for reference, software version information displayed in kind prevail.
Specifications
RGB INPUT
| Mode | Resolution | Horizontal Frequency (KHz) | Vertical Frequency (HZ) |
| DOS | 720x400 | 31.5 | 70 |
| VGA | 640x480 | 31.5 | 60 |
| SVGA | 800x600 | 37.9 | 60 |
| XGA | 1024x768 | 48.4 | 60 |
| WXGA | 1366 x768 | 47.7 | 60 |
HDMI INPUT
| Mode | Resolution | Horizontal Frequency (KHz) | Vertical Frequency (HZ) |
| VGA | 640 x 480 | 31.47 | 59.94 |
| 480i | 720 x480i | 15.73 | 59.94/60 |
| 576i | 720 x 576i | 15.63 | 50 |
| 480p | 720 x480p | 31.47 | 59.94/60 |
| 576p | 720 x 576p | 31.26 | 50 |
| 720p | 1280 x 720p | 37.50 | 50 |
| 44.96 | 59.94/60 | ||
| 1080i | 1920 x 1080i | 28.13 | 50 |
| 33.75 | 59.94/60 | ||
| 1080p | 1920 x 1080p | 56.25 | 50 |
| 67.5 | 59.94/60 |
COMPONENT VIDEO (YPbPr) INPUT
| Mode | Resolution | Horizontal Frequency (KHz) | Vertical Frequency (HZ) |
| 480i | 720 x480i | 15.73 | 59.94/60 |
| 576i | 720 x 576i | 15.63 | 50 |
| 480p | 720 x480p | 31.47 | 59.94/60 |
| 576p | 720 x 576p | 31.26 | 50 |
| 720p | 1280 x 720p | 37.50 | 50 |
| 44.96 | 59.94/60 | ||
| 1080i | 1920 x 1080i | 28.13 | 50 |
| 33.75 | 59.94/60 | ||
| 1080p | 1920 x 1080p | 56.25 | 50 |
| 67.5 | 59.94/60 |
Due to continuous product development, specifications are subject to change without prior notice.
Troubleshooting
Before consulting service personnel, check the following chart for possible solutions.
| PROBLEM | SOLUTION |
| TV will not turn on | Make sure the power cord is plugged in.The batteries in the remote control may be drained; replace the batteries. |
| No picture, no sound | Check the cable between TV and antenna/ external AV device.Press the power button on the remote.Press the SOURCE button the remote, then press the “▲/▼”button repeatedly to select the TV source. |
| Poor picture, sound OK | Check the cable between TV and antenna/ external AV device.Try another channel, the station may have broadcast difficulties.Adjust the brightness/contrast in the Video menu.Check that the unit is set to PAL |
| Audio noise | Move any infrared equipment away from the TV. |
The TFT LED panel uses a panel consisting of sub pixels which requires sophisticated technology to produce. However, there may be a small number of bright or dark pixels on the screen. These pixels will have no impact on the performance of the product.
- YASIN
- LED TV
- USER MANUAL 32E5000
- Contents
- Introduction
- INSTALLATION
- Warning
- Caution
- Main unit description
- Control Panel Button Function
- TV Terminal Connections
- Remote control
- Switch to TV or SMART
- OSD Basic Adjustment
- CHANNEL
- PICTURE
- SOUND
- TIME
- SETTING
- USB Features
- Smart TV
- Browser
- Application Manager
- Network
- Language and Input
- System
- About
- Specifications
- Troubleshooting
Marque : Yasin
Modèle : 32E5000
Catégorie : Téléviseur