
SNES - Console NINTENDO - Notice d'utilisation et mode d'emploi gratuit
Retrouvez gratuitement la notice de l'appareil SNES NINTENDO au format PDF.


| Type de produit | Console de jeu vidéo |
| Marque | Nintendo |
| Modèle | SNES (Super Nintendo Entertainment System) |
| Dimensions (approx.) | 256 x 190 x 72 mm |
| Poids | Environ 1,2 kg |
| Alimentation | Adaptateur secteur 9V / 850 mA (prise DC) |
| Consommation électrique | Environ 9 W |
| Support de jeu | Cartouches de jeu SNES |
| Ports manettes | 2 ports avant (7 broches) |
| Sorties vidéo | RCA composite, S-Vidéo (via câble optionnel), RF |
| Sorties audio | RCA stéréo (rouge/blanc), mono via RF |
| Fonctions principales | Lecture de jeux, sauvegarde de parties (selon cartouche), mode multijoueur (2 joueurs) |
| Entretien et nettoyage | Nettoyer les connecteurs avec un chiffon doux et sec ; éviter les liquides et les produits abrasifs |
| Sécurité | Ne pas exposer à l'humidité ou à une chaleur excessive ; débrancher avant nettoyage ; ne pas ouvrir le boîtier |
| Pièces détachées et réparabilité | Manettes, câble AV, bloc d'alimentation, cartouches de jeu ; réparation possible par un professionnel |
| Informations générales | Console 16 bits sortie en 1990 (Japon) / 1991 (Amérique du Nord) / 1992 (Europe) |
FOIRE AUX QUESTIONS - SNES NINTENDO
Questions des utilisateurs sur SNES NINTENDO
0 question sur cet appareil. Repondez a celles que vous connaissez ou posez la votre.
Poser une nouvelle question sur cet appareil
Téléchargez la notice de votre Console au format PDF gratuitement ! Retrouvez votre notice SNES - NINTENDO et reprennez votre appareil électronique en main. Sur cette page sont publiés tous les documents nécessaires à l'utilisation de votre appareil SNES de la marque NINTENDO.
MODE D'EMPLOI SNES NINTENDO

INSTRUCTION MANUAL
SUPER NINTENDO
ENTERTAINMENT SYSTEM
WARNING: PLEASE CAREFULLY READ THE CONSUMER INFORMATION AND PRECAUTIONS BOOKLET INCLUDED WITH THIS PRODUCT BEFORE USING YOUR NINTENDO HARDWARE SYSTEM, GAME PAK, OR ACCESSORY.
TABLE OF CONTENTS
| PAGE | ||
| SECTION 1 | SUPER NES INSTRUCTION MANUAL | 2 |
| SUPER NES COMPONENTS | 3 | |
| CONNECTION AND INSTALLATION | 4 | |
| CONNECTING THE AC ADAPTER | 12 | |
| CONNECTING THE CONTROLLER(S) | 13 | |
| SECTION 2 | SUPER NES OPERATION | 14 |
| REMOVING GAME PAKS | 15 | |
| RETURNING TO REGULAR TV | 15 | |
| SECTION 3 | TROUBLESHOOTING | 16 |
| SECTION 4 | WARRANTY AND SERVICE INFORMATION | 18 |
| CONSUMER PARTS LIST AND ORDER FORM | 19 |
This official seal is your assurance that Nintendo has reviewed this product and that it has met our standards for excellence in workmanship, reliability and entertainment value. Always look for this seal when
buying games and accessories to ensure complete compatibility with your Nintendo product.

All Nintendo products are licensed by sale for use only with other authorized products bearing the Official Nintendo Seal of Quality™.
SECTION 1
SUPER NES INSTRUCTION MANUAL
Thank you for purchasing the Super NES ^™ . Nintendo's most advanced video entertainment system, featuring full digital stereo sound and breathtaking graphics! The Super Nintendo Entertainment System ^® includes a Control Deck ^® , high-tech controller, AC adapter, and RF switch.
NEED HELP WITH INSTALLATION MAINTENANCE OR SERVICE?
Call the Nintendo World Class Service ^5 Center
Consumer Assistance Hotline
1-800-255-3700
Mon.-Sat., 4:00 a.m.-12:00 midnight; Sun., 6:00 a.m.-7:00 p.m., Pacific Time
(Times subject to change)
Please read the setup instructions and the Consumer Information and Precautions Booklet before attempting to connect the Super NES Control Deck to your TV set. If after reading all setup instructions, you are still unable to hook up your system, please call the Consumer Assistance Hotline at the number listed above.
^18 and © are trademarks of Nintendo of America Inc. © 1992 Nintendo of America Inc. All Rights Reserved.
AtariGuide ^2
SUPER NES COMPONENTS

AC ADAPTER

RF PLUG
To Control Deck
75Ω CONNECTOR
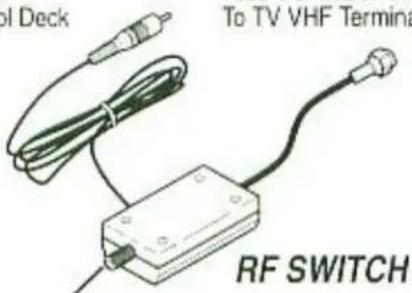
F-TYPE CONNECTOR
From Antenna Cable
CONNECTION AND INSTALLATION
There are three (3) different methods of connecting the Super NES Control Deck to a TV. To choose which method to use, first match one of the drawings below to the connection panel on the back of your TV set. Then turn to the page shown for the connection diagram for your TV.
NOTE: If you currently have an NES ^™ Control Deck connected to your TV and want to connect both the NES and Super NES Control Decks together, then turn to page 11.
If your TV has audio/video jacks and looks like this: Then turn to page 5.

natural_image
Simple line drawing of two cylindrical objects on a rectangular plate (no text or symbols)If your TV has a VHF cable connector and looks like this: Then turn to page 7.

natural_image
Simple line drawing of a cylindrical object on a rectangular plate (no text or symbols)If your TV has VHF screw type connectors and looks like this: Then turn to page 9.

natural_image
Simple line drawing of two circular shapes on a tilted rectangular background (no text or symbols)NOTE: If your TV has more than one type of connector, then choose whichever connector is not currently being used.
CONNECTION METHOD 1
USING AUDIO/VIDEO JACKS
▶ If your TV has stereo audio/video input jacks (left & right audio / video) Then follow diagram Ⓐ
▶ If your TV has audio/video input jacks, but not stereo (audio / video only) Then follow diagram Ⓗ


NOTE: This is the only method of connecting the Super NES Control Deck to a TV to get the full effects of the stereo sound. It is also possible to connect the audio output of the Control Deck to a stereo system. For additional information on this type of connection call: 1-800-255-3700
AFTER COMPLETING THE CONNECTIONS AS SHOWN, TURN TO PAGE 12
B
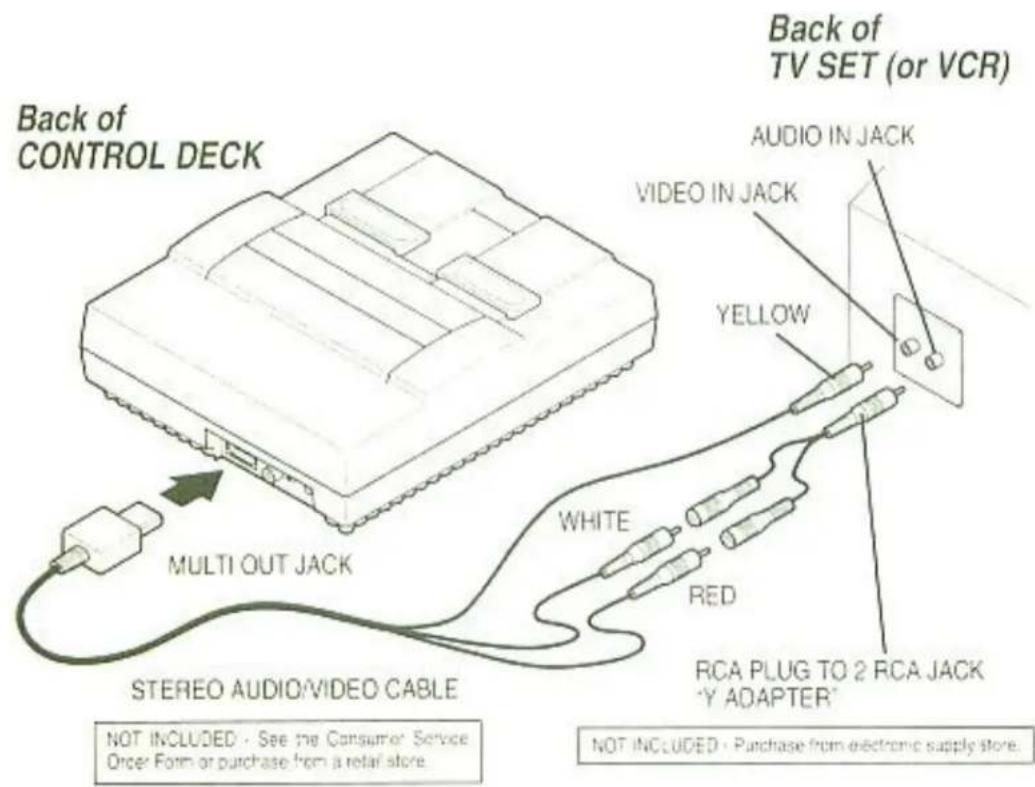
NOTE: This method of connection will produce mono sound only (the left and right stereo channels are mixed).
AFTER COMPLETING THE CONNECTIONS AS SHOWN. TURN TO PAGE 12
CONNECTION METHOD 2
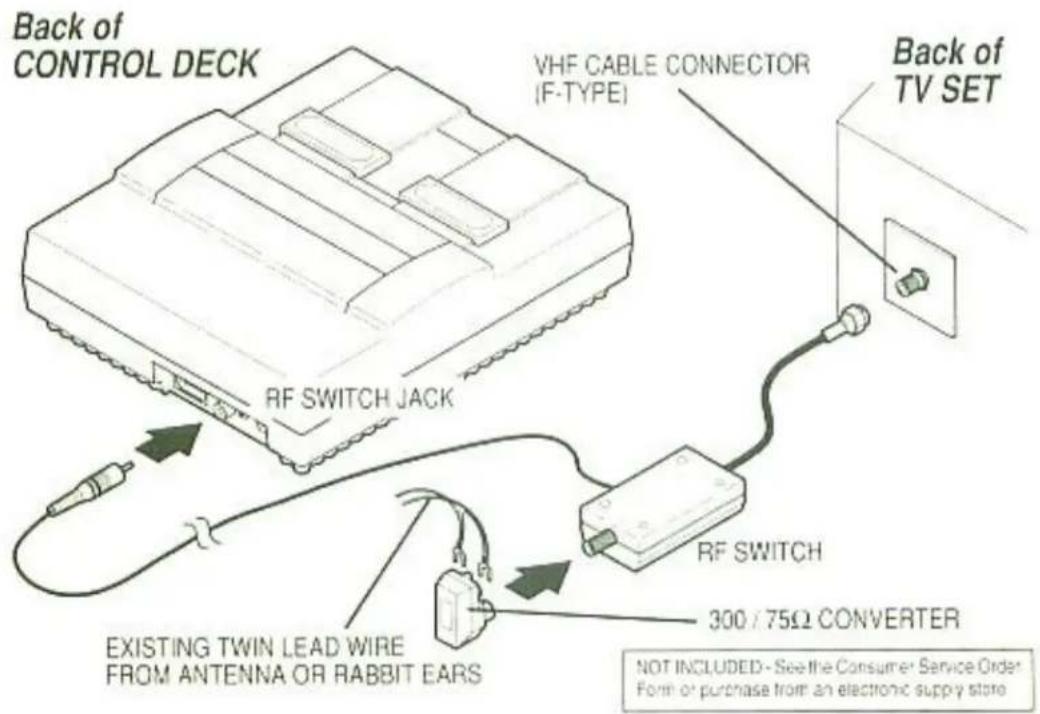
USING A VHF CABLE CONNECTOR (F-TYPE)
▶ If the existing antenna or cable connected to your TV looks like this:
Then follow diagram Ⓐ
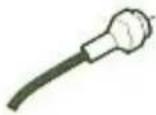
▶ If the existing antenna or cable connected to your TV looks like this:
Then follow diagram Ⓑ


Remove the existing cable connected to the back of your TV set and reconnect it to the RF switch as shown.
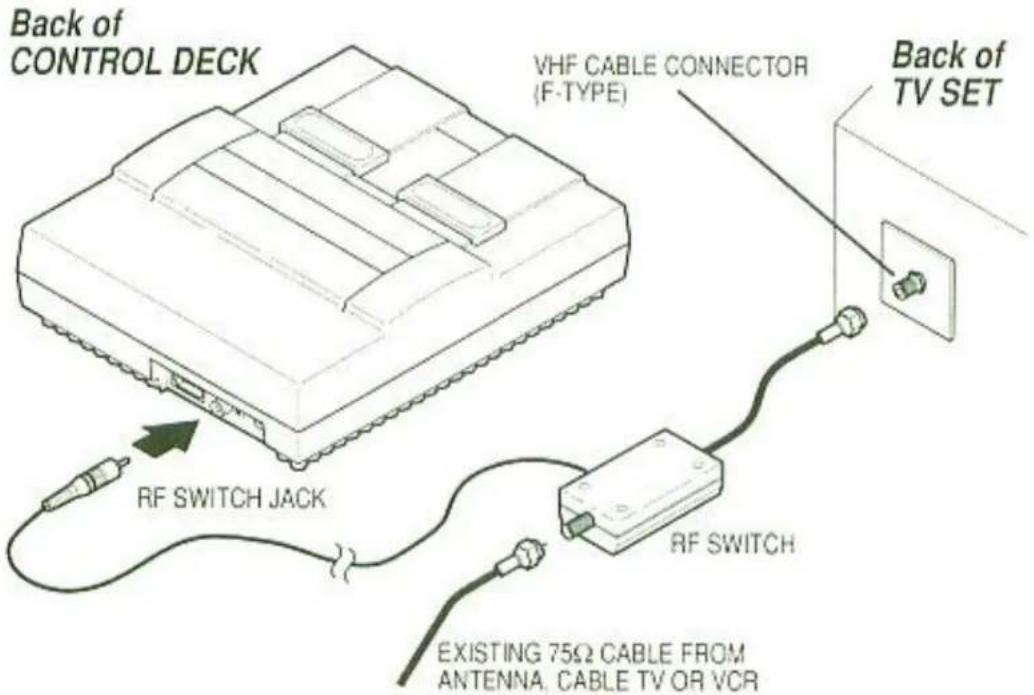
NOTE: This method of connection will produce mono sound only (the left and right stereo channels are mixed).
AFTER COMPLETING THE CONNECTIONS AS SHOWN, TURN TO PAGE 12

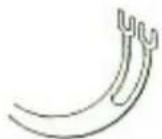
Remove the existing twin lead wire (and converter) connected to the back of your TV set and reconnect it to the RF switch as shown.
NOTE: This method of connection will produce mono sound only (the left and right stereo channels are mixed).
AFTER COMPLETING THE CONNECTIONS AS SHOWN, TURN TO PAGE 12
CONNECTION METHOD 3
USING VHF SCREW TYPE CONNECTORS (works on most TV's)
▶ If the existing antenna or cable connected to your TV looks like this:
Then follow diagram Ⓐ

▶ If the existing antenna or cable connected to your TV looks like this:
Then follow diagram Ⓑ

Remove the existing cable connected to the 75 / 300Ω converter on the back of your TV set and reconnect it to the RF switch as shown.
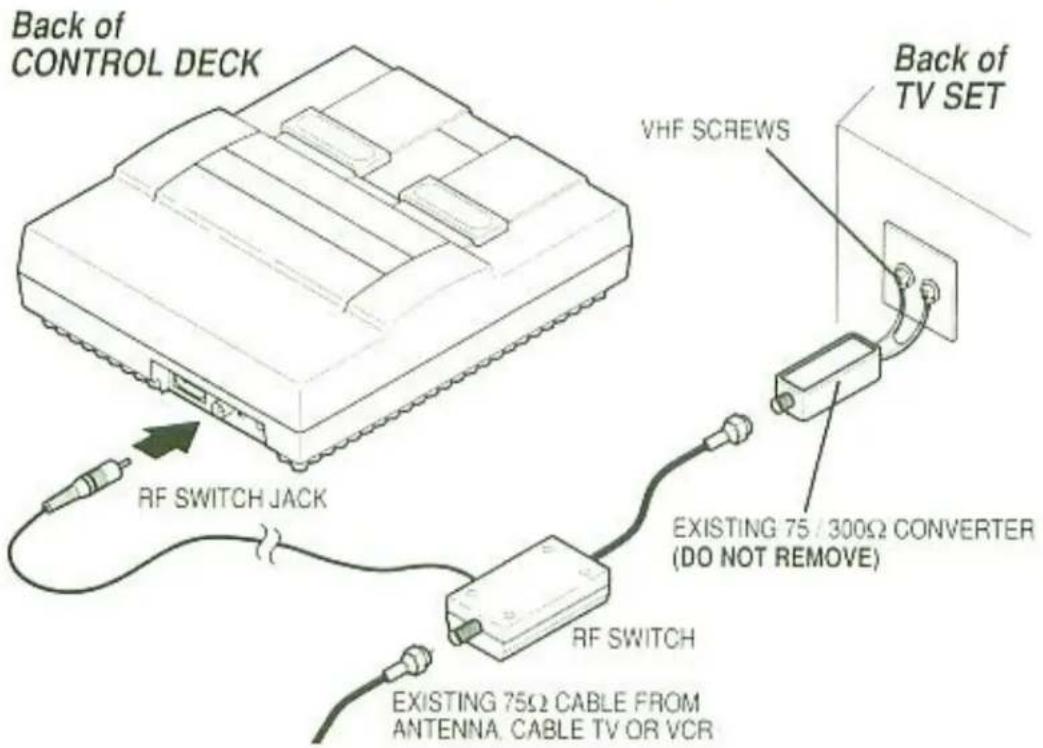
NOTE: This method of connection will produce mono sound only (the left and right stereo channels are mixed).
AFTER COMPLETING THE CONNECTIONS AS SHOWN, TURN TO PAGE 12

Remove the existing twin lead wire connected to the back of your TV set and reconnect it to the RF switch as shown.

NOTE: This method of connection will produce mono sound only (the left and right stereo channels are mixed).
AFTER COMPLETING THE CONNECTIONS AS SHOWN, TURN TO PAGE 12
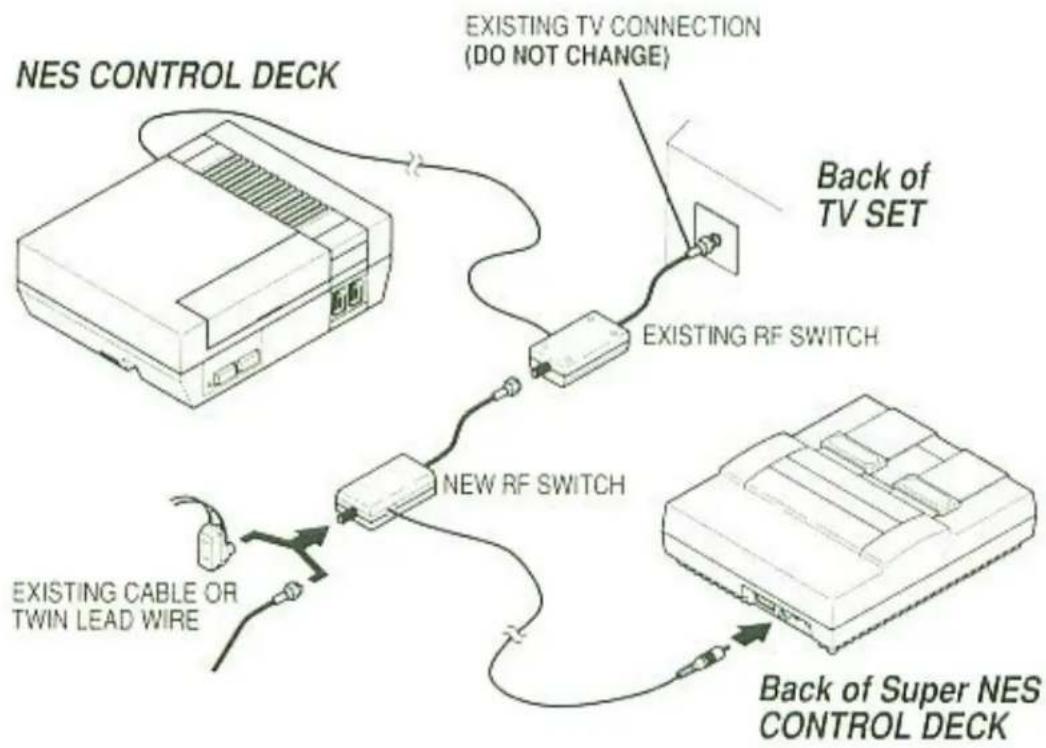
CONNECTING THE NES AND SUPER NES TOGETHER
Remove the existing cable (or twin lead wire and converter) connected to the existing RF switch and reconnect it to the new RF switch as shown. Connect the new RF switch to the back of the existing one.
flowchart
graph TD
    A["NES CONTROL DECK"] --> B["EXISTING TV CONNECTION (DO NOT CHANGE)"]
    B --> C["BACK OF TV SET"]
    A --> D["EXISTING RF SWITCH"]
    D --> E["NEW RF SWITCH"]
    E --> F["EXISTING CABLE OR TWIN LEAD WIRE"]
    E --> G["Back of Super NES CONTROL DECK"]
    G --> H["Back of Super NES CONTROL DECK"]
NOTE: This method of connection will produce mono sound only (the left and right stereo channels are mixed).
It is also possible to connect both the NES and Super NES Control Decks using audio/video connections if your TV has at least two (2) pairs of input jacks (audio and video). Follow CONNECTION METHOD 1 on page 5 and 6.
AFTER COMPLETING THE CONNECTIONS AS SHOWN, TURN TO PAGE 12
CONNECTING THE AC ADAPTER
Connect the AC plug to the AC adapter in jack on the back of the Control Deck. Plug the AC adapter into a standard (110 /120 volt AC) wall outlet.
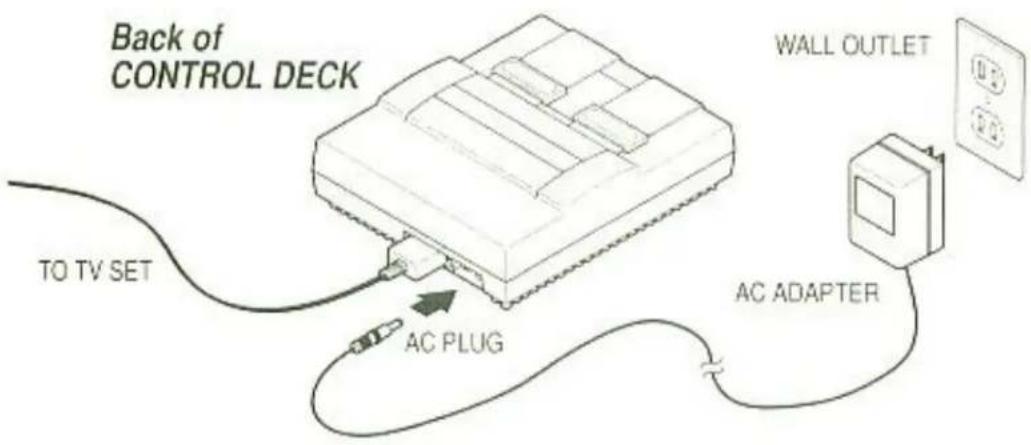
WARNING: DO NOT TRY TO USE THE NES TYPE AC ADAPTER WITH YOUR SUPER NES CONTROL DECK. THEY ARE NOT COMPATIBLE.
NOTE: To save energy, unplug the AC adapter from the wall outlet when the Super NES is not being used.
CONNECTING THE CONTROLLER
Plug the Super NES Controller(s) into the socket on the front of the Control Deck as shown.

All Super NES Controllers are identical and can be plugged into either socket number, but the select and start buttons will work only on the controller plugged into socket #1. For one-player games or when you are playing a game alone, the controller must be plugged into socket #1.
Each game may have different functions for the various buttons and control pad. Some games may have no pause function or may have a different function for both the select and start buttons. Consult the instruction booklet for the Game Pak you are using.
NOTE: Do not plug or unplug the controller(s) from the Control Deck during game play or while the power is on, as this may cause a game malfunction.
SECTION 2
SUPER NES OPERATION
① Turn your television on.
② Set your TV to channel 3.
NOTE: If channel 3 is broadcasting in your area, set the switch on the back of the Control Deck and the TV to channel 4.
NOTE: If you are using audio/video jacks (CONNECTION METHOD #1), then set the TV/VIDEO switch on your TV to "VIDEO".
③ If your TV has an automatic fine tuning control (AFC), turn it off. If turning off the AFC causes your TV to display only black and white, then leave the AFC on.
Use the manual fine tuning dial to adjust the picture after loading a Game Pak as described below.
④ Make sure the power switch of the Control Deck is turned off.
CAUTION: Always make sure that the power switch of the Control Deck is off and that you have checked the Game Pak edge connector for foreign material before attempting to load a Game Pak into the Control Deck.
⑤ Load a Game Pak into the top of the Control Deck as shown. Push it down all the way.

natural_image
Isometric line drawing of a device with a downward arrow indicating a component or process (no text or symbols present)⑥ Slide the power switch to the on position.
NOTE: If you have both an NES and a Super NES Control Deck connected, turn on only one or the other.
Make sure the red power indicator light on the front of the Control Deck is on (check the AC adapter and plug if not). Push the reset button and release. After a moment, a game display should appear on the TV.
NOTE: If there is no game display or a distorted picture on the TV screen, slide the powerswitch off. Press the eject button and remove the Game Pak. Start over from step ④. If you are still having problems, check the TROUBLESHOOTING guide on page 16, or call the Consumer Assistance Hotline at: 1-800-255-3700
⑦ Use the select button on controller #1 to select the game you want, then press the start button to begin the game.
NOTE: If you have any game play questions, call: 1-206-885-7529
REMOVING GAME PAKS
① Slide the power switch to the off position.
CAUTION: Do not try to remove a Game Pak by force. Always slide the power switch to the off position before loading or removing a Game Pak.
② Push the eject button.
③ Remove the Game Pak.
(Turn the Control Deck power off when not in use).
RETURNING TO REGULAR TV
After you have finished playing, slide the power switch of the Control Deck to the off position. Turn your TV selector to the desired channel to view regular TV programs. There is no need to disconnect the RF switch, cables, etc.
NOTE: If you are using audio/video jacks (CONNECTION METHOD #1), then set the TV/VIDEO switch on your TV, back to 'TV'.
FOR ADDITIONAL MAINTENANCE, CARE AND PRECAUTIONS, REFER TO THE CONSUMER INFORMATION AND PRECAUTIONS BOOKLET
SECTION 3
TROUBLESHOOTING
Before seeking repair services, check the problem against the list below:
PROBLEM
TV SCREEN DOES NOT COME ON.
SOLUTION
- Make sure the power switch of the Control Deck is turned on and the AC adapter and AC output plug are plugged in.

PROBLEM
NO GAME DISPLAY IMAGE ON TV SCREEN (but screen is lit).
SOLUTION
• Make sure the power switch on the Control Deck is turned on.
• Make sure that the AC adapter is plugged into a 110-120 volt wall outlet and that the AC adapter output plug is plugged into the Control Deck.
- Make sure that the Control Deck and the antenna or cable are connected to the RF switch properly and that the RF switch is connected to the TV (see pages 7 - 10).
• Make sure the Game Pak is loaded into the Control Deck correctly (see page 14 - 15 SUPER NES OPERATION).
• Make sure that the CH 3-CH 4 switch on the Control Deck is set to channel 3 and that the TV is set to channel 3.
- If your TV has both audio/video and VHF (antenna) inputs, make sure the TV/VIDEO switch is switched to the correct input.

natural_image
Pixelated illustration of a landscape with trees and buildings under a blue sky (no text or symbols)PROBLEM
GAME DISPLAY IS ON TV SCREEN BUT THE PICTURE IS ROLLING OR THE SCREEN HAS BARS OR LINES ON IT.
SOLUTION
- Adjust the vertical or horizontal hold controls on your television until the picture becomes steady.

PROBLEM
PICTURE QUALITY IS GOOD, BUT THE SOUND BUZZES.
SOLUTION
- If there is interference on channel 3, change the CH 3-CH 4 switch on your Control Deck and your TV to channel 4.
- A particularly strong television station may be broadcasting on channel 3 or 4 (or on cable TV) in your area and causing interference. Try disconnecting the antenna wire from the RF switch. (You will have to reconnect it again for regular television viewing.
- Make sure that you are not trying to use both the RF switch and the audio/video cables. Only one or the other is required (see page 4 CONNECTION AND INSTALLATION).

natural_image
Close-up of a textured surface with repeating wavy patterns and a dark linear mark (no text or symbols)PROBLEM
WHEN NOT PLAYING, REGULAR TV WILL NOT COME IN.
SOLUTION
• Make sure the power switch of the Control Deck is turned off.
• Make sure that the antenna or cable is connected to the RF switch properly and that the RF switch is connected to the TV (see pages 7 - 10).
- If regular TV programs will still not come in, unhook your RF switch from your TV and hook up the antenna or cable directly. (You will have to hook up the RF switch again in order to play.) Or use a video switch (not provided).
natural_image
Illustration of a cityscape with buildings and greenery under a blue sky (no text or symbols)PROBLEM
GAME DISPLAY IS ON TV SCREEN BUT THE PICTURE IS FUZZY, HAS NO COLOR OR HAS SNOW IN IT.
SOLUTION
- Make sure that the Control Deck and the antenna or cable are connected to the RF switch properly and that the RF switch is connected to the TV (see pages 7 - 10).
- Adjust the fine tuning and contrast controls on your TV to receive the clearest picture possible.
- If your TV has an automatic fine tuning control (AFC), turn it off and use the manual fine tuning dial to adjust the picture. If turning off the AFC causes your TV to display only black and white, then leave the AFC on.
- If the Control Deck is too close to the television, the Control Deck may cause some interference. Try moving the Control Deck farther from the TV.
- If there is interference on channel 3, change the CH 3-CH 4 switch on your Control Deck and your TV to channel 4.
• A particularly strong television station may be broadcasting on channel 3 or 4 (or on cable TV) in your area and causing interference. Try disconnecting the antenna wire from the RF switch. (You will have to reconnect it again for regular television viewing.) Or use a video switch (not provided). - Make sure the short thick "coaxial" cable of the RF switch (marked TV), is connected to the VHF input on your TV.

PROBLEM
PICTURE QUALITY IS GOOD, BUT THERE IS NO SOUND.
SOLUTION
• Make sure the TV volume is turned up.
- Adjust the fine tuning control until the sound is good.
• The sound in some Game Paks begins only after the start button is pressed.
natural_image
Illustration of a cartoon character with trees and buildings in a snowy landscape (no text or symbols)PROBLEM
PICTURE IS BLINKING OR DISTORTED.
SOLUTION
- Try pushing the reset button. If there is no improvement, slide the Control Deck power switch off, remove the Game Pak and re-load it. Slide the power switch back on and push the reset button.
IF YOU ARE STILL UNABLE TO SOLVE THE PROBLEM, PLEASE CALL THE NINTENDO WORLD CLASS SERVICE CENTER CONSUMER ASSISTANCE HOTLINE AT: 1-800-255-3700
SECTION 4
HW-1
WARRANTY AND SERVICE INFORMATION
3-MONTH LIMITED WARRANTY (For Hardware, Game Paks. & Accessories)
Nintendo of America Inc. ("Nintendo") warrants to the original purchaser that the product (hardware, game paks and accessories) shall be free from defects in material and workmanship for a period of three (3) months from the date of purchase. If a defect covered by this warranty occurs during this three (3) month warranty period, Nintendo will repair or replace the defective product or component part, at its option, free of charge
ADDITIONAL 3-MONTH LIMITED WARRANTY (Hardware Only)
Nintendo warrants to the original purchaser that the hardware product shall be free from defects in material and workmanship for an additional three (3) months beyond the original 3-month warranty period described above. If a defect covered by this warranty occurs during this additional 3-month warranty period, Nintendo will repair the defective hardware product or component free of charge. The original purchaser is entitled to this additional 3-month limited repair warranty only if the Consumer Proof of Purchase Card (attached to the hardware packaging when sold) is returned promptly after the date of purchase to Nintendo by the original purchaser or the original purchaser's retailer
WARRANTY SERVICE OR REPAIR/SERVICE AFTER EXPIRATION OF WARRANTY
You may need only simple instructions to correct any problem with your product. Call the NINTENDO WORLD CLASS SERVICE Consumer Assistance Hotline at: 1-800-255-3700 rather than going to your retailer. Hours of operation are 4 a.m. to Midnight Pacific Time, Monday - Saturday, and 6 a.m. to 7 p.m., Pacific Time, on Sundays (times subject to change). If the problem cannot be solved over the telephone, you will be referred to the nearest AUTHORIZED NINTENDO WORLD CLASS SERVICE Center or you will be offered express factory service through Nintendo. You also may refer to your yellow pages directory under the heading of Video Games - Service & Repair, for the nearest authorized service location. In some instances, it may be necessary for you to ship the complete product, FREIGHT PREPAID AND INSURED FOR LOSS OR DAMAGE, to the nearest service location.
WARRANTY LIMITATIONS
THIS WARRANTY SHALL NOT APPLY IF THIS PRODUCT (a) IS USED WITH PRODUCTS NOT SOLD OR LICENSED BY NINTENDO (INCLUDING, BUT NOT LIMITED TO, NON-LICENSED GAME ENHANCEMENT DEVICES, ADAPTERS, AND POWER SUPPLY DEVICES); (b) IS USED FOR COMMERCIAL PURPOSES (INCLUDING RENTAL) OR IS MODIFIED OR TAMPERED WITH; (c) IS DAMAGED BY NEGLIGENCE, ACCIDENT, UNREASONABLE USE, OR BY OTHER CAUSES UNRELATED TO DEFECTIVE MATERIALS OR WORKMANSHIP; OR (d) HAS HAD THE SERIAL NUMBER ALTERED, DEFACED, OR REMOVED
ANY APPLICABLE IMPLIED WARRANTIES, INCLUDING WARRANTIES OF MERCHANTABILITY AND FITNESS FOR A PARTICULAR PURPOSE, ARE HEREBY LIMITED IN DURATION TO THE WARRANTY PERIODS DESCRIBED ABOVE (3 MONTHS OR 6 MONTHS, AS APPLICABLE). IN NO EVENT SHALL NINTENDO BE LIABLE FOR CONSEQUENTIAL OR INCIDENTAL DAMAGES RESULTING FROM THE BREACH OF ANY IMPLIED OR EXPRESS WARRANTIES SOME STATES DO NOT ALLOW LIMITATIONS ON HOW LONG AN IMPLIED WARRANTY LASTS OR EXCLUSION OF CONSEQUENTIAL OR INCIDENTAL DAMAGES. SO THE ABOVE LIMITATIONS MAY NOT APPLY TO YOU.
This warranty gives you specific legal rights, and you may also have other rights which vary from state to state. Nintendo's address is as set forth on the back cover of this manual.
This warranty is valid only in the United States.
CONSUMER PARTS LIST & ORDER FORM
SUPER NINTENDO ENTERTAINMENT SYSTEM PARTS LIST & ORDER FORM
THESE ITEMS ARE ALSO AVAILABLE AT YOUR LOCAL NINTENDO WORLD CLASS SERVICE® CENTER
| Nintendo Part No. | Part Name | Price ea. | Qty. | Amount of Purchase |
| 22817 | Super NES - AC adapter | $19.95 | ||
| 21636 | RF switch (for both NES and Super NES) | 11.00 | ||
| 22682 | Super NES - Controller | 19.95 | ||
| 21638 | 300/75Ω converter (for both NES and Super NES) | 3.00 | ||
| 21639 | 75/300Ω converter (for both NES and Super NES) | 3.00 | ||
| 21714 | Stereo AV cable | 19.95 | ||
| 22425 | S-VHS cable | 19.95 | ||
| 22821 | Super NES - Game Pak cover | 1.00 | ||
| 22818 | Super NES - Control Deck manual | 2.50 | ||
| 22822 | Super NES - Consumer Info./ Precautions Booklet | 2.50 | ||
| XXX | Super NES - Game Pak manual (please specify)* | 2.00 | ||
| 22681 | Super NES Cleaning KitTM | 9.95 | ||
| 22820 | Super NES cleaner wand w/lips | 3.00 | ||
| 22819 | Super NES Cleaning Kit manual | 2.50 |
To Order by Phone (Requires VISA or MASTERCARD) Call: 1-800-255-3700, Mon.- Sat., 4:00 a.m.-12:00 m.d., Sun. 6:00 a.m.-7:00 p.m., Pacific Time. Please have your VISA or MASTERCARD card number and expiration date ready.
To Order by Mail, Please Complete the Following:
- Name Phone ( )
Street Address
City State Zip
- Enclose Money Order or Credit Card Authorization for Total Amount Due. If paying by VISA or MASTERCARD:
Please charge total amount due of \$ ____ to my: ☐ VISA ☐ MASTERCARD
CARD # Expiration Date
Name on Card (Print)
Signed
- Mail to: Nintendo of America Inc., P.O. Box 97032, Redmond, WA 98073-9732
As of 4 - 6 weeks for delivery. We patrol accept cash stamps or C.D.B. charges. Prices are applicable within the United States only and are subject to change without notice

natural_image
Cartoon character wearing a cap and holding a screwdriver, standing next to a briefcase (no text or symbols visible)NEED HELP WITH INSTALLATION, MAINTENANCE, OR SERVICE? CALL 1-800-255-3700.
Nintendo
Nintendo of America Inc.
P.O. Box 957, Redmond, WA 98073-0957 U.S.A.
PRINTED IN JAPAN

- SECTION 1
- SUPER NES INSTRUCTION MANUAL
- NEED HELP WITH INSTALLATION MAINTENANCE OR SERVICE?
- SUPER NES COMPONENTS
- CONNECTION AND INSTALLATION
- CONNECTION METHOD 1
- USING AUDIO/VIDEO JACKS
- CONNECTION METHOD 2
- USING A VHF CABLE CONNECTOR (F-TYPE)
- CONNECTION METHOD 3
- USING VHF SCREW TYPE CONNECTORS (works on most TV's)
- CONNECTING THE NES AND SUPER NES TOGETHER
- CONNECTING THE AC ADAPTER
- CONNECTING THE CONTROLLER
- SECTION 2
- SUPER NES OPERATION
- REMOVING GAME PAKS
- RETURNING TO REGULAR TV
- SECTION 3
- TROUBLESHOOTING
- TV SCREEN DOES NOT COME ON.
- NO GAME DISPLAY IMAGE ON TV SCREEN (but screen is lit).
- GAME DISPLAY IS ON TV SCREEN BUT THE PICTURE IS ROLLING OR THE SCREEN HAS BARS OR LINES ON IT.
- PICTURE QUALITY IS GOOD, BUT THE SOUND BUZZES.
- WHEN NOT PLAYING, REGULAR TV WILL NOT COME IN.
- SOLUTION
- GAME DISPLAY IS ON TV SCREEN BUT THE PICTURE IS FUZZY, HAS NO COLOR OR HAS SNOW IN IT.
- PICTURE QUALITY IS GOOD, BUT THERE IS NO SOUND.
- PICTURE IS BLINKING OR DISTORTED.
- SECTION 4
- WARRANTY AND SERVICE INFORMATION
- 3-MONTH LIMITED WARRANTY (For Hardware, Game Paks. & Accessories)
- ADDITIONAL 3-MONTH LIMITED WARRANTY (Hardware Only)
- WARRANTY SERVICE OR REPAIR/SERVICE AFTER EXPIRATION OF WARRANTY
- WARRANTY LIMITATIONS
- CONSUMER PARTS LIST & ORDER FORM
- SUPER NINTENDO ENTERTAINMENT SYSTEM PARTS LIST & ORDER FORM
- Nintendo
Marque : NINTENDO
Modèle : SNES
Catégorie : Console