
SBM-15 - Machine à pain SANYO - Notice d'utilisation et mode d'emploi gratuit
Retrouvez gratuitement la notice de l'appareil SBM-15 SANYO au format PDF.


| Type de produit | Machine à pain |
| Marque | Sanyo |
| Modèle | SBM-15 |
| Dimensions (L x P x H) | Environ 30 x 35 x 30 cm |
| Poids | Environ 7 kg |
| Alimentation électrique | 220-240 V, 50 Hz |
| Puissance | 600 W |
| Capacité du moule | Jusqu'à 1,5 kg de pain |
| Programmes de cuisson | Pain blanc, complet, sans gluten, sucré, pâte à pizza, confiture |
| Fonctions principales | Minuterie différée (jusqu'à 13h), maintien au chaud (1h), sélection de croûte (clair/moyen/foncé) |
| Entretien et nettoyage | Cuve antiadhésive amovible, pétrin amovible, nettoyage avec un chiffon humide |
| Sécurité | Arrêt automatique en fin de programme, poignées isolées thermiquement |
| Pièces détachées | Cuve, pétrin, couvercle, joint |
| Réparabilité | Pièces disponibles sur demande auprès du service client Sanyo |
| Informations générales | Notice d'utilisation fournie, 18 pages |
FOIRE AUX QUESTIONS - SBM-15 SANYO
Questions des utilisateurs sur SBM-15 SANYO
0 question sur cet appareil. Repondez a celles que vous connaissez ou posez la votre.
Poser une nouvelle question sur cet appareil
Téléchargez la notice de votre Machine à pain au format PDF gratuitement ! Retrouvez votre notice SBM-15 - SANYO et reprennez votre appareil électronique en main. Sur cette page sont publiés tous les documents nécessaires à l'utilisation de votre appareil SBM-15 de la marque SANYO.
MODE D'EMPLOI SBM-15 SANYO
INSTRUCTION MANUAL
SBM-15
Automatic Breadmaker

IMPORTANT SAFEGUARDS
When using electrical appliances, basic safety precautions should always be followed including the following:
- Read all instructions.
- Do not touch hot surfaces. Use handles or knobs.
- To protect against electrical shock do not immerse cord, plugs or breadmaker in water or other liquid.
- Close supervision is necessary when any appliance is used by or near children.
- Unplug from outlet when not in use and before cleaning. Allow to cool before putting on or taking off parts.
- Do not operate any appliance with a damaged cord or plug or after the appliance malfunctions, or has been damaged in any manner. Return appliance to the nearest authorized service facility for examination, repair or adjustment.
- The use of accessory attachments not recommended by the appliance manufacturer may cause injuries.
- Do not use outdoors.
- Do not let cord hang over edge of table or counter or touch hot surfaces.
- Do not place on or near a hot gas or electric burner or in a heated oven.
- To disconnect, turn any control to "off", then remove plug from wall outlet.
- Do not use breadmaker for storage purposes nor insert any utensils in the automatic breadmaker as they may create a fire or electric shock.
- A fire may occur if the automatic bread maker is covered or touching flammable material, including curtains, draperies, walls, and the like when in operation.
- Do not clean with metal scouring pads. Pieces can break off the pad and touch electrical parts involving a risk of electric shock.
- Avoid contacting moving parts.
- Do not use appliance for other than intended use.
SAVE THESE INSTRUCTIONS
Note :
A. A short power supply cord is provided to reduce the risk resulting from becoming entangled in or tripping over a longer cord.
B. Extension cords are available and may be used if care is exercised in their use.
C. When an extension cord is used, (1) the marked electrical rating of the cord set or extension cord should be at least as great as the electrical rating of the appliance and (2) the longer cord should be arranged so that it will not drape over the countertop or tabletop where it can be pulled on by children or tripped over unintentionally.
D. This product is designed for household use only.
E. "This appliance has a polarized plug (one blade is wider than the other). As a safety feature, this plug will fit in a polarized outlet only one way. If the plug does not fit fully in the outlet, reverse the plug. If it still does not fit, contact a qualified electrician. Do not attempt to defeat this safety feature".
IMPORTANT SAFETY TIPS FROM SANYO
* Be sure to follow these instructions in order to use the Bread Factory properly.
BEFORE USE
□ Be sure to plug the unit directly into the outlet.
□ Remove foreign matter.
- Remove all foreign matter (crumbs, flour, etc.) from the inner pot.
WHERE TO USE
- Use the bread maker on dry, stable surfaces, away from cushions, burners, or in areas where cooking grease or water may splatter onto the appliance.
□Take special care when infants and children are nearby.
- Keep the unit out of reach of infants and children while it is hot. If any buttons or pads are accidentally touched, the operation may stop.
WHILE IN USE
□The temperature is very high during operation.
- Be careful to keep your face and hands away from the unit. Place the unit at least 2 inches away from any walls.
□Do not cover the unit.
- If the unit is covered with towels, steam will not be able to escape. This could cause the shape and color of the lid to change.
☐ Do not remove the inner pot or insert your hand into the unit during operation to keep from getting burnt or being injured.
- This could lead to machine malfunction or accidents.
- If you need to remove the inner pot before the setting is complete, first press the RESET pad for two seconds to stop operation of the machine.
■ AFTER USE
☐ Do not pour water into the unit or submerge the unit in water.
□Handle the power cord with care.
- Don't bend or pull the cord. Always hold the plug, not the cord, when unplugging the unit.
□When cooled, clean the inside of the unit.
- Remove any flour or bread crumbs and all foreign matter from the inside of the unit.
REMEMBER...
☐ Do not use the unit for any purposes other than making bread or dough recipes from the cookbook provided.
□ Do not obstruct the air intake.
● Air intake is located at the bottom of the unit.
● Take care not to cover or obstruct it.
☐ Do not put a larger quantity of ingredients into the inner pot than recommended.
- By doing so, the bread may not mix or bake correctly and the machine may be damaged.
- The maximum amount of flour to be used for the BAKE setting is 3 1/4 cups.
The maximum amount of premixed flour is 2 1/4 cups.
The maximum for the DOUGH setting is 4 1/2 cups flour.
□Handle the inner pot with care.
- Do not turn or shake the inner pot while taking it out. Pull it out straight. If the inner pot is damaged or bent, the temperature sensor won't work properly.
TABLE OF CONTENTS
IMPORTANT SAFEGUARDS ....1
IMPORTANT SAFETY TIPS FROM SANYO 2
WELCOME TO THE SANYO BREAD FACTORY PLUS 3
PROPER CARE AND CLEANING OF THE BREAD FACTORY PLUS 4
NAMES AND FUNCTIONS OF PARTS 5
CONTROL PANEL NAMES AND OPERATION 6
HOW YOUR BREADMAKER WORKS 7
BASIC BREAD AND DOUGH INGREDIENTS 8
HOW TO OPERATE YOUR BREAD FACTORY PLUS 9\~14
A. GETTING STARTED
B. BAKE Settings - Immediate Start
C. BAKE Settings - Delayed Finish
D. Dough Settings
TROUBLESHOOTING GUIDE LOAVES 15
TROUBLESHOOTING GUIDE BREADMAKER 16
COMMONLY ASKED QUESTIONS 16\~17
LIMITED WARRANTY 18
WELCOME TO THE SANYO BREAD FACTORY PLUS
Congratulations on your purchase of the Sanyo Bread Factory Plus. Bread making will now be as simple as 1,2,3! With the five BAKE settings and the four DOUGH settings to choose from, home baking has never been so easy. All of the recipes have been thoroughly tested for consistently good results and good taste, but we do ask you to please read the information contained in this booklet so that every Bread Factory Plus experience will be a successful one.
Major Features of your Sanyo Bread Factory Plus
- Five bread settings for versatility.
● Simple operation for ease of use. - Delayed Finish function allowing you to enjoy hot bread anytime.
● Glass window permits you to see each stage of the selected setting.
● Automatic keep warm function.
After baking is completed, keeps the bread warm so it won't become soggy.
PROPER CARE AND CLEANING OF THE BREAD FACTORY PLUS
* Unplug the power cord and allow the machine to cool completely.
*Use only a mild kitchen detergent to clean. Benzine, cleansers, thinners, scrubbing brushes and chemical cleaners will damage the unit's surfaces.
□Body and outer lid (main unit)
- Remove all bread crumbs and other foreign matter by wiping off with a slightly damp cloth.
- Clean the inside with a damp cloth.
□ Temperature sensor
●Wipe gently in order to avoid bending the sensor.
□Kneader blade hole
- If the hole in the kneader blade is clogged, clean it out with a soft bristle brush
- Do not use anything that could scratch the finish.
□Inner pot, kneader blade
- Remove each of these from the unit body and wash with a damp sponge or dish cloth.
- Do not use strong detergent or wash in a dishwasher. Warm water is usually all that is needed to clean the inner pot and kneading blade.
- If it is difficult to remove the kneader blade from the inner pot, fill the inner pot with lukewarm water let stand a few minutes, and then remove the blade.
■Care of the fluorine coated surface on the inner pot and kneader blade
- In order to avoid damaging the fluorine coated surface:
- Wash after each use.
- Do not use scrubbing brushes or metal utensils.
• A fluorine coated surface may change in appearance after prolonged use. This is caused by moisture and steam and has no effect on the use or hygiene of the bread maker.
■Before storing the bread maker
- Make sure the body has cooled down completely and the unit has been cleaned, and has dried.
NAMES AND FUNCTIONS OF PARTS

Your Bread Maker Also Comes With
A Cookbook
Includes recipes, helpful tips, and high altitude instructions.

CONTROL PANEL NAMES AND OPERATION
Be sure to press the pad until a beep is heard
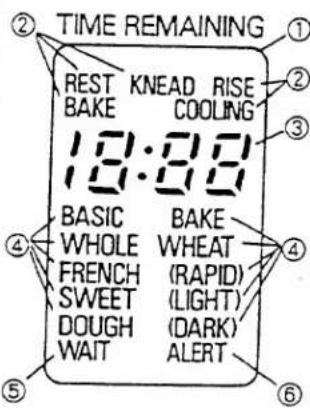 | 1DISPLAY WINDOWUsed to show:Settings and their stages.Time left until completion of setting.LIGHT/DARK selection, if used.Warning indicators.2Indicates the current stage of the selected setting.The time until completion is "counted down" in 1-minute increments.The name of the BAKE/DOUGH setting is displayed."WAIT" appears in the display window if you try to start the machine and the interior of machine is over 108°F (42°C).Wait for the unit to become cool and then press the "START" pad. (This may occur when the Bread Factory is used continuously.)If power has been interrupted for approximately 10 minutes,"ALERT" appears in the display window.If power is interrupted for longer than 10 minutes, all indicator lights disappear from the window. |
| TIMER ENTER OPERATING | The corresponding indicator lights up when the timer has been set or during operation. |
 | TIMER PADSPress to program the Delayed Finish feature.DOWN :Displayed time will move backwards in 10 minute increments.UP: Displayed time will advance in 10 minute increments.If the pads are pressed and held, the time setting will move at high speed in forward or reverse. |
 | SELECT PADPress to select the setting of your choice. |
 | START PADPress to start operation or begin timer countdown for Delayed Finish feature. |
 | RESET PADPress to cancel a mistake, to stop operation, or to cancel a timer setting. If operation has begun, press and hold the RESET pad 2 seconds to cancel. |
Refer to page 16 for instructions on what to do if the "WAIT" or "ALERT" indicators appear in display window.
HOW YOUR BREADMAKER WORKS
1. BASIC, FRENCH, SWEET Settings
| BAKE | First Knead | Rest | Second Knead | Rise | Shape | Final Rise | Bake | Cool |
| DOUGH | First Knead | Rest | Second Knead | Rise |
2. WHOLE WHEAT Settings
| BAKE | Rest | Knead | Rise | Punch | Rise | Shape | Final Rise | Bake | Cool |
| RAPID BAKE | Rest | Knead | Rise | Punch | Rise | Shape | Final Rise | Bake | Cool |
| DOUGH | Rest | Knead | Rise | Punch | Rise |
□ KNEAD
During the first knead the dough ingredients are gently mixed together for a few minutes then kneaded.
Kneading forms the gluten which is the basic framework of bread.
□ REST
For BASIC, FRENCH, and SWEET, the dough is left alone and allowed to rest to avoid overworking the dough.
The WHOLE WHEAT settings, rest allows time for water to dampen the whole wheat flour and for the breadmaker's interior to warm.
WHOLE WHEAT and WHOLE WHEAT (RAPID) rest periods occur at the beginning of their settings.
□RISE
The dough is left to rise and "proof."
□ PUNCH
Gas that has built up in the dough is released.
□ SHAPE
The dough is shaped into a smooth, round ball.
□ FINAL RISE
The dough is left to rise and the bread is formed for baking.
□BAKE
Two bake stages are used for good results.
The buzzer sounds five times when baking is completed.
□COOLING
After baking is completed, the bread is kept warm automatically so it will not become soggy.
BASIC BREAD AND DOUGH INGREDIENTS
Flours
- Bread flour is the highest in gluten of the readily available flours. It gives the tallest results and is the most tolerant of adverse conditions, high temperatures, high humidity, etc.
● Whole wheat flour still contains the bran and germ from the wheat kernel. It is lower in gluten and needs to be used only with the WHOLE WHEAT BAKE settings. - All-purpose flour is used only in some of the DOUGH recipes. It is not a substitute for bread flour in a recipe.
Yeast
- It is a living organism that causes the dough to rise.
● All of the recipes call for active dry yeast.
●Rapid rise and compressed yeast are not direct substitutes for active dry yeast.
Salt
● Controls the action of the yeast.
- Adds to and enhances the flavor of the bread.
- At altitudes over 7,000 feet additional salt may be used to improve bread results.
Sugar
● Helps speed up the fermentation process of the yeast.
●Enhances the browning process of the bread.
Fat
- Adds flavor and enhances the tenderness.
- Increases the "keeping" capabilities of the product.
Milk
● Increases the nutritional value.
●Produces a soft crust and a velvety texture.
●Enhances the flavor.
Gluten
- Gluten is the elastic substance that is developed from protein when wheat flour is combined with liquid and then mixed or kneaded. The gluten helps give bread its cellular structure.
For proper measuring of ingredients see page 10.
HOW TO OPERATE YOUR BREAD FACTORY PLUS
These instructions are divided into four sections to assist you with learning how to use your Bread Factory Plus.
As you have already read, the Bread Factory Plus. The Bread Factory Plus can be programmed to perform various functions. The BAKE settings make bread from start to finish, the DOUGH settings make dough for a variety of recipes, and the Delayed Finish feature can be programmed to make bread while you are at work or asleep.
A. GETTING STARTED-All Settings
All of the settings are programmed by first following steps 1 through 7 on pages 10 through 11. Then, depending on the setting desired, refer to BAKE settings-Immediate Start (page 12), BAKE settings-Delayed Finish (pages 13 and 14) or DOUGH settings (page 14) to complete the process.
For example, if you wish to make the Doughnuts recipe, you would follow steps 1\~7 for adding ingredients, placing the inner pot into the machine, etc. Then you would follow the steps in Section D-DOUGH Settings (page14) for starting the machine, taking the dough out, etc.
B. BAKE Settings - Immediate Start (pages 12)
This section explains how to set the machine using one of the various BAKE settings. Make sure that the setting you select is the correct setting for the recipe you are making.
C. BAKE Settings - Delayed Finish (pages 13 and 14)
This section explains how to set the Delayed Finish feature so that you can have a loaf of bread whenever you want.
This feature can be used only with the BASIC BAKE, WHOLE WHEAT BAKE, FRENCH BAKE, and SWEET BAKE settings. It cannot be used with the WHOLE WHEAT BAKE (RAPID) nor any of the DOUGH settings.
Remember - Foods that you would normally refrigerate such as eggs, milk, and cheese, are not suitable ingredients for the Delayed Finish feature.
D. DOUGH Settings (page 14)
This section explains how to set the machine using the different DOUGH settings.
After the machine is through mixing, kneading and letting the dough rise, you will need to shape and bake the dough as instructed in the Bread Factory Plus Cookbook recipes.
A. GETTING STARTED
- Before adding ingredients, remove the inner pot by pulling straight up on the handle.
-
Attach the kneader blade to the inner pot by pushing it down onto the mounting shaft. (See Illustration "A")
-
If the kneader blade is not placed correctly, mixing will be affected.
- Check the parts for crumbs or foreign materials.
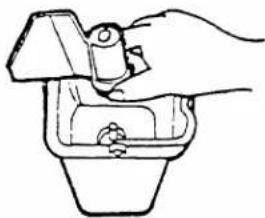
Illustration "A"
-
Measure accurately for successful breadmaker bread loaves. Mismeasuring, even slightly, can make a big difference in your results. Measure each ingredient precisely before placing it into the inner pot.
-
To measure liquids, use the see-through plastic measuring cup provided for best results. Or use a see-through glass or plastic liquid measuring cup. Read the measurement at eye level.
- To measure flour, spoon into a standard dry-ingredient measuring cup and level with a straight-edge knife or metal spatula.
- Use standard measuring spoons and level with a straight-edge knife or metal spatula.

Measuring Cup

Graduated Measuring Cups

Graduated Measuring Spoons
Assemble ingredients on your kitchen counter in order of use before adding them to the inner pot. Measure ingredients into inner pot in the order given in the recipe. Once all ingredients have been added to the inner pot, recheck the recipe to be sure each one was used, and in the correct quantity and order.
The correct order of adding ingredients is :
- Water and other liquids (including eggs)
- Flour, shortening, sugar, salt, etc.
- Active dry yeast.
Note: when using the Delayed Finish feature, please pay special attention to the order of the ingredients. Yeast needs to be kept from touching the water.
- For BAKE settings, the maximum amount of flour is 3 1/4 cups. The maximum for the DOUGH setting is 4 1/2 cups flour.
If you are using a prepakaged bread mix, make sure that it does not exceed 2¼ cups. If the mix exceeds that amount measure out 2¼ cups. For best results consult the manufacturer's directions.
-
Place the inner pot into the inner case.
-
Wipe off any moisture from the outer side of the inner pot before placing it into the inner case.
- Make sure the word FRONT on the upper rim of the inner pot is facing toward the front of the breadmaker.
- Push down on rim until inner pot locks into place.
- Unless the inner pot is securely placed inside the breadmaker, the bread will not be baked correctly.

-
Close the outer lid.
-
Plug the breadmaker into a 120 volt 60Hz AC outlet.
- When the breadmaker is plugged in, the display window will flash 18:88. When a setting is selected, the display window will show that information.
-
Select the desired setting.
-
Pless the SELECT pad until the desired setting appear in the display window.
- Each time the SELECT pad is pressed, the display window changes to the next setting.
- The name of the setting and the required amount of time in hours and minutes for each setting will appear.

![graph LR A["BASIC settings"] --> B["BASIC 3:2.0 BAKE"] B --> C["BASIC 3:1.1 BAKE (LIGHT)"] C --> D["BASIC 3:3.7 BAKE (DARK)"] D --> E["BASIC 1:3.5 DOUGH"] F["WHOLE WHEAT settings"] --> G["4:2.0 Whole WHEAT"] G --> H["3:0.8 Whole WHEAT (RAPID)"] H --> I["2:5.8 Whole WHEAT DOUGH"] J["FRENCH settings"]…](/content/2026/06/1315263/images/5e225eeab7bda68d9f896a59e489d96f6cafb908333c411f21e5414625953a23.jpg)
B. BAKE Settings-Immediate Start
Follow steps 1 through 7 on pages 10\~11.
8. Press the START pad.
- The display will show current stage (REST or KNEAD) in the selected setting. Time remaining before completion of the bread will "count down" in 1-minute increments. The name of the selected setting will remain in the display window.

- For the first 30 minutes of the WHOLE WHEAT BAKE and the first 15 minutes of the WHOLE WHEAT BAKE (RAPID) settings, the word "REST" will appear in the display window. The machine is heating and allowing the water to dampen the flour. The kneader blade does not mix or knead during this time. - When a setting is completed, the buzzer will sound five times.
9. Remove the inner pot
- Open the lid.
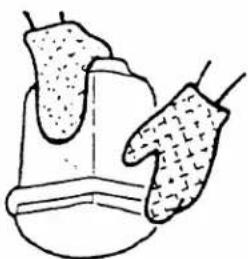
- Using hot pads or mitts, remove the inner pot by pulling straight up on the handle.
BE SURE TO USE HOT PADS OR MITTS TO REMOVE THE INNER POT AS IT CAN GET EXTREMELY HOT!
When a BAKE setting is completed, the machine automatically goes into "COOLING" stage.
- The word "COOLING" will appear in the display window.
- You may remove your bread anytime during this period, or you may wait until the cooling period is over.
- At the end of the cooling, the word "COOLING" will disappear from the display window.
10. Remove the bread
Turn the inner pot upside-down and shake it several times to remove the bread.
- Be sure to use pot holders or mitts when removing the bread from the inner pot.
- Place the bread on a wire rack and allow it to cool.
*About the kneader blade
- When the kneader blade sticks to the inner pot, fill the inner pot with warm water and let the kneader blade soak for a short while before removing it. Do not immerse the inner pot.
- Occasionally, the kneader blade remains in the bottom of the loaf. If this should occur, allow the loaf to cool then remove the kneader blade and clean.
- Do not use anything to clean the kneader blade that will scratch its surface.
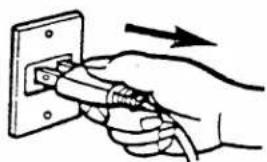
11. Unplug the unit
- Holding the plug, not the cord, unplug the machine from the outlet.
- Clean as directed on page 4.
C. BAKE Settings-Delayed Finish
●The Delayed Finish feature can be used to delay the finish of BASIC, WHOLE WHEAT, FRENCH, and SWEET BAKE settings up to 13 hours.
- This feature cannot be used with the WHOLE WHEAT BAKE (RAPID) nor with the DOUGH settings.
- The minimum amount of time that can be programmed for the Delayed Finish feature depends on the length of the setting's BAKE time. Typically, the minimum is 10 to 15 minutes longer than the setting's actual BAKE time.
| EXAMPLELet's say that it is 9 pm and you wish to have a loaf of White Bread to be finished by 6:30 am. The White Bread is a BASIC BAKE setting recipe. It is nine hours, 30 minutes between 9 pm and 6:30 am. You will need to select BASIC BAKE, and a Delayed Finish for 9 hours, 30 minutes. | ||
| To program the machine for Delayed Finish :Follow steps 1 through 7 on pages 10~11 for selecting and setting BASIC BAKE. | ||
8.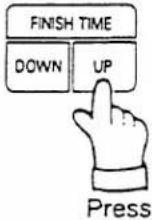 | 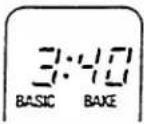 Press once Press once | Enter 9:30 in the display window by pressing either the "UP" or "DOWN" pads.If you press the "UP" pad, 3:40 will appear in the display window. If you press "DOWN", 13:00 will appear.Delayed Finish can be set in 10-minute increments. |
9. | 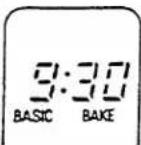 | If you press and "hold" one of the timer pads, the time will move quickly forward or backward.Use the "DOWN" pad if you wish to program time for several hours or if you already have advanced past the time you wanted. |
10. |  Ligh Ligh | Press the START pad.The timer indicator light will light up and the amount of time remaining will appear in the display window. |
- If you make a mistake setting the Delayed Finish, press the RESET pad for two seconds. This will clear the display window and you can begin again.
Note: The order in which the ingredients are added to the inner pot is critical when using the Delayed Finish feature. For best results the water and yeast must not touch.
● Liquids are added first.
●Shortening, butter, or margarine are added next.
●Dry ingredients such as salt, sugar, flour are added.
●Yeast is added last and should be at the very top, away from the water.
- Recipes using eggs, fresh milk, sour cream, cheese, or other foods that could spoil are not recommended for the Delayed Finish feature.
Follow the same directions and precautions for removing the inner pot, turning the machine off, etc, as for any immediate BAKE setting.
See pages 12 for more detailed information.
Tip: Pile dry ingredients along one wall of the inner pot with yeast on top. This keeps the yeast farthest away from the liquid ingredients and helps to delay activation.
D. DOUGH Settings
Four DOUGH settings are provided for creating a variety of baked goods. Please consult the cookbook for selecting the right DOUGH setting for the recipe.
To set the DOUGH settings : Follow steps 1 through 7 on pages 10\~11.
8. Press the START pad.
- The display window shows the setting plus the word DOUGH will be in the lower left side of the display window.
●The BASIC, FRENCH, and SWEET settings begin with a KNEAD period. The word "KNEAD" will appear in the display window. - The WHOLE WHEAT DOUGH setting begins with a REST period. The word "REST" will appear in the display window. No kneading occurs during this "REST" period.
●The buzzer will sound five times when the dough is finished.

9. Remove the dough.
- Open the lid, remove the inner pot by lifting it straight up and remove the dough.
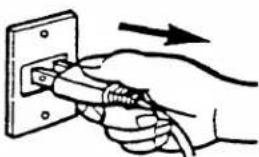
10. Turn the machine off and unplug the cord.
● Unplug the machine by holding the plug, not the cord.
- Clean as directed on page 4.
TROUBLESHOOTING GUIDE LOAVES
| Problem | Causes |
| Not Baked In Center | Can happen with recipes calling for moist ingredients such as applesauce and yogurt in fruit bread recipes.Reduce the liquids by 1 tablespoon.Humidity may be high. Add 1 to 2 tablespoons flour. |
| Collapse | Ingredient amounts were out of proportion. Salt omitted.Too much dough was made. Exceeding the capacity of the inner pot may cause an underbaked, gummy center and a collapsed top. When dough rises to the top of the machine, it interferes with circulation needed for proper baking and cooling.Warm weather, high humidity or overheated liquids all speed up yeast action, which may cause the dough to rise too fast and the bread to collapse before baking begins. |
| Overrising | Usually indicates that ingredient quantities are out of proportion. Too much yeast, sugar, flour, liquid or a combination may result in exceeding the capacity of the inner pot. |
| Open, Coarse or Holey Texture | Excess water or yeast was used, or yeast action was accelerated by hot, humid weather or overheated ingredients. Salt omitted. |
| Heavy, Dence Texture | Not enough water or too much flour was used.Not enough sugar or yeast was used.Recipe was imbalanced by an excess of whole grain flours, whole grains, dried fruits or other added ingredients. |
| Short Losf, Unsatisfactory Rising | Not enough sugar was used.Delayed Finish feature was used and ingredients were placed in inner pot in a way that salt or water were in contact with the yeast for a prolonged period.Short, heavier loaves are to be expected when whole grains or whole grain flours are used or when all-purpose flour is substituted.Incorrect amount of yeast was used, or yeast was not fresh. |
| No rise | Old or improperly stored yeast was used. Yeast was omitted or mismeasured.Delayed Finish feature was used and ingredients were placed in the pan incorrectly. |
| Muchroom-Shaped Top | Too much yeast may have been used. Be sure yeast was measured with a teaspoon, not a tablespoon.Added ingredients that contain sugar, such as sweetened applesause or raisins. |
| Sunken | Loaf with top or sides that have caved in could be caused by too much moisture. Reduce the liquids by 2 tablespoons the next time you make the recipe.If recipes call for fruit or vegetables, drain well and pat them dry. |
TROUBLESHOOTING GUIDE BREADMAKER
| Problem | Solution |
| Flour spilled out of inner pot into inner case | Wipe out inner case with a clean cloth. Use care when cleaning around heating element.For BAKE settings, use a maximum of 31⁄4 cups flour at a time.When using premixed bread machine bread mixes, use a maximum of 21⁄4 cups of mix.For DOUGH settings, use a maximum of 41⁄2 cups flour. |
| Bread not baking properly | Check to see that the kneader blade mounting shaft rotates easily. If the rotation of the shaft is binding or tight, please contact SFS at (800) 421-5013 for service information. |
"WAIT" appears in display window 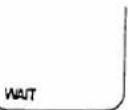 | Allow the bread maker to cool. The word "WAIT" will disappesr from the display window. Press the RESET pad and then the START pad. |
"ALERT" appears in the display window  | The power has been interrupted for less than 10 minutes. Although operation resumes automatically as soon as the power is restored, the bread may not come out as well as it normally would."ALERT"will remain in the display window throughout the operation. |
| Display window is empty | Indicates that power was interrupted for longer then 10 minutes. Remove the ingredients from the inner pot and start over. |
COMMONLY ASKED QUESTIONS
Can I use my favorite bread recipes in my breadmaker?
You can if you are willing to experiment. Unfortunately, there is no tried-and-ture formula for doing this because bread recipes vary. The recipe needs to be scaled down to fit the flour restrictions of your breadmaker (3¼ cups for BAKE settings, 4½ cups for DOUGH settings). You will have to figure amounts mathematically.(For example, if a favorite recipe uses 5½ to 6 cups or flour, because your breadmaker has a maximum amount of 3¼ cups of flour for baked recipes, you could begin by using 3 cups of flour and one-half of the amount of remaining ingredients.) Use the same order of adding ingredients to the inner pot as recommended in our recipes.
What has happened to the kneader blade?
It may have been baked into the bottom of the loaf of bread. See step 10 on page 12 for how to remove the kneader blade from the loaf.
Why is bread flour used in most of the recipes?
Bread flour is high in protein. When kneaded the protein produces gluten that gives bread a strong structure more tolerant or variations in the recipe, weather conditions, etc., than all-purpose flour.
What is gluten?
See page 8 for a complete explanation.
Can I use all-purpose flour in my breadmaker?
You may use all-purpose flour, however, the bread will be lower in volume and the texture will be slightly different than bread made with bread flour. Because the bread structure is less strong than bread flour is used, breads made with all-purpose flour aren't as tolerant to additional ingredients such as fruit, grains or vegetables.
Can I use self-rising flour in my breadmaker?
No, the leavening in self-rising flour interferes with the yeast, and the result will not be satisfactory.
Can I add gluten to regular (all-purpose) flour to make it more like bread flour?
You can experiment if you like. Be sure to purchase powdered vital gluten, available at health-food stores, and follow the package directions. Generally, 1 teaspoon of gluten is added per 1 cup of all-purpose flour. For 1 cup of whole grain flours (such as whole wheat or rye), 1 1/2 teaspoons of gluten is generally added.
How does humid weather affect breads baked in breadmakers?
Flour absorbs and loses moisture over time. Therefore, humidity can affect the use of flour in recipes. Humid climates may require a slightly higher measurement of flour because of the moisture the flour itself has absorbed. In humid weather, try adding 1 extra tablespoon for each cup of flour. In areas of low humidity, try removing 1 tablespoon from each cup of flour.
Specifications
| Power source | 120V AC |
| Power consumption | Heater 600W |
| Outer dimensions (W × D × H) | 11 3/8 " × 9 3/8 " × 13 3/8 "(296 × 245 × 355mm) |
| Net weight | 14.4lbs (6.5kg) |
| Accessory | Cookbook |
- IMPORTANT SAFEGUARDS
- SAVE THESE INSTRUCTIONS
- NOTE
- IMPORTANT SAFETY TIPS FROM SANYO
- BEFORE USE
- WHERE TO USE
- WHILE IN USE
- AFTER USE
- REMEMBER
- TABLE OF CONTENTS
- WELCOME TO THE SANYO BREAD FACTORY PLUS
- MAJOR FEATURES OF YOUR SANYO BREAD FACTORY PLUS
- PROPER CARE AND CLEANING OF THE BREAD FACTORY PLUS
- NAMES AND FUNCTIONS OF PARTS
- YOUR BREAD MAKER ALSO COMES WITH
- CONTROL PANEL NAMES AND OPERATION
- HOW YOUR BREADMAKER WORKS
- BASIC, FRENCH, SWEET SETTINGS
- WHOLE WHEAT SETTINGS
- KNEAD
- REST
- RISE
- PUNCH
- SHAPE
- FINAL RISE
- BAKE
- COOLING
- BASIC BREAD AND DOUGH INGREDIENTS
- FLOURS
- YEAST
- SALT
- SUGAR
- FAT
- MILK
- GLUTEN
- HOW TO OPERATE YOUR BREAD FACTORY PLUS
- GETTING STARTED-ALL SETTINGS
- BAKE SETTINGS - IMMEDIATE START (PAGES 12)
- BAKE SETTINGS - DELAYED FINISH (PAGES 13 AND 14)
- DOUGH SETTINGS (PAGE 14)
- GETTING STARTED
- BAKE SETTINGS-IMMEDIATE START
- PRESS THE START PAD
- REMOVE THE INNER POT
- REMOVE THE BREAD
- UNPLUG THE UNIT
- BAKE SETTINGS-DELAYED FINISH
- DOUGH SETTINGS
- REMOVE THE DOUGH
- TURN THE MACHINE OFF AND UNPLUG THE CORD
- COMMONLY ASKED QUESTIONS
Marque : SANYO
Modèle : SBM-15
Catégorie : Machine à pain