
SBM-10 - Machine à pain SANYO - Notice d'utilisation et mode d'emploi gratuit
Retrouvez gratuitement la notice de l'appareil SBM-10 SANYO au format PDF.


| Type de produit | Machine à pain |
| Marque | Sanyo |
| Modèle | SBM-10 |
| Dimensions (L x P x H) | 30 cm x 25 cm x 35 cm |
| Poids | 5 kg |
| Alimentation | 220-240 V, 50 Hz, 600 W |
| Capacité du pain | Jusqu'à 1 kg |
| Fonctions principales | Pétrissage, levée, cuisson automatique |
| Programmes | Pain blanc, complet, rapide, pâte à pizza, confiture |
| Couleur de la croûte | Clair, moyen, foncé |
| Minuterie | Programmable jusqu'à 13 heures |
| Maintien au chaud | Jusqu'à 1 heure après cuisson |
| Matériau de la cuve | Antiadhésif |
| Entretien et nettoyage | Nettoyer la cuve et le pétrisseur à l'eau tiède savonneuse ; essuyer le boîtier avec un chiffon humide |
| Sécurité | Arrêt automatique en cas de surchauffe, protection thermique |
| Pièces détachées et réparabilité | Cuve et pétrisseur remplaçables |
| Informations générales | Notice d'utilisation disponible en téléchargement gratuit |
FOIRE AUX QUESTIONS - SBM-10 SANYO
Questions des utilisateurs sur SBM-10 SANYO
0 question sur cet appareil. Repondez a celles que vous connaissez ou posez la votre.
Poser une nouvelle question sur cet appareil
Téléchargez la notice de votre Machine à pain au format PDF gratuitement ! Retrouvez votre notice SBM-10 - SANYO et reprennez votre appareil électronique en main. Sur cette page sont publiés tous les documents nécessaires à l'utilisation de votre appareil SBM-10 de la marque SANYO.
MODE D'EMPLOI SBM-10 SANYO
SANYO
Instruction Manual
AUTOMATIC BREAD MAKER
SBM 10

IMPORTANT SAFEGUARDS
When using electrical appliances, basic safety precautions should always be followed including the following:
- Read all instructions
- Do not touch hot surfaces. Use handles or knobs.
- To protect against electrical shock do not immerse cord, plugs or bread maker in water or other liquid.
- Close supervision is necessary when any appliance is used by or near children.
- Unplug from outlet when not in use and before cleaning. Allow to cool before putting on or taking off parts.
- Do not operate any appliance with a damaged cord or plug or after the appliance malfunctions, or has been damaged in any manner. Return appliance to the nearest authorized service facility for examination, repair or adjustment.
- The use of accesory attachments not recommended by the appliance manufacturer may cause injuries.
- Do not use outdoors.
- Do not let cord hang over edge of table or counter or touch hot surfaces.
- Do not place on or near a hot gas or electric burner or in a heated oven.
- To disconnect, turn any control to "off", then remove plug from wall outlet.
- Do not use bread maker for storage purposes nor insert any utensils in the automatic bread maker as they may create a fire or electric shock.
- A fire may occur if the automatic bread maker is covered or touching flammable material, including curtains, draperies, walls, and the like when in operation.
- Do not clean with metal scouring pads. Pieces can break off the pad and touch electrical parts involving a risk of electric shock.
- Do not use appliance for other than intended use.
SAVE THESE INSTRUCTIONS
Note:
A. A short power supply cord is provided to reduce the risk resulting from becoming entangled in or tripping over a longer cord.
B. Extension cords are available and may be used if care is exercised in their use.
C. When an extension cord is used, (1) the marked electrical rating of the cord set or extension cord should be at least as great as the electrical rating of the appliance and (2) the longer cord should be arranged so that it will not drape over the countertop or tabletop where it can be pulled on by children or tripped over unintentionally.
D. This product is designed for household use only.
BREAD MAKER FEATURES
Just add the ingredients and press the Start pad
Every step of the bread making process from kneading and rising through baking is performed automatically in approximately 3 hours ("BREAD" setting).
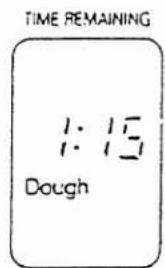
Dough setting (all processes up to rising) are completed in approximately one and a quarter hours.
1 Timer function
- To set the desired baking completion time, calculate the number of hours and minutes between the present and the desired completion time and enter this number. (The digital timer shows the difference between the two times.)
- The timer can be set for any length of time between 3 hours 10 minutes and 13 hours. (For "BREAD" baking, only.)
2 Glass window
- The glass window is provided to allow clear viewing at every stage of the bread making process, without opening the oven lid.
3 Additional ingredients
- This convenient function is when you want to bake various types of bread. The buzzer sounds eight times to indicate the best time to add ingredients such as raisins, pumpkin, oatmeal, nuts etc to the dough. (The buzzer sounds after approximately 23 minutes).
4 Air duct
- After baking is completed, cool air is drawn into the unit automatically in order to cool the bread. So even if you forget to remove your bread after baking, it will be kept soft and fresh thanks to the air duct operation.
5 ON/OFF button
- Controls the power supply to the oven.
BEFORE YOU BEGIN BAKING
The ingredients you will need
:Flour: Bread is usually made from hard wheat flour, which is high in protein. When the flour is mixed with water, gluten is formed and air is trapped. This is what allows the bread to rise well.
:Dry yeast: This causes the bread to rise. Use active dry yeast (instant) requiring no preliminary fermentation.
:Salt: Salt controls the action of the yeast. Salt adds to and enhances the flavor of the bread while producing a firm dough.
:Sugar: Sugar helps the fermentation process of the yeast. Sugar makes the bread sweet and the crust brown.
:Fat: Fat adds flavor and aroma. Shortening, Butter, Margarine, etc. are used to keep the dough soft and fresh. They also help the dough leaven properly.
:Milk: Milk increases the nutritional value of the bread. Milk enhances the flavor and helps create a soft and smooth crust.
:Water:
BAKING PROCESS (When the "BREAD" setting is used)
1 First kneading Press the "START" pad to begin the first kneading operation.
2 Rest When kneading stops, the dough is left to rest.
3 Second kneading The dough is kneaded a second time.
4 First rising The dough is left to rise.
5 Shaping The dough is shaped in to a smooth, round ball.
6 Final rising The dough is left to rise again, and the shape of the bread is formed for baking.
7 Baking The buzzer sounds five times when baking is completed.
8 Finishing Air is drawn in through the air duct in order to cool the bread.
NAMES AND FUNCTIONS OF PARTS

Accessories
Measuring Spoon
These spoons are used to measure yeast, salt, sugar, etc.
Tablespoon
teaspoon

Measuring Cup
This cup is used to measure water, flour, etc.

CONTROL PANEL NAMES AND OPERATION
L
Be sure to press the pad in question until a beep is heard
 | When this button is pressed, the power is switched on and the lamp lights up. |
TIME REMAININGKnead Rise Bake Cooling Dough Bread Wait Dough Bread Wait | An indicator for each step of the process (kneading, rising, baking, and finishing) is shown in the display window. |
| The time until completion of baking is displayed in 1 minute increments. | |
| "DOUGH" is displayed for dough-makinhjg and "BREAD" is displayed for bread-making. | |
| When the inside of the unit reaches 108°F (42°C), the buzzer sounds three times and the indication "Wait" is displayed.Wait for the unit to become cool and then press the "START" pad. (This may often occur when the home bakery is used continuously.) | |
| TIMER ENTER OPERATING | The corresponding lamp lights up when the time is being set, or during operation. |
| FINISH TIMEDOWN UP | Press to program the timer.DOWN ...... Displayed time will move backwards in 10 minute increments.UP ...... Displayed time will advance in 10 minute increments.If the "TIMER" pad is kept pressed down, the time setting will move at high speed in forward or reverse. |
| BREAD/DOUGH | Press to select either the "BREAD" setting or the "DOUGH" setting. Note the desired setting in the display window. |
| START | Press to start operation or begin timer countdown for delayed baking or dough making. |
| RESET | Press to cancel a mistake, to stop operation, or to cancel a timer setting. If operation has begun, press the "RESET" pad slightly longer to cancel. |
TIME REMAINING
Knead Rise Bake Cooling
Dough
Bread
Wait
TIMER ENTER OPERATING
FINISH TIME
DOWN UP
BREAD/DOUGH
START
RESET
OPERATING INSTRUCTIONS
When baking bread using the "BREAD" setting
| Ingredients | (maximum quantity) |
| Bread flour | 2 cups |
| Sugar | 2 Tablespoons |
| Salt | 1/2 teaspoon |
| Shortening | 1 Tablespoon |
| Milk | 1 Tablespoon |
| Lukewarm water | 3/4 cup |
| Dry yeast | 1 teaspoon |
Measure each ingredient accurately. Use the measuring spoon provided.

Pre-mixed flour that includes all the necessary ingredients is available in pre-packaged from. The maximum quantity of this pre-mixed flour to be used is 2 cups.
- Remove the inner pot from the main unit
• Take out the inner pot to add the ingredients.
Remove the inner pot by lifting it straight up using the handle.
- Mount the kneader blade and the dough hook onto the inner pot
Mount the kneader blade to the kneader blade mounting shaft (See illustration)
"A") Insert the dough hook and turn it clockwise. (See illustration "B") Check to make sure it is securely locked in place.
to make sure it is securely locked in place.
c Baking will not take place unless the kneader blade and the dough hook are mounted firmly.
mounted firmly.
Be sure there are no crumbs around the kneader blade mounting shaft.
Illustration "A"
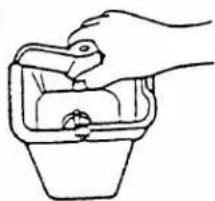
Illustration "B"

- Put the ingredients into the inner pot in the correct order
- Put in the ingredients in the following order.
(1) Water
(2) Bread flour, Sugar, Milk, Salt, Shortening
(3) Dry yeast
• See page 11 for order of ingredients when using timer setting.
■ When baking a loaf in 3 hours
- Be careful to add yeast directly after water. When the timer setting is used, see page 11 for correct ingredients.
4 Replace the inner pot into the main unit
- Hold the handle down and insert the inner pot so that the dough hook is placed on the right side.
Unless the inner pot is securely placed inside the bread maker, the bread will not be baked to perfection.
- Wipe off any moisture from the outer side of the inner pot before placing it in the bread maker.
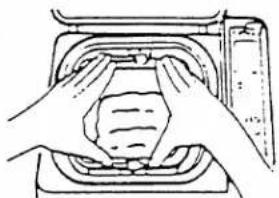
5 Close the outer lid
- Make sure the outer lid clicks when closed.
Unless the outer lid is closed correctly, the operation won't start when the "START" pad is pressed. (The buzzer sounds three times.)

6 Plug in
- Insert the plug into the outlet.
- Press the "ON/OFF" button.
- Be sure to take hold of the plug and insert it directly into the outlet.
When you press the "ON/OFF" button, the power lamp lights up.

7 Start (when baking is to begin immediately)
See page 11 when the timer setting is be used to.
- Press the "START" pad:
- The time remaining until baking completion is displayed in 1-minute increments.
- After operation has started the buzzer will sound eight times successively, add any additional ingredients to be mixed into the bread, such as raisins, nuts cheese, etc...
(The buzzer sounds after approx. 23 minutes.)
- Open the outer lid and quickly add the raisins, etc. While the outer lid is open, the kneading operation stops. Close the outer lid immediately so that the kneabing process will continue. Internal temperature of the unit is maintained.
. The buzzer will sound five times when baking is completed.

TIME REMAINING

8 Remove the inner pot
- After the buzzer sounds five times, press the "ON/OFF" button, open the lid and promptly remove the inner pot.
- Be sure to use a Hot pad when removing the inner pot, as the container is extremely hot.
- When cooling is completed, the buzzer sounds once and all the displays on the panel go out.
- If you don't press the "RESET" pad and remove the bread after the buzzer sounds five times in succession, air is delivered for 15 minutes to cool the bread.
A slight sound is heard during cooling. This is not a malfunction but is caused by air entering the unit to cool it down.
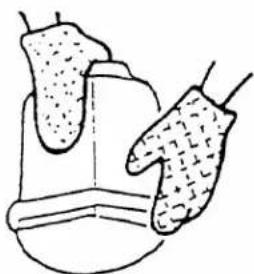
9 Remove the bread
- Turn the dough hook counterclockwise and remove it.
- Turn the inner pot upside down and shake it several times to remove the bread.
- Be sure to use a Hot pad when removing the bread from the inner pot.
- Place the bread on a wire rack and allow it to cool.
■ About the kneader blade
When the kneader blade sticks to the inner pot, put some lukewarm water into the container and let the kneader blade soak for a short while before removing it.
Dew may form on the bread surface after cooling, depending on the room temperature.
Occasionally the kneader blade will bake into the bottom of the loaf. If this should occur, simply remove the kneader blade and clean.
10 Unplug the unit
- Press the "ON/OFF" button and check to see if the power lamp is off.
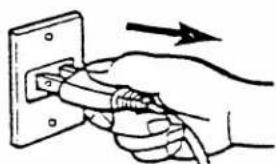
- Pull the plug from the outlet. - When unplugging the unit, make sure to take hold of the plug and not the cord.
WHEN THE FOLLOWING HAPPENS
L
If the "High internal temperature" indication is displayed, the internal temperature of the bread maker is very high (108°F [42°C] or higher).
(1) Wait until the inside of the unit has cooled and the display goes out. (When the bread maker is used continuously, high internal temperatures may often occur.)
(2) When the display goes out, press the "RESET" pad and then press the "START" pad again.
■ Quantity of flour to be used when baking a loaf of bread. Is a max. of 2 cups bread flour.
If you are using a pre-packaged mix, the maximum quantity is 2 cups. If you purchase a large quantity of pre-mixed flour, carefully measure out 2 cups using a standard dry measuring cup.
(Example)
If you buy a prepakaged flour mix (measuring 2½ cups), measure out ½ cup. It is important that you use exactly 1 teaspoon of dry yeast, unless the recipe states otherwise. When using the "DOUGH" setting the flour quantity should not exceed 3½ cups.
TIME REMAINING
Wait
HOW TO USE THE TIMER SETTING FOR DELAYED BAKING
■ The timer can be set to any length of time from 3 hours 10 minutes up to 13 hours.
The timer setting cannot be used for the "DOUGH" setting.
To set the baking finish time, calculate the number of hours and minutes between the present time and the desired baking finish time, then enter this number.
| (Example)Let's say it's 9:00 PM and you want baking to be completed at 6:30 AM. There are 9 hours and 30 minutes between the present time and the baking finish time. Therefore, you would enter 9 hours and 30 minutes on the timer. | |||
 |  |  | *The timer can be set to any length of time from 3 hours 10 minutes and 13 hours, in 10 minute increments.*If you press the "UP" pad first, 3:10 will be displayed; while if the "DOWN" pad is pressed first, 13:00 will be shown. |
| • Press | |||
 | 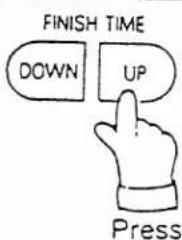 |  | *If you keep pressing the "TIMER" pad, the time indication will move quickly forward or backward.*Use the "DOWN" pad to move back the time if advanced too far, or if you want to quickly program time for several hours. |
| • Keep pressing to move the display at high speed in forward or reverse. | |||
| [WZZA] |  |  | *The amount of time remaining until baking is complete will be displayed in 1 minute increments. |
| Lights up TIMER ENTER | |||
When you make a mistake setting the timer.Press the "RESET" pad and reset the correct time. | |||
When you make a mistake setting the timer. - Press the "RESET" pad and reset the correct time.
Adding ingredients to the inner pot in the correct order is critical to delayed baking. Liquid is added first, then dry ingredients, fat and yeast last. See page 5 of "THE HOME BAXERY COOK BOOK" for more information.
DOUGH SETTING
■ How to make dough for rolls.
(Do not use pre-packaged loaf mix, as the ingredients differ.)
• Steps 1 to 6 are the same as on page 7 \~ 8
| Ingredients (for 10 rolls) Bread flour 2 cups Sugar 2 Tablespoons Salt 1/4 teaspoon Buter 1/4 cup Milk 1 Tablespoon | Lukewarm water — 1 egg yolk plus warm water to measure 3/4 cup Dry yeast 1 teaspoon Melted butter or margarine for brushing onto rolls prior to baking. |
Set the baking course
- Use the "SETTING" pad to select the "DOUGH" setting.
: When this setting is used, delayed timer setting Cannot be used.
Start
- Press the "START" pad.
- All processes from kneading to rising are completed.
- The amount of time remaining until kneading completion is displayed in 1 minute increments.
Just as with the "BREAD" setting, the buzzer sounds eight times in the "DOUGH" setting 5 minutes before the second kneading operation is completed.
Open the outer lid and add raisins, nuts, etc., if desired.
Kneading stops while the lid is open.
Be sure to close the lid promptly in order to maintain the internal temperature.
Remove the dough
- Open the lid and remove the dough when the buzzer stops.
The buzzer sounds five times when the dough is finished.
Unplug the unit
- Press the "ON/OFF" button.
- Remove the power plug from the outlet.
The power lamp goes out when the "ON/OFF" button is pressed.
When unplugging the unit, be sure to take hold of the plug and not the cord.


* Please see page of the "HOME BAKERY COOK BOOK" for information regarding procedures from final dough rising to completion of baking.
IMPORTANT SAFETY TIPS
* Be sure to follow the instructions in order to use the home bakery properly.
BEFORE USE
□ Be sure to plug the unit directly into the outlet.
□ Remove foreign matter.
- Remove all foreign matter from the inner pot before use.
WHERE TO USE
- Do not use the Bread Maker on wet or unstable surfaces, on cushions, near burners, or in areas where cooking grease or water may splatter onto it.
□ Take special care when infants and children are nearby.
- Keep the unit out of reach of infants and children since the unit is hot. If any buttons are accidentally touched the baking operation may stop.
WHILE IN USE
☐ The temperature is very high during operation.
- Be careful to keep your face and hands away from the unit.
- Place the unit at least 2 inches away from any walls.
□ Do not cover the unit.
- If the unit is covered with towels, steam won't be able to escape. This could cause the shape and color of the lid to change.
AFTER USE
☐ Do not pour water into the unit or submerge the unit in water.
☐ Handle the power cord with care.
- Don't bend or pull the cord. Always take hold of the plug when unplugging the unit.
☐ Do not use the unit for any purposes other than making bread.
☐ Do not remove the inner pot or insert your hand during operation.
• This could lead to bread malfunction or accidents.
- When serving just-baked, be sure to press the "RESET" pad and then remove the inner pot from the unit.
□ When cooled, keep the inside of the unit clean.
- Remove any flour or bread crumbs and all foreign matter from the inside of the unit.
□ Do not obstruct the air intake.
- There is an air intake on the bottom of the unit. Take care not to cover or obstruct it.
Do not put a larger quantity of ingredients into the inner pot than required.
- By doing so, the bread will not be as soft or well-raised and the top crust may stick to the inside of the lid.
- The maximum amount of bread flour to be used is 2 cups. The maximum amount of premixed flour is 2 cups.
□ Handle the inner pot with care.
- Do not turn or shake the inner pot while taking it out. Pull it straight out. If the inner pot is flawed, the temperature sensor won't work properly.
PROPER CARE AND CLEANING
Cleaning the Bread Maker
★ Unplug the power cord and allow the body to cool completely.
★ Use only a mild kitchen detergent to clean. Benzine, Cleansers, Thinners, Scrubbing brushes and Chemical cleaners will damage the unit's surfaces.
□ Body and outer lid (main unit)
- Remove all bread crumbs and other foreign matter by wiping off with a slightly damp cloth.
□ Temperature sensor
- Wipe gently in order to avoid bending the sensor.
□ Kneader blade hole
- If the hole in the kneader blade is clogged, clean it out with a soft bristle brush.
☐ Inner pot, kneader blade and dough hook
- Remove each of these from the unit body and wash with a sponge.
★ If it is difficult to remove the kneader blade from the inner container, soak the container in lukewarm water and then remove the blade.
■ Care of the fluorine coated surface on the inner pot and kneader blade.
• In order to avoid damaging the fluorine coated surface.
Wash after each use.
Do not use scrubbing brushes or metal utensils.
A fluorine coated surface may change appearance after prolonged use. This is caused by moisture and steam and has no effect on the use or hygiene of the bread maker.
Storing the bread maker
- Make sure the body has cooled down completely, the unit has been cleaned, and all moisture has been completely removed before storing.
BREAD MAKING — QUESTIONS AND ANSWERS
Q. What is gluten?
A. Gluten is a sticky layer of combined proteins that coats the dough. It is formed by adding water to flour and kneading it.
Q. Why does fresh baked bread sometime smell?
A. This may happen if old flour or bad water is used. Therefore, make sure to use fresh ingredients and clean water.
Q. What is the hook attached to the side of the inner pot used for?
A. This is the dough hook. It twists the dough for efficient kneading, promoting the formation of gluten.
Q. Why is bread flour, used for bread making?
A. There are 3 main kinds of flour, for bread making; bread flour, all purpose flour, and cake flour. The difference between these is the amount of protein they contain. In order to make a well-raised bread, a layer of gluten able to hold the carbon dioxide generated by fermentation is necessary. Therefore, high protein bread flour is most suitable.
Q. What is the difference between the first and second dough rising stages?
A. The first dough rising lets the dough rise until it is about twice the size it was while being kneaded. Carbon dioxide gas is let out of the dough and the dough is left to rest before being shaped. The purpose of the second dough rising is to sofeten the gluten. Letting the dough rise twice results in a softer and smoother dough texture.
Q. Why is an air duct necessary?
A. Without an air duct, the bread would have to be removed from the inner container immediately after baking is completed in order to cool it. If the bread is not cooled, it absorbs moisture and shrinks in size. The air duct allows heat and steam to escape automatically, keeping the bread soft, well-raised and full of flavor, even if you forget to take it out of the home bakery.
Q. What has happen to the kneader blade at the end of the baking cycle?
A. It may have baked into the bottom of the loaf. Simply remove with kitchen tongs or a hot pad.
Specifications
| Power source | 120V AC |
| Power consumption | Heater 600W |
| Outer dimensions (W×D×H) | 113/8 × 92/8 × 133/8 (296 × 245 × 355 mm) |
| Net weight | 15lbs, 15ozs (7.2 kg) |
| Accessories | Measuring Spoon · Measuring cup |
PRE-PACKAGED BREAD MIX
For your convenience, a pre-measured bread mix especially formulated for the Sanyo Bread Maker is now available.
It's a delicious way to help ensure a perfect loaf of freshly baked bread.
Please use the order form enclosed.
If you require further information, please write to the following address:
Food Masters, Inc.
9 East 45th Street
Suite 401
New York, New York 10017
TEL: 1-800-447-9423
LIMITED WARRANTY
Sanyo takes pride in its products and believes they are manufactured to the highest possible standards. Consequently, Sanyo warrants to the original consumer its Automatic Bread Maker to be free from defects in material and workmanship for a period of one (1) year from the original purchase date. Sanyo will, at its option, repair any unit covered by this warranty without cost to the consumer for either parts or labor. Sanyo will require an original sales slip or bill of sale before instituting any repairs under this warranty.
Sanyo specifically excludes from this warranty any non-electric/mechanical attachments and accessories and disposable parts. For example, these items include measuring cup, measuring spoon, inner pot, outside case, cord and plug. Also, Sanyo assumes no liability and does not guarantee or warrant any repairs and/or replacement parts not supplied or performed by Sanyo or any authorized service station: any 50/60 Hz or 60/50 Hz conversions: damage caused by or failure to follow the owner's manual as to adjustments and/or maintenance abuse, misuse, neglect, accident, fire, flood, or any other acts of God are excluded from this warranty.
This warranty is void and of no effect if any serial numbers on the Sanyo product are altered, replaced, defaced or missing. This Sanyo warranty is only for Sanyo products purchased and used in the continental United States.
In those cases where only parts are warranted, the consumer will be responsible for the labor charges. In addition, transportation costs for all carry in items are the sole responsibility of the consumer. No consumer telephone claims will be allowed.
This is the entire Sanyo warranty and it may not be changed or amended by any person, agency, distributor, dealer, or company with prior written authority from Sanyo.
This warranty gives the consumer specific legal rights but he may have other legal rights which may vary from state to state. Sanyo assumes no liability and indeed specifically denies responsibility for any consequential damages beyond the repair or replacement of its Automatic Break Maker.
Should the consumer need repairs or assistance in locating his nearest Authorized Service Station, he may call or write to SFS Corp. (Sanyo Fisher Service Corporation) as follows.
East
SFS Corporation
210 Riser Rd.
Little Ferry. N.J. 07643
(201) 641-3000
Central
SFS Corporation
600 Sumpreme Dr.
Bensenville, ILL 60106
(708) 350-1505
South
SFS Corporation
1790 Corporate Dr.
Suite 340 Norcross. 30093
(404) 925-8900
West:
SFS Corporation
1200 W. Artesia Blvd.
Compton, Calif. 90220
(213) 537-5830
SANYO
200 Riser Road, Little Ferry.
NJ076-3
- SANYO
- IMPORTANT SAFEGUARDS
- SAVE THESE INSTRUCTIONS
- NOTE
- BREAD MAKER FEATURES
- JUST ADD THE INGREDIENTS AND PRESS THE START PAD
- 1 TIMER FUNCTION
- 2 GLASS WINDOW
- 3 ADDITIONAL INGREDIENTS
- 4 AIR DUCT
- 5 ON/OFF BUTTON
- BEFORE YOU BEGIN BAKING
- THE INGREDIENTS YOU WILL NEED
- BAKING PROCESS (WHEN THE "BREAD" SETTING IS USED)
- NAMES AND FUNCTIONS OF PARTS
- ACCESSORIES
- CONTROL PANEL NAMES AND OPERATION
- OPERATING INSTRUCTIONS
- WHEN BAKING BREAD USING THE "BREAD" SETTING
- WHEN BAKING A LOAF IN 3 HOURS
- 4 REPLACE THE INNER POT INTO THE MAIN UNIT
- 5 CLOSE THE OUTER LID
- 6 PLUG IN
- 7 START (WHEN BAKING IS TO BEGIN IMMEDIATELY)
- 8 REMOVE THE INNER POT
- 9 REMOVE THE BREAD
- ABOUT THE KNEADER BLADE
- 10 UNPLUG THE UNIT
- WHEN THE FOLLOWING HAPPENS
- (EXAMPLE)
- HOW TO USE THE TIMER SETTING FOR DELAYED BAKING
- DOUGH SETTING
- HOW TO MAKE DOUGH FOR ROLLS
- SET THE BAKING COURSE
- START
- REMOVE THE DOUGH
- UNPLUG THE UNIT
- IMPORTANT SAFETY TIPS
- BEFORE USE
- WHERE TO USE
- WHILE IN USE
- AFTER USE
- PROPER CARE AND CLEANING
- CLEANING THE BREAD MAKER
- BREAD MAKING — QUESTIONS AND ANSWERS
- PRE-PACKAGED BREAD MIX
- LIMITED WARRANTY
Marque : SANYO
Modèle : SBM-10
Catégorie : Machine à pain