
Montana 8 - Tente COLEMAN - Notice d'utilisation et mode d'emploi gratuit
Retrouvez gratuitement la notice de l'appareil Montana 8 COLEMAN au format PDF.


| Type de produit | Tente de camping familiale |
| Marque | Coleman |
| Modèle | Montana 8 |
| Capacité | 8 personnes |
| Dimensions (montée) | 610 cm x 366 cm x 213 cm (L x l x H) |
| Surface au sol | Environ 22,3 m² |
| Poids | Environ 24 kg |
| Matériau du toit | Polyester enduit de polyuréthane |
| Matériau du sol | Polyéthylène résistant |
| Arceaux | Acier ou fibre de verre |
| Imperméabilité | Toit : 2 000 mm, Sol : 2 000 mm |
| Fonctions principales | Grand espace intérieur, deux pièces séparables, entrée avec auvent |
| Particularités | Ventilation réglable, fenêtres en maille, rangements intégrés, coutures scellées |
| Entretien et nettoyage | Utiliser un chiffon humide et du savon doux ; ne pas laver en machine |
| Stockage | Ranger dans un endroit sec après séchage complet |
| Garantie | Garantie du fabricant d'un an |
| Pièces détachées disponibles | Arceaux de rechange, piquets, haubans |
| Réparabilité | Réparation possible avec kit rustine, coutures à renouveler |
| Accessoires inclus | Sachet de piquets, haubans, manuel d'utilisation |
FOIRE AUX QUESTIONS - Montana 8 COLEMAN
Questions des utilisateurs sur Montana 8 COLEMAN
0 question sur cet appareil. Repondez a celles que vous connaissez ou posez la votre.
Poser une nouvelle question sur cet appareil
Téléchargez la notice de votre Tente au format PDF gratuitement ! Retrouvez votre notice Montana 8 - COLEMAN et reprennez votre appareil électronique en main. Sur cette page sont publiés tous les documents nécessaires à l'utilisation de votre appareil Montana 8 de la marque COLEMAN.
MODE D'EMPLOI Montana 8 COLEMAN
Before you begin
Read all instructions before set up.
- Select a level site clear of rocks, branches, and other hard or sharp objects, to install your tent.
WARNING: Keep clear of overhead power lines.
- Do not set up your tent under trees because of potential lightning strikes or falling tree limbs in inclement weather.
- Secure with all stakes and guylines provided to prevent property damage or personal injury.
- For best results in windy conditions, position narrow end of tent into the wind.
- Enlist the help of at least one other person to assist you when it is time to assemble the tent.
Pole Descriptions
| Pole Pole PoleDescription Qty. Dia. Repair Kit Replacement Kit | ||
| Main Body Pole, black | 2 11mm | 501000539 501000549 |
| Side Body Pole, grey | 2 | 9.5mm 501000540 501000548 |
| Rainfly Pole, black | 1 | 11mm 501000539 501000549 |
| Vertical Door Pole, black,short w/rubber tips | 1 | 6.3mm 501000543 501000545 |
| Door Pole, black,long w/rubber tips | 1 | 6.3mm 501000543 501000545 |
To Set Up Tent
- Unfold tent and spread out on a clean, level surface with the door facing the desired direction. (Fig. 1)
- Assemble all poles by interlocking the shock-corded, sections together.
- Insert grey Side Body Poles through the grey trimmed sleeves on both sides of tent; then insert black Main Body Poles through black trimmed sleeves, in center of tent, forming a "X". Make sure black Main Body Poles overlap the grey Side Body Poles. (Fig. 1)

- Insert end of each black Main Body Poles & grey Side Body Poles into pins. (Fig. 2 & 2A)
- Go to opposite end of each pole and gradually apply pressure to each forming arches. Insert the pin into each pole end at the sides and corners of tent. (Fig. 2 & 2A)
- Attach frame clips along edges of tent to the black Main Body Poles & grey Side Body Poles. (Fig. 2B)
- Stretch tent until taut, then secure metal loops located on both sides and web loops located at four corners of tent with stakes. (Fig. 2C)

Hinged, Rigid Door
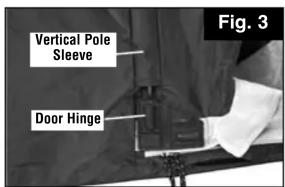
- Assemble Vertical Door Pole (shorter black pole with plastic tips); then insert through zippered vertical pole sleeve on hinged side of door. (Fig. 3)
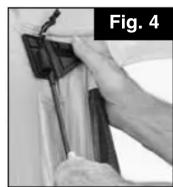
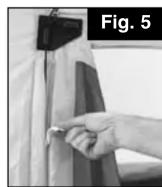
- Insert end of Vertical Door Pole into bottom hinge plate, apply pressure to form a slight bow, then insert other tip of pole into top hinge. Zip up vertical pole sleeve. (Fig. 4 & 5)
- Assemble Door Pole (longer black pole with plastic cap tips); then insert into zippered pole sleeve at top of door. (Fig. 6)
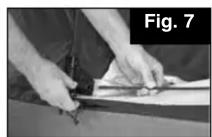
- Insert end of Door Pole into top hinge plate, apply pressure to form a bow, then insert other tip of pole into the bottom hinge. (Fig. 7)
- Zip up pole sleeve to enclose Door Pole. (Fig. 8)


To Attach Rainfly
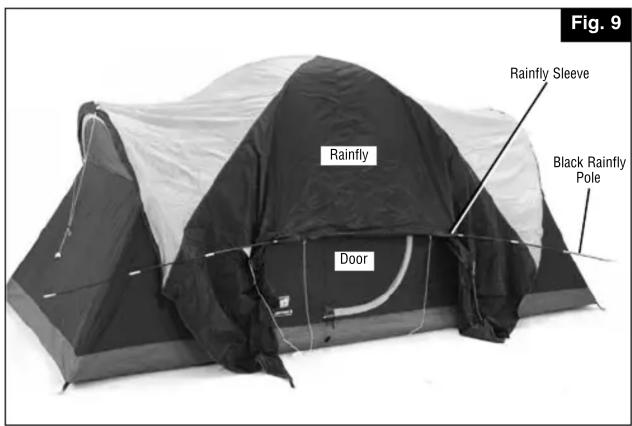
- Insert black Rainfly Pole with through sleeve in underside of Rainfly. (Fig. 9)
- Drape Rainfly over tent with Rainfly Pole centered above front door & the dark blue vestibule flaps located in the front. (Fig 9)
(continued on other side)
To Attach Rainfly continued
- Insert end of each black Rainfly Pole into pin on either side of front door. (Fig. 10 & 10A)
- Go to opposite end of Rainfly Pole and gradually apply pressure to form an arch. Insert the pin into pole end at other side of the door. (Fig. 10 & 10A)
- Locate all hook & loop fasteners on underside of Rainfly and wrap around black and grey poles to secure. (Fig. 10B)
- Stretch elastic straps and hook clip on each to the metal loops at the front and back of the tent. (Fig. 10C)
- Extend out vestibule flaps and secure with metal stakes through the loops in the web straps (Fig. 10 & 5D)
- Stretch guylines until taut, then secure with stakes. (Fig. 10 & 10E)

Electrical Cord Access
- Unzip the access panel in the lower left corner of tent and bring in an electrical cord. NOTE: Use only UL approved cords rated for outdoor usage. (Fig. 16)

natural_image
Close-up of hands holding a leaf with a small object, labeled 'Fig. 16' in the corner (no other text or symbols)Cooler Access
The smaller zippered opening at the side of tent is designed for added ventilation and easy access to your beverage cooler.
- To use as a vent, unzip flap to expose screen.
- To use as a cooler access, unzip other flap to make an avenue to bring beverages into tent. (Fig. 17)
To Store
- All poles and stakes must be placed in the storage bag to prevent damage to the fabric items placed in the carry case.
- Make sure tent is clean and dry before placing in carry case.
- Remove rainfly, spread out on floor of tent, then unzip door & vents before taking tent down for storage.
- Neatly fold tent to width of pole storage bag, place on tent, roll tightly, and place in carry case.
- Store in a clean, dry area.
Things You Should Know:
- Under certain conditions (cold weather, high humidity, etc.) condensation will form on the inside of your tent. Condensation is caused by water vapor from your breath, perspiration, or any wet clothing inside the tent. It is NOT LEAKAGE through the tent fabric. It can be minimized by removing wet clothing from your tent and by providing good ventilation through the tent.
- Tree limbs, tree sap, bird droppings, or moisture steadily dripping off tree limbs can cause damage to the tent fabric and its coating resulting in leaks or loss of flame-resistant properties.
- Never store tent, even for a short period of time, without drying it thoroughly and brushing off caked dirt. Do not pack stakes or poles inside your tent. Use a separate storage bag.
- Stakes should be removed by pulling on the stake itself. NEVER PULL ON THE TENT TO REMOVE STAKES AS THIS COULD RESULT IN PROPERTY DAMAGE OR PERSONAL INJURY.
- Tent poles should not be left telescoped together during storage.
- Do not leave your tent set-up for weeks at a time. Be aware that exposure to ultraviolet rays from the sun can seriously damage material and/or cause it to become discolored.
⚠ WARNING: Keep all flame and heat sources away from this tent fabric.
This tent meets the flammability requirements of CPAI-84. The fabric may burn if left in continuous contact with any flame source. The application of any foreign substance to the tent fabric may render the flame-resistant properties ineffective.
Coleman
The Coleman Company, Inc. • 3600 N. Hydraulic • Wichita, Kansas 67219 1-800-835-3278 • www.coleman.com
MADE IN CHINA • PRINTED IN CHINA
© 2008 The Coleman Company, Inc.
Coleman®, , and Coleman® are registered trademarks and Montana™ is a trademark of The Coleman Company, Inc.
4010004002 (20081030)
Marque : COLEMAN
Modèle : Montana 8
Catégorie : Tente