
ASW-40AP - Lave-linge SANYO - Notice d'utilisation et mode d'emploi gratuit
Retrouvez gratuitement la notice de l'appareil ASW-40AP SANYO au format PDF.


| Marque | Sanyo |
| Modèle | ASW-40AP |
| Type de produit | Lave-linge top à chargement par le dessus |
| Capacité de lavage | 4 kg |
| Vitesse d'essorage maximale | 850 tr/min |
| Nombre de programmes | 12 programmes dont coton, synthétiques, délicats, rapide |
| Alimentation électrique | 220-240 V ~ 50 Hz |
| Puissance nominale | 500 W |
| Consommation d'eau par cycle | 60 L environ |
| Consommation énergétique annuelle | 200 kWh/an (estimation) |
| Dimensions (H x L x P) | 85 x 55 x 55 cm |
| Poids net | 28 kg |
| Niveau sonore (lavage/essorage) | 58 / 72 dB(A) |
| Système de sécurité | Verrouillage de porte, sécurité enfants |
| Matériau de la cuve | Polypropylène |
| Fonctions spéciales | Départ différé, arrêt sur remplissage, rinçage supplémentaire |
| Classe d'efficacité énergétique | C (selon ancienne étiquette) |
| Diamètre de l'ouverture | 30 cm |
| Entretien et nettoyage | Nettoyage régulier du filtre, tambour et tiroir à lessive |
| Pièces détachées et réparabilité | Pièces disponibles : pompe, courroie, résistance, programmateur |
| Accessoires fournis | Flexible d'arrivée et d'évacuation, bouchons de transport |
FOIRE AUX QUESTIONS - ASW-40AP SANYO
Questions des utilisateurs sur ASW-40AP SANYO
0 question sur cet appareil. Repondez a celles que vous connaissez ou posez la votre.
Poser une nouvelle question sur cet appareil
Téléchargez la notice de votre Lave-linge au format PDF gratuitement ! Retrouvez votre notice ASW-40AP - SANYO et reprennez votre appareil électronique en main. Sur cette page sont publiés tous les documents nécessaires à l'utilisation de votre appareil ASW-40AP de la marque SANYO.
MODE D'EMPLOI ASW-40AP SANYO
INSTRUCTION MANUAL
ASW-40AP
COMPACT
FULLY AUTOMATIC
WASHING MACHINE

CONTENTS
IMPORTANT SAFEGUARDS....1
NAME OF PARTS 2
INSTALLATION INSTRUCTIONS.... 3
GROUNDING INSTRUCTIONS .... 3
OPERATING INSTRUCTIONS ....
HOW TO WASH THE DELICATE FABRICS......
WASHING HINTS....7 \~ 8
DETERGENT AND LOAD RECOMMENDATIONS ..... 7
HOW TO USE THE SOFTENER DISPENSER .... 8
HOW TO USE THE BLEACH INLET 8
USING POWDERED SOAP 8
CARE AND MAINTENANCE....9
TROUBLE SHOOTING GUIDE....9
SPECIFICATIONS 10
Before operating this washing machine, please read these instructions carefully and completely.
IMPORTANT SAFEGUARDS

WARNINGS
Never put your hand(s) into the Wash/Spin Bowl while the washer is operating.
- If you reach into the Wash/Spin Bowl, it can cause injury.
- If the Wash/Spin Bowl does not stop within 15 seconds after the Washer Lid is opened, turn the washer off immediately and call a service person.

Never wash items stained with benzine, kerosene, thinner or gasoline.
- It may cause the risk of accidental fire.

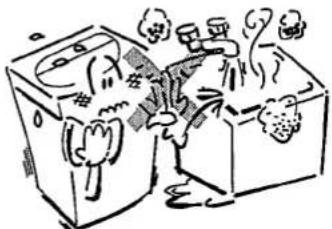
Do not install the washer in or other very humid place.
• Insulation may deteriorate causing malfunction or accidents.
Do not allow children to play on or in the washer.
- If a child accidentally falls into the Wash/Spin Bowl, serious injury could occur.

Be sure not to splash or pour water on the Control Panel where the timer and switches are located.
- It may cause the malfunction or the electrical shock.

Do not repair the washer by unqualified service person.
- It may cause the risk of accidental fire.
- If the washer operates abnormally, you may cause injury.


CAUTIONS
Be sure to connect Power Plug and Power Cord properly.
- Be sure to plug the washer into an outlet reserved exclusively for the washer.
- An improperly attached plug may catch fire.
- Never disconnect by pulling the cord. Hold its plug as you pull it out.
- Never use a damaged Power Cord.


Do not allow the wash load to stick out from the Wash/Spin Bowl.
- Do not wash waterproof clothes or sheets.
- Push evenly thick clothes or bulky wash items completely down the Wash/Spin Bowl. Otherwise, they may be damaged during the SPIN cycle.

Be sure not to bring any type of flame near the washer or put lit cigarettes or volatile materials on the top of washer.
- It may change the shape or catch fire, because this washer incorporates a large number of plastic parts.

Do not use water hotter than 60°C.
- It may change the shape of the plastic parts in the washer and cause a malfunction.
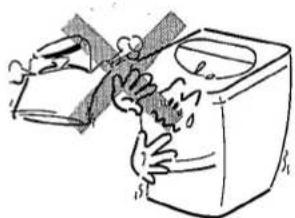
Do not put your hand(s) under the washer during operation.
- Rotating parts may cause injury to your hand(s).

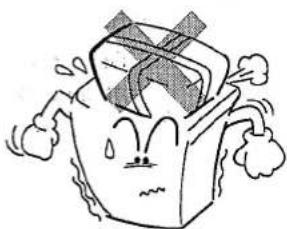
Do not get on the washer or do not put any heavy things on the washer.
- It may change the shape or damage the washer, and you may cause injury.
NAME OF PARTS


ACCESSORIES

Water Supply Hose

Drain Hose

Goose Neck
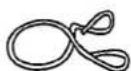
2 Hose Bands
INSTALLATION INSTRUCTIONS
1. Location
(1) Choose a dry spot, out of sunlight.
(2) Install the washer on a stable, level surface.
Adjust the Adjustable Leg of the washer if necessary to make the washer level.
The maximum permissible inclination of the supporting surface is 2° .

CAUTIONS:
- Do not block the bottom of washer by carpeting when the washer is installed on a carpeted floor.
- Do not block ventilation holes in the bottom of washer.
2. Installing the Water Supply Hose
(1) Attach elbow end of the Water Supply Hose to the Water Inlet on the washer.
(2) Attach the other end of the Water Supply Hose to a faucet for cold.
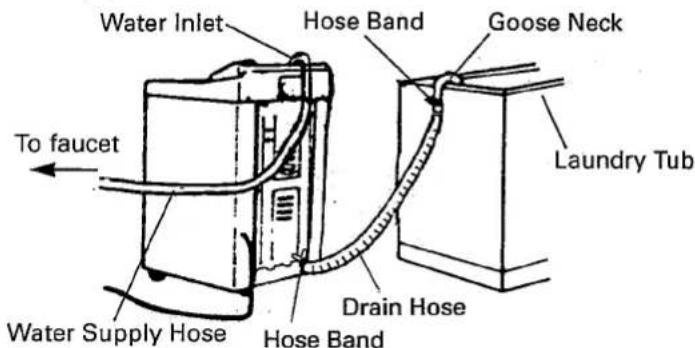
3. Installing the Drain Hose
(1) Slip the Hose Band onto the end of the Drain Hose, then attach to the drain pump in the rear of the washer and secure it with a Hose Band.
(2) Attach the free end of the Drain Hose to the Goose Neck and secure it with a Hose Band, then hook it over a laundry tub or drain bypass.
NOTE:
- The built-in pump is capable of discharging water to a maximum height of 1.2 metres and minimum height of 0.7 metres.
This must be within 1.5 metres of either side of the location of the washer.

4. Plug In the Washer
Plug the Power Cord into an Electrical Outlet. To prevent possible electrical shock, be sure to provide adequate electrical grounding for the washer.

GROUNDING INSTRUCTIONS
This appliance must be grounded.
In the event of malfunction or breakdown, grounding will reduce the risk of electrical shock by providing a path of least resistance for electric current.
The plug must be plugged into an appropriate outlet that is properly installed and grounded in accordance with all local codes and ordinances.
DANGER=Improper connection of the equipment-grounding conductor can result in a risk of electrical shock.
- Check with a qualified electrician or serviceperson if you are in doubt as to whether the appliance is properly grounded.
- Do not modify the plug provided with the appliance – if it will not fit the electrical outlet, have a proper electrical outlet installed by a qualified electrician.
Cord Replacement: If the power cord is damaged, it must only be replaced by a dealer or a repair shop as authorized by Sanyo, because special purpose tools are required.
OPERATING INSTRUCTIONS
Washing Procedure
Preparation
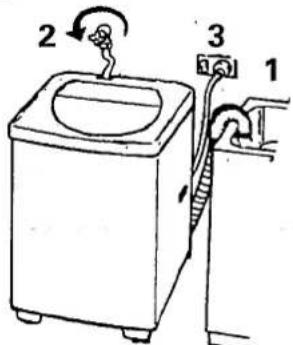
1 Make sure to fit the Drain Hose secured by a Goose Neck to the laundry tub or drain bypass.
2 Connect the Water Supply Hose to the faucet and turn the faucet on.
3 Plug the Power Cord into an electrical outlet and turn on the switch.
- Check to make sure that the washer has been grounded.
1

1 Load the laundry into the washer.
2 Put the detergent into the washer.
2
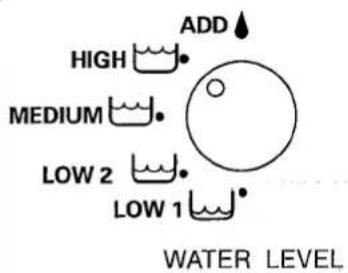
Set the WATER LEVEL knob to choose the water level.
3

GENTLE NORMAL

WASH ACTION
Depress the desired WASH ACTION button.
4

Set the Program Timer and pull the knob to begin the washer operation.
5

Close the Washer Lid.
- The washer will stop operation after the first drain if the Washer Lid is not closed. To restart operation, close the Washer Lid.
ENERGY-SAVING-TIPS
- Try to wash less often. Save articles of the same type of fabric until you have a full size loads. Oversize loads use extra energy; undersize loads waste energy.
- Use lower water levels when you wash very small loads.
- Use the correct setting for the type of loads and wash times you are washing. Select shorter wash times for lightly soiled loads.
- Use cold water for rinsing. Cold rinses have been found to be virtually as effective as expensive warm water rinses plus you save the cost of heating the water.
- Operating your washer at off-peak utility hours as recommended by your local utility company.
OPERATING INSTRUCTIONS
HOW TO USE THE PROGRAM TIMER
-
Pull the knob in the centre of the timer dial and the washer will begin the operation. Push it in stop.
-
The washing programs for automatic operation is described in the table below.
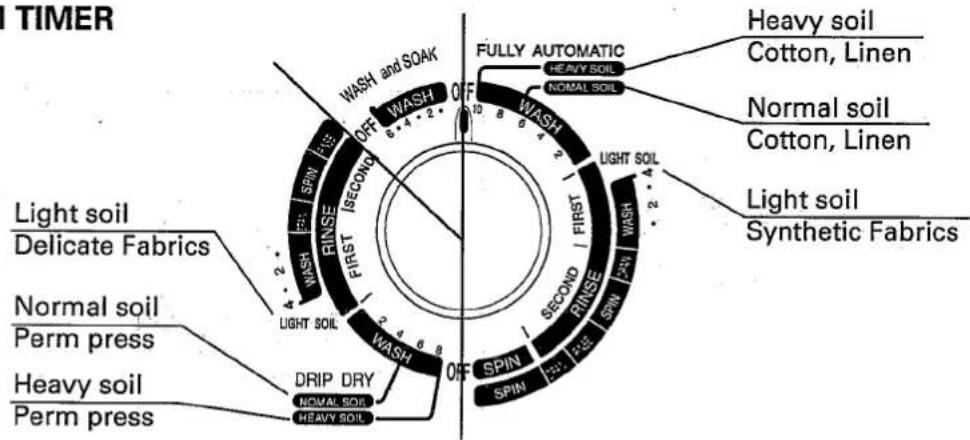
FULL AUTOMATIC
HEAVY SOIL
Heavy soil, Cotton, Linen
| Wash | 10 Min. (Max) |
| Drain | 2 Min. |
| 1st Rinse | 4 Min. 20 sec. |
| Drain | 2 Min. |
| Spin-Dry | 1 Min. |
| Pause | 1 Min. |
| Spin-Dry | 1 Min. |
| 2nd Rinse | 2 Min. |
| Drain | 2 Min. |
| Spin-Dry | 5 Min. |
| Off |
NORMAL SOIL
Normal soil, Cotton, Linen
| Wash | 8 Min. (Max) |
| Drain | 2 Min. |
| 1st Rinse | 4 Min. 20 sec. |
| Drain | 2 Min. |
| Spin-Dry | 1 Min. |
| Pause | 1 Min. |
| Spin-Dry | 1 Min. |
| 2nd Rinse | 2 Min. |
| Drain | 2 Min. |
| Spin-Dry | 5 Min. |
| Off |
LIGHT SOIL
Light soil, Synthetic Fabrics
| Wash | 4 Min. (Max) |
| Drain | 2 Min. |
| Spin-Dry | 1 Min. |
| Pause | 1 Min. |
| Spin-Dry | 1 Min. |
| Rinse | 2 Min. |
| Drain | 2 Min. |
| Spin-Dry | 5 Min. |
| Off |
DRIP DRY
HEAVY SOIL
Heavy soil, Permanent Press
| Wash | 8 Min. (Max) |
| Drain | 2 Min. |
| 1st Rinse | 4 Min. 20 sec. |
| Drain | 2 Min. |
| Spin-Dry | 1 Min. |
| Pause | 1 Min. |
| Spin-Dry | 1 Min. |
| 2nd Rinse | 2 Min. |
| Off |
NORMAL SOIL
Normal soil, Permanent Press
| Wash | 5 Min. (Max) |
| Drain | 2 Min. |
| 1st Rinse | 4 Min. 20 sec. |
| Drain | 2 Min. |
| Spin-Dry | 1 Min. |
| Pause | 1 Min. |
| Spin-Dry | 1 Min. |
| 2nd Rinse | 2 Min. |
| Off |
LIGHT SOIL
Light soil, Delicate Fabrics
| Wash | 4 Min. (Max) |
| Drain | 2 Min. |
| Spin-Dry | 1 Min. |
| Pause | 1 Min. |
| Spin-Dry | 1 Min. |
| Rinse | 2 Min. |
| Off |
WASH and SOAK
Wash 1 to 6 Min.
WASHING INSTRUCTIONS
-
WASHING TIME Adjust wash time on the Program Timer according to the fabric type. The timer can be readjusted during operation. Refer to the section titled "HOW TO USE THE WASH ACTION SELECTOR" on page 6.
-
WASH and SOAK This cycle is also operated automatically. The laundry can be washed twice without changing water and detergent. At the end of the first WASH and SOAK cycle, take out the first load and put in the second load. Then advance the timer dial to the FULL AUTOMATIC cycle and pull the knob.
NOTES: • For the first washing, do not wash dirty laundry.
- For the second washing, add detergent if necessary.
- When the second laundry is loaded, push it lightly into the water.
- PRE-WASHING For very heavily soiled laundry, use the WASH and SOAK cycle which takes about 3 minutes. Then turn the knob until it points to the DRAIN section to drain the water.
NOTE: • Do not pre-wash silk, wool, synthetic fibres and light clothing.
- DRAIN or SPIN-DRY Turn the knob until it points to the DRAIN or SPIN section of the FULL AUTOMATIC cycle.
HOW TO USE THE WASH ACTION SELECTOR
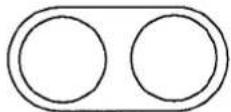
Depress either the GENTLE or NORMAL WASH ACTION Selector button and adjust wash time on the Program Timer according to the fabric type as follows.
| The kind of laundry | Wash Action | Washing Time |
| Preshrunk Wool and Delicate Fabrics | GENTLE | 4 to 6 min. |
| Synthetic Fibre | NORMAL | 6 to 8 min. |
| Cotton, Linen | NORMAL | 6 to 8 min. |
| Heavily Soiled Cotton or Linen | NORMAL | 8 to 10 min. |

GENTLE

NORMAL
WASH ACTION
HOW TO USE THE WATER LEVEL SELECTOR
Choose the water level in accordance with the amount of laundry being done.
LOW 1 is for loads less than 1/3 full of clothes. LOW 2 is for loads between 1/3 and 1/2 full. MEDIUM is for loads between 1/2 and 2/3 full. HIGH is for loads over 2/3 full.
HOW TO WASH THE DELICATE FABRICS
When you wash delicate fabrics, such as lingerie, lace trimmed, embroidered and woolen fabrics, set the Program Timer "LIGHT SOIL" position.
Washable Clothes
Material: That made of silk or wool fibre with "hand wash" label attached.
NOTES:
- Use a neutral detergent. Sufficiently dissolve the detergent in warm water (at about 30°C) and then put it in the Wash/Spin Bowl.
- When finished washing, lay items flat on a towel, adjust shape properly, and dry in the shade.

WATER LEVEL
WASHING TIPS
- Items with buttons or embroidery should be turned inside out before washing.
- When the laundry floats on the water, lightly push it down into the water after pushing the Program Timer knob.
- Using warm water (at about 30°C) effectively removes most stains.

After Washing
1 Push the Program Timer knob to turn off the washer operation.
2 After turning off the faucet, detach Water Supply Hose from the faucet.
3 Unplug the Power Cord of the washer and turn off the switch.
![graph TD A["WASH and SOAK"] --> B["OFF"] B --> C["WASH"] C --> D["10:4"] D --> E["WASH"] E --> F["2.4"] F --> G["SHORT"] G --> H["RINSE"] H --> I["FIRST (SECOND)"] I --> J["10:4"] J --> K["SHORT"] K --> L["RINSE"] L --> M["FIRST (SECOND)"] M --> N["10:4"] N --> O["SHORT"] O --> P["SHORT"] P --> Q["S…](/content/2026/06/1313785/images/4f837045ba49e83388c9a8dc7ab8832ccb891839335da459b4b7306133b0fdef.jpg)


DETERGENT AND LOAD RECOMMENDATIONS
Too much detergent causes poor rinsing and too little detergent causes poor washing. Use recommended amount of detergent for your load as shown in chart.
| Water Level | LOW 1 | LOW 2 | MEDIUM | HIGH | |
| Water Volume | 27L | 33L | 38L | 43L | |
| Detergent Volume | Concentrate type (25g detergent per 30L water) | 23g | 28g | 32g | 36g |
| Synthetic type (40g detergent per 30L water) | 36g | 44g | 51g | 57g | |
| Powdered soap (40g detergent per 30L water) | 36g | 44g | 51g | 57g | |
| Liquid type (40mL detergent per 30L water) | 36mL | 44mL | 51mL | 57mL | |
| Clothes | Sheets | - | - | - | 1 |
| Tablecloths | - | - | 2 | 2 | |
| Shirts | 1 | 2 | 2 | 3 | |
| Bath towels | 1 | 2 | 2 | 4 | |
| T-shirts | 1 | 1 | 1 | 3 | |
| Pillow cases | 1 | 2 | 2 | 3 | |
| Shorts | 1 | 4 | 4 | 3 | |
| Wash cloths | 4 | 4 | 2 | 4 | |
| Handkerchiefs | 2 | 5 | 2 | 5 | |
NOTES:
- If the recommended amount of detergent produces too many suds, switch to a low suds detergent, and follow instructions on package.
- You may adjust the detergent volume according to sorts of detergent – follow recommendations on package.
- Preshrunk wool items that have "Hand Wash" labels or other delicate fabrics should be placed in a nylon laundry net for extra protection.
- Using too little detergent is a common case of laundry problems. Always measure detergent in a standard measuring cup.
- The amount of washable laundry will vary according to the type, size, thickness, etc. of the laundry articles. After watched the movement of the laundry in the Wash/Spin Bowl, adjust the volume of the laundry if necessary.
For best results, use about 80% of the load recommended in the above chart:
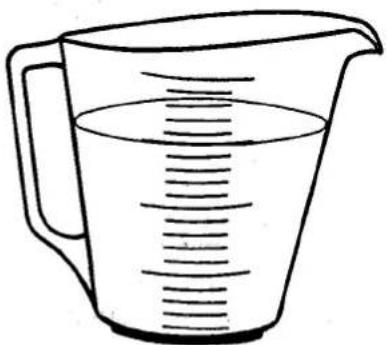
Standard Measuring Cup
HOW TO USE THE SOFTENER DISPENSER
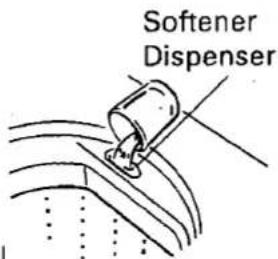
Pour softener slowly to the Softener Dispenser before starting operation.
SOFTENER VOLUME
Normal type .... 20 mL softener per 30 L of water. Concentrate type .... 6.6 mL softener per 30L of water.
| Water level | LOW 1 (27L) | LOW 2 (33L) | MED. (38L) | HIGH (43L) |
| Normal type | 18mL | 22mL | 25mL | 29mL |
| Concentrate type | 6mL | 7mL | 8mL | 9mL |
POURING TIPS
- Dilute concentrated softener with twice the quantity of water and pour the softener slowly to the Softener Dispenser.
- If the softener is difficult to pour, turn the Softener Dispenser of the Wash/Spin Bowl clockwise by hands.
NOTES:
- Do not use detergent, bleach or starch into the Softener Dispenser.
- Using too much softener may produce unsatisfactory results.
- Do not open or close the Washer Lid during intermittent Spin-Dry cycle. If it is opened, the softener will not be distributed properly due to the interruption in the cycle.
- Do not leave the softener in the Softener Dispenser for a long time. Because softener will become stiff.
HOW TO USE THE BLEACH INLET
Liquid Type Bleach
- Dilute bleach with twice the volume of water.
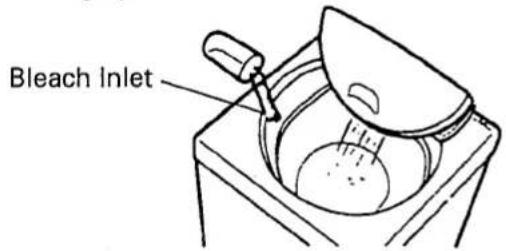
- Pour the bleach into the Bleach Inlet port on the top of the washer during supply of water in the washing cycle.
Powdered Type Bleach
Pour the bleach and detergent into the Wash/Spin Bowl at the same time.
NOTES:
- Please read carefully and follow the directions and warnings for the bleach.
- Do not use bleach for coloured fabrics.
- Do not pour bleach onto the laundry directly, otherwise the laundry may change colour.
- After adding bleach, rinse the Bleach inlet port with water.
- Do not leave water in the Wash/Spin Bowl for an extended period of time. Drain after use.
USING POWDERED SOAP
Since powdered soap does not dissolve easily when the water temperature is low, it should be dissolved in a small amount of hot water before being put into the washer.
Since the cleaning power of a powdered soap rises with the water temperature, make sure that the water is about 40° C when heavily-soiled laundry is to be washed using powdered soap.
NOTES:
- Since powdered soap does not rinse as well as concentrated detergent, it may be necessary to repeat the rinse cycle.
- If you put too much powdered soap or the water temperature is low, undissolved powdered soap may cling to the inside of the drain hose or
-Wash/Spin-Bowl.-It may come out in the washing water and stain the laundry.

About 5L
CARE AND MAINTENANCE
Cleaning the Lint Filter
1) Removing: Pull the Lint Filter out of Wash/Spin Bowl.
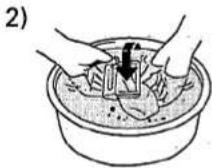
2) Cleaning: Take the lint out of the filter and wash in water.
3) Replacing: Re-attach the Lint Filter to Wash/Spin Bowl along the groove.


NOTES:
- Clean the Lint Filter each time you wash.
- Laundry that can damage the net of the Lint Filter should be placed in a nylon net washing bag.
- If the Lint Filter is damaged, a new one can be purchased at your dealer.
Cleaning the washer
Wipe the washer clean and dry with a soft cloth.
- Do not use brushes, polishing powder, benzine or
other volatile material to clean the washer. It may be damaged paintwork or plastic parts. - Do not splash water on the washer. It may cause short circuit or electrical shock.

Cleaning the Water Inlet
- Remove the Water Supply Hose.
- Occasionally remove the Water Supply Hose from the Water Inlet and clean the metal filter of the Water Inlet.
- Connect the Water Supply Hose.

TROUBLE SHOOTING GUIDE

WARNING
If a malfunction should occur during the washer operation, first check the following items before calling a serviceperson or dealer.
| Kind of Trouble | Where to Check |
| The washer does not work at all. | Check whether the timer dial is pulled out to activate.Check the Power Cord whether it is securely plugged in.Check whether power failure occurs.Check whether the fuse or circuit breaker has been activated. |
| The water does not flow into the Wash/Spin Bowl. | Check whether the water supply faucet is turned on.Check whether the water supply has been cut off.Check whether the metal filter in the Water Inlet is clogged.See the above page 9.9 |
| Water does not drain out. | Check whether the Washer Lid is closed.Check whether the Drain Hose is anything wrong.Check whether the Drain Hose is clogged with lint.Check the Drain Hose placement for maximum height limited as stated on page 3.3 |
| The washer does not spin. | Check whether the Washer Lid is closed.Check whether the laundry is clumped on one side of the Wash/Spin Bowl.Check whether the washer is on the level surface. See page 3.3 |
| The washer operation is excessive noise. | Check whether the laundry is clumped on one side of the Wash/Spin Bowl.Check the Pulsator is clogged for any obstructions.Check whether the washer is installed on the stable, level surface. |
Before calling a serviceperson or dealer, carefully read and follow the instructions contained in this INSTRUCTION MANUAL.
SPECIFICATIONS
Overall Dimensions....540(W) x 570(D) x 920(H) mm
Weight.....Approx 30 kg
Power Source....240Vac, 50 Hz
Power Consumption......Wash/Spin Motor 310 W
Pump Motor 40 W
Water Levels....LOW 1 : 27 litres
LOW 2 : 33 litres
MEDIUM : 38 litres
HIGH : 43 litres
Pulsator....180 rpm
Spin-Dryer....840 rpm
Spin-Drying Method......Centrifugal spin-drying
Service Water Pressure......Below 750 kPa (110 p.s.i.)
ATTENTION
For your protection in the event of theft or loss of this product, please fill in the information requested below:
Model No.
Serial No.
(Located on the back of the unit)
Date of Purchase ____
Purchased Price ____
Where Purchased
3
CODE NO. 301-6-414S-12500
SANYO
SANYO Electric Co., Ltd.
Printed in Singapore
- INSTRUCTION MANUAL
- ASW-40AP
- CONTENTS
- IMPORTANT SAFEGUARDS
- WARNINGS
- CAUTIONS
- NAME OF PARTS
- ACCESSORIES
- INSTALLATION INSTRUCTIONS
- LOCATION
- INSTALLING THE WATER SUPPLY HOSE
- INSTALLING THE DRAIN HOSE
- NOTE
- PLUG IN THE WASHER
- GROUNDING INSTRUCTIONS
- OPERATING INSTRUCTIONS
- WASHING PROCEDURE
- ENERGY-SAVING-TIPS
- HOW TO USE THE PROGRAM TIMER
- FULL AUTOMATIC
- HEAVY SOIL
- NORMAL SOIL
- LIGHT SOIL
- DRIP DRY
- WASH AND SOAK
- WASHING INSTRUCTIONS
- HOW TO USE THE WASH ACTION SELECTOR
- HOW TO USE THE WATER LEVEL SELECTOR
- HOW TO WASH THE DELICATE FABRICS
- WASHABLE CLOTHES
- NOTES
- WASHING TIPS
- AFTER WASHING
- DETERGENT AND LOAD RECOMMENDATIONS
- HOW TO USE THE SOFTENER DISPENSER
- SOFTENER VOLUME
- POURING TIPS
- HOW TO USE THE BLEACH INLET
- LIQUID TYPE BLEACH
- POWDERED TYPE BLEACH
- USING POWDERED SOAP
- CARE AND MAINTENANCE
- CLEANING THE LINT FILTER
- CLEANING THE WASHER
- CLEANING THE WATER INLET
- TROUBLE SHOOTING GUIDE
- WARNING
- SPECIFICATIONS
- ATTENTION
Marque : SANYO
Modèle : ASW-40AP
Catégorie : Lave-linge