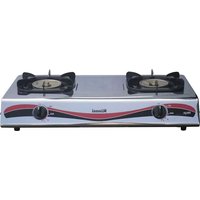
RI-522MM - Cuisinière Rinnai - Notice d'utilisation et mode d'emploi gratuit
Retrouvez gratuitement la notice de l'appareil RI-522MM Rinnai au format PDF.


| Type de produit | Cuisinière à gaz |
| Marque | Rinnai |
| Modèle | RI-522MM |
| Dimensions (L x P x H) | 90 x 60 x 85 cm |
| Poids | 55 kg |
| Alimentation | Gaz butane ou propane (G30/G31) |
| Nombre de brûleurs | 5 brûleurs gaz |
| Type de four | Four électrique multifonction |
| Volume du four | 70 litres |
| Fonctions principales | Allumage électronique, chaleur tournante, gril, pyrolyse |
| Sécurité | Robinet à sécurité gaz, arrêt automatique, vitre froide |
| Nettoyage | Pyrolyse pour le four, brûleurs démontables |
| Entretien | Nettoyer les brûleurs avec de l'eau savonneuse, éviter les produits abrasifs |
| Pièces détachées | Brûleurs, grilles, ampoules, joint de porte disponibles |
| Réparabilité | Indice de réparabilité : 8.2/10 |
| Classe énergétique du four | A+ |
| Consommation du four | 0.9 kWh (cycle conventionnel) |
| Niveau sonore | 52 dB |
| Garantie | 2 ans |
| Pays d'origine | Japon |
| Accessoires inclus | Lèchefrite, grille de four, plaque à pâtisserie |
FOIRE AUX QUESTIONS - RI-522MM Rinnai
Questions des utilisateurs sur RI-522MM Rinnai
0 question sur cet appareil. Repondez a celles que vous connaissez ou posez la votre.
Poser une nouvelle question sur cet appareil
Téléchargez la notice de votre Cuisinière au format PDF gratuitement ! Retrouvez votre notice RI-522MM - Rinnai et reprennez votre appareil électronique en main. Sur cette page sont publiés tous les documents nécessaires à l'utilisation de votre appareil RI-522MM de la marque Rinnai.
MODE D'EMPLOI RI-522MM Rinnai
Safe and easy to operate, the burners will ignite automatically when the control knobs are pushed and turned in counter-clockwise direction. For best results from your Rinnai Gas Cooker, Please read the instruction given below carefully prior to operating the unit.
MODEL:
RI-511M
RI-522M
RI-522MM
RI-602M
RI-602MM
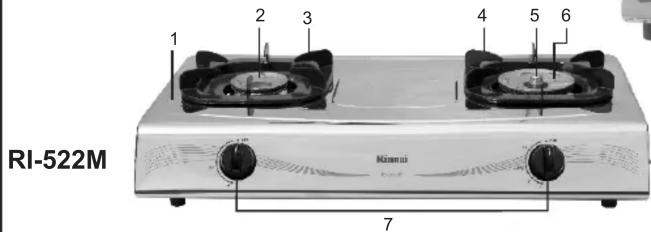
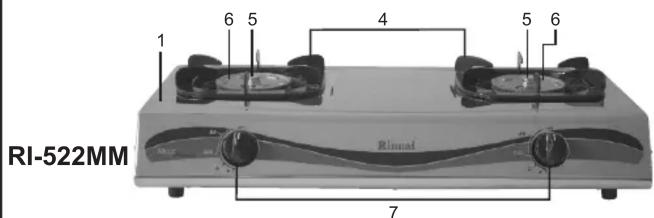
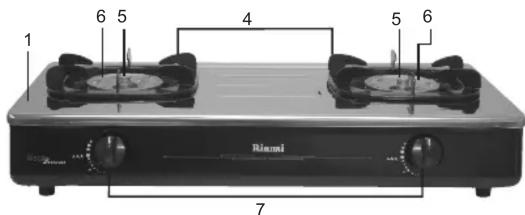
NAME OF PARTS

RI-511M
- Top Plate
- Small Burner Head
- Small Hole Pan Support
- Big Hole Pan Support
- Simmer Burner Head
- Big Burner Head
- Ignition Knob
RI-602M

RI-602MM
SPECIFICATION
| Model | Dimension | Net. Weight | Gas Consumption / h | Gas Inlet Connection | |||||||
| LPG (30 mbar/3.0 kPa) NG (25 mbar/2.5 kPa) | |||||||||||
| Height | Width | Length | LHS LHS | RHS RH$ | Total | Total | |||||
| RI-511M | 154 mm | 280 mm | 380 mm | 2.3 Kg | - | - | 4.8 kW | - | - | 4.9 kW | Rubber Hose mm∅9.5 |
| RI-522M | 157 mm | 700 mm | 378 mm | 4.2 Kg | 3.3 kW | 4.8 kW | 8.1 kW | 3.5 kW | 4.9 kW | 8.4 kW | |
| RI-522MM | 157 mm | 700 mm | 378 mm | 4.5 Kg | 4.8 kW | 4.8 kW | 9.6 kW | 4.9 kW | 4.9 kW | 9.8 kW | |
| RI-602M | 157 mm | 702 mm | 380 mm | 4.6 Kg | 3.3 kW | 4.8 kW | 8.1 kW | 3.5 kW | 4.9 kW | 8.4 kW | |
| RI-602MM | 157 mm | 702 mm | 380 mm | 4.8 Kg | 4.8 kW | 4.8 kW | 9.7 kW | 4.9 kW | 4.9 kW | 9.8 kW | |
Automatic Ignition (Piezo Magnetic)
PREPARING THE UNIT FOR USE
- Check to ensure that all parts of the gas cooker are complete.
- A minimum clearance is 15 cm from the side / back wall and 100 cm from the ceiling is required when installing the gas cooker. The gas cooker shall be placed in a good ventilated room. (Figure No. 1)
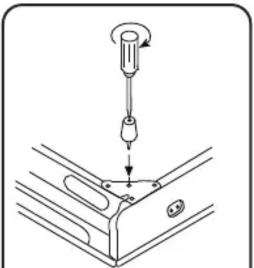
- Using a screwdriver affix the rubber legs with the provided screw into the designated hole on the gas cooker's bottom. (Figure No. 2)
- Insert the ignition knob in its correct position by pushing it inward firmly. (Figure No. 3)
- Place the Simmer Burner Head onto the gas pipe located at the gas cooker's. (Figure No. 3)
- Place the small hole pan support on the left burner and big hole pan support on the right burner. (Only for RI-522M, RI-602M) (Figure No. 3)
- Push the rubber hose on the gas pipe and regulator as far as it will go. Secure the hose using a hose clamp.
- Open the main valve on the gas cylinder. In the event of gas leak, close the main valve immediately and open the windows in the room to allow the gas to escape.


(Figure No.1) (Figure No. 2)
natural_image
Diagram of a screwdriver inserted into a mechanical component (no text or symbols)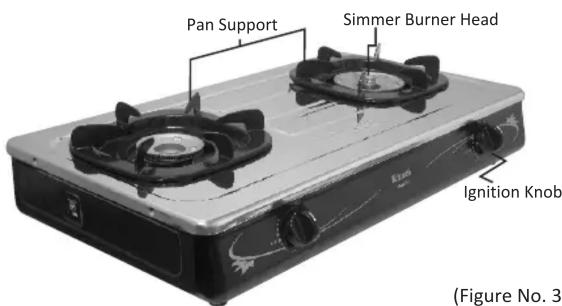
OPERATING THE UNIT
1. Igniting the burner and adjusting the flame.
*) Open the valve on the cylinder
•RHS Burner (All model)
•LHS Burner (RI-522MM, RI-602MM)
Operate the burner with its double ring burner and "MAX", "Simmer" and "Minimum Simmer" flame selector as follow:
Maximum Flame
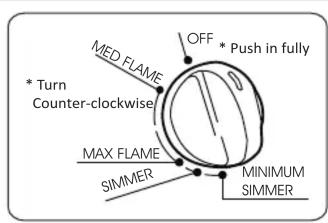
Push the knob in fully and turn counter clockwise to "MAX" in this position both outer and inner burner will burn fully.
Flame is adjustable between the "MAX" and "OFF" position slowly turning the knob to the "OFF" position. (Figure No. 5)
Simmer Flame
Turn the knob to the left on the “Simmer” direction the outer burner will be switched off and only the smaller inner burner (simmer) will function.
Minimum Simmer Flame
Turn the knob to left on the “Minimum Simmer”, Where the inner burner will burn smaller.
•LHS Burner (RI-522M, RI-602M)
Maximum Flame
Push the knob in fully and turn it counter clockwise to "MAX" position, where the burner will burn fully.
Minimum Flame
From “MAX” position turn the knob to the left on “MIN” position, where the burner will burn smaller.
Flame is adjustable between the "MAX" and "OFF" slowly turning the knob to the "OFF" position. (Figure No. 4)
- If no flame, turn back the knob to "OFF" position, repeat the ignition procedure as above.
3. Air Control
For good flame, turn Damper upward or downward until a blue-colored flame is obtained. (Figure No. 6)
MAINTENANCE AND CARE
- Using a brush, to clean the Burner Head and Burner Top surface of any dust adhering to these part.
- Wipe clean the pan support, and other Stainless Steel Part with a small amount of Soapy Water. Don't use the alcohol or gasoline, because can damaged the part.
- Clean the Electrodes as dust adhering to these parts may prevent a good ignition. (Figure No. 7)
ATTENTION
- Keep away any flammable material / liquid from the gas cooker.
- The gas cooker shall be placed in a good ventilated room.
- Never use one single rubber hose for two gas cooker.
- Do not place any objects that may easily be blown away by the wind on the gas cooker.
- In the event of gas leak, do not switch on any fan/ lighter.
- Do not use any small cooking utensil that may cover the burner flame and thereby extinguishing it.
- Do not use any large cooking covering the entire gas cooker surface.
- Replace any damage / cracked rubber hose immediately.
- Don't touch the gas cooker immediately after cooking.
Take care that no boiling water spills onto the gas burner's top surface.
- Do not use the gas cooker to dry.
- Do not leave the gas cooker unattended when on.
- Do not route the rubber hose under the gas cooker.

(Figure No. 4)
(Figure No. 5)

natural_image
Mechanical assembly diagram showing a gear mechanism and a bracket mechanism with directional arrows (no text or labels)(Figure No. 6)

natural_image
Simple line drawing of a mechanical device with no text or symbols(Figure No. 7)
TROUBLE SHOOTING GUIDE
| TROUBLE | CAUSE | SOLUTION |
| Flame does not ignite | Main Gas Stopcock is not turned on. | Turn off the gas cooker once and than turn it in fully. |
| Air remains in the gas piping. | Repeat ignition operation until all air in the piping is purged out completely. | |
| Bend or crushed rubber tubing. | Straighten it, or replace it. | |
| Piezo electrode or insular is dirty. | Clean it with dry cloth. | |
| The gas cooker out of order. | Request to AFTER SALES SERVICE for repair. | |
| Smell of gas | Cracks or holes in the rubber tubing. | Replace it with a new one. |
| Rubber tubing is not connected properly. | Connect the rubber tubing properly. | |
| Regulator leakage. | Replace it with a new one. | |
| The gas cooker out of order. | Request to AFTER SALES SERVICE for repair. | |
| Flame abnormal | Air supply is not properly adjusted. | Adjust is properly. (See Page 2 Fig.6) |
| Burner is not fitted properly. | Fix burner body properly. | |
| Flame outlet of burner is clogged. | Clean the clogged part. | |
| The gas cooker out of order. | Request to AFTER SALES SERVICE for repair. |
If trouble occurs, fix it referring to the above table. But if the problem still remain, or in case a serious malfunction, and if you are doubt, then take the gas cooker to our AFTER SALES SERVICE for repairing without trying to repair it your self.

Marque : Rinnai
Modèle : RI-522MM
Catégorie : Cuisinière